首页 文章 精选 留言 我的

精选列表

搜索[ios],共10000篇文章
优秀的个人博客,低调大师

iOS:创建撒花动画

一、介绍 在很多的游戏中,会有这么一个桥段,就是闯关成功后,会弹出一个奖品同时出现很多的鲜花或者笑脸。例如微信中祝福生日时,出现蛋糕等等。那么,这次我就来实现这个功能。 二、实现原理 对外接收一个图片,然后给对应的每一张图片创建CADisplaylink定时器,开启计时器后,在计时器定义的方法中不停的绘制UIImageView,使其从视图顶部下落到顶部后慢慢改变透明度,直至消失。 对外暴露两个方法即可: (1)开始撒花动画,接收图片参数,开启所有的计时器 (2)结束撒花动画,销毁所有的计时器 三、实现类 FlowFlower(动画): @interface FlowFlower : NSObject /** 类方法创建对象 @param images 花图片数组 */ + (FlowFlower *)flowerFLow:(NSArray *)images; /** 启动落花 @param view 飞行的视图区域 */ - (void)startFlyFlowerOnView:(UIView *)view; /** 结束落花 */ - (void)endFlyFlower; @end UIImage (Extension)扩展,通过颜色绘制图片,同时可以改变图片尺寸: @interface UIImage (Extension) /** * 按照指定的颜色返回一个图片 * @param color 给定的图片颜色 * @return 图片 */ + (UIImage *)imageWithColor:(UIColor *)color; /** * 按照指定的大小返回一个图片 * @param itemSize 给定的大小 * @param imageName 给定的名称 * @return 图片 */ + (UIImage *)imageWithSize:(CGSize)itemSize imageName:(NSString *)imageName; /** * 利用qurazt2D画图的方法返回旋转后的图片 * @param image 原始图片 * @param orientation 旋转方向 */ + (UIImage *)image:(UIImage *)image rotation:(UIImageOrientation)orientation; /** UIImage:去色功能的实现(图片灰色显示) @param sourceImage 图片 */ + (UIImage *)grayImage:(UIImage *)sourceImage; @end 四、测试 // // ViewController.m // FlowFlower // // Created by 夏远全 on 2017/3/29. // Copyright © 2017年 夏远全. All rights reserved. // #import "ViewController.h" #import "FlowFlower.h" #import "UIImage+Extension.h" #define UIColorFromRGB(rgbValue) [UIColor colorWithRed:((float)((rgbValue & 0xFF0000) >> 16))/255.0 green:((float)((rgbValue & 0xFF00) >> 8))/255.0 blue:((float)(rgbValue & 0xFF))/255.0 alpha:1.0] @interface ViewController () @property (strong,nonatomic)FlowFlower *flowFlower; @end @implementation ViewController - (void)viewDidLoad { [super viewDidLoad]; [self FlyFaceImage]; } #pragma mark - 鲜花 -(void)FlyColorImage{ //#FFBF00 #038AE6 #73D0F5 #D93600 #FFFF00 #63DB59 彩片颜色值 UIImage *image1 = [UIImage imageWithColor:UIColorFromRGB(0xFFBF00)]; UIImage *image2 = [UIImage imageWithColor:UIColorFromRGB(0x038AE6)]; UIImage *image3 = [UIImage imageWithColor:UIColorFromRGB(0x73D0F5)]; UIImage *image4 = [UIImage imageWithColor:UIColorFromRGB(0xD93600)]; UIImage *image5 = [UIImage imageWithColor:UIColorFromRGB(0xFFFF00)]; UIImage *image6 = [UIImage imageWithColor:UIColorFromRGB(0x3DB59)]; //飞行 _flowFlower = [FlowFlower flowerFLow:@[image1,image2,image3,image4,image5,image6]]; [_flowFlower startFlyFlowerOnView:self.view]; } #pragma mark - 表情 -(void)FlyFaceImage{ //face UIImage *faceImage = [UIImage imageNamed:@"face.png"]; //飞行 _flowFlower = [FlowFlower flowerFLow:@[faceImage]]; [_flowFlower startFlyFlowerOnView:self.view]; } @end 五、源码 github:https://github.com/xiayuanquan/FlowFlower 简书:http://www.jianshu.com/p/011c9522cae3 六、演示截图 七、声明 本博文为原创,如转载请注明出处,希望对大家有所帮助~~~~ 程序猿神奇的手,每时每刻,这双手都在改变着世界的交互方式! 本文转自当天真遇到现实博客园博客,原文链接:http://www.cnblogs.com/XYQ-208910/p/6686397.html ,如需转载请自行联系原作者

优秀的个人博客,低调大师

iOS:Tools:快速注释Doxygen

Xcode5有个新特性就是自己定义的函数也会被检测集成到代码提示里面,也就是在Quick Help有提示。如 /** * @brief 设置id * * @param id 要设置的id */ +(void) setUserID:(NSString *)id { NSUserDefaults *userDefaults = [NSUserDefaults standardUserDefaults]; [userDefaults setObject:id forKey:@"userID"]; } 相应的提示是: 然后发现了一个可以自动添加注释的脚本,Doxygen.rb,结合这个可以十分方便的写注释。 脚本设置链接:Xcode4快速Doxygen文档注释 — 简明图文教程 enjoy it! 本文转自老Zhan博客园博客,原文链接:http://www.cnblogs.com/mybkn/p/3176363.html,如需转载请自行联系原作者

优秀的个人博客,低调大师

iOS:NSBundle的具体介绍

NSBundle介绍:它是一个单例类,用来加载资源 bundle是一个目录,其中包含了程序会使用到的资源. 这些资源包含了如图像,声音,编译好的代码,nib文件(用户也会把bundle称为plug-in). 对应bundle,cocoa提供了类NSBundle. 我们的程序是一个bundle. 在Finder中,一个应用程序看上去和其他文件没有什么区别. 但是实际上它是一个包含了nib文件,编译代码,以及其他资源的目录. 我们把这个目录叫做程序的main bundle bundle中的有些资源可以本地化.例如,对于foo.nib,我们可以有两个版本: 一个针对英语用户,一个针对法语用户. 在bundle中就会有两个子目录:English.lproj和French.lproj,我们把各自版本的foo.nib文件放到其中. 当程序需要加载foo.nib文件时,bundle会自动根据所设置的语言来加载. 我们会在16章再详细讨论本地化 通过使用下面的方法得到程序的main bundle NSBundle *myBundle = [NSBundle mainBundle]; 一般我们通过这种方法来得到bundle.如果你需要其他目录的资源,可以指定路径来取得bundle NSBundle *goodBundle; goodBundle = [NSBundle bundleWithPath:@"~/.myApp/Good.bundle"]; 一旦我们有了NSBundle 对象,那么就可以访问其中的资源了 // Extension is optional NSString *path = [goodBundle pathForImageResource:@"Mom"]; NSImage *momPhoto = [[NSImage alloc] initWithContentsOfFile:path]; bundle中可以包含一个库. 如果我们从库得到一个class, bundle会连接库,并查找该类: Class newClass = [goodBundle classNamed:@"Rover"]; id newInstance = [[newClass alloc] init]; 如果不知到class名,也可以通过查找主要类来取得 Class aClass = [goodBundle principalClass]; id anInstance = [[aClass alloc] init]; 可以看到, NSBundle有很多的用途.在这当中, NSBundle负责(在后台)加载nib文件. 我们也可以不通过NSWindowController来加载nib文件, 直接使用NSBundle: BOOL successful = [NSBundle loadNibNamed:@"About" owner:someObject]; 注意噢, 我们指定了一个对象someObject作为nib的File's Owner 使用initWithContentsOfFile时,文件路径的写法 使用initWithContentsOfFile方法可以通过读取一个文件的内容来初始化对象。 但文件的路径应该怎么确定呢? 可以使用NSBundle的对象来获取。 例如当前程序所在目录下有个文件re.xml,我们要将该文件的内容做为NSData的数据源来初始化一个NSData对象,可以用下面的方法来实现: NSString *filePath = [[NSBundle mainBundle] pathForResouse:@"re" ofType:@"xml”]; NSData *data = [[NSData alloc] initWithContentsOfFile:filePath]; 读取plist中的内容: NSString *dataPath = [[NSBundle mainBundle] pathForResource:@"Data" ofType:@"plist"]; self.data = [NSArray arrayWithContentsOfFile:dataPath]; 删除本地文件 NSString * thePath=[self getUserDocumentDirectoryPath]; NSMutableString * fullPath=[[[NSMutableString alloc]init]autorelease]; [fullPath appendString:thePath]; NSString * idString=[idArray objectAtIndex:indexPath.row]; NSString * coverName=[NSString stringWithFormat:@"/%@.jpg",idString]; [fullPath appendString:coverName]; NSFileManager *defaultManager; defaultManager = [NSFileManager defaultManager]; - (BOOL)removeItemAtPath:(NSString *)path error:(NSError **)error BOOL boolValue=[defaultManager removeItemAtPath: fullPath error: nil]; if (boolValue) { NSLog(@"remove cover image ok"); } - (NSString*)getUserDocumentDirectoryPath { NSArray* array = NSSearchPathForDirectoriesInDomains( NSDocumentDirectory, NSUserDomainMask,YES); if([array count]) return [array objectAtIndex: 0]; else return @""; } 总结: 在此记录一下:在以后的开发中不直接使用任何相对路径,而是使用经过计算以后的绝对路径。 一.获取图片 1. NSString *path = [[NSBuddle mainBuddle] pathForResource:@"resourceName" oftype@"resourceType”]; UIImage *image = [[UIImageimageWithContentsOfFile:path]; 2. UIImage *image = [UIImage imageNamed:@"imageName”]; 加载图片: //方法1 UIImage*imag1=[UIImageimageNamed:@"image.png"];//这种方式加载图片会缓存,下次用的时候不用再加载,但是缺点是应用程序占用内存。 //方法2 //很好的解决了内存缓存的问题 UIImage*image2=[UIImageimageWithContentsOfFile:[[NSBundlemainBundle]pathForResource:@"image.png"ofType:nil]]; //方法3 //很好的解决了内存的缓存问题 NSData*imageData=[NSDatadataWithContentsOfFile:[[NSBundlemainBundle]pathForResource:@"image.png"ofType:nil]]; UIImage*image3=[UIImageimageWithData:imageData]; 二.获取plist文件 NSArray *array =[[NSArray alloc]initWithContentsOfFile:[[NSBundlemainBundle]pathForResource:@"name"ofType:@"plist"]]; NSDictionary *dict=[arrayobjectAtIndex:index];//将plist文件中的内容转换成字典 程序猿神奇的手,每时每刻,这双手都在改变着世界的交互方式! 本文转自当天真遇到现实博客园博客,原文链接:http://www.cnblogs.com/XYQ-208910/p/4762861.html,如需转载请自行联系原作者

优秀的个人博客,低调大师

[IOS]《A Swift Tour》翻译(一)

以下翻译内容为原创,转载请注明: 来自天天博客:http://www.cnblogs.com/tiantianbyconan/p/3768936.html 碎碎念。。。 Swift是苹果在WWDC刚发布的新语言,本人也没学过,现在看苹果官方文档一边翻译一边学习,再加上英语水平和对编程理解很有限,有错误的地方请大家指出,翻译只供参考,建议阅读苹果Swift官方的文档 Swift 之旅 按照传统,在开始学习一门新的语言时写的第一个程序应该是在屏幕上打印“Hello, World”,这个可以用一行来完成: print(“Hello, world”) 如果你有写过C或者Objective-C的经验,这个语法你应该会感觉很熟悉——在Swift中,这行代码就是一个完整的程序。你不需要像输入输出流或者字符串处理等那样去导入另外的具有功能性的库。在全局范围编写的代码即是程序的入口点,所以你不需要一个main方法。你也不需要在每个语句后面写上分号。 这个旅程会带给你足够的信息让你用Swift来完成各种编程任务。不用担心你是否懂得一些编程——这本书对各个方面都进行来详细的介绍。 基本数据 使用let来表示一个常量,使用var来表示一个变量。常量的值不需要在编译时期被知道,但是你必须且只能一次分配一个值给它。这表示你一旦给这个常量分配了一个值,你就能在很多地方使用它了。 var myVariable = 42; myVariable = 50; let myConstant = 42; 一个常量或者变量的类型必须要跟你分配给它的值的类型一致。然而,你一般不需要精确的写明它的类型。当你创建了一个常量或者变量,并赋值后,编译器会自动推断出它的类型。比如在上面的例子中,编译器会推断出myVariable是一个integer,因为它的初始值就是一个integer。 如果初始值不能提供足够的信息(或者它根本没有初始值),可以在这个变量后面加上冒号,然后写上指定类型。 let implicitInteger = 70 let implicitDouble = 70.0 let explicitDouble: Double = 70 值不会隐式地被转换成另一种类型。如果你需要转换成一个不同类型的值,显示地生成一个期望类型的实例。 let label = “The width is ” let width = 94 let widthLabel = label + String(width) 还有一个更简单的方法,在字符串中包含变量值:写一对括号里面写一个变量值,然后在括号前面写一个反斜杠,举个例子: let apples = 3 let oranges = 5 let appleSummary = “I have \(apples) apples.” let fruitSummary = “I have \(apples + oranges) pieces of fruit.” 使用中括号([])来创建一个数组或者字典,使用index(索引)或者key(键)访问他们的某一项。 var shoppingList = [“catfish”, “water”, “tulips”, “blue paint”] shoppingList[1] = “bottle of water” var occupations = [ “Malcolm”: “Captain”, “Kaylee”: “Mechanic”, ] occupations[“Jayne”] = “Public Relations” 使用初始化器的语法来创建一个空的数组或者字典。 let emptyArray = String[]() let emptyDictionary = Dictionary<String, Float>() 如果类型信息是可推断的,你可以使用[]创建一个空的数组,使用[:]来创建一个空的字典,举个例子,当你设置一个新的值或者往方法中传入一个变量作为参数 shoppingList = [] 控制语句 使用if和switch来创建一个条件,使用for-in,for,while和do-while来创建一个循环。 条件和循环变量上的括号是可选的。if后面大括号和循环体的大括号是必须的。 let individualScores = [75, 43, 103, 87, 12] var teamScore = 0 for score in individualScores{ if score > 50{ teamScore += 3 }else{ teamScore += 1 } } teamScore 在一个if语句中,条件必须是一个布尔类型的表达式——这表示像if score { … }这样的代码是错误的,这个score并不是隐式地去跟0比较。 你可以在值可能为空的时候同时使用if和let。这些值就被表示为可选地。一个可选的值可能包含一个值或者包含一个nil,nil表示这个值是空。在这个值的类型后面写上一个疑问符号(?)可以把这个值标记为可选的。 var optionalString: String? = “Hello” optionalString == nil var optionalName: String? = “John Appleseed” var greeting = “Hello!” if let name = optionalName{ greeting = “Hello, \(name)” } 如果可选值是nil,那么这个条件就为false,大括号中代码就会跳过。否则,可选值执行后面代码块中的代码并分配给let后面的常数。 Switches支持各种数据和各种各样的比较操作——它们不局限于integers和相等式的比较。 let vegetable = “red pepper” switch vegetable{ case “celery”: let vegetableComment = “Add some raisins and make ants on a log.” case “cucumber”, “watercress”: let vegetableComment = “That would make a good tea sandwich.” case let x where x.hasSuffix(“pepper”): let vegetableComment = “Is it a spicy \(x)?” default: let vegetableComment = “Everything tastes good in soup.” } 在匹配的case中执行完代码后,程序退出switch语句。执行不会在下一个case中继续,所以不需要显示的在每个cases中的最后依次写上跳出该switch的break语句。 你可以使用for-in语句来迭代键值对形式的字典中的所有items。 let interestingNumbers = [ “Prime”: [2, 3, 5, 7, 11, 13], “Fibonacci”: [1, 1, 2, 3, 5, 8], “Square”: [1, 4, 9, 16, 25], ] var largest = 0 for(kind, numbers) in interestingNumbers{ for number in numbers{ if number > largest{ largest = number } } } largest 使用while来重复代码块中的代码,直到条件改变。循环条件也可以放在最后,可以确保这个循环至少执行一次。 var n = 2 while n < 100{ n = n * 2 } n var m = 2 do{ m = m * 2 } while m < 100 m 你可以在循环中保持一个索引index——通过使用..来限定一个索引范围或者指明初始值,条件和增量。下面两个结果一样的循环: var firstForLoop = 0 for i in 0..3{ firstForLoop += i } firstForLoop var secondForLoop = 0 for var i = 0; i < 3; ++i{ secondForLoop += 1 } secondForLoop 使用..来限定范围会省略范围的上限值,使用...来限定范围会包含所有限定值。(译者注:..是左闭右开整数区间,…是左闭右闭整数区间) 本文转自天天_byconan博客园博客,原文链接:http://www.cnblogs.com/tiantianbyconan/p/3768936.html ,如需转载请自行联系原作者

优秀的个人博客,低调大师

iOS:UITableView表格视图控件

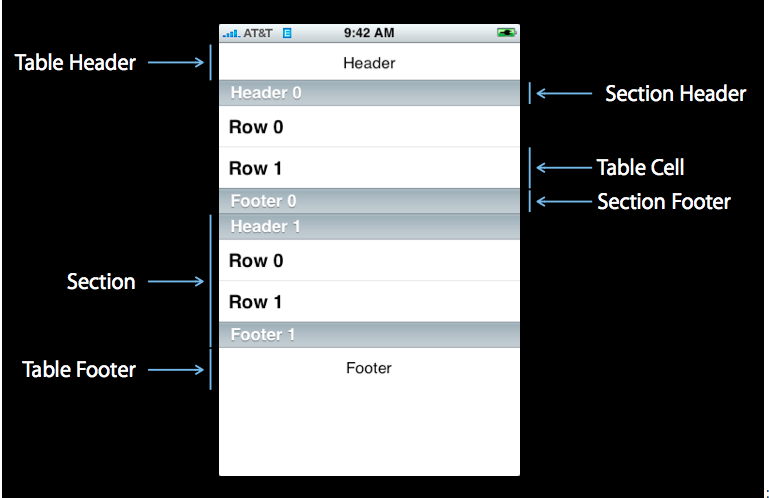
UITableView:表格视图控件,继承滚动视图控件UIScrollView,(类似于UIPickerView选择器,它主要通过设置数据源代理和行为代理实现协议来设置单元格) 对表格的操作主要有:创建表格、设置单元格(行数、内容、行高)、编辑单元格(删除单元格、插入单元格)、移动单元格、标记单元格、修改单元格等。 一、表格式图的属性和行为: 1.基本属性: @interface UITableView : UIScrollView <NSCoding> @property (nonatomic, readonly) UITableViewStyle style;//表格样式 @property (nonatomic, assign) id <UITableViewDataSource> dataSource;//数据源代理 @property (nonatomic, assign) id <UITableViewDelegate> delegate;//操作代理 @property (nonatomic)CGFloat rowHeight; //行高 @property (nonatomic)CGFloat sectionHeaderHeight;//组表头高度 @property (nonatomic)CGFloat sectionFooterHeight;//组表尾高度 @property (nonatomic)CGFloat estimatedRowHeight ;//行评估高度 @property (nonatomic)CGFloat estimatedSectionHeaderHeight ;//组表头评估高度 @property (nonatomic)CGFloat estimatedSectionFooterHeight ;//组表尾评估高度 @property (nonatomic) UIEdgeInsets separatorInset;//分离矩形区域 @property(nonatomic,readwrite,retain)UIView*backgroundView//背景视图 @end 2.基本方法: - (instancetype)initWithFrame:(CGRect)frame style:(UITableViewStyle)style; //初始化 - (NSInteger)numberOfSections; //组数 - (NSInteger)numberOfRowsInSection:(NSInteger)section;//某一组行数 - (CGRect)rectForSection:(NSInteger)section;//某一组的矩形区域 - (CGRect)rectForHeaderInSection:(NSInteger)section;//某一组的表头矩形区域 - (CGRect)rectForFooterInSection:(NSInteger)section;//某一组表尾矩形区域 - (CGRect)rectForRowAtIndexPath:(NSIndexPath *)indexPath;//某一组某行的矩形区域 - (NSIndexPath *)indexPathForRowAtPoint:(CGPoint)point;//返回指定表单元的NSIndexPath路径信息 - (NSIndexPath *)indexPathForCell:(UITableViewCell *)cell;//返回指定表单元的NSIndexPath路径信息 - (NSArray *)indexPathsForRowsInRect:(CGRect)rect;//返回指定CGRect的NSIndexPath路径信息数组 - (UITableViewCell*)cellForRowAtIndexPath:(NSIndexPath*)indexPath;//返回某组某一行的单元格 - (NSArray *)visibleCells;//返回可见单元格数组 - (NSArray *)indexPathsForVisibleRows;//返回可见行的索引数组 - (UITableViewHeaderFooterView *)headerViewForSection:(NSInteger)section ;//返回某一组表头视图 - (UITableViewHeaderFooterView *)footerViewForSection:(NSInteger)section ;//返回某一组表尾视图 - (void)scrollToRowAtIndexPath:(NSIndexPath *)indexPath atScrollPosition:(UITableViewScrollPosition) scrollPositionanimated:(BOOL)animated;//将单元格滑动到指定位置的行 -(void)scrollToNearestSelectedRowAtScrollPosition:(UITableViewScrollPosition)scrollPosition animated:(BOOL)animated;//将单元格滑动到选中的行 - (UITableViewCellAccessoryType)tableView:(UITableView*)tableView accessoryTypeForRowWithIndexPath:(NSIndexPath*)indexPath //返回标记效果类型 Plain类型: Group类型: 表格视图与数据源和代理的结构图: 3.表格视图主要分两种内置类型:一种Plain,另一种是Group UITableViewStylePlain, // 规则的表格式图 UITableViewStyleGrouped //分组的表格视图 4.标记单元格Cell (对选中的单元格做处理的显示方式) 标记分别有四种效果: UITableViewCellAccessoryCheckmark //单元格右边每条记录后面打上对勾 UITableViewCellAccessoryDetailDisclosureButton //单元格右边带箭头的小圆按钮,可以添加事件 UITableViewCellAccessoryDisclosureIndicator//展开指示器,相当于内容被折叠起来后可以打开UITableViewCellAccessoryNone//没有任何的样式 5.对单元格的编辑三种类型: UITableViewCellEditingStyleDelete //删除选中的单元格 UITableViewCellEditingStyleInsert//插入新的单元格 UITableViewCellEditingStyleNone//移动单元格 6.在删除和添加单元格的用到UITableViewRowAnimation几种动画刷新效果 UITableViewRowAnimationAutomatic//单元格按自动方式滑入/出 UITableViewRowAnimationTop //单元格滑动到相邻单元格之上 UITableViewRowAnimationBottom //单元格滑动到相邻单元格之下 UITableViewRowAnimationLeft//单元格往左滑入/出 UITableViewRowAnimationRight //单元格往右滑入/出 UITableViewRowAnimationMiddle //单元格往中间滑入/出 UITableViewRowAnimationFade //单元格淡入/出 UITableViewRowAnimationNone //没有动画效果 7.UITableView提供了4种基本的表格视图单元格,在SDK 3.0 之后,每个单元格都有3个属性textLabel(主标题),detailTextLabel(副标题)和imageView(图像视图)。 下面一一介绍这4种基本单元格类型格式: <1>UITableViewCellStyleDefault 该格式提供了一个简单的左对齐的文本标签textLabel和一个可选的图像imageView。如果显示图像,那么图像将在最左边。 这种格式虽然可以设置detailTextLabel,但是不会显示该标签。 <2>UITableViewCellStyleSubtitle 该格式与前一种相比,增加了对detailTextLabel的支持,该标签将会显示在textLabel标签的下面,字体相对较小。 <3>UITableViewCellStyleValue1 该格式居左显示textLabel,居右显示detailTextLabel,且字体较小。 该格式不支持图像。 <4>UITableViewCellStyleValue2 该格式居左现实一个小型蓝色主标签textLabel,在其右边显示一个小型黑色副标题详细标签detailTextLabel。 该格式不支持图像 二、表格视图的数据源协议:UITableViewDataSource @protocol UITableViewDataSource<NSObject> @required //设置每组多少行 - (NSInteger)tableView:(UITableView *)tableView numberOfRowsInSection:(NSInteger)section; //设置每一行的单元格 - (UITableViewCell *)tableView:(UITableView *)tableView cellForRowAtIndexPath:(NSIndexPath *)indexPath; @optional //设置有多少组 - (NSInteger)numberOfSectionsInTableView:(UITableView *)tableView; //设置表头内容 - (NSString*)tableView:(UITableView*)tableView titleForHeaderInSection:(NSInteger)section; //设置表尾内容 - (NSString*)tableView:(UITableView*)tableView titleForFooterInSection:(NSInteger)section; //设置编辑状态(某一行是否可以编辑(删除)) - (BOOL)tableView:(UITableView*)tableView canEditRowAtIndexPath:(NSIndexPath*)indexPath; //设置移动状态(某一行是否可以移动来进行重新排序) - (BOOL)tableView:(UITableView*)tableView canMoveRowAtIndexPath:(NSIndexPath*)indexPath; //右边的索引栏的内容 - (NSArray*)sectionIndexTitlesForTableView:(UITableView*)tableView; //根据单元格索引和内容返回组索引 - (NSInteger)tableView:(UITableView*)tableView sectionForSectionIndexTitle:(NSString*)title atIndex:(NSInteger)index; //对指定的组、行的单元格执行编辑操作(增加、删除、插入) - (void)tableView:(UITableView*)tableView commitEditingStyle:(UITableViewCellEditingStyle)editingStyle forRowAtIndexPath:(NSIndexPath*)indexPath; //对指定的组、行的单元格执行移动操作 - (void)tableView:(UITableView*)tableView moveRowAtIndexPath:(NSIndexPath*)sourceIndexPath toIndexPath:(NSIndexPath*)destinationIndexPath; @end 三、//NSIndexPath @interface NSIndexPath (UITableView) + (NSIndexPath *)indexPathForRow:(NSInteger)row inSection:(NSInteger)section; @property(nonatomic,readonly)NSIntegersection;//组 @property(nonatomic,readonly) NSInteger row;//行 @end 四、表格视图的行为协议:UITableViewDelegate @protocol UITableViewDelegate<NSObject, UIScrollViewDelegate> @optional //选择某一行单元格开始时 - (void)tableView:(UITableView *)tableView willDisplayCell:(UITableViewCell *)cell forRowAtIndexPath:(NSIndexPath *)indexPath; //选择某一组表头视图开始时 - (void)tableView:(UITableView *)tableView willDisplayHeaderView:(UIView *)view forSection:(NSInteger)section ; //选择某一组表尾视图开始时 - (void)tableView:(UITableView *)tableView willDisplayFooterView:(UIView *)view forSection:(NSInteger)section; //选择某一行单元格开始时 - (void)tableView:(UITableView *)tableView didEndDisplayingCell:(UITableViewCell *)cell forRowAtIndexPath:(NSIndexPath*)indexPath ; //选择某一组表头视图结束时 - (void)tableView:(UITableView *)tableView didEndDisplayingHeaderView:(UIView *)view forSection:(NSInteger)section ; //选择某一组表尾视图结束时 - (void)tableView:(UITableView *)tableView didEndDisplayingFooterView:(UIView *)view forSection:(NSInteger)section; //选中了UITableView的某一行 - (void)tableView:(UITableView *)tableView didSelectRowAtIndexPath:(NSIndexPath *)indexPath; //取消了UITableView的某一行 - (void)tableView:(UITableView*)tableView didDeselectRowAtIndexPath:(NSIndexPath*) //返回某一行的高度 - (CGFloat)tableView:(UITableView *)tableView heightForRowAtIndexPath:(NSIndexPath *)indexPath; //返回某一组表头的高度 - (CGFloat)tableView:(UITableView *)tableView heightForHeaderInSection:(NSInteger)section; //返回某一组表尾的高度 - (CGFloat)tableView:(UITableView *)tableView heightForFooterInSection:(NSInteger)section; //显示某一组表头的视图 •- (UIView *)tableView:(UITableView *)tableViewviewForHeaderInSection:(NSInteger)section //显示某一组表尾的视图 •-(UIView *)tableView:(UITableView *)tableViewviewForFooterInSection:(NSInteger)section //设置每一行的等级缩进(数字越小,等级越高) •- (NSInteger)tableView:(UITableView *)tableViewindentationLevelForRowAtIndexPath:(NSIndexPath *)indexPath //返回单元格的编辑类型 -(UITableViewCellEditingStyle)tableView:(UITableView*)tableView editingStyleForRowAtIndexPath:(NSIndexPath*)indexPath @end 重点:获取indexPath的三种方式 //1.通过标记tag获取 //1.1通过按钮的tag获取indexPath //Product *product = [self.products objectAtIndex:sender.tag]; //1.2通过拿出按钮的父视图的父视图获取单元格 //shopingTableViewCell *cell = (shopingTableViewCell*)sender.superview.superview;(button->contentView->cell) //NSIndexPath *indexPath = [self.tableView indexPathForCell:cell]; //Product *product = [self.products objectAtIndex:indexPath.row]; //1.3通过event记录的触摸点获取indexPath UITouch*touch = [[eventallTouches]anyObject]; CGPointpoint = [touchlocationInView:self.tableView]; NSIndexPath *indexPath = [self.tableView indexPathForRowAtPoint:point]; 范例一:制作一个水果分组表格 1 #import "ViewController.h" 2 3 @interface ViewController ()<UITableViewDataSource> 4 @property (weak, nonatomic) IBOutlet UITableView *tableView; 5 @property (strong,nonatomic)NSArray *fruit; 6 @property (strong,nonatomic)NSArray *meat; 7 8 @end 9 10 @implementation ViewController 11 12 - (void)viewDidLoad { 13 [super viewDidLoad]; 14 //初始化数据 15 self.fruit = [NSArray arrayWithObjects:@"apple",@"banana",@"pear",@"orange",nil]; 16 self.meat = [NSArray arrayWithObjects:@"pig",@"fish",@"cow",@"chicken", nil]; 17 18 //设置tableView的数据源代理dataSource 19 self.tableView.dataSource = self; 20 } 21 22 #pragma mark - tableView的数据源方法 23 //设置有多少组 24 -(NSInteger)numberOfSectionsInTableView:(UITableView *)tableView 25 { 26 return 2; 27 } 28 //设置每组多少行 29 -(NSInteger)tableView:(UITableView *)tableView numberOfRowsInSection:(NSInteger)section 30 { 31 return section==0?[self.fruit count]:[self.meat count]; 32 } 33 //设置每一行的单元格 34 -(UITableViewCell *)tableView:(UITableView *)tableView cellForRowAtIndexPath:(NSIndexPath *)indexPath 35 { 36 UITableViewCell *cell = [[UITableViewCell alloc]initWithStyle:UITableViewCellStyleDefault reuseIdentifier:nil]; 37 38 cell.textLabel.text = indexPath.section==0?self.fruit[[indexPath row]]:self.meat[[indexPath row]]; 39 40 return cell; 41 } 42 @end 范例二:制作一个中国城市表格 1 #import "ViewController.h" 2 3 @interface ViewController ()<UITableViewDataSource> 4 @property (strong,nonatomic)UITableView *tableView; 5 @property (strong,nonatomic)NSArray *provinces; 6 @property (strong,nonatomic)NSDictionary *cities; 7 @end 8 9 @implementation ViewController 10 11 - (void)viewDidLoad { 12 [super viewDidLoad]; 13 //初始化数据 14 NSBundle *bundle = [NSBundle mainBundle]; 15 NSString *path = [bundle pathForResource:@"cities" ofType:@"plist"]; 16 NSDictionary *dictionary = [NSDictionary dictionaryWithContentsOfFile:path]; 17 if(dictionary) 18 { 19 self.provinces = [dictionary objectForKey:@"provinces"]; 20 self.cities = [dictionary objectForKey:@"cities"]; 21 } 22 23 //创建UITableView,设置数据源 24 self.tableView = [[UITableView alloc]initWithFrame:self.view.frame style:UITableViewStyleGrouped]; 25 26 self.tableView.dataSource = self; 27 28 [self.view addSubview:self.tableView]; 29 } 30 31 #pragma mark -tableView数据源方法 32 //有多少个section 33 -(NSInteger)numberOfSectionsInTableView:(UITableView *)tableView 34 { 35 return self.provinces.count; 36 } 37 //每个section有多少个row 38 -(NSInteger)tableView:(UITableView *)tableView numberOfRowsInSection:(NSInteger)section 39 { 40 //取出某省的所有城市 41 NSArray *citiesOfProvince = [self.cities objectForKey:self.provinces[section]]; 42 return citiesOfProvince.count; 43 } 44 //设置每一个单元格的内容 45 -(UITableViewCell *)tableView:(UITableView *)tableView cellForRowAtIndexPath:(NSIndexPath *)indexPath 46 { 47 //1.根据reuseIdentifier,先到对象池中去找重用的单元格对象,重用单个页面显示的所有单元格,节约内存 48 static NSString *reuseIdentifier = @"cityCell"; 49 UITableViewCell *cell = [self.tableView dequeueReusableCellWithIdentifier:reuseIdentifier]; 50 //2.如果没有找到,自己创建单元格对象 51 if(cell == nil) 52 { 53 cell = [[UITableViewCell alloc]initWithStyle:UITableViewCellStyleDefault reuseIdentifier:reuseIdentifier]; 54 NSLog(@"创建单元格对象"); 55 } 56 //3.设置单元格对象的内容 57 //取出某省的所有城市 58 NSArray *citiesOfProvince = [self.cities objectForKey:self.provinces[[indexPath section]]]; 59 60 //设置单元格的内容为相应的城市的名称 61 cell.textLabel.text = [citiesOfProvince objectAtIndex:[indexPath row]]; 62 63 return cell; 64 } 65 66 //设置每一个section头部的名称,设置省的名字 67 -(NSString *)tableView:(UITableView *)tableView titleForHeaderInSection:(NSInteger)section 68 { 69 return [self.provinces objectAtIndex:section]; 70 } 71 72 //添加右边的索引,便于查找对应的省 73 -(NSArray*)sectionIndexTitlesForTableView:(UITableView *)tableView 74 { 75 return self.provinces; 76 } 77 78 @end 范例三 制作带有图像、主标题、副标题的通讯录 1 #import "ViewController.h" 2 #import "Contact.h" 3 #define CONTACT_NUM 20 4 @interface ViewController ()<UITableViewDataSource,UITableViewDelegate,UIAlertViewDelegate> 5 @property (strong,nonatomic)UITableView *tableView; 6 @property (strong,nonatomic)NSArray *contacts; 7 @end 8 9 @implementation ViewController 10 11 - (void)viewDidLoad { 12 [super viewDidLoad]; 13 //初始化联系人信息 14 NSMutableArray *arrayM = [NSMutableArray arrayWithCapacity:CONTACT_NUM]; 15 for(int i=0; i<CONTACT_NUM; i++) 16 { 17 Contact *contact = [[Contact alloc]initWithName:[NSString stringWithFormat:@"name%d",i+1] andTel:[NSString stringWithFormat:@"1861010%04d",arc4random_uniform(10000)] andFaceName:[NSString stringWithFormat:@"%d.png",arc4random_uniform(9)]]; 18 [arrayM addObject:contact]; 19 } 20 self.contacts = arrayM; 21 22 //创建tableView 23 self.tableView = [[UITableView alloc]initWithFrame:self.view.frame style:UITableViewStylePlain]; 24 25 self.tableView.dataSource = self; 26 self.tableView.delegate = self; 27 28 [self.view addSubview:self.tableView]; 29 } 30 31 #pragma mark -tableView的数据源方法 32 33 //每个组section有多少row 34 -(NSInteger)tableView:(UITableView *)tableView numberOfRowsInSection:(NSInteger)section 35 { 36 return self.contacts.count; 37 } 38 //设置每一个单元格的内容 39 -(UITableViewCell *)tableView:(UITableView *)tableView cellForRowAtIndexPath:(NSIndexPath *)indexPath 40 { 41 //1.根据reuseIdentifier,先到对象池中去找重用的单元格对象 42 static NSString *reuseIdentifier = @"contactCell"; 43 UITableViewCell *cell = [self.tableView dequeueReusableCellWithIdentifier:reuseIdentifier]; 44 //2.如果没有找到,自己创建单元格对象 45 if(cell == nil) 46 { 47 cell = [[UITableViewCell alloc]initWithStyle:UITableViewCellStyleSubtitle reuseIdentifier:reuseIdentifier]; 48 } 49 //3.设置单元格对象的内容 50 Contact *contact = [self.contacts objectAtIndex:indexPath.row]; 51 //设置头像 52 [cell.imageView setImage:[UIImage imageNamed:contact.faceName]]; 53 //设置姓名 54 cell.textLabel.text = contact.name; 55 //设置电话 56 cell.detailTextLabel.text = contact.tel; 57 58 //设置辅助指引视图 59 cell.accessoryType = UITableViewCellAccessoryDisclosureIndicator; 60 61 return cell; 62 } 63 64 #pragma mark -tableVie的代理方法 65 //设置单元格每行的高度 66 -(CGFloat)tableView:(UITableView *)tableView heightForRowAtIndexPath:(NSIndexPath *)indexPath 67 { 68 return 70; 69 } 70 71 //选中某行时的操作 72 -(void)tableView:(UITableView *)tableView didSelectRowAtIndexPath:(NSIndexPath *)indexPath 73 { 74 //NSLog(@"选中了第%ld行",[indexPath row]); 75 //创建一个提示框 76 UIAlertView *alertView = [[UIAlertView alloc]initWithTitle:@"提示" message:[NSString stringWithFormat:@"你选中了第%ld行",indexPath.row] delegate:self cancelButtonTitle:@"确定" otherButtonTitles:@"取消", nil]; 77 //设置类型 78 alertView.alertViewStyle = UIAlertViewStylePlainTextInput; 79 80 //在文本框当中显示原来的名字 81 Contact *contact = [self.contacts objectAtIndex:indexPath.row]; 82 [alertView textFieldAtIndex:0].text = contact.name; 83 84 //用tag记录选中的行号 85 alertView.tag = indexPath.row; 86 87 //显示提示框 88 [alertView show]; 89 } 90 91 //取消了某行的操作 92 -(void)tableView:(UITableView *)tableView didDeselectRowAtIndexPath:(NSIndexPath *)indexPath 93 { 94 NSLog(@"取消了第%ld行",[indexPath row]); 95 } 96 97 #pragma mark -alertView代理方法 98 //获取点击了那个按钮 99 -(void)alertView:(UIAlertView *)alertView clickedButtonAtIndex:(NSInteger)buttonIndex 100 { 101 //NSLog(@"buttonIndex:%ld",buttonIndex); 102 if(buttonIndex == 0) //确定 103 { 104 //1.修改数据模型 105 Contact *contact = [self.contacts objectAtIndex:alertView.tag]; 106 [contact setName:[alertView textFieldAtIndex:0].text]; 107 108 //2.表格刷新,显示新的数据 109 //表格全部刷新 110 //[self.tableView reloadData]; 111 112 //表格局部刷新 113 NSIndexPath *indexpath = [NSIndexPath indexPathForRow:alertView.tag inSection:0]; 114 [self.tableView reloadRowsAtIndexPaths:@[indexpath] withRowAnimation:UITableViewRowAnimationLeft]; 115 } 116 } 117 @end 范例四、删除单元格、插入单元格 前《=====》后 前<======>后 1 #import "ViewController.h" 2 #define ARRAYM_NUM 20 3 @interface ViewController ()<UITableViewDataSource,UITableViewDelegate> 4 @property (weak, nonatomic) IBOutlet UITableView *tableView; 5 @property (strong,nonatomic)NSMutableArray *arrayM; 6 @property (assign,nonatomic)BOOL isDelete; 7 @end 8 9 @implementation ViewController 10 - (IBAction)addClicked:(UIBarButtonItem *)sender { 11 self.isDelete = NO; 12 self.tableView.editing = !self.tableView.editing; 13 } 14 - (IBAction)deleteClicked:(UIBarButtonItem *)sender { 15 self.isDelete = YES; 16 self.tableView.editing = !self.tableView.editing; 17 } 18 19 - (void)viewDidLoad { 20 [super viewDidLoad]; 21 //初始化数据 22 self.arrayM = [NSMutableArray arrayWithCapacity:ARRAYM_NUM]; 23 for (int i=0; i<ARRAYM_NUM; i++) 24 { 25 NSString *productName = [NSString stringWithFormat:@"产品-%02d",i+1]; 26 [self.arrayM addObject:productName]; 27 28 //设置tableView的数据源和代理 29 self.tableView.dataSource = self; 30 self.tableView.delegate = self; 31 } 32 } 33 34 #pragma mark -tableView的数据源方法 35 36 //每组多少行 37 -(NSInteger)tableView:(UITableView *)tableView numberOfRowsInSection:(NSInteger)section 38 { 39 return self.arrayM.count; 40 } 41 //设置每一个单元格的内容 42 -(UITableViewCell *)tableView:(UITableView *)tableView cellForRowAtIndexPath:(NSIndexPath *)indexPath 43 { 44 //1.根据reuseIdentifier,先到对象池中去找重用的单元格对象 45 static NSString *reuseIdentifier = @"productCell"; 46 UITableViewCell *cell = [self.tableView dequeueReusableCellWithIdentifier:reuseIdentifier]; 47 //2.如果没有找到,自己创建单元格对象 48 if(cell == nil) 49 { 50 cell = [[UITableViewCell alloc]initWithStyle:UITableViewCellStyleDefault reuseIdentifier:reuseIdentifier]; 51 } 52 //3.设置单元格对象的内容 53 cell.textLabel.text = [self.arrayM objectAtIndex:indexPath.row]; 54 55 return cell; 56 } 57 58 //tableView的编辑的处理 59 -(void)tableView:(UITableView *)tableView commitEditingStyle:(UITableViewCellEditingStyle)editingStyle forRowAtIndexPath:(NSIndexPath *)indexPath 60 { 61 if(editingStyle == UITableViewCellEditingStyleDelete) 62 { 63 NSLog(@"要删除第%ld行",indexPath.row); 64 //1.要在数组中删掉相应的元素 65 [self.arrayM removeObjectAtIndex:indexPath.row]; 66 //2.做局部的刷新 67 [self.tableView deleteRowsAtIndexPaths:@[indexPath] withRowAnimation:UITableViewRowAnimationMiddle]; 68 } 69 if(editingStyle == UITableViewCellEditingStyleInsert) 70 { 71 NSLog(@"要插入第%ld行",indexPath.row); 72 //1.要在数组中插入新的元素 73 [self.arrayM insertObject:[NSString stringWithFormat:@"产品-%02d", arc4random_uniform(100)] atIndex:indexPath.row]; 74 //2.做局部的刷新 75 [self.tableView insertRowsAtIndexPaths:@[indexPath] withRowAnimation:UITableViewRowAnimationRight]; 76 } 77 } 78 79 -(UITableViewCellEditingStyle)tableView:(UITableView *)tableView editingStyleForRowAtIndexPath:(NSIndexPath *)indexPath 80 { 81 if(self.isDelete) 82 return UITableViewCellEditingStyleDelete; 83 else 84 return UITableViewCellEditingStyleInsert; 85 } 86 @end 总结: 单元格的重用(解决内存占用问题,优化内存) (1)创建一个对象池(系统自动创建的) (2) 为了支持多种不同类型的单元格类型,每一个单元格对象都有一个标识:reuseIdentifier; (3)需要用到新的单元格对象时 ,先到对象池中去找;如果没有找到相应类型的单元格对象,那么久创建单元格对象。 (4)单元格对象不再使用时,将它放回对象池。 1 //设置每一个单元格的内容 2 -(UITableViewCell *)tableView:(UITableView *)tableView cellForRowAtIndexPath:(NSIndexPath *)indexPath 3 { 4 //1.根据reuseIdentifier,先到对象池中去找重用的单元格对象 5 static NSString *reuseIdentifier = @"<#name#>"; 6 UITableViewCell *cell = [self.tableView dequeueReusableCellWithIdentifier:reuseIdentifier]; 7 //2.如果没有找到,自己创建单元格对象 8 if(cell == nil) 9 { 10 cell = [[UITableViewCell alloc]initWithStyle:UITableViewCellStyleDefault reuseIdentifier:reuseIdentifier]; 11 } 12 //3.设置单元格对象的内容 13 14 return cell; 15 } tableView的编辑模式(删除、插入)分三步处理 1.打开tableView的编辑模式 self.tableView.editing = YES 2.返回单元格的编辑类型 编辑类型三种:none、insert、delete 默认的编辑类型为delete -(UITableViewCellEditingStyle)tableView:(UITableView *)tableView editingStyleForRowAtIndexPath:(NSIndexPath *)indexPath 3.对单元格进行具体的编辑处理 -(void)tableView:(UITableView *)tableView commitEditingStyle:(UITableViewCellEditingStyle)editingStyle forRowAtIndexPath:(NSIndexPath *)indexPath 1 //tableView的编辑的处理 2 -(void)tableView:(UITableView *)tableView commitEditingStyle:(UITableViewCellEditingStyle)editingStyle forRowAtIndexPath:(NSIndexPath *)indexPath 3 { 4 if(editingStyle == UITableViewCellEditingStyleDelete) 5 { 6 NSLog(@"要删除第%ld行",indexPath.row); 7 //1.要在数组中删掉相应的元素 8 [self.arrayM removeObjectAtIndex:indexPath.row]; 9 //2.做局部的刷新 10 [self.tableView deleteRowsAtIndexPaths:@[indexPath] withRowAnimation:UITableViewRowAnimationMiddle]; 11 } 12 if(editingStyle == UITableViewCellEditingStyleInsert) 13 { 14 NSLog(@"要插入第%ld行",indexPath.row); 15 //1.要在数组中插入新的元素 16 [self.arrayM insertObject:[NSString stringWithFormat:@"产品-%02d", arc4random_uniform(100)] atIndex:indexPath.row]; 17 //2.做局部的刷新 18 [self.tableView insertRowsAtIndexPaths:@[indexPath] withRowAnimation:UITableViewRowAnimationRight]; 19 } 20 } 21 22 //返回单元格编辑类型 23 -(UITableViewCellEditingStyle)tableView:(UITableView *)tableView editingStyleForRowAtIndexPath:(NSIndexPath *)indexPath 24 { 25 if(self.isDelete) 26 return UITableViewCellEditingStyleDelete; 27 else 28 return UITableViewCellEditingStyleInsert; 29 } 在tableView中移动单元格的步骤: 1、把tableView的editing设置成YES 2、在返回单元格编辑类型方法时一定要返回none 3、设置单元格能够移动(返回YES) -(BOOL)tableView:(UITableView *)tableView canMoveRowAtIndexPath:(NSIndexPath *)indexPath 4、进行单元格移动后的处理 -(void)tableView:(UITableView *)tableView moveRowAtIndexPath:(NSIndexPath *)sourceIndexPath toIndexPath:(NSIndexPath *)destinationIndexPath 1 //返回单元格编辑类型 2 -(UITableViewCellEditingStyle)tableView:(UITableView *)tableView editingStyleForRowAtIndexPath:(NSIndexPath *)indexPath 3 { 4 return UITableViewCellEditingStyleNone; 5 } 6 //设置单元格是否能移动 7 -(BOOL)tableView:(UITableView *)tableView canMoveRowAtIndexPath:(NSIndexPath *)indexPath 8 { 9 return YES; 10 } 11 12 //移动单元格时的处理 13 -(void)tableView:(UITableView *)tableView moveRowAtIndexPath:(NSIndexPath *)sourceIndexPath toIndexPath:(NSIndexPath *)destinationIndexPath 14 { 15 //修改数组中的元素的顺序 16 //1.先取出要移动的元素 17 NSString *item = [self.arrayM objectAtIndex:sourceIndexPath.row]; 18 19 //2.先把原来位置的元素删掉 20 [self.arrayM removeObjectAtIndex:sourceIndexPath.row]; 21 22 //3.在新的位置上重新插入 23 [self.arrayM insertObject:item atIndex:destinationIndexPath.row]; 24 } 程序猿神奇的手,每时每刻,这双手都在改变着世界的交互方式! 本文转自当天真遇到现实博客园博客,原文链接:http://www.cnblogs.com/XYQ-208910/p/4783645.html,如需转载请自行联系原作者

优秀的个人博客,低调大师

iOS:UIToolBar控件的使用

UIToolBar控件:是经常使用的一个工具条控件,虽然在上面可以添加子控件,但是toolbar中只能添加UIBarButtonItem类型的子控件,其他子控件会被包装成这种类型的,例如UIButton。通过工具栏可以用来对视图View中内容进行操作。 原理: 可以在toolBar上添加任何子控件。其实它的原理是把你要添加的子控件先加到toolbarItems数组里面,最后再把toolbarItems数组一次性放到toolbar工具栏里面。 虽然可以在toolbar中添加其他任何的视图控件如UILabel、UITextField、UIImageView等等,但是在xib/storyboard图形界面设计时,不能它们直接放置到UIToolBar中。若强行将它们拖曳到UIToolBar,会使它们放置在上层容器中,而不是UIToolBar中。所以前提是先必须添加一个视图UIView控件到toolbar中,它会被包装成UIBarButtonItem类型,然后再在UIView中添加需要的子视图控件。 举例如下:将UILabel加入到toolbar工具栏中,步骤如下: 1. 将UIView拖曳到UIToolBar(UIToolBar中自动增加了一个UIBarButtonItem,其中便是刚才插入的UIView); 2. 将UILabel(或其他控件)拖曳到刚才的UIView中; 3. 将刚才的UIView的Background设为某种颜色(如蓝色); 4. 将刚才的UIView的Background设为Default。 对toolbar进行初始化: -initWithTitle(添加button用这个) -initWithImage -initWithBarButtonSystemItem(添加系统自定义的button,形状跟大小都已经固定了)下面链接里面有按钮图片样式 -initWithCustomView(添加除了button以外的View) 一、采用系统默认.xib文件中的UIToolBar,制作的工具栏(删除和添加图片) (1)默认的View视图布局 代码如下:需要在代码中为添加的控件人为设置frame具体坐标x,y、大小width,height 1 #import "ViewController.h" 2 #define CONTACE_VIEW_HEIGHT 50 3 @interface ViewController () 4 @property (weak, nonatomic) IBOutlet UIToolbar *toolBar; 5 @property (weak, nonatomic) IBOutlet UIBarButtonItem *barButtonitemDelete; 6 7 @end 8 9 @implementation ViewController 10 - (IBAction)addContact:(UIBarButtonItem *)sender 11 { 12 13 //让删除按钮有效 14 [self.barButtonitemDelete setEnabled:YES]; 15 16 //在subView中已经有了3个控件 17 NSInteger count = self.view.subviews.count - 3; 18 CGRect lastFrame = self.toolBar.frame; 19 20 UIView *contactView = [[UIView alloc]init]; 21 CGFloat gapY = 5; 22 CGFloat x = 0; 23 CGFloat y = lastFrame.origin.y + lastFrame.size.height + (CONTACE_VIEW_HEIGHT+gapY) * count; 24 CGFloat w = self.view.frame.size.width; 25 26 contactView.frame = CGRectMake(x,y,w,CONTACE_VIEW_HEIGHT); 27 28 29 //添加头像 30 UIImage *image = [UIImage imageNamed:[NSString stringWithFormat:@"%d.png",arc4random_uniform(9)]]; 31 UIImageView *face = [[UIImageView alloc]initWithImage:image]; 32 face.frame = CGRectMake(10, 0,50,50); 33 [contactView addSubview:face]; 34 35 //添加姓名 36 UILabel *labelName = [[UILabel alloc]init]; 37 labelName.text = [NSString stringWithFormat:@"name%d",arc4random_uniform(10)]; 38 labelName.frame = CGRectMake(10+image.size.width+50, 0, 100, 50); 39 [contactView addSubview:labelName]; 40 41 42 contactView.backgroundColor = [UIColor lightGrayColor]; 43 44 [self.view addSubview:contactView]; 45 } 46 - (IBAction)deleteContact:(UIBarButtonItem *)sender 47 { 48 //删除视图 49 UIView *lastView = [self.view.subviews lastObject]; 50 [lastView removeFromSuperview]; 51 52 //如果没有了contactView,设置删除按钮无效 53 if(self.view.subviews.count == 3) 54 { 55 [self.barButtonitemDelete setEnabled:NO]; 56 } 57 } 58 59 - (void)viewDidLoad { 60 [super viewDidLoad]; 61 //开始时删除设置为无效 62 [self.barButtonitemDelete setEnabled:NO]; 63 } 64 65 - (void)didReceiveMemoryWarning { 66 [super didReceiveMemoryWarning]; 67 // Dispose of any resources that can be recreated. 68 } 二、采用提前自定义布局的.xib文件中的UIToolBar,制作的工具栏(删除和添加图片) (2)自定义的View视图布局,添加UIImage、UILabel控件 代码如下:不需要在代码中再去设置添加控件的frame,在.xib文件中已经布局好了。 1 import "ViewController.h" 2 #define CONTACE_VIEW_HEIGHT 50 3 @interface ViewController () 4 @property (weak, nonatomic) IBOutlet UIToolbar *toolBar; 5 @property (weak, nonatomic) IBOutlet UIBarButtonItem *barButtonitemDelete; 6 7 @end 8 9 @implementation ViewController 10 - (IBAction)addContact:(UIBarButtonItem *)sender 11 { 12 13 //让删除按钮有效 14 [self.barButtonitemDelete setEnabled:YES]; 15 16 //在subView中已经有了3个控件 17 NSInteger count = self.view.subviews.count - 3; 18 CGRect lastFrame = self.toolBar.frame; 19 20 //加载xib文件 21 NSArray *views = [[NSBundle mainBundle]loadNibNamed:@"contactView" owner:nil options:nil]; 22 23 //添加contactView 24 UIView *contactView = [views lastObject]; 25 26 27 CGFloat gapY = 5; 28 CGFloat x = 0; 29 CGFloat y = lastFrame.origin.y + lastFrame.size.height + (CONTACE_VIEW_HEIGHT+gapY) * count; 30 CGFloat w = self.view.frame.size.width; 31 contactView.frame = CGRectMake(x,y,w,CONTACE_VIEW_HEIGHT); 32 33 34 //添加头像 35 UIImageView *face = (UIImageView *)[contactView viewWithTag:1]; 36 UIImage *image = [UIImage imageNamed:[NSString stringWithFormat:@"%d.png",arc4random_uniform(9)]]; 37 [face setImage:image]; 38 39 40 41 //添加姓名 42 UILabel *labelName = (UILabel *)[contactView viewWithTag:2]; 43 labelName.text = [NSString stringWithFormat:@"name%d",arc4random_uniform(10)]; 44 45 [self.view addSubview:contactView]; 46 } 47 48 - (IBAction)deleteContact:(UIBarButtonItem *)sender 49 { 50 //删除视图 51 UIView *lastView = [self.view.subviews lastObject]; 52 [lastView removeFromSuperview]; 53 54 //如果没有了contactView,设置删除按钮无效 55 if(self.view.subviews.count == 3) 56 { 57 [self.barButtonitemDelete setEnabled:NO]; 58 } 59 } 60 61 - (void)viewDidLoad { 62 [super viewDidLoad]; 63 //开始时删除设置为无效 64 [self.barButtonitemDelete setEnabled:NO]; 65 } 66 67 - (void)didReceiveMemoryWarning { 68 [super didReceiveMemoryWarning]; 69 // Dispose of any resources that can be recreated. 70 } 71 72 @end 程序猿神奇的手,每时每刻,这双手都在改变着世界的交互方式! 本文转自当天真遇到现实博客园博客,原文链接:http://www.cnblogs.com/XYQ-208910/p/4767887.html,如需转载请自行联系原作者

优秀的个人博客,低调大师

iOS:UIImageView图像视图控件

UIImageView:图像视图控件: 它是UIView的子类,因此也是视图控件,可以用来显示图像。因为它具有帧动画属性和操作方法,因此可以用来制作动画,其实动画就是很短的时间内,执行显示连续的很多张图片,人肉眼无法处分,使人看起来仿佛图像在动似的。例如典型的实例:汤姆猫实例 @interfaceUIImageView :UIView{ @property(nonatomic,retain)UIImage*image; //图像 @property(nonatomic,retain)UIImage*highlightedImage; //高亮图像 @property(nonatomic,getter=isUserInteractionEnabled)BOOLuserInteractionEnabled;//视图能否交互 @property(nonatomic,getter=isHighlighted)BOOLhighlighted;//是否高亮 @property(nonatomic,copy)NSArray*animationImages;//帧动画图像数组(全部的图像) @property(nonatomic,copy)NSArray*highlightedAnimationImages;//高亮的帧动画图像数组(全部的图像) @property(nonatomic)NSTimeIntervalanimationDuration;//执行一次全程的帧动画时间 @property(nonatomic)NSIntegeranimationRepeatCount;//帧动画重复次数 @property(nonatomic,retain)UIColor*tintColor;//控件颜色 } - (instancetype)initWithImage:(UIImage*)image;//初始化 - (instancetype)initWithImage:(UIImage*)image highlightedImage:(UIImage*)highlightedImage;//初始化 - (void)startAnimating;//开始帧动画 - (void)stopAnimating;//停止帧动画 - (BOOL)isAnimating;//是否正在执行帧动画 @end 实例如下:汤姆猫 只要图像素材充足,其实代码很简单,素材截图和代码如下: #import "ViewController.h" @interface ViewController () @property (weak, nonatomic) IBOutlet UIImageView *imgviewCat; //每一个按钮都对应着自己的一个事件 - (IBAction)drinkBtnClicked; - (IBAction)clawBtnClicked; - (IBAction)birdBtnClicked; - (IBAction)breadBtnClicked; - (IBAction)CymbalBtnClicked; - (IBAction)stomachBtnClicked; - (IBAction)fartBtnClicked; - (IBAction)knockoutBtnClicked; - (IBAction)angryBtnClicked; @end @implementation ViewController - (void)viewDidLoad { [super viewDidLoad]; // Do any additional setup after loading the view, typically from a nib. } //喝牛奶 - (IBAction)drinkBtnClicked { [self action:@"drink" andNums:81]; } //划玻璃 - (IBAction)clawBtnClicked { [self action:@"scratch" andNums:56]; } //吃小鸟 - (IBAction)birdBtnClicked { [self action:@"eat" andNums:40]; } //附蛋糕 - (IBAction)breadBtnClicked { [self action:@"pie" andNums:24]; } //敲镲 - (IBAction)CymbalBtnClicked { [self action:@"cymbal" andNums:13]; } //肚子痛 - (IBAction)stomachBtnClicked { [self action:@"stomach" andNums:34]; } //放屁 - (IBAction)fartBtnClicked { [self action:@"fart" andNums:28]; } //敲头头晕 - (IBAction)knockoutBtnClicked { [self action:@"knockout" andNums:81]; } //打脸生气 - (IBAction)angryBtnClicked { [self action:@"angry" andNums:26]; } //所有的动作事件 -(void)action:(NSString *)actionName andNums:(NSInteger) num { //如果正在执行当前的动画,对新触发的事件不做处理,直到当前的动作执行结束为止 if(self.imgviewCat.isAnimating) { return; } //1、加载图片资源到数组中 NSMutableArray *arrayM = [NSMutableArray array]; for(int i=0; i<num; i++) { NSString *catName = [NSString stringWithFormat:@"%@_%02d.jpg",actionName,i]; //通过imagNamed:这种方式加载图片,加载好的图片会一直保存在内存中,不会释放,这样下次在使用的时候就不需要再加载了,提高了运行速度;但 是,缺点是由于缓存的缘故,如果资源过大,那么应用程序会一直占用太多的内存,这就是缓存。 //即使没有强类型指针引用,对象在方法结束后也不会被销毁,这就是缓存造成的。 //UIImage *imgcat = [UIImage imageNamed:catName]; //解决办法,换一种加载方式,只要没有强类型指针引用,加载的图片对象在方法执行完后就会被销毁 NSString *path = [[NSBundle mainBundle] pathForResource:catName ofType:nil]; //不能再传入图片名称,而是要传入放在根目录下的完整的图片路径,即绝对路径 UIImage *imgcat = [UIImage imageWithContentsOfFile:path]; [arrayM addObject:imgcat]; } //2、设置UIImageView(图片框)的animationImages属性,这个属性包含的就是所有的帧动画 self.imgviewCat.animationImages = arrayM; //3、设置动画持续时间 self.imgviewCat.animationDuration = self.imgviewCat.animationImages.count * 0.08; //4、设置动画重复次数 self.imgviewCat.animationRepeatCount = 1; //5、开始动画 [self.imgviewCat startAnimating]; //6.在动画执行完后,再清空图片集合,设置图片框在调用performSelector方法时,让其延迟执行 [self.imgviewCat performSelector:@selector(setAnimationImages:)withObject:nil afterDelay:self.imgviewCat.animationImages.count*0.1]; } @end 程序猿神奇的手,每时每刻,这双手都在改变着世界的交互方式! 本文转自当天真遇到现实博客园博客,原文链接:http://www.cnblogs.com/XYQ-208910/p/4782306.html,如需转载请自行联系原作者

优秀的个人博客,低调大师

iOS:UI简单的总结

UI简单总结: 一、常用单例: NSBundle*bundel = [NSBundlemainBundle]; //加载资源 NSFileManager*fm = [NSFileManagerdefaultManager];//文件管理 UIApplication*app = [UIApplicationsharedApplication];//app对象 UIScreen*screen = [UIScreenmainScreen];//屏幕 NSNotificationCenter*center = [NSNotificationCenterdefaultCenter];//通知中心 二、常用代理: 文本框:<UITextFieldDelegate> 文本视图:<UITextViewDelegate> 表格视图:<UITableViewDelegate>、<UITableViewDataSource> 集合视图:<UICollectionViewDelegate>、<UICollectionViewDatasource> 滚动视图:<UIScrollViewDelegate> 搜索栏:<UISearchBarDelegate>、<UISearchDisplayDelegate> 三、视图切换方式: 1、模态窗口(modal:模态) (1)控制器之间没有用segue联接时,获取要切换到的目的控制器和切换视图方法为: //获取所在的故事板 + (UIStoryboard *)storyboardWithName:(NSString *)name bundle:(NSBundle *)storyboardBundleOrNil; //故事板对象通过目的控制器的身份标识StoryBoardID获取目的控制器 - (id)instantiateViewControllerWithIdentifier:(NSString *)identifier; //在源控制器中显示目的控制器的模态窗口 - (void)presentViewController:(UIViewController*)viewControllerToPresent animated: (BOOL)flag completion:(void(^)(void))completion ; //在目的控制器中关闭当前控制器的模态窗口 - (void)dismissViewControllerAnimated:(BOOL)animated; 如下: 源控制器中: UIStoryboard *storyboard = [UIStoryboard storyboardWithName:@"Main" bundle:nil]; destinationViewController *desVC= [storyboard instantiateViewControllerWithIdentifier:@“deVC”]; [self presentViewController:desVC animate:YES completion:nil];//模态出目的控制器的窗口 目的控制器中: UIStoryBoard *storyboard = [UIStoryboard storyboardWithName:@“Main” bundle:nil]; resourceViewController *resVC = [storyboard instantiateViewControllerWithIdentifier:@“reVC”]; [self.presentingViewControllerdismissViewControllerAnimated:YES];//当前控制器关闭模态窗口 或者 (如果写self调用该方法,默认是self.presentingViewController调用该方法) [self dissmissViewControllerAnimated:YES] (2)控制器之间通过segue联接时,获取要切换到的目的控制器并切换视图方法为:在故事板中首先给segue设置identifier标识,然后再使用以下方法。 //触发某个事件时,可以直接根据segue的identifier跳转到目的控制器界面 - (void)performSegueWithIdentifier:(NSString *)identifier sender:(id)sender; //可以重写该方法,视图切换时,会自动调用该方法,可以用来正向传数据,也可以获取到目的控制器 - (void)prepareForSegue:(UIStoryboardSegue *)segue sender:(id)sender; 如下: 通过segue连接目的控制器后,假如segue的identifier的标识符为deVC,跳转视图为: [self performSegueWithIdentifier:deVC sender:self];//切换到目的控制的视图 视图切换时,重写该方法获取目的控制器和传数据,仍假如segue的identifier的标识符为deVC -(void)prepareForSugue:(UIStoryboardSegue *)identifier sender:(id)sender { if([segue.identifier isEqualToString:deVC]) { destinationViewController *desVC = segue.destinationViewController;//获取目的控制器 desVC.info = self.TextField.text;//将当前控制器的数据传到目的控制器中 } } 2、UINavigationController(push:入栈 pop:出栈):导航栏控制器 前提是必须先存在UINavigationController控制器容器,然后在它的底部添加一个根控制器,作为第一个显示的视图,如果接着显示其他视图,就将目的控制器压入栈即可,反之推出栈。 (1)控制器之间没有用segue联接时,获取要切换到的目的控制器和切换视图方法为: //获取所在的故事板 + (UIStoryboard *)storyboardWithName:(NSString*)name bundle:(NSBundle *)storyboardBundleOrNil; //故事板对象通过目的控制器的身份标识StoryBoardID获取目的控制器 - (id)instantiateViewControllerWithIdentifier:(NSString *)identifier; //将目的控制器压入栈,即显示目的控制器视图 - (void)pushViewController:(UIViewController *)viewController animated:(BOOL)animated; //将栈顶控制器推出栈,即显示它的前一个控制器的视图 - (UIViewController *)popViewControllerAnimated:(BOOL)animated; //返回指定的子控制器(即将它上面的控制器都推出栈,显示它的视图) - (NSArray *)popToViewController:(UIViewController *)viewController animated:(BOOL)animated; //返回根控制器(显示栈底的控制器的视图) - (NSArray*)popToRootViewControllerAnimated:(BOOL)animated; 如下: 源控制器中: UIStoryboard*storyboard = [UIStoryboardstoryboardWithName:@"Main"bundle:nil]; destinationViewController *desVC= [storyboard instantiateViewControllerWithIdentifier:@“deVC”]; [self.navigationController pushViewController:deVC animate:YES];//将目的控制器压入栈中,即显示 目的控制器中: [self.navigationController popViewControllerAnimated:YES];//将当前显示的视图的控制器推出栈中,即显示上一个控制器的视图 (2)控制器之间通过segue联接时,获取要切换到的目的控制器并切换视图方法为:在故事板中首先给segue设置identifier标识,然后再使用以下方法。 //触发某个事件时,可以直接根据segue的identifier跳转到目的控制器界面 - (void)performSegueWithIdentifier:(NSString *)identifier sender:(id)sender; //可以重写该方法,视图切换时,会自动调用该方法,可以用来正向传数据,也可以获取到目的控制器 - (void)prepareForSegue:(UIStoryboardSegue*)segue sender:(id)sender; 如下: 通过segue连接目的控制器后,假如segue的identifier的标识符为deVC,跳转视图为: [self performSegueWithIdentifier:deVC sender:self];//切换到目的控制的视图 视图切换时,重写该方法获取目的控制器和传数据,仍假如segue的identifier的标识符为deVC -(void)prepareForSugue:(UIStoryboardSegue *)identifier sender:(id)sender { if([segue.identifier isEqualToString:deVC]) { destinationViewController *desVC = segue.destinationViewController;//获取目的控制器 desVC.info = self.TextField.text;//将当前控制器的数据传到目的控制器中 } } 3、UITabBarController:标签栏控制器 •通过设置viewControllers属性或者addChildViewController方法可以添加子控制器 –NSArray*viewControllers –- (void)addChildViewController:(UIViewController*)childController •UIViewController的tabBarItem属性决定了UITabBar显示的内容 –使用系统自带的UITabBarItem样式: controller.tabBarItem = [[[UITabBarItem alloc]initWithTabBarSystemItem:UITabBarSystemItemSearch tag:1] autorelease]; –自己设置UITabBarItem的标题和图片: controller.tabBarItem.title = @”More”; // controller.title也可以用于设置标题 controller.tabBarItem.image = [UIImage imageNamed:@”more”]; –设置UITabBarItem右上角的红色数字 controller.tabBarItem.badgeValue = @”10”; 纯代码将下面的三个控制器加入tabBarController中,有如下两种方式: //[tabBarController addChildViewController:firstVC]; //[tabBarController addChildViewController:secondVC]; //[tabBarController addChildViewController:threeVC]; 或者: tabBarController.viewControllers = @[firstVC,secondVC,threeVc]; 程序猿神奇的手,每时每刻,这双手都在改变着世界的交互方式! 本文转自当天真遇到现实博客园博客,原文链接:http://www.cnblogs.com/XYQ-208910/p/4808135.html,如需转载请自行联系原作者

资源下载

更多资源
腾讯云软件源

腾讯云软件源

为解决软件依赖安装时官方源访问速度慢的问题,腾讯云为一些软件搭建了缓存服务。您可以通过使用腾讯云软件源站来提升依赖包的安装速度。为了方便用户自由搭建服务架构,目前腾讯云软件源站支持公网访问和内网访问。

Nacos

Nacos

Nacos /nɑ:kəʊs/ 是 Dynamic Naming and Configuration Service 的首字母简称,一个易于构建 AI Agent 应用的动态服务发现、配置管理和AI智能体管理平台。Nacos 致力于帮助您发现、配置和管理微服务及AI智能体应用。Nacos 提供了一组简单易用的特性集,帮助您快速实现动态服务发现、服务配置、服务元数据、流量管理。Nacos 帮助您更敏捷和容易地构建、交付和管理微服务平台。

Rocky Linux

Rocky Linux

Rocky Linux(中文名:洛基)是由Gregory Kurtzer于2020年12月发起的企业级Linux发行版,作为CentOS稳定版停止维护后与RHEL(Red Hat Enterprise Linux)完全兼容的开源替代方案,由社区拥有并管理,支持x86_64、aarch64等架构。其通过重新编译RHEL源代码提供长期稳定性,采用模块化包装和SELinux安全架构,默认包含GNOME桌面环境及XFS文件系统,支持十年生命周期更新。

Sublime Text

Sublime Text

Sublime Text具有漂亮的用户界面和强大的功能,例如代码缩略图,Python的插件,代码段等。还可自定义键绑定,菜单和工具栏。Sublime Text 的主要功能包括:拼写检查,书签,完整的 Python API , Goto 功能,即时项目切换,多选择,多窗口等等。Sublime Text 是一个跨平台的编辑器,同时支持Windows、Linux、Mac OS X等操作系统。

用户登录
用户注册
修改密码
忘记密码