Hadoop - Mac OSX下配置和启动hadoop以及常见错误解决
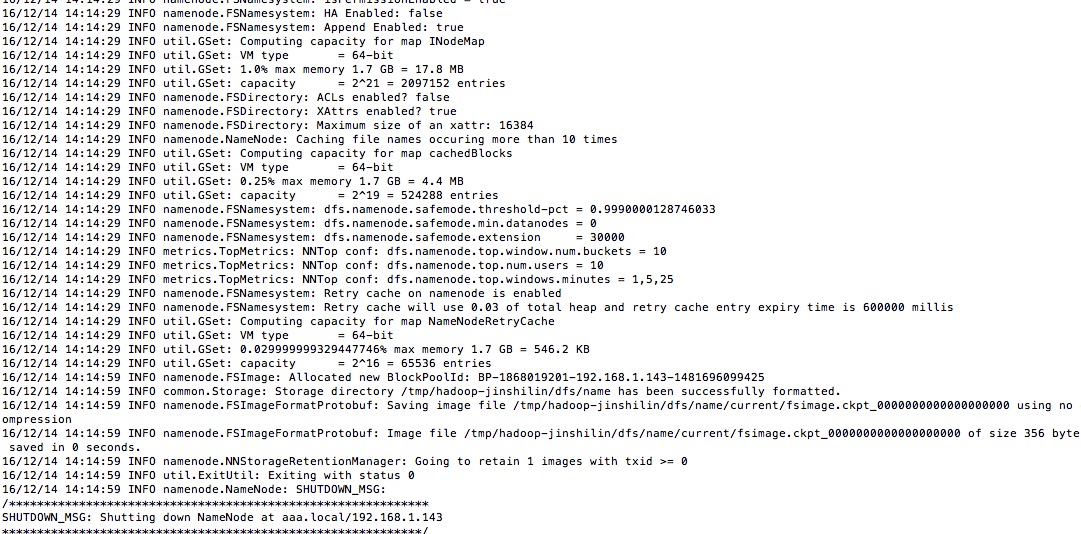
0. 安装JDK 参考网上教程在OSX下安装jdk 1. 下载及安装hadoop a) 下载地址: http://hadoop.apache.org b)配置ssh环境 在terminal里面输入: ssh localhost 如果有错误提示信息,表示当前用户没有权限。这个多半是系统为安全考虑,默认设置的。 更改设置如下:进入system preference --> sharing --> 勾选remote login,并设置allow access for all users。 再次输入“ssh localhost",再输入密码并确认之后,可以看到ssh成功。 c) ssh免登陆配置 命令行输入: ssh-keygen-tdsa-P''-f~/.ssh/id_dsa ssh-keygen表示生成秘钥;-t表示秘钥类型;-P用于提供密语;-f指定生成的秘钥文件。 这个命令在”~/.ssh/“文件夹下创建两个文件id_dsa和id_dsa.pub,是ssh的一对儿私钥和公钥。 接下来,将公钥追加到授权的key中去,输入: cat~/.ssh/id_dsa.pub>>~/.ssh/authorized_keys ******************************************************************************** 免密码登录localhost 1. ssh-keygen -t rsa Press enter for each line 提示输入直接按回车就好 2. cat ~/.ssh/id_rsa.pub >> ~/.ssh/authorized_keys 3. chmod og-wx ~/.ssh/authorized_keys 测试ssh localhost如果仍然提示要输入密码,那么可以vim ~/.ssh/config文件,添加以下代码。 Host localhost AddKeysToAgent yes UseKeychain yes IdentityFile ~/.ssh/id_rsa 测试ssh localhost,不再提示需要输入密码。 ******************************************************************************** d) 设置环境变量 在实际启动Hadoop之前,有三个文件需要进行配置。但在这之前,我们需要在我们的bash_profile中配置如下几个配置 命令行输入: open ~/.bash_profile; # hadoopexport HADOOP_HOME=/Users/YourUserName/Documents/Dev/hadoop-2.7.3export PATH=$PATH:$HADOOP_HOME/bin:$HADOOP_HOME/sbin e) 配置hadoop-env.sh 在${HADOOP_HOME}/etc/hadoop目录下,找到hadoop-env.sh,打开编辑确认如下设置是否正确: export JAVA_HOME=${JAVA_HOME} export HADOOP_HEAPSIZE=2000(去掉注释)export HADOOP_OPTS="-Djava.security.krb5.realm=OX.AC.UK -Djava.security.krb5.kdc=kdc0.ox.ac.uk:kdc1.ox.ac.uk"(去掉注释) f)配置core-site.xml——指定了NameNode的主机名与端口 <?xml version="1.0" encoding="UTF-8"?> <?xml-stylesheet type="text/xsl" href="configuration.xsl"?> <!-- Licensed under the Apache License, Version 2.0 (the "License"); you may not use this file except in compliance with the License. You may obtain a copy of the License at http://www.apache.org/licenses/LICENSE-2.0 Unless required by applicable law or agreed to in writing, software distributed under the License is distributed on an "AS IS" BASIS, WITHOUT WARRANTIES OR CONDITIONS OF ANY KIND, either express or implied. See the License for the specific language governing permissions and limitations under the License. See accompanying LICENSE file. --> <!-- Put site-specific property overrides in this file. --> <configuration> <property> <name>/Users/YourUserName/Documents/Dev/hadoop-2.7.3/hadoop-${user.name}</name> <value>hdfs://localhost:9000</value> <description>A base for other temporary directories.</description> </property> <property> <name>fs.default.name</name> <value>hdfs://localhost:8020</value> </property> </configuration> g)配置hdfs-site.xml——指定了HDFS的默认参数副本数,因为仅运行在一个节点上,所以这里的副本数为1 <?xml version="1.0" encoding="UTF-8"?> <?xml-stylesheet type="text/xsl" href="configuration.xsl"?> <!-- Licensed under the Apache License, Version 2.0 (the "License"); you may not use this file except in compliance with the License. You may obtain a copy of the License at http://www.apache.org/licenses/LICENSE-2.0 Unless required by applicable law or agreed to in writing, software distributed under the License is distributed on an "AS IS" BASIS, WITHOUT WARRANTIES OR CONDITIONS OF ANY KIND, either express or implied. See the License for the specific language governing permissions and limitations under the License. See accompanying LICENSE file. --> <!-- Put site-specific property overrides in this file. --> <configuration> <property> <name>dfs.replication</name> <value>1</value> </property> </configuration> h)配置mapred-site.xml——指定了JobTracker的主机名与端口 <?xml version="1.0"?> <?xml-stylesheet type="text/xsl" href="configuration.xsl"?> <!-- Licensed under the Apache License, Version 2.0 (the "License"); you may not use this file except in compliance with the License. You may obtain a copy of the License at http://www.apache.org/licenses/LICENSE-2.0 Unless required by applicable law or agreed to in writing, software distributed under the License is distributed on an "AS IS" BASIS, WITHOUT WARRANTIES OR CONDITIONS OF ANY KIND, either express or implied. See the License for the specific language governing permissions and limitations under the License. See accompanying LICENSE file. --> <!-- Put site-specific property overrides in this file. --> <configuration> <property> <name>mapred.job.tracker</name> <value>hdfs://localhost:9001</value> </property> <property> <name>mapred.tasktracker.map.tasks.maximum</name> <value>2</value> </property> <property> <name>mapred.tasktracker.reduce.tasks.maximum</name> <value>2</value> </property> </configuration> i)安装HDFS 经过以上的配置,就可以进行HDFS的安装了 命令行输入: cd $HADOOP_HOME/bin hadoop namenode -format 如果出现下图,说明你的HDFS已经安装成功了 j)启动Hadoop cd ${HADOOP_HOME}/sbin start-dfs.sh start-yarn.sh k) 验证hadoop 如果在启动过程中没有发生任何错误 启动完成之后,在命令行输入: jps 如果结果如下: 3761 DataNode4100 Jps3878 SecondaryNameNode3673 NameNode4074 NodeManager3323 ResourceManager 以上几个节点都打印出来,那么恭喜你,你已经成功安装和启动hadoop了! 最后,我们可以在浏览器通过http的方式进行验证 浏览器输入: http://localhost:8088/ 结果如下: 浏览器输入: http://localhost:50070/ 结果如下: 2. 常见错误解决 hadoop namenode不能启动 org.apache.hadoop.hdfs.server.common.InconsistentFSStateException: Directory /tmp/hadoop-javoft/dfs/name is in an inconsistent state: storage di rectory does not exist or is not accessible. 原因在于core-site.xml你必须覆盖hadoop.tmp.dir为你自己的hadoop目录... hadoop.tmp.dir /home/javoft/Documents/hadoop/hadoop-${user.name}