首页 文章 精选 留言 我的

精选列表

搜索[匹配算法],共10000篇文章
优秀的个人博客,低调大师

spark ML算法之线性回归使用

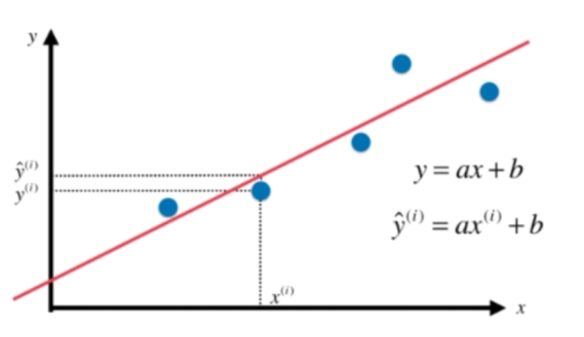
版权声明:本文由董可伦首发于https://dongkelun.com,非商业转载请注明作者及原创出处。商业转载请联系作者本人。 https://blog.csdn.net/dkl12/article/details/80259410 我的原创地址:https://dongkelun.com/2018/04/09/sparkMlLinearRegressionUsing/ 前言 本文是讲如何使用spark ml进行线性回归,不涉及线性回归的原理。 1、数据格式 1.1 普通标签格式 1.1.1 格式为: 标签,特征值1 特征值2 特征值3... 1,1.9 2,3.1 3,4 3.5,4.45 4,5.02 9,9.97 -2,-0.98 1.1.2 spark 读取 1、Rdd 旧版(mllib)的线性回归要求传入的参数类型为RDD[LabeledPoint] import org.apache.spark.SparkConf import org.apache.spark.SparkContext import org.apache.spark.mllib.linalg.Vectors import org.apache.spark.mllib.regression.LabeledPoint val data_path = "files/ml/linear_regression_data1.txt" val data = sc.textFile(data_path) val training = data.map { line => val arr = line.split(',') LabeledPoint(arr(0).toDouble, Vectors.dense(arr(1).split(' ').map(_.toDouble))) }.cache() training.foreach(println) 结果: (1.0,[1.9]) (2.0,[3.1]) (3.0,[4.0]) (3.5,[4.45]) (4.0,[5.02]) (9.0,[9.97]) (-2.0,[-0.98]) 一共有两列,第一列可以通过.label获得(类型为Double),第二列可以通过.features获得(类型为Vector[Double]) 2、 DataFrame 新版(ml)的线性回归要求传入的参数类型为Dataset[_] import org.apache.spark.ml.linalg.Vectors import org.apache.spark.sql.Row import spark.implicits._ val data_path = "files/ml/linear_regression_data1.txt" val data = spark.read.text(data_path) val training = data.map { case Row(line: String) => var arr = line.split(',') (arr(0).toDouble, Vectors.dense(arr(1).split(' ').map(_.toDouble))) }.toDF("label", "features") training.show() 结果: +-----+--------+ |label|features| +-----+--------+ | 1.0| [1.9]| | 2.0| [3.1]| | 3.0| [4.0]| | 3.5| [4.45]| | 4.0| [5.02]| | 9.0| [9.97]| | -2.0| [-0.98]| +-----+--------+ 其中列名”label”, “features”固定,不能改为其他列名。 1.2 LIBSVM格式 1.2.1 格式为: label index1:value1 index2:value2 ... 其中每一行的index必须为升序 为了便于理解,造几条多维数据: 1 1:1.9 2:2 4:2 100:3 101:6 2 1:3.1 2:2 4:2 100:3 101:6 3 1:4 2:2 4:2 100:3 101:6 3.5 1:4.45 2:2 4:2 100:3 101:6 4 1:5.02 2:2 4:2 100:3 101:6 9 1:9.97 4:2 100:3 101:6 -2 1:-0.98 2:2 4:2 100:3 201:6 1.2.2 spark 读取 1、Rdd import org.apache.spark.SparkConf import org.apache.spark.SparkContext import org.apache.spark.mllib.util.MLUtils val data_path = "files/ml/linear_regression_data2.txt" val training = MLUtils.loadLibSVMFile(sc, data_path) training.foreach(println) 结果: (1.0,(201,[0,1,3,99,100],[1.9,2.0,2.0,3.0,6.0])) (2.0,(201,[0,1,3,99,100],[3.1,2.0,2.0,3.0,6.0])) (3.0,(201,[0,1,3,99,100],[4.0,2.0,2.0,3.0,6.0])) (3.5,(201,[0,1,3,99,100],[4.45,2.0,2.0,3.0,6.0])) (4.0,(201,[0,1,3,99,100],[5.02,2.0,2.0,3.0,6.0])) (9.0,(201,[0,3,99,100],[9.97,2.0,3.0,6.0])) (-2.0,(201,[0,1,3,99,200],[-0.98,2.0,2.0,3.0,6.0])) 返回类型为RDD[LabeledPoint],其中第一列为label,第二列vector的第一个值为max(index),第二个index-1组成的数组,第三个为value组成的数组。 2、DataFrame val data_path = "files/ml/linear_regression_data2.txt" val data = spark.read.text(data_path) val training = spark.read.format("libsvm").load(data_path) training.show(false) 结果: +-----+--------------------------------------------+ |label|features | +-----+--------------------------------------------+ |1.0 |(201,[0,1,3,99,100],[1.9,2.0,2.0,3.0,6.0]) | |2.0 |(201,[0,1,3,99,100],[3.1,2.0,2.0,3.0,6.0]) | |3.0 |(201,[0,1,3,99,100],[4.0,2.0,2.0,3.0,6.0]) | |3.5 |(201,[0,1,3,99,100],[4.45,2.0,2.0,3.0,6.0]) | |4.0 |(201,[0,1,3,99,100],[5.02,2.0,2.0,3.0,6.0]) | |9.0 |(201,[0,3,99,100],[9.97,2.0,3.0,6.0]) | |-2.0 |(201,[0,1,3,99,200],[-0.98,2.0,2.0,3.0,6.0])| +-----+--------------------------------------------+ 2、线性回归代码 2.1 数据 用libsvm格式的数据: 1 1:1.9 2 1:3.1 3 1:4 3.5 1:4.45 4 1:5.02 9 1:9.97 -2 1:-0.98 2.2 旧版代码 package com.dkl.leanring.spark.ml import org.apache.log4j.{ Level, Logger } import org.apache.spark.{ SparkConf, SparkContext } import org.apache.spark.mllib.regression.LinearRegressionWithSGD import org.apache.spark.mllib.util.MLUtils import org.apache.spark.mllib.regression.LabeledPoint import org.apache.spark.mllib.linalg.Vectors import org.apache.spark.mllib.regression.LinearRegressionModel object OldLinearRegression { def main(args: Array[String]) { // 构建Spark对象 val conf = new SparkConf().setAppName("OldLinearRegression").setMaster("local") val sc = new SparkContext(conf) Logger.getRootLogger.setLevel(Level.WARN) //读取样本数据 val data_path = "files/ml/linear_regression_data3.txt" val training = MLUtils.loadLibSVMFile(sc, data_path) val numTraing = training.count() // 新建线性回归模型,并设置训练参数 val numIterations = 10000 val stepSize = 0.5 val miniBatchFraction = 1.0 //书上的代码 intercept 永远为0 //val model = LinearRegressionWithSGD.train(examples, numIterations, stepSize, miniBatchFraction) var lr = new LinearRegressionWithSGD().setIntercept(true) lr.optimizer.setNumIterations(numIterations).setStepSize(stepSize).setMiniBatchFraction(miniBatchFraction) val model = lr.run(training) println(model.weights) println(model.intercept) // 对样本进行测试 val prediction = model.predict(training.map(_.features)) val predictionAndLabel = prediction.zip(training.map(_.label)) val print_predict = predictionAndLabel.take(20) println("prediction" + "\t" + "label") for (i <- 0 to print_predict.length - 1) { println(print_predict(i)._1 + "\t" + print_predict(i)._2) } // 计算测试误差 val loss = predictionAndLabel.map { case (p, l) => val err = p - l err * err }.reduce(_ + _) val rmse = math.sqrt(loss / numTraing) println(s"Test RMSE = $rmse.") } } 其中注释的第30行代码为书上的写法,但这样写intercept一直为0,也就是只适用于y=a*x的形式,不适用于y=ax+b,改为31、32替代即可。 结果: [0.992894785953067] -0.9446037936869749 prediction label 0.9418962996238525 1.0 2.133370042767533 2.0 3.0269753501252934 3.0 3.473778003804174 3.5 4.039728031797421 4.0 8.954557222265104 9.0 -1.9176406839209805 -2.0 Test RMSE = 0.06866615969192089. 即a=0.992894785953067,b=-0.9446037936869749,y=0.992894785953067*x-0.9446037936869749 2.2 新版代码 package com.dkl.leanring.spark.ml import org.apache.spark.ml.regression.LinearRegression import org.apache.spark.sql.SparkSession object NewLinearRegression { def main(args: Array[String]): Unit = { val spark = SparkSession .builder .appName("NewLinearRegression") .master("local") .getOrCreate() val data_path = "files/ml/linear_regression_data3.txt" import spark.implicits._ import org.apache.spark.ml.linalg.Vectors import org.apache.spark.sql.Row val training = spark.read.format("libsvm").load(data_path) val lr = new LinearRegression() .setMaxIter(10000) .setRegParam(0.3) .setElasticNetParam(0.8) val lrModel = lr.fit(training) println(s"Coefficients: ${lrModel.coefficients} Intercept: ${lrModel.intercept}") val trainingSummary = lrModel.summary println(s"numIterations: ${trainingSummary.totalIterations}") println(s"objectiveHistory: [${trainingSummary.objectiveHistory.mkString(",")}]") trainingSummary.residuals.show() println(s"RMSE: ${trainingSummary.rootMeanSquaredError}") println(s"r2: ${trainingSummary.r2}") trainingSummary.predictions.show() spark.stop() } } 结果: Coefficients: [0.9072296333951224] Intercept: -0.630360819004294 numIterations: 3 objectiveHistory: [0.5,0.41543560544030766,0.08269406021049913] +--------------------+ | residuals| +--------------------+ | -0.0933754844464385| |-0.18205104452058585| |0.001442285423804...| | 0.09318895039599973| | 0.07606805936077965| | 0.5852813740549223| | -0.4805541402684861| +--------------------+ RMSE: 0.2999573166705823 r2: 0.9906296595124621 +-----+---------------+------------------+ |label| features| prediction| +-----+---------------+------------------+ | 1.0| (1,[0],[1.9])|1.0933754844464385| | 2.0| (1,[0],[3.1])| 2.182051044520586| | 3.0| (1,[0],[4.0])|2.9985577145761955| | 3.5| (1,[0],[4.45])|3.4068110496040003| | 4.0| (1,[0],[5.02])|3.9239319406392204| | 9.0| (1,[0],[9.97])| 8.414718625945078| | -2.0|(1,[0],[-0.98])|-1.519445859731514| +-----+---------------+------------------+

优秀的个人博客,低调大师

BMH子串查找算法(PHP实现)

代码 interface StringSearchable { public function search($substring, $buffer); } class BoyerMooreStringSearch implements StringSearchable { public $substring = null; public $buffer = ''; public $jumpTable = array(); protected $results = array(); public function __construct() { } public function __destruct() { } public function search($substring, $buffer) { $this->results = array(); $this->substring = $substring; $this->buffer = $buffer; $this->deriveJumpTable(); $substringLen = strlen($this->substring); $currentCharIndex = $substringLen - 1; $bufferLen = strlen($this->buffer); while ($currentCharIndex < $bufferLen) { for ($i = $substringLen - 1; $i >= 0; $i--) { if ($this->buffer[$currentCharIndex - $substringLen + $i + 1] == $this->substring[$i]) { if ($i == 0) { $this->results[] = $currentCharIndex - $substringLen; $currentCharIndex += $this->getJumpLength($this->buffer[$currentCharIndex]); } else { continue; } } else { $currentCharIndex += $this->getJumpLength($this->buffer[$currentCharIndex]); break; } } } return (sizeof($this->results) > 0); } protected function deriveJumpTable() { $maxJump = strlen($this->substring); for ($i = strlen($this->substring) - 2; $i >= 0; $i--) { if (!array_key_exists($this->substring[$i], $this->jumpTable)) { $this->jumpTable[$this->substring[$i]]] = $maxJump - $i -1; } } } public function getJumpTable() { return $this->jumpTable; } public function getResults() { return $this->results; } public function getResultsCount() { return sizeof($this->results); } public function getJumpLength($charIndex) { if (array_key_exists($charIndex, $this->jumpTable)) { return $this->jumpTable[$charIndex]; } else { return strlen($this->substring); } } } function Main() { $poem = <<<POEM you son of bitch god damn it hey,god love me POEM; $bm = new BoyerMooreStringSearch(); $bm->search('god', $poem); $count = $bm->getResultsCount; echo $count; } 复制代码 本文转自Phinecos(洞庭散人)博客园博客,原文链接:http://www.cnblogs.com/phinecos/archive/2010/04/21/1717668.html,如需转载请自行联系原作者

优秀的个人博客,低调大师

ES设置查询的相似度算法

similarity Elasticsearch allows you to configure a scoring algorithm orsimilarityper field. Thesimilaritysetting provides a simple way of choosing a similarity algorithm other than the defaultBM25, such asTF/IDF. Similarities are mostly useful fortextfields, but can also apply to other field types. Custom similarities can be configured by tuning the parameters of the built-in similarities. For more details about this expert options, see thesimilarity module. The only similarities which can be used out of the box, without any further configuration are: BM25 The Okapi BM25 algorithm. The algorithm used by default in Elasticsearch and Lucene. See Pluggable Similarity Algorithmsfor more information. classic The TF/IDF algorithm which used to be the default in Elasticsearch and Lucene. See Lucene’s Practical Scoring Functionfor more information. boolean A simple boolean similarity, which is used when full-text ranking is not needed and the score should only be based on whether the query terms match or not. Boolean similarity gives terms a score equal to their query boost. Thesimilaritycan be set on the field level when a field is first created, as follows: PUT my_index { "mappings": { "my_type": { "properties": { "default_field": { "type": "text" }, "classic_field": { "type": "text", "similarity": "classic" }, "boolean_sim_field": { "type": "text", "similarity": "boolean" } } } } } COPY AS CURL VIEW IN CONSOLE Thedefault_fielduses theBM25similarity. Theclassic_fielduses theclassicsimilarity (ie TF/IDF). Theboolean_sim_fielduses thebooleansimilarity. Default and Base Similarities By default, Elasticsearch will use whatever similarity is configured asdefault. However, the similarity functionsqueryNorm()andcoord()are not per-field. Consequently, for expert users wanting to change the implementation used for these two methods, while not changing thedefault, it is possible to configure a similarity with the namebase. This similarity will then be used for the two methods. You can change the default similarity for all fields in an index when it iscreated: PUT /my_index { "settings": { "index": { "similarity": { "default": { "type": "classic" } } } } } If you want to change the default similarity after creating the index you mustcloseyour index, send the follwing request andopenit again afterwards: PUT /my_index/_settings { "settings": { "index": { "similarity": { "default": { "type": "classic" } } } } } from:https://www.elastic.co/guide/en/elasticsearch/reference/5.4/index-modules-similarity.html 本文转自张昺华-sky博客园博客,原文链接:http://www.cnblogs.com/bonelee/p/7451929.html,如需转载请自行联系原作者

优秀的个人博客,低调大师

Elasticsearch mapping文档相似性算法

Elasticsearch allows you to configure a scoring algorithm orsimilarityper field. Thesimilaritysetting provides a simple way of choosing a similarity algorithm other than the default TF/IDF, such asBM25. Similarities are mostly useful fortextfields, but can also apply to other field types. Custom similarities can be configured by tuning the parameters of the built-in similarities. For more details about this expert options, see thesimilarity module. The only similarities which can be used out of the box, without any further configuration are: BM25 The Okapi BM25 algorithm. The algorithm used by default in Elasticsearch and Lucene. See Pluggable Similarity Algorithmsfor more information. classic The TF/IDF algorithm which used to be the default in Elasticsearch and Lucene. See Lucene’s Practical Scoring Functionfor more information. Thesimilaritycan be set on the field level when a field is first created, as follows: PUT my_index { "mappings": { "my_type": { "properties": { "default_field": { "type": "text" }, "classic_field": { "type": "text", "similarity": "classic" } } } } } COPY AS CURL VIEW IN CONSOLE Thedefault_fielduses theBM25similarity. Theclassic_fielduses theclassicsimilarity (ie TF/IDF). 参考:https://www.elastic.co/guide/en/elasticsearch/reference/current/similarity.html 本文转自张昺华-sky博客园博客,原文链接:http://www.cnblogs.com/bonelee/p/6472719.html,如需转载请自行联系原作者

优秀的个人博客,低调大师

妙趣横生的算法--顺序表

静态表 题目:创建一个静态的顺序表存放整数,大小为10,完成以下的操作。 (1)输入6个整数,打印出顺序表的内容,并显示表中的剩余空间个数。 (2)在顺序表中的第3个位置插入0,打印出顺序表中的内容,并显示表中剩余的空间个数。 (3)再试图插入表中第11个位置整数0,程序提示超出范围。 (4)删除表中第6个元素,打印出顺序表中的内容,并表示表中剩余的空间个数。 #include "stdio.h" #define MaxSize 10 /*静态顺序表的各种操作*/ /** 向顺序表中插入元素 */ /** 参数Sqlist:表首地址 */ /** 参数*len: 表的长度 */ /** 参数i: 插入元素的位置 */ /** 参数x:待插入的元素值 */ void insertElem(int Sqlist[],int *len,int i,int x) { int t; if(*len==MaxSize || i<1 || i>*len+1) { printf("This insert is illegal\n"); return; } /*非法插入*/ for(t=*len-1;t>=i-1;t--) Sqlist[t+1]=Sqlist[t];//插入位置之后的元素往后面推 Sqlist[i-1]=x; /*插入元素*/ *len=*len+1; /*表长加1*/ } /** 向顺序表中删除元素 */ /** 参数Sqlist:表首地址 */ /** 参数*len: 表的长度 */ /** 参数i: 插入元素的位置 */ void DelElem(int Sqlist[],int *len,int i) { int j; if(i<1 || i>*len) { printf("This insert is illegal"); return; } /*非法插入*/ for(j=i;j<=*len-1;j++) Sqlist[j-1]=Sqlist[j]; //将删除元素后面的元素往前移动 *len=*len-1; /*表长减1*/ } /**测试函数*/ main() { /*按照题目要求进行测试*/ int Sqlist[MaxSize]; /*定义一个静态顺序表*/ int len; int i; for(i=0;i<6;i++) scanf("%d",&Sqlist[i]); /*从键盘输入6个整数*/ len=6; for(i=0;i<len;i++) printf("%d ",Sqlist[i]); /*输出顺序表中的6个整数*/ printf("\nThe spare length is %d\n",MaxSize - len); /*显示表中的剩余空间*/ insertElem(Sqlist,&len,3,0); /*在表中第3位置插入整数0*/ for(i=0;i<len;i++) printf("%d ",Sqlist[i]); /*输出顺序表中的所有元素*/ printf("\nThe spare length is %d\n",MaxSize - len); /*显示表中的剩余空间*/ insertElem(Sqlist,&len,11,0); /*在表中第11位置插入整数0*/ DelElem(Sqlist,&len,6); /*删除顺序表中的第6个元素*/ for(i=0;i<len;i++) printf("%d ",Sqlist[i]); /*输出顺序表中的所有元素*/ printf("\nThe spare length is %d\n",MaxSize - len); /*显示表中的剩余空间*/ } 动态表 编写一个程序,动态的创建一个顺序表。要求:顺序表初始长度为10,向顺序表中输入15个整数,并打印出来;再检出顺序表中的第5个元素,打印出来删除后的结果。 #include "stdio.h" #include "conio.h" #include "stdlib.h" #define MaxSize 10 typedef int ElemType ; /*将int定义为ElemType*/ typedef struct{ int *elem;//元素 int length;//长度 int listsize; //内存 } Sqlist; /** 初始化一个顺序表 */ /** 参数L:Sqlist类型的指针 */ void initSqlist(Sqlist *L){ L->elem=(int *)malloc(MaxSize*sizeof(ElemType)); if(!L->elem) exit(0);//没有创建成功 L->length=0; L->listsize= MaxSize; } /** 向顺序表中插入元素 */ /** 参数L:Sqlist类型的指针 */ /** 参数i:插入元素的位置 */ /** 参数item:插入的元素 */ void InsertElem(Sqlist *L,int i,ElemType item){ /*向顺序表L中第i个位置上插入元素item*/ ElemType *base,* insertPtr,*p; if(i<1||i>L->length+1) exit(0);//防止过量插入 if(L->length>=L->listsize) { base=(ElemType*)realloc(L->elem,(L->listsize+10)*sizeof(ElemType));//重新分配内存空间 L->elem=base;//传首地址 L->listsize=L->listsize+100; } insertPtr=&(L->elem[i-1]);//将要删除的地址赋值 for(p=&(L->elem[L->length-1]);p>= insertPtr;p--)//以地址来判断 *(p+1)=*p;//往后面移 * insertPtr=item; L->length++;//长度增加 } /** 从顺序表中删除元素 */ /** 参数L:Sqlist类型的指针 */ /** 参数i:删除元素的位置 */ void DelElem(Sqlist *L,int i) { /*从顺序表L中删除第i个元素*/ ElemType *delItem, *q; if(i<1||i>L->length) exit(0);//防止没有那个位置的删除 delItem=&(L->elem[i-1]);//穿要删除的地址 q=L->elem+L->length-1 ;//这里的-1没有理解非常深刻,后面是<=,那么这里的-1应该是可有可无的 for(++delItem; delItem<=q;++ delItem)*( delItem-1)=* delItem;//往前面移 L->length--;//长度减小 } /** 测试函数 */ main() { Sqlist l; int i; initSqlist(&l); /*初始化一个顺序表*/ for(i=0;i<15;i++) InsertElem(&l,i+1,i+1); /*向顺序表中插入1……15*/ printf("\nThe content of the list is\n"); for(i=0;i<l.length;i++) printf("%d ",l.elem[i]);/*打印出顺序表中的内容*/ DelElem(&l,5); /*删除第5个元素,即5*/ printf("\nDelete the fifth element\n"); for(i=0;i<l.length;i++) /*打印出删除后的结果*/ printf("%d ",l.elem[i]); getche(); } 顺序表个人敲了一遍代码之后能够理解了,但是还是有些细节不够明白哈。希望大概能看懂,上面也写的有注释。 本文转自我爱物联网博客园博客,原文链接:http://www.cnblogs.com/yydcdut/p/3663792.html,如需转载请自行联系原作者

资源下载

更多资源
腾讯云软件源

腾讯云软件源

为解决软件依赖安装时官方源访问速度慢的问题,腾讯云为一些软件搭建了缓存服务。您可以通过使用腾讯云软件源站来提升依赖包的安装速度。为了方便用户自由搭建服务架构,目前腾讯云软件源站支持公网访问和内网访问。

Nacos

Nacos

Nacos /nɑ:kəʊs/ 是 Dynamic Naming and Configuration Service 的首字母简称,一个易于构建 AI Agent 应用的动态服务发现、配置管理和AI智能体管理平台。Nacos 致力于帮助您发现、配置和管理微服务及AI智能体应用。Nacos 提供了一组简单易用的特性集,帮助您快速实现动态服务发现、服务配置、服务元数据、流量管理。Nacos 帮助您更敏捷和容易地构建、交付和管理微服务平台。

Spring

Spring

Spring框架(Spring Framework)是由Rod Johnson于2002年提出的开源Java企业级应用框架,旨在通过使用JavaBean替代传统EJB实现方式降低企业级编程开发的复杂性。该框架基于简单性、可测试性和松耦合性设计理念,提供核心容器、应用上下文、数据访问集成等模块,支持整合Hibernate、Struts等第三方框架,其适用范围不仅限于服务器端开发,绝大多数Java应用均可从中受益。

Rocky Linux

Rocky Linux

Rocky Linux(中文名:洛基)是由Gregory Kurtzer于2020年12月发起的企业级Linux发行版,作为CentOS稳定版停止维护后与RHEL(Red Hat Enterprise Linux)完全兼容的开源替代方案,由社区拥有并管理,支持x86_64、aarch64等架构。其通过重新编译RHEL源代码提供长期稳定性,采用模块化包装和SELinux安全架构,默认包含GNOME桌面环境及XFS文件系统,支持十年生命周期更新。

用户登录
用户注册