Netty(一):server启动流程解析
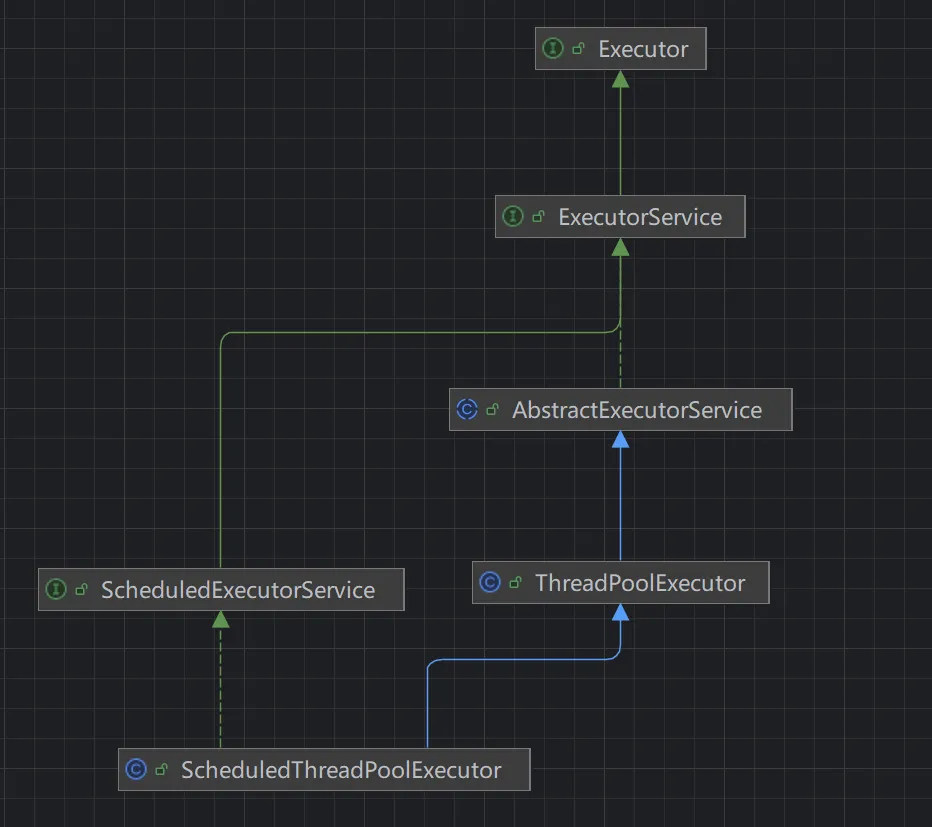
netty作为一个被广泛应用的通信框架,有必要我们多了解一点。 实际上netty的几个重要的技术亮点: 1. reactor的线程模型; 2. 安全有效的nio非阻塞io模型应用; 3. pipeline流水线式的灵活处理过程; 4. channelHandler的灵活实现; 5. 提供许多开箱即用的处理器和编解码器; 我们可以从这些点去深入理解其过人之处。 1. 一个NettyServer的demo 要想深入理解某个框架,一般还是要以demo作为一个抓手点的。以下,我们可以看到一个简单的nettyServer的创建过程,即netty的quick start样例吧。 @Slf4j public class NettyServerHelloApplication { /** * 一个server的样例 */ public static void main(String[] args) throws Exception { // 1. 创建对应的EventLoop线程池备用, 分bossGroup和workerGroup EventLoopGroup bossGroup = new NioEventLoopGroup(1); EventLoopGroup workerGroup = new NioEventLoopGroup(4); try { // 2. 创建netty对应的入口核心类 ServerBootstrap ServerBootstrap b = new ServerBootstrap(); // 3. 设置server的各项参数,以及应用处理器 b.group(bossGroup, workerGroup) .channel(NioServerSocketChannel.class) .option(ChannelOption.SO_BACKLOG, 100) // 设置tcp协议的请求等待队列 .childHandler(new ChannelInitializer<SocketChannel>() { @Override public void initChannel(SocketChannel ch) throws Exception { // 3.2. 最重要的,将各channelHandler绑定到netty的上下文中(暂且这么说吧) ChannelPipeline p = ch.pipeline(); p.addLast(new LoggingHandler(LogLevel.INFO)); p.addLast("encoder", new MessageEncoder()); p.addLast("decoder", new MessageDecoder()); p.addLast(new EchoServerHandler()); } }); // 4. 绑定tcp端口开启服务端监听, sync() 保证执行完成所有任务 ChannelFuture f = b.bind(ServerConstant.PORT).sync(); // 5. 等待关闭信号,让业务线程去服务业务了 f.channel().closeFuture().sync(); } finally { // 6. 收到关闭信号后,优雅关闭server的线程池,保护应用 bossGroup.shutdownGracefully(); workerGroup.shutdownGracefully(); } } } 以上,就是一个简版的nettyServer的整个框架了,这也基本上整个nettyServer的编程范式了。主要即分为这么几步: 1. 创建对应的EventLoop线程池备用, 分bossGroup和workerGroup; 2. 创建netty对应的入口核心类 ServerBootstrap; 3. 设置server的各项参数,以及应用处理器(必备的channelHandler业务接入过程); 4. 绑定tcp端口开启服务端监听; 5. 等待关闭信号,让业务线程去服务业务了; 6. 收到关闭信号后,优雅关闭server的线程池,保护应用; 事实上,如果我们直接基于jdk提供的ServerSocketChannel是否也差不了多少呢?是的,至少表面看起来是的,但我们要处理许多的异常情况,且可能面对变化繁多的业务类型。又该如何呢? 毕竟一个框架的成功,绝非偶然。下面我们就这几个过程来看看netty都是如何处理的吧! 2. EventLoop 的创建 EventLoop 直译为事件循环,但在这里我们也可以理解为一个线程池,因为所有的事件都是提交给其处理的。那么,它倒底是个什么样的循环呢? 首先来看下其类继承情况: 从类图可以看出,EventLoop也是一个executor或者说线程池的实现,它们也许有相通之处。 // 调用方式如下 EventLoopGroup bossGroup = new NioEventLoopGroup(1); EventLoopGroup workerGroup = new NioEventLoopGroup(4); // io.netty.channel.nio.NioEventLoopGroup#NioEventLoopGroup(int, java.util.concurrent.ThreadFactory) /** * Create a new instance using the specified number of threads, the given {@link ThreadFactory} and the * {@link SelectorProvider} which is returned by {@link SelectorProvider#provider()}. */ public NioEventLoopGroup(int nThreads, ThreadFactory threadFactory) { this(nThreads, threadFactory, SelectorProvider.provider()); } public NioEventLoopGroup( int nThreads, Executor executor, final SelectorProvider selectorProvider) { this(nThreads, executor, selectorProvider, DefaultSelectStrategyFactory.INSTANCE); } public NioEventLoopGroup(int nThreads, Executor executor, final SelectorProvider selectorProvider, final SelectStrategyFactory selectStrategyFactory) { super(nThreads, executor, selectorProvider, selectStrategyFactory, RejectedExecutionHandlers.reject()); } // io.netty.channel.MultithreadEventLoopGroup#MultithreadEventLoopGroup(int, java.util.concurrent.Executor, java.lang.Object...) protected MultithreadEventLoopGroup(int nThreads, Executor executor, Object... args) { // 默认线程是 cpu * 2 super(nThreads == 0 ? DEFAULT_EVENT_LOOP_THREADS : nThreads, executor, args); } // io.netty.util.concurrent.MultithreadEventExecutorGroup#MultithreadEventExecutorGroup(int, java.util.concurrent.Executor, java.lang.Object...) /** * Create a new instance. * * @param nThreads the number of threads that will be used by this instance. * @param executor the Executor to use, or {@code null} if the default should be used. * @param args arguments which will passed to each {@link #newChild(Executor, Object...)} call */ protected MultithreadEventExecutorGroup(int nThreads, Executor executor, Object... args) { this(nThreads, executor, DefaultEventExecutorChooserFactory.INSTANCE, args); } // io.netty.util.concurrent.MultithreadEventExecutorGroup#MultithreadEventExecutorGroup(int, java.util.concurrent.Executor, io.netty.util.concurrent.EventExecutorChooserFactory, java.lang.Object...) /** * Create a new instance. * * @param nThreads the number of threads that will be used by this instance. * @param executor the Executor to use, or {@code null} if the default should be used. * @param chooserFactory the {@link EventExecutorChooserFactory} to use. * @param args arguments which will passed to each {@link #newChild(Executor, Object...)} call */ protected MultithreadEventExecutorGroup(int nThreads, Executor executor, EventExecutorChooserFactory chooserFactory, Object... args) { if (nThreads <= 0) { throw new IllegalArgumentException(String.format("nThreads: %d (expected: > 0)", nThreads)); } // 创建一个执行器,该执行器每提交一个任务,就创建一个线程来运行,即并没有队列的概念 if (executor == null) { executor = new ThreadPerTaskExecutor(newDefaultThreadFactory()); } // 使用一个数组来保存整个可用的线程池 children = new EventExecutor[nThreads]; for (int i = 0; i < nThreads; i ++) { boolean success = false; try { // 为每个child创建一个线程运行, 该方法由子类实现 children[i] = newChild(executor, args); success = true; } catch (Exception e) { // TODO: Think about if this is a good exception type throw new IllegalStateException("failed to create a child event loop", e); } finally { if (!success) { // 如果创建失败,则把已经创建好的线程池关闭掉 // 不过值得注意的是,当某个线程池创建失败后,并没有立即停止后续创建工作,即无 return 操作,这是为啥? // 实际上,发生异常时,Exeception 已经被抛出,此处无需关注 for (int j = 0; j < i; j ++) { children[j].shutdownGracefully(); } for (int j = 0; j < i; j ++) { EventExecutor e = children[j]; try { while (!e.isTerminated()) { e.awaitTermination(Integer.MAX_VALUE, TimeUnit.SECONDS); } } catch (InterruptedException interrupted) { // Let the caller handle the interruption. Thread.currentThread().interrupt(); break; } } } } } // 创建选择器,猜测是做负载均衡时使用 // 此处的chooser默认是 DefaultEventExecutorChooserFactory chooser = chooserFactory.newChooser(children); final FutureListener<Object> terminationListener = new FutureListener<Object>() { @Override public void operationComplete(Future<Object> future) throws Exception { if (terminatedChildren.incrementAndGet() == children.length) { terminationFuture.setSuccess(null); } } }; for (EventExecutor e: children) { e.terminationFuture().addListener(terminationListener); } Set<EventExecutor> childrenSet = new LinkedHashSet<EventExecutor>(children.length); Collections.addAll(childrenSet, children); readonlyChildren = Collections.unmodifiableSet(childrenSet); } // io.netty.channel.nio.NioEventLoopGroup#newChild @Override protected EventLoop newChild(Executor executor, Object... args) throws Exception { // 注意此处的参数类型是由外部进行保证的,在此直接做强转操作 return new NioEventLoop(this, executor, (SelectorProvider) args[0], ((SelectStrategyFactory) args[1]).newSelectStrategy(), (RejectedExecutionHandler) args[2]); } // io.netty.channel.nio.NioEventLoop#NioEventLoop NioEventLoop(NioEventLoopGroup parent, Executor executor, SelectorProvider selectorProvider, SelectStrategy strategy, RejectedExecutionHandler rejectedExecutionHandler) { // 此构造器会做很多事,比如创建队列,开启nio selector... super(parent, executor, false, DEFAULT_MAX_PENDING_TASKS, rejectedExecutionHandler); if (selectorProvider == null) { throw new NullPointerException("selectorProvider"); } if (strategy == null) { throw new NullPointerException("selectStrategy"); } provider = selectorProvider; final SelectorTuple selectorTuple = openSelector(); selector = selectorTuple.selector; unwrappedSelector = selectorTuple.unwrappedSelector; selectStrategy = strategy; } // io.netty.util.concurrent.DefaultEventExecutorChooserFactory#newChooser @SuppressWarnings("unchecked") @Override public EventExecutorChooser newChooser(EventExecutor[] executors) { // 如: 1,2,4,8... 都会创建 PowerOfTwoEventExecutorChooser if (isPowerOfTwo(executors.length)) { return new PowerOfTwoEventExecutorChooser(executors); } else { return new GenericEventExecutorChooser(executors); } } // io.netty.util.concurrent.DefaultPromise#addListener @Override public Promise<V> addListener(GenericFutureListener<? extends Future<? super V>> listener) { checkNotNull(listener, "listener"); synchronized (this) { addListener0(listener); } if (isDone()) { notifyListeners(); } return this; } 以上,就是 NioEventLoopGroup 的创建过程了. 本质上其就是一个个的单独的线程组成的数组列表, 等待被调用. 3. ServerBootstrap 的创建 ServerBootstrap是Netty的一个服务端核心入口类, 它可以很快速的创建一个稳定的netty服务. ServerBootstrap 的类图如下: 还是非常纯粹的啊!其中有意思是的, ServerBootstrap继承自 AbstractBootstrap, 而这个 AbstractBootstrap 是一个自依赖的抽象类: AbstractBootstrap<B extends AbstractBootstrap<B, C>, C extends Channel> , 这样,即父类可以直接返回子类的信息了。 其默认构造方法为空,所以所以参数都使用默认值, 因为还有后续的参数设置过程,接下来,我们看看其一些关键参数的设置: // 1. channel的设定 // io.netty.bootstrap.AbstractBootstrap#channel /** * The {@link Class} which is used to create {@link Channel} instances from. * You either use this or {@link #channelFactory(io.netty.channel.ChannelFactory)} if your * {@link Channel} implementation has no no-args constructor. */ public B channel(Class<? extends C> channelClass) { if (channelClass == null) { throw new NullPointerException("channelClass"); } // 默认使用构造器反射的方式创建 channel return channelFactory(new ReflectiveChannelFactory<C>(channelClass)); } // io.netty.bootstrap.AbstractBootstrap#channelFactory(io.netty.channel.ChannelFactory<? extends C>) /** * {@link io.netty.channel.ChannelFactory} which is used to create {@link Channel} instances from * when calling {@link #bind()}. This method is usually only used if {@link #channel(Class)} * is not working for you because of some more complex needs. If your {@link Channel} implementation * has a no-args constructor, its highly recommend to just use {@link #channel(Class)} for * simplify your code. */ @SuppressWarnings({ "unchecked", "deprecation" }) public B channelFactory(io.netty.channel.ChannelFactory<? extends C> channelFactory) { return channelFactory((ChannelFactory<C>) channelFactory); } // io.netty.bootstrap.AbstractBootstrap#channelFactory(io.netty.bootstrap.ChannelFactory<? extends C>) /** * @deprecated Use {@link #channelFactory(io.netty.channel.ChannelFactory)} instead. */ @Deprecated public B channelFactory(ChannelFactory<? extends C> channelFactory) { if (channelFactory == null) { throw new NullPointerException("channelFactory"); } if (this.channelFactory != null) { throw new IllegalStateException("channelFactory set already"); } this.channelFactory = channelFactory; return self(); } @SuppressWarnings("unchecked") private B self() { return (B) this; } // 2. option 参数选项设置, 它会承包各种特殊配置的设置, 是一个通用配置项设置的入口 /** * Allow to specify a {@link ChannelOption} which is used for the {@link Channel} instances once they got * created. Use a value of {@code null} to remove a previous set {@link ChannelOption}. */ public <T> B option(ChannelOption<T> option, T value) { if (option == null) { throw new NullPointerException("option"); } // options 是一个 new LinkedHashMap<ChannelOption<?>, Object>(), 即非线程安全的容器, 所以设置值时要求使用 synchronized 保证线程安全 // value 为null时代表要将该选项设置删除, 如果key相同,后面的配置将会覆盖前面的配置 if (value == null) { synchronized (options) { options.remove(option); } } else { synchronized (options) { options.put(option, value); } } return self(); } // 3. childHandler 添加channelHandler, 这是一个最重要的一个方法, 它会影响到后面的业务处理统筹 // 调用该方法仅将 channelHandler的上下文加入进来, 实际还未进行真正的添加操作 .childHandler(new ChannelInitializer<SocketChannel>() { ServerBootstrap b = new ServerBootstrap(); b.group(bossGroup, workerGroup) .channel(NioServerSocketChannel.class) .option(ChannelOption.SO_BACKLOG, 100) // 设置tcp协议的请求等待队列 .childHandler(new ChannelInitializer<SocketChannel>() { @Override public void initChannel(SocketChannel ch) throws Exception { ChannelPipeline p = ch.pipeline(); p.addLast(new LoggingHandler(LogLevel.INFO)); p.addLast("encoder", new MessageEncoder()); p.addLast("decoder", new MessageDecoder()); p.addLast(new EchoServerHandler()); } }); /** * Set the {@link ChannelHandler} which is used to serve the request for the {@link Channel}'s. */ public ServerBootstrap childHandler(ChannelHandler childHandler) { if (childHandler == null) { throw new NullPointerException("childHandler"); } // 仅将 channelHandler 绑定到netty的上下文中 this.childHandler = childHandler; return this; } // 4. bossGroup, workGroup 如何被分配 ? /** * Set the {@link EventLoopGroup} for the parent (acceptor) and the child (client). These * {@link EventLoopGroup}'s are used to handle all the events and IO for {@link ServerChannel} and * {@link Channel}'s. */ public ServerBootstrap group(EventLoopGroup parentGroup, EventLoopGroup childGroup) { // parentGroup 是给acceptor使用的, 主要用于对socket连接的接入,所以一般一个线程也够了 super.group(parentGroup); if (childGroup == null) { throw new NullPointerException("childGroup"); } if (this.childGroup != null) { throw new IllegalStateException("childGroup set already"); } // childGroup 主要用于接入后的socket的事件的处理,一般要求数量较多,视业务属性决定 this.childGroup = childGroup; return this; } bind 绑定tcp端口,这个是真正触发server初始化的一步,工作量比较大,我们另开一段讲解。 4. nettyServer 的初始化 前面所有工作都是在准备, 都并未体现在外部, 而 bind 则会是开启一个对外服务, 对外可见, 真正启动server. // io.netty.bootstrap.AbstractBootstrap#bind(int) /** * Create a new {@link Channel} and bind it. */ public ChannelFuture bind(int inetPort) { return bind(new InetSocketAddress(inetPort)); } // io.netty.bootstrap.AbstractBootstrap#bind(java.net.SocketAddress) /** * Create a new {@link Channel} and bind it. */ public ChannelFuture bind(SocketAddress localAddress) { // 先验证各种参数是否设置完整, 如线程池是否设置, channelHandler 是否设置... validate(); if (localAddress == null) { throw new NullPointerException("localAddress"); } // 绑定tcp端口 return doBind(localAddress); } private ChannelFuture doBind(final SocketAddress localAddress) { // 1. 创建一些channel使用, 与eventloop绑定, 统一管理嘛 final ChannelFuture regFuture = initAndRegister(); final Channel channel = regFuture.channel(); if (regFuture.cause() != null) { return regFuture; } if (regFuture.isDone()) { // At this point we know that the registration was complete and successful. ChannelPromise promise = channel.newPromise(); // 2. 注册成功之后, 开始实际的 bind() 操作, 实际就是调用 channel.bind() // doBind0() 是一个异步的操作,所以使用的一个 promise 作为结果驱动 doBind0(regFuture, channel, localAddress, promise); return promise; } else { // Registration future is almost always fulfilled already, but just in case it's not. final PendingRegistrationPromise promise = new PendingRegistrationPromise(channel); regFuture.addListener(new ChannelFutureListener() { @Override public void operationComplete(ChannelFuture future) throws Exception { Throwable cause = future.cause(); if (cause != null) { // Registration on the EventLoop failed so fail the ChannelPromise directly to not cause an // IllegalStateException once we try to access the EventLoop of the Channel. promise.setFailure(cause); } else { // Registration was successful, so set the correct executor to use. // See https://github.com/netty/netty/issues/2586 promise.registered(); doBind0(regFuture, channel, localAddress, promise); } } }); return promise; } } 所以,从整体来说,bind()过程分两大步走:1. 初始化channel,与nio关联; 2. 落实channel和本地端口的绑定工作; 我们来细看下: 4.1 初始化channel 初始化channel, 并注册到 selector上, 这个操作实际上非常重要。 // 以下我们先看下执行框架 // io.netty.bootstrap.AbstractBootstrap#initAndRegister final ChannelFuture initAndRegister() { Channel channel = null; try { // 即根据前面设置的channel 使用反射创建一个实例出来 // 即此处将会实例化出一个 ServerSocketChannel 出来 // 所以如果你想用jdk的nio实现,则设置channel时使用 NioServerSocketChannel.class即可, 而你想使用其他更优化的实现时比如EpollServerSocketChannel时,改变一下即可 // 而此处的 channelFactory 就是一个反射的实现 ReflectiveChannelFactory, 它会调用如上channel的无参构造方法实例化 // 重点工作就需要在这个无参构造器中完成,我们接下来看看 channel = channelFactory.newChannel(); // 初始化channel的一些公共参数, 相当于做一些属性的继承, 因为后续它将不再依赖 ServerBootstrap, 它需要有独立自主能力 init(channel); } catch (Throwable t) { if (channel != null) { // channel can be null if newChannel crashed (eg SocketException("too many open files")) channel.unsafe().closeForcibly(); // as the Channel is not registered yet we need to force the usage of the GlobalEventExecutor return new DefaultChannelPromise(channel, GlobalEventExecutor.INSTANCE).setFailure(t); } // as the Channel is not registered yet we need to force the usage of the GlobalEventExecutor return new DefaultChannelPromise(new FailedChannel(), GlobalEventExecutor.INSTANCE).setFailure(t); } // 注册创建好的 channel 到eventLoop中 ChannelFuture regFuture = config().group().register(channel); if (regFuture.cause() != null) { if (channel.isRegistered()) { channel.close(); } else { channel.unsafe().closeForcibly(); } } // If we are here and the promise is not failed, it's one of the following cases: // 1) If we attempted registration from the event loop, the registration has been completed at this point. // i.e. It's safe to attempt bind() or connect() now because the channel has been registered. // 2) If we attempted registration from the other thread, the registration request has been successfully // added to the event loop's task queue for later execution. // i.e. It's safe to attempt bind() or connect() now: // because bind() or connect() will be executed *after* the scheduled registration task is executed // because register(), bind(), and connect() are all bound to the same thread. return regFuture; } // 1. 先看看 NioServerSocketChannel 的构造过程 // io.netty.channel.socket.nio.NioServerSocketChannel#NioServerSocketChannel() /** * Create a new instance */ public NioServerSocketChannel() { // newSocket 简单说就是创建一个本地socket, api调用: SelectorProvider.provider().openServerSocketChannel() // 但此时本 socket 并未和任何端口绑定 this(newSocket(DEFAULT_SELECTOR_PROVIDER)); } /** * Create a new instance using the given {@link ServerSocketChannel}. */ public NioServerSocketChannel(ServerSocketChannel channel) { // 注册 OP_ACCEPT 事件 super(null, channel, SelectionKey.OP_ACCEPT); // 此处的 javaChannel() 实际就是 channel, 这样调用只是为统一吧 // 创建一个新的 socket 传入 NioServerSocketChannelConfig 中 // 主要用于一些 RecvByteBufAllocator 的设置,及channel的保存 config = new NioServerSocketChannelConfig(this, javaChannel().socket()); } // io.netty.channel.nio.AbstractNioChannel#AbstractNioChannel /** * Create a new instance * * @param parent the parent {@link Channel} by which this instance was created. May be {@code null} * @param ch the underlying {@link SelectableChannel} on which it operates * @param readInterestOp the ops to set to receive data from the {@link SelectableChannel} */ protected AbstractNioChannel(Channel parent, SelectableChannel ch, int readInterestOp) { // 先让父类初始化必要的上下文 super(parent); // 保留 channel 信息,并设置非阻塞标识 this.ch = ch; this.readInterestOp = readInterestOp; try { ch.configureBlocking(false); } catch (IOException e) { try { ch.close(); } catch (IOException e2) { if (logger.isWarnEnabled()) { logger.warn( "Failed to close a partially initialized socket.", e2); } } throw new ChannelException("Failed to enter non-blocking mode.", e); } } // io.netty.channel.AbstractChannel#AbstractChannel(io.netty.channel.Channel) /** * Creates a new instance. * * @param parent * the parent of this channel. {@code null} if there's no parent. */ protected AbstractChannel(Channel parent) { // 初始化上下文 this.parent = parent; // DefaultChannelId id = newId(); // NioMessageUnsafe unsafe = newUnsafe(); // new DefaultChannelPipeline(this); // 比较重要,将会初始化 head, tail 节点 pipeline = newChannelPipeline(); } // io.netty.channel.DefaultChannelPipeline#DefaultChannelPipeline protected DefaultChannelPipeline(Channel channel) { this.channel = ObjectUtil.checkNotNull(channel, "channel"); succeededFuture = new SucceededChannelFuture(channel, null); voidPromise = new VoidChannelPromise(channel, true); // 初始化 head, tail tail = new TailContext(this); head = new HeadContext(this); // 构成双向链表 head.next = tail; tail.prev = head; } // 2. 初始化channel, 有个最重要的动作是将 Acceptor 接入到 pipeline 中 // io.netty.bootstrap.ServerBootstrap#init @Override void init(Channel channel) throws Exception { final Map<ChannelOption<?>, Object> options = options0(); // 根据前面的设置, 将各种属性copy过来, 放到 config 字段中 // 同样, 因为 options 和 attrs 都不是线程安全的, 所以都要上锁操作 synchronized (options) { setChannelOptions(channel, options, logger); } final Map<AttributeKey<?>, Object> attrs = attrs0(); synchronized (attrs) { for (Entry<AttributeKey<?>, Object> e: attrs.entrySet()) { @SuppressWarnings("unchecked") AttributeKey<Object> key = (AttributeKey<Object>) e.getKey(); channel.attr(key).set(e.getValue()); } } // 此处的pipeline, 就是在 NioServerSocketChannel 中初始化好head,tail的pipeline ChannelPipeline p = channel.pipeline(); // childGroup 实际就是外部的 workGroup final EventLoopGroup currentChildGroup = childGroup; final ChannelHandler currentChildHandler = childHandler; final Entry<ChannelOption<?>, Object>[] currentChildOptions; final Entry<AttributeKey<?>, Object>[] currentChildAttrs; synchronized (childOptions) { currentChildOptions = childOptions.entrySet().toArray(newOptionArray(childOptions.size())); } synchronized (childAttrs) { currentChildAttrs = childAttrs.entrySet().toArray(newAttrArray(childAttrs.size())); } // 这个就比较重要了, 关联 ServerBootstrapAcceptor // 主动添加一个 initializer, 它将作为第一个被调用的 channelInitializer 存在 // 而 channelInitializer 只会被调用一次 p.addLast(new ChannelInitializer<Channel>() { @Override public void initChannel(final Channel ch) throws Exception { final ChannelPipeline pipeline = ch.pipeline(); ChannelHandler handler = config.handler(); if (handler != null) { pipeline.addLast(handler); } ch.eventLoop().execute(new Runnable() { @Override public void run() { // 添加 Acceptor 到 pipeline 中, 形成一个 head -> ServerBootstrapAcceptor -> tail 的pipeline pipeline.addLast(new ServerBootstrapAcceptor( ch, currentChildGroup, currentChildHandler, currentChildOptions, currentChildAttrs)); } }); } }); // 此操作过后,当前pipeline中,就只有此一handler } 4.2 handler的添加过程 addLast() 看起来只是一个添加元素的过程, 总体来说就是一个双向链表的添加, 但也蛮有意思的, 有兴趣可以戳开详情看看. // io.netty.channel.ChannelHandler @Override public final ChannelPipeline addLast(ChannelHandler... handlers) { return addLast(null, handlers); } // io.netty.channel.DefaultChannelPipeline#addLast(io.netty.util.concurrent.EventExecutorGroup, io.netty.channel.ChannelHandler...) @Override public final ChannelPipeline addLast(EventExecutorGroup executor, ChannelHandler... handlers) { if (handlers == null) { throw new NullPointerException("handlers"); } // 支持同时添加多个 handler for (ChannelHandler h: handlers) { if (h == null) { break; } addLast(executor, null, h); } return this; } // io.netty.channel.DefaultChannelPipeline#addLast(io.netty.util.concurrent.EventExecutorGroup, java.lang.String, io.netty.channel.ChannelHandler) @Override public final ChannelPipeline addLast(EventExecutorGroup group, String name, ChannelHandler handler) { final AbstractChannelHandlerContext newCtx; synchronized (this) { // 重复性检查 @Shareable 参数使用 checkMultiplicity(handler); // 生成一个新的上下文, filterName()将会生成一个唯一的名称, 如 ServerBootstrap$1#0 newCtx = newContext(group, filterName(name, handler), handler); // 将当前ctx添加到链表中 addLast0(newCtx); // If the registered is false it means that the channel was not registered on an eventloop yet. // In this case we add the context to the pipeline and add a task that will call // ChannelHandler.handlerAdded(...) once the channel is registered. if (!registered) { newCtx.setAddPending(); // 未注册情况下, 不会进行下一步了 callHandlerCallbackLater(newCtx, true); return this; } // 而已注册情况下, 则会使用 executor 提交callHandlerAdded0, 即调用 pipeline 的头节点 EventExecutor executor = newCtx.executor(); if (!executor.inEventLoop()) { newCtx.setAddPending(); executor.execute(new Runnable() { @Override public void run() { callHandlerAdded0(newCtx); } }); return this; } } callHandlerAdded0(newCtx); return this; } private AbstractChannelHandlerContext newContext(EventExecutorGroup group, String name, ChannelHandler handler) { return new DefaultChannelHandlerContext(this, childExecutor(group), name, handler); } private void addLast0(AbstractChannelHandlerContext newCtx) { // 一个双向链表保存上下文 AbstractChannelHandlerContext prev = tail.prev; newCtx.prev = prev; newCtx.next = tail; prev.next = newCtx; tail.prev = newCtx; } // 添加ctx到队列尾部 private void callHandlerCallbackLater(AbstractChannelHandlerContext ctx, boolean added) { assert !registered; PendingHandlerCallback task = added ? new PendingHandlerAddedTask(ctx) : new PendingHandlerRemovedTask(ctx); PendingHandlerCallback pending = pendingHandlerCallbackHead; if (pending == null) { pendingHandlerCallbackHead = task; } else { // Find the tail of the linked-list. while (pending.next != null) { pending = pending.next; } pending.next = task; } } // 对每一次添加 handler, 则都会产生一个事件, 通知现有的handler, handlerAdded() private void callHandlerAdded0(final AbstractChannelHandlerContext ctx) { try { // We must call setAddComplete before calling handlerAdded. Otherwise if the handlerAdded method generates // any pipeline events ctx.handler() will miss them because the state will not allow it. ctx.setAddComplete(); ctx.handler().handlerAdded(ctx); } catch (Throwable t) { boolean removed = false; try { remove0(ctx); try { ctx.handler().handlerRemoved(ctx); } finally { ctx.setRemoved(); } removed = true; } catch (Throwable t2) { if (logger.isWarnEnabled()) { logger.warn("Failed to remove a handler: " + ctx.name(), t2); } } if (removed) { fireExceptionCaught(new ChannelPipelineException( ctx.handler().getClass().getName() + ".handlerAdded() has thrown an exception; removed.", t)); } else { fireExceptionCaught(new ChannelPipelineException( ctx.handler().getClass().getName() + ".handlerAdded() has thrown an exception; also failed to remove.", t)); } } } 4.3 注册channel,绑定eventloop线程 经过前面两步, channel已经创建好和初始化好了, 但还没有看到 eventLoop 的影子. 实际上eventloop和channel间就差一个注册了. 也就是前面看到的 ChannelFuture regFuture = config().group().register(channel); 此处的group 即是 bossGroup. // io.netty.channel.MultithreadEventLoopGroup#register(io.netty.channel.Channel) @Override public ChannelFuture register(Channel channel) { // next() 相当于是一个负载均衡器, 会选择出一个合适的 eventloop 出来, 默认是round-robin return next().register(channel); } // io.netty.channel.MultithreadEventLoopGroup#next @Override public EventLoop next() { return (EventLoop) super.next(); } // io.netty.util.concurrent.MultithreadEventExecutorGroup#next @Override public EventExecutor next() { // 使用前面创建的 PowerOfTwoEventExecutorChooser 进行调用 // 默认实现为轮询 return chooser.next(); } // io.netty.util.concurrent.DefaultEventExecutorChooserFactory.PowerOfTwoEventExecutorChooser#next @Override public EventExecutor next() { return executors[idx.getAndIncrement() & executors.length - 1]; } // io.netty.channel.SingleThreadEventLoop#register(io.netty.channel.Channel) @Override public ChannelFuture register(Channel channel) { // 使用 DefaultChannelPromise 封装channel, 再注册到 eventloop 中 return register(new DefaultChannelPromise(channel, this)); } @Override public ChannelFuture register(final ChannelPromise promise) { ObjectUtil.checkNotNull(promise, "promise"); // NioMessageUnsafe promise.channel().unsafe().register(this, promise); return promise; } // io.netty.channel.AbstractChannel.AbstractUnsafe#register @Override public final void register(EventLoop eventLoop, final ChannelPromise promise) { if (eventLoop == null) { throw new NullPointerException("eventLoop"); } if (isRegistered()) { promise.setFailure(new IllegalStateException("registered to an event loop already")); return; } if (!isCompatible(eventLoop)) { promise.setFailure( new IllegalStateException("incompatible event loop type: " + eventLoop.getClass().getName())); return; } AbstractChannel.this.eventLoop = eventLoop; // inEventLoop() 判断当前线程是否在 eventLoop 中 // 判断方式为直接比较 eventloop 线程也当前线程是否是同一个即可 Thread.currentThread() == this.thread; // 核心注册方法 register0() if (eventLoop.inEventLoop()) { register0(promise); } else { // 不在 eventLoop 中, 则异步提交任务给 eventloop 处理 try { eventLoop.execute(new Runnable() { @Override public void run() { register0(promise); } }); } catch (Throwable t) { logger.warn( "Force-closing a channel whose registration task was not accepted by an event loop: {}", AbstractChannel.this, t); closeForcibly(); closeFuture.setClosed(); safeSetFailure(promise, t); } } } // register0() 做真正的注册 // io.netty.channel.AbstractChannel.AbstractUnsafe#register0 private void register0(ChannelPromise promise) { try { // check if the channel is still open as it could be closed in the mean time when the register // call was outside of the eventLoop if (!promise.setUncancellable() || !ensureOpen(promise)) { return; } boolean firstRegistration = neverRegistered; // 具体的注册逻辑由子类实现, NioServerSocketChannel doRegister(); neverRegistered = false; registered = true; // Ensure we call handlerAdded(...) before we actually notify the promise. This is needed as the // user may already fire events through the pipeline in the ChannelFutureListener. // 几个扩展点: fireHandlerAdded() -> fireChannelRegistered() -> fireChannelActive() // part1: fireChannelAdded(), 它将会回调上面的 ServerBootstrapAcceptor 的添加 channelInitializer pipeline.invokeHandlerAddedIfNeeded(); safeSetSuccess(promise); // part2: fireChannelRegistered() pipeline.fireChannelRegistered(); // Only fire a channelActive if the channel has never been registered. This prevents firing // multiple channel actives if the channel is deregistered and re-registered. if (isActive()) { if (firstRegistration) { pipeline.fireChannelActive(); } else if (config().isAutoRead()) { // This channel was registered before and autoRead() is set. This means we need to begin read // again so that we process inbound data. // // See https://github.com/netty/netty/issues/4805 beginRead(); } } } catch (Throwable t) { // Close the channel directly to avoid FD leak. closeForcibly(); closeFuture.setClosed(); safeSetFailure(promise, t); } } // io.netty.channel.nio.AbstractNioChannel#doRegister @Override protected void doRegister() throws Exception { boolean selected = false; // 进行注册即是 JDK 的 ServerSocketChannel.register() 过程 // 即 netty 与 socket 建立了关系连接, ops=0, 代表监听所有读事件 for (;;) { try { // 一直注册直到成功 // 此处 ops=0, 即不关注任何事件哦, 那么前面的 OP_ACCEPT 和这里又是什么关系呢? selectionKey = javaChannel().register(eventLoop().unwrappedSelector(), 0, this); return; } catch (CancelledKeyException e) { if (!selected) { // Force the Selector to select now as the "canceled" SelectionKey may still be // cached and not removed because no Select.select(..) operation was called yet. eventLoop().selectNow(); selected = true; } else { // We forced a select operation on the selector before but the SelectionKey is still cached // for whatever reason. JDK bug ? throw e; } } } } 4.4 ServerBootstrapAcceptor 速览 前面我们看到, 在做 register() 完了之后, netty 会触发一个invokeHandlerAddedIfNeeded, 从而调用fireHandlerAdded. 此时将会触发 handlerAdded() 从而首次调用 ChannelInitializer.initChannel(), 从而将 ServerBootstrapAcceptor 添加到pipeline进来. ServerBootstrapAcceptor 独立做的事情不多,更多是交给父类处理。 ServerBootstrapAcceptor( final Channel channel, EventLoopGroup childGroup, ChannelHandler childHandler, Entry<ChannelOption<?>, Object>[] childOptions, Entry<AttributeKey<?>, Object>[] childAttrs) { this.childGroup = childGroup; this.childHandler = childHandler; this.childOptions = childOptions; this.childAttrs = childAttrs; // Task which is scheduled to re-enable auto-read. // It's important to create this Runnable before we try to submit it as otherwise the URLClassLoader may // not be able to load the class because of the file limit it already reached. // // See https://github.com/netty/netty/issues/1328 // enableAutoReadTask = new Runnable() { @Override public void run() { channel.config().setAutoRead(true); } }; } // ServerBootstrapAcceptor 大部分情况下都是普通的 InboundHandler, 除了 channelRead() 时 // io.netty.bootstrap.ServerBootstrap.ServerBootstrapAcceptor#channelRead @Override @SuppressWarnings("unchecked") public void channelRead(ChannelHandlerContext ctx, Object msg) { final Channel child = (Channel) msg; child.pipeline().addLast(childHandler); setChannelOptions(child, childOptions, logger); for (Entry<AttributeKey<?>, Object> e: childAttrs) { child.attr((AttributeKey<Object>) e.getKey()).set(e.getValue()); } try { // 它会向 childGroup 中提交channel过去, 从而使用 childGroup 产生作用 childGroup.register(child).addListener(new ChannelFutureListener() { @Override public void operationComplete(ChannelFuture future) throws Exception { if (!future.isSuccess()) { forceClose(child, future.cause()); } } }); } catch (Throwable t) { forceClose(child, t); } } 4.5 端口的绑定 doBind0 经过前面的channel的创建,初始化, Acceptor 的添加到handlerAdded(), 整个pipeline已经work起来了. 然后netty会回调之前添加好的 listeners, 其中一个便是 doBind0(); // 回顾下: ... // Registration future is almost always fulfilled already, but just in case it's not. final PendingRegistrationPromise promise = new PendingRegistrationPromise(channel); regFuture.addListener(new ChannelFutureListener() { @Override public void operationComplete(ChannelFuture future) throws Exception { Throwable cause = future.cause(); if (cause != null) { // Registration on the EventLoop failed so fail the ChannelPromise directly to not cause an // IllegalStateException once we try to access the EventLoop of the Channel. promise.setFailure(cause); } else { // Registration was successful, so set the correct executor to use. // See https://github.com/netty/netty/issues/2586 promise.registered(); doBind0(regFuture, channel, localAddress, promise); } } }); ... // io.netty.bootstrap.AbstractBootstrap#doBind0 private static void doBind0( final ChannelFuture regFuture, final Channel channel, final SocketAddress localAddress, final ChannelPromise promise) { // This method is invoked before channelRegistered() is triggered. Give user handlers a chance to set up // the pipeline in its channelRegistered() implementation. // 这还是一个异步过程 channel.eventLoop().execute(new Runnable() { @Override public void run() { // channel.bind(), channel 与 端口绑定 if (regFuture.isSuccess()) { channel.bind(localAddress, promise).addListener(ChannelFutureListener.CLOSE_ON_FAILURE); } else { promise.setFailure(regFuture.cause()); } } }); } // io.netty.channel.AbstractChannel#bind(java.net.SocketAddress, io.netty.channel.ChannelPromise) @Override public ChannelFuture bind(SocketAddress localAddress, ChannelPromise promise) { // bind() 被当作一个普通的出站事件, 在pipeline中被传递 return pipeline.bind(localAddress, promise); } // io.netty.channel.DefaultChannelPipeline#bind(java.net.SocketAddress, io.netty.channel.ChannelPromise) @Override public final ChannelFuture bind(SocketAddress localAddress, ChannelPromise promise) { // 从tail开始传递 return tail.bind(localAddress, promise); } // io.netty.channel.AbstractChannelHandlerContext#bind(java.net.SocketAddress, io.netty.channel.ChannelPromise) @Override public ChannelFuture bind(final SocketAddress localAddress, final ChannelPromise promise) { if (localAddress == null) { throw new NullPointerException("localAddress"); } if (isNotValidPromise(promise, false)) { // cancelled return promise; } // 同样是一个pipeline式调用, bind() 是一个出站事件, 所以查找 outbound // 最终会调到 DefaultChannelPipeline 中 // netty的pipeline机制就体现在这里, 它会一直查找可用的handler, 然后执行它, 直到结束 final AbstractChannelHandlerContext next = findContextOutbound(); // 获取其绑定的 executor EventExecutor executor = next.executor(); if (executor.inEventLoop()) { next.invokeBind(localAddress, promise); } else { safeExecute(executor, new Runnable() { @Override public void run() { next.invokeBind(localAddress, promise); } }, promise, null); } return promise; } // ------------------------------------------------------------------------- // 出入站handler的查找实现, 非常简单, 却很有效 (该方法在 AbstractChannelHandlerContext 中实现,被所有handler通用) // io.netty.channel.AbstractChannelHandlerContext#findContextInbound private AbstractChannelHandlerContext findContextInbound() { // 以当前节点作为起点开始查找, 取第一个入站handler返回, 没有则说明 pipeline 已结束 AbstractChannelHandlerContext ctx = this; do { ctx = ctx.next; } while (!ctx.inbound); return ctx; } // io.netty.channel.AbstractChannelHandlerContext#findContextOutbound private AbstractChannelHandlerContext findContextOutbound() { // 以当前节点作为起点开始查找, 取第一个出站handler返回, 没有则说明 pipeline 已结束 AbstractChannelHandlerContext ctx = this; do { ctx = ctx.prev; } while (!ctx.outbound); return ctx; } // ------------------------------------------------------------------------- // io.netty.channel.AbstractChannelHandlerContext#invokeBind private void invokeBind(SocketAddress localAddress, ChannelPromise promise) { if (invokeHandler()) { try { ((ChannelOutboundHandler) handler()).bind(this, localAddress, promise); } catch (Throwable t) { notifyOutboundHandlerException(t, promise); } } else { bind(localAddress, promise); } } // 最终传递到 HeadContext 中进行处理 // io.netty.channel.DefaultChannelPipeline.HeadContext#bind @Override public void bind( ChannelHandlerContext ctx, SocketAddress localAddress, ChannelPromise promise) throws Exception { // unsafe 处理bind() 操作 unsafe.bind(localAddress, promise); } // io.netty.channel.AbstractChannel.AbstractUnsafe#bind @Override public final void bind(final SocketAddress localAddress, final ChannelPromise promise) { assertEventLoop(); if (!promise.setUncancellable() || !ensureOpen(promise)) { return; } // See: https://github.com/netty/netty/issues/576 if (Boolean.TRUE.equals(config().getOption(ChannelOption.SO_BROADCAST)) && localAddress instanceof InetSocketAddress && !((InetSocketAddress) localAddress).getAddress().isAnyLocalAddress() && !PlatformDependent.isWindows() && !PlatformDependent.maybeSuperUser()) { // Warn a user about the fact that a non-root user can't receive a // broadcast packet on *nix if the socket is bound on non-wildcard address. logger.warn( "A non-root user can't receive a broadcast packet if the socket " + "is not bound to a wildcard address; binding to a non-wildcard " + "address (" + localAddress + ") anyway as requested."); } boolean wasActive = isActive(); try { // 这里会调用 jdk 的ServerSocketChannel接口, 实现真正的端口绑定 // 至此, 服务对外可见 doBind(localAddress); } catch (Throwable t) { safeSetFailure(promise, t); closeIfClosed(); return; } // 判断是否是首次创建 channel, 如果是, 则调用 fireChannelActive() 传播channelActive事件 if (!wasActive && isActive()) { // 这将会被稍后执行 invokeLater(new Runnable() { @Override public void run() { pipeline.fireChannelActive(); } }); } // 触发一些通知什么的, 结束了 safeSetSuccess(promise); } // 最终的bind(), 是通过 jdk 底层的 serverSocketChannel 开启socket监听 // io.netty.channel.socket.nio.NioServerSocketChannel#doBind @Override protected void doBind(SocketAddress localAddress) throws Exception { if (PlatformDependent.javaVersion() >= 7) { // 调用 serverSocketChannel bind() 方法,开启socket监听 javaChannel().bind(localAddress, config.getBacklog()); } else { javaChannel().socket().bind(localAddress, config.getBacklog()); } } 至此, bind 工作总算是完成了.我们来总结下它的主要工作: 1. 初始化一个channel, 根据设置里来, 我们使用 NioServerSocketChannel; 2. 过继现有的配置项给到channel; 3. 将channel与eventloop绑定做注册, 添加 ServerBootstrapAcceptor 到 pipeline 中; 4. 绑定完成后, 通知现有的handler, 触发系列事件: fireHandlerAdded() -> fireChannelRegistered() -> fireChannelActive(); 5. 而bind()则作为一个出站事件, 被处理, 最终调用 jdk的ServerSocketChannel.register() 完成端口的开启; 不过有一点需要注意, 在这个过程中, 只有 bossGroup 起作用, 所有的 workGroup 都还在待命中. 我们目前看到的 pipeline 是这样的: head -> Acceptor -> tail; 讲了这么多, 有一种绕了一大圈的感觉有木有, 如果你自己直接使用nio写, 估计10行代码都不要就搞定了. 尴尬! 5. netty eventloop 主循环 evenloop是netty的重要概念, 但在前面我们并未细讲这玩意如何起作用(仅看过其创建过程而已), 不过这并不意味着它还没起作用, 而是我们暂时忽略了它. 每次要执行任务时, 总是会调用 eventloop().execute(...), 实际上这就是 eventloop的入口: // io.netty.util.concurrent.SingleThreadEventExecutor#execute @Override public void execute(Runnable task) { // execute 在线程池中, 是一个异步任务的提交方法, eventloop中同样也一样 // 但是大部分情况下只是添加队列, 因为 eventloop 是单线程的 if (task == null) { throw new NullPointerException("task"); } // 向eventLoop队列中添加task boolean inEventLoop = inEventLoop(); addTask(task); // 如果自身就是运行在 eventloop 环境中, 添加完task后则不再做更多的事 if (!inEventLoop) { // 如果不是在eventLoop线程中,则都会尝试创建新线程运行, 但实际会重新检测线程是否创建 startThread(); if (isShutdown() && removeTask(task)) { reject(); } } if (!addTaskWakesUp && wakesUpForTask(task)) { wakeup(inEventLoop); } } // io.netty.util.concurrent.SingleThreadEventExecutor#addTask /** * Add a task to the task queue, or throws a {@link RejectedExecutionException} if this instance was shutdown * before. */ protected void addTask(Runnable task) { if (task == null) { throw new NullPointerException("task"); } // taskQueue = MpscUnsafeUnboundedArrayQueue, 基于Unsafe 和 cas 实现的线程安全的队列 if (!offerTask(task)) { // 添加失败,则走拒绝策略 reject(task); } } // startThread, 看起来是开启线程的意思, 却又不太一样 private void startThread() { // 所以实际上只会创建一次线程 if (state == ST_NOT_STARTED) { // 抢到锁的线程才能调用start()方法 if (STATE_UPDATER.compareAndSet(this, ST_NOT_STARTED, ST_STARTED)) { try { doStartThread(); } catch (Throwable cause) { STATE_UPDATER.set(this, ST_NOT_STARTED); PlatformDependent.throwException(cause); } } } } // 开启eventLoop的线程 // io.netty.util.concurrent.SingleThreadEventExecutor#doStartThread private void doStartThread() { assert thread == null; // 它并不是简单的thread.start() executor.execute(new Runnable() { @Override public void run() { thread = Thread.currentThread(); if (interrupted) { thread.interrupt(); } boolean success = false; updateLastExecutionTime(); try { // 核心方法,由 SingleThreadEventExecutor.run() 实现 // 当然是由具体的executor具体实现了, 此文为 NioEventLoop.run() SingleThreadEventExecutor.this.run(); success = true; } catch (Throwable t) { logger.warn("Unexpected exception from an event executor: ", t); } finally { // 线程池关闭,优雅停机 ... } } }); } 核心: 事件循环主框架, 既然是事件循环,则其必然是不会退出的。 // io.netty.channel.nio.NioEventLoop#run @Override protected void run() { // 一个死循环检测任务, 这就 eventloop 的大杀器哦 for (;;) { try { switch (selectStrategy.calculateStrategy(selectNowSupplier, hasTasks())) { case SelectStrategy.CONTINUE: continue; // 有任务时执行任务, 否则阻塞等待网络事件, 或被唤醒 case SelectStrategy.SELECT: // select.select(), 带超时限制 select(wakenUp.getAndSet(false)); // 'wakenUp.compareAndSet(false, true)' is always evaluated // before calling 'selector.wakeup()' to reduce the wake-up // overhead. (Selector.wakeup() is an expensive operation.) // // However, there is a race condition in this approach. // The race condition is triggered when 'wakenUp' is set to // true too early. // // 'wakenUp' is set to true too early if: // 1) Selector is waken up between 'wakenUp.set(false)' and // 'selector.select(...)'. (BAD) // 2) Selector is waken up between 'selector.select(...)' and // 'if (wakenUp.get()) { ... }'. (OK) // // In the first case, 'wakenUp' is set to true and the // following 'selector.select(...)' will wake up immediately. // Until 'wakenUp' is set to false again in the next round, // 'wakenUp.compareAndSet(false, true)' will fail, and therefore // any attempt to wake up the Selector will fail, too, causing // the following 'selector.select(...)' call to block // unnecessarily. // // To fix this problem, we wake up the selector again if wakenUp // is true immediately after selector.select(...). // It is inefficient in that it wakes up the selector for both // the first case (BAD - wake-up required) and the second case // (OK - no wake-up required). if (wakenUp.get()) { selector.wakeup(); } // fall through default: } cancelledKeys = 0; needsToSelectAgain = false; // ioRatio 为io操作的占比, 和运行任务相比, 默认为 50:50 final int ioRatio = this.ioRatio; if (ioRatio == 100) { try { // step1. 运行io操作 processSelectedKeys(); } finally { // Ensure we always run tasks. // step2. 运行task任务 runAllTasks(); } } else { final long ioStartTime = System.nanoTime(); try { processSelectedKeys(); } finally { // Ensure we always run tasks. final long ioTime = System.nanoTime() - ioStartTime; // 运行任务的最长时间 runAllTasks(ioTime * (100 - ioRatio) / ioRatio); } } } catch (Throwable t) { handleLoopException(t); } // Always handle shutdown even if the loop processing threw an exception. try { if (isShuttingDown()) { closeAll(); if (confirmShutdown()) { return; } } } catch (Throwable t) { handleLoopException(t); } } } // select, 事件循环的依据 private void select(boolean oldWakenUp) throws IOException { Selector selector = this.selector; try { int selectCnt = 0; long currentTimeNanos = System.nanoTime(); // 带超时限制, 默认最大超时1s, 但当有延时任务处理时, 以它为标准 long selectDeadLineNanos = currentTimeNanos + delayNanos(currentTimeNanos); for (;;) { long timeoutMillis = (selectDeadLineNanos - currentTimeNanos + 500000L) / 1000000L; if (timeoutMillis <= 0) { // 超时则立即返回 if (selectCnt == 0) { selector.selectNow(); selectCnt = 1; } break; } // If a task was submitted when wakenUp value was true, the task didn't get a chance to call // Selector#wakeup. So we need to check task queue again before executing select operation. // If we don't, the task might be pended until select operation was timed out. // It might be pended until idle timeout if IdleStateHandler existed in pipeline. if (hasTasks() && wakenUp.compareAndSet(false, true)) { selector.selectNow(); selectCnt = 1; break; } int selectedKeys = selector.select(timeoutMillis); selectCnt ++; if (selectedKeys != 0 || oldWakenUp || wakenUp.get() || hasTasks() || hasScheduledTasks()) { // - Selected something, // - waken up by user, or // - the task queue has a pending task. // - a scheduled task is ready for processing break; } if (Thread.interrupted()) { // Thread was interrupted so reset selected keys and break so we not run into a busy loop. // As this is most likely a bug in the handler of the user or it's client library we will // also log it. // // See https://github.com/netty/netty/issues/2426 if (logger.isDebugEnabled()) { logger.debug("Selector.select() returned prematurely because " + "Thread.currentThread().interrupt() was called. Use " + "NioEventLoop.shutdownGracefully() to shutdown the NioEventLoop."); } selectCnt = 1; break; } long time = System.nanoTime(); if (time - TimeUnit.MILLISECONDS.toNanos(timeoutMillis) >= currentTimeNanos) { // timeoutMillis elapsed without anything selected. selectCnt = 1; } else if (SELECTOR_AUTO_REBUILD_THRESHOLD > 0 && selectCnt >= SELECTOR_AUTO_REBUILD_THRESHOLD) { // The selector returned prematurely many times in a row. // Rebuild the selector to work around the problem. logger.warn( "Selector.select() returned prematurely {} times in a row; rebuilding Selector {}.", selectCnt, selector); rebuildSelector(); selector = this.selector; // Select again to populate selectedKeys. selector.selectNow(); selectCnt = 1; break; } currentTimeNanos = time; } if (selectCnt > MIN_PREMATURE_SELECTOR_RETURNS) { if (logger.isDebugEnabled()) { logger.debug("Selector.select() returned prematurely {} times in a row for Selector {}.", selectCnt - 1, selector); } } } catch (CancelledKeyException e) { if (logger.isDebugEnabled()) { logger.debug(CancelledKeyException.class.getSimpleName() + " raised by a Selector {} - JDK bug?", selector, e); } // Harmless exception - log anyway } } 反正整体就是这样了, 循环检测select, 运行io事件及execute task. 有了这个 eventloop, 整体server就可以run起来了, 不管是有外部请求进来, 还是有内部任务提交, 都将被eventloop执行. 不过还有一点未澄清的: 前面在做channel.register()时传递了一个 ops=0, 那它是如何监听新连接事件的呢? 实际上它是在注册激活完成之后, 再进行了一个read()的操作, 重新将 OP_ACCEPT 添加到 selectionKey 中了.(没错,底层永远没那么多花招) // io.netty.channel.DefaultChannelPipeline.HeadContext#channelActive @Override public void channelActive(ChannelHandlerContext ctx) throws Exception { ctx.fireChannelActive(); // 会触发 read() 流程, 修改 selectionKey 的 ops 标志位 readIfIsAutoRead(); } ... // io.netty.channel.AbstractChannel.AbstractUnsafe#beginRead @Override public final void beginRead() { assertEventLoop(); if (!isActive()) { return; } try { doBeginRead(); } catch (final Exception e) { invokeLater(new Runnable() { @Override public void run() { pipeline.fireExceptionCaught(e); } }); close(voidPromise()); } } // io.netty.channel.nio.AbstractNioMessageChannel#doBeginRead @Override protected void doBeginRead() throws Exception { if (inputShutdown) { return; } super.doBeginRead(); } // io.netty.channel.nio.AbstractNioChannel#doBeginRead @Override protected void doBeginRead() throws Exception { // Channel.read() or ChannelHandlerContext.read() was called final SelectionKey selectionKey = this.selectionKey; if (!selectionKey.isValid()) { return; } readPending = true; final int interestOps = selectionKey.interestOps(); if ((interestOps & readInterestOp) == 0) { // readInterestOp, 即是前面设置的 OP_ACCEPT selectionKey.interestOps(interestOps | readInterestOp); } } 本文有点长了, 留点东西下篇继续: io事件如何处理? 任务如何执行? 看完三件事❤️ 如果你觉得这篇内容对你还蛮有帮助,我想邀请你帮我三个小忙: 点赞,转发,有你们的 『点赞和评论』,才是我创造的动力。 关注公众号 『java烂猪皮』,不定期分享原创知识。 同时可以期待后续文章ing🚀 作者:等你归去来 出处:https://www.cnblogs.com/yougewe/p/13415440.html