一步步动手实现高并发的Reactor模型 —— Kafka底层如何充分利用多线程优势去处理网络I/O与业务分发
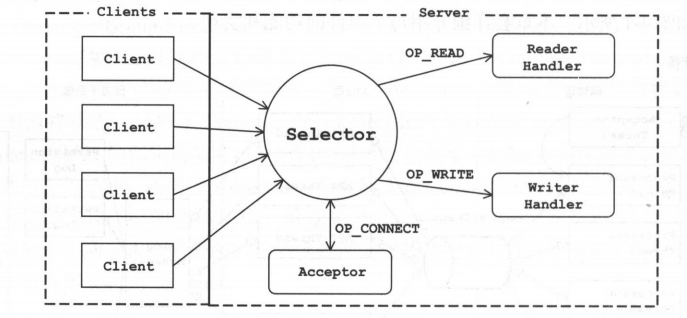
一、从《Apeche Kafka源码剖析》上搬来的概念和图 Kafka网络采用的是Reactor模式,是一种基于事件驱动的模式。熟悉Java编程的读者应该了解Java NIO提供了Reactor模式的API。常见的单线程Java NIO编程模式如图所示。 熟悉NIO编程都应该知道这个Selector,我们可以通过轮询它来获取监听事件,然后通过事件来进行不同的处理,比如OP_ACCEPT连接,OP_READ读取数据等等。 这样简单的处理对于客户端是没什么问题,但对于服务端来说就有些缺点了。在服务端,我们要求读取请求、处理请求以及发送响应各个环节必须能迅速完成,并且要尽可能做到互不影响。所以我们就需要对上述简单的模型进行修改。 为了满足高并发的需求,也为了充分利用服务器的资源,我们对上述的架构稍作调整,将网络读写的逻辑与业务处理的逻辑进行拆分,让其由不同的线程池来处理,如图所示。 二、套餐一:直接撸Kafka源码 如果不想看本文下面这个很挫的Reactor模型,可以直接看Kafka的源码 ~ 如果需要稍微借助一点中文注释,我已经标注了十分多的注释~ 可以直接看这个版本,基于Kafka0.10.0.1的源码解读 ,当然也可以直接去看官方版本。 SocketServer就是它的入口。 其中,内部类 Acceptor 负责建立并配置新连接 内部类 Processor 负责处理IO事件。 KafkaRequestHandler 这个类负责业务的处理。 而业务处理和IO之间的桥则是 RequestChannel。 三、套餐二:动手一步步实现Reactor模型 事先声明,以下这个很挫(但也简单)的Reactor模型只是保证它能用,而且思路和Kafka大致一致,并没有去做很多的异常处理!!很多细节地方也做得不是很到位。 3.1 回忆一下selector是怎么用的 //1. 获取服务端通道 ServerSocketChannel ssChannel = ServerSocketChannel.open(); ssChannel.bind(new InetSocketAddress(9898)); //2. 设置为非阻塞模式 ssChannel.configureBlocking(false); //3. 打开一个监听器 Selector selector = Selector.open(); //4. 向监听器注册接收事件 ssChannel.register(selector, SelectionKey.OP_ACCEPT); while (selector.select() > 0) { //5. 获取监听器上所有的监听事件值 Iterator<SelectionKey> it = selector.selectedKeys().iterator(); //6. 如果有值 while (it.hasNext()) { //7. 取到SelectionKey SelectionKey key = it.next(); //8. 根据key值判断对应的事件 if (key.isAcceptable()) { //9. 接入处理 SocketChannel socketChannel = ssChannel.accept(); socketChannel.configureBlocking(false); socketChannel.register(selector, SelectionKey.OP_READ); } else if (key.isReadable()) { //10. 可读事件处理 SocketChannel channel = (SocketChannel) key.channel(); readMsg(channel); } //11. 移除当前key it.remove(); } } 这就是我们上面提到的第一张图的模型,我们发现它的IO操作和业务处理是杂糅在一起的。当然我们简单的做可以使用一个业务处理的线程池负责处理业务。 但是我们这里是要去实现第二个图的模型~ 3.2 实现负责建立连接的Acceptor 在 Acceptor 中监听端口 public Acceptor(InetSocketAddress inetSocketAddress, Processor[] processors) throws IOException { ServerSocketChannel serverSocketChannel = ServerSocketChannel.open(); serverSocketChannel.configureBlocking(false); serverSocketChannel.socket() .bind(inetSocketAddress); this.serverSocketChannel = serverSocketChannel; this.selector = Selector.open(); this.processors = processors;// 先忽略这个东西 = = } 注册 OP_ACCEPT 事件,并且不断轮询进行连接的建立,kafka在初始化中大量使用了CountdownLaunch来确保初始化的成功,这里偷懒省去这一步骤。 @Override public void run() { if (init) { System.out.println("已可以开始建立连接"); init = false; } try { serverSocketChannel.register(selector, SelectionKey.OP_ACCEPT); } catch (ClosedChannelException e) { e.printStackTrace(); } int currentProcessors = 0; while (true) { try { int ready = selector.select(500); // 半秒轮询一次 if (ready > 0) { Iterator<SelectionKey> selectionKeys = selector.selectedKeys() .iterator(); while (selectionKeys.hasNext()) { SelectionKey selectionKey = selectionKeys.next(); selectionKeys.remove(); if (selectionKey.isAcceptable()) { this.accept(selectionKey, processors[currentProcessors]); currentProcessors = (currentProcessors + 1) % processors.length; } else { throw new RuntimeException("不应该出现的情况,因为只订阅了OP_ACCEPT"); } } } } catch (IOException e) { e.printStackTrace(); } } } // 建立连接,并且使用RoundRobin分配给一个Processor,也就是负责IO的角色 public void accept(SelectionKey selectionKey, Processor processor) throws IOException { SelectableChannel channel = selectionKey.channel(); SocketChannel socketChannel = ((ServerSocketChannel) channel).accept(); socketChannel.configureBlocking(false); socketChannel.socket() .setTcpNoDelay(true); socketChannel.socket() .setKeepAlive(true); // 将需要连接的socketChannel转交给processor去处理 processor.accept(socketChannel); } 3.3 实现负责处理IO的Processor 新连接进来后的处理:这里只是简单将新建立的连接放在了newConnection中。 public Processor(String name, RequestChannel requestChannel, ConcurrentHashMap<SelectionKey, ArrayBlockingQueue<ByteBuffer>> inFlightResponse) throws IOException { this.name = name; this.newConnection = new ConcurrentLinkedQueue<>(); this.selector = Selector.open(); this.inFlightResponse = inFlightResponse; this.requestChannel = requestChannel; } protected void accept(SocketChannel socketChannel) { try { System.out.println(name + "正在与" + socketChannel.getLocalAddress() + "建立连接"); } catch (IOException e) { e.printStackTrace(); } newConnection.add(socketChannel); // 还需要wakeUp,如果轮询阻塞了,告诉它可以不阻塞了 selector.wakeup(); } 处理newConnection,并注册OP_READ,等待客户端传输数据 @Override public void run() { while (true) { /* * 处理新链接 */ while (!newConnection.isEmpty()) { SocketChannel socketChannel = newConnection.poll(); try { socketChannel.register(selector, SelectionKey.OP_READ); } catch (ClosedChannelException e) { e.printStackTrace(); } } 新接收到的数据,我们会将其丢进 RequestChannel,并取消关注OP_READ,保证不会让多个请求同时进来。 requestChannel.sendRequest(new Request(selectionKey, byteBuffer));// 接受完数据后,把数据丢进队列 而最新处理完的数据,我们则会将其缓存在 inFlightRequest ,并关注OP_WIRTE。这是仿照 Kafka 的 inFlightRequest 做的,当然做得很粗糙。 Kafka 的 inFlightRequest 是将对应每个节点请求/应答的请求和响应放在了队列中,确保在同一时间段内,一个节点只会有一个请求和应答。这也巧妙的避开了拆包粘包问题,首先 Kafka 保证了不会同时对一个节点发送请求,其次,Kafka 使用了自定的协议(其实就是包头上标明了整个包的长度再加上CRC校验)来保证一次请求的完整性。 我们的Selector轮询中,会将刚才在上一步中关注了OP_WRITE的SelectionKey连同要返回的数据一同拿出,并进行处理,处理完成后,取消关注OP_WRITE,并重新关注OP_READ。 处理新请求与新应答,我们将READ事件和WRITE事件放在了Processor来进行。 /* * 将新应答放入缓冲队列 */ Response response = requestChannel.receiveResponse(); while (response != null) { SelectionKey key = response.getSelectionKey(); key.interestOps(key.interestOps() | SelectionKey.OP_WRITE); ArrayBlockingQueue<ByteBuffer> inFlight = inFlightResponse.getOrDefault(response.getSelectionKey(), new ArrayBlockingQueue<>(100)); inFlightResponse.put(response.getSelectionKey(), inFlight); try { inFlight.put(response.getByteBuffer()); } catch (InterruptedException e) { e.printStackTrace(); } response = requestChannel.receiveResponse(); } int ready = selector.select(500);// 半秒轮询一次 if (ready > 0) { Iterator<SelectionKey> selectionKeys = selector.selectedKeys() .iterator(); while (selectionKeys.hasNext()) { SelectionKey selectionKey = selectionKeys.next(); selectionKeys.remove(); /* * 处理新请求 */ if (selectionKey.isReadable()) { System.out.println(name + "正在处理新请求"); SocketChannel socketChannel = (SocketChannel) selectionKey.channel(); ByteBuffer byteBuffer = ByteBuffer.allocate(1024);// 懒得定协议,就默认取这么多吧 = = socketChannel.read(byteBuffer);// TODO 划重点 byteBuffer.flip(); requestChannel.sendRequest(new Request(selectionKey, byteBuffer));// 接受完数据后,把数据丢进队列 selectionKey.interestOps(selectionKey.interestOps() & ~SelectionKey.OP_READ);// 不再关注read } /* * 处理新应答 */ if (selectionKey.isWritable()) { System.out.println(name + "正在处理新应答"); ByteBuffer send = inFlightResponse.get(selectionKey)// // TODO 划重点 .poll(); SocketChannel socketChannel = (SocketChannel) selectionKey.channel(); socketChannel.write(send); selectionKey.interestOps(selectionKey.interestOps() & ~SelectionKey.OP_WRITE); selectionKey.interestOps(selectionKey.interestOps() | SelectionKey.OP_READ); } } } RequestChannel的实现实际上十分简单..就是两个队列 /** * Created by Anur IjuoKaruKas on 2018/12/13 */ public class RequestChannel { private ArrayBlockingQueue<Request> requestQueue; private ArrayBlockingQueue<Response> responseQueue; public RequestChannel() { requestQueue = new ArrayBlockingQueue<>(100); responseQueue = new ArrayBlockingQueue<>(100); } .......... } 3.4 实现负责处理业务的Handler 很容易想到,Handler 实际上就是负责从 RequestChannel 的 requestQueue 中拉取需要处理的数据,并塞回 RequestChannel 的 responseQueue 中。 我们可以根据接收数据的不同,来进行不同的业务处理。甚至如果需要拓展,这里可以像 netty 一样,仅仅把 Handler 当成Boss,具体业务的执行可以创建相应的线程池去进行处理,比如说 Fetch 业务比较耗时,我可以创建一个较大的线程池,去执行Fetch业务,而 Hello 业务,我们只需要 Executors.newSingleThreadExecutor() 即可。 @Override public void run() { while (true) { Request request = requestChannel.receiveRequest(); if (request != null) { System.out.println("接收的请求将由" + name + "进行处理"); handler(request.getSelectionKey(), request.getByteBuffer()); } } } public void handler(SelectionKey selectionKey, ByteBuffer byteBuffer) { byte[] bytes = byteBuffer.array(); String msg = new String(bytes); try { Thread.sleep(500); // 模拟业务处理 } catch (InterruptedException e) { e.printStackTrace(); } ByteBuffer response; if (msg.startsWith("Fetch")) { response = ByteBuffer.allocate(2048); response.put("Fetch ~~~~~~~~~~".getBytes()); response.put(bytes); response.flip(); } else if (msg.startsWith("Hello")) { response = ByteBuffer.allocate(2048); response.put("Hi ~~~~~~~~~~".getBytes()); response.put(bytes); response.flip(); } else { response = ByteBuffer.allocate(2048); response.put("Woww ~~~~~~~~~~".getBytes()); response.put(bytes); response.flip(); } System.out.println(name + "处理完毕,正将处理结果返回给Processor"); requestChannel.sendResponse(new Response(selectionKey, response)); } 3.5 运行我们很挫的模型 我们会发现现在这个很挫的 Reactor 模型的拓展性却很好,大头的两个 Processor 和 Handler 都是可以随意拓展数量的。Kafka 也是这么做的,不过 Kafka 是根据服务器核心的数量来创建 processor 和 handler 的: // processors的创建 val protocol = endpoint.protocolType // 网络协议 val processorEndIndex = processorBeginIndex + numProcessorThreads for (i <- processorBeginIndex until processorEndIndex) processors(i) = newProcessor(i, connectionQuotas, protocol) // 创建Processor // 在这里面会 // 循环启动processor线程 val acceptor = new Acceptor(endpoint, sendBufferSize, recvBufferSize, brokerId, processors.slice(processorBeginIndex, processorEndIndex), connectionQuotas) // 创建Acceptor // handlers的创建 // 保存KafkaRequestHandler的执行线程 val threads = new Array[Thread](numThreads) // KafkaRequestHandler集合 val runnables = new Array[KafkaRequestHandler](numThreads) for (i <- 0 until numThreads) { runnables(i) = new KafkaRequestHandler(i, brokerId, aggregateIdleMeter, numThreads, requestChannel, apis) threads(i) = Utils.daemonThread("kafka-request-handler-" + i, runnables(i)) threads(i).start() } 这里进行简单处理,我将所有的东西统统扔进一个线程池。 运行一下我们的整个模型,然后我们使用 Hercules 模拟客户端对我们的服务器进行请求。 /** * Created by Anur IjuoKaruKas on 2018/12/12 */ public class Reactor { public static final int PORT = 9999; public static void main(String[] args) throws IOException { RequestChannel requestChannel = new RequestChannel(); ConcurrentHashMap<SelectionKey, ArrayBlockingQueue<ByteBuffer>> inFlightResponse = new ConcurrentHashMap<>(); Processor processor1 = new Processor("p1", requestChannel, inFlightResponse); Processor processor2 = new Processor("p2", requestChannel, inFlightResponse); Acceptor acceptor = new Acceptor(new InetSocketAddress(PORT), new Processor[] { processor1, processor2 }); ExecutorService executorService = Executors.newFixedThreadPool(10); executorService.execute(acceptor); executorService.execute(processor1); executorService.execute(processor2); Handler handler1 = new Handler("h1", requestChannel); Handler handler2 = new Handler("h2", requestChannel); executorService.execute(handler1); executorService.execute(handler2); } } 建立连接后,我们模拟两个客户端,依次发送 ‘hello baby’,‘Fetch msg’ 和 ‘感谢gaojingyu_gw发现问题’。 得到如下响应: 并且服务器日志如下: 我们发现,p1和p2会交替从Acceptor中获取新的连接。h1和h2也交替会从RequestChannel中获取任务来进行执行~ 另外额外感谢gaojingyu_gw发现问题,反馈无法建立更多连接。博主来来回回看了很多个地方,终于发现原版的代码确实无法建立更多的连接,Acceptor、Processor中的轮询代码有误,错误代码如下: Set<SelectionKey> selectionKeys = selector.selectedKeys(); for (SelectionKey selectionKey : selectionKeys) { if (selectionKey.isAcceptable()) { this.accept(selectionKey, processors[currentProcessors]); currentProcessors = (currentProcessors + 1) % processors.length; } else { throw new RuntimeException("不应该出现的情况,因为只订阅了OP_ACCEPT"); } } 我们在循环selectionKeys的时候,不能直接循环。我们需要获得其迭代器,并在每次获得迭代器的下一个元素时,将这个元素移除。为什么不能直接循环: Keys are added to the selected-key set by selection operations. A key may be removed directly from the selected-key set by invoking the set's remove method or by invoking the remove method of an iterator obtained from the set. Keys are never removed from the selected-key set in any other way; they are not, in particular, removed as a side effect of selection operations. Keys may not be added directly to the selected-key set. 正确代码如下: Iterator<SelectionKey> selectionKeys = selector.selectedKeys().iterator(); while (selectionKeys.hasNext()) { SelectionKey selectionKey = selectionKeys.next(); selectionKeys.remove(); if (selectionKey.isAcceptable()) { this.accept(selectionKey, processors[currentProcessors]); currentProcessors = (currentProcessors + 1) % processors.length; } else { throw new RuntimeException("不应该出现的情况,因为只订阅了OP_ACCEPT"); } } 具体的代码请点击这里,直接拉取下来即可运行,运行的主类是 src/reactor/Reactor 觉得好的话可以顺手为文章点个赞哟~谢谢各位看官老爷! 参考文献: 《Apeche Kafka源码剖析》—— 徐郡明著 Kafka 源码 0.10.0.1
)