首页 文章 精选 留言 我的

精选列表

搜索[一键部署],共10000篇文章
优秀的个人博客,低调大师

Hive 基本环境部署

一、Hive 运行模式 与Hadoop类似,Hive也有 3 种运行模式: 1. 内嵌模式 将元数据保存在本地内嵌的 Derby数据库中,这是使用hive最简单的方式。但是这种方式缺点也比较明显,因为一个内嵌的 Derby 数据库每次只能访问一个数据文件,这也就意味着它不支持多会话连接。 2. 本地模式 这种模式是将元数据保存在本地独立的数据库中(一般是MySQL),这用就可以支持多会话和多用户连接了。 3. 远程模式 此模式应用于 Hive 客户端较多的情况。把mysql数据库独立出来,将元数据保存在远端独立的 MySQL 服务中,避免了在每个客户端都安装 MySQL 服务从而造成冗余浪费的情况。 二、下载安装 Hive http://hive.apache.org/downloads.html 三、配置系统环境变量 修改 /etc/profile 文件,使用sudo vim /etc/profile来修改: #Hiveenvironment exportHIVE_HOME=/usr/local/hadoop/hive exportPATH=$HIVE_HOME/bin:$HIVE_HOME/conf:$PATH 四、内嵌模式 (1)修改 Hive 配置文件 $HIVE_HOME/conf 对应的是 Hive 的配置文件路径,类似于之前学习的Hbase, 该路径下的 hive-site.xml 是 Hive 工程的配置文件。默认情况下,该文件并不存在,我们需要拷贝它的模版来实现: $cphive-default.xml.templatehive-site.xml hive-site.xml 的主要配置有: hive.metastore.warehouse.dir该参数指定了 Hive 的数据存储目录,默认位置在 HDFS 上面的 /user/hive/warehouse 路径下。 hive.exec.scratchdir该参数指定了 Hive 的数据临时文件目录,默认位置为 HDFS 上面的 /tmp/hive 路径下。 同时我们还要修改 Hive 目录下 /conf/hive-env.sh 文件(请根据自己的实际路径修改),该文件默认也不存在,同样是拷贝它的模版来修改: exportHADOOP_HEAPSIZE=1024 #SetHADOOP_HOMEtopointtoaspecifichadoopinstalldirectory HADOOP_HOME=/usr/local/hadoop #HiveConfigurationDirectorycanbecontrolledby: exportHIVE_CONF_DIR=/usr/local/hadoop/hive/conf #Foldercontainingextraibrariesrequiredforhivecompilation/executioncanbecontrolledby: exportHIVE_AUX_JARS_PATH=/usr/local/hadoop/hive/lib (2)创建必要目录 前面我们看到 hive-site.xml 文件中有两个重要的路径,切换到hadoop用户下查看 HDFS 是否有这些路径: $hadoopdfs-ls/ 没有发现上面提到的路径,因此我们需要自己新建这些目录,并且给它们赋予用户写(W)权限。 $hadoopdfs-mkdir/user/hive/warehouse $hadoopdfs-mkdir/tmp/hive $hadoopdfs-chmod777/user/hive/warehouse $hadoopdfs-chmod777/tmp/hive 如果你遇到no such file or directory类似的错误,就一步一步新建目录,例如: $hadoopdfs-mkdir/tmp $hadoopdfs-mkdir/tmp/hive 检查是否新建成功hadoop dfs -ls /以及hadoop dfs -ls /user/hive/: (3)修改 io.tmpdir 路径 同时,要修改 hive-site.xml 中所有包含${system:Java.io.tmpdir}字段的 value 即路径(vim下 / 表示搜索,后面跟你的关键词,比如搜索 hello,则为/hello, 再回车即可),你可以自己新建一个目录来替换它,例如/home/hive/iotmp. 同样注意修改写权限。如果不修改这个,你很可能会出现如下错误 (4) 初始化 :/schematool -initSchema -dbType derby 运行 Hive ./hive 前面我们已经提到过,内嵌模式使用默认配置和 Derby 数据库,所以无需其它特别修改,先./start-all.sh启动 Hadoop, 然后直接运行hive: 报错 解决方法: create table test_table(id INT, username string); show tables; 五、远程模式 1.配置 vimhive-site.xml <?xmlversion="1.0"?><configuration> <property> <name>javax.jdo.option.ConnectionURL</name><value>jdbc:mysql://{ip:port}/{databases}</value></property><property><name>javax.jdo.option.ConnectionDriveName</name><value>com.mysql.jdbc.Driver</value></property><property><name>javax.jdo.option.ConnectionUserName</name><value>{username}</value></property><property><name>javax.jdo.option.ConnectionPassword</name><value>{password}</value></property><property><name>hive.metastore.warehouse.dir</name><value>/hive/warehouse</value></property></configuration> 初始化 ./schematool -dbType mysql -initSchema 2.启动metastore ./hive--servicemetastore& 默认端口 9083 在debug模式下开启metastore :执行hive --service metastore -hiveconf hive.root.logger=DEBUG,console 3.启动HiveServer2 默认端口:10000 ./hive--servicehiveserver2& 4.启动客户端 ./hive--servicecli 5.启动shell 或是 beeline ./beeline-ujdbc:hive2://app:10000/default 六.配置spark为默认引擎 hive使用spark有严格的版本限制, Hive根pom.xml的<spark.version>定义了使用它构建/测试的Spark的版本 版本不对会报如下错误: FAILED: Execution Error, return code 1 from org.apache.hadoop.hive.ql.exec.spark.SparkTask 第一种方法 1.要将Spark依赖项添加到Hive 在Hive 2.2.0之前,将spark-assembly jar链接到HIVE_HOME / lib 2.配置Hive执行引擎使用Spark: Hive-site.xml配置 <property> <name>hive.execution.engine</name> <value>Spark</value></property> 第二种方法 配置hive-site.xml <property><name>spark.home</name><value>/root/spark-without-hive</value></property> 七、Java客户端 1.默认用户名和密码为空 2.默认端口10000,如果连不上须关闭防火墙 vim /etc/sysconfig/iptables -A INPUT -p tcp -m state --state NEW -m tcp --dport 10000 -j ACCEPT service iptables restart 错误 org.apache.hive.service.cli.HiveSQLException: Failed to open new session: java.lang.RuntimeException: org.apache.hadoop.ipc.RemoteException(org.apache.hadoop.security.authorize.AuthorizationException): User: root is not allowed to impersonate anonymousat org.apache.hive.jdbc.Utils.verifySuccess(Utils.java:264)at org.apache.hive.jdbc.Utils.verifySuccess(Utils.java:255)at org.apache.hive.jdbc.HiveConnection.openSession(HiveConnection.java:593)at org.apache.hive.jdbc.HiveConnection.<init>(HiveConnection.java:172)at org.apache.hive.jdbc.HiveDriver.connect(HiveDriver.java:107)at java.sql.DriverManager.getConnection(Unknown Source)at java.sql.DriverManager.getConnection(Unknown Source)at com.car.test.HiveJdbcCli.getConn(HiveJdbcCli.java:156)at com.car.test.HiveJdbcCli.main(HiveJdbcCli.java:35) 解决方法: 修改hadoop 配置文件 etc/hadoop/core-site.xml,加入如下配置项 <property> <name>hadoop.proxyuser.root.hosts</name> <value>*</value> </property> <property> <name>hadoop.proxyuser.root.groups</name> <value>*</value> </property> 重启hadoop 测试:./beeline -u 'jdbc:hive2://localhost:10000/userdb' -n username(替换为上述的用户名部分) 错误 java.sql.SQLException: org.apache.thrift.transport.TTransportException: SASL authentication not completeat org.apache.hive.jdbc.HiveStatement.closeClientOperation(HiveStatement.java:211)at org.apache.hive.jdbc.HiveStatement.close(HiveStatement.java:228)at com.car.test.HiveJdbcCli.main(HiveJdbcCli.java:74)Caused by: org.apache.thrift.transport.TTransportException: SASL authentication not complete 解决办法: This is because the thrift server is expecting to authenticate via SASL when you open your transport connection. Hive Server 2 defaults to using SASL - unfortunately,PHPlacks a version of TSaslClientTransport (which is used as a wrapper around another TTransport object) which handles the SASL negotiation when you open your transport connection. The easiest solution for now is to set the following property in your hive-site.xml <property><name>hive.server2.authentication</name><value>NOSASL</value></property> Hive安装方法二以下操作在hdpsrc3 节点上操作一,下载安装包1,下载hive http://mirrors.hust.edu.cn/apache/ 得到apache-hive-1.1.0.tar.gz ,放到该目录下 /home/hdpsrc/ 2,下载mysql http://dev.mysql.com/downloads/mysql/5.5.html#downloads 得到 mysql-client-5.5.39-2.linux2.6.x86_64.rpmmysql-devel-5.5.39-2.linux2.6.x86_64.rpmmysql-server-5.5.39-2.linux2.6.x86_64.rpmmysql-shared-5.5.39-2.linux2.6.x86_64.rpmmysql-shared-compat-5.5.39-2.linux2.6.x86_64.rpm拷贝到该目录下 /home/hdpsrc/Desktop/mysql/二,安装mysql1,卸载系统自带的mysql相关安装包,仅卸载 mysql 开头的包rpm -qa|grep MySQLsudo rpm -e --nodeps mysql-libs-5.1.71-1.el6.x86_642,安装cd /home/hdpsrc/Desktop/mysql/sudo rpm -ivh mysql-*sudo cp /usr/share/mysql/my-large.cnf /etc/my.cnf3,启动设置mysql启动mysql服务sudo service mysql start设置为开机自启动sudo chkconfig mysql on设置root用户登录密码sudo /usr/bin/mysqladmin -u root password 'wu123'登录mysql 以root用户身份登录mysql -uroot -pwu123创建hive用户,数据库等insert into mysql.user(Host,User,Password) values("localhost","hive",password("hive"));create database hive;grant all on hive.* to hive@'%' identified by 'hive';grant all on hive.* to hive@'localhost' identified by 'hive';flush privileges; 退出mysql exit验证hive用户mysql -uhive -phiveshow databases;看到如下反馈信息,则说明创建成功mysql> show databases;+--------------------+| Database |+--------------------+| information_schema || hive || test |+--------------------+3 rows in set (0.00 sec)退出mysqlexit三,安装hive1,解压安装包cd ~tar -zxvf apache-hive-1.1.0-bin.tar.gz2,建立软连接ln -s apache-hive-1.1.0-bin hive3,添加环境变量vi .bash_profile导入下面的环境变量export HIVE_HOME=/home/hdpsrc/hiveexport PATH=$PATH:$HIVE_HOME/bin使其有效source .bash_profile4,修改hive-site.xml主要修改以下参数<property> <name>javax.jdo.option.ConnectionURL </name> <value>jdbc:mysql://localhost:3306/hive </value> </property> <property> <name>javax.jdo.option.ConnectionDriverName </name> <value>com.mysql.jdbc.Driver </value> </property><property> <name>javax.jdo.option.ConnectionPassword </name> <value>hive </value> </property> <property> <name>hive.hwi.listen.port </name> <value>9999 </value> <description>This is the port the Hive Web Interface will listen on </descript ion> </property> <property> <name>datanucleus.autoCreateSchema </name> <value>true</value> </property> <property> <name>datanucleus.fixedDatastore </name> <value>false</value> </property> </property> <property> <name>javax.jdo.option.ConnectionUserName</name> <value>hive</value> <description>Username to use against metastore database</description> </property> <property> <name>hive.exec.local.scratchdir</name> <value>/home/hdpsrc/hive/iotmp</value> <description>Local scratch space for Hive jobs</description> </property> <property> <name>hive.downloaded.resources.dir</name> <value>/home/hdpsrc/hive/iotmp</value> <description>Temporary local directory for added resources in the remote file system.</description> </property> <property> <name>hive.querylog.location</name> <value>/home/hdpsrc/hive/iotmp</value> <description>Location of Hive run time structured log file</description> </property>cp hive/conf/hive-default.xml.template hive/conf/hive-site.xml编辑hive-site.xml5,拷贝mysql-connector-java-5.1.6-bin.jar 到hive 的lib下面mv /home/hdpsrc/Desktop/mysql-connector-java-5.1.6-bin.jar /home/hdpsrc/hive/lib/6,把jline-2.12.jar拷贝到hadoop相应的目录下,替代jline-0.9.94.jar,否则启动会报错cp /home/hdpsrc/hive/lib/jline-2.12.jar /home/hdpsrc/hadoop-2.6.0/share/hadoop/yarn/lib/mv /home/hdpsrc/hadoop-2.6.0/share/hadoop/yarn/lib/jline-0.9.94.jar /home/hdpsrc/hadoop-2.6.0/share/hadoop/yarn/lib/jline-0.9.94.jar.bak /7,穿件hive临时文件夹mkdir /home/hdpsrc/hive/iotmp四,启动测试hive启动hadoop后,执行hive命令hive测试输入 show database;hive> show databases;OKdefaultTime taken: 0.907 seconds, Fetched: 1 row(s)遇到问题总结希望可以帮助遇到此类问题的人。建议先建元数据库,设置编码latin1。否则建好元数据相关可能会出问题,如drop table 卡死, create table too long等等hive对utf-8支持不好。设置完编码latin1,发现table 字段描述无法显示中文。修改元数据库表的字符(1)修改表字段注解和表注解alter table COLUMNS_V2 modify column COMMENT varchar(256) character set utf8alter table TABLE_PARAMS modify column PARAM_VALUE varchar(4000) character set utf8(2) 修改分区字段注解:alter table PARTITION_PARAMS modify column PARAM_VALUE varchar(4000) character set utf8 ; alter table PARTITION_KEYS modify column PKEY_COMMENT varchar(4000) character set utf8; (3)修改索引注解:alter table INDEX_PARAMS modify column PARAM_VALUE varchar(4000) character set utf8;连接元数据设置dbc:mysql://192.168.209.1:3306/metastore_hive_db?createDatabaseIfNotExist=true&amp;characterEncoding=UTF-8对于已经建好的表,不起作用。 最好安装的时候就修改编码格式。元数据mysql远程模式配置<property> <name>hive.metastore.uris</name> <value>thrift://192.168.223.129:9083</value> <description>运行hive的主机地址及端口(特别重要ip不要弄错)</description></property>启动元数据bin/hive --service metastore &到此hive已经安装完成参考文档:http://www.mamicode.com/info-detail-516526.htmlhttp://blog.csdn.net/blueheart20/article/details/38460541备注:1,遇到的问题:http://www.mamicode.com/info-detail-516526.html

优秀的个人博客,低调大师

Apache AirFlow安装部署

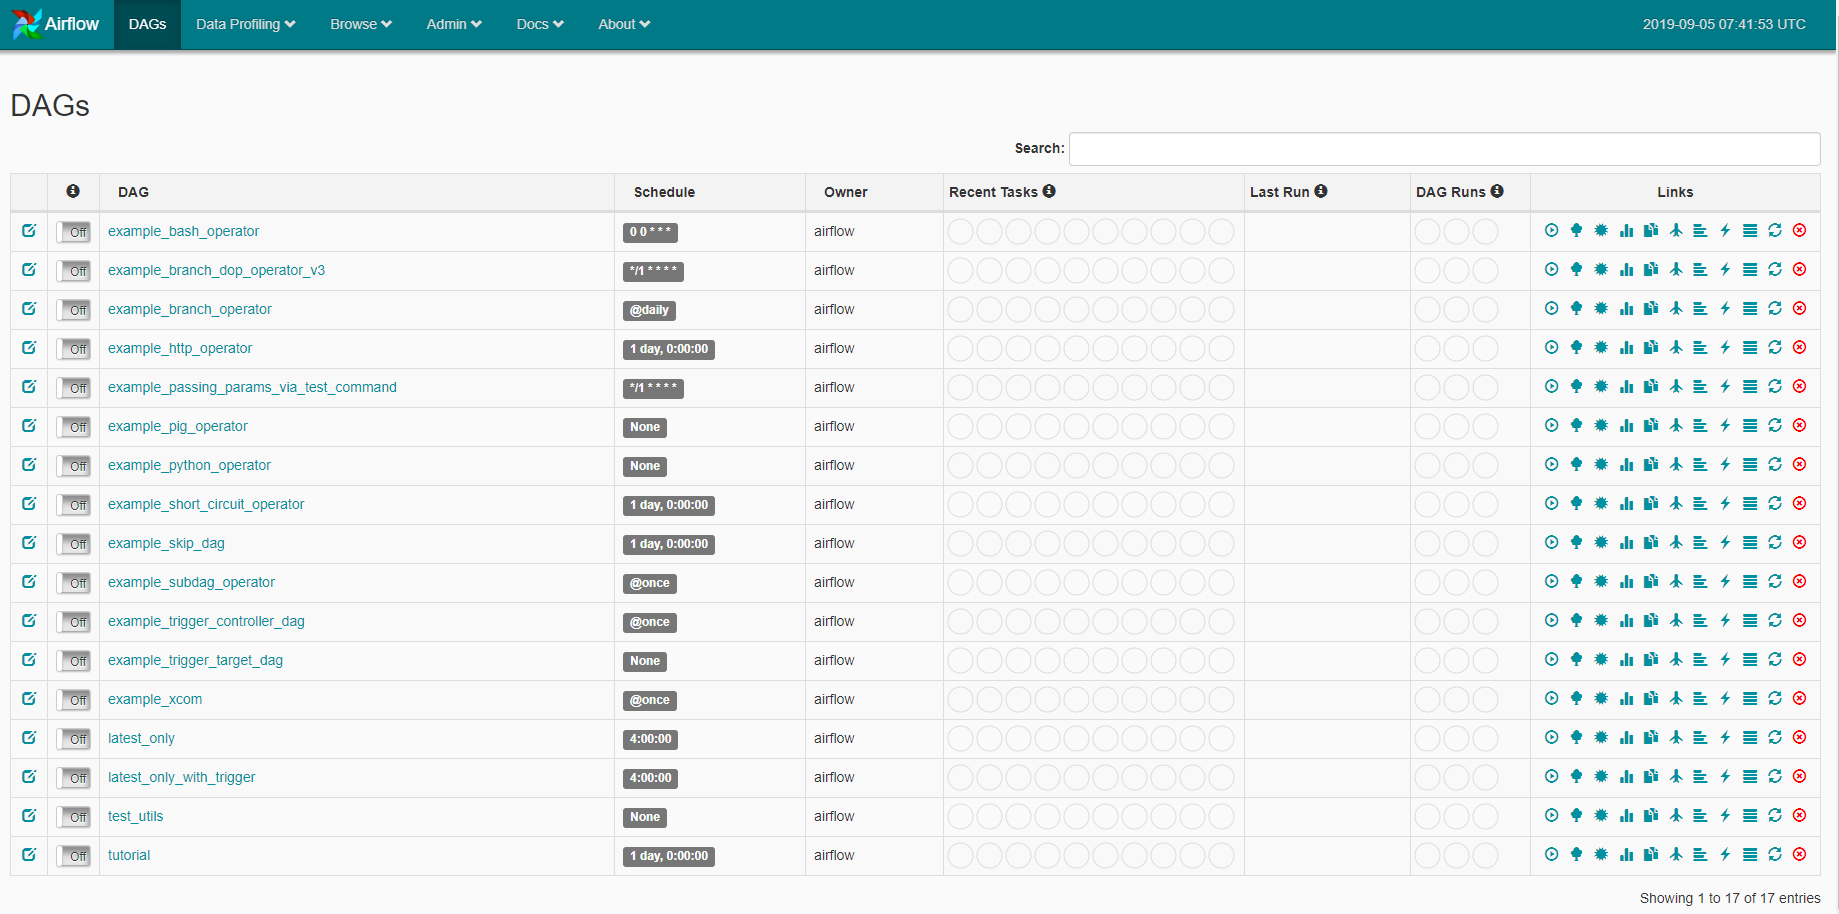
1.环境依赖 Centos7 组件 版本 Python 2.7.5 AirFlow 1.10.5 pyhton依赖库 (airflow) [bigdata@carbondata airflow]$ pip list DEPRECATION: Python 2.7 will reach the end of its life on January 1st, 2020. Please upgrade your Python as Python 2.7 won't be maintained after that date. A future version of pip will drop support for Python 2.7. More details about Python 2 support in pip, can be found at https://pip.pypa.io/en/latest/development/release-process/#python-2-support Package Version ---------------------- ----------- alembic 1.1.0 apache-airflow 1.10.5 apispec 2.0.2 attrs 19.1.0 Babel 2.7.0 cached-property 1.5.1 certifi 2019.6.16 chardet 3.0.4 Click 7.0 colorama 0.4.1 colorlog 4.0.2 configparser 3.5.3 croniter 0.3.30 dill 0.2.9 docutils 0.15.2 dumb-init 1.2.2 enum34 1.1.6 Flask 1.1.1 Flask-Admin 1.5.3 Flask-AppBuilder 1.13.1 Flask-Babel 0.12.2 Flask-Caching 1.3.3 Flask-JWT-Extended 3.22.0 Flask-Login 0.4.1 Flask-OpenID 1.2.5 Flask-SQLAlchemy 2.4.0 flask-swagger 0.2.13 Flask-WTF 0.14.2 funcsigs 1.0.0 functools32 3.2.3.post2 future 0.16.0 futures 3.3.0 gunicorn 19.9.0 idna 2.8 iso8601 0.1.12 itsdangerous 1.1.0 Jinja2 2.10.1 json-merge-patch 0.2 jsonschema 3.0.2 lazy-object-proxy 1.4.2 lockfile 0.12.2 Mako 1.1.0 Markdown 2.6.11 MarkupSafe 1.1.1 marshmallow 2.19.5 marshmallow-enum 1.5.1 marshmallow-sqlalchemy 0.17.2 monotonic 1.5 numpy 1.16.5 ordereddict 1.1 pandas 0.24.2 pendulum 1.4.4 pip 19.2.3 prison 0.1.0 psutil 5.6.3 Pygments 2.4.2 PyJWT 1.7.1 pyrsistent 0.15.4 python-daemon 2.1.2 python-dateutil 2.8.0 python-editor 1.0.4 python-openid 2.2.5 pytz 2019.2 pytzdata 2019.2 PyYAML 5.1.2 requests 2.22.0 setproctitle 1.1.10 setuptools 41.2.0 six 1.12.0 SQLAlchemy 1.3.8 tabulate 0.8.3 tenacity 4.12.0 termcolor 1.1.0 text-unidecode 1.2 thrift 0.11.0 typing 3.7.4.1 tzlocal 1.5.1 unicodecsv 0.14.1 urllib3 1.25.3 Werkzeug 0.15.6 wheel 0.33.6 WTForms 2.2.1 zope.deprecation 4.4.0 2.资源准备 安装包下载 百度云盘链接:链接:https://pan.baidu.com/s/1LQKEwVMR8Tp_LZBqgO7xdg 提取码:ku54 3.安装 a).安装virtualenv ## 在线安装 pip install virtualenv ## 离线安装 b).安装tensorflow 进入虚拟机,安装tensorflow ## Step1: 创建虚拟机 virtualenv airflow ## Step2: 进入虚拟机 source ./airflow/bin/activate ## 在线安装 pip install airflow ## 离线安装 pip install --no-index --find-links=/path/to/airflow_1.10.5/package -r airflow-1.10.5.txt 4.初始化数据源 命令: airflow initdb (airflow) [bigdata@carbondata airflow]$ airflow initdb [2019-09-05 23:16:38,422] {__init__.py:51} INFO - Using executor SequentialExecutor DEPRECATION: Python 2.7 will reach the end of its life on January 1st, 2020. Airflow 1.10 will be the last release series to support Python 2 DB: sqlite:////home/bigdata/airflow/airflow.db [2019-09-05 23:16:39,766] {db.py:369} INFO - Creating tables INFO [alembic.runtime.migration] Context impl SQLiteImpl. INFO [alembic.runtime.migration] Will assume non-transactional DDL. INFO [alembic.runtime.migration] Running upgrade -> e3a246e0dc1, current schema INFO [alembic.runtime.migration] Running upgrade e3a246e0dc1 -> 1507a7289a2f, create is_encrypted /home/bigdata/airflow/lib/python2.7/site-packages/alembic/ddl/sqlite.py:39: UserWarning: Skipping unsupported ALTER for creation of implicit constraint "Skipping unsupported ALTER for " INFO [alembic.runtime.migration] Running upgrade 1507a7289a2f -> 13eb55f81627, maintain history for compatibility with earlier migrations INFO [alembic.runtime.migration] Running upgrade 13eb55f81627 -> 338e90f54d61, More logging into task_instance INFO [alembic.runtime.migration] Running upgrade 338e90f54d61 -> 52d714495f0, job_id indices INFO [alembic.runtime.migration] Running upgrade 52d714495f0 -> 502898887f84, Adding extra to Log INFO [alembic.runtime.migration] Running upgrade 502898887f84 -> 1b38cef5b76e, add dagrun INFO [alembic.runtime.migration] Running upgrade 1b38cef5b76e -> 2e541a1dcfed, task_duration INFO [alembic.runtime.migration] Running upgrade 2e541a1dcfed -> 40e67319e3a9, dagrun_config INFO [alembic.runtime.migration] Running upgrade 40e67319e3a9 -> 561833c1c74b, add password column to user INFO [alembic.runtime.migration] Running upgrade 561833c1c74b -> 4446e08588, dagrun start end INFO [alembic.runtime.migration] Running upgrade 4446e08588 -> bbc73705a13e, Add notification_sent column to sla_miss INFO [alembic.runtime.migration] Running upgrade bbc73705a13e -> bba5a7cfc896, Add a column to track the encryption state of the 'Extra' field in connection INFO [alembic.runtime.migration] Running upgrade bba5a7cfc896 -> 1968acfc09e3, add is_encrypted column to variable table INFO [alembic.runtime.migration] Running upgrade 1968acfc09e3 -> 2e82aab8ef20, rename user table INFO [alembic.runtime.migration] Running upgrade 2e82aab8ef20 -> 211e584da130, add TI state index INFO [alembic.runtime.migration] Running upgrade 211e584da130 -> 64de9cddf6c9, add task fails journal table INFO [alembic.runtime.migration] Running upgrade 64de9cddf6c9 -> f2ca10b85618, add dag_stats table INFO [alembic.runtime.migration] Running upgrade f2ca10b85618 -> 4addfa1236f1, Add fractional seconds to mysql tables INFO [alembic.runtime.migration] Running upgrade 4addfa1236f1 -> 8504051e801b, xcom dag task indices INFO [alembic.runtime.migration] Running upgrade 8504051e801b -> 5e7d17757c7a, add pid field to TaskInstance INFO [alembic.runtime.migration] Running upgrade 5e7d17757c7a -> 127d2bf2dfa7, Add dag_id/state index on dag_run table INFO [alembic.runtime.migration] Running upgrade 127d2bf2dfa7 -> cc1e65623dc7, add max tries column to task instance INFO [alembic.runtime.migration] Running upgrade cc1e65623dc7 -> bdaa763e6c56, Make xcom value column a large binary INFO [alembic.runtime.migration] Running upgrade bdaa763e6c56 -> 947454bf1dff, add ti job_id index INFO [alembic.runtime.migration] Running upgrade 947454bf1dff -> d2ae31099d61, Increase text size for MySQL (not relevant for other DBs' text types) INFO [alembic.runtime.migration] Running upgrade d2ae31099d61 -> 0e2a74e0fc9f, Add time zone awareness INFO [alembic.runtime.migration] Running upgrade d2ae31099d61 -> 33ae817a1ff4, kubernetes_resource_checkpointing INFO [alembic.runtime.migration] Running upgrade 33ae817a1ff4 -> 27c6a30d7c24, kubernetes_resource_checkpointing INFO [alembic.runtime.migration] Running upgrade 27c6a30d7c24 -> 86770d1215c0, add kubernetes scheduler uniqueness INFO [alembic.runtime.migration] Running upgrade 86770d1215c0, 0e2a74e0fc9f -> 05f30312d566, merge heads INFO [alembic.runtime.migration] Running upgrade 05f30312d566 -> f23433877c24, fix mysql not null constraint INFO [alembic.runtime.migration] Running upgrade f23433877c24 -> 856955da8476, fix sqlite foreign key INFO [alembic.runtime.migration] Running upgrade 856955da8476 -> 9635ae0956e7, index-faskfail INFO [alembic.runtime.migration] Running upgrade 9635ae0956e7 -> dd25f486b8ea INFO [alembic.runtime.migration] Running upgrade dd25f486b8ea -> bf00311e1990, add index to taskinstance INFO [alembic.runtime.migration] Running upgrade 9635ae0956e7 -> 0a2a5b66e19d, add task_reschedule table INFO [alembic.runtime.migration] Running upgrade 0a2a5b66e19d, bf00311e1990 -> 03bc53e68815, merge_heads_2 INFO [alembic.runtime.migration] Running upgrade 03bc53e68815 -> 41f5f12752f8, add superuser field INFO [alembic.runtime.migration] Running upgrade 41f5f12752f8 -> c8ffec048a3b, add fields to dag INFO [alembic.runtime.migration] Running upgrade c8ffec048a3b -> dd4ecb8fbee3, Add schedule interval to dag INFO [alembic.runtime.migration] Running upgrade dd4ecb8fbee3 -> 939bb1e647c8, task reschedule fk on cascade delete INFO [alembic.runtime.migration] Running upgrade c8ffec048a3b -> a56c9515abdc, Remove dag_stat table INFO [alembic.runtime.migration] Running upgrade 939bb1e647c8 -> 6e96a59344a4, Make TaskInstance.pool not nullable INFO [alembic.runtime.migration] Running upgrade 6e96a59344a4 -> 74effc47d867, change datetime to datetime2(6) on MSSQL tables INFO [alembic.runtime.migration] Running upgrade 939bb1e647c8 -> 004c1210f153, increase queue name size limit WARNI [airflow.utils.log.logging_mixin.LoggingMixin] cryptography not found - values will not be stored encrypted. Done. 5.启动服务 a).启动webserver 命令: airflow webserver -p port (airflow) [bigdata@carbondata airflow]$ airflow webserver -p 8383 [2019-09-05 23:17:30,787] {__init__.py:51} INFO - Using executor SequentialExecutor DEPRECATION: Python 2.7 will reach the end of its life on January 1st, 2020. Airflow 1.10 will be the last release series to support Python 2 ____________ _____________ ____ |__( )_________ __/__ /________ __ ____ /| |_ /__ ___/_ /_ __ /_ __ \_ | /| / / ___ ___ | / _ / _ __/ _ / / /_/ /_ |/ |/ / _/_/ |_/_/ /_/ /_/ /_/ \____/____/|__/ [2019-09-05 23:17:31,379] {dagbag.py:90} INFO - Filling up the DagBag from /home/bigdata/airflow/dags Running the Gunicorn Server with: Workers: 4 sync Host: 0.0.0.0:8383 Timeout: 120 Logfiles: - - ================================================================= [2019-09-05 23:17:32 +0000] [66386] [INFO] Starting gunicorn 19.9.0 [2019-09-05 23:17:32 +0000] [66386] [INFO] Listening at: http://0.0.0.0:8383 (66386) [2019-09-05 23:17:32 +0000] [66386] [INFO] Using worker: sync [2019-09-05 23:17:32 +0000] [66396] [INFO] Booting worker with pid: 66396 [2019-09-05 23:17:32,886] {__init__.py:51} INFO - Using executor SequentialExecutor [2019-09-05 23:17:32 +0000] [66397] [INFO] Booting worker with pid: 66397 [2019-09-05 23:17:32,958] {__init__.py:51} INFO - Using executor SequentialExecutor [2019-09-05 23:17:33 +0000] [66399] [INFO] Booting worker with pid: 66399 [2019-09-05 23:17:33,123] {__init__.py:51} INFO - Using executor SequentialExecutor [2019-09-05 23:17:33 +0000] [66401] [INFO] Booting worker with pid: 66401 [2019-09-05 23:17:33,227] {__init__.py:51} INFO - Using executor SequentialExecutor [2019-09-05 23:17:33,263] {dagbag.py:90} INFO - Filling up the DagBag from /home/bigdata/airflow/dags [2019-09-05 23:17:33,389] {dagbag.py:90} INFO - Filling up the DagBag from /home/bigdata/airflow/dags [2019-09-05 23:17:33,691] {dagbag.py:90} INFO - Filling up the DagBag from /home/bigdata/airflow/dags [2019-09-05 23:17:33,778] {dagbag.py:90} INFO - Filling up the DagBag from /home/bigdata/airflow/dags [2019-09-05 23:18:05 +0000] [66386] [INFO] Handling signal: ttin [2019-09-05 23:18:05 +0000] [66439] [INFO] Booting worker with pid: 66439 [2019-09-05 23:18:05,321] {__init__.py:51} INFO - Using executor SequentialExecutor [2019-09-05 23:18:05,593] {dagbag.py:90} INFO - Filling up the DagBag from /home/bigdata/airflow/dags [2019-09-05 23:18:06 +0000] [66386] [INFO] Handling signal: ttou [2019-09-05 23:18:06 +0000] [66396] [INFO] Worker exiting (pid: 66396) b).启动scheduler 命令: airflow scheduler (airflow) [bigdata@carbondata airflow]$ airflow scheduler & [2] 66557 (airflow) [bigdata@carbondata airflow]$ [2019-09-05 23:19:27,397] {__init__.py:51} INFO - Using executor SequentialExecutor DEPRECATION: Python 2.7 will reach the end of its life on January 1st, 2020. Airflow 1.10 will be the last release series to support Python 2 ____________ _____________ ____ |__( )_________ __/__ /________ __ ____ /| |_ /__ ___/_ /_ __ /_ __ \_ | /| / / ___ ___ | / _ / _ __/ _ / / /_/ /_ |/ |/ / _/_/ |_/_/ /_/ /_/ /_/ \____/____/|__/ [2019-09-05 23:19:42,748] {scheduler_job.py:1315} INFO - Starting the scheduler [2019-09-05 23:19:42,748] {scheduler_job.py:1323} INFO - Running execute loop for -1 seconds [2019-09-05 23:19:42,748] {scheduler_job.py:1324} INFO - Processing each file at most -1 times [2019-09-05 23:19:42,748] {scheduler_job.py:1327} INFO - Searching for files in /home/bigdata/airflow/dags [2019-09-05 23:19:42,753] {scheduler_job.py:1329} INFO - There are 20 files in /home/bigdata/airflow/dags [2019-09-05 23:19:42,753] {scheduler_job.py:1376} INFO - Resetting orphaned tasks for active dag runs [2019-09-05 23:19:42,796] {dag_processing.py:545} INFO - Launched DagFileProcessorManager with pid: 66585 [2019-09-05 23:19:42,809] {settings.py:54} INFO - Configured default timezone <Timezone [UTC]> [2019-09-05 23:19:42,831] {dag_processing.py:748} ERROR - Cannot use more than 1 thread when using sqlite. Setting parallelism to 1 [2019-09-05 23:19:50 +0000] [66525] [INFO] Handling signal: ttin [2019-09-05 23:19:50 +0000] [66593] [INFO] Booting worker with pid: 66593 [2019-09-05 23:19:50,301] {__init__.py:51} INFO - Using executor SequentialExecutor [2019-09-05 23:19:50,589] {dagbag.py:90} INFO - Filling up the DagBag from /home/bigdata/airflow/dags [2019-09-05 23:19:51 +0000] [66525] [INFO] Handling signal: ttou [2019-09-05 23:19:51 +0000] [66535] [INFO] Worker exiting (pid: 66535) 6.验证 URL: http://hostname:port

优秀的个人博客,低调大师

EOS docker 部署 入门

1.首先准备一台内存大于8Gib的机器,安装docker 2.然后从docker hub上拉最新的eos镜像 开发镜像 docker pull eosio/eos-dev 正式镜像 docker pull eosio/eos 默认拉取的是last的tag,如有需要也可以更改其他tag docker pull eosio/eos:lastest 为了同时运行nodeos和keosd,我们需要从eos github上下载一个文件 https://github.com/EOSIO/eos/blob/master/Docker/docker-compose-latest.yml 检查文件内的镜像名称是否与你刚才pull下来的一样,如果不一样要改成一样的 version: "3" services: nodeosd: image: eosio/

优秀的个人博客,低调大师

使用 Docker 部署 MediaWiki

MediaWiki 0 简介 MediaWiki 是 Wikipedia 使用的网站解决方案的开源版,以个人观点来看,Wiki 在这个时代显得不够时尚,且不支持 MarkDown 等新兴的标记语言,另外页面的组织方式采用了自己的一套管理语言,上手需要一定的学习成本。不过经典总归是经典。 MediaWiki 也提供了官方的 Docker image,这就节省了不少安装环境的工作量,接下来就来看看私有 MediaWiki 站点是如何搭建起来的吧。 1 使用 docker 安装 MediaWiki 第一部分中的命令除非特殊说明,都需要 root 权限。 1.1 安装 Docker 第一部自然是要先安装 docker,我们使用官方的 docker 安装脚本来规避不同操作系统安装命令不同的问题,命令运行结束后,docker 就安装好了,如果你的环境中还没有 wget 命令,CentOS 和 RedHat 用 yum install -y wget,Debian 和 Ubuntu 系统用 apt install -y wget 安装。 # wget -qO- https://get.docker.com/ | sh 接下来需修改 docker 的下载源: # cat /etc/docker/daemon.json { "registry-mirrors": ["https://registry.docker-cn.com", "http://hub.c.163.com"] } # systemctl restart docker.service 1.2 下载所需的 docker images MediaWiki 需要 MySQL,且 MediaWiki 镜像中不提供 MySQL,所以 MySQL 镜像也须要下载。 # docker pull wikimedia/mediawiki:1.30.0-wmf4 # docker pull mysql/mysql-server:5.7 1.3 启动 MediaWiki 和 MySQL,并关联 MediaWiki 需要依赖于 MySQL,所以要先启动 MySQL,再启动 MediaWiki,不然启动会失败。而且需要开启 MySQL 的远程连接权限。 # docker run -d --name mediawiki-mysql -e MYSQL_ROOT_PASSWORD=<mysql-root-password> mysql/mysql-server:5.7 # docker exec -it mediawiki-mysql /bin/bash bash-4.2# mysql -uroot -p<mysql-root-password> ...... mysql> GRANT ALL PRIVILEGES ON *.* TO 'root'@'%' IDENTIFIED BY '<mysql-root-password>' WITH GRANT OPTION; mysql> FLUSH PRIVILEGES; 然后启动 MediaWiki。 # docker run --name facethink-mediawiki --link mediawiki-mysql:mysql -p 80:80 -e MEDIAWIKI_DB_PASSWORD=<mysql-root-password> -d wikimedia/mediawiki:1.30.0-wmf4 需要注意的是,启动 MediaWiki 时,需要使用 --link 参数来关联之前启动的 MySQL。 另外 -p 将 MediaWiki docker 中的 80 端口和 docker 宿主机上的 80 端口绑定在了一起。在浏览器中访问 docker 宿主机的 IP 就可以访问刚刚建好的 MediaWiki 网站了。不过要保证宿主机上 80 端口没有被其他程序占用,不然 docker run 命令无法执行成功。 下面就是刚刚建好的 wiki 站点页面,过程并不复杂,如果遇到问题,可以流言讨论: MediaWiki main page 2. MediaWiki 配置 2.1 MediaWiki 的默认管理员 Wiki 是有了,不过这么素的界面,当然是要做些配置,那么就需要管理员权限了,可在安装过程中,我们并不知道这些信息。不过我们可以从 MySQL 中找到。 # docker exec -it mediawiki-mysql -- mysql -uroot -p<mysql-root-password> ...... mysql> use mediawiki; mysql> select * from user; mysql> select * from user; +---------+-----------+----------------+-------------------------------------------------------------------------------------------------------------------------------------------+------------------+-------------------+---------------------+----------------+----------------------------------+--------------------------+----------------------------------+--------------------------+-------------------+----------------+-----------------------+ | user_id | user_name | user_real_name | user_password | user_newpassword | user_newpass_time | user_email | user_touched | user_token | user_email_authenticated | user_email_token | user_email_token_expires | user_registration | user_editcount | user_password_expires | +---------+-----------+----------------+-------------------------------------------------------------------------------------------------------------------------------------------+------------------+-------------------+---------------------+----------------+----------------------------------+--------------------------+----------------------------------+--------------------------+-------------------+----------------+-----------------------+ | 1 | Admin | | :pbkdf2:sha512:30000:64:CyuznKx44JuAClGG7avxow==:V9MLp3r/obJIjv+BR2Bs0eCvyWkyDK0eveqEE+9HiUgxvMjzu26kGBz+BcZSmlRssLswzq1j3a+PVuh6AFEaxQ== | | NULL | NULL | 20180622063649 | 490898f83d4ad9d1ec1c0276a740209b | NULL | d3bcbd107e31220c891334c8e1ba0440 | 20180629063644 | 20180622050411 | 0 | NULL +---------+-----------+----------------+-------------------------------------------------------------------------------------------------------------------------------------------+------------------+-------------------+---------------------+----------------+----------------------------------+--------------------------+----------------------------------+--------------------------+-------------------+----------------+-----------------------+ 看以看到默认账户是 Admin,但密码是加密的,好在 root 用户是有权限修改这个密码的, mysql> UPDATE user SET user_password = MD5( CONCAT( user_id, '-', MD5( 'NEWPASS' ) ) ) WHERE user_id =1; 至此,我们终于可以用管理员的权限登陆了。 login page 2.2 使用 php 变量配置 MediaWiki 站点地址 假设已经为站点申请了域名:wiki.example.com,如何让 wiki 自己能够识别这个域名呢? 这需要登陆到 MediaWiki 的 docker 中去,修改配置文件。MediaWiki 是 php 语言编写的,所以配置文件以 .php 后缀结尾。 $ sudo docker exec -it facethink-mediawiki /bin/bash root@1a0f3692a08d:/# vi /var/www/html/LocalSettings.php ... $wgServer = "http://wiki.example.com"; ... php 可以动态读取配置文件,所以无需重启即可生效。 2.3 修改 Logo 默认 logo 是金色的葵花,那么如何更换成自己心仪的图标呢? 首先需要开启 wiki 的文件上传功能: $ sudo docker exec -it facethink-mediawiki /bin/bash root@1a0f3692a08d:/# vi /var/www/html/LocalSettings.php ... $wgEnableUploads = true; ... 然后给 /var/www/html/images 目录添加全部用户开启所有权限。 $ sudo docker exec -it facethink-mediawiki /bin/bash root@1a0f3692a08d:/# chmod 777 /var/www/html/images 然后在 Upload File 页面上传文件: upload file page 找到文件所在目录: # ll /var/www/html/images/thumb/6/64/example.png/120px-example.png 修改 php 配置文件: $ sudo docker exec -it facethink-mediawiki /bin/bash root@1a0f3692a08d:/# vi /var/www/html/LocalSettings.php ... $wgLogo = $wgScriptPath . "images/thumb/6/64/example.png/120px-example.png"; ... 好了,刷新一下页面,看看更换 logo 之后效果如何吧。 2.4 邮箱配置 MediaWiki 的邮箱配置很坑,调试不太方便,而且默认配置很容易被判定成垃圾邮件, 或者无效,被拒掉,需要调整发件人的地址来规避。这里用的是 Elastic Email 的邮件服务器系统,这里大家需要自己注册。 配置部分还是需要修改 /var/www/html/LocalSettings.php # cat /var/www/html/LocalSettings.php ... $wgServerName = "example.com"; $wgPasswordSender = ""; $wgSMTP = array( 'host' => 'smtp.elasticemail.com', 'port' => 2525, 'IDHost' => 'wiki.example.com', 'username' => <user-id>, 'password' => <password>, 'auth' => true ); ... 同时需要安装 PHP 与邮件发送相关的插件,这里还需要说明一点,MediaWiki 的 docker 虽然能运行 PHP 代码,但实际上并没有安装 PHP,原因是 Apache 能够解析运行 PHP,LAMP 果然是集成度很高。而安装 pear 是要依赖于 PHP 环境的,所以必须要安装 PHP。 # apt install php, php-pear # pear install mail, net_smtp 2.5 限制用户权限 如果不想开放 Wiki 的公开注册,并且在未登陆时,限制可见的页面的话,还是需要通过对 LocalSettings.php 的定制实现。 # cat /var/www/html/LocalSettings.php ... # Prevent new user registrations $wgWhitelistAccount = array("user" => 0, "sysop" => 1, "developer" => 1); $wgGroupPermissions['*']['createaccount'] = false; $wgGroupPermissions['*']['read'] = true; $wgGroupPermissions['*']['edit'] = false; $wgWhitelistRead = array("Main Page", "Special:Userlogin", "Wikipedia:Help"); ... 2.6 添加用户 现在已经关闭了用户注册,那用户只能手动添加了。MediaWiki 也提供添加用户的脚本: # apt install php-mbstring, php-mysql # php /usr/src/mediawiki/maintenance/createAndPromote.php --conf=/var/www/html/LocalSettings.php --force <user-id> <password> 3. 参考文档 MySQL Docker MediaWiki docker file MediaWiki default admin user and password MediaWiki configuration settings Trouble uploading after installation

优秀的个人博客,低调大师

Saltstack基本安装部署

配置环境 master节点 :172.16.100.10 minion节点 :172.16.100.20 msater节点 #####安装软件包##### # curl -o /etc/yum.repos.d/epel-7.repo http://mirrors.aliyun.com/repo/epel-7.repo # yum -y install salt-master salt-minion # systemctl start salt-master.service # ^start^enable #####修改minion配置文件##### # vim /etc/salt/minion master: 172.16.100.10 主节点地址 id: FQDN 不设置的话为默认主机名,存放位置/etc/salt/minion_id # systemctl start salt-minion # ^start^enable # tree /etc/salt/pki/ /etc/salt/pki/ ├── master │ ├── master.pem │ ├── master.pub │ ├── minions │ ├── minions_autosign │ ├── minions_denied │ ├── minions_pre 存放监控节点公钥 │ │ ├── compute │ │ └── controller │ └── minions_rejected └── minion ├── minion.pem └── minion.pub minion节点 #####安装软件包##### # curl -o /etc/yum.repos.d/epel-7.repo http://mirrors.aliyun.com/repo/epel-7.repo # yum -y install salt-minion #####修改配置文件##### # vim /etc/salt/minion master: 172.16.100.10 # systemctl start salt-minion # ^start^enable # tree /etc/salt/pki/minion /etc/salt/pki/minion ├── minion.pem └── minion.pub 服务启动生成的公钥会传输到主节点的/etc/salt/pki/master/minions_pre目录下 master点 #####添加监控节点##### # salt-key -a compute,controller # salt-key 查看允许通信的监控主机 Accepted Keys: compute controller Denied Keys: Unaccepted Keys: Rejected Keys: # tree /etc/salt/pki /etc/salt/pki ├── master │ ├── master.pem │ ├── master.pub │ ├── minions 公钥从minios_pre转到minios │ │ ├── compute │ │ └── controller │ ├── minions_autosign │ ├── minions_denied │ ├── minions_pre │ └── minions_rejected └── minion ├── minion_master.pub ├── minion.pem └── minion.pub # netstat -lpta |grep 4505 发送端口 tcp 0 0 0.0.0.0:4505 0.0.0.0:* LISTEN 67903/python tcp 0 0 172.16.100.10:52424 172.16.100.10:4505 ESTABLISHED 69995/python tcp 0 0 172.16.100.10:4505 172.16.100.20:60225 ESTABLISHED 67903/python tcp 0 0 172.16.100.10:4505 172.16.100.10:52424 ESTABLISHED 67903/python # netstat -lpta |grep 4506 接受端口 tcp 0 0 0.0.0.0:4506 0.0.0.0:* LISTEN 67925/python tcp 0 0 172.16.100.10:4506 172.16.100.10:51547 ESTABLISHED 67925/python tcp 0 0 172.16.100.10:51547 172.16.100.10:4506 ESTABLISHED 69995/python tcp 0 0 172.16.100.10:4506 172.16.100.20:44469 ESTABLISHED 67925/python

优秀的个人博客,低调大师

docker快速部署gitlab

docker安装gitlabhttps://docs.gitlab.com/omnibus/docker/使用文档:https://docs.gitlab.com.cn/ce/gitlab-basics/README.htmlgit使用:http://blog.jobbole.com/25775/ 拉取镜像:docker pull gitlab/gitlab-ce 运行gitlab sudo docker run --detach \ --hostname 10.39.10.223 \ --publish 443:443 --publish 80:80 --publish 2222:22 \ --name gitlab \ --restart always \ --volume /data0/gitlab/config:/etc/gitlab \ --volume /data0/gitlab/logs:/var/log/gitlab \ --volume /data0/gitlab/data:/var/opt/gitlab \ gitlab/gitlab-ce:latest 运行成功后,即可通过80访问页面,2222为ssh端口。 配置gitlab服务器的访问地址修改gitlab的配置文件vi /data0/gitlab/config/gitlab.rb 配置http协议所使用的访问地址,此处为主机ip地址: external_url 'http://10.39.10.223' 修改gitlab.rb配置文件之后,重启容器。或者在容器里执行gitlab-ctl reconfigure命令 http://10.39.3.23 Command line instructions Git global setup git config --global user.name "dataqa"git config --global user.email "249016681@qq.com" Create a new repository git clone git@10.39.10.223:dataqa/te.gitcd tetouch README.mdgit add README.mdgit commit -m "add README"git push -u origin master Existing folder cd existing_foldergit initgit remote add origin git@10.39.3.23:dataqa/te.gitgit add .git commit -m "Initial commit"git push -u origin master Existing Git repository cd existing_repogit remote add origin git@10.39.3.23:dataqa/te.gitgit push -u origin --allgit push -u origin --tags

资源下载

更多资源
Nacos

Nacos

Nacos /nɑ:kəʊs/ 是 Dynamic Naming and Configuration Service 的首字母简称,一个易于构建 AI Agent 应用的动态服务发现、配置管理和AI智能体管理平台。Nacos 致力于帮助您发现、配置和管理微服务及AI智能体应用。Nacos 提供了一组简单易用的特性集,帮助您快速实现动态服务发现、服务配置、服务元数据、流量管理。Nacos 帮助您更敏捷和容易地构建、交付和管理微服务平台。

Rocky Linux

Rocky Linux

Rocky Linux(中文名:洛基)是由Gregory Kurtzer于2020年12月发起的企业级Linux发行版,作为CentOS稳定版停止维护后与RHEL(Red Hat Enterprise Linux)完全兼容的开源替代方案,由社区拥有并管理,支持x86_64、aarch64等架构。其通过重新编译RHEL源代码提供长期稳定性,采用模块化包装和SELinux安全架构,默认包含GNOME桌面环境及XFS文件系统,支持十年生命周期更新。

Sublime Text

Sublime Text

Sublime Text具有漂亮的用户界面和强大的功能,例如代码缩略图,Python的插件,代码段等。还可自定义键绑定,菜单和工具栏。Sublime Text 的主要功能包括:拼写检查,书签,完整的 Python API , Goto 功能,即时项目切换,多选择,多窗口等等。Sublime Text 是一个跨平台的编辑器,同时支持Windows、Linux、Mac OS X等操作系统。

WebStorm

WebStorm

WebStorm 是jetbrains公司旗下一款JavaScript 开发工具。目前已经被广大中国JS开发者誉为“Web前端开发神器”、“最强大的HTML5编辑器”、“最智能的JavaScript IDE”等。与IntelliJ IDEA同源,继承了IntelliJ IDEA强大的JS部分的功能。

用户登录
用户注册