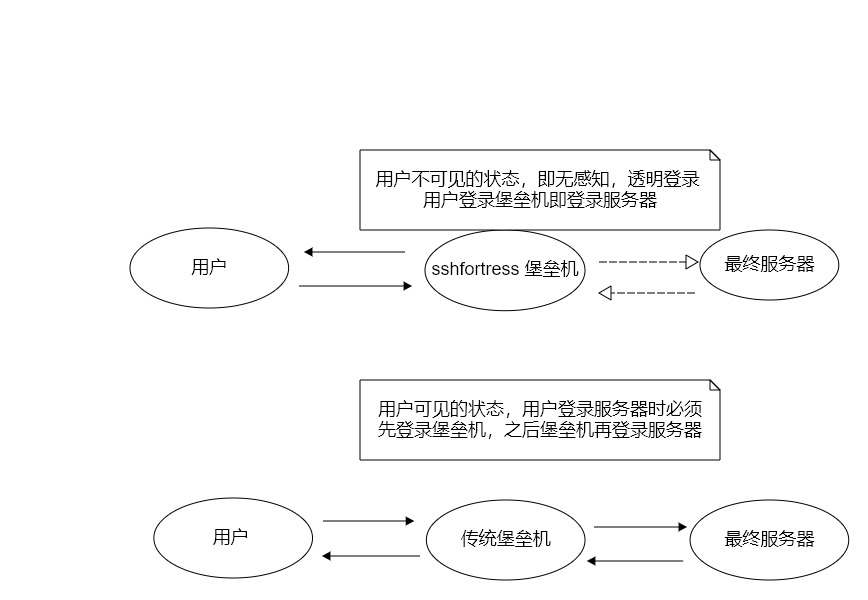
真正无感知的堡垒机----sshfortress
SSHfortress 中文 English 下载文件尽量到github去下载,因为目前官网的带宽很小 社区版完全免费,用户无须注册和授权文件,版本区别。 这个说明是介绍如何安装sshfortress系统,它有一个Web管理界面greatfortress是用java实现的用来可示化的增加账号、资产等功能;后端sshfortress是在openssh的基础上开发的功能,好了往下面看如何安装和配置吧。 目录 产品简介 功能 注意 依赖 安装 演示视频 如何使用 产品简介 sshfortress堡垒机集中了运维身份鉴别、账号管控、系统操作审计等多种功能。基于协议反向代理实现,通过反向代理的方式实现对 SSH 、SCP 及 SFTP 协议的数据流进行全程记录。统一运维入口,统一用户与主机帐号间的权限关系,防止内部数据泄密。 功能 堡垒机具备操作审计、职权管控、安全认证、高效运维等功能。 操作审计 多面记录运维人员的操作行为,作为事件追溯的保障和事故分析的依据。 运维操作记录: 操作失误、恶意操作、越权操作详细记录。 Linux命令审计: 可提取命令符审计。 文件传输审计: 支持远程桌面文件传输、SFTP的原文件审计。 终端录制回放: 支持终端录制ssh操作过程,完全兼容linux自带工具scriptreplay进行回放。回放文件存放路径/var/log/sshfortress_playback,按年月日归类。 职权管控 通过账号管控和权限组管理,实现分职权进行人员和资产的管理。 账号管控: 运维账号唯一,解决共享账号、临时账号、滥用权限等问题。 权组管理: 按照人员、部门组织、资源组,建立人员职责与资源分配的授权管理。 高效运维 原生实现,不改变用户使用习惯,仿佛没有使用堡垒机一样。 C/S架构运维接入: 支持SSH、SCP、SFTP协议。 多运维工具: 支持PuTTY、SecureCRT、Xshell等工具。 注意 sshfortress将接管22端口,所以在这之前你需要另外编译安装一个openssh并监听其他端口(22端口以外)以便你远程连接 https://openbsd.hk/pub/OpenBSD/OpenSSH/portable/ # wget https://openbsd.hk/pub/OpenBSD/OpenSSH/portable/openssh-8.1p1.tar.gz # tar zxvf openssh-8.1p1.tar.gz # cd openssh-8.1p1/ # ./configure --prefix=/usr/local/openssh2233 # make -j4; make install # sed -i '1i\Port 2233' /usr/local/openssh2233/etc/sshd_config # sed -i '2i\PermitRootLogin yes' /usr/local/openssh2233/etc/sshd_config # /usr/local/openssh2233/sbin/sshd 可以创建一个开机启动项 rc-local在centos7以前是加载的,之后不再开机加载了,现在我们打开它 [root@centos8 tmp]# cat /usr/lib/systemd/system/rc-local.service [Unit] Description=/etc/rc.local ConditionPathExists=/etc/rc.local [Service] Type=forking ExecStart=/etc/rc.local start TimeoutSec=0 StandardOutput=tty RemainAfterExit=yes SysVStartPriority=99 [Install] WantedBy=multi-user.target # systemctl daemon-reload # systemctl enable rc-local # chmod +x /etc/rc.local # echo "/usr/local/openssh2233/sbin/sshd" >> /etc/rc.local 友情提示centos8开始启用了nftables而不是iptables,如果你不熟悉规则的添加,最好清空规则 # nft flush ruleset 依赖 glibc 2.17+ mysql 5.6+ or MariaDB jdk 1.8 tomcat 8 sshfortress 安装 进入资源页按需下载即可,https://sshfortress.com/downloads/ 或者 https://github.com/sshfortress/sshfortress/releases 进行下载 apache-tomcat-8.5.31.tar.gz 09-Jan-2020 11:21 9M audit_sec.sql 09-Jan-2020 16:07 10M greatfortress.tar.gz 10-Jan-2020 09:52 65M jdk-8u172-linux-x64.tar.gz 09-Jan-2020 11:22 182M sshfortress-1.6.1.sha256 09-Jan-2020 16:14 155 sshfortress-1.6.1.tar.gz 09-Jan-2020 15:58 10M jdk # tar zxvf jdk-8u172-linux-x64.tar.gz -C /usr/local/ # ln -s /usr/local/jdk1.8.0_172/ /usr/local/jdk # echo "export JAVA_HOME=/usr/local/jdk" >> /etc/profile # echo "export JRE_HOME=/usr/local/jdk/jre" >> /etc/profile # echo "export CLASSPATH=.:\${JAVA_HOME}/lib:\${JRE_HOME}/lib:\${CLASSPATH}" >> /etc/profile # echo "export PATH=\${JAVA_HOME}/bin:\${JRE_HOME}/bin:/usr/local/mysql/bin:\${PATH}" >> /etc/profile # source /etc/profile mysql 选项1: 源码编译 # yum -y install make gcc-c++ cmake bison-devel bison ncurses-devel libgnomeui-devel perl-Module-Install bzip2 libtirpc-devel # wget https://github.com/sshfortress/sshfortress/releases/download/1.6.1/mysql-5.7.16.tar.gz # wget https://github.com/sshfortress/sshfortress/releases/download/1.6.1/boost_1_59_0.tar.bz2 # tar jxvf boost_1_59_0.tar.bz2 -C /tmp # tar zxvf mysql-5.7.16.tar.gz # groupadd mysql;useradd -r -g mysql -s /bin/false -M mysql # cd mysql-5.7.16/ # cmake . -DCMAKE_INSTALL_PREFIX=/usr/local/mysql \ -DINSTALL_DATADIR=/usr/local/mysql/data \ -DSYSCONFDIR=/usr/local/mysql/etc \ -DDEFAULT_CHARSET=utf8mb4 \ -DDEFAULT_COLLATION=utf8mb4_general_ci \ -DEXTRA_CHARSETS=all \ -USER=mysql \ -DWITH_MYISAM_STORAGE_ENGINE=1 \ -DWITH_INNOBASE_STORAGE_ENGINE=1 \ -DWITH_ARCHIVE_STORAGE_ENGINE=1 \ -DWITH_BLACKHOLE_STORAGE_ENGINE=1 \ -DWITH_MEMORY_STORAGE_ENGINE=1 \ -DWITH_BOOST=/tmp/boost_1_59_0 # make -j4; make install # chown -R mysql.mysql /usr/local/mysql # cp -f support-files/mysql.server /etc/init.d/mysqld # mysqld --initialize --user=mysql --basedir=/usr/local/mysql --datadir=/usr/local/mysql/data # /etc/init.d/mysqld start # 初始密码,初始化的时候可以看到 <temporary password 'nibmcstse9!i'> # mysql -uroot -p'NiBMcstse9!i' --connect-expired-password -e "alter user 'root'@'localhost' identified by 'SSHfortress123@';CREATE USER 'sshfortress'@'%' IDENTIFIED BY 'SSHfortress123@';GRANT ALL PRIVILEGES ON *.* TO 'sshfortress'@'%' IDENTIFIED BY 'SSHfortress123@' WITH GRANT OPTION MAX_QUERIES_PER_HOUR 0 MAX_CONNECTIONS_PER_HOUR 0 MAX_UPDATES_PER_HOUR 0 MAX_USER_CONNECTIONS 0;flush privileges;" # mysql -uroot -p'SSHfortress123@' -e "create database audit_sec; use mysql;create user 'audit'@'127.0.0.1' identified by 'audit'; grant all privileges on audit_sec.* to 'audit'@'127.0.0.1';" # mysql -uroot -p'SSHfortress123@' -e "set global log_bin_trust_function_creators=1; set global explicit_defaults_for_timestamp=1;set global sql_mode='STRICT_TRANS_TABLES,NO_ENGINE_SUBSTITUTION';" # mysql -uroot -p'SSHfortress123@' audit_sec <audit_sec.sql 为了防止每次重启失效,所以把它写入到配置文件中如下: #[root@centos8 local]# cat etc my.cnf [mysqld] log_bin_trust_function_creators="on" explicit_defaults_for_timestamp="on" sql_mode="NO_ENGINE_SUBSTITUTION,STRICT_TRANS_TABLES" # systemctl enable mysqld # /etc/init.d/mysqld restart 选项2: YUM安装 这里centos8.0 mysql 8.0为例 # yum install mysql-server # echo "skip_ssl" >> /etc/my.cnf.d/mysql-server.cnf # echo "log_bin_trust_function_creators=on" >> /etc/my.cnf.d/mysql-server.cnf # echo "explicit_defaults_for_timestamp=on" >> /etc/my.cnf.d/mysql-server.cnf # echo "sql_mode=NO_ENGINE_SUBSTITUTION,STRICT_TRANS_TABLES" >> /etc/my.cnf.d/mysql-server.cnf # systemctl enable mysqld # systemctl restart mysqld # mysql -e "create user audit@'127.0.0.1' identified by 'audit'; grant all privileges on *.* to audit@'127.0.0.1' with grant option;" # mysql -e "create database audit_sec;" # mysql audit_sec < audit_sec.sql 选项3: APT安装 这里以Debian 9.9.0 MariaDB 10.1.41为例 # apt-get install mysql-server # systemctl enable mariadb # mysql -e "create user audit@'127.0.0.1' identified by 'audit'; grant all privileges on *.* to audit@'127.0.0.1' with grant option;" # mysql -e "create database audit_sec;" # mysql audit_sec < audit_sec.sql tomcat # tar zxvf apache-tomcat-8.5.31.tar.gz -C /usr/local/ # ln -s /usr/local/apache-tomcat-8.5.31/ /usr/local/tomcat # rm -rf /usr/local/tomcat/webapps/* # tar zxvf greatfortress.tar.gz -C /usr/local/tomcat/webapps # sed -i 's/192.168.7.3/x.x.x.x/g' /usr/local/tomcat/webapps/greatfortress/common/layui/layui.js # /usr/local/tomcat/bin/catalina.sh start x.x.x.x 是你的监听地址 http://x.x.x.x:8080/greatfortress 帐号:fortress 密码 hilookhere 启动tomcat后,首次登录有点慢 sshfortress # tar zxvf sshfortress-x.x.x.tar.gz # cd sshfortress-x.x.x # ./install.sh 演示视频 https://sshfortress.com/en/video.html 如何使用 登录名加两个减号加资产ID Example: ssh name--ID@x.x.x.x scp ll.jpg name--ID@x.x.x.x:/tmp sftp name--ID@x.x.x.