首页 文章 精选 留言 我的

精选列表

搜索[翻译工具],共10000篇文章
优秀的个人博客,低调大师

Docker, Java EE 7, 和 Maven with WebLogic 12.1.3 【已翻译100%】

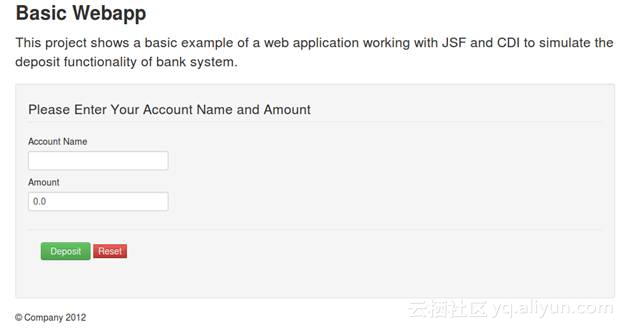
WebLogic 12.1.3已经发布,并且对于JavaEE7的APIs在数据库支持web应用开发上也是最重要的支持。以下是在发行版本中支持的一些标准: Java Persistence API 2.1 (implemented by EclipseLink) JAX-RS 2.0 (implemented by Jersey) JSON-P 1.0 (implemented by GlassFish subproject jsonp) WebSockets 1.0 (implemented by Tyrus) 如上面你所见到的,WebLogic 以相同的实现方式捆绑使用在GlassFish 4.0上,如果你已经开始开发Java EE 7应用(Well,当然是仅限上述的APIs),并且正在寻找一个商用支持的环境,那么WebLogic 可以提供给你一个合适的应用服务。 同样Apache Maven Plugin 有许多的改进,这使得开发者的生活更简便,允许更好的自动化测试(Arquillian(一种单元测试框架)!),持续的集成和分发。那些支持基于Maven的工程的IDE同样从中受益。 这是不是使得WebLogic成为运行现代的满足RESTful原则的HTML5/Javascript网页应用程序和WebSockets服务的最好的Java EE应用服务器?如果我告诉你是不公平的,对吗?因此,为了让你有一个更好的方式去测试WebLogic,我创建了一个Dockerfile。这个Dockerfile可以使你在你自己的开发环境中创建一个WebLogic域并且去如你所想的那样去测试它。去WebLogic Community GitHub repository的weblogic-docker上下载Developer ZIP Distro Dockerfile。 开始使用WebLogic 12.1.3,Java EE 7,Maven和Docker 现在让我们开始。首先开发人员登陆Oracle.com并下载 WebLogic 12.1.3 ZIP Distro for Developers。保存该文件,供以后使用。 **安装WebLogic 12.1.3 没有Docker那么(容易)**WebLogic ZIP 非常容易就可以安装: 1.解压的内容在一个文件夹里,你要保存zip包里的wls12130文件夹,在我的linux机器上我把他放在了 /home/bruno/Work/tools/. 2.进去wls12130文件夹并运行configure.cmd(windows)或者configure.sh(unix) 创建domain的过程可能要花很长时间,此时安装过程是冻结的,如果是linux系统请确保你的配置:$ export CONFIG_JVM_ARGS=-Djava.security.egd=file:/dev/./urandom 3.当安装程序问你如果你想创建一个domain,type[Y] 4.安装程序会问你的用户名/密码。在开发环境中,我通常使用weblogic/welcome1 5.安装程序将WebLogic马上开始,你可以检查它运行在http://localhost:7001/控制台 使用Docker安装WebLogic 12.1.3(容易) 如果你的开发环境是基于Linux的,而且你现在并不熟悉Docker,那么先看What is Docker,然后试一试。长话短说:Docker是一个Linux容器;它就像个虚拟机,但又不是(例如有人在Vagrant虚拟机上运行Docker)。对我们来说最重要的是它会用虚拟的IP地址创建一个虚拟的网络接口。 我笔记本的系统是Ubuntu 14.04,所以我用Docker Installation Instruction来安装。假设你已经使用某种方式已经在你的机器上安装了Docker,阅读instructions for your own operational system. 1.下载Zip文件或者从weblogic-docker的Git仓库上检出,然后提取文件到你电脑的某个地方。我会使用$DOCKER_HOME作为文件存放位置的引用。 2.复制你先前下载的wls12130_dev.zip到$DOCKER_HOME/weblogic-docker/weblogic12c-zip/ 3.使用build.sh(以sudo身份)命令,等待Docker释放它的魔法 4.使用dockWebLogic.sh命令,观察WebLogic在Docker容器的启动和运行 它会和你主机的7001端口绑定 5.打开http://localhost:7001/console。Username/password 是 weblogic/welcome1 注意:我们不为任何环境下Docker上的WebLogic提供支持,所以在你自己的硬盘上使用它。开发者分布(ZIP)仅仅是为了开发环境,而且也不支持,因为它是不可打补丁的。如果你仍然想在Docker上运行WebLogic 12c Full Distribution,阅读here's a way to set it up. 配置本地Maven仓库 现在可以不再本地安装WebLogic就可以使用Maven了,这对CI环境(Hudson/Jenkins)很适合。你仍然需要一步安装,即设置Maven插件的初始化。你一旦为你的远程Maven仓库安装完毕并部署在一个远程服务器上,其它的开发者和CI 环境就不需要在本地进行WebLogic的安装了。对于本地开发者来说,你同样可以把WebLogic作为一个“远程”服务器。 配置Maven的步骤已经被写成文档了,地址为:Maven Synchronization Plug-in.在本地仓库上安装后,你可以调用sync goal来填充本地或远程的仓库。下面是在本地环境下填充的步骤: 1.到WebLogic安装目录的根目录下,例如:$ cd /home/bruno/Work/wls12130/ 2.进入子目录$ cd oracle_common/plugins/maven/com/oracle/maven/oracle-maven-sync/12.1.3/ 3.执行下面的命令:$ mvn install:install-file -DpomFile=oracle-maven-sync-12.1.3.pom -Dfile=oracle-maven-sync-12.1.3.jar 4.最后,调用push命令向你的仓库(在本例中是本地仓库)上传所有的Maven artifacts(插件、原型等)$ mvn com.oracle.maven:oracle-maven-sync:push -DoracleHome=/home/bruno/Work/wls12130/ 如果你想配置一个远程的仓库,参考文档Populating a Remote Repository。 WebLogic提供了一组原型的预配置Maven插件。让我们创建一个简单的Web项目使用基本WebApp Maven原型: mvn archetype:generate -DarchetypeGroupId=com.oracle.weblogic.archetype -DarchetypeArtifactId=basic-webapp -DarchetypeVersion=12.1.3-0-0 -DgroupId=org.mycompany -DartifactId=my-basic-webapp-project -Dversion=1.0-SNAPSHOT 现在你当然可以打开这个Maven项目关于NetBeans,IntelliJ IDEA,Eclipse,然后安装WebLogic IDE。或者你可以发出下面的命令来构建,包,这场战争和部署工件WebLogic服务器你计算机上运行(使用码头工人或正常安装): mvn package pre-integration-test -DoracleUsername=weblogic -DoraclePassword=welcome1 -Dupload=true 我们一定要使用-Dupload = true因为我不确定您使用的是否为Docker。如果你是,那么需要上传自容器没有访问您的本地文件系统(although possible!) 现在打开http://localhost:7001 / basicWebapp看看这个示例应用程序启动并运行!

优秀的个人博客,低调大师

如何在 Swift 中优雅地处理 JSON 【已翻译100%】

因为Swift对于类型有非常严格的控制,它在处理JSON时是挺麻烦的,因为它天生就是隐式类型。SwiftyJSON是一个能帮助我们在Swift中使用JSON的开源类库。开始之前,让我们先看一下在Swift中处理JSON是多么痛苦。 在Swift中使用JSON的问题 以Twitter API为例。使用Swift,从tweet中取得一个用户的“name”值应该非常简单。下面就是我们要处理的JSON: [ { ...... "text": "just another test", ...... "user": { "name": "OAuth Dancer", "favourites_count": 7, "entities": { "url": { "urls": [ { "expanded_url": null, "url": "http://bit.ly/oauth-dancer", "indices": [ 0, 26 ], "display_url": null } ] } ...... }, "in_reply_to_screen_name": null, }, ......] 在Swift中,你必须这样使用: let jsonObject : AnyObject! = NSJSONSerialization.JSONObjectWithData(dataFromTwitter, options: NSJSONReadingOptions.MutableContainers, error: nil) if let statusesArray = jsonObject as? NSArray{ if let aStatus = statusesArray[0] as? NSDictionary{ if let user = aStatus["user"] as? NSDictionary{ if let userName = user["name"] as? NSDictionary{ //Finally We Got The Name } } } } 或者,你可以用另外的一个方法,但这不易于阅读: let jsonObject : AnyObject! = NSJSONSerialization.JSONObjectWithData(dataFromTwitter, options: NSJSONReadingOptions.MutableContainers, error: nil) if let userName = (((jsonObject as? NSArray)?[0] as? NSDictionary)?["user"] as? NSDictionary)?["name"]{ //What A disaster above } 开始 下载在这儿下载SwiftyJSON,或者直接在GitHub克隆它: git clone https://github.com/lingoer/SwiftyJSON.git 基础用法 SwiftyJSON的使用十分的简单: 典型的NSURLSessionTask抓取Twitter的API将产生dataFromNetwork: NSData!: 你首先应该做的事情是初始化JSONValue: let json = JSONValue(dataFromNetwork) JSONValue是一个枚举类型表示一个典型的JSON数据结构。 你能使用subscripts检索不同的值从原始的JSONValue中,像这样: let userName:JSONValue = json[0]["user"]["name"] 注意userName仍然是一个JSONValue。那怎样得到一个字符串呢? 你能用.string属性得到JSON数据表示的真正值。 let userNameString = userName.string! 对每一种JSON类型, JSONValue都提供了一种属性检索它: var string: String? var number: NSNumber? var bool: Bool? var array: Array<JSONValue>? var object: Dictionary<String, JSONValue>? 注意每一种属性都是一个Optional值。这是因为JSON数据能包含任何它定义的有效类型。 因此,建议的方式是用Optional绑定检索值: if let name = userName.string{ //This could avoid lots of crashes caused by the unexpected data types } if let name = userName.number{ //As the value of the userName is Not a number. It won't execute. } .number属性产生一个NSNumber值,在Swift中这通常不是很有用。你能用.double或者.integer得到一个Double值或者一个Int值。 if let intValue = numberValue.integer{ count += intValue } 枚举(Enumeration)在Swift中JSONValue实际上是一个枚举: enum JSONValue { case JNumber(NSNumber) case JString(String) case JBool(Bool) case JNull case JArray(Array<JSONValue>) case JObject(Dictionary<String,JSONValue>) case JInvalid(NSError) }你可以使用一个switch子句去更有效地获取值: let json = JSONValue(jsonObject)switch json["user_id"]{case .JString(let stringValue): let id = stringValue.toInt() case .JNumber(let numberValue): let id = numberValue.integerValue default: println("ooops!!! JSON Data is Unexpected or Broken") 下标(Subscripts) 注意,在JSON中一个数组结构被包装成intoArray,它意味着数组里的每一个元素都是一个JSONValue。甚至你从JSONValue中取出一个数组,你仍然可以使用基本的属性去获取元素的值: if let array = json["key_of_array"].array{ if let string = array[0].string{ //The array[0] is still a JSONValue! } } 对象也是一样。因此,推荐的方式是访问每一个数组和对象时使用JSONValue的下标。 if let string = json["key_of_array"][0].string{ } 实际上,你可以用下标访问一个JSONValue,还不用担心运行时错误导致的崩溃: let userName = json[99999]["wrong_key"] 如果你使用推荐的方式去取数据,它是安全的: if let userName = json[99999]["wrong_key"]["name"].string{ //It's always safe } 打印 JSONValue遵守Printable协议.所以很容易在原始字符串中得到JSON数据: let json = JSONValue(dataFromNetwork)println(json)/*You can get a well printed human readable raw JSON string: { "url": { "urls": [ { "expanded_url": null, "url": "http://bit.ly/oauth-dancer", "indices": [ 0, 26 ], "display_url": null } ] } */如果你不想打印出来,你可以使用.description属性来得到上述字符串。 let printableString = json.description 调试与错误处理 要是JSON数据出错或者我们错误地检索数据,那会怎么样呢?你可以使用if语句来测试: let json = JSONValue(dataFromNetworking)["some_key"]["some_wrong_key"]["wrong_name"] if json{ //JSONValue it self conforms to Protocol "LogicValue", with JSONValue.JInvalid stands for false and others stands true } 如果我们尝试使用错误的键值或索引来访问数据,description属性会高数你KeyPath在哪里出错了. let json = JSONValue(dataFromNetworking)["some_key"]["some_wrong_key"]["wrong_name"] if json{ } else { println(json) //> JSON Keypath Error: Incorrect Keypath "some_wrong_key/wrong_name" //It always tells you where your key went wrong switch json{ case .JInvalid(let error): //An NSError containing detailed error information } } 后记 SwiftyJSON的开发将会发布在Github, 请持续关注后续版本。

优秀的个人博客,低调大师

iOS 在 Flash 中集成消息推送服务 【已翻译100%】

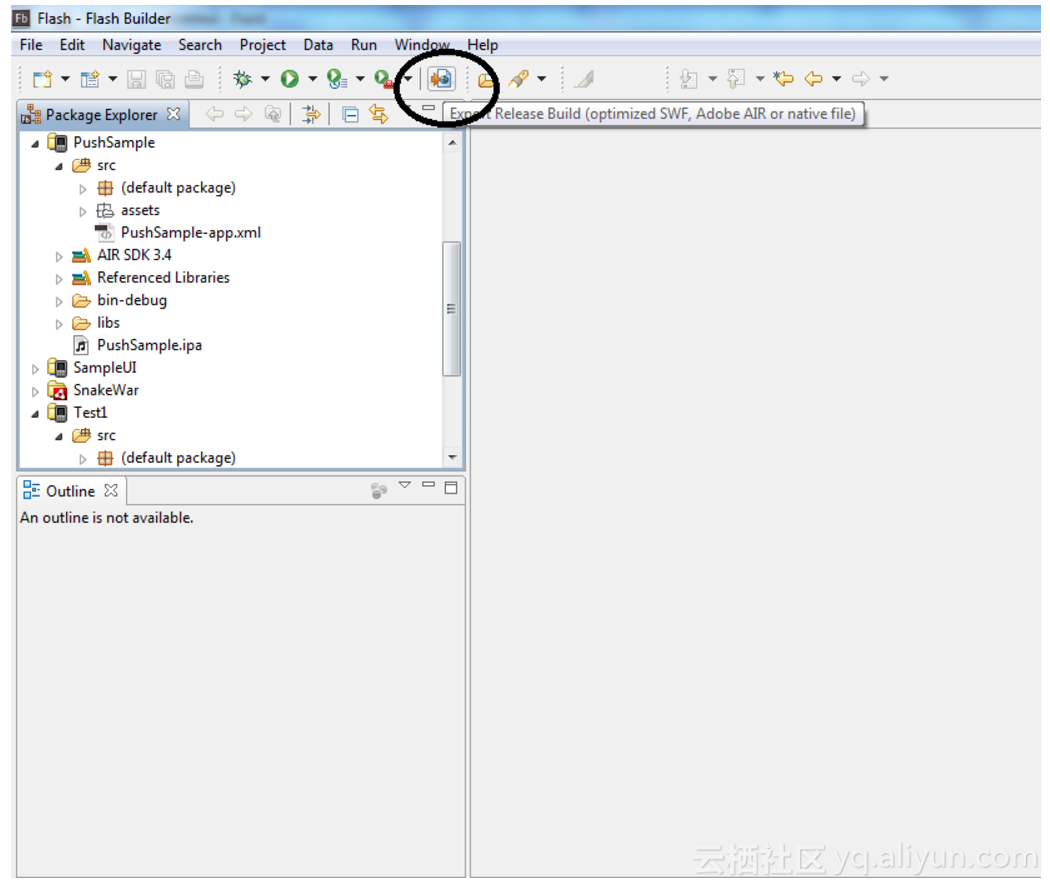
在Flash平台上用ActionScript应用程序接口开发具有Push通知功能的iOS应用是非常耗时的过程,同时我们也知道时间非常珍贵。因此,这篇文章的主要目标就是让哪些使用Flash给iPhone开发具有Push功能的应用的开发人员开发过程所耗时间更短,开发的方法更容易得到理解。为了便于理解,下面我们举了一个使用App42 Action-Script应用程序接口的Push应用。我们只用了几分钟就可以把App42 PUSH通知组件集成到应用里。 所讨论的内容 1.如何在Flash iOS应用中使用App42 Action-Script应用程序接口集成Push通知组件? 2.如何使用App42 Action-Script Push通知应用程序接口发送Push通知消息? 运行例程 1.注册到App42平台 2.注册之后在快速进入页面创建应用 3.如果你已经注册过了,那么请登录到AppHQ控制台,然后点击App管理标签,通过它创建应用 4.首先你需要到iOS开发中心创建证书,然后按照安装之前设置部分所提到的步骤提交证书 5.然后下载例程项目,并把这个项目导入到FlashBuilder里。如果你打算自己创建项目,那么请点击选择移动应用标签,然后创建新的ActionScript移动项目。选择Apple iOS,提交,接着点击完成。 6.向Adobe集成运行环境(AIR)移动应用描述XML文件添加信息。这个文件是iOS特有的。(注意:创建新项目的时候可以更改这个文件) <id>Bundle ID</id> //添加在第四步看到的Apple包的ID <iPhone> <InfoAdditions> <![CDATA[ <key>UIDeviceFamily</key> <array> <string>1</string> <string>2</string> </array> <key>UIStatusBarStyle</key> <string>UIStatusBarStyleBlackOpaque</string> <key>UIRequiresPersistentWiFi</key> <string>YES</string> ]]> </InfoAdditions> <Entitlements> <![CDATA[ <key>aps-environment</key> <string>development</string> ]]> </Entitlements> <requestedDisplayResolution>high</requestedDisplayResolution> </iPhone> 7.打开例程所在项目的Constant.as文件,并做一下修改:替换你在第二步或者第三步看到的api-Key和secert-Key用你注册Push通知应用所用的用户名替换现有的user-name 8, 您能使用Flash Builder - File|Export|Release Build (在Flash Builder的输出对话框下)选项或者直接在截图中显示的位置选择Export Release Build 添加iOS包文件 a)选择项目,程序,目标平台 b)设置包设置,为在第4步中已接收的部分选择所有的数字签名集。现在,点击结束,几秒钟后将在你的项目目录中生成.ipa文件10.选择这个.ipa文件和.mobileprovision并访问iTunes。然后,安装它到你的手机中。 在AppHQ控制台测试和验证Push通知消息 1 点击Store Token按钮,保存在第7步中已通过的用户设备令牌。 2 在注册Push通知消息之后,进入AppHQ控制台并点击PushNotification。选择用户和程序 3 从已注册的用户列表中选择期望的用户并点击发送Push 4 选择发送按钮发送适当的消息给用户 使用App42 ActionScript API给用户发送Push通知消息 1.点击Store Token按钮,存储在第7步中已通过的用户设备令牌 StoreToken Integrating Push Notification in Flash With iOS public function storeDeviceToken_click(e:MouseEvent):void { outputBtn.text = ""; pushNotificationService.storeDeviceToken(Constant.userName, deviceToken, DeviceType.iOS , new app42StorePushCallBack()); } //Callback Class class app42StorePushCallBack implements App42CallBack { public function onSuccess(response:Object):void { outputBtn.appendText("\n PushNotification"); var pushNotification:PushNotification = PushNotification(response); outputBtn.appendText("\n PushNotification success is : "+pushNotification) outputBtn.appendText("\n User Name : "+pushNotification.getUserName()); outputBtn.appendText("\n DeviceToken :"+pushNotification.getDeviceToken()); outputBtn.appendText("\n Device Type : "+pushNotification .getType()); } public function onException(exception:App42Exception):void { outputBtn.appendText ( "\n Exception is : " + exception); } } 输入消息并按发送消息按钮,在输入控制台界面你将得到响应信息。 SendMessage Integrating Push Notification in Flash With iOS public function sendMessage_click(e:MouseEvent):void { outputBtn.text = ""; pushNotificationService.sendPushMessageToUser(Constant.userName, headingTextField , new app42PushCallBack()); } //Callback Class class app42PushCallBack implements App42CallBack { public function onSuccess(response:Object):void { outputBtn.appendText("\n PushNotification"); var pushNotification:PushNotification = PushNotification(response); outputBtn.appendText("\n PushNotification success is : "+pushNotification) outputBtn.appendText("\n User Name : "+pushNotification.getUserName()); outputBtn.appendText("\n Expiry is " + pushNotification.getExpiry()); outputBtn.appendText("\n Message is " + pushNotification.getMessage()); } public function onException(exception:App42Exception):void { outputBtn.appendText ( "\n Exception is : " + exception); } } 请注意:如果你的App是启动的,消息将显示在输出控制台

优秀的个人博客,低调大师

从 Objective-C 到 Swift —— Swift 糖果 【已翻译100%】

Swift带来很多确实很棒的特性,使得很难再回到Objective-C。主要的特性是安全性,不过这也被看成是一种额外副作用。 带类型接口的强型别 Swift有强型别,这意味着除非你要求,不然Swift不会为你做类型之间的转换。所以,例如你无法把Int型赋给Double型。你不得不首先转换类型: let i: Int = 42 let d: Double = Double(i) 或者你必须给Double类扩展一个方法用来转换Int型: extension Double { func __convert(i: Int) -> Double { return Double(i) } } let another_d: Double = i 强型别对于安全性是非常非常有利的。但是,如果它没有为你给类型接口添加许多类型信息的话,它也可能变成有一点令人生畏的事情,有点像是在写脚本语言。 let ary = ["Hello", "world"] // NOTE: 'ary' is of type String[] or Array<String> for s in ary { // NOTE: 's' is of type String print(s + " ") } 如果你想要创建一个包含很多类型(无共同祖先)的数组,你应该用枚举(它可以包含值,见如下)。如果你想要它能够包含所有值,你可以用Any型。如果想让它包含任何Objective-C的类型,那就用AnyObject型。 请注意类型接口不会在申明函数的时候为你添加类型。你必须明确地说明你所申明函数的类型。 Blocks Swift 中的Blocks很像Objective-C中的Blocks, 不过有两点不同: 类型推断和避免weakify dance. 对于类型推断,你不必每次写block时都包含完整类型信息: sort([2,1,3], { (a: Int, b: Int) -> Bool in return a < b }) // Using Type Inference // Using the Trailing Closures feature sort([2,1,3]) { a, b in return a < b } // Implicit 'return' for single-expression blocks sort([2,1,3]) { a,b in a<b } // Shorthand Argument Names sort([2,1,3]) { $0 < $1 } // Operators are functions, and functions are blocks too! let sorted: Int[] = sort([2,1,3], <) 访问 Closures 了解更多blocks信息。 除此之外,Objectvie-C 的weakify dance有点容易,只需在block的开始处加上 [unowned self] 或 [weak self] 即可。 class CallbackTest { var i = 5 var callback: (Int -> ())? // NOTE: The optional callback takes an Int deinit { // NOTE: This is like -dealloc in Objective-C println("Deinit") } } var obj = CallbackTest() obj.callback = { [unowned obj] // NOTE: Without this, deinit() would never be invoked! a in obj.i = a } 请注意Introduction post文章中介绍了Optional(像上面的callback)。 请参考 ARC 章节来了解更多关于Swift中ARC的信息。 强劲的Enumerations Swift中的枚举比Objective-C中的有很大提高。 **修复 Enums**Apple一直提倡显示的提供枚举类型的大小,不过被Objective-C搞乱了: // Apple recommended enum definition in Objective-C typedef NS_ENUM(NSInteger, UIViewAnimationCurve) { UIViewAnimationCurveEaseInOut, UIViewAnimationCurveEaseIn, UIViewAnimationCurveEaseOut, UIViewAnimationCurveLinear }; // Previous Apple recommended enum definition in Objective-C. No link between // enum values and theUIViewAnimationCurve type. typedef enum { UIViewAnimationCurveEaseInOut, UIViewAnimationCurveEaseIn, UIViewAnimationCurveEaseOut, UIViewAnimationCurveLinear }; typedef NSInteger UIViewAnimationCurve; // Traditional enum definition in Objective-C. No explicit fixed size. typedef enum { UIViewAnimationCurveEaseInOut, UIViewAnimationCurveEaseIn, UIViewAnimationCurveEaseOut, UIViewAnimationCurveLinear } UIViewAnimationCurve; Swift中的修复: enum UIViewAnimationCurve : Int { case EaseInOut case EaseIn case EaseOut case Linear } 拓展Enums Enums 在Swift中更进一步,只作为一个独立的选项列表。你可以添加方法(以及计算属性): enum UIViewAnimationCurve : Int { case EaseInOut case EaseIn case EaseOut case Linear func typeName() -> String { return "UIViewAnimationCurve" } } 使用类型拓展,你可以向枚举中添加任何你想要的方法: extension UIViewAnimationCurve { func description() -> String { switch self { case EaseInOut: return "EaseInOut" case EaseIn: return "EaseIn" case EaseOut: return "EaseOut" case Linear: return "Linear" } } } 向Enums中添加值Swift中的枚举跟进一步,允许每一个独立的选项都有一个对应的值: enum Shape { case Dot case Circle(radius: Double) // Require argument name! case Square(Double) case Rectangle(width: Double, height: Double) // Require argument names! func area() -> Double { switch self { case Dot: return 0 case Circle(let r): // Assign the associated value to the constant 'r' return π*r*r case Square(let l): return l*l case Rectangle(let w, let h): return w*h } } } var shape = Shape.Dot shape = .Square(2) shape = .Rectangle(width: 3, height: 4) // Argument names required shape.area() 如果你喜欢,你可以把它当做一个安全的union类型。或者只用枚举应该做的事情。 Enumerations 文章介绍了更多关于Apple对此的看法。 Swift Switch语句 就像你看到的,Swift中switch语句有很多优化。 隐式的fall-through行为已经改为了显示的: var (i, j) = (4, -1) // Assign (and create) two variables simultaneously switch i { case 1: j = 1 case 2, 3: // The case for both 2 and 3 j = 2 case 4: j = 4 fallthrough case 5: j++ default: j = Int.max // The Swift version of INT_MAX } 就像前面看到的,Switch 语句可以访问枚举的关联值,不过它还可以做更多: var tuple: (Int, Int) // Did I mention that Swift has tuples? :-) var result: String tuple = (1,3) switch tuple { case (let x, let y) where x > y: result = "Larger" case (let x, let y) where x < y: result = "Smaller" default: result = "Same" } 甚至可以使用String: var s: String = "Cocoa" switch s { case "Java": s = "High caffeine" case "Cocoa": s = "High sugar" case "Carbon": s = "Lots of bubbles" default: () } 另外,如果你觉得他可以使你的代码更可读,你可以重载~=操作符来改变switch语句的行为。 func ~=(pattern: String, str: String) -> Bool { return str.hasPrefix(pattern) } var s = "Carbon" switch s { case "J": s = "High caffeine" case "C": s = "No caffeine" default: () } 你可以从 Conditional Statements 这篇文章中了解更多关于switch语句的知识。 类与结构体 类似于C++,Swift的类与结构体初看是一样的: class Apple { var color = "green" // Property declaration init() {} // Default initializer init(_ color: String) { // '_' means no argument name self.color = color } func description() -> String { return "apple of color \(color)" } func enripen() { color = "red" } } struct Orange { var color = "green" init() {} init(_ color: String) { self.color = color } func description() -> String { return "orange of color \(color)" } mutating func enripen() { // NOTE: 'mutating' is required color = "orange" } } var apple1 = Apple() var apple2 = apple1 // NOTE: This references the same object! apple1.enripen() apple2.description() // Result: "apple of color red" var orange1 = Orange() var orange2 = orange1 // NOTE: This makes a copy! orange1.enripen() orange2.description() // Result: "orange of color green" 主要的不同点在于类是(和块相似的)引用类型,而结构体是(和枚举相似的)数值类型。所以两个变量能够指向同一个(类的)对象,而把一个结构体赋给另外一个变量则必须做一个此结构体的(缓慢的)拷贝。关键词'mutating'告诉调用者enripen()方法不能被常结构体调用。把一个常引用mutating给一个类对象则没有问题。 Swift中大多数内建类型实际上都是结构体。甚至Int型也是。通过点击Cmd你能够看到内建类型的申明,比如Int型的Swift(或者Playground)源码。数组和词典类型也是结构体,但是数组在某些方面表现得像是引用类型:赋值数组并不拷贝每一个元素,实际上你可以更新常数组只要元素的个数保持不变。 let array1 = [1, 2, 3] let array2 = array1 // A copy, but references the same elements! array1[1] = 5 // Legal, as it doesn't modify the struct but a referenced element array2 // Result: [1, 5, 3] 在苹果的文档中,你可以读到更多关于Collection Types的内容。 对象的生命周期 另一个类与结构体的不同是类可以被子类化。 类和结构体都可以被拓展,并且实现protocol,但是只用类可以继承其他类。 class Pineapple : Apple { init(color: String) { super.init(color) } convenience init() { self.init("green") } convenience init(ripe: Bool) { self.init() if ripe { color = "yellow" } else { color = "green" } } deinit { println("Pineapple down") } override func description() -> String { return "pine" + super.description() } override func enripen() { color = "yellow" } } 就像你看到的,Swift为继承添加了一点更有趣的需要学习的东西。对于初学者来说,你需要清除你覆盖父类中某个方法的意图。如果你想阻止子类覆盖一些东西,你可以在一个单独声明或整个类的前面加上@final属性。阅读 Apple’s documentation了解更多。 初始化 Swift的对象分两步进行初始化: 首先对象必须是有效的,然后它能被替换。 class ChildShoe { var size: Double // Uninitialized properties are not allowed unless taken care of in init() init(foot_size: Double) { size = foot_size // First make the object valid addGrowthCompensation() } func addGrowthCompensation() { size++ } } 使对象有效必须要调用一个超级类指定的init()方法。类可以同时拥有指定的以及便捷的(用关键词'convenience'标记)初始化方法。便捷初始化方法调用同一个类中的其他初始化方法(最终还是一个指定的初始化方法),而指定的初始化方法调用超级类的初始化方法。 如果你给所有的超级类指定初始化方法添加初始化方法,你的类也会自动继承所有便捷初始化方法。如果没有添加任何指定的初始化方法,你的类则继承超级类的所有(指定的和便捷的)初始化方法。 深入阅读请参见Initialization。 类型转换 类之间的转换,特别是向下转换,你可以使用"is","as?"和"as"关键词: let apple: Apple = Pineapple() let exotic: Bool = apple is Pineapple let pineappleOption: Pineapple? = apple as? Pineapplelet pineapple: Pineapple = apple as Pineapple // NOTE: Throws if not! if let obj = apple as? Pineapple { // If executed, 'obj' is a Pineapple "sweet" }想了解更多这方面内容请参见Type Casting一章. 泛型 泛型是Swift的一个加分的特点。他们看起来有一点像C++里面的模板,但是有更强的型别,也更简单(更简单使用,功能稍逊)。 // Mark both Int and Double as being convertible to a Double using the '+' prefix protocol DoubleConvertible { @prefix func +(v: Self) -> Double } @prefix func +(v: Int) -> Double { return Double(v) } extension Double: DoubleConvertible {} extension Int: DoubleConvertible {} // NOTE: Repeat this for all Int*, UInt*, and the Float type // The traits of a generalized point protocol PointTraits { typealias T class var dimensions: Int { get } func getCoordinate(dimension: Int) -> T } // Generalized Pythagoras struct Pythagoras<P1: PointTraits, P2: PointTraits where P1.T: DoubleConvertible, P2.T: DoubleConvertible> { static func apply(a: P1, b: P2, dimensions: Int) -> Double { if dimensions == 0 { return 0 } let d: Double = +a.getCoordinate(dimensions-1) - +b.getCoordinate(dimensions-1) // NOTE: '+' to convert to Double return d * d + apply(a, b: b, dimensions: dimensions-1) } static func apply(a: P1, b: P2) -> Double { let dimensions = P1.dimensions assert(P2.dimensions == dimensions) return apply(a, b: b, dimensions: dimensions) } }; import func Foundation.sqrt // NOTE: You can import a typealias&shy;, struct&shy;, class&shy;, enum&shy;, protocol&shy;, var&shy;, or func only func distance<P1: PointTraits, P2: PointTraits where P1.T: DoubleConvertible, P2.T: DoubleConvertible>(a: P1, b: P2) -> Double { assert(P1.dimensions == P2.dimensions) return sqrt(Pythagoras.apply(a, b: b)); } // A generalized 2D point struct Point2D<Number> : PointTraits { static var dimensions: Int { return 2 } var x: Number, y: Number func getCoordinate(dimension: Int) -> Number { return dimension == 0 ? x : y } // NOTE: The typealias T is inferred } let a = Point2D(x: 1.0, y: 2.0) let b = Point2D(x: 5, y: 5) Pythagoras.apply(a, b: b) // NOTE: Methods require all argument names, except the first distance(a, b) // NOTE: Functions do not require argument names // UIColor extension UIColor : PointTraits { class var dimensions: Int { return 4 } func getCoordinate(dimension: Int) -> Double { var red: CGFloat = 0, green: CGFloat = 0, blue: CGFloat = 0, alpha: CGFloat = 0 getRed(&red, green: &green, blue: &blue, alpha: &alpha) switch dimension { case 0: return red case 1: return green case 2: return blue default: return alpha } } } distance(UIColor.redColor(), UIColor.orangeColor()) 以上代码是受Boost中的Design Rationale的启发.几何的C++库。Swift中的泛型功能不是那么强,但是却能使源码比C++中泛型更具阅读性。 Swift的泛型是通过类型参数化的。每个参数类型要求实现一个特定的协议或者继承自一个特定的基类。在申明参数类型后,有一个可选的"where"项目能用于给这个类型(或者是他们的内部类型,就如上面那个PointTraits协议中的别名'T')添加额外的需求。这个"where“也能要求两种类型是相等的。 苹果有更多更完整的Generics章节。 选定Swift 现在你已经准备好了去看各种各样的源码了,甚至可以自己写了 :-) 在把你自己留在一个新的大的Swift未知大陆之前,我有几个最终的建议: Apple推荐你使用Int作为所有Integer类型,即使你之前用无符号数的地方。“只有在你真的需要一个与平台原生大小想相同的无符号integer类型时再使用UInt类型.” 如果你想知道@private和al.在哪:好吧,他们还没完成呢,后续版本会加进来的。 如果你创建了一个module,你可以Cmd+单击你的module的名字来查看你的module的自动生成的Swift头。 Swift的modules其实是命名空间,因此在任何东西前加像 CF, NS, UI等的前缀。当创建第三方库是就不是那么绝对必要了。 Enjoy using Swift!

资源下载

更多资源
Mario

Mario

马里奥是站在游戏界顶峰的超人气多面角色。马里奥靠吃蘑菇成长,特征是大鼻子、头戴帽子、身穿背带裤,还留着胡子。与他的双胞胎兄弟路易基一起,长年担任任天堂的招牌角色。

腾讯云软件源

腾讯云软件源

为解决软件依赖安装时官方源访问速度慢的问题,腾讯云为一些软件搭建了缓存服务。您可以通过使用腾讯云软件源站来提升依赖包的安装速度。为了方便用户自由搭建服务架构,目前腾讯云软件源站支持公网访问和内网访问。

Nacos

Nacos

Nacos /nɑ:kəʊs/ 是 Dynamic Naming and Configuration Service 的首字母简称,一个易于构建 AI Agent 应用的动态服务发现、配置管理和AI智能体管理平台。Nacos 致力于帮助您发现、配置和管理微服务及AI智能体应用。Nacos 提供了一组简单易用的特性集,帮助您快速实现动态服务发现、服务配置、服务元数据、流量管理。Nacos 帮助您更敏捷和容易地构建、交付和管理微服务平台。

Sublime Text

Sublime Text

Sublime Text具有漂亮的用户界面和强大的功能,例如代码缩略图,Python的插件,代码段等。还可自定义键绑定,菜单和工具栏。Sublime Text 的主要功能包括:拼写检查,书签,完整的 Python API , Goto 功能,即时项目切换,多选择,多窗口等等。Sublime Text 是一个跨平台的编辑器,同时支持Windows、Linux、Mac OS X等操作系统。

用户登录
用户注册