k8s源码Client-go中Reflector解析
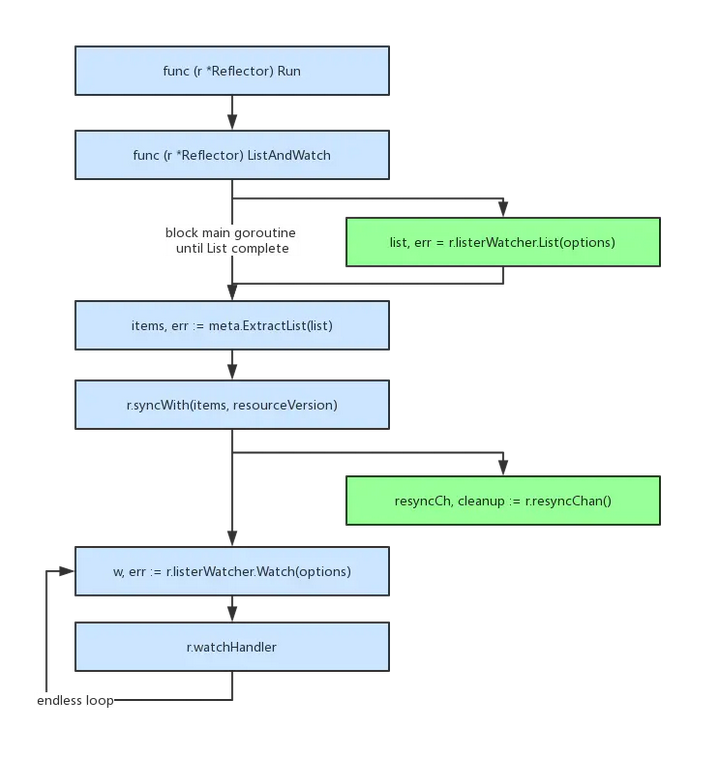
摘要:通过本文,可以了解Reflector通过ListWatcher从Kubernetes API中获取对象的流程,以及存储到store中,后续会对DeltaFIFO进行源码研读,通过结合informer,来加深对整个informer的理解。 本文分享自华为云社区《Client-go源码分析之Reflector》,作者: kaliarch 。 一 背景 Reflector 是保证 Informer 可靠性的核心组件,在丢失事件,收到异常事件,处理事件失败等多种异常情况下需要考虑的细节很多。单独的listwatcher缺少重新连接和重新同步机制,有可能出现数据不一致问题。其对事件响应是同步的,如果执行复杂的操作会引起阻塞,需要引入队列。 二 Reflector Reflector可以成为反射器,将etcd中的数据反射到存储(DeltaFIFO)中。Reflector通过其内部的List操作获取所有资源对象数据,保存到本地存储,之后Watch监视资源变化,触发对应事件处理,例如Add、Update、Delete等。 Reflector 结构体的定义位于 staging/src/http://k8s.io/client-go/tools/cache/reflector.go下面: // k8s.io/client-go/tools/cache/reflector.go type Reflector struct { // name 标识这个反射器的名称,默认为 文件:行数(比如reflector.go:125) // 默认名字通过 k8s.io/apimachinery/pkg/util/naming/from_stack.go 下面的 GetNameFromCallsite 函数生成 name string // 期望放到 Store 中的类型名称,如果提供,则是 expectedGVK 的字符串形式 // 否则就是 expectedType 的字符串,它仅仅用于显示,不用于解析或者比较。 expectedTypeName string // An example object of the type we expect to place in the store. // Only the type needs to be right, except that when that is // `unstructured.Unstructured` the object's `"apiVersion"` and // `"kind"` must also be right. // 放到 Store 中的对象类型 expectedType reflect.Type // 如果是非结构化的,期望放在 Sotre 中的对象的 GVK expectedGVK *schema.GroupVersionKind // 与 watch 源同步的目标 Store store Store // 用来执行 lists 和 watches 操作的 listerWatcher 接口(最重要的) listerWatcher ListerWatcher // backoff manages backoff of ListWatch backoffManager wait.BackoffManager resyncPeriod time.Duration // ShouldResync 会周期性的被调用,当返回 true 的时候,就会调用 Store 的 Resync 操作 ShouldResync func() bool // clock allows tests to manipulate time clock clock.Clock // paginatedResult defines whether pagination should be forced for list calls. // It is set based on the result of the initial list call. paginatedResult bool // Kubernetes 资源在 APIServer 中都是有版本的,对象的任何修改(添加、删除、更新)都会造成资源版本更新,lastSyncResourceVersion 就是指的这个版本 lastSyncResourceVersion string // 如果之前的 list 或 watch 带有 lastSyncResourceVersion 的请求中是一个 HTTP 410(Gone)的失败请求,则 isLastSyncResourceVersionGone 为 true isLastSyncResourceVersionGone bool // lastSyncResourceVersionMutex 用于保证对 lastSyncResourceVersion 的读/写访问。 lastSyncResourceVersionMutex sync.RWMutex // WatchListPageSize is the requested chunk size of initial and resync watch lists. // If unset, for consistent reads (RV="") or reads that opt-into arbitrarily old data // (RV="0") it will default to pager.PageSize, for the rest (RV != "" && RV != "0") // it will turn off pagination to allow serving them from watch cache. // NOTE: It should be used carefully as paginated lists are always served directly from // etcd, which is significantly less efficient and may lead to serious performance and // scalability problems. WatchListPageSize int64 } // NewReflector 创建一个新的反射器对象,将使给定的 Store 保持与服务器中指定的资源对象的内容同步。 // 反射器只把具有 expectedType 类型的对象放到 Store 中,除非 expectedType 是 nil。 // 如果 resyncPeriod 是非0,那么反射器会周期性地检查 ShouldResync 函数来决定是否调用 Store 的 Resync 操作 // `ShouldResync==nil` 意味着总是要执行 Resync 操作。 // 这使得你可以使用反射器周期性地处理所有的全量和增量的对象。 func NewReflector(lw ListerWatcher, expectedType interface{}, store Store, resyncPeriod time.Duration) *Reflector { // 默认的反射器名称为 file:line return NewNamedReflector(naming.GetNameFromCallsite(internalPackages...), lw, expectedType, store, resyncPeriod) } // NewNamedReflector 与 NewReflector 一样,只是指定了一个 name 用于日志记录 func NewNamedReflector(name string, lw ListerWatcher, expectedType interface{}, store Store, resyncPeriod time.Duration) *Reflector { realClock := &clock.RealClock{} r := &Reflector{ name: name, listerWatcher: lw, store: store, backoffManager: wait.NewExponentialBackoffManager(800*time.Millisecond, 30*time.Second, 2*time.Minute, 2.0, 1.0, realClock), resyncPeriod: resyncPeriod, clock: realClock, } r.setExpectedType(expectedType) return r } 三 流程 Reflector.Run()调用ListAndWatch(), 启动一个子协程(goroutine)执行List,主协程阻塞等待List执行完成。 Meta.ExtractList(list)把List结果转化成runtime.Object数组。 r.syncWith(items, resourceVersion)写入DeltaFIFO,全量同步到Indexer。 r.resyncChan()也是在一个子协程里执行。 循环执行r.ListerWatcher.Watch(optiopns)。 r.WatchHandler增量同步runtime.Object到indexer。 List只做一次全量同步,watch持续做增量同步。 四 Reflector关键方法 4.1 构造方法 // NewReflector 创建一个新的反射器对象,将使给定的 Store 保持与服务器中指定的资源对象的内容同步。 // 反射器只把具有 expectedType 类型的对象放到 Store 中,除非 expectedType 是 nil。 // 如果 resyncPeriod 是非0,那么反射器会周期性地检查 ShouldResync 函数来决定是否调用 Store 的 Resync 操作 // `ShouldResync==nil` 意味着总是要执行 Resync 操作。 // 这使得你可以使用反射器周期性地处理所有的全量和增量的对象。 func NewReflector(lw ListerWatcher, expectedType interface{}, store Store, resyncPeriod time.Duration) *Reflector { // 默认的反射器名称为 file:line return NewNamedReflector(naming.GetNameFromCallsite(internalPackages...), lw, expectedType, store, resyncPeriod) } // NewNamedReflector 与 NewReflector 一样,只是指定了一个 name 用于日志记录 func NewNamedReflector(name string, lw ListerWatcher, expectedType interface{}, store Store, resyncPeriod time.Duration) *Reflector { realClock := &clock.RealClock{} r := &Reflector{ name: name, listerWatcher: lw, store: store, backoffManager: wait.NewExponentialBackoffManager(800*time.Millisecond, 30*time.Second, 2*time.Minute, 2.0, 1.0, realClock), resyncPeriod: resyncPeriod, clock: realClock, } r.setExpectedType(expectedType) return r } //新建Indexer和reflector func NewNamespaceKeyedIndexerAndReflector(lw ListerWatcher, expectedType interface{}, resyncPeriod time.Duration) (indexer Indexer, reflector *Reflector) { indexer = NewIndexer(MetaNamespaceKeyFunc, Indexers{NamespaceIndex: MetaNamespaceIndexFunc}) reflector = NewReflector(lw, expectedType, indexer, resyncPeriod) return indexer, reflector } 4.2 Run方法 // Run 重复使用反射器的 ListAndWatch 来获取所有对象和后续增量。当 stopCh 关闭时,运行将退出 func (r *Reflector) Run(stopCh <-chan struct{}) { klog.V(2).Infof("Starting reflector %s (%s) from %s", r.expectedTypeName, r.resyncPeriod, r.name) wait.BackoffUntil(func() { if err := r.ListAndWatch(stopCh); err != nil { r.watchErrorHandler(r, err) } }, r.backoffManager, true, stopCh) klog.V(2).Infof("Stopping reflector %s (%s) from %s", r.expectedTypeName, r.resyncPeriod, r.name) } 4.3 ListWatch List部分逻辑:设置分页参数;执行list方法;将list结果同步进DeltaFIFO队列中,其实是调用store中的Replace方法。 定时同步:定时同步以协程的方式运行,使用定时器实现定期同步,Store中的Resync操作。 Watch部分逻辑:在for循环里;执行watch函数获取resultchan;监听resultchan中数据并处理; // ListAndWatch 函数首先列出所有的对象,并在调用的时候获得资源版本,然后使用该资源版本来进行 watch 操作。 // 如果 ListAndWatch 没有初始化 watch 成功就会返回错误。 func (r *Reflector) ListAndWatch(stopCh <-chan struct{}) error { klog.V(3).Infof("Listing and watching %v from %s", r.expectedTypeName, r.name) var resourceVersion string options := metav1.ListOptions{ResourceVersion: r.relistResourceVersion()} // 1.List部分逻辑:设置分页参数;执行list方法;将list结果同步进DeltaFIFO队列中; if err := func() error { initTrace := trace.New("Reflector ListAndWatch", trace.Field{"name", r.name}) defer initTrace.LogIfLong(10 * time.Second) var list runtime.Object var paginatedResult bool var err error listCh := make(chan struct{}, 1) panicCh := make(chan interface{}, 1) go func() { defer func() { if r := recover(); r != nil { panicCh <- r } }() // Attempt to gather list in chunks, if supported by listerWatcher, if not, the first // list request will return the full response. pager := pager.New(pager.SimplePageFunc(func(opts metav1.ListOptions) (runtime.Object, error) { return r.listerWatcher.List(opts) })) switch { case r.WatchListPageSize != 0: pager.PageSize = r.WatchListPageSize case r.paginatedResult: // We got a paginated result initially. Assume this resource and server honor // paging requests (i.e. watch cache is probably disabled) and leave the default // pager size set. case options.ResourceVersion != "" && options.ResourceVersion != "0": // User didn't explicitly request pagination. // // With ResourceVersion != "", we have a possibility to list from watch cache, // but we do that (for ResourceVersion != "0") only if Limit is unset. // To avoid thundering herd on etcd (e.g. on master upgrades), we explicitly // switch off pagination to force listing from watch cache (if enabled). // With the existing semantic of RV (result is at least as fresh as provided RV), // this is correct and doesn't lead to going back in time. // // We also don't turn off pagination for ResourceVersion="0", since watch cache // is ignoring Limit in that case anyway, and if watch cache is not enabled // we don't introduce regression. pager.PageSize = 0 } list, paginatedResult, err = pager.List(context.Background(), options) if isExpiredError(err) || isTooLargeResourceVersionError(err) { r.setIsLastSyncResourceVersionUnavailable(true) // Retry immediately if the resource version used to list is unavailable. // The pager already falls back to full list if paginated list calls fail due to an "Expired" error on // continuation pages, but the pager might not be enabled, the full list might fail because the // resource version it is listing at is expired or the cache may not yet be synced to the provided // resource version. So we need to fallback to resourceVersion="" in all to recover and ensure // the reflector makes forward progress. list, paginatedResult, err = pager.List(context.Background(), metav1.ListOptions{ResourceVersion: r.relistResourceVersion()}) } close(listCh) }() select { case <-stopCh: return nil case r := <-panicCh: panic(r) case <-listCh: } if err != nil { return fmt.Errorf("failed to list %v: %v", r.expectedTypeName, err) } // We check if the list was paginated and if so set the paginatedResult based on that. // However, we want to do that only for the initial list (which is the only case // when we set ResourceVersion="0"). The reasoning behind it is that later, in some // situations we may force listing directly from etcd (by setting ResourceVersion="") // which will return paginated result, even if watch cache is enabled. However, in // that case, we still want to prefer sending requests to watch cache if possible. // // Paginated result returned for request with ResourceVersion="0" mean that watch // cache is disabled and there are a lot of objects of a given type. In such case, // there is no need to prefer listing from watch cache. if options.ResourceVersion == "0" && paginatedResult { r.paginatedResult = true } r.setIsLastSyncResourceVersionUnavailable(false) // list was successful initTrace.Step("Objects listed") // listMetaInterface, err := meta.ListAccessor(list) if err != nil { return fmt.Errorf("unable to understand list result %#v: %v", list, err) } // 获取资源版本号 resourceVersion = listMetaInterface.GetResourceVersion() initTrace.Step("Resource version extracted") // 将资源对象转换为资源列表,讲runtime.Object 对象转换为[]runtime.Object对象 items, err := meta.ExtractList(list) if err != nil { return fmt.Errorf("unable to understand list result %#v (%v)", list, err) } initTrace.Step("Objects extracted") // 将资源对象列表中的资源和版本号存储在store中 if err := r.syncWith(items, resourceVersion); err != nil { return fmt.Errorf("unable to sync list result: %v", err) } initTrace.Step("SyncWith done") r.setLastSyncResourceVersion(resourceVersion) initTrace.Step("Resource version updated") return nil }(); err != nil { return err } // 2.定时同步:定时同步以协程的方式运行,使用定时器实现定期同步 resyncerrc := make(chan error, 1) cancelCh := make(chan struct{}) defer close(cancelCh) go func() { resyncCh, cleanup := r.resyncChan() defer func() { cleanup() // Call the last one written into cleanup }() for { select { case <-resyncCh: case <-stopCh: return case <-cancelCh: return } // 如果ShouldResync 为nil或者调用返回true,则执行Store中的Resync操作 if r.ShouldResync == nil || r.ShouldResync() { klog.V(4).Infof("%s: forcing resync", r.name) // 将indexer的数据和deltafifo进行同步 if err := r.store.Resync(); err != nil { resyncerrc <- err return } } cleanup() resyncCh, cleanup = r.resyncChan() } }() // 3.在for循环里;执行watch函数获取resultchan;监听resultchan中数据并处理; for { // give the stopCh a chance to stop the loop, even in case of continue statements further down on errors select { case <-stopCh: return nil default: } timeoutSeconds := int64(minWatchTimeout.Seconds() * (rand.Float64() + 1.0)) options = metav1.ListOptions{ ResourceVersion: resourceVersion, // We want to avoid situations of hanging watchers. Stop any wachers that do not // receive any events within the timeout window. TimeoutSeconds: &timeoutSeconds, // To reduce load on kube-apiserver on watch restarts, you may enable watch bookmarks. // Reflector doesn't assume bookmarks are returned at all (if the server do not support // watch bookmarks, it will ignore this field). AllowWatchBookmarks: true, } // start the clock before sending the request, since some proxies won't flush headers until after the first watch event is sent start := r.clock.Now() w, err := r.listerWatcher.Watch(options) if err != nil { // If this is "connection refused" error, it means that most likely apiserver is not responsive. // It doesn't make sense to re-list all objects because most likely we will be able to restart // watch where we ended. // If that's the case begin exponentially backing off and resend watch request. if utilnet.IsConnectionRefused(err) { <-r.initConnBackoffManager.Backoff().C() continue } return err } if err := r.watchHandler(start, w, &resourceVersion, resyncerrc, stopCh); err != nil { if err != errorStopRequested { switch { case isExpiredError(err): // Don't set LastSyncResourceVersionUnavailable - LIST call with ResourceVersion=RV already // has a semantic that it returns data at least as fresh as provided RV. // So first try to LIST with setting RV to resource version of last observed object. klog.V(4).Infof("%s: watch of %v closed with: %v", r.name, r.expectedTypeName, err) default: klog.Warningf("%s: watch of %v ended with: %v", r.name, r.expectedTypeName, err) } } return nil } } } 4.4 LastSyncResourceVersion 获取上一次同步的资源版本 func (r *Reflector) LastSyncResourceVersion() string { r.lastSyncResourceVersionMutex.RLock() defer r.lastSyncResourceVersionMutex.RUnlock() return r.lastSyncResourceVersion } 4.5 resyncChan 返回一个定时通道和清理函数,清理函数就是停止计时器。这边的定时重新同步是使用定时器实现的。 func (r *Reflector) resyncChan() (<-chan time.Time, func() bool) { if r.resyncPeriod == 0 { return neverExitWatch, func() bool { return false } } // The cleanup function is required: imagine the scenario where watches // always fail so we end up listing frequently. Then, if we don't // manually stop the timer, we could end up with many timers active // concurrently. t := r.clock.NewTimer(r.resyncPeriod) return t.C(), t.Stop } 4.6 syncWith 将从apiserver list的资源对象结果同步进DeltaFIFO队列中,调用队列的Replace方法实现。 func (r *Reflector) syncWith(items []runtime.Object, resourceVersion string) error { found := make([]interface{}, 0, len(items)) for _, item := range items { found = append(found, item) } return r.store.Replace(found, resourceVersion) } 4.7 watchHandler watch的处理:接收watch的接口作为参数,watch接口对外方法是Stop和Resultchan,前者关闭结果通道,后者获取通道。 func (r *Reflector) watchHandler(start time.Time, w watch.Interface, resourceVersion *string, errc chan error, stopCh <-chan struct{}) error { eventCount := 0 // Stopping the watcher should be idempotent and if we return from this function there's no way // we're coming back in with the same watch interface. defer w.Stop() loop: for { select { case <-stopCh: return errorStopRequested case err := <-errc: return err case event, ok := <-w.ResultChan(): if !ok { break loop } if event.Type == watch.Error { return apierrors.FromObject(event.Object) } if r.expectedType != nil { if e, a := r.expectedType, reflect.TypeOf(event.Object); e != a { utilruntime.HandleError(fmt.Errorf("%s: expected type %v, but watch event object had type %v", r.name, e, a)) continue } } // 判断期待的类型和监听到的事件类型是否一致 if r.expectedGVK != nil { if e, a := *r.expectedGVK, event.Object.GetObjectKind().GroupVersionKind(); e != a { utilruntime.HandleError(fmt.Errorf("%s: expected gvk %v, but watch event object had gvk %v", r.name, e, a)) continue } } // 获取事件对象 meta, err := meta.Accessor(event.Object) if err != nil { utilruntime.HandleError(fmt.Errorf("%s: unable to understand watch event %#v", r.name, event)) continue } newResourceVersion := meta.GetResourceVersion() // 对事件类型进行判断,并进行对应操作 switch event.Type { case watch.Added: err := r.store.Add(event.Object) if err != nil { utilruntime.HandleError(fmt.Errorf("%s: unable to add watch event object (%#v) to store: %v", r.name, event.Object, err)) } case watch.Modified: err := r.store.Update(event.Object) if err != nil { utilruntime.HandleError(fmt.Errorf("%s: unable to update watch event object (%#v) to store: %v", r.name, event.Object, err)) } case watch.Deleted: // TODO: Will any consumers need access to the "last known // state", which is passed in event.Object? If so, may need // to change this. err := r.store.Delete(event.Object) if err != nil { utilruntime.HandleError(fmt.Errorf("%s: unable to delete watch event object (%#v) from store: %v", r.name, event.Object, err)) } case watch.Bookmark: // 表示监听已在此处同步,只需更新 // A `Bookmark` means watch has synced here, just update the resourceVersion default: utilruntime.HandleError(fmt.Errorf("%s: unable to understand watch event %#v", r.name, event)) } *resourceVersion = newResourceVersion r.setLastSyncResourceVersion(newResourceVersion) if rvu, ok := r.store.(ResourceVersionUpdater); ok { rvu.UpdateResourceVersion(newResourceVersion) } eventCount++ } } watchDuration := r.clock.Since(start) if watchDuration < 1*time.Second && eventCount == 0 { return fmt.Errorf("very short watch: %s: Unexpected watch close - watch lasted less than a second and no items received", r.name) } klog.V(4).Infof("%s: Watch close - %v total %v items received", r.name, r.expectedTypeName, eventCount) return nil } 4.8 relistResourceVersion relistResourceVersion 函数获得反射器 relist 的资源版本,如果资源版本非 0,则表示根据资源版本号继续获取,当传输过程中遇到网络故障或者其他原因导致中断,下次再连接时,会根据资源版本号继续传输未完成的部分。可以使本地缓存中的数据与Etcd集群中的数据保持一致,该函数实现如下所示: // 如果最后一次relist的结果是HTTP 410(Gone)状态码,则返回"",这样relist将通过quorum读取etcd中可用的最新资源版本。 // 返回使用 lastSyncResourceVersion,这样反射器就不会使用在relist结果或watch事件中watch到的资源版本更老的资源版本进行relist了 func (r *Reflector) relistResourceVersion() string { r.lastSyncResourceVersionMutex.RLock() defer r.lastSyncResourceVersionMutex.RUnlock() if r.isLastSyncResourceVersionUnavailable { // 因为反射器会进行分页List请求,如果 lastSyncResourceVersion 过期了,所有的分页列表请求就都会跳过 watch 缓存 // 所以设置 ResourceVersion="",然后再次 List,重新建立反射器到最新的可用资源版本,从 etcd 中读取,保持一致性。 return "" } if r.lastSyncResourceVersion == "" { // 反射器执行的初始 List 操作的时候使用0作为资源版本。 return "0" } return r.lastSyncResourceVersion } 五 整体流程 // k8s.io/client-go/informers/apps/v1/deployment.go // NewFilteredDeploymentInformer 为 Deployment 构造一个新的 Informer。 // 总是倾向于使用一个 informer 工厂来获取一个 shared informer,而不是获取一个独立的 informer,这样可以减少内存占用和服务器的连接数。 func NewFilteredDeploymentInformer(client kubernetes.Interface, namespace string, resyncPeriod time.Duration, indexers cache.Indexers, tweakListOptions internalinterfaces.TweakListOptionsFunc) cache.SharedIndexInformer { return cache.NewSharedIndexInformer( &cache.ListWatch{ ListFunc: func(options metav1.ListOptions) (runtime.Object, error) { if tweakListOptions != nil { tweakListOptions(&options) } return client.AppsV1().Deployments(namespace).List(context.TODO(), options) }, WatchFunc: func(options metav1.ListOptions) (watch.Interface, error) { if tweakListOptions != nil { tweakListOptions(&options) } return client.AppsV1().Deployments(namespace).Watch(context.TODO(), options) }, }, &appsv1.Deployment{}, resyncPeriod, indexers, ) } 从上面代码我们就可以看出来当我们去调用一个资源对象的 Informer() 的时候,就会去调用上面的 NewFilteredDeploymentInformer 函数进行初始化,而在初始化的使用就传入了 cache.ListWatch 对象,其中就有 List 和 Watch 的实现操作,也就是说前面反射器在 ListAndWatch 里面调用的 ListWatcher 的 List 操作是在一个具体的资源对象的 Informer 中实现的,比如我们这里就是通过的 ClientSet 客户端与 APIServer 交互获取到 Deployment 的资源列表数据的,通过在 ListFunc 中的 client.AppsV1().Deployments(namespace).List(context.TODO(), options) 实现的。 获取到了全量的 List 数据过后,通过 listMetaInterface.GetResourceVersion() 来获取资源的版本号,ResourceVersion(资源版本号)非常重要,Kubernetes 中所有的资源都拥有该字段,它标识当前资源对象的版本号,每次修改(CUD)当前资源对象时,Kubernetes API Server 都会更改 ResourceVersion,这样 client-go 执行 Watch 操作时可以根据ResourceVersion 来确定当前资源对象是否发生了变化。 然后通过 meta.ExtractList 函数将资源数据转换成资源对象列表,将 runtime.Object 对象转换成 []runtime.Object 对象,因为全量获取的是一个资源列表。 接下来是通过反射器的 syncWith 函数将资源对象列表中的资源对象和资源版本号存储在 Store 中,这个会在后面的章节中详细说明。 最后处理完成后通过 r.setLastSyncResourceVersion(resourceVersion) 操作来设置最新的资源版本号,其他的就是启动一个 goroutine 去定期检查是否需要执行 Resync 操作,调用存储中的 r.store.Resync() 来执行。 紧接着就是 Watch 操作了,Watch 操作通过 HTTP 协议与 APIServer 建立长连接,接收Kubernetes API Server 发来的资源变更事件,和 List 操作一样,Watch 的真正实现也是具体的 Informer 初始化的时候传入的,比如上面的 Deployment Informer 中初始化的时候传入的 WatchFunc,底层也是通过 ClientSet 客户端对 Deployment 执行 Watch 操作 client.AppsV1().Deployments(namespace).Watch(context.TODO(), options) 实现的。 获得 watch 的资源数据后,通过调用 r.watchHandler 来处理资源的变更事件,当触发Add 事件、Update 事件、Delete 事件时,将对应的资源对象更新到本地缓存(DeltaFIFO)中并更新 ResourceVersion 资源版本号。 这就是 Reflector 反射器中最核心的 ListAndWatch 实现,从上面的实现我们可以看出获取到的数据最终都流向了本地的 Store,也就是 DeltaFIFO,所以接下来我们需要来分析 DeltaFIFO 的实现。 六 小试牛刀 package main import ( "fmt" corev1 "k8s.io/api/core/v1" "k8s.io/apimachinery/pkg/fields" "k8s.io/apimachinery/pkg/util/wait" "k8s.io/client-go/kubernetes" "k8s.io/client-go/tools/cache" "k8s.io/client-go/tools/clientcmd" "k8s.io/client-go/util/homedir" "path/filepath" "time" ) func Must(e interface{}) { if e != nil { panic(e) } } func InitClientSet() (*kubernetes.Clientset, error) { kubeconfig := filepath.Join(homedir.HomeDir(), ".kube", "config") restConfig, err := clientcmd.BuildConfigFromFlags("", kubeconfig) if err != nil { return nil, err } return kubernetes.NewForConfig(restConfig) } // 生成listwatcher func InitListerWatcher(clientSet *kubernetes.Clientset, resource, namespace string, fieldSelector fields.Selector) cache.ListerWatcher { restClient := clientSet.CoreV1().RESTClient() return cache.NewListWatchFromClient(restClient, resource, namespace, fieldSelector) } // 生成pods reflector func InitPodsReflector(clientSet *kubernetes.Clientset, store cache.Store) *cache.Reflector { resource := "pods" namespace := "default" resyncPeriod := 0 * time.Second expectedType := &corev1.Pod{} lw := InitListerWatcher(clientSet, resource, namespace, fields.Everything()) return cache.NewReflector(lw, expectedType, store, resyncPeriod) } // 生成 DeltaFIFO func InitDeltaQueue(store cache.Store) cache.Queue { return cache.NewDeltaFIFOWithOptions(cache.DeltaFIFOOptions{ // store 实现了 KeyListerGetter KnownObjects: store, // EmitDeltaTypeReplaced 表示队列消费者理解 Replaced DeltaType。 // 在添加 `Replaced` 事件类型之前,对 Replace() 的调用的处理方式与 Sync() 相同。 // 出于向后兼容的目的,默认情况下为 false。 // 当为 true 时,将为传递给 Replace() 调用的项目发送“替换”事件。当为 false 时,将发送 `Sync` 事件。 EmitDeltaTypeReplaced: true, }) } func InitStore() cache.Store { return cache.NewStore(cache.MetaNamespaceKeyFunc) } func main() { clientSet, err := InitClientSet() Must(err) // 用于在processfunc中获取 store := InitStore() // queue DeleteFIFOQueue := InitDeltaQueue(store) // 生成podReflector podReflector := InitPodsReflector(clientSet, DeleteFIFOQueue) stopCh := make(chan struct{}) defer close(stopCh) go podReflector.Run(stopCh) //启动 ProcessFunc := func(obj interface{}) error { // 最先收到的事件会被最先处理 for _, d := range obj.(cache.Deltas) { switch d.Type { case cache.Sync, cache.Replaced, cache.Added, cache.Updated: if _, exists, err := store.Get(d.Object); err == nil && exists { if err := store.Update(d.Object); err != nil { return err } } else { if err := store.Add(d.Object); err != nil { return err } } case cache.Deleted: if err := store.Delete(d.Object); err != nil { return err } } pods, ok := d.Object.(*corev1.Pod) if !ok { return fmt.Errorf("not config: %T", d.Object) } fmt.Printf("Type:%s: Name:%s\n", d.Type, pods.Name) } return nil } fmt.Println("Start syncing...") wait.Until(func() { for { _, err := DeleteFIFOQueue.Pop(ProcessFunc) Must(err) } }, time.Second, stopCh) } 七 总结 通过本文,可以了解Reflector通过ListWatcher从Kubernetes API中获取对象的流程,以及存储到store中,后续会对DeltaFIFO进行源码研读,通过结合informer,来加深对整个informer的理解。 参考链接 https://blog.csdn.net/u013276277/article/details/108592288 https://www.jianshu.com/p/1daeae7b6970 点击关注,第一时间了解华为云新鲜技术~