首页 文章 精选 留言 我的

精选列表

搜索[入门],共10000篇文章
优秀的个人博客,低调大师

Storm入门之附录A

本文翻译自《Getting Started With Storm》译者:吴京润 编辑:郭蕾 方腾飞 安装Storm客户端 Storm客户端能让我们使用命令管理集群中的拓扑。按照以下步骤安装Storm客户端: 从Storm站点下载最新的稳定版本(https://github.com/nathanmarz/storm/downloads)当前最新版本是storm-0.8.1。(译者注:原文是storm-0.6.2,不过翻译的时候已经是storm-0.8.1了) 把下载的文件解压缩到/usr/local/bin/storm的Storm共享目录。 把Storm目录加入PATH环境变量,这样就不用每次都输入全路径执行Storm了。如果我们使用了/usr/local/bin/storm,执行export PATH=$PATH:/usr/local/bin/storm。 最后,创建Storm本地配置文件:~/.storm/storm.yaml,在配置文件中按如下格式加入nimbus主机: nimbus.host:"我们的nimbus主机" 现在,你可以管理你的Storm集群中的拓扑了。 NOTE:Storm客户端包含运行一个Storm集群所需的所有Storm命令,但是要运行它你需要安装一些其它的工具并做一些配置。详见附录B。 有许多简单且有用的命令可以用来管理拓扑,它们可以提交、杀死、禁用、再平衡拓扑。 jar命令负责把拓扑提交到集群,并执行它,通过StormSubmitter执行主类。 1 storm jar path-to-topology-jar class-with-the-main arg1 arg2 argN path-to-topology-jar是拓扑jar文件的全路径,它包含拓扑代码和依赖的库。class-with-the-main是包含main方法的类,这个类将由StormSubmitter执行,其余的参数作为main方法的参数。 我们能够挂起或停用运行中的拓扑。当停用拓扑时,所有已分发的元组都会得到处理,但是spouts的nextTuple方法不会被调用。 停用拓扑: 1 storm deactivte topology-name 启动一个停用的拓扑: 1 storm activate topology-name 销毁一个拓扑,可以使用kill命令。它会以一种安全的方式销毁一个拓扑,首先停用拓扑,在等待拓扑消息的时间段内允许拓扑完成当前的数据流。 杀死一个拓扑: 查看源代码 打印 帮助 1 stormkilltopology-name NOTE:执行kill命令时可以通过-w [等待秒数]指定拓扑停用以后的等待时间。 再平衡使你重分配集群任务。这是个很强大的命令。比如,你向一个运行中的集群增加了节点。再平衡命令将会停用拓扑,然后在相应超时时间之后重分配工人,并重启拓扑。 再平衡拓扑: 1 storm rebalance topology-name NOTE:执行不带参数的Storm客户端可以列出所有的Storm命令。完整的命令描述请见:https://github.com/nathanmarz/storm/wiki/Command-line-client。 文章转自并发编程网-ifeve.com

优秀的个人博客,低调大师

elk之elasticsearch 入门

一、概述: 1、查看elasticsearch集群的健康状况: 1 [root@node115 kibana]# curl -X GET http://192.168.39.115:9200/_cat/health?v 2 epoch timestamp cluster status node.total node.data shards pri relo init unassign pending_tasks max_task_wait_time active_shards_percent 3 1487146452 16:14:12 elasticsearch green 2 2 42 21 0 0 0 0 - 100.0% 2、查看elasticsearch集群的节点信息: 1 [root@node115 kibana]# curl -X GET http://192.168.39.115:9200/_cat/nodes?v 2 ip heap.percent ram.percent cpu load_1m load_5m load_15m node.role master name 3 192.168.39.115 30 24 1 0.43 0.20 0.22 mdi * node-1 4 192.168.39.175 43 100 1 0.53 0.42 0.39 mdi - node-2 3、查看index信息: 1 [root@node115 kibana]# curl -X GET http://192.168.39.115:9200/_cat/indices?v 2 health status index uuid pri rep docs.count docs.deleted store.size pri.store.size 3 green open .kibana e1EFtVxJSeS1jLxeX7kLSg 1 1 2 0 21.4kb 10.7kb 4 green open logstash-2017.02.15 i2rSKoflRtiEZoj9CmgEOA 5 1 6916294 0 4.3gb 2.1gb 5 green open logstash-2017.02.14 zMnftdmDQRShH86XsmwWlw 5 1 6127 0 4.8mb 2.4mb 6 green open filebeat-2017.02.15 alVH725IQgmwZiYvuW3Dsg 5 1 6922434 0 3.8gb 1.9gb 7 green open filebeat-2017.02.14 E2v3vgcPQz6jrDhxZMprOw 5 1 6127 0 4mb 2mb 4、创建index 1 PUT /customer?pretty #创建名为customer的index 5、查看index的详细信息: 1 curl -X GET http://192.168.39.115:9200/logstash-2017.02.15?pretty 6、删除index: 1 DELETE /customer?pretty #删除index (customer) 7、查看index上设置信息: 1 [root@node115 kibana]# curl -X GET http://192.168.39.115:9200/logstash-2017.02.16/_settings 2 { 3 "logstash-2017.02.16":{ 4 "settings":{ 5 "index":{ 6 "refresh_interval":"5s", 7 "number_of_shards":"5", 8 "provided_name":"logstash-2017.02.16", 9 "creation_date":"1487203204821", 10 "number_of_replicas":"1", 11 "uuid":"-Bwpq-5TT8mzLMJeU7PQ7A", 12 "version":{ 13 "created":"5020099" 14 } 15 } 16 } 17 } 18 } 8、修改index上的配置信息: 二、kafka相关: 查看topic bin/kafka-topics.sh --list --zookeeper localhost:2181

优秀的个人博客,低调大师

Docker入门(基于CentOS)

一 安装 Install with yum 查看当前Linux内核 uname -r 更新yum sudo yum update 添加yum仓库 sudo tee /etc/yum.repos.d/docker.repo <<-'EOF'[dockerrepo]name=Docker Repositorybaseurl=https://yum.dockerproject.org/repo/main/centos/7/enabled=1gpgcheck=1gpgkey=https://yum.dockerproject.org/gpgEOF 安装docker yum install docker-engine 查看docker版本 docker -v 开启docker服务 systemctl enable docker.service 启动docker systemctl start docker 查看docker进程 ps -aux | grep docker 查看docker docker ps -a

优秀的个人博客,低调大师

SparkStreaming入门及例子

看书大概了解了下Streaming的原理,但是木有动过手啊。。。万事开头难啊,一个wordcount 2小时怎么都运行不出结果。是我太蠢了,好了言归正传。 SparkStreaming是一个批处理的流式计算框架,适合处理实时数据与历史数据混合处理的场景(比如,你用streaming将实时数据读入处理,再使用sparkSQL提取历史数据,与之关联处理)。Spark Streaming将数据流以时间片为单位分割形成RDD,使用RDD操作处理每一块数据,没块数据都会生成一个spark JOB进行处理,最终以批处理方式处理每个时间片的数据。(多的就不解释了,百度就好了~) 首先确保你安装了hadoop和spark,在IDEA中也已入来了相应jar包。 写吧- - 新手要注意红框部分,spark官网上给的例子是调用socketFileStream方法,这是通过socket连接远程的,倘若只在本机上测试学习,就用textFileStream读取本地文件路径,没错是路径不是文件,因为sparkStreaming是处理实时数据的,倘若直接指定一个文件,输出后是无法得到结果的。所以新建了个路径,在这里设置了Seconds(20)每20秒读取一次。随后run一下。 启动后,将准备好的文件cp到这个路径下,20秒过后结果就出来了,模拟了下实时数据。结束。

优秀的个人博客,低调大师

Docker入门者手册

Docker - Beginner's tutorial Docker is a relatively new and rapidly growing project that allows to create very light “virtual machines”. The quotation marks here are important, what Docker allows you to create are not really virtual machines, they’re more akin to chroots on steroids, a lot of steroids. Before we continue, let me clear something up. As of right now (4th of January of 2015)Docker works only on Linux, it cannot function natively on Windows or OSX. I’ll be talking about the architecture of Docker later on and the reason will become obvious. So if you want Docker on a platform that is not Linux, you’ll need to run Linux on a VM. This tutorialhas three objectives:explainingwhat problem it solves, explaininghow it solves itat a high level, andexplainingwhat technologies does it useto solve it. This is not a step-by-step tutorial,there arealreadymany goodstep-by-steptutorialson Docker,including an online interactive one from the authors of Docker. That said, there is a little step-by-step at the end, it's just there to connect all of the theory I present during the post with a clearcut realworld example, but is by no means exhaustive. What can Docker can do for you? Docker solves many of the same problem that a VM solves, plus some other that VMs could solve if they didn’t were so resource intensive. Hereare some of the things that Docker can deal with: Isolating an application dependencies Creating an application image and replicating it Creating ready to start applications that are easily distributable Allowing easy and fast scalation of instances Testing out applications and disposing them afterwards The idea behind Docker is to createportablelightweightcontainers for software applicationsthat can be run on any machine with Docker installed, regardless of the underlying OS, akin to the cargo containers used on ships. Pretty ambitious, and they’re succeeding. What does Docker do exactly? In this section I will not be explaining what technologies Docker uses to do what it does, or what specific commands are available, that’s on the last section, here I’ll explain the resources and abstractions that Docker offers. The two most important entities in Docker areimagesandcontainers. Aside from those,linksandvolumesare also important. Let’s start with images. Images Images on Docker are like thesnapshot of a virtual machine, but way more lightweight, way way way more lightweight (more on the next section). There are several ways to create an image on Docker, most of them rely on creating an new image based on an already existing image, and since there are public images to pretty much everything you need, including for all the major linux distributions, it’s not likely that you will not find one that suit your needs. If you however feel the need to build andimage from scratch,thereareways. To create an image you take one image and modify it to create a child image. This can be done either through a file that specifies a base image and the modifications that are to be done, or live by “running” an image, modifying it and committing it. There are advantages to each method, but generally you’ll want to use a file to specify the changes. Images have an unique ID, and an unique human-readable name andtag pair. Images can be called, for example, ubuntu:latest, ubuntu:precise, django:1.6, django:1.7, etc. Containers Now onto containers. From images you can create containers, this is the equivalent of creating a VM from a snapshot, but way more lightweight. Containers are the ones that run stuff. Let use an example, you could download an image of ubuntu (there is a public repository of images called thedocker registry), modify it by installing Gunicornand your Django app with all its dependencies, and then create a container from that image that runs your app when it starts. Containers, like VMs, are isolated (with one little caveat that I’ll discuss later). They also have an unique ID and a unique human-readablename. It’s necessary for containers to expose services, so Docker allows you to expose specific ports of a container. Containers have two main differences that separate them from VMs. The first one is that they are designed torun a single process, they don’t simulate well a complete environment (if that’s what you need check outLXC). You may be temptedto run a runitor supervisord instance and get several processes up,but it’s reallynot necessary(in my humble opinion). The whole single process vs multiple processes issomewhat ofan outstandingdebate. You should know that the Docker designers heavily promote the"one process per container approach", and that the only case where you really have no other option but to run more than one process is to run something like ssh, to access the container while it is running for debugging purposes, however the commanddocker execsolves that problem. The second big difference between containers and VMsis that when you stop a VM, no files are erased besides maybe some temporary files, when you stop a Docker container allchangesdone to the initialstate(the state of the image from which the container was created) arelost. This is one of the biggest changes in mindset that one must make when working with Docker:containers are ephemeral and disposable. Volumes So if your ecommerce website had just received payments for 30000$ that were already charged to the clients and you get a kernel panic, all changes to the database are lost...not very good publicity, for you or Docker, but fear not. Docker allows you to definevolumes, spaces inside the container that can hold persistent data. Docker forces you to define what parts are yourapplicationand what parts are yourdata, and demands that you keep themseparated. Volumes are specific to each container, you can create several containers from a single image and define different volumes for each. Volumes are stored in the filesystem of the host running Docker, you can specify the directory where a volume will be stored, or let Docker store them in a default location. Whatever is not a volume is stored in other type of filesystem, but more on that later. Links Linksare another very important part of Docker. Whenever a container is started, a random private IP is assigned to it, other containers can use this IP address to communicate with it. This is important for 2 reasons: first it provides a way for containers to talk to each other, second containers share a local network. I had a problem once when I started two elasticsearch containers for two clients on the same machine, but left the cluster name to the default setting, the two elasticsearch servers promptly made an unsolicited cluster. To allow intercontainer communicationDocker allows you to reference other existing containers when spinning up a new one, those referenced containers receive an alias (that you specify) inside the container you just created. We say that the two containers arelinked. So if my DB container is already running, I can create my webserver container and reference the DB container upon creation, giving it analias,dbappfor example. When inside my newly created webserver container I can use the hostnamedbappto communicate with my DB container at any time. Docker takes it one step further, requiring you to state which ports a container will make available to other containers when it is linked, otherwise no ports will be available. Portability of Docker images There is one caveat when creating images. Docker allows you specify volumes and ports in an image. Containers created from that image inherit those settings. However, Docker doesn’t allow you to specify anything on an image that is not portable. For example, you can define volumes in an image, just as long as they’re stored on the default location that Docker uses. This is because if you were to specifya certain directory within the host filesystem to store the volume, there is no guarantee that that directory will exists on every other host where thatimage might be used. You can define exposed ports, but only those ports that are exposed to other containers when links are created, you can’t specify ports exposed to the host, since you don't know wich ports will be available on the hosts that might use thatimage. You can’t define links on an image either. Making a link requires you to reference another container by name, and you can't know beforehand how will the containers be named on every host that might use the image. Images must be completely portable, Docker doesn’t allow otherwise. So those are the primary moving parts, you create images, use those to create containers that expose ports and have volumes if needed, and connect several containers together with links. How can this all work with little to no overhead? How does Docker do what it needs to be done? Two words:cgroupsandunion filesystems. Docker uses cgroups to provide container isolation, and union filesystem to store the images and make containers ephemeral. Cgroups This is a Linux kernel feature that makes two things possible: Limit resource utilization (RAM, CPU) for Linuxprocess groups Make PID, UTS, IPC, Network, User and mount namespaces for process groups The keyword here is namespace. APID namespace, for example, permits processes in it to use PIDs isolated and independent of the main PID namespace, so you could have your own init process with a PID of 1 within a PID namespace. Analogous for all the other namespaces. You can then use cgroups to create an environment where processes can be executed isolated from the rest of your OS, but the key here is that the processes on this environmentuse your already loaded and running kernel, so the overhead is pretty much the same as running another process. Chroot is to cgroups whatIamtoThe Hulk,BaneandVenomcombined. Union filesystems An union filesystem allows a layered accumulation of changes through an union mount. In an union filesystem several filesystems can be mounted on top of each other, the result is a layered collection of changes. Each filesystem mounted represents a collection of changes to the previous filesystem, like a diff. When you download an image, modify it, and store your new version, you’ve just made a new union filesystem to be mounted on top of the initial layers that conformed your base image. This makes Docker images very light, for example: your DB, Nginx and Syslog images can all share the same Ubuntu base, each one storing only the changes from this base that they need to function. As of January 4th2015, Docker allows to use eitheraufs,btrfsordevice mapperfor union filesystems. Images Let me show you an image of postgresql: [{ "AppArmorProfile": "", "Args": [ "postgres" ], "Config": { "AttachStderr": true, "AttachStdin": false, "AttachStdout": true, "Cmd": [ "postgres" ], "CpuShares": 0, "Cpuset": "", "Domainname": "", "Entrypoint": [ "/docker-entrypoint.sh" ], "Env": [ "PATH=/usr/lib/postgresql/9.3/bin:/usr/local/sbin:/usr/local/bin:/usr/sbin:/usr/bin:/sbin:/bin", "LANG=en_US.utf8", "PG_MAJOR=9.3", "PG_VERSION=9.3.5-1.pgdg70+1", "PGDATA=/var/lib/postgresql/data" ], "ExposedPorts": { "5432/tcp": {} }, "Hostname": "6334a2022f21", "Image": "postgres", "MacAddress": "", "Memory": 0, "MemorySwap": 0, "NetworkDisabled": false, "OnBuild": null, "OpenStdin": false, "PortSpecs": null, "StdinOnce": false, "Tty": false, "User": "", "Volumes": { "/var/lib/postgresql/data": {} }, "WorkingDir": "" }, "Created": "2015-01-03T23:56:12.354896658Z", "Driver": "devicemapper", "ExecDriver": "native-0.2", "HostConfig": { "Binds": null, "CapAdd": null, "CapDrop": null, "ContainerIDFile": "", "Devices": null, "Dns": null, "DnsSearch": null, "ExtraHosts": null, "IpcMode": "", "Links": null, "LxcConf": null, "NetworkMode": "", "PortBindings": null, "Privileged": false, "PublishAllPorts": false, "RestartPolicy": { "MaximumRetryCount": 0, "Name": "" }, "SecurityOpt": null, "VolumesFrom": [ "bestwebappever.dev.db-data" ] }, "HostnamePath": "/mnt/docker/containers/6334a2022f213f9534b45df33c64437081a38d50c7f462692b019185b8cbc6da/hostname", "HostsPath": "/mnt/docker/containers/6334a2022f213f9534b45df33c64437081a38d50c7f462692b019185b8cbc6da/hosts", "Id": "6334a2022f213f9534b45df33c64437081a38d50c7f462692b019185b8cbc6da", "Image": "aaab661c1e3e8da2d9fc6872986cbd7b9ec835dcd3886d37722f1133baa3d2db", "MountLabel": "", "Name": "/bestwebappever.dev.db", "NetworkSettings": { "Bridge": "docker0", "Gateway": "172.17.42.1", "IPAddress": "172.17.0.176", "IPPrefixLen": 16, "MacAddress": "02:42:ac:11:00:b0", "PortMapping": null, "Ports": { "5432/tcp": null } }, "Path": "/docker-entrypoint.sh", "ProcessLabel": "", "ResolvConfPath": "/mnt/docker/containers/6334a2022f213f9534b45df33c64437081a38d50c7f462692b019185b8cbc6da/resolv.conf", "State": { "Error": "", "ExitCode": 0, "FinishedAt": "0001-01-01T00:00:00Z", "OOMKilled": false, "Paused": false, "Pid": 21654, "Restarting": false, "Running": true, "StartedAt": "2015-01-03T23:56:42.003405983Z" }, "Volumes": { "/var/lib/postgresql/data": "/mnt/docker/vfs/dir/5ac73c52ca86600a82e61279346dac0cb3e173b067ba9b219ea044023ca67561", "postgresql_data": "/mnt/docker/vfs/dir/abace588b890e9f4adb604f633c280b9b5bed7d20285aac9cc81a84a2f556034" }, "VolumesRW": { "/var/lib/postgresql/data": true, "postgresql_data": true } } ] Thats it, images are just a json that specifies the characteristic of the containers that will be run from that image, where the union mount is stored, what ports are exposed, etc. Each image is associated with one union filesystem, each union filesystem on Docker has a parent, so images have a hierarchy. Several Docker images can be created from a same base, but each image may only haveone parent, just like a computer science tree (unlike some other trees that have a bigger family group).Don't worry if it looks daunting or some things don't quite add up, you'll not be handling these files directly, this is for educational purposes only. Containers The reason containers are ephemeral is that, when you create a container from an image, Docker creates a blank union filesystem to be mounted on top of the union filesystem associated to that image. Since the union filesystem is blank it means no changes are applied to the image's filesystem, when youcreate some change it gets reflected, but when the container is stopped the union filesystem of that container is discarded, leaving you with the original image'sfilesystem you started with. Unless you create a new image, or make a volume, your changes will always disappear on container stop. What volumes do is to specify a directory within the container that will be stored it outside the union filesystem. Here is a container for thebestwebappever: [{ "AppArmorProfile": "", "Args": [], "Config": { "AttachStderr": true, "AttachStdin": false, "AttachStdout": true, "Cmd": [ "/sbin/my_init" ], "CpuShares": 0, "Cpuset": "", "Domainname": "", "Entrypoint": null, "Env": [ "DJANGO_CONFIGURATION=Local", "HOME=/root", "PATH=/usr/local/sbin:/usr/local/bin:/usr/sbin:/usr/bin:/sbin:/bin", "TALPOR_ENVIRONMENT=local", "TALPOR_DIR=/opt/bestwebappever" ], "ExposedPorts": { "80/tcp": {} }, "Hostname": "44a87fdaf870", "Image": "talpor/bestwebappever:dev", "MacAddress": "", "Memory": 0, "MemorySwap": 0, "NetworkDisabled": false, "OnBuild": null, "OpenStdin": false, "PortSpecs": null, "StdinOnce": false, "Tty": false, "User": "", "Volumes": { "/opt/bestwebappever": {} }, "WorkingDir": "/opt/bestwebappever" }, "Created": "2015-01-03T23:56:15.378511619Z", "Driver": "devicemapper", "ExecDriver": "native-0.2", "HostConfig": { "Binds": [ "/home/german/bestwebappever/:/opt/bestwebappever:rw" ], "CapAdd": null, "CapDrop": null, "ContainerIDFile": "", "Devices": null, "Dns": null, "DnsSearch": null, "ExtraHosts": null, "IpcMode": "", "Links": [ "/bestwebappever.dev.db:/bestwebappever.dev.app/db", "/bestwebappever.dev.redis:/bestwebappever.dev.app/redis" ], "LxcConf": null, "NetworkMode": "", "PortBindings": { "80/tcp": [ { "HostIp": "", "HostPort": "8887" } ] }, "Privileged": false, "PublishAllPorts": false, "RestartPolicy": { "MaximumRetryCount": 0, "Name": "" }, "SecurityOpt": null, "VolumesFrom": [ "bestwebappever.dev.requirements-data" ] }, "HostnamePath": "/mnt/docker/containers/44a87fdaf870281e86160e9e844b8987cfefd771448887675fed99460de491c4/hostname", "HostsPath": "/mnt/docker/containers/44a87fdaf870281e86160e9e844b8987cfefd771448887675fed99460de491c4/hosts", "Id": "44a87fdaf870281e86160e9e844b8987cfefd771448887675fed99460de491c4", "Image": "b84804fac17b61fe8f344359285186f1a63cd8c0017930897a078cd09d61bb60", "MountLabel": "", "Name": "/bestwebappever.dev.app", "NetworkSettings": { "Bridge": "docker0", "Gateway": "172.17.42.1", "IPAddress": "172.17.0.179", "IPPrefixLen": 16, "MacAddress": "02:42:ac:11:00:b3", "PortMapping": null, "Ports": { "80/tcp": [ { "HostIp": "0.0.0.0", "HostPort": "8887" } ] } }, "Path": "/sbin/my_init", "ProcessLabel": "", "ResolvConfPath": "/mnt/docker/containers/44a87fdaf870281e86160e9e844b8987cfefd771448887675fed99460de491c4/resolv.conf", "State": { "Error": "", "ExitCode": 0, "FinishedAt": "0001-01-01T00:00:00Z", "OOMKilled": false, "Paused": false, "Pid": 21796, "Restarting": false, "Running": true, "StartedAt": "2015-01-03T23:56:47.537259546Z" }, "Volumes": { "/opt/bestwebappever": "/home/german/bestwebappever", "requirements_data": "/mnt/docker/vfs/dir/bc14bec26ca311d5ed9f2a83eebef872a879c9e2f1d932470e0fd853fe8be336" }, "VolumesRW": { "/opt/bestwebappever": true, "requirements_data": true } } ] Basically the same as an image, but now some exported ports to the host are also specified, where volumes are located on the host is also stated, the container state is present towards the end, etc. As before, don't worry if it looks daunting, you will not be handling these jsondirectly. Tiny and small and puny step-by-step So, step 1.Install Docker. The Docker cmd utilitiesneedroot permissions to work. You may include your user in the docker group to avoid having to sudo everything. Step two, lets download an image from thepublic registryusing the following command: $> docker pull ubuntu:latest ubuntu:latest: The image you are pulling has been verified 3b363fd9d7da: Pull complete .....<bunch of downloading-stuff output>..... 8eaa4ff06b53: Pull complete Status: Downloaded newer image for ubuntu:latest $> There are images for pretty much everything you may need on this public registry: Ubuntu, Fedora, Postgresql, MySQL, Jenkins, Elasticsearch, Redis, etc. The Docker developers maintain several images in the public registry, but the bulk of what you can pull from itcome from users that publishtheir own creations. There may be come a time when you need/want a private registry (for containers for developing apps and such),you should read this first.Now,there arewaysto setupyour ownprivateregistry.You could alsojust pay for one. Step three, list your images: $> docker images REPOSITORY TAG IMAGE ID CREATED VIRTUAL SIZE ubuntu latest 8eaa4ff06b53 4 days ago 192.7 MB Step four, create a container from that image. $> docker run --rm -ti ubuntu /bin/bash root@4638a40c2fbb:/# ls bin boot dev etc home lib lib64 media mnt opt proc root...... root@4638a40c2fbb:/# exit Quick rundown of what youdid on that last command: --rm: tells Docker to remove the container as soon as the process is running exits. Good for making tests and avoiding clutter -ti: tell Docker to allocate a pseudo tty and put me on interactive mode. This is for entering the container and is good for rapid prototyping and playing around, but for production containers you will not be turning these flags on ubuntu: this is the image we're basing the container on /bin/bash: the command to run, and since we started on interactive mode, it gives us a prompt to the container On the run command you specify your links, volumes, ports, name of the container (Docker assings default name if you do not provide one) etc. Now let's run a container on the background: $> docker run -d ubuntu ping 8.8.8.8 31c68e9c09a0d632caae40debe13da3d6e612364198e2ef21f842762df4f987f $> The output is the assigned ID, yours will vary as it is random. Let's check out what our container is up to: $> docker ps CONTAINER ID IMAGE COMMAND CREATED STATUS PORTS NAMES 31c68e9c09a0 ubuntu:latest "ping 8.8.8.8" 2 minutes ago Up 2 minutes loving_mcclintock There he is, his automated assigned human-readable name is loving_mcclintock. Now lets check inside the container to see what's happening: $> docker exec -ti loving_mcclintock /bin/bash root@31c68e9c09a0:/# ps -aux|grep ping root 1 0.0 0.0 6504 636 ? Ss 20:46 0:00 ping 8.8.8.8 root@31c68e9c09a0:/# exit What we just did is to execute a programinside the container, in this case the program was /bin/bash. The flags -ti servesthe same purpose as in docker run, so it just placed us inside a shell in the container. Wrap up This about wraps it up. There is so much more to cover, but that's beyond the scope of this blogpost. I'll however leave you with some links and further reading material that Ibelieveis important/interesting Docker basic structure: https://docs.docker.com/introduction/understanding-docker/ http://blog.docker.com/2014/03/docker-0-9-introducing-execution-drivers-and-libcontainer/ Further reading: Dockerfiles: These allow you to define an image using a text file, they are really important Did I mentioned thatdockerfilesare very important? You really should check outdockerfiles docker build: you need this to build yourdockerfiles docker push/docker pull docker create/docker run docker rm/docker rmi docker start/docker stop docker exec docker inspect docker tag Links Volumes Interesting links: ANNOUNCING DOCKER MACHINE, SWARM, AND COMPOSE FOR ORCHESTRATING DISTRIBUTED APPS Docker at Shopify: How we built containers that power over 100,000 online shops Why CoreOS is a game-changer in the data center and cloud Docker Misconceptions Microservices - Not a Free Lunch! Feature Preview: Docker-Based Development Environments How to compile Docker on Windows(thanks tocomputermedicon reddit for the link) Useful projects and links Phusion Docker baseimage Shipyard DockerUI CoreOS Decking Docker-py Docker-map Docker-fabric
优秀的个人博客,低调大师

语音朗读入门

利用微软自带的TTS,能够做到一个简单的语音朗读功能 using System.Speech.Synthesis; //用于语音朗读 using System.Speech.Recognition;//用于识别语音 namespace ConsoleApplication1 { class Program { static void Main(string[] args) { while (true) { Console.WriteLine("请输入英文:"); string s = Console.ReadLine(); SpeechSynthesizer synth = new SpeechSynthesizer(); //选择不同的发音 synth.SelectVoice("Microsoft Anna");//美式发音,但只能读英文 //synth.SelectVoice("Microsoft Lili");//能读中英文 synth.Speak(s); } //语音识别 //SpeechRecognitionEngine sre = new SpeechRecognitionEngine(); } } }

优秀的个人博客,低调大师

【Arthas技术专题】「快速入门指南」安装入门及基础指令介绍

Arthas特性介绍 Arthas是Alibaba开源的Java诊断工具,深受开发者喜爱。在线排查问题,无需重启;动态跟踪Java代码;实时监控JVM状态。 Arthas支持JDK 6+,支持Linux/Mac/Windows,采用命令行交互模式,同时提供丰富的Tab自动补全功能,进一步方便进行问题的定位和诊断。 Arthas解决范畴 这个类从哪个 jar 包加载的?为什么会报各种类相关的 Exception? 我改的代码为什么没有执行到?难道是我没 commit?分支搞错了? 遇到问题无法在线上 debug,难道只能通过加日志再重新发布吗? 线上遇到某个用户的数据处理有问题,但线上同样无法 debug,线下无法重现! 是否有一个全局视角来查看系统的运行状况? 有什么办法可以监控到JVM的实时运行状态? 怎么快速定位应用的热点,生成火焰图? 怎样直接从JVM内查找某个类的实例? Arthas快速开始 使用arthas-boot(推荐) 下载arthas-boot.jar,然后用java -jar的方式启动: 下载文件 curl -O https://arthas.aliyun.com/arthas-boot.jar wget https://alibaba.github.io/arthas/arthas-boot.jar 执行命令 java -jar arthas-boot.jar 打印帮助信息: java -jar arthas-boot.jar -h 如果下载速度比较慢,可以使用aliyun的镜像: java -jar arthas-boot.jar --repo-mirror aliyun --use-http 使用as.sh Arthas 支持在 Linux/Unix/Mac 等平台上一键安装: curl -L https://arthas.aliyun.com/install.sh | sh 下载启动脚本文件 as.sh 到当前目录,你可以放在任何地方或将其加入到 $PATH 中。 直接在shell下面执行./as.sh,就会进入交互界面。 也可以执行./as.sh -h来获取更多参数信息。 Arthas基础指令 dashboard 在Arthas的命令行界面,输入dashboard,会实时展示当前JVM应用服务的多线程状态、JVM各内存区域、GC情况等信息。 参数信息 数据说明 ID: Java级别的线程ID,注意这个ID不能跟jstack中的nativeID一一对应。 NAME: 线程名 GROUP: 线程组名 PRIORITY: 线程优先级, 1~10之间的数字,越大表示优先级越高 STATE: 线程的状态 CPU%: 线程的cpu使用率。 比如采样间隔1000ms,某个线程的增量cpu时间为100ms,则cpu使用率=100/1000=10% DELTA_TIME: 上次采样之后线程运行增量CPU时间,数据格式为秒 TIME: 线程运行总CPU时间,数据格式为分:秒 INTERRUPTED: 线程当前的中断位状态 DAEMON: 是否是daemon线程 JVM内部线程 **Java8之后支持获取JVM内部线程CPU时间,这些线程只有名称和CPU时间,没有ID及状态等信息(显示ID为-1)。 ** 内部线程观测到JVM活动,如GC、JIT编译等占用CPU情况,方便了解JVM整体运行状况。 当JVM堆(heap)/元数据(metaspace)空间不足或OOM时,可以看到GC线程的CPU占用率明显高于其他的线程。 当执行trace/watch/tt/redefine等命令后,可以看到JIT线程活动变得更频繁。因为JVM热更新class字节码时清除了此class相关的JIT编译结果,需要重新编译。 JVM内部线程包括下面几种: JIT编译线程: 如 C1 CompilerThread0, C2 CompilerThread0 GC线程: 如GC Thread0, G1 Young RemSet Sampling 其它内部线程: 如VM Periodic Task Thread, VM Thread, Service Thread thread 查看当前线程信息,查看线程的堆栈。 参数说明 cpu使用率是如何统计出来的? cpu使用率与linux 命令top -H -p <pid> 的线程%CPU类似,一段采样间隔时间内,当前JVM里各个线程的增量cpu时间与采样间隔时间的比例。 实际案例 输入thread会显示所有线程的状态信息 输入thread -n 3会显示当前最忙的3个线程,可以用来排查线程CPU消耗 输入thread -b 会显示当前处于BLOCKED状态的线程,可以排查线程锁的问题 工作原理说明: 首先第一次采样,获取所有线程的CPU时间 java.lang.management.ThreadMXBean#getThreadCpuTime() sun.management.HotspotThreadMBean.getInternalThreadCpuTimes() 然后睡眠等待一个间隔时间(默认为200ms,可以通过 -i 指定间隔时间) 再次第二次采样,获取所有线程的CPU时间,对比两次采样数据,计算出每个线程的增量CPU时间 线程CPU使用率 = 线程增量CPU时间 / 采样间隔时间 * 100% 注意: 这个统计也会产生一定的开销(JDK这个接口本身开销比较大),因此会看到as的线程占用一定的百分比,为了降低统计自身的开销带来的影响,可以把采样间隔拉长一些,比如5000毫秒。 最忙的前N个线程并打印堆栈: 没有线程ID,包含[Internal]表示为JVM内部线程,参考dashboard命令的介绍。 cpuUsage为采样间隔时间内线程的CPU使用率,与dashboard命令的数据一致。 deltaTime为采样间隔时间内线程的增量CPU时间,小于1ms时被取整显示为0ms。 time 线程运行总CPU时间。 输出所有相关的线程的明细: thread -all 查看某个线程号对应的堆栈: thread pid 查看指定状态的线程 thread –state <thread state> jvm 输入jvm,查看jvm详细的性能数据 Runtime Memory/OperationSystem/Thread jad 对类进行反编译: getstatic 推荐直接使用ognl命令,更加灵活。 通过getstatic命令可以方便的查看类的静态属性。使用方法为getstatic class_name field_name sc 查看JVM已加载的类信息。 “Search-Class” 的简写,这个命令能搜索出所有已经加载到 JVM 中的 Class 信息,这个命令支持的参数有 [d]、[E]、[f] 和 [x:]。 mc Memory Compiler/内存编译器,编译.java文件生成.class。 mc /tmp/TestSample.java trace 通常说一个接口性能不好,其实就是接口响应时间比较长造成的,具体代码中哪个函数耗时比较长呢?可以使用trace功能来监控一下 解释: -j 参数可以过滤掉jdk自身的函数 sc 查找JVM中已经加载的类 $ sc -d org.springframework.web.context.support.XmlWebApplicationContext class-info org.springframework.web.context.support.XmlWebApplicationContext code-source /Users/xxx/work/test/WEB-INF/lib/spring-web-3.2.11.RELEASE.jar name org.springframework.web.context.support.XmlWebApplicationContext isInterface false isAnnotation false isEnum false isAnonymousClass false isArray false isLocalClass false isMemberClass false isPrimitive false isSynthetic false simple-name XmlWebApplicationContext modifier public annotation interfaces super-class +-org.springframework.web.context.support.AbstractRefreshableWebApplicationContext +-org.springframework.context.support.AbstractRefreshableConfigApplicationContext +-org.springframework.context.support.AbstractRefreshableApplicationContext +-org.springframework.context.support.AbstractApplicationContext +-org.springframework.core.io.DefaultResourceLoader +-java.lang.Object class-loader +-org.apache.catalina.loader.ParallelWebappClassLoader +-java.net.URLClassLoader@6108b2d7 +-sun.misc.Launcher$AppClassLoader@18b4aac2 +-sun.misc.Launcher$ExtClassLoader@1ddf84b8 classLoaderHash 25131501 sm 查看已加载类的方法信息 “Search-Method” 的简写,这个命令能搜索出所有已经加载了 Class 信息的方法信息。 sm 命令只能看到由当前类所声明 (declaring) 的方法,父类则无法看到。 $ sm java.lang.String java.lang.String-><init> java.lang.String->equals java.lang.String->toString java.lang.String->hashCode java.lang.String->compareTo java.lang.String->indexOf java.lang.String->valueOf java.lang.String->checkBounds java.lang.String->length java.lang.String->isEmpty java.lang.String->charAt java.lang.String->codePointAt java.lang.String->codePointBefore java.lang.String->codePointCount java.lang.String->offsetByCodePoints java.lang.String->getChars java.lang.String->getBytes java.lang.String->contentEquals java.lang.String->nonSyncContentEquals java.lang.String->equalsIgnoreCase java.lang.String->compareToIgnoreCase java.lang.String->regionMatches java.lang.String->startsWith java.lang.String->endsWith java.lang.String->indexOfSupplementary java.lang.String->lastIndexOf java.lang.String->lastIndexOfSupplementary java.lang.String->substring java.lang.String->subSequence java.lang.String->concat java.lang.String->replace java.lang.String->matches java.lang.String->contains java.lang.String->replaceFirst java.lang.String->replaceAll java.lang.String->split java.lang.String->join java.lang.String->toLowerCase java.lang.String->toUpperCase java.lang.String->trim java.lang.String->toCharArray java.lang.String->format java.lang.String->copyValueOf java.lang.String->intern stack 查看方法 test.arthas.TestSample#execute 的调用堆栈: $ stack test.arthas.TestSample execute Press Ctrl+C to abort. Affect(class-cnt:1 , method-cnt:1) cost in 286 ms. ts=2018-09-18 10:11:45;thread_name=http-bio-8080-exec-10;id=d9;is_daemon=true;priority=5;TCCL=org.apache.catalina.loader.ParallelWebappClassLoader@25131501 @test.arthas.TestSample.execute() at javax.servlet.http.HttpServlet.service(HttpServlet.java:624) at javax.servlet.http.HttpServlet.service(HttpServlet.java:731) at org.apache.catalina.core.ApplicationFilterChain.internalDoFilter(ApplicationFilterChain.java:303) at org.apache.catalina.core.ApplicationFilterChain.doFilter(ApplicationFilterChain.java:208) at org.apache.tomcat.websocket.server.WsFilter.doFilter(WsFilter.java:52) at org.apache.catalina.core.ApplicationFilterChain.internalDoFilter(ApplicationFilterChain.java:241) at org.apache.catalina.core.ApplicationFilterChain.doFilter(ApplicationFilterChain.java:208) at org.apache.catalina.core.ApplicationFilterChain.internalDoFilter(ApplicationFilterChain.java:241) at org.apache.catalina.core.ApplicationFilterChain.doFilter(ApplicationFilterChain.java:208) at org.apache.catalina.core.StandardWrapperValve.invoke(StandardWrapperValve.java:220) at org.apache.catalina.core.StandardContextValve.invoke(StandardContextValve.java:110) ... at org.apache.catalina.core.StandardHostValve.invoke(StandardHostValve.java:169) at org.apache.catalina.valves.ErrorReportValve.invoke(ErrorReportValve.java:103) at org.apache.catalina.core.StandardEngineValve.invoke(StandardEngineValve.java:116) at org.apache.catalina.connector.CoyoteAdapter.service(CoyoteAdapter.java:451) at org.apache.coyote.http11.AbstractHttp11Processor.process(AbstractHttp11Processor.java:1121) at org.apache.coyote.AbstractProtocol$AbstractConnectionHandler.process(AbstractProtocol.java:637) at org.apache.tomcat.util.net.JIoEndpoint$SocketProcessor.run(JIoEndpoint.java:316) at java.util.concurrent.ThreadPoolExecutor.runWorker(ThreadPoolExecutor.java:1142) at java.util.concurrent.ThreadPoolExecutor$Worker.run(ThreadPoolExecutor.java:617) at org.apache.tomcat.util.threads.TaskThread$WrappingRunnable.run(TaskThread.java:61) at java.lang.Thread.run(Thread.java:745) retransform 加载外部的.class文件,retransform 热更新jvm已加载的类。 retransform /tmp/TestSample.class retransform -c 327a647b /tmp/TestSample.class /tmp/Test\$Inner.class retransform指定的 .class 文件 $ retransform /tmp/TestSample.class retransform success, size: 1, classes: com.TestSample 加载指定的 .class 文件,然后解析出class name,再retransform jvm中已加载的对应的类。每加载一个 .class 文件,则会记录一个 retransform entry。 如果多次执行 retransform 加载同一个 class 文件,则会有多条 retransform entry. 查看 retransform entry $ retransform -l Id ClassName TransformCount LoaderHash LoaderClassName 1 com.TestSample 1 null null TransformCount 统计在 ClassFileTransformer#transform 函数里尝试返回 entry对应的 .class文件的次数,但并不表明transform一定成功。 删除指定 retransform entry 需要指定 id: retransform -d 1 删除所有 retransform entry retransform --deleteAll 显式触发 retransform $ retransform --classPattern com.TestSample retransform success, size: 1, classes: com.TestSample 注意:对于同一个类,当存在多个 retransform entry时,如果显式触发 retransform ,则最后添加的entry生效(id最大的)。 消除 retransform 的影响 如果对某个类执行 retransform 之后,想消除影响,则需要: 删除这个类对应的 retransform entry 重新触发retransform 如果不清除掉所有的 retransform entry,并重新触发 retransform ,则arthas stop时,retransform过的类仍然生效。

优秀的个人博客,低调大师

TinyPro SpringBoot 最新入门指南,解决开发者入门难题

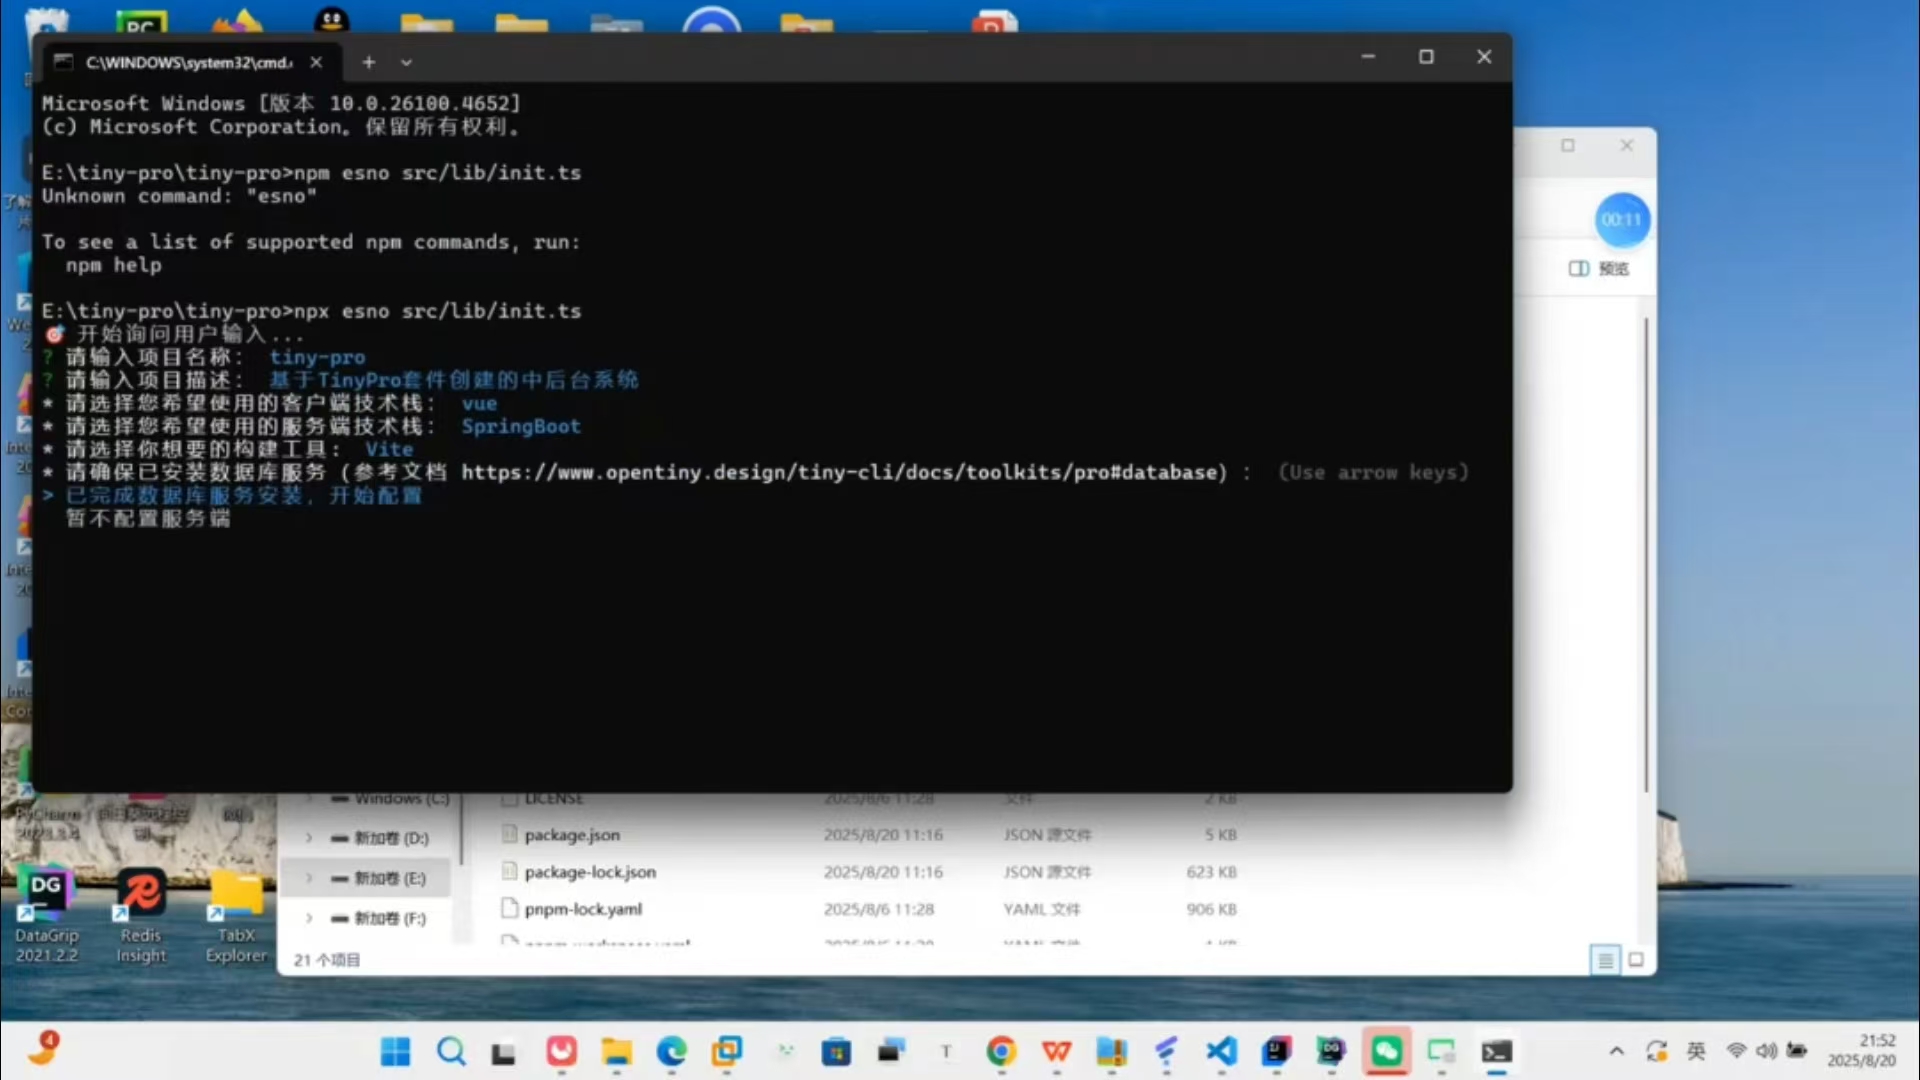
本文由TinyPro中后台系统贡献者周泽龙原创。 在长达三个月的开发下,终于TinyPro的Springboot后端版本终于要问世了,在本期内容中我将带大家一步步去搭建整个后端的流程,也将带大家去探索对于最新版本的更改应该如何实现,以及如何使用本项目进行一个二次的开发和探索。 首先我们先要对于TinyPro项目进行一个整体的拉取,去到TinyPro的官方进行拉取,当我们获取到项目以后就可以进行开始今天的项目构建了。 接下来的流程就是对于前端i项目的搭建以及后端的springboot项目的搭建,最后再去介绍咱们新版本里面的一些特性和组件 1.前端部分的搭建 首先要确保咱们安装了Node.js、NPM、TinyCLI接下来就要正式初始化项目了首先我们进行初始化 (1)在命令行输入tiny init pro对项目进行一个初始化具体的流程可以看我的视频介绍 (2)接下来就让我们进入到我们的项目里面,tinyvue的前端代码里面我们首先进行一个项目的依赖的下载大家可以使用npm install进行项目依赖的下载。 (3)当我们项目依赖下载完成后就可以进入到一个启动流程了,使用npm start进行一个项目的启动启动后就会开启3031端口这样就可以看见项目的启动界面了! 到目前为止我们的前端项目就算正式启动成功了,接下来让我们一起开始启动后端项目 2.后端项目的搭建 首先我们需要确保自己的本地环境里面有jdk17,maven,mysql,redis以及一个自己喜欢的开发软件可以idea或者vscode 好了准备工作做好以后接下来就让我们进入后端的开发和后端二次开发的一个介绍并且我也将带着大家去了解springboot里面的一些设计和里面的一些函数的内容接下来开始吧 项目结构的介绍: 当进入到项目里面的时候我们最直观的可以看见项目的一个整体结构 (1)先介绍一下项目的一个配置文件,对于所有的springboot项目上来第一件事就算看配置文件application.properties文件这个文件里面包含了所有项目需要的配置比如:mysql,redis,Springjpa,mybatis-plus(项目里面没有使用,但是基本的配置都配置好了,也就兼容了喜欢使用mybatis-plus的同学)大家可以更具自己的数据库信息和redis进行配置,需要自己填写好数据库的用户名,端口和驱动地址,还有redis的配置信息比如主机地址和端口号 到这里的同学,那就恭喜大家数据服务的配置我们就是做好了,接下来就是对项目的依赖的下载,这块主要涉及到maven的使用,如果还,没有下载maven的同学记得赶快去下载 (2)接下来开始项目依赖的初始化过程,在项目启动的时候,我们需要先对项目的依赖包去官方的仓库里面下载(这块给大家一个提醒,如果下载过慢的同学记得去配置一下maven的国内镜像源进行下载和配置),敲入命令 mvn install进行一个项目依赖的下载。 如果到这里都执行成功,大家就可以正式的启动项目,正式启动项目之前我希望大家可以去查看自己jdk的配置是否是17,因为接下来的必须要使用jdk17了 (3)进入到TinyProApplication文件里面进行启动项目,在这之前需要确保启动了redis和mysql的服务,并且配置好了密码,然后启动项目以后我们就会看到一个提示: 这里就算证明项目的整体正式启动成功了,接下来就开始监听3000端口了。 项目启动成功以后就可以开始进行一个交互了,大家就可以进入到刚才启动的前端项目里面准备进行一个交互,账户和密码都是admin,这块是配置里面预先写好的,如果有人需要修改这个用户和角色名称,可以进到 DataInitializer文件里面找到user配置进行修改 3.二次开发 这个项目中支持二次开发的模块包括:权限管理,拒绝策略,以及用户的登录校验,初始化配置 (1)首先就是项目的权限管理的问题大家可以看见代码里面首先需要权限校验的接口上面都会有一个 @PermissionAnnotation这个注解里面配置的就是当前接口需要用户所拥有的权限,然后这块里面底层的实现细节在aspect这个目录里面,然后里面就是对于apo的一个使用。如果大家需要给某一个接口增加新的权限大家就可以直接在接口的上面进行一个使用然后写入具体要限制的细节 比如可以写: 这块就是要求用户必须要有menu::query::list这个权限才能进入到这个接口里面进行查询操作如果大家想更进一步了解到权限管理的细节,可以去看aop的使用java里面的切面编程 (2)接下来可以看拒绝的策略,首先对于接口拒绝策略的具体控制在配置文件里面,大家可以看到 这块就是一个拒绝策略的开关,如果大家想开始拒绝策略就可以直接输入true这个然后就会开启拒绝策略进行项目模式,目前是默认在演示模式里面 这个里面主要分为一个演示模式和一个项目模式,在项目模式里面大家可以自由的进行控制但是在演示模式里面,有很多的功能都被禁止了,所以大家要是不能使用的话就需要先查看是否是因为在演示模式里面导致的 (3)接下来就是用户的登录校验,大家首先要明白的一个流程就是用户首先要登录,只有登录成功以后才会将token放到redis里面,然后用户登录的校验就会先去redis里面进行查询,如果查询的到就会通过校验,如果redis里面没有当前用户人的信息就会进行一个拒绝的返回,然后就会跳转到前端的登录界面里面进行一个登录。具体就是拿一个拦截器进行拦截然后对每一个请求都进行校验只有登录过的才能进行项目的操作 (4)项目的初始化整个项目的初始化都在DataInitializer.java这个文件里面,如果后续需要进行一个项目的初始化调整,比如更改初始化的顺序以及在初始化的过程中想再加载一些资源都可以在这个文件里面进行增加 在这个run方法里面进行添加,这样项目在启动的时候就会先去加载项目里面的内容然后生成一个data文件夹的,这就标志着项目以及初始化过了,不需要再进行初始化,接下来每次的项目初始化都会先去看项目里面是否有data的目录如果存在就不走初始化的逻辑了 好了讲解完二次开发以后,接下来就要进入到docker的一个部署流程,在这个之前,大家可以更具的自己的情况去看是去买一个云服务器还是自己搭建一个虚拟机环境,然后进行配置,我在视频里面给搭建演示的就是在自己的虚拟机里面进行一个docker的部署和调用 4.docker部署 首先要了解在进行docker部署的时候,自己的容器文件里面的内容是否创建好了,以及对应的docker-compose.yml的一个配置 再检查完这些内容以后就要进入到我们的一个docker的部署流程环节,其实本质上也很简单就是进入到项目的文件夹目录里面,然后直接执行docker compose up -d这个命令以后,等待下载,但是下载的过程里面会有很多的问题比如下载过慢问题 (1)将项目的文件上传到服务器上面 然后进入当前目录大家可以看见,项目里面有两个文件一个是Dockerfile另一个是docker-compose.yml着两个文件是我们必须要的文件,进入进去看见 里面就是一些配置比如mysql的地址以及redis的地址,都是对应着我们即将启动的容器名称 (2)接下来就开始正式的启动docker-compose.yml文件,使用命令docker compose up -d启动成功以后就可以进行前端端口的配置映射到线上的docker地址,方便未来的开发 这个就是启动成功了,大家可以看映射的地址进行修改前端的配置了 5.本次参加开源之夏的感受和收获 在参加完这次的开源之夏以后,我最大的感受就是第一次有一个整齐的计划和老师还有别的学校的同学们可以一起开发一个软件,让我还没出社会的时候就已经拥有了独立开发的经验和经历。其次就是老师的辅导和社区的教导让我真的成长了很多,我特别感谢开源之夏和+OpenTiny社区对我的帮助,最后谢谢我的导师(真的很牛),他也很耐心的教我,特别感谢名字的话就不说了,不然以后有人烦他去了 谢谢大家我真的很珍惜这次机会,谢谢开源之夏,谢谢OpenTiny社区,谢谢导师,那我的这次开源之旅就结束,但是我相信只是暂时,我以后还会继续投身到开源里面,也希望可以帮助更多的人 关于OpenTiny 欢迎加入 OpenTiny 开源社区。添加微信小助手:opentiny-official 一起参与交流前端技术~ OpenTiny 官网:https://opentiny.design OpenTiny 代码仓库:https://github.com/opentiny TinyPro 源码:https://github.com/opentiny/tiny-pro 欢迎进入代码仓库 Star🌟TinyEngine、TinyVue、TinyNG、TinyCLI、TinyEditor~ 如果你也想要共建,可以进入代码仓库,找到 good first issue标签,一起参与开源贡献~

优秀的个人博客,低调大师

HCIP | 入门基础知识

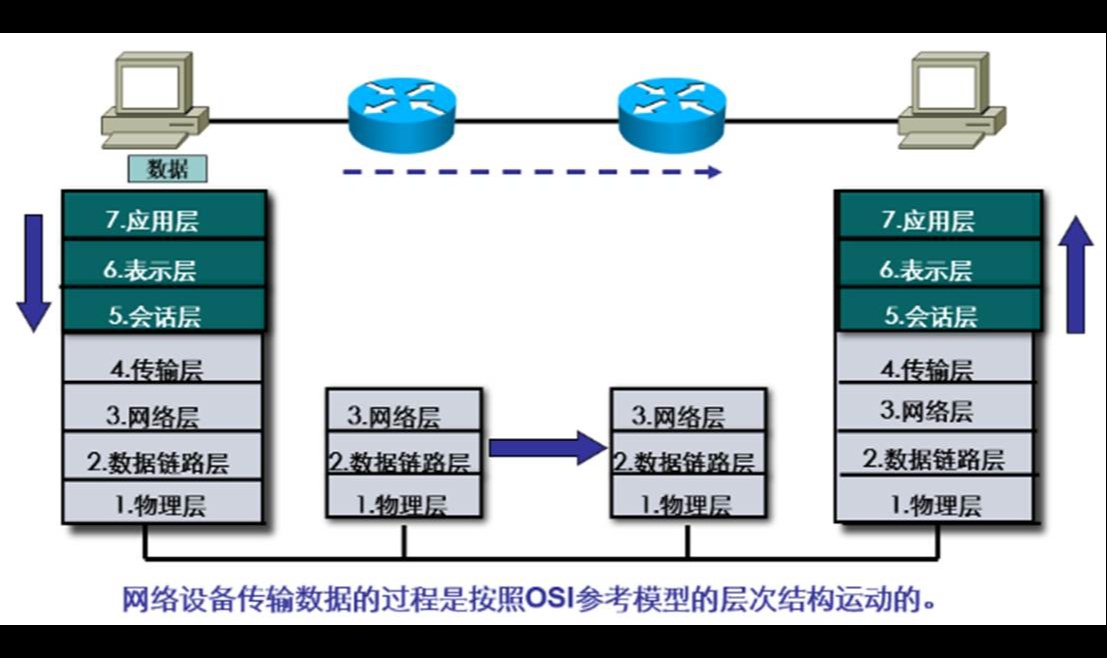
# 一、情景: ISP网络为学校提供了DNS服务,所以,DNS服务器驻留在ISP网络内,而不再学校网络内。DHCP服务器运行在学校的路由器上。 小明拿了一台电脑,通过网线,接入到校园网内部。其目的是为了访问谷歌网站,即谷歌的web服务器 ![](https://developer.qcloudimg.com/http-save/yehe-12796585/c7993ea7956bd68e355e1b190b207e26.gif) # 二、访问谷歌(百度)服务器前的准备工作——计算机对人类语言的加工 ## 1、计算机网络发展第一阶段人机交互的过程: 应用层:把人类语言转换成编码,ASCII     UTF-8 表示层:把编码转换成二进制 介质访问控制层:把二进制转换电信号 物理层:传输电信号 ## 2、OSI参考模型 ![](https://developer.qcloudimg.com/http-save/yehe-12796585/e00a29bb7147b3320c0c879f024fcea6.jpg) ### (1)每层作用: 应用层:为应用程序提供网络服务。 表示层:定义数据的格式,对数据进行压缩、解压缩、加密、解密、编码、解码。 会话层:对通信双方间的会话进行建立、维护、拆除-----session  id---区分同一应用程序的不同进程 传输层:建立端到端的连接---端口号----逻辑连接;提供分段---MSS---1500字节 端口号:0-65535,0和65535不能用,系统保留 知名端口号:1-1023 HTTP---80--TCP HTTPS--443--TCP FTP--20   \\21----TCP TFTP------UDP DNS---53---TCP\\UDP SMTP:邮件的发送端---25--tcp POP3:邮件的接收端--110--tcp telnet---23----tcp DHCP---67(服务器端)   68(客户端) 动态端口号:1024以上的随机端口号 网络层:根据IP地址转发数据、提供分片功能----MTU----1500字节---范围转发 数据链路层:根据MAC地址转发数据;封装成帧、差错检测、透明传输--精确转发 物理层:传输电信号、光信号、传输比特流,定义了一些参数标准(电压、线缆。信号的传输模式) 单工模式:通信的一方具备收或发两个功能。收音机 半双工模式:通信的双方具备收和发两个功能,但不是同时具备,对讲机 双工模式:通信的双方同时具备收和发两个功能。 ### (2)通讯过程(封装与解封装) ![](https://developer.qcloudimg.com/http-save/yehe-12796585/1310893bf7c8601cc7002985744ae302.gif) 封装:在原始数据的基础上加入一些额外信息形成新的格式 解封装:拆掉封装的额外信息,还原成原始数据 过程: 数据发送时,从上至下逐层封装; 数据接受时,从下至上逐层解封装; 只有拆除外层封装,才能看到内层封装 ## 3、TCP/IP参考模型 ### (1)两种模型及其区别 ![](https://developer.qcloudimg.com/http-save/yehe-12796585/a31cfecf70573943d90b924fb5eb2488.jpg) ### (2)通讯过程(封装与解封装) ![](https://developer.qcloudimg.com/http-save/yehe-12796585/f08293ebfa20bffdb3b6f48828b6494e.jpg) ## 4、TCP/IP的跨层封装 ### (1)两种模型之间的不同点: 1. TCP/IP支持跨层封装,而OSI不行; 2. OSI参考模型的核心思想是分层,而分层的目的就是上层协议在其下层协议提供的服务的基础上提供增值服务。所以,OSI在设计协议的时候,层次之间还是存在依赖性的; 3. TCP/IP模型其本身就是先有的协议,后有的模型。TCP/IP协议簇里的协议本身都是相互独立的,每层中的协议可以根据系统的需要进行组合匹配。 ![](https://developer.qcloudimg.com/http-save/yehe-12796585/11a32e89627e1e503c90921fcd162b1e.jpg) ### (2)跨层封装的目的 提高封装和解封装的速度,加快传输效率。 ### (3)跨层封装的应用 **跨四层封装---跳过传输层----端口号、分段** 特点:直连的路由设备之间 典型代表:OSPF协议 ![](https://developer.qcloudimg.com/http-save/yehe-12796585/919d3af525b4c00c359136407c1c9cbd.gif) ![](https://developer.qcloudimg.com/http-save/yehe-12796585/3180c904c77777670aebae148b6c853a.gif) ![](https://developer.qcloudimg.com/http-save/yehe-12796585/d07aeaba8f97a3e0b864b7c1f5cc8771.gif) 分片代替分段。protocol代替端口号功能。 正常封装,其上层是TCP或者UDP协议。TCP协议对应的协议号是6,UDP协议对应的协议号是17。但是我们这个协议号的取值范围是0 - 255(8位二进制),剩余的这些协议号都是用来标定跨层封装协议的。比如我们OSPF协议,对应的协议号是89。ICMP协议,对应协议号是1 ![](https://developer.qcloudimg.com/http-save/yehe-12796585/771fde71d2191e65be7409452629f8ef.gif) **跨三四层封装** ----跳过了传输层、网络层 特点:直连的交换设备之间 典型代表:stp协议 ![](https://developer.qcloudimg.com/http-save/yehe-12796585/2c72e36d8d17ce5887cbd33252d34717.gif) 传输层----端口号、分段 网络层---IP寻址、分片 ![](https://developer.qcloudimg.com/http-save/yehe-12796585/705d6086e84e5e83dfbbce781520aaa6.gif) 三四层的工作需要二层完成,以太网Ⅱ帧里类型字段,可以用来区分上层协议,勉强能完成四层工作,但是三层四层的分片分段工作并无法完成。这时候我们就需要使用另外一种以太网的帧结构了,802.3帧。 ![](https://developer.qcloudimg.com/http-save/yehe-12796585/63c7b4a457d4898e822eacd118693037.gif) LLC:逻辑链路控制子层:为传输提供可靠的保证。减少帧的丢失、重复、失序。负责分片和提供帧类型号 MAC:媒体接入控制子层:负责识别网络层的协议、封装成帧、差错检测、透明传输的功能。 # 三、访问一个谷歌(百度)服务器的流程? ![](https://developer.qcloudimg.com/http-save/yehe-12796585/33f3ec0dfb51502ba67d3e20146f2cc7.jpg) ## 1、主机需要一个IP地址才能上网(本场景中通过DHCP服务获取IP地址) ![](https://developer.qcloudimg.com/http-save/yehe-12796585/f5c3a3ec8bf225a332c1545ceb42737b.jpg) ## (1)DHCP协议回顾: ![](https://developer.qcloudimg.com/http-save/yehe-12796585/08161918f7d3303c8baaf74d96a96406.jpg) 数据包的封装(以discover包为例) ![](https://developer.qcloudimg.com/http-save/yehe-12796585/dcf2ec43caf48f22829020ab24f4d414.gif) ## (2)DHCP的第一个报文通过网线来到了---交换机 工作原理: ![](https://developer.qcloudimg.com/http-save/yehe-12796585/4299f1d1fe62b2ec1d6c3f78631e2b4e.jpg) 交换机收到此广播包后,执行泛洪操作(广播) 1. 遇到广播帧 --- 即目标MAC地址为广播地址(全F)的数据帧 2. 遇到组播帧 --- 即目标MAC地址为组播地址的数据帧 3. 遇到未知的单播帧 --- 即在本地MAC地址表中没有记录的,广播发送 ## (3)交换机泛洪后,数据将顺着网线,来到网关---路由器 工作原理: ![](https://developer.qcloudimg.com/http-save/yehe-12796585/d1ea609e9d8bc3d8eca17bed1819381e.jpg) 物理层+数据链路层+网络层+传输层+应用层+数据 路由器收到一个数据包,会根据数据包中的目标IP地址查表转发,此时会根据最长掩码匹配规则遍历整个路由表,如果发现有对应的路由条目则转发,如果没有则看路由表中是否存在缺省路由条目,如果存在缺省路由则转发,如果不存在丢弃此数据包。 ![](https://developer.qcloudimg.com/http-save/yehe-12796585/3458f682c3387526275a8604ab7ddd39.gif) DHCP offer包 物理层+目标MAC:00:16:D3:23:68:8A  源MAC:00:22:6B:45:1F:1B+目标地址:68.85.2.101(服务器临时借用自己给客户端提供的IP地址,用于封装使用) 源IP地址:68.85.2.1+目标端口号:68  源端口号:67+应用层+数据 DHCP Request包 物理层+目标MAC:FF-FF-FF-FF-FF-FF  源MAC:00:16:D3:23:68:8A+目标地址:255.255.255.255  源IP地址: 68.85.2.101(临时借用自己给客户端提供的IP地址,用于封装使用)+目标端口号:67  源端口号:68+应用层+数据 DHCP Ack包 物理层+目标MAC:00:16:D3:23:68:8A  源MAC:00:22:6B:45:1F:1B+目标地址:68.85.2.101(服务器临时借用自己给客户端提供的IP地址,用于封装使用) 源IP地址:68.85.2.1+目标端口号:68  源端口号:67+应用层+数据 ## 2、首先要得到 www.goole.com( www.baidu.com)的ip地址 客户端需要发送一个dns数据包给dns服务器,可能dns服务器的ip地址和客户端的ip地址不在同一个网段内,那么客户端会将dns数据包发给默认网关,如果客户端arp缓存表里没有默认网关的mac地址,客户端需要发送arp广播获取默认网关的mac地址,然后将dns数据包封装后交给默认网关,网关路由器解封装后查看路由表,然后逐条转发到dns服务器,dns解析dns数据包,将www.goole.com( www.baidu.com)IP地址返回给了客户端。 ![](https://developer.qcloudimg.com/http-save/yehe-12796585/e950c17adfdb97402f768d7a626b1a54.jpg) ### (1)DNS协议简介: 域名解析系统----用于域名和IP地址的相互解析,采用C/S模式,是一个具有树状层次结构的、联机分布式的数据库系统; 基于TCP/UDP协议的53号端口,绝大多数的 DNS 查询来说都会使用 UDP 数据报进行传输,TCP 协议只会在在多个命名服务器之间快速迁移记录。 在浏览器的地址栏中输 www.goole.com( www.baidu.com) URL:统一资源定位符, 结构:协议+网站的域名信息+WEB服务器文件所在路径 ![](https://developer.qcloudimg.com/http-save/yehe-12796585/37021235456911039248dd3d9008a64d.gif) ### (2)DNS产生背景: 通过IP地址访问目标主机,不便于记忆; 通过容易记忆的域名来标识主机位置; ### (3)域名的属性层次化结构: 域是因特网中一种管理范围的划分:根域、顶级域名、二级域名、三级域名等等 域名结构:顶级域名、二级域名、三级域名等等 域名的特点:不同等级的域名之间使用点号隔开,级别最高的写在右边,低的在左边;              每一级域名都由字母和数字组成,不区分大小写;              域名的根域用'.'表示,以点号结尾的域名被称为完全合格域名(FQND) 域名结构树: ![](https://developer.qcloudimg.com/http-save/yehe-12796585/59ba75ca9b7e59c57f1d7d0c44b71ffb.gif) 根域 顶级域:主机所在的国际/区域,注册人的性质 二级域:注册人自行创建的名称 主机名:区域内部的主机名称 完全合格域名:[www.sina.com.cn.](http://www.sina.com.cn. "www.sina.com.cn.") ### (4)域名解析原理 域名解析工作通过调用服务器上的解析器软件完成的; DNS域名解析按照域名空间的分层树状结构自顶至下进行; ![](https://developer.qcloudimg.com/http-save/yehe-12796585/6aeb3ba0a5a523677fbd48880c6b5333.gif) DNS域名解析的完整过程: ![](https://developer.qcloudimg.com/http-save/yehe-12796585/bcea7333def0195788c348699f933b28.gif) ### (5)DNS域名解析的两种工作模式 递归查询:UDP 客户端到本地DNS服务器之间的查询交互采用递归查询 DNS服务器一般会返回一个确切的查询结果 ![](https://developer.qcloudimg.com/http-save/yehe-12796585/790cd303b7256f643384855035ad3263.gif) 迭代查询:TCP DNS服务器会返回一个已知的其他DNS服务器,由请求者自行查询 一般本地DNS服务器到根域名DNS服务器之间的查询交互采用迭代查询 ![](https://developer.qcloudimg.com/http-save/yehe-12796585/793169047c7291529d8dd3b4f20172c3.gif) **这里我们回到情景里,看看小明是如何向本地DNS服务器发起查询操作的** 物理层+目标MAC:00:22:6B:45:1F:1B源MAC:00:16:D3:23:68:8A +目标IP:68.87.71.226 源IP:68.85.2.101  +目标端口号:53  源端口号:1025+应用层+数据 通过ARP协议,我们获取到了网关的MAC地址,之后,我们的DNS请求报文可以完成封装了。 ## 3、客户端知道谷歌(百度)的ip地址后,会触发客户端与服务器建立TCP连接(TCP三次握手过程) ![](https://developer.qcloudimg.com/http-save/yehe-12796585/38a11e1fc237e2b6e8a0bb3d8cd9efc4.jpg) ## 4、建立连接后,客户端使用http协议发送数据包给服务器 客户端发送数据包给谷歌(百度)服务器,谷歌(百度)服务器收到数据包后将数据返回给客户端的浏览器,浏览器通过渲染,最终用户看到了网站上的主页信息。 **HTTP协议简介:** **超文本传输协议,**一个典型的C/S架构的协议,HTTP协议传输层是基于**TCP协议**来进行工作的,使用的端口号是**80端口**。 1. 超文本(HyperText):是一种按照URL指示,将超文本文档从一台主机(Web服务器)传输到另一台主机(浏览器)的应用层协议,以实现超链接的功能。 2. 超文本传输协议HTTP:包含有超链接(Link)和各种多媒体元素标记(Markup)的文本。这些超文本文件彼此链接,形成网状(Web),因此又被称为网页(Web Page)。这些链接使用URL表示。最常见的超文本格式是超文本标记语言HTML。 ![](https://developer.qcloudimg.com/http-save/yehe-12796585/b3d5285a267f8263c74ad8807d18a1d7.gif) **HTTP****的请求报文** ![](https://developer.qcloudimg.com/http-save/yehe-12796585/8b4289b0257336569801cea1b474efd5.gif) 如果baidu服务器正常收到该请求报文,也可以正常应答请求内容,则将回复一个**HTTP应答报文** ![](https://developer.qcloudimg.com/http-save/yehe-12796585/36e2d121647a256196b8fb2e7aa3e44d.gif) ![](https://developer.qcloudimg.com/http-save/yehe-12796585/a7031e33b61e6df8864e46836ad61960.gif) ![](https://developer.qcloudimg.com/http-save/yehe-12796585/e87d2d273bd8b8d831fcb27626527ec2.gif) ## 5、当所有数据都接受完毕后,取消连接(TCP的四次挥手) ![](https://developer.qcloudimg.com/http-save/yehe-12796585/0f42fabee51bac70ac8a93609f5812e1.jpg) # 四、静态路由综合实验 ![](https://developer.qcloudimg.com/http-save/yehe-12796585/6a698eb811f88a34ea8a60268882d1e5.gif)

优秀的个人博客,低调大师

InheritableThreadLocal从入门到放弃

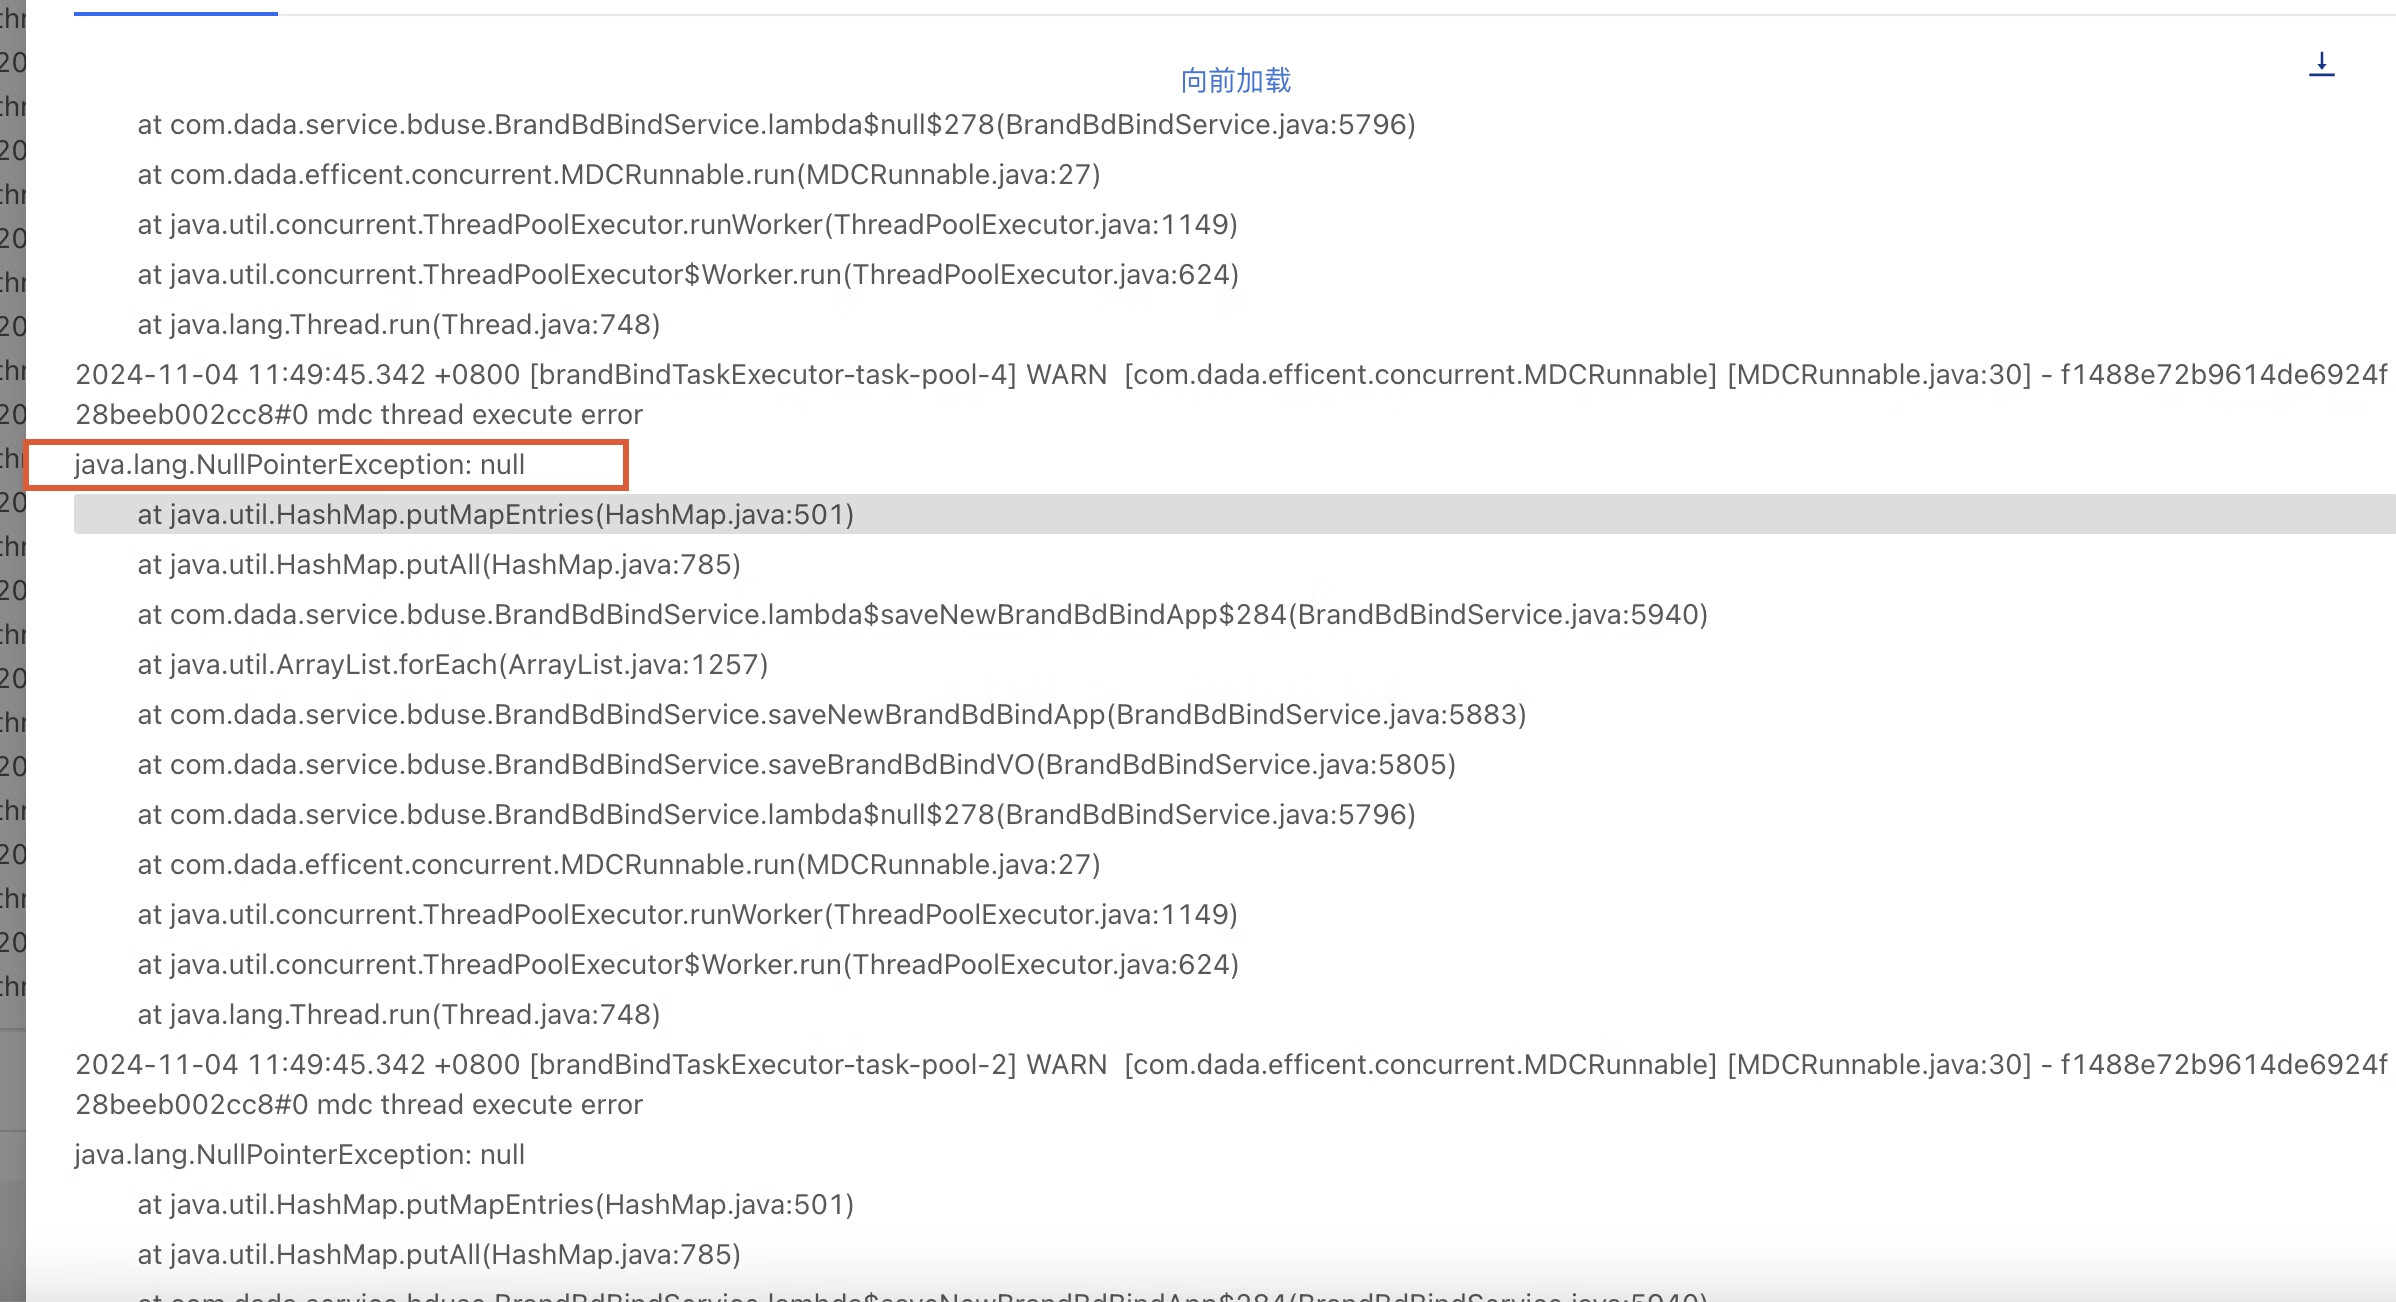
背景: 一个上线了很久但是请求量很低(平均每天一两次)的历史功能突然出现空指针报错:    我们翻开代码定位到对应的报错代码:    结合堆栈和代码可以确定是由于bdIdJobMap的值为null导致往bdIdEmployeeJobMap这个map中putAll的时候空指针了。 而bdIdJobMap又取自employeeJobMapThread.get(); 那么这个employeeJobMapThread又是何物?    哦豁,employeeJobMapThread居然是个InheritableThreadLocal。 梳理一下报错代码的上下文逻辑如下: 1. 首先在当前主线程中对InheritableThreadLocal类型变量employeeJobMapThread进行赋值 2. 把耗时操作提交到线程池中异步执行,在异步任务中去获取employeeJobMapThread的值(其中线程池配置的coreSize/maxSize均为4,queue大小为3000) 3. 在主线程中执行employeeJobMapThread.remove(),在异步任务完成之后没有执行employeeJobMapThread.remove() 4. 最后在异步任务中通过employeeJobMapThread获取到的值为null导致后续操作空指针  是否和最近的上线有关? 相信大家都有这样的共识:线上出现报错,首先怀疑是否和最近的上线有关系。 我们做的第一件事情也是排查了近期的上线功能,从上线的功能点和相关代码上来看都和这次报错的代码没什么关系, 因此初步排除了这个原因。所以接下来只能进一步了解代码来排查原因了。 要搞清楚当前报错的根因,毫无疑问肯定是要翻过InheritableThreadLocal这座小山啦。  简单聊下InheritableThreadLocal: 提起ThreadLocal,大家应该相对都比较熟悉了,比如存放登录用户信息到ThreadLocal变量中,然后在接口层可以比较方便的获取登录用户,帮助开发提效。 但是对于InheritableThreadLocal,有不少同学都不太了解。 挑重点来说,InheritableThreadLocal相比ThreadLocal多一个能力:在创建子线程Thread时,子线程Thread会自动继承父线程的InheritableThreadLocal信息到子线程中,进而实现在在子线程获取父线程的InheritableThreadLocal值的目的。 举个简单的栗子对比下InheritableThreadLocal和ThreadLocal: public class InheritableThreadLocalTest { private static final ThreadLocal<String> threadLocal = new ThreadLocal<>(); private static final InheritableThreadLocal<String> inheritableThreadLocal = new InheritableThreadLocal<>(); public static void main(String[] args) { testThreadLocal(); testInheritableThreadLocal(); } /** * threadLocal测试 */ public static void testThreadLocal() { // 在主线程中设置值到threadLocal threadLocal.set("我是父线程threadLocal的值"); // 创建一个新线程并启动 new Thread(() -> { // 在子线程里面无法获取到父线程设置的threadLocal,结果为null System.out.println("从子线程获取到threadLocal的值: " + threadLocal.get()); }).start(); } /** * inheritableThreadLocal测试 */ public static void testInheritableThreadLocal() { // 在主线程中设置一个值到inheritableThreadLocal inheritableThreadLocal.set("我是父线程inheritableThreadLocal的值"); // 创建一个新线程并启动 new Thread(() -> { // 在子线程里面可以自动获取到父线程设置的inheritableThreadLocal System.out.println("从子线程获取到inheritableThreadLocal的值: " + inheritableThreadLocal.get()); }).start(); } } 执行结果:    可以看到子线程中可以获取到父线程设置的inheritableThreadLocal值,但不能获取到父线程设置的threadLocal值。 为什么InheritableThreadLocal能够做到这点呢? 是因为在父线程创建子线程Thread的时候,Thread的构造器内部会自动继承父线程的InheritableThreadLocal到子线程。 Thread源码这两处地方解释了原因:    init方法内部实现:     通过这个简单的介绍可以帮助对于InheritableThreadLocal不了解的同学有一个初步的了解,本文不是专门介绍InheritableThreadLocal的深入原理,所以就不展开聊了,大家感兴趣可以自己进一步探索。 验证InheritableThreadLocal+线程池: 前面介绍了InheritableThreadLocal可以自动把父线程的InheritableThreadLocal信息继承到子线程Thread中。 但是在业务项目中真正需要用到子线程的时候正经人谁自己new Thread,咱可是用线程池的。 当然了,就像文章开头说明的,这次报错的代码里面也用线程池来执行异步任务。 那么InheritableThreadLocal+线程池的组合会摩擦出什么样的火花呢? 我把这次报错的代码精简之后得到下面的示例(实际代码中往InheritableThreadLocal赋的值类型不是字符串,后面会提到): package com.dada.bd.data.service; import java.util.concurrent.LinkedBlockingQueue; import java.util.concurrent.ThreadPoolExecutor; import java.util.concurrent.TimeUnit; public class InheritableThreadLocalWithThreadPoolTest { private static final InheritableThreadLocal<String> inheritableThreadLocal = new InheritableThreadLocal<>(); private static final ThreadPoolExecutor threadPoolExecutor = new ThreadPoolExecutor( 2, 2, 0L, TimeUnit.MILLISECONDS, new LinkedBlockingQueue<Runnable>(3000), new ThreadPoolExecutor.CallerRunsPolicy() ); public static void main(String[] args) { testInheritableThreadLocalWithThreadPool(); threadPoolExecutor.shutdown(); } /** * inheritableThreadLocal+线程池测试 */ public static void testInheritableThreadLocalWithThreadPool() { // 1. 在主线程中设置一个值到inheritableThreadLocal inheritableThreadLocal.set("我是父线程inheritableThreadLocal的值"); // 2. 提交异步任务到线程池 threadPoolExecutor.execute(() -> { // 3. 在线程池-子线程里面可以获取到父线程设置的inheritableThreadLocal吗? System.out.println("从线程池-子线程获取到inheritableThreadLocal的值: " + inheritableThreadLocal.get()); }); // 4. 清除inheritableThreadLocal inheritableThreadLocal.remove(); } }    执行结果如图所示,可以看到在线程池里面也可以获取到父线程设置的inheritableThreadLocal值。 接下来我们来分析下InheritableThreadLocal+线程池的执行过程:   也就说只有在以下这两个场景下才会继承父线程的InheritableThreadLocal: 1.线程池当前线程数 < 核心线程数 2.线程池当前线程数 >= 核心线程数 && 队列已满 && 线程数 < 最大线程数(本次线上报错的代码使用的线程池设置的coreSize和maxSize一致,所以走不到该场景) 其他情况都是在复用线程池现有的Thread,自然也就不会继承父线程的InheritableThreadLocal。 我们提交多个异步任务到线程池来验证下: package com.dada.bd.data.service; import java.util.concurrent.LinkedBlockingQueue; import java.util.concurrent.ThreadPoolExecutor; import java.util.concurrent.TimeUnit; public class InheritableThreadLocalWithThreadPoolTest { private static final InheritableThreadLocal<String> inheritableThreadLocal = new InheritableThreadLocal<>(); private static final ThreadPoolExecutor threadPoolExecutor = new ThreadPoolExecutor( 2, 2, 0L, TimeUnit.MILLISECONDS, new LinkedBlockingQueue<Runnable>(3000), new ThreadPoolExecutor.CallerRunsPolicy() ); public static void main(String[] args) { testInheritableThreadLocalWithThreadPool("张三"); testInheritableThreadLocalWithThreadPool("李四"); testInheritableThreadLocalWithThreadPool("王五"); testInheritableThreadLocalWithThreadPool("赵六"); testInheritableThreadLocalWithThreadPool("孙七"); threadPoolExecutor.shutdown(); } /** * inheritableThreadLocal+线程池测试 */ public static void testInheritableThreadLocalWithThreadPool(String param) { // 1. 在主线程中设置一个值到inheritableThreadLocal inheritableThreadLocal.set(param); // 2. 提交异步任务到线程池 threadPoolExecutor.execute(() -> { // 3. 在线程池-子线程里面可以获取到父线程设置的inheritableThreadLocal吗? System.out.println("线程名: " + Thread.currentThread().getName() + ", 父线程设置的inheritableThreadLocal值: " + param + ", 子线程获取到inheritableThreadLocal的值: " + inheritableThreadLocal.get()); }); // 4. 清除inheritableThreadLocal inheritableThreadLocal.remove(); } }   执行结果用表格形式展示如下: 步骤 使用线程池 结果解释说明 提交第一个异步任务值为【张三】 创建Thread:pool-1-thread-1 自动继承父线程的InheritableThreadLocal值【张三】到pool-1-thread-1 提交第二个异步任务值为【李四】 创建Thread:pool-1-thread-2 自动继承父线程的InheritableThreadLocal值【李四】到pool-1-thread-2 提交第三个异步任务值为【王五】 复用Thread:pool-1-thread-1 没有自动继承父线程的InheritableThreadLocal值【王五】,所以拿到了第一个任务提交时Thread继承下来的值【张三】 提交第四个异步任务值为【赵六】 复用Thread:pool-1-thread-2 没有自动继承父线程的InheritableThreadLocal值【赵六】,所以拿到了第一个任务提交时Thread继承下来的值【李四】 可以看到InheritableThreadLocal+线程池的组合,会面临InheritableThreadLocal污染的问题,即异步任务可能取到其他父线程设置的InheritableThreadLocal值。 有同学会提到我们不是在代码里面加了inheritableThreadLocal.remove()来清除inheritableThreadLocal的吗?为什么没有清除掉呢? 这是因为此时我们清除的只是父线程的inheritableThreadLocal,而没有清除子线程的inheritableThreadLocal的缘故。  为什么InheritableThreadLocal污染对线上没有产生影响? 既然InheritableThreadLocal+线程池的组合,会存在InheritableThreadLocal污染的问题,那岂不是线上报错的这段代码也存在这个问题? 再次检查代码,确认历史代码的确存在这个问题, 但是,这个代码上线2年多为啥一直稳定运行且没有用户反馈过功能有问题?只有最近突然出现报错?一时之间脑袋懵懵的。    仔细检代码之后发现: 这段代码在父子线程之间通过InheritableThreadLocal类型变量employeeJobMapThread传递的值是【全量的<人员Id, 该人员基本信息>结构的map】,可以近乎看做是一个不变的常量,所以虽然异步任务会拿到污染的数据,也是正常可以用的,没有产生业务影响。 这种感觉怎么说呢,只能说感叹前人的智慧,把几乎不可能做到了可能~ 好了,到这里我们解释了为什么这段代码上线这么久一直没问题,因为代码确实有InheritableThreadLocal污染问题,但被污染了也不影响使用。。。所以从最终结果来看确实可以正常运行。     什么原因导致子线程获取到的InheritableThreadLocal值是null? 但是。。。说了这么多,还是不能解释为什么线上代码获取到的inheritableThreadLocal值会是null。 1.难道父线程设置的inheritableThreadLocal值可能会是null? 检查代码发现父线程设置的inheritableThreadLocal不可能为null,顶多会是空集合:     2.难道是线程池创建之后通过prestartAllCoreThreads初始化了核心线程,在执行异步任务的时候,都是复用的已有线程导致的? 检查了对应线程池的初始化代码,发现并没有初始化核心线程,也排除了这个可能。而且如果真的是该原因22年上线之后功能一定是有问题的,前面说过,该功能上线之后没人反馈过异常,所以也可以排除该原因。  • 该功能22年上线之间2年多一直没人反馈,大概率该功能之前很长时间是正常的,近期由于某个原因导致功能异常 • 虽然历史代码的用法存在子任务中获取到的InheritableThreadLocal被污染的问题,但是被污染的值也能用,不影响正确性 • 只要线程池中的线程初始化的时候继承了正确的InheritableThreadLocal值,后续就不会被清除掉,也就可以正常运行功能 从这些已知的信息来推断,可以推断出这段历史代码写法虽然有隐患,但是不是引发当前空指针的的原因。 3.剩下的只有一种可能:存在线程池的共用。 在执行这个报错的异步任务的时候,复用了某个已有的线程A,并且当时创建该线程A的时候,没有继承InheritableThreadLocal,进而导致后面复用该线程的时候,从InheritableThreadLocal获取到的值为null。 而只要是通过这段历史代码创建的线程一定是没问题的,所以一定是存在其他业务共用了这个线程池,并且这个业务优先执行进而初始化了线程池的线程,导致线程池的线程没有继承InheritableThreadLocal。 如下代码示例: package com.dada.bd.data.service; import java.util.concurrent.LinkedBlockingQueue; import java.util.concurrent.ThreadPoolExecutor; import java.util.concurrent.TimeUnit; public class InheritableThreadLocalWithThreadPoolTest { private static final InheritableThreadLocal<String> inheritableThreadLocal = new InheritableThreadLocal<>(); // 这里线程池core/max数量都只有2 private static final ThreadPoolExecutor threadPoolExecutor = new ThreadPoolExecutor( 2, 2, 0L, TimeUnit.MILLISECONDS, new LinkedBlockingQueue<Runnable>(3000), new ThreadPoolExecutor.CallerRunsPolicy() ); public static void main(String[] args) { // 先执行了不涉及InheritableThreadLocal的子任务初始化线程池线程 testAnotherFunction(); testAnotherFunction(); // 后执行了本次的历史代码,其涉及InheritableThreadLocal testInheritableThreadLocalWithThreadPool("张三"); testInheritableThreadLocalWithThreadPool("李四"); threadPoolExecutor.shutdown(); } /** * inheritableThreadLocal+线程池测试 */ public static void testInheritableThreadLocalWithThreadPool(String param) { // 1. 在主线程中设置一个值到inheritableThreadLocal inheritableThreadLocal.set(param); // 2. 提交异步任务到线程池 threadPoolExecutor.execute(() -> { // 3. 在线程池-子线程里面可以获取到父线程设置的inheritableThreadLocal吗? System.out.println("线程名: " + Thread.currentThread().getName() + ", 父线程设置的inheritableThreadLocal值: " + param + ", 子线程获取到inheritableThreadLocal的值: " + inheritableThreadLocal.get()); }); // 4. 清除inheritableThreadLocal inheritableThreadLocal.remove(); } /** * 模拟另一个独立的功能 */ public static void testAnotherFunction() { // 提交异步任务到线程池 threadPoolExecutor.execute(() -> { // 在线程池-子线程里面可以获取到父线程设置的inheritableThreadLocal吗? System.out.println("线程名: " + Thread.currentThread().getName() + ", 线程池-子线程摸个鱼"); }); } } 执行结果:    在项目里面搜一下看看,果真如此,有2出地方在用这个线程池,并且另外的一处代码中提交的异步任务不涉及inheritableThreadLocal:    示意图如下: 逻辑执行顺序为:创建线程池 - 执行功能A - 执行功能A - 执行功能B 其中: 功能A全流程均不涉及InheritableThreadLocal 功能B对应报错的代码,主线程设置InheritableThreadLocal并且在子线程使用    至此,线上报错的根因确定了:就是因为InheritableThreadLocal + 线程池共用导致。  扩展一下: 假如执行顺序是这样呢:创建线程池 - 执行功能B - 执行功能B - 执行功能A    结局居然是一切安好。  假如执行顺序是这样呢:创建线程池 - 执行功能B - 执行功能A - 执行功能B    发现了吗?如果应用启动之后功能B先执行并且初始化了线程池所有核心线程,那么一切正常,否则就可能报错。 也就是说功能B是否正常还看运气的,运气好就正常执行,运气不好就报空指针的错。  这你敢信?    小插曲: 这个问题的排查当中还遇到了2个小插曲: 插曲1: 最初怀疑是线程池复用导致的,但是在IDEA里面搜代码的时候粗心大意没有看到其他地方在复用线程池。 因此期间一度自我怀疑见鬼了,导致本来可以一两个小时确定根因的,结果饶了弯路多花了两个小时才确定根因。 所以说排查问题的时候每一步都要保持细心,得出的每一个结论都应该是证据确凿,理由充分, 否则会让自己兜兜转转浪费宝贵的时间。  插曲2: 排查代码的时候发现异步任务代码没有做任何的异常处理,这其实是很坑的。 有经验的同学应该知道,线程池里面提交异步任务如果没有做异常处理,出现异常的话不会有任何的日志信息。 本地运行的时候会打印到控制台,但是线上控制台的信息可不会记录到日志里面。 所以经常遇到异步任务执行结果不符合预期,但是线上没有任何相关日志就是这个原因。 我们这里有日志是因为使用的线程池是二次封装过的,里面对异步任务做了兜底的异常记录。  总结: 前面分析到了导致空指针的原因是线程池共用导致的老代码报错,而共用这个线程池的代码是新上线的功能引入的。 这就打脸了开头我们检查了上线的功能与此无关,实则有关。 只是我们评估复用线程池的影响时,很难想到会有这样的影响,通常我们会考虑: 1. 是否会影响共用该线程池的老功能响应时间边长 2. 是否存在父子任务共用线程池导致可能产生死锁 针对InheritableThreadLocal,我个人的建议是: 1. InheritableThreadLocal(其实ThreadLocal也一样)不适合应用于业务代码中,因为他们都是隐式的参数传递,而业务系统中好维护的代码应当是显式的参数传递(我们这个线上问题就采用该方式) 2. 框架类代码才是InheritableThreadLocal和ThreadLocal主要发光发热的地方,因为对应的研发水平通常较高,且代码经过严格测试验证,并且较少变动。而业务系统研发水平参差不齐,且经常会发生同步操作变异步等 3. 虽然InheritableThreadLocal不建议在业务代码中使用,但是我们还是需要掌握它,不为别的,只有掌握它的优缺点才能告诉自己和他人为什么应该在业务代码中放弃使用它  针对如何有效的应对业务研发遇到的一些“疑难杂症”,我的建议是: 1. 大胆提出合理的假设,小心谨慎进行验证 2. 没有充足理由,不要轻易下结论 3. 没有头绪时,休息一下,或找合适的人一起探讨,给自己打开新的思路  最后,愿天下没有故障,没有线上问题,没有bug。

优秀的个人博客,低调大师

Apache Doris 入门 10 问

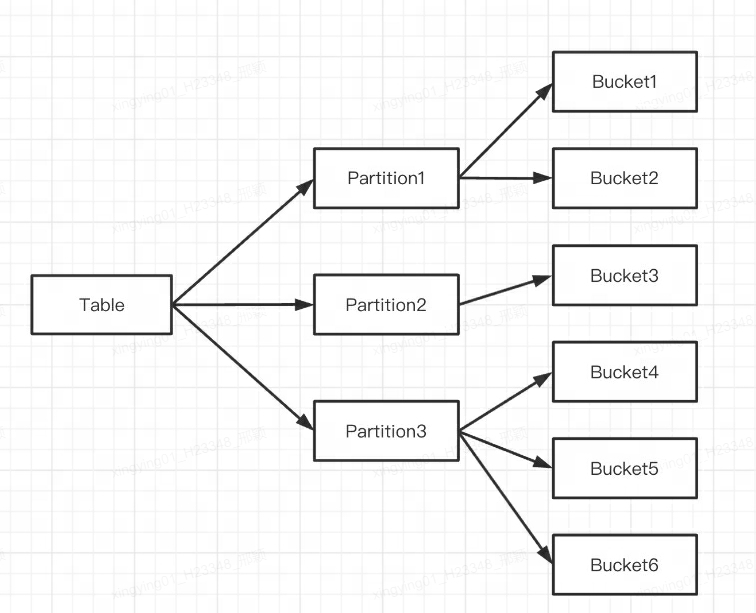
基于 Apache Doris 在读写流程、副本一致性机制、 存储机制、高可用机制等方面的常见疑问点进行梳理,并以问答形式进行解答。在开始之前,我们先对本文相关的名词进行解释: FE:Frontend,即 Doris 的前端节点。主要负责接收和返回客户端请求、元数据以及集群管理、查询计划生成等工作。 BE:Backend,即 Doris 的后端节点。主要负责数据存储与管理、查询计划执行等工作。 BDBJE:Oracle Berkeley DB Java Edition, 在 Doris 中,使用 BDBJE 完成元数据操作日志的持久化、FE 高可用等功能。 Tablet:Tablet 是一张表实际的物理存储单元,一张表按照分区和分桶后在 BE 构成分布式存储层中以 Tablet 为单位进行存储,每个 Tablet 包括元信息及若干个连续的 RowSet。 RowSet:RowSet 是 Tablet 中一次数据变更的数据集合,数据变更包括了数据导入、删除、更新等。RowSet 按版本信息进行记录。每次变更会生成一个版本。 Version:由 Start、End 两个属性构成,维护数据变更的记录信息。通常用来表示 RowSet 的版本范围,在一次新导入后生成一个 Start、End 相等的 RowSet,在 Compaction 后生成一个带范围的 RowSet 版本。 Segment:表示 RowSet 中的数据分段,多个 Segment 构成一个 RowSet。 Compaction:连续版本的 RowSet 合并的过程成称为 Compaction,合并过程中会对数据进行压缩操作。 Key 列、Value 列:在 Doris 中,数据以表(Table)的形式进行逻辑上的描述。一张表包括行(Row)和列(Column),Row 即用户的一行数据,Column 用于描述一行数据中不同的字段。Column 可以分为两大类:Key 和 Value。从业务角度看,Key 和 Value 可以分别对应维度列和指标列。Doris 的 Key 列是建表语句中指定的列,建表语句中的关键字 unique key 或 aggregate key 或 duplicate key 后面的列就是 Key 列,除了 Key 列剩下的就是 Value 列。 数据模型:Doris 的数据模型主要分为 3 类:Aggregate、Unique、Duplicate。 Base 表:在 Doris 中,我们将用户通过建表语句创建出来的表称为 Base 表(Base Table),Base 表中保存着按用户建表语句指定方式存储的基础数据。 ROLLUP 表:在 Base 表之上,用户可以创建任意多个 ROLLUP 表。这些 ROLLUP 的数据是基于 Base 表产生的,并且在物理上是独立存储的。ROLLUP 表的基本作用,在于在 Base 表的基础上,获得更粗粒度的聚合数据,类似于物化视图。 Q1:Doris 分区跟分桶有什么区别? Doris 支持两层数据划分: 第一层是 Partition(分区),支持 Range 和 List 的划分方式(类似于 MySQL 的分区表的概念)。若干个 Partition 组成一个 Table,Partition 可以视为是逻辑上最小的管理单元。数据的导入与删除,仅能针对一个 Partition 进行。 第二层是 Bucket(Tablet 也称为分桶),支持 Hash 和 Random 的划分方式。每个 Tablet 包含若干数据行,各个 Tablet 之间的数据没有交集,并且在物理上是独立存储的。Tablet 是数据移动、复制等操作的最小物理存储单元。 也可以仅使用一层分区,建表时如果不写分区的语句即可,此时 Doris 会生成一个默认的分区,对用户是透明的。 示意如下: 多个 Tablet 在逻辑上归属于不同的分区(Partition),一个 Tablet 只属于一个 Partition,而一个 Partition 包含若干个 Tablet。因为 Tablet 在物理上是独立存储的,所以可以视为 Partition 在物理上也是独立。 从逻辑上来讲,分区和分桶最大的区别就是分桶随机分割数据库,分区是非随机分割数据库。 怎么保证数据多副本的? 为了提高保存数据的可靠性和计算时的性能,Doris 对每个表复制多份进行存储。数据的每份复制就叫做一个副本。Doris 按 Tablet 为基本单元对数据进行副本存储,默认一个分片有 3 个副本。建表时可在 PROPERTIES 中设置副本的数量: PROPERTIES ( "replication_num" = "3" ); 下图示例,有两个表分别导入 Doris,表 1 导入后按 3 副本存储,表 2 导入后按 2 副本存储。数据分布如下: Q2:为什么需要分桶? 为了分桶裁剪,并且避免数据倾斜,同时也为了分散读 IO,提升查询性能,可以将 Tablet 的不同副本分散在不同机器上,查询时可以充分发挥不同机器的 IO 性能。 Q3:物理文件的存储结构及格式是怎样的? Doris 的每次导入可视为一个事务,会生成一个 RowSet 。而 RowSet 又包括多个 Segment,即 Tablet-->Rowset-->Segment 。那 BE 是如何存储这些文件的呢? Doris 的存储结构 Doris 通过 storage_root_path 进行存储路径配置,Segment 文件存放在 tablet_id 目录下按 SchemaHash 管理。Segment 文件可以有多个,一般按照大小进行分割,默认为 256MB。存储目录以及 Segment 文件命名规则为: ${storage_root_path}/data/${shard}/${tablet_id}/${schema_hash}/${rowset_id}_${segment_id}.dat 进入 storage_root_path 目录,可以看到如下存储结构: ${shard}:即上图中的 0、1。是存储目录下 BE 自动创建的,是随机的。会随着数据的增多而增多。 ${tablet_id}:即上图中的 15123、27003 等,即上面提到的 Bucket 的 ID。 ${schema_hash}:即上图中的 727041558、1102328406 等。因为一个表的结构可能会被变更,所以对每个 Schema 的版本生成一个 SchemaHash,来标识该版本下的数据。 ${segment_id}.dat:其中前面的为 rowset_id,即上图中的 02000000000000e3ba4924368a21695d8cc3cf8525f80789;${segment_id} 为当前 RowSet 的 segment_id,从 0 开始递增。 Segment 文件的存储格式 Segment 整体的文件格式分为数据区域,索引区域和 Footer 三个部分,如下图所示: Data Region: 用于存储各个列的数据信息,这里的数据是按需分 Page 加载的,其中 Page 中包含了列的数据,每个 Page 为 64k。 Index Region:Doris 中将各个列的 Index 数据统一存储在 Index Region,这里的数据会按照列粒度进行加载,所以跟列的数据信息分开存储。 Footer 信息:包含文件的元数据信息、内容的 Checksum 等。 Q4:Doris 的不同表模型在 DML 方面有什么限制? Update:Update 语句目前仅支持 UNIQUE KEY 模型,并且只支持更新 Value 列。 Delete:1)如果是使用聚合类的表模型(AGGREGATE、UNIQUE),Delete 操作只能指定 Key 列上的条件;2)该操作会同时删除和此 Base Index 相关的 Rollup Index 的数据。 Insert:所有数据模型均可 Insert。 Insert 怎么实现?数据插入后如何被查询到? AGGREGATE 模型:Insert 阶段将增量的数据按照 Append 的方式写到 RowSet,查询阶段采用 Merge on Read 的方式进行进行合并。也就是说数据在导入时先写入一个新的 RowSet,写入后并不会执行去重,只有在发起查询时才会做多路并发排序,在进行多路归并排序时,会将重复的 Key 排在一起,并进行聚合操作。其中高版本 Key 的会覆盖低版本的 Key,最终只返回给用户版本最高的那一条记录。 DUPLICATE 模型:该模型写入与上述类似,读取阶段不会有任何聚合操作。 UNIQUE 模型:在 1.2 版本之前,该模型本质上是聚合模型的一个特例,行为与 AGGREGATE 模型一致。由于聚合模型的实现方式是读时合并(Merge on Read),因此在一些聚合查询上性能不佳。Doris 在 1.2 版本后引入了 Unique 模型新的实现方式,写时合并(Merge on Write),通过在写入时将被覆盖和被更新的数据进行标记删除,在查询的时候,所有被标记删除的数据都会在文件级别被过滤掉,读取出来的数据就都是最新的数据,消除掉了读时合并中的数据聚合过程,并且能够在很多情况下支持多种谓词的下推。 简单来讲,Merge on Write 的处理流程是: 对于每一条 Key,查找它在 Base 数据中的位置(RowSetid + Segmentid + 行号)【内存中维护了 Segment 级别的主键区间树,加速查询】 如果 Key 存在,则将该行数据标记删除。标记删除的信息记录在 Delete Bitmap 中,其中每个 Segment 都有一个对应的 Delete Bitmap。 将更新的数据写入新的 RowSet 中,完成事务,让新数据可见,即能够被用户查询到。 查询时,读取 Delete Bitmap,将被标记删除的行过滤掉,只返回有效的数据【对于命中的所有 Segment,按照版本从高到低进行查询】 下面介绍一下写入流程和读取流程的实现。 写入流程:写入数据时会先创建每个 Segment 的主键索引,再更新 Delete Bitmap。 读取流程:Bitmap 的读取流程如下图所示,从图片中我们可知: 一个请求了版本 7 的 Query,只会看到版本 7 对应的数据 读取 RowSet5 的数据时,会将 V6 和 V7 对它的修改产生的 Bitmap 合并在一起,得到 Version7 对应的完整 DeleteBitmap,用来过滤数据 在上图的示例中,版本 8 的导入覆盖了 RowSet1 的 Segment2 一条数据,但请求版本 7 的 Query 仍然能读到该条数据 Update 怎么实现的? UNIQUE 模型 Update 过程本质上是 Select+Insert。 Update 利用查询引擎自身的 Where 过滤逻辑,从待更新表中筛选出需要被更新的行,基于此维护 Delete Bitmap 以及生成新插入的数据。 接着再执行 Insert 逻辑,具体流程跟上述的 UNIQUE 模型写入逻辑类似。 Q5:Doris 的 Delete 是怎么实现的?也是会生成一个 RowSet?如何删除对应的数据? Doris 的 Delete 也是会生成一个 RowSet,DELETE 模式下没有对数据进行实际删除操作,而是对数据删除条件进行了记录。存储在 Meta 信息中。当执行 Base Compaction 时删除条件会一起被合入到 Base 版本中。 Doris 在 UNIQUE KEY 模型下也支持了 LOAD_DELETE ,实现了通过批量导入要删除的 key 对数据进行删除,能够支持大量数据删除能力。整体思路是在数据记录中加入删除状态标识,在 Compaction 流程中会对删除的 Key 进行压缩。Compaction 主要负责将多个 RowSet 版本进行合并。 Q6:Doris 有哪些索引? 目前 Doris 主要支持两类索引: 内建的智能索引,包括前缀索引和 ZoneMap 索引。 用户手动创建的二级索引,包括倒排索引、 Bloomfilter 索引、 Ngram Bloomfilter 索引 和 Bitmap 索引。 其中 ZoneMap 索引是在列存格式上,对每一列自动维护的索引信息,包括 Min/Max,Null 值个数等等。这种索引对用户透明。 索引是什么级别? 现在 Doris 里所有索引都是 BE 级别 Local 的,例如:倒排索引、 Bloomfilter 索引、 Ngram Bloomfilter 索引 和 Bitmap 索引、前缀索引和 ZoneMap 索引等 Doris 没有 Global Index。广义理解上,分区间+分桶键 这些也能算是 Global 的,但是比较粗粒度。 索引的存储格式是怎样的? Doris 中将各个列的 Index 数据统一存储在 Segment 文件的 Index Region,这里的数据会按照列粒度进行加载,所以跟列的数据信息分开存储。这里以 Short Key Index 前缀索引为例进行介绍。 Short Key Index 前缀索引,是在 Key(AGGREGATE KEY、UNIQ KEY 和 DUPLICATE KEY)排序的基础上,实现的一种根据给定前缀列,快速查询数据的索引方式。这里 Short Key Index 索引也采用了稀疏索引结构,在数据写入过程中,每隔一定行数,会生成一个索引项。这个行数为索引粒度默认为 1024 行,可配置。该过程如下图所示: 其中,KeyBytes 中存放了索引项数据,OffsetBytes 存放了索引项在 KeyBytes 中的偏移。 Short Key Index 采用了前 36 个字节,作为这行数据的前缀索引。当遇到 VARCHAR 类型时,前缀索引会直接截断。 Short Key Index 采用了前 36 个字节,作为这行数据的前缀索引。当遇到 VARCHAR 类型时,前缀索引会直接截断。 读的过程如何命中索引? 在查询一个 Segment 中的数据时,根据执行的查询条件,会对首先根据字段加索引的情况对数据进行过滤。然后在进行读取数据,整体的查询流程如下: 首先,会按照 Segment 的行数构建一个 row_bitmap,表示记录哪些数据需要进行读取。没有使用任何索引的情况下,需要读取所有数据。 当查询条件中按前缀索引规则使用到了 Key 时,会先进行 ShortKey Index 的过滤,可以在 ShortKey Index 中匹配到的 Oordinal 行号范围,合入到 row_bitmap 中。 当查询条件中列字段存在 BitMap Index 索引时,会按照 BitMap 索引直接查出符合条件的 Ordinal 行号,与 row_bitmap 求交过滤。这里的过滤是精确的,之后去掉该查询条件,这个字段就不会再进行后面索引的过滤。 当查询条件中列字段存在 BloomFilter 索引并且条件为等值(eq,in,is)时,会按 BloomFilter 索引过滤,这里会走完所有索引,过滤每一个 Page 的 BloomFilter,找出查询条件能命中的所有 Page。将索引信息中的 Ordinal 行号范围与 row_bitmap 求交过滤。 当查询条件中列字段存在 ZoneMap 索引时,会按 ZoneMap 索引过滤,这里同样会走完所有索引,找出查询条件能与 ZoneMap 有交集的所有 Page。将索引信息中的 Ordinal 行号范围与 row_bitmap 求交过滤。 生成好 row_bitmap 之后,批量通过每个 Column 的 OrdinalIndex 找到到具体的 Data Page。 批量读取每一列的 Column Data Page 的数据。在读取时,对于有 Null 值的 Page,根据 Null 值位图判断当前行是否是 Null,如果为 Null 进行直接填充即可。 Q7:Doris 如何进行 Compaction 的? Doris 通过 Compaction 将增量聚合 RowSet 文件提升性能,RowSet 的版本信息中设计了有两个字段 Start、End 来表示 Rowset 合并后的版本范围。未合并的 Cumulative RowSet 的版本 Start 和 End 相等。Compaction 时相邻的 RowSet 会进行合并,生成一个新的 RowSet,版本信息的 Start、End 也会进行合并,变成一个更大范围的版本。另一方面,Compaction 流程大大减少 RowSet 文件数量,提升查询效率。 如上图所示,Compaction 任务分为两种,Base Compaction 和 Cumulative Compaction。cumulative_point 是分割两种策略关键。 可以这样理解: cumulative_point 右边是从未合并过的增量 RowSet,其每个 RowSet 的 Start 与 End 版本相等; cumulative_point 左边是合并过的 RowSet,Start 版本与 End 版本不等。 Base Compaction 和 Cumulative Compaction 任务流程基本一致,差异仅在选取要合并的 InputRowSet 逻辑有所不同。 Compaction 是按照什么 Key 来的? 在一个 Segment 中,数据始终按照 Key(AGGREGATE KEY、UNIQ KEY 和 DUPLICATE KEY)排序顺序进行存储,即 Key 的排序决定了数据存储的物理结构,确定了列数据的物理结构顺序。 所以 Doris Compaction 过程是基于 AGGREGATE KEY、UNIQ KEY 和 DUPLICATE KEY 来进行的。 Q8:Doris 怎么实现跨集群数据复制功能? 为了实现跨集群数据复制功能,Doris 引入了 Binlog 机制。通过 Binlog 机制自动记录数据修改记录和操作,以实现数据的可追溯性,同时还可以基于 Binlog 回放机制来实现数据的重放和恢复。 Binlog 怎么记录的? 在开启 Binlog 属性后,FE 和 BE 会将 DDL/DML 操作的修改记录持久化成 Meta Binlog 和 Data Binlog。 Meta Binlog:Doris 对 EditLog 的实现进行了增强,以确保日志的有序性。通过构建一个递增序列的 LogID,对每个操作进行准确记录,并按顺序持久化。这种有序的持久化机制有助于保证数据的一致性。 Data Binlog:在 FE 发起 Publish Transaction 的时候,BE 会执行对应的 Publish 操作,BE 会将这次 Transaction 涉及 RowSet 的元数据信息写入以 rowset_meta 为前缀的 KV 中,并持久化到 Meta 存储中,提交后会把导入的 Segment Files 链接到 Binlog 文件夹下。 Binlog 生成: BInlog 数据回放: Q9:Doris 的表是多副本的,写入阶段怎么保证多副本的,是否有主从概念?需要 Majority 后再返回写入成功吗? Doris BE 的 3 副本没有主从的概念,采用 Quorum 算法保证多副本写入。 在写入过程中,FE 会判断每一个 Tablet 成功写入数据的副本数量是否超过了 Tablet 副本总数的一半,如果每一个 Tablet 成功写入数据的副本数量都超过 Tablet 副本总数的一半(多数成功),则 Commit Transaction 成功,并将事务状态设置为 COMMITTED;COMMITTED 状态表示数据已经成功写入,但是数据还不可见,需要继续执行 Publish Version 任务,此后,事务不可被回滚。 FE 会有一个单独的线程对 Commit 成功的 Transaction 执行 Publish Version,FE 执行 Publish Version 时会通过 Thrift RPC 向 Transaction 相关的所有 Executor BE 节点下发 Publish Version 请求,Publish Version 任务在各个 Executor BE 节点异步执行,将数据导入生成的 RowSet 变为可见的数据版本。 为什么会有 Publish 机制:类似于 MVCC,如果没有 Publish 机制,用户可能读到还没有提交的数据。 如果表为 3 副本,只写入成功 1 个副本会怎样:这个时候事务会 ABORTED 如果表为 3 副本,只写入成功 2 副本会怎样:这个时候事务会 COMMITTED,Doris FE 会定期执行 Tablet 监控巡检,如果发现 Tablet 副本异常,会生成 Clone 任务,Clone 一个新的副本。 为什么用户执行完 Insert Into,立即执行查询,结果可能为空呢:原因是事务还没有 Publish Q10:Doris 的 FE 怎么保证高可用的? 元数据层面,Doris 采用 Paxos 协议以及 Memory + Checkpoint + Journal 的机制来确保元数据的高性能及高可靠。 元数据的数据流具体过程如下: 只有 Leader FE 可以对元数据进行写操作。写操作在修改 Leader 的内存后,会序列化为一条 Log,按照 key-value 的形式写入 BDBJE。其中 Key 为连续的整型,作为 log id,Value 即为序列化后的操作日志。 日志写入 BDBJE 后,BDBJE 会根据策略(写多数/全写),将日志复制到其他 Non-Leader 的 FE 节点。Non-Leader FE 节点通过对日志回放,修改自身的元数据内存镜像,完成与 Leader 节点的元数据同步。 Leader 节点的日志条数达到阈值(默认 10w 条)并且满足 Checkpoint 线程执行周期(默认六十秒)。Checkpoint 会读取已有的 Image 文件,和其之后的日志,重新在内存中回放出一份新的元数据镜像副本。然后将该副本写入到磁盘,形成一个新的 Image。之所以是重新生成一份镜像副本,而不是将已有镜像写成 Image,主要是考虑写 Image 加读锁期间,会阻塞写操作。所以每次 Checkpoint 会占用双倍内存空间。 Image 文件生成后,Leader 节点会通知其他 Non-Leader 节点新的 Image 已生成。Non-Leader 主动通过 HTTP 拉取最新的 Image 文件,来更换本地的旧文件。 BDBJE 中的日志,在 Image 做完后,会定期删除旧的日志。 解释: 元数据的每次更新,都首先写入到磁盘的日志文件中,然后再写到内存中,最后定期 Checkpoint 到本地磁盘上。 相当于是一个纯内存的一个结构,也就是说所有的元数据都会缓存在内存之中,从而保证 FE 在宕机后能够快速恢复元数据,而且不丢失元数据。 Leader、Follower 和 Observer 它们三个构成一个可靠的服务,单机的节点故障的时候其实基本上三个就够了,因为 FE 节点毕竟它只存了一份元数据,它的压力不大,所以如果 FE 太多的时候它会去消耗机器资源,所以多数情况下三个就足够了,可以达到一个很高可用的元数据服务。 用户可以使用 MySQL 连接任意一个 FE 节点进行元数据的读写访问。如果连接的是 Non-Leader 节点,则该节点会将写操作转发给 Leader 节点。 作者介绍 隐形(邢颖) 网易资深数据库内核工程师,毕业至今一直从事数据库内核开发工作,目前主要参与 MySQL 与 Apache Doris 的开发维护和业务支持工作。作为 MySQL 内核贡献者,为 MySQL 上报了 50 多个 Bug 及优化项,多个提交被合入 MySQL 8.0 版本。从 2023 年起加入 Apache Doris 社区,Apache Doris Active Contributor,已为社区提交并合入数十个 Commits。

优秀的个人博客,低调大师

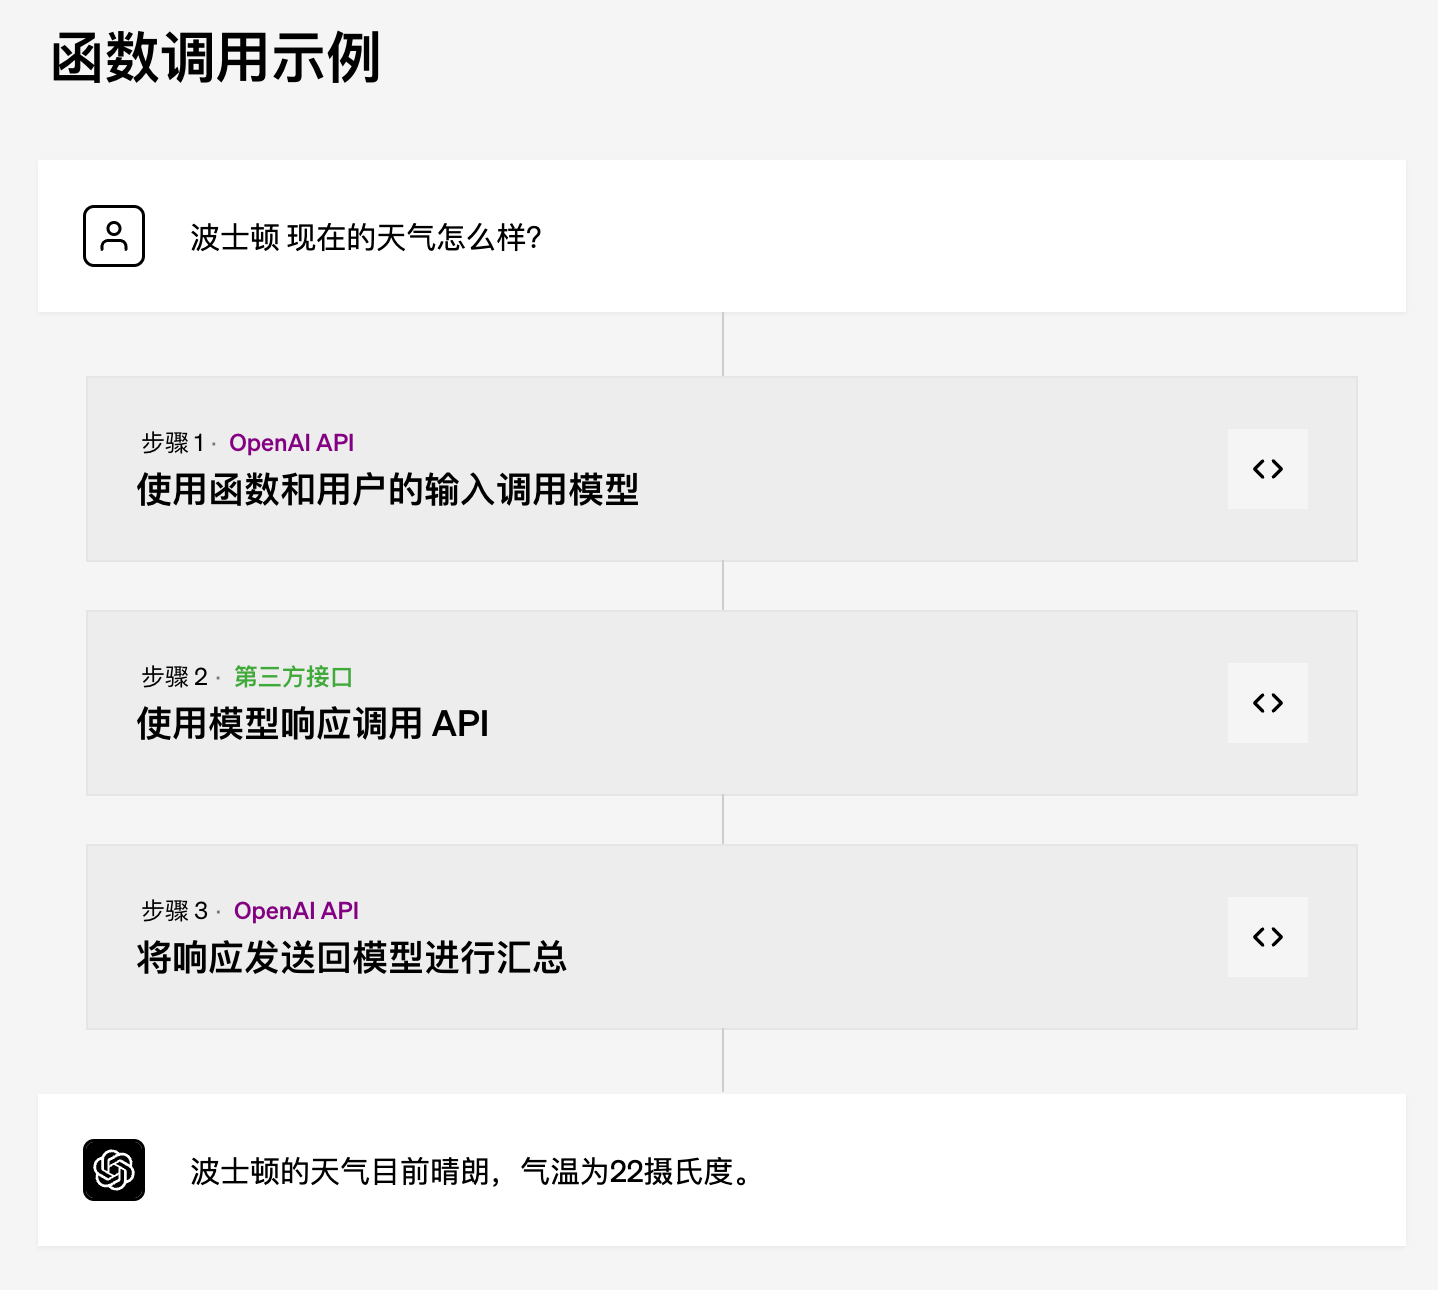
OpenAI 函数调用 功能入门

作者:AI小火箭的HB 我是AI小火箭的HB,我探索和写作人工智能和语言交叉点的所有事物,范围从LLM,聊天机器人,语音机器人,开发框架,以数据为中心的潜在空间等。 范例 初步体验 OpenAI新增了“函数调用”功能,这是什么呢? 我们先调用API来体验下。 下面是发送到模型的 JSON 文档。此调用的目的是生成一个 JSON 文件,该文件可用于发送到发送电子邮件的 API。 您可以看到函数名称为 send_email,并定义了三个参数, to_address , subject 和 body ,即电子邮件正文。 用户请求为: Send Cobus from humanfirst ai an email asking for the monthly report? curl --location 'https://api.openai.com/v1/chat/completions' \ --header 'Content-Type: application/json' \ --header 'Authorization: Bearer sk-xxxx' \ --data '{ "model": "gpt-3.5-turbo-0613", "messages": [ {"role": "user", "content": "Send Cobus from humanfirst ai an email asking for the monthly report?"} ], "functions": [ { "name": "send_email", "description": "Please send an email.", "parameters": { "type": "object", "properties": { "to_address": { "type": "string", "description": "To address for email" }, "subject": { "type": "string", "description": "subject of the email" }, "body": { "type": "string", "description": "Body of the email" } } } } ] }' 下面是返回的 JSON { "id": "chatcmpl-7TQuwzJpQAY470saQM2RPfxwF6DDE", "object": "chat.completion", "created": 1687249338, "model": "gpt-3.5-turbo-0613", "choices": [ { "index": 0, "message": { "role": "assistant", "content": null, "function_call": { "name": "send_email", "arguments": "{\n \"to_address\": \"cobus@humanfirst.ai\",\n \"subject\": \"Request for Monthly Report\",\n \"body\": \"Hi Cobus,\\n\\nI hope you're doing well. Could you please share the monthly report with me? It would be great to have it before the end of the week.\\n\\nThanks,\\n[Your Name]\"\n}" } }, "finish_reason": "function_call" } ], "usage": { "prompt_tokens": 86, "completion_tokens": 82, "total_tokens": 168 } } GPT模型会返回需要调用的函数名 send_email和对应的参数(放在arguments字段)。 { "to_address": "cobus@humanfirst.ai", "subject": "Request for Monthly Report", "body": "Hi Cobus,\n\nI hope you're doing well. Could you please share the monthly report with me? It would be great to have it before the end of the week.\n\nThanks,\n[Your Name]" } 这就非常有用,第三方的应用可以提供多个函数/服务(类似插件),GPT模型可以根据用户的指令自动选择不同的函数/服务。 现在再来看示例,就比较清晰了。 用途 根据官网文档,函数调用允许您更可靠地从模型中获取结构化数据。例如,您可以: 创建聊天机器人,通过调用外部 API 来回答问题(例如 ChatGPT 插件) 例如,定义像 send_email(to: string, body: string) 或 get_current_weather(location: string, unit: 'celsius' | 'fahrenheit') 这样的函数 将自然语言转换为 API 调用 例如,将“谁是我的顶级客户?”转换为 get_customers(min_revenue: int, created_before: string, limit: int) 并调用您的内部 API 从文本中提取结构化数据 例如,定义一个名为 extract_data(name: string, birthday: string) 或 sql_query(query: string) 的函数 函数调用的基本步骤顺序如下: 使用用户查询和函数参数中定义的一组函数调用模型。 模型可以选择调用函数;如果是这样,内容将是符合自定义架构的字符串化 JSON 对象(注意:模型可能会生成无效的 JSON 或幻觉参数)。 在代码中将字符串解析为 JSON,并使用提供的参数调用函数(如果存在)。 通过将函数响应追加为新消息来再次调用模型,并让模型将结果汇总回给用户。 AI小火箭 AI小火箭已经支持函数调用和gpt-3.5-turbo-16k、gpt-3.5-turbo-0613、gpt-3.5-turbo-16k-0613,大家可以去体验下。

优秀的个人博客,低调大师

Vue3开发入门

### 1、基础环境相关版本信息 ``` C:\Users\xxxxx>node -v v14.17.0 C:\Users\xxxxx>npm -v 7.18.1 ``` ### 2、新建vue3项目 ``` # a.切换到项目代码目录 cd /d D:\Development\Vue # b.新建项目 D:\Development\Vue>npm init @vitejs/app Need to install the following packages: @vitejs/create-app Ok to proceed? (y) √ Project name: ... study-admin √ Select a framework: » vue √ Select a variant: » vue-ts Scaffolding project in D:\Development\Vue\study-admin... Done. Now run: cd study-admin npm install npm run dev # c.安装依赖,运行项目,运行时会有一个报错,解决办法是手动执行node脚本安装spawn D:\Development\Vue>cd study-admin D:\Development\Vue\study-admin>npm install added 91 packages in 4s D:\Development\Vue\study-admin>npm run dev > dev > vite events.js:353 throw er; // Unhandled 'error' event ^ Error: spawn D:\Development\Vue\study-admin\node_modules\esbuild\esbuild.exe ENOENT at Process.ChildProcess._handle.onexit (internal/child_process.js:269:19) at onErrorNT (internal/child_process.js:467:16) at processTicksAndRejections (internal/process/task_queues.js:82:21) Emitted 'error' event on ChildProcess instance at: at Process.ChildProcess._handle.onexit (internal/child_process.js:275:12) at onErrorNT (internal/child_process.js:467:16) at processTicksAndRejections (internal/process/task_queues.js:82:21) { errno: -4058, code: 'ENOENT', syscall: 'spawn D:\\Development\\Vue\\study-admin\\node_modules\\esbuild\\esbuild.exe', path: 'D:\\Development\\Vue\\study-admin\\node_modules\\esbuild\\esbuild.exe', spawnargs: [ '--service=0.12.9', '--ping' ] } # 解决errno: -4058,code: 'ENOENT',spawn 相关报错 D:\Development\Vue\study-admin>node D:\Development\Vue\study-admin\node_modules\esbuild\install.js D:\Development\Vue\study-admin>npm run dev > dev > vite Pre-bundling dependencies: vue (this will be run only when your dependencies or config have changed) vite v2.3.7 dev server running at: > Local: http://localhost:3000/ > Network: use `--host` to expose ready in 693ms. ``` ### 3、修改vite启动参数相关配置,vite.config.ts > 参考文档:https://cn.vitejs.dev/config/ ``` import { defineConfig } from 'vite' import vue from '@vitejs/plugin-vue' // 需要安装 @types/node -> npm i @types/node -D import { resolve } from 'path' // https://vitejs.dev/config/ export default defineConfig({ plugins: [vue()], resolve: { alias: { '@': resolve(__dirname, 'src') // 设置 `@` 指向 `src` 目录 } }, server: { port: 4000, // 服务端口号 open: true, // 启动时自动打开浏览器 cors: true // 允许跨域访问 } }) ``` ### 4、集成vue-router路由模块 > 参考文档:https://next.router.vuejs.org/zh/introduction.html ``` # a.安装vue-router v4.x,只有v4版本支持vue3 D:\Development\Vue\study-admin>npm i vue-router@4 added 2 packages in 2s # b.创建 src/router/index.ts 文件 import { createRouter, createWebHashHistory, Router, RouteRecordRaw } from 'vue-router' import Login from '@/views/Login.vue' const routes: Array = [ { path: '/', name: 'Login', component: Login }, { path: '/admin', name: 'Admin', component: () => import('@/views/Admin.vue') // 懒加载 Admin 组件 } ] const router: Router = createRouter({ history: createWebHashHistory(), routes: routes }) export default router # c.在 src 下创建 views 目录,用来存储页面组件。在 views 目录下创建 Login.vue 、Admin.vue。 # Login.vue Login 登陆 # Admin.vue Admin # d.在 main.ts 文件中加载路由配置 import { createApp } from 'vue' import App from '@/App.vue' import router from './router/index' createApp(App).use(router).mount('#app') # e.修改App.vue,添加路由映射 APP Module ``` ### 5、集成UI框架Element Plus ``` # a.安装element-plus和vite-plugin-style-import npm i element-plus npm i vite-plugin-style-import -D # b.修改vite.config.ts配置按需加载 import { defineConfig } from 'vite' import vue from '@vitejs/plugin-vue' // 需要安装@types/node -> npm i @types/node -D import { resolve } from 'path' // 需要安装vite-plugin-style-import -> npm i vite-plugin-style-import -D import styleImport from 'vite-plugin-style-import'; // https://vitejs.dev/config/ export default defineConfig({ plugins: [ vue(), // 按需载入 Element Plus styleImport({ libs: [ { libraryName: 'element-plus', esModule: true, ensureStyleFile: true, resolveStyle: (name) => { return `element-plus/lib/theme-chalk/${name}.css` }, resolveComponent: (name) => { return `element-plus/lib/${name}` } } ] }) ], resolve: { alias: { '@': resolve(__dirname, 'src') // 设置 `@` 指向 `src` 目录 } }, server: { port: 4000, // 设置服务启动端口号 open: true, // 设置服务启动时是否自动打开浏览器 cors: true // 允许跨域 } }) # c.在main.ts中加载element-plus import { createApp } from 'vue' import App from '@/App.vue' import router from './router/index' // 按需引入需要的element-plus组件 import { ElIcon, ElLoading, ElCard, ElButton } from 'element-plus' // 创建Vue3实例 const app = createApp(App) // 加载默认路由 app.use(router) // 加载element-plus组件 app.use(ElButton).use(ElCard).use(ElLoading).use(ElIcon) // 挂载到DOM app.mount('#app') # d.修改Login.vue将登陆链接改为element-plus的el-button组件,验证UI组件是否正确引入 Login 登陆 --> 登陆 ```

优秀的个人博客,低调大师

ShardingSphere-JDBC入门实战

前言 Apache ShardingSphere 是一套开源的分布式数据库解决方案组成的生态圈,它由 JDBC、Proxy 和 Sidecar(规划中)这 3 款既能够独立部署,又支持混合部署配合使用的产品组成;接下来的几篇文章将重点分析ShardingSphere-JDBC,从数据分片,分布式主键,分布式事务,读写分离,弹性伸缩等几个方面来介绍。 简介 ShardingSphere-JDBC定位为轻量级 Java 框架,在 Java 的 JDBC 层提供的额外服务。 它使用客户端直连数据库,以 jar 包形式提供服务,无需额外部署和依赖,可理解为增强版的 JDBC 驱动,完全兼容 JDBC 和各种 ORM 框架。整体架构图如下(来自官网): ShardingSphere-JDBC包含了众多的功能模块包括数据分片,分布式主键,分布式事务,读写分离,弹性伸缩等等;作为一个数据库中间件最核心的功能当属数据分片了,ShardingSphere-JDBC提供了很多分库分表的策略和算法,接下来看看具体是如何使用这些策略的; 数据分片 作为一个开发者我们希望中间件可以帮我们屏蔽底层的细节,让我们在面对分库分表的场景下,可以像使用单库单表一样简单;当然ShardingSphere-JDBC不会让大家失望,引入了分片数据源、逻辑表等概念; 分片数据源和逻辑表 逻辑表:逻辑表是相对物理表来说的,通常做分表处理,某一张表会被分成多张表,比如订单表被拆分成10张表,分别是t_order_0到t_order_9,而对应的逻辑表就是t_order,对于开发者来说只需要使用逻辑表即可; 分片数据源:对于分库来说,通常会有多个库,或者说是多个数据源,所以这些数据源需要被统一管理起来,引入了分片数据源的概念,常见的ShardingDataSource 有了以上两个最基本的概念当然还不够,还需要分库分表策略算法帮助我们做路由处理;但是这两个概念可以让开发者有一种使用单库单表的感觉,就像下面这样一个简单的实例: DataSource dataSource = ShardingDataSourceFactory.createDataSource(dataSourceMap, shardingRuleConfig, new Properties()); Connection conn = dataSource.getConnection(); String sql = "select id,user_id,order_id from t_order where order_id = 103"; PreparedStatement preparedStatement = conn.prepareStatement(sql); ResultSet set = preparedStatement.executeQuery(); 以上根据真实数据源列表,分库分表策略生成了一个抽象数据源,可以简单理解就是ShardingDataSource;接下来的操作和我们使用jdbc操作正常的单库单表没有任何区别; 分片策略算法 ShardingSphere-JDBC在分片策略上分别引入了分片算法、分片策略两个概念,当然在分片的过程中分片键也是一个核心的概念;在此可以简单的理解分片策略 = 分片算法 + 分片键;至于为什么要这么设计,应该是ShardingSphere-JDBC考虑更多的灵活性,把分片算法单独抽象出来,方便开发者扩展; 分片算法 提供了抽象分片算法类:ShardingAlgorithm,根据类型又分为:精确分片算法、区间分片算法、复合分片算法以及Hint分片算法; 精确分片算法:对应PreciseShardingAlgorithm类,主要用于处理 = 和 IN的分片; 区间分片算法:对应RangeShardingAlgorithm类,主要用于处理 BETWEEN AND, >, <, >=, <= 分片; 复合分片算法:对应ComplexKeysShardingAlgorithm类,用于处理使用多键作为分片键进行分片的场景; Hint分片算法:对应HintShardingAlgorithm类,用于处理使用 Hint 行分片的场景; 以上所有的算法类都是接口类,具体实现交给开发者自己; 分片策略 分片策略基本和上面的分片算法对应,包括:标准分片策略、复合分片策略、Hint分片策略、内联分片策略、不分片策略; 标准分片策略:对应StandardShardingStrategy类,提供PreciseShardingAlgorithm和RangeShardingAlgorithm两个分片算法,PreciseShardingAlgorithm是必须的,RangeShardingAlgorithm可选的; public final class StandardShardingStrategy implements ShardingStrategy { private final String shardingColumn; private final PreciseShardingAlgorithm preciseShardingAlgorithm; private final RangeShardingAlgorithm rangeShardingAlgorithm; } 复合分片策略:对应ComplexShardingStrategy类,提供ComplexKeysShardingAlgorithm分片算法; public final class ComplexShardingStrategy implements ShardingStrategy { @Getter private final Collection<String> shardingColumns; private final ComplexKeysShardingAlgorithm shardingAlgorithm; } 可以发现支持多个分片键; Hint分片策略:对应HintShardingStrategy类,通过 Hint 指定分片值而非从 SQL 中提取分片值的方式进行分片的策略;提供HintShardingAlgorithm分片算法; public final class HintShardingStrategy implements ShardingStrategy { @Getter private final Collection<String> shardingColumns; private final HintShardingAlgorithm shardingAlgorithm; } 内联分片策略:对应InlineShardingStrategy类,没有提供分片算法,路由规则通过表达式来实现; 不分片策略:对应NoneShardingStrategy类,不分片策略; 分片策略配置类 在使用中我们并没有直接使用上面的分片策略类,ShardingSphere-JDBC分别提供了对应策略的配置类包括: StandardShardingStrategyConfiguration ComplexShardingStrategyConfiguration HintShardingStrategyConfiguration InlineShardingStrategyConfiguration NoneShardingStrategyConfiguration 实战 有了以上相关基础概念,接下来针对每种分片策略做一个简单的实战,在实战前首先准备好库和表; 准备 分别准备两个库:ds0、ds1;然后每个库分别包含两个表:t_order0,t_order1; CREATE TABLE `t_order0` ( `id` bigint(20) NOT NULL AUTO_INCREMENT, `user_id` bigint(20) NOT NULL, `order_id` bigint(20) NOT NULL, PRIMARY KEY (`id`) ) ENGINE=InnoDB DEFAULT CHARSET=utf8 准备真实数据源 我们这里有两个数据源,这里都使用java代码的方式来配置: // 配置真实数据源 Map<String, DataSource> dataSourceMap = new HashMap<>(); // 配置第一个数据源 BasicDataSource dataSource1 = new BasicDataSource(); dataSource1.setDriverClassName("com.mysql.jdbc.Driver"); dataSource1.setUrl("jdbc:mysql://localhost:3306/ds0"); dataSource1.setUsername("root"); dataSource1.setPassword("root"); dataSourceMap.put("ds0", dataSource1); // 配置第二个数据源 BasicDataSource dataSource2 = new BasicDataSource(); dataSource2.setDriverClassName("com.mysql.jdbc.Driver"); dataSource2.setUrl("jdbc:mysql://localhost:3306/ds1"); dataSource2.setUsername("root"); dataSource2.setPassword("root"); dataSourceMap.put("ds1", dataSource2); 这里配置的两个数据源都是普通的数据源,最后会把dataSourceMap交给ShardingDataSourceFactory管理; 表规则配置 表规则配置类TableRuleConfiguration,包含了五个要素:逻辑表、真实数据节点、数据库分片策略、数据表分片策略、分布式主键生成策略; TableRuleConfiguration orderTableRuleConfig = new TableRuleConfiguration("t_order", "ds${0..1}.t_order${0..1}"); orderTableRuleConfig.setDatabaseShardingStrategyConfig( new StandardShardingStrategyConfiguration("user_id", new MyPreciseSharding())); orderTableRuleConfig.setTableShardingStrategyConfig( new StandardShardingStrategyConfiguration("order_id", new MyPreciseSharding())); orderTableRuleConfig.setKeyGeneratorConfig(new KeyGeneratorConfiguration("SNOWFLAKE", "id")); 逻辑表:这里配置的逻辑表就是t_order,对应的物理表有t_order0,t_order1; 真实数据节点:这里使用行表达式进行配置的,简化了配置;上面的配置就相当于配置了: db0 ├── t_order0 └── t_order1 db1 ├── t_order0 └── t_order1 数据库分片策略:这里的库分片策略就是上面介绍的五种类型,这里使用的StandardShardingStrategyConfiguration,需要指定分片键和分片算法,这里使用的是精确分片算法; public class MyPreciseSharding implements PreciseShardingAlgorithm<Integer> { @Override public String doSharding(Collection<String> availableTargetNames, PreciseShardingValue<Integer> shardingValue) { Integer index = shardingValue.getValue() % 2; for (String target : availableTargetNames) { if (target.endsWith(index + "")) { return target; } } return null; } } 这里的shardingValue就是user_id对应的真实值,每次和2取余;availableTargetNames可选择就是{ds0,ds1};看余数和哪个库能匹配上就表示路由到哪个库; 数据表分片策略:指定的**分片键(order_id)**和分库策略不一致,其他都一样; 分布式主键生成策略:ShardingSphere-JDBC提供了多种分布式主键生成策略,后面详细介绍,这里使用雪花算法; 配置分片规则 配置分片规则ShardingRuleConfiguration,包括多种配置规则:表规则配置、绑定表配置、广播表配置、默认数据源名称、默认数据库分片策略、默认表分片策略、默认主键生成策略、主从规则配置、加密规则配置; 表规则配置 tableRuleConfigs:也就是上面配置的库分片策略和表分片策略,也是最常用的配置; 绑定表配置 bindingTableGroups:指分⽚规则⼀致的主表和⼦表;绑定表之间的多表关联查询不会出现笛卡尔积关联,关联查询效率将⼤⼤提升; 广播表配置 broadcastTables:所有的分⽚数据源中都存在的表,表结构和表中的数据在每个数据库中均完全⼀致。适⽤于数据量不⼤且需要与海量数据的表进⾏关联查询的场景; 默认数据源名称 defaultDataSourceName:未配置分片的表将通过默认数据源定位; 默认数据库分片策略 defaultDatabaseShardingStrategyConfig:表规则配置可以设置数据库分片策略,如果没有配置可以在这里面配置默认的; 默认表分片策略 defaultTableShardingStrategyConfig:表规则配置可以设置表分片策略,如果没有配置可以在这里面配置默认的; 默认主键生成策略 defaultKeyGeneratorConfig:表规则配置可以设置主键生成策略,如果没有配置可以在这里面配置默认的;内置UUID、SNOWFLAKE生成器; 主从规则配置 masterSlaveRuleConfigs:用来实现读写分离的,可配置一个主表多个从表,读面对多个从库可以配置负载均衡策略; 加密规则配置 encryptRuleConfig:提供了对某些敏感数据进行加密的功能,提供了⼀套完整、安全、透明化、低改造成本的数据加密整合解决⽅案; 数据插入 以上准备好,就可以操作数据库了,这里执行插入操作: DataSource dataSource = ShardingDataSourceFactory.createDataSource(dataSourceMap, shardingRuleConfig, new Properties()); Connection conn = dataSource.getConnection(); String sql = "insert into t_order (user_id,order_id) values (?,?)"; PreparedStatement preparedStatement = conn.prepareStatement(sql); for (int i = 1; i <= 10; i++) { preparedStatement.setInt(1, i); preparedStatement.setInt(2, 100 + i); preparedStatement.executeUpdate(); } 通过以上配置的真实数据源、分片规则以及属性文件创建分片数据源ShardingDataSource;接下来就可以像使用单库单表一样操作分库分表了,sql中可以直接使用逻辑表,分片算法会根据具体的值就行路由处理; 经过路由最终:奇数入ds1.t_order1,偶数入ds0.t_order0;以上使用了最常见的精确分片算法,下面继续看一下其他几种分片算法; 分片算法 上面的介绍的精确分片算法中,通过PreciseShardingValue来获取当前分片键值,ShardingSphere-JDBC针对每种分片算法都提供了相应的ShardingValue,具体包括: PreciseShardingValue RangeShardingValue ComplexKeysShardingValue HintShardingValue 区间分片算法 用在区间查询的时候,比如下面的查询SQL: select * from t_order where order_id>2 and order_id<9 以上两个区间值2、9会直接保存到RangeShardingValue中,这里没有指定user_id用来做库路由,所以会访问两个库; public class MyRangeSharding implements RangeShardingAlgorithm<Integer> { @Override public Collection<String> doSharding(Collection<String> availableTargetNames, RangeShardingValue<Integer> shardingValue) { Collection<String> result = new LinkedHashSet<>(); Range<Integer> range = shardingValue.getValueRange(); // 区间开始和结束值 int lower = range.lowerEndpoint(); int upper = range.upperEndpoint(); for (int i = lower; i <= upper; i++) { Integer index = i % 2; for (String target : availableTargetNames) { if (target.endsWith(index + "")) { result.add(target); } } } return result; } } 可以发现会检查区间开始和结束中的每个值和2取余,是否都能和真实的表匹配; 复合分片算法 可以同时使用多个分片键,比如可以同时使用user_id和order_id作为分片键; orderTableRuleConfig.setDatabaseShardingStrategyConfig( new ComplexShardingStrategyConfiguration("order_id,user_id", new MyComplexKeySharding())); orderTableRuleConfig.setTableShardingStrategyConfig( new ComplexShardingStrategyConfiguration("order_id,user_id", new MyComplexKeySharding())); 如上在配置分库分表策略时,指定了两个分片键,用逗号隔开;分片算法如下: public class MyComplexKeySharding implements ComplexKeysShardingAlgorithm<Integer> { @Override public Collection<String> doSharding(Collection<String> availableTargetNames, ComplexKeysShardingValue<Integer> shardingValue) { Map<String, Collection<Integer>> map = shardingValue.getColumnNameAndShardingValuesMap(); Collection<Integer> userMap = map.get("user_id"); Collection<Integer> orderMap = map.get("order_id"); List<String> result = new ArrayList<>(); // user_id,order_id分片键进行分表 for (Integer userId : userMap) { for (Integer orderId : orderMap) { int suffix = (userId+orderId) % 2; for (String s : availableTargetNames) { if (s.endsWith(suffix+"")) { result.add(s); } } } } return result; } } Hint分片算法 在一些应用场景中,分片条件并不存在于 SQL,而存在于外部业务逻辑;可以通过编程的方式向 HintManager 中添加分片条件,该分片条件仅在当前线程内生效; // 设置库表分片策略 orderTableRuleConfig.setDatabaseShardingStrategyConfig(new HintShardingStrategyConfiguration(new MyHintSharding())); orderTableRuleConfig.setTableShardingStrategyConfig(new HintShardingStrategyConfiguration(new MyHintSharding())); // 手动设置分片条件 int hitKey1[] = { 2020, 2021, 2022, 2023, 2024 }; int hitKey2[] = { 3020, 3021, 3022, 3023, 3024 }; DataSource dataSource = ShardingDataSourceFactory.createDataSource(dataSourceMap, shardingRuleConfig, new Properties()); Connection conn = dataSource.getConnection(); for (int i = 1; i <= 5; i++) { final int index = i; new Thread(new Runnable() { @Override public void run() { try { HintManager hintManager = HintManager.getInstance(); String sql = "insert into t_order (user_id,order_id) values (?,?)"; PreparedStatement preparedStatement = conn.prepareStatement(sql); // 分别添加库和表分片条件 hintManager.addDatabaseShardingValue("t_order", hitKey1[index - 1]); hintManager.addTableShardingValue("t_order", hitKey2[index - 1]); preparedStatement.setInt(1, index); preparedStatement.setInt(2, 100 + index); preparedStatement.executeUpdate(); } catch (SQLException e) { e.printStackTrace(); } } }).start(); } 以上实例中,手动设置了分片条件,分片算法如下所示: public class MyHintSharding implements HintShardingAlgorithm<Integer> { @Override public Collection<String> doSharding(Collection<String> availableTargetNames, HintShardingValue<Integer> shardingValue) { List<String> shardingResult = new ArrayList<>(); for (String targetName : availableTargetNames) { String suffix = targetName.substring(targetName.length() - 1); Collection<Integer> values = shardingValue.getValues(); for (int value : values) { if (value % 2 == Integer.parseInt(suffix)) { shardingResult.add(targetName); } } } return shardingResult; } } 不分片 配置NoneShardingStrategyConfiguration即可: orderTableRuleConfig.setDatabaseShardingStrategyConfig(new NoneShardingStrategyConfiguration()); orderTableRuleConfig.setTableShardingStrategyConfig(new NoneShardingStrategyConfiguration()); 这样数据会插入每个库每张表,可以理解为广播表 分布式主键 面对多个数据库表需要有唯一的主键,引入了分布式主键功能,内置的主键生成器包括:UUID、SNOWFLAKE; UUID 直接使用UUID.randomUUID()生成,主键没有任何规则;对应的主键生成类:UUIDShardingKeyGenerator; SNOWFLAKE 实现类:SnowflakeShardingKeyGenerator;使⽤雪花算法⽣成的主键,⼆进制表⽰形式包含 4 部分,从⾼位到低位分表为:1bit 符号位、41bit 时间戳位、10bit ⼯作进程位以及 12bit 序列号位;来自官网的图片: 扩展 实现接口:ShardingKeyGenerator,实现自己的主键生成器; public interface ShardingKeyGenerator extends TypeBasedSPI { Comparable<?> generateKey(); } 实战 使用也很简单,直接使用KeyGeneratorConfiguration即可,配置对应的算法类型和字段名称: orderTableRuleConfig.setKeyGeneratorConfig(new KeyGeneratorConfiguration("SNOWFLAKE", "id")); 这里使用雪花算法生成器,对应生成的字段是id;结果如下: mysql> select * from t_order0; +--------------------+---------+----------+ | id | user_id | order_id | +--------------------+---------+----------+ | 589535589984894976 | 0 | 0 | | 589535590504988672 | 2 | 2 | | 589535590718898176 | 4 | 4 | +--------------------+---------+----------+ 分布式事务 ShardingSphere-JDBC使用分布式事务和使用本地事务没什么区别,提供了透明化的分布式事务;支持的事务类型包括:本地事务、XA事务和柔性事务,默认是本地事务; public enum TransactionType { LOCAL, XA, BASE } 依赖 根据具体使用XA事务还是柔性事务,需要引入不同的模块; <dependency> <groupId>org.apache.shardingsphere</groupId> <artifactId>sharding-transaction-xa-core</artifactId> </dependency> <dependency> <groupId>org.apache.shardingsphere</groupId> <artifactId>shardingsphere-transaction-base-seata-at</artifactId> </dependency> 实现 ShardingSphere-JDBC提供了分布式事务管理器ShardingTransactionManager,实现包括: XAShardingTransactionManager:基于 XA 的分布式事务管理器; SeataATShardingTransactionManager:基于 Seata 的分布式事务管理器; XA 的分布式事务管理器具体实现包括:Atomikos、Narayana、Bitronix;默认是Atomikos; 实战 默认的事务类型是TransactionType.LOCAL,ShardingSphere-JDBC天生面向多数据源,本地模式其实是循环提交每个数据源的事务,不能保证数据的一致性,所以需要使用分布式事务,具体使用也很简单: //改变事务类型为XA TransactionTypeHolder.set(TransactionType.XA); DataSource dataSource = ShardingDataSourceFactory.createDataSource(dataSourceMap, shardingRuleConfig, new Properties()); Connection conn = dataSource.getConnection(); try { //关闭自动提交 conn.setAutoCommit(false); String sql = "insert into t_order (user_id,order_id) values (?,?)"; PreparedStatement preparedStatement = conn.prepareStatement(sql); for (int i = 1; i <= 5; i++) { preparedStatement.setInt(1, i - 1); preparedStatement.setInt(2, i - 1); preparedStatement.executeUpdate(); } //事务提交 conn.commit(); } catch (Exception e) { e.printStackTrace(); //事务回滚 conn.rollback(); } 可以发现使用起来还是很简单的,ShardingSphere-JDBC会根据当前的事务类型,在提交的时候判断是走本地事务提交,还是使用分布式事务管理器ShardingTransactionManager进行提交; 读写分离 对于同一时刻有大量并发读操作和较少写操作类型的应用系统来说,将数据库拆分为主库和从库,主库负责处理事务性的增删改操作,从库负责处理查询操作,能够有效的避免由数据更新导致的行锁,使得整个系统的查询性能得到极大的改善。 主从配置 在上面章节介绍分片规则的时候,其中有说到主从规则配置,其目的就是用来实现读写分离的,核心配置类:MasterSlaveRuleConfiguration: public final class MasterSlaveRuleConfiguration implements RuleConfiguration { private final String name; private final String masterDataSourceName; private final List<String> slaveDataSourceNames; private final LoadBalanceStrategyConfiguration loadBalanceStrategyConfiguration; } name:配置名称,当前使用的4.1.0版本,这里必须是主库的名称; masterDataSourceName:主库数据源名称; slaveDataSourceNames:从库数据源列表,可以配置一主多从; LoadBalanceStrategyConfiguration:面对多个从库,读取的时候会通过负载算法进行选择; 主从负载算法类:MasterSlaveLoadBalanceAlgorithm,实现类包括:随机和循环; ROUND_ROBIN:实现类RoundRobinMasterSlaveLoadBalanceAlgorithm RANDOM:实现类RandomMasterSlaveLoadBalanceAlgorithm 实战 分别给ds0和ds1准备从库:ds01和ds11,分别配置主从同步;读写分离配置如下: List<String> slaveDataSourceNames0 = new ArrayList<String>(); slaveDataSourceNames0.add("ds01"); MasterSlaveRuleConfiguration masterSlaveRuleConfiguration0 = new MasterSlaveRuleConfiguration("ds0", "ds0", slaveDataSourceNames0); shardingRuleConfig.getMasterSlaveRuleConfigs().add(masterSlaveRuleConfiguration0); List<String> slaveDataSourceNames1 = new ArrayList<String>(); slaveDataSourceNames1.add("ds11"); MasterSlaveRuleConfiguration masterSlaveRuleConfiguration1 = new MasterSlaveRuleConfiguration("ds1", "ds1", slaveDataSourceNames1); shardingRuleConfig.getMasterSlaveRuleConfigs().add(masterSlaveRuleConfiguration1); 这样在执行查询操作的时候会自动路由到从库,实现读写分离; 总结 本文重点介绍了ShardingSphere-JDBC的数据分片功能,这也是所有数据库中间件的核心功能;当然分布式主键、分布式事务、读写分离等功能也是必不可少的;同时ShardingSphere还引入了弹性伸缩的功能,这是一个非常亮眼的功能,因为数据库分片本身是有状态的,所以我们在项目启动之初都固定了多少库多少表,然后通过分片算法路由到各个库表,但是业务的发展往往超乎我们的预期,这时候如果想扩表扩库会很麻烦,目前看ShardingSphere官网弹性伸缩处于alpha开发阶段,非常期待此功能。 参考 https://shardingsphere.apache.org/document/current/cn/overview/ 感谢关注 可以关注微信公众号「回滚吧代码」,第一时间阅读,文章持续更新;专注Java源码、架构、算法和面试。

资源下载

更多资源
Nacos

Nacos

Nacos /nɑ:kəʊs/ 是 Dynamic Naming and Configuration Service 的首字母简称,一个易于构建 AI Agent 应用的动态服务发现、配置管理和AI智能体管理平台。Nacos 致力于帮助您发现、配置和管理微服务及AI智能体应用。Nacos 提供了一组简单易用的特性集,帮助您快速实现动态服务发现、服务配置、服务元数据、流量管理。Nacos 帮助您更敏捷和容易地构建、交付和管理微服务平台。

Spring

Spring

Spring框架(Spring Framework)是由Rod Johnson于2002年提出的开源Java企业级应用框架,旨在通过使用JavaBean替代传统EJB实现方式降低企业级编程开发的复杂性。该框架基于简单性、可测试性和松耦合性设计理念,提供核心容器、应用上下文、数据访问集成等模块,支持整合Hibernate、Struts等第三方框架,其适用范围不仅限于服务器端开发,绝大多数Java应用均可从中受益。

Rocky Linux

Rocky Linux

Rocky Linux(中文名:洛基)是由Gregory Kurtzer于2020年12月发起的企业级Linux发行版,作为CentOS稳定版停止维护后与RHEL(Red Hat Enterprise Linux)完全兼容的开源替代方案,由社区拥有并管理,支持x86_64、aarch64等架构。其通过重新编译RHEL源代码提供长期稳定性,采用模块化包装和SELinux安全架构,默认包含GNOME桌面环境及XFS文件系统,支持十年生命周期更新。

WebStorm

WebStorm

WebStorm 是jetbrains公司旗下一款JavaScript 开发工具。目前已经被广大中国JS开发者誉为“Web前端开发神器”、“最强大的HTML5编辑器”、“最智能的JavaScript IDE”等。与IntelliJ IDEA同源,继承了IntelliJ IDEA强大的JS部分的功能。

用户登录
用户注册