iOS - Phone 电话
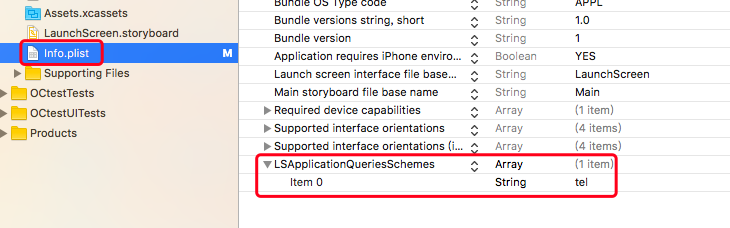
1、调用电话 1.1 拨打系统电话 调用系统自带的打电话程序,要跳转到打电话程序,打完电话自动跳转回来。 在 iOS9.0 + 系统隐私控制里禁止查询设备中已安装的 App,所以在 iOS9.0 + 系统中要实现应用间跳转还需要配置协议白名单。在发起跳转的 App 的 Info.plist 文件中增加一个 LSApplicationQueriesSchemes 字段,把它设置为数组类型,并配置需要跳转的协议名单。 URL 地址:tel://电话号码 iOS 系统版本 < 10.0 NSURL *url = [NSURL URLWithString:@"tel://10086"]; if ([[UIApplication sharedApplication] canOpenURL:url]) { [[UIApplication sharedApplication] openURL:url]; } else { NSLog(@"没有安装应用"); } iOS 系统版本 >= 10.0 NSURL *url = [NSURL URLWithString:@"tel://10086"]; if ([[UIApplication sharedApplication] canOpenURL:url]) { [[UIApplication sharedApplication] openURL:url options:@{} completionHandler:nil]; } else { NSLog(@"没有安装应用"); } 1.2 拨打电话 在应用内部打电话,不需要跳出程序,完全在自己的程序中,打完电话自动跳转回来。 UIWebView *callWebView = [[UIWebView alloc] init]; NSURL *url = [NSURL URLWithString:@"tel:10086"]; [callWebView loadRequest:[NSURLRequest requestWithURL:url]]; [self.view addSubview:callWebView]; 2、调用短信 2.1 调用系统短信 调用系统自带的信息程序,要跳转到信息程序,发完短信后不会跳转回来。 在 iOS9.0 + 系统隐私控制里禁止查询设备中已安装的 App,所以在 iOS9.0 + 系统中要实现应用间跳转还需要配置协议白名单。在发起跳转的 App 的 Info.plist 文件中增加一个 LSApplicationQueriesSchemes 字段,把它设置为数组类型,并配置需要跳转的协议名单。 URL 地址:sms://电话号码 iOS 系统版本 < 10.0 NSURL *url = [NSURL URLWithString:@"sms://10086"]; if ([[UIApplication sharedApplication] canOpenURL:url]) { [[UIApplication sharedApplication] openURL:url]; } else { NSLog(@"没有安装应用"); } iOS 系统版本 >= 10.0 NSURL *url = [NSURL URLWithString:@"sms://10086"]; if ([[UIApplication sharedApplication] canOpenURL:url]) { [[UIApplication sharedApplication] openURL:url options:@{} completionHandler:nil]; } else { NSLog(@"没有安装应用"); } 2.2 带内容发送短信 在应用内部发送短信,不需要跳出程序,完全在自己的程序中,发送短信后自动跳转回来。可以在程序中设置发送的短信内容。 添加 MessageUI.framework 框架。 在发起发送短信的视图控制器中 // 引入头文件 #import <MessageUI/MessageUI.h> // 遵守协议 <MFMessageComposeViewControllerDelegate> 发送短信 if ([MFMessageComposeViewController canSendText]) { MFMessageComposeViewController *messageVC = [[MFMessageComposeViewController alloc] init]; messageVC.messageComposeDelegate = self; // 设置电话号码 messageVC.recipients = @[@"10086"]; // 设置短信内容 messageVC.body = @"话费余额"; // 调用系统发送短信界面 [self presentViewController:messageVC animated:YES completion:nil]; } 处理发送响应结果 // MFMessageComposeViewControllerDelegate 协议方法 - (void)messageComposeViewController:(MFMessageComposeViewController *)controller didFinishWithResult:(MessageComposeResult)result { [self dismissViewControllerAnimated:YES completion:nil]; if (result == MessageComposeResultCancelled) { NSLog(@"Message cancelled"); } else if (result == MessageComposeResultSent) { NSLog(@"Message sent"); } else { NSLog(@"Message failed"); } } 3、调用邮件 3.1 发送系统邮件 调用系统自带的邮件程序,要跳转到邮件程序,发完邮件后不会跳转回来。 在 iOS9.0 + 系统隐私控制里禁止查询设备中已安装的 App,所以在 iOS9.0 + 系统中要实现应用间跳转还需要配置协议白名单。在发起跳转的 App 的 Info.plist 文件中增加一个 LSApplicationQueriesSchemes 字段,把它设置为数组类型,并配置需要跳转的协议名单。 URL 地址:mailto://邮件地址 iOS 系统版本 < 10.0 NSURL *url = [NSURL URLWithString:@"mailto://qq0228@163.com"]; if ([[UIApplication sharedApplication] canOpenURL:url]) { [[UIApplication sharedApplication] openURL:url]; } else { NSLog(@"没有安装应用"); } iOS 系统版本 >= 10.0 NSURL *url = [NSURL URLWithString:@"mailto://qq0228@163.com"]; if ([[UIApplication sharedApplication] canOpenURL:url]) { [[UIApplication sharedApplication] openURL:url options:@{} completionHandler:nil]; } else { NSLog(@"没有安装应用"); } 3.2 带内容发送邮件 在应用内部发送邮件,不需要跳出程序,完全在自己的程序中,发送邮件后自动跳转回来。可以在程序中设置发送的邮件内容。 添加 MessageUI.framework 框架。 在发起发送邮件的视图控制器中 // 引入头文件 #import <MessageUI/MessageUI.h> // 遵守协议 <MFMailComposeViewControllerDelegate> 发送邮件 if ([MFMailComposeViewController canSendMail]) { MFMailComposeViewController *mailVC = [[MFMailComposeViewController alloc] init]; mailVC.mailComposeDelegate = self; // 设置邮箱 [mailVC setToRecipients:@[@"qq0228@163.com"]]; // 设置邮件主题 [mailVC setSubject:@"Hello"]; // 设置邮件内容 [mailVC setMessageBody:@"Lorem ipsum dolor sit amet" isHTML:NO]; // 调用系统发送邮件界面 [self presentViewController:mailVC animated:YES completion:nil]; } 处理发送响应结果 // MFMailComposeViewControllerDelegate 协议方法 - (void)mailComposeController:(MFMailComposeViewController *)controller didFinishWithResult:(MFMailComposeResult)result error:(NSError *)error { [self dismissViewControllerAnimated:YES completion:nil]; if (result == MFMailComposeResultCancelled) { NSLog(@"Message cancelled"); } else if (result == MFMailComposeResultSent) { NSLog(@"Message sent"); } else if (result == MFMailComposeResultSaved) { NSLog(@"Message saved"); } else { NSLog(@"Message failed"); } } 4、调用地图 4.1 调用系统地图 在 iOS9.0 + 系统隐私控制里禁止查询设备中已安装的 App,所以在 iOS9.0 + 系统中要实现应用间跳转还需要配置协议白名单。在发起跳转的 App 的 Info.plist 文件中增加一个 LSApplicationQueriesSchemes 字段,把它设置为数组类型,并配置需要跳转的协议名单。 URL 地址:maps:// iOS 系统版本 < 10.0 NSURL *url = [NSURL URLWithString:@"maps://"]; if ([[UIApplication sharedApplication] canOpenURL:url]) { [[UIApplication sharedApplication] openURL:url]; } else { NSLog(@"没有安装应用"); } iOS 系统版本 >= 10.0 NSURL *url = [NSURL URLWithString:@"maps://"]; if ([[UIApplication sharedApplication] canOpenURL:url]) { [[UIApplication sharedApplication] openURL:url options:@{} completionHandler:nil]; } else { NSLog(@"没有安装应用"); } 5、调用浏览器 51 调用系统浏览器 在 iOS9.0 + 系统隐私控制里禁止查询设备中已安装的 App,所以在 iOS9.0 + 系统中要实现应用间跳转还需要配置协议白名单。在发起跳转的 App 的 Info.plist 文件中增加一个 LSApplicationQueriesSchemes 字段,把它设置为数组类型,并配置需要跳转的协议名单。 URL 地址:http://网址 或:https://网址 iOS 系统版本 < 10.0 NSURL *url = [NSURL URLWithString:@"http://www.baidu.com"]; if ([[UIApplication sharedApplication] canOpenURL:url]) { [[UIApplication sharedApplication] openURL:url]; } else { NSLog(@"没有安装应用"); } iOS 系统版本 >= 10.0 NSURL *url = [NSURL URLWithString:@"http://www.baidu.com"]; if ([[UIApplication sharedApplication] canOpenURL:url]) { [[UIApplication sharedApplication] openURL:url options:@{} completionHandler:nil]; } else { NSLog(@"没有安装应用"); } 6、调用应用商店 6.1 调用系统应用商店 找到应用程序的描述链接,然后将 http:// 替换为 itms:// 或者 itms-apps://。比如: http://itunes.apple.com/gb/app/yi-dong-cai-bian/id391945719?mt=8 itms-apps://itunes.apple.com/gb/app/yi-dong-cai-bian/id391945719?mt=8 itms://itunes.apple.com/gb/app/yi-dong-cai-bian/id391945719?mt=8 URL 地址:itms-apps://网址 或:itms://网址 itms-apps:// // 调用系统 App Store 应用 itms:// // 调用系统 iTunes Store 应用 iOS 系统版本 < 10.0 NSURL *url = [NSURL URLWithString:@"itms-apps://itunes.apple.com/gb/app/yi-dong-cai-bian/id391945719?mt=8"]; if ([[UIApplication sharedApplication] canOpenURL:url]) { [[UIApplication sharedApplication] openURL:url]; } else { NSLog(@"没有安装应用"); } iOS 系统版本 >= 10.0 NSURL *url = [NSURL URLWithString:@"itms-apps://itunes.apple.com/gb/app/yi-dong-cai-bian/id391945719?mt=8"]; if ([[UIApplication sharedApplication] canOpenURL:url]) { [[UIApplication sharedApplication] openURL:url options:@{} completionHandler:nil]; } else { NSLog(@"没有安装应用"); } 7、保存图片到相册 设置系统访问相册权限 保存图片到相册 // 将图片存储到相册中 UIImageWriteToSavedPhotosAlbum(image, nil, nil, nil); // 将图片存储到相册中,完成后调用指定的方法 UIImageWriteToSavedPhotosAlbum(image, self, @selector(image:didFinishSavingWithError:contextInfo:), nil); // 保存完成后调用的方法,必须为这个方法 - (void)image:(UIImage *)image didFinishSavingWithError:(NSError *)error contextInfo:(void *)contextInfo { } 8、访问通讯录 详细讲解见 iOS - Contacts 通讯录 9、获取 wifi 信息 9.1 获取 wifi 名称信息 具体实现代码见 GitHub 源码 QExtension #import <SystemConfiguration/CaptiveNetwork.h> NSString * const BSSIDKey = @"BSSID"; NSString * const SSIDKey = @"SSID"; NSString * const SSIDDATAKey = @"SSIDDATA"; // 获取当前 Wifi 信息 + (NSDictionary *)q_getCurrentWifiInfo { NSDictionary *wifiDic = [NSDictionary dictionary]; CFArrayRef arrayRef = CNCopySupportedInterfaces(); if (arrayRef != nil) { CFDictionaryRef dicRef = CNCopyCurrentNetworkInfo(CFArrayGetValueAtIndex(arrayRef, 0)); CFRelease(arrayRef); if (dicRef != nil) { wifiDic = (NSDictionary *)CFBridgingRelease(dicRef); } } return wifiDic; } // 获取当前 Wifi 信息 NSDictionary *wifiInfo = [NSDictionary q_getCurrentWifiInfo]; NSLog(@"%@", wifiInfo); NSString *bssid = wifiInfo[BSSIDKey]; NSString *ssid = wifiInfo[SSIDKey]; NSString *ssidData = [[NSString alloc] initWithData:wifiInfo[SSIDDATAKey] encoding:NSUTF8StringEncoding]; NSLog(@"%@\n %@\n %@", bssid, ssid, ssidData); 9.2 获取 IP 地址 具体实现代码见 GitHub 源码 QExtension #import <arpa/inet.h> #import <ifaddrs.h> // 获取本地 IP 地址 + (NSString *)q_getIPAddress { NSString *address = @"error"; struct ifaddrs *interfaces = NULL; struct ifaddrs *temp_addr = NULL; int success = 0; // retrieve the current interfaces - returns 0 on success success = getifaddrs(&interfaces); if (success == 0) { // Loop through linked list of interfaces temp_addr = interfaces; while (temp_addr != NULL) { if (temp_addr->ifa_addr->sa_family == AF_INET) { // Check if interface is en0 which is the wifi connection on the iPhone if ([[NSString stringWithUTF8String:temp_addr->ifa_name] isEqualToString:@"en0"]) { // Get NSString from C String address = [NSString stringWithUTF8String:inet_ntoa(((struct sockaddr_in *)temp_addr->ifa_addr)->sin_addr)]; } } temp_addr = temp_addr->ifa_next; } } // Free memory freeifaddrs(interfaces); return address; } // 获取本地 IP 地址 NSString *ipStr = [NSString q_getIPAddress]; NSLog(@"%@", ipStr);