首页 文章 精选 留言 我的

精选列表

搜索[计算机基础],共10007篇文章
优秀的个人博客,低调大师

从短句到长文,计算机如何学习阅读理解

(从左至右:崔磊、韦福如、周明、杨南) 在电影《她(HER)》中有这样一幕:主人公是一位信件撰写人,人工智能操作系统萨曼莎在得到他的允许后阅读他的邮件资料,总结出需要保留和删除的邮件,帮助他修改信件草稿中的错字,并且与他探讨她喜爱的信件片段。与此同时,萨曼莎通过阅读主人公的海量信息来了解他,也通过阅读互联网上的海量数据来了解世界。阅读这项人类的基本能力,在众多科幻作品中也成了人工智能的入门标配。 尽管人工智能的热点此起彼伏,但毫无疑问的是,自然语言处理始终是实现智能、自然人机交互愿景里一块重要的技术基石。而机器阅读理解则可以被视为是自然语言处理领域皇冠上的明珠,也是目前该领域的研究焦点之一。 做机器阅读理解研究的学者想必对由斯坦福大学自然语言计算组发起的SQuAD(Stanford Question Answering Datase

优秀的个人博客,低调大师

OSPF基础概述

一、OSPF协议简介 OSPF(Open Shortest Path First,开放最短路径优先)是IETF(Internet Engineering Task Force,互联网工程任务组)组织开发的一个基于链路状态的内部网关协议。工作在IP层,协议号89。 二、RIP的缺陷 1. 最大跳数限制了网络规模(15跳) 2. 以跳数为度量值无法准确判断最优路径 3. 路由更新发送完整路由表消耗网络带宽 4. 收敛速度慢 5. 协议会产生路由自环 三、OSPF初始化流程 1. 建立邻居和邻接关系 1.1 发送hello报文发现和建立邻居关系,组播地址224.0.0.5 说明:必须满足:接口UP;双方接口IP地址在同一网段;双方接口在同一区域等条件。 1.2 选举DR/BDR,建立邻接关系 备注:DR(Designated Router,指定路由器) BDR(Backup Designated Router,备份指定路由器) 选举原因:使路由信息交换更加高速有序 选举范围:每条广播链路(每一个网段)上都需要选举出一个DR和一个BDR 选举规则:(1)优先级数字大的优先,默认优先级都是1;(2)Router-id大的优先 Router-id:定义,Rid,标识路由器的身份;产生方法:(1)手动配置一个IPv4地址格式作为Rid;(2)自动选举,1.在所有环回口中选举IP地址最大的作为Rid;2.在所有物理接口中选举IP地址最大的作为Rid 建议手动配置一个本地环回口的IP地址作为Rid 关系状态:DRother与DR建立邻接关系;DRother与BDR建立邻接关系;DR与BDR建立邻接关系;两个DRother之间保持邻居关系 说明:DRother:既不是DR路由器也不是BDR路由器,剩下的同网段其它路由器 2. 邻接路由器之间交换链路状态信息,实现区域内链路状态数据库同步 备注:邻居关系的路由器不参与链路状态信息交换 相关概念: 链路状态通告:LSA,用来描述路由器的接口、路由条目的相关信息 链路状态数据库:LSDB,存储本地所有LSA 工作流程: (1)向邻接路由器发送DD报文,通告本地LSDB中所有LSA的摘要信息; (2)收到DD后,与本地LSDB对比,向对方发送LSR报文,请求发送本机所需的LSA的完整信息 (3)收到LSR后,把对方所需的LSA的完整信息打包为一条LSU报文,发送至对方 (4)收到LSU后,向对方回复LSAck报文,进行确认 说明:可以看出OSPF路由更新不会发送完整路由表,因此消耗网络带宽较低。 3. 每台路由器根据本机链路状态数据库,计算到达每个目的网段的最优路由,写入路由表 说明:可以看出OSPF路由更新不会发送完整路由表,因此消耗网络带宽较低 四、OSPF报文类型 (1)Hello报文,周期性发送,用来发现和维持OSPF邻居关系;进行DR、BDR的选举 (2)DD报文(Database Description,数据库描述),用于描述本地LSDB中所有LSA的摘要,用于两台路由器进行数据库同步 (3)LSR报文(Link State Request,链路状态请求),向对方请求所需的LSA。两台路由器互相交换DD报文之后,得知对端的路由器有哪些LSA是本地的LSDB所缺少的,这时需要发送LSR报文向对方请求所需的LSA (4)LSU报文(Link State Update,链路状态更新),向对方发送其所需要的LSA (5)LSAck报文(Link State Acknowledgment,链路状态确认),用来对收到的LSA进行确认 五、OSPF分区域管理 1.分区域的原因 加快收敛速度;把网络故障隔离在区域内部 说明:分区后,邻居、邻接关系的建立在各自区域内进行,所以可以加快收敛速度。划分区域后,可以在区域边界路由器上进行路由聚合,以减少通告到其他区域的LSA数量,还可以将网络拓扑变化带来的影响最小化(本区域的OSPF链路故障不会通告到其它区域) 2. 路由器角色 IR(内部路由器),所有接口都处于同一个区域 ABR(区域边界路由器),连接不同区域的路由器 ASBR(自治系统边界路由器),连接外部自治系统的路由器 OSPF分区图示: 3. 区域类型 骨干区域,只能有一个骨干区域,一般是区域0;骨干区域必须是连续的 非骨干区域,非骨干区域必须连接到骨干区域 说明:这样规定的原因主要是为了防环 五、OSPF常用命令 (1)[h3c]ospf 'process id' router-id 'rid' 开启OSPF进程,指定Router-id,进入OSPF协议视图 (2)[h3c-ospf-1]area 'area id' 进入区域视图 (3)[h3c-ospf-1-area 0.0.0.0]network 'ip address' 'wild-mask' 宣告网段 说明:wild-mask(掩码通配符),0对应的部分需要匹配一致,1对应的部分不检查,与子网掩码没有半毛钱关系 (4)[h3c-ospf-1]slient-interface 'interface id' 配置静默接口,OSPF不会在向静默接口上收发协议报文(与RIP静默接口目的一样) (5)[h3c]display ospf peer 查看OSPF邻居关系,FULL:表示邻接关系;2-Way:表示邻居关系 (6)[h3c]display ospf routing 查看OSPF路由 六、OSPF配置实例 1. 配置拓扑 2.配置需求 (1)按照图示配置 IP 地址; (2)按照图示分区域配置 OSPF ,实现全网互通; (3)为了路由结构稳定,要求路由器使用环回口作为 Router-id,ABR 的环回口宣告进骨干区域; 3.配置步骤 (1)按照拓扑所示,配置IP地址 [R1]intLoopBack0 [R1-LoopBack0]ipa1.1.1.132 [R1-LoopBack0]intg0/0 [R1-GigabitEthernet0/0]ipa20.1.1.124 [R1-GigabitEthernet0/0]intg0/2 [R1-GigabitEthernet0/2]ipa10.1.1.224 [R1-GigabitEthernet0/2]quit [R1] [R2]intLoopBack0 [R2-LoopBack0]ipa2.2.2.232 [R2-LoopBack0]intg0/0 [R2-GigabitEthernet0/0]ipa20.1.1.224 [R2-GigabitEthernet0/0]intg0/1 [R2-GigabitEthernet0/1]ipa30.1.1.124 [R2-GigabitEthernet0/1]quit [R2] [R3]interfaceLoopBack0 [R3-LoopBack0]ipa3.3.3.332 [R3-LoopBack0]intg0/1 [R3-GigabitEthernet0/1]ipa30.1.1.224 [R3-GigabitEthernet0/1]intg0/2 [R3-GigabitEthernet0/2]ipa40.1.1.124 [R3-GigabitEthernet0/2]quit [R3] [R4]intLoopBack0 [R4-LoopBack0]ipa4.4.4.432 [R4-LoopBack0]intg0/2 [R4-GigabitEthernet0/2]ipa10.1.1.124 [R4-GigabitEthernet0/2]quit [R4] [R5]intLoopBack0 [R5-LoopBack0]ipa5.5.5.532 [R5-LoopBack0]intg0/2 [R5-GigabitEthernet0/2]ipa40.1.1.224 [R5-GigabitEthernet0/2]quit [R5] (2)按照图示分区域配置 OSPF ,实现全网互通 说明:1. 创建ospf进程可以手动指定router-id,也可以不指定自动生成 2.环回口可以宣告进ospf,也可以不宣告,不影响业务互通;宣告时可以宣告进骨干区域,也可以宣告非骨干区域。有选择困难的建议宣告到骨干区域 [R1]ospf1router-id1.1.1.1 [R1-ospf-1]area0 [R1-ospf-1-area-0.0.0.0]network20.1.1.10.0.0.255 [R1-ospf-1-area-0.0.0.0]network1.1.1.10.0.0.0 [R1-ospf-1-area-0.0.0.0]disthis # area0.0.0.0 network1.1.1.10.0.0.0 network20.1.1.00.0.0.255 # [R1-ospf-1-area-0.0.0.0]quit [R1-ospf-1]area1 [R1-ospf-1-area-0.0.0.1]network10.1.1.20.0.0.255 [R1-ospf-1-area-0.0.0.1]disthis # area0.0.0.1 network10.1.1.00.0.0.255 # [R1-ospf-1-area-0.0.0.1]quit [R1-ospf-1]quit [R1] [R2]ospf1router-id2.2.2.2 [R2-ospf-1-area-0.0.0.0]network2.2.2.20.0.0.0 [R2-ospf-1-area-0.0.0.0]network20.1.1.20.0.0.255 [R2-ospf-1-area-0.0.0.0]network30.1.1.10.0.0.255 [R2-ospf-1-area-0.0.0.0]disthis # area0.0.0.0 network2.2.2.20.0.0.0 network20.1.1.00.0.0.255 network30.1.1.00.0.0.255 # return R2-ospf-1-area-0.0.0.0] quit [R2-ospf-1]quit [R2] [R3]ospf1router-id3.3.3.3 [R3-ospf-1]area0 [R3-ospf-1-area-0.0.0.0]network3.3.3.30.0.0.0 [R3-ospf-1-area-0.0.0.0]network30.1.1.20.0.0.255 [R3-ospf-1-area-0.0.0.0]quit [R3-ospf-1]area2 [R3-ospf-1-area-0.0.0.2]network40.1.1.10.0.0.255 [R3-ospf-1-area-0.0.0.2]quit [R3-ospf-1]quit [R3] [R4]ospf1router-id4.4.4.4 [R4-ospf-1]area1 [R4-ospf-1-area-0.0.0.1]network4.4.4.40.0.0.0 [R4-ospf-1-area-0.0.0.1]network10.1.1.10.0.0.255 [R4-ospf-1-area-0.0.0.1]disthis # area0.0.0.1network4.4.4.40.0.0.0 network10.1.1.00.0.0.255 # return [R4-ospf-1-area-0.0.0.1]quit [R4-ospf-1]quit [R4] [R5]ospf1router-id5.5.5.5 [R5-ospf-1]area2 [R5-ospf-1-area-0.0.0.2]network5.5.5.50.0.0.0 [R5-ospf-1-area-0.0.0.2]network40.1.1.20.0.0.255 [R5-ospf-1]quit [R5] (3)检查是否全网互通 说明:检查 OSPF 是否全网互通,一个是检查邻居关系表,看邻居关系是否正常;另一个是检查路由表,看是否学习到全网路由 这里只展示 R1 的检查结果 检查邻居关系 说明:可以看到,R1 已经学习到了全网所有网段的路由信息,配置完成。 附: 关注我,加微信,获取此次配置工程、更多配置案例,也可以承接远程调试各厂商交换机、路由器、防火墙等私活,欢迎各位老板加微信私聊。

优秀的个人博客,低调大师

Django基础6

1.模板的继承(使用频率较高) 2.模板的导入 3.数据库正向与反向迁移 4.单表查询前期准备 5.django脚本环境 6.单表查询关键字 7.单表查询之神奇的双下线查询 8.多表查询之外键字段的增删改查 1.模板的继承(使用频率较高) 需求: 页面主体不变 部分区域变化 模板继承1.需要现在母版中使用block提前划定区域 {% block 区域名称 %} {% endblock %} 2.在子版中先继承再局部替换 {% extends '母版.html' %} {% block 区域名称 %} {% endblock %} 总结母版一般情况下都应该至少含有三个区域 1.css区域 2.content区域 3.js区域 补充{{ block.super }} 调用母版内容 2.模板的导入(了解) {% include 'myform.html' %} 3.数据库正向与反向迁移 正向迁移(将django中的类导入到MySQL中变成表) python3 manage.py makemigrations python3 manage.py migrate 反向迁移inspectdb 4.单表查询预备知识 from django.db import models # Create your models here. class Books(models.Model): title = models.CharField(max_length=32) price = models.DecimalField(max_digits=8,decimal_places=2) # 日期类型 publish_time = models.DateField(auto_now_add=True) """ auto_now:每次修改数据之后都会自动更新当前时间 auto_now_add:第一次创建数据的时候自动记录时间 """ # publish_time = models.DateTimeField() def __str__(self): return self.title # 只能返回字符串类型的数据 class Book(models.Model): title = models.CharField(max_length=32) price = models.DecimalField(max_digits=8, decimal_places=2) # 日期类型 publish_time = models.DateField(auto_now_add=True) publish = models.ForeignKey(to='Publish') authors = models.ManyToManyField(to='Author') def __str__(self): return self.title # 只能返回字符串类型的数据 class Publish(models.Model): title = models.CharField(max_length=32) addr = models.CharField(max_length=64) def __str__(self): return self.title class Author(models.Model): name = models.CharField(max_length=32) age = models.IntegerField() author_detail = models.OneToOneField(to='AuthorDetail') def __str__(self): return self.name class AuthorDetail(models.Model): phone = models.BigIntegerField() addr = models.CharField(max_length=64) def __str__(self): return self.addr 5.django脚本环境 django默认情况下是不允许单独使用某个功能部分(models.py) 解决方法: 1.要么自己新建一个py文件 2.要么使用自带的tests文件 import os if __name__ == "__main__": os.environ.setdefault("DJANGO_SETTINGS_MODULE", "day47.settings") import django django.setup() 6.单表查询关键字 # 增 1.create() # models.Books.objects.create(title='三国演义',price=456.23) # models.Books.objects.create(title='水浒传',price=876.45) # models.Books.objects.create(title='聊斋志异',price=123.69) # models.Books.objects.create(title='草堂笔记',price=456.96) # 查 2.all() # res = models.Books.objects.all() # print(res) # QuerySet对象 # print(res.query) # 只要是QuerySet对象就可以点query查看内部SQL语句 # 查 3.filter() # res1 = models.Books.objects.filter() # pk特指当前表的主键字段 # print(res1) # QuerySet对象 # print(res1.query) # print(res1.first()) # 获取列表中第一个数据对象 # print(res1.last()) # 获取列表中最后一个数据对象 # 4.values与5.values_list # res2 = models.Books.objects.values('title','price') # print(res2) # QuerySet对象 可以看成列表套字典 # print(res2.query) # res3 = models.Books.objects.values_list('title','price') # print(res3) # QuerySet对象 可以看成列表套元祖 # print(res3.query) # 6.查 get() 不推荐使用 # res4 = models.Books.objects.get(pk=1) # print(res4) # 数据对象 # res5 = models.Books.objects.get(pk=100) # print(res5) # 数据对象 # res6 = models.Books.objects.filter(pk=100) # print(res6) # 数据对象 # 7.取反 exclude() # res7 = models.Books.objects.exclude(pk=1) # print(res7) # QuerySet # print(res7.query) # 8.排序 order_by() 默认是升序(asc) 字段前面加负号降序(desc) # res8 = models.Books.objects.order_by('price') # res8 = models.Books.objects.order_by('-price') # select * from books order by price desc,price asc; # res8 = models.Books.objects.order_by('-price','price') # print(res8) # QuerySet对象 # print(res8.query) # 9.反转 reverse() 必须先有顺序才可以反转 # res9 = models.Books.objects.all() # res9 = models.Books.objects.order_by('price').reverse() # print(res9) # 10.去重 distinct() # res10 = models.Books.objects.all().distinct() # res10 = models.Books.objects.values('title','price').distinct() # print(res10) # 11.计数 count() # res11 = models.Books.objects.count() # print(res11) # 6 # 12.判断是否有数据 exists() # res12 = models.Books.objects.filter(pk=999).exists() # print(res12) # False # 13.update() # 14.delete() 7.单表查询之神奇的双下划线 # 查询筛选价格的书籍 # res = models.Books.objects.filter(price__gt=200) # print(res) # res1 = models.Books.objects.filter(price__lt=200) # print(res1) # res2 = models.Books.objects.filter(price__gte=456.23) # print(res2) # res3 = models.Books.objects.filter(price__lte=456.23) # print(res3) # 成员运算 # res4 = models.Books.objects.filter(price__in=(456.23,111)) # print(res4) # 范围查询 # res5 = models.Books.objects.filter(price__range=(100,456.23)) # print(res5) # 模糊查询 # 查询书籍名称中含有字母a的书 # res6 = models.Books.objects.filter(title__contains='a') # print(res6) # 区分 # res7 = models.Books.objects.filter(title__icontains='a') # print(res7) # 忽略大小写 # 日期相关 # 查看出版月份是五月的书 # res8 = models.Books.objects.filter(publish_time__month=5) # print(res8) # print(res8.query) # res9 = models.Books.objects.filter(publish_time__year=2021) # print(res9) 8.多表查询之外键字段增删改查 # 增 # models.Book.objects.create(title='三国演义',price=345.43,publish_id=1) # models.Book.objects.create(title='红楼梦',price=678.31,publish_id=2) # publish_obj = models.Publish.objects.filter(pk=2).first() # models.Book.objects.create(title='三国演义',price=345.43,publish=publish_obj) # models.Book.objects.create(title='七龙珠',price=908.43,publish=publish_obj) # 改 # models.Book.objects.filter(pk=2).update(publish_id=1) # models.Book.objects.filter(pk=2).update(publish=publish_obj) # 删 级联更新级联删除 # models.Publish.objects.filter(pk=1).delete() # 多对多 book_obj = models.Book.objects.filter(pk=3).first() # 绑定关系 # book_obj.authors.add(1) # 去书与作者的关系表中绑定关系 # book_obj.authors.add(1,2) # 去书与作者的关系表中绑定关系 # book_obj.authors.add(author_obj1) # book_obj.authors.add(author_obj1,author_obj2) # 修改关系 # book_obj.authors.set([1,]) # book_obj.authors.set([1,2]) # book_obj.authors.set([author_obj,]) # book_obj.authors.set([author_obj1,author_obj2]) # 移除关系 # book_obj.authors.remove(1) # book_obj.authors.remove(1,2) # book_obj.authors.remove(author_obj,) # book_obj.authors.remove(author_obj1,author_obj2) # 清空关系 book_obj.authors.clear()

优秀的个人博客,低调大师

Springboot日志基础

Springboot配置日志配置文件位置 logging.config: classpath:logging/logback.yml Springboot日志分类 log4j: 是apache实现的一个开源日志组件 logback: 同样是由log4j的作者设计完成的,拥有更好的特性,用来取代log4j的一个日志框架,是slf4j的原生实现 log4j2: 是log4j 1.x和logback的改进版,采用了一些新技术(无锁异步、等等),使得日志的吞吐量、性能比log4j 1.x提高10倍,并解决了一些死锁的bug,而且配置更加简单灵活 slf4j+log4j和直接用log4j的区别 slf4j是对所有日志框架制定的一种规范、标准、接口,并不是一个框架的具体的实现,因为接口并不能独立使用,需要和具体的日志框架实现配合使用(如log4j、logback),使用接口的好处是当项目需要更换日志框架的时候,只需要更换jar和配置,不需要更改相关java代码。 import org.slf4j.Logger; import org.slf4j.LoggerFactory; public class TestSlf4j { //Logger和LoggerFactory导入的是org.slf4j包 private final static Logger logger = LoggerFactory.getLogger(TestSlf4j.class); } log4j、logback、log4j2都是一种日志具体实现框架,所以既可以单独使用也可以结合slf4j一起搭配使用 import org.apache.logging.log4j.LogManager; import org.apache.logging.log4j.Logger; public class TestLog4j { // Logger和LogManager导入的是org.apache.logging包 private static final Logger LOG = LogManager.getLogger(TestLog4j.class); } 导入需要使用的jar包(slf4j+log4j2) log4j2 如项目中有导入spring-boot-starter-web依赖包记得去掉spring自带的日志依赖spring-boot-starter-logging <dependency> <groupId>org.springframework.boot</groupId> <artifactId>spring-boot-starter-web</artifactId> <exclusions> <exclusion> <groupId>org.springframework.boot</groupId> <artifactId>spring-boot-starter-logging</artifactId> </exclusion> </exclusions> </dependency> springboot项目中需导入log4j2 <dependency> <groupId>org.springframework.boot</groupId> <artifactId>spring-boot-starter-log4j2</artifactId> </dependency> 如果要使用log4j,则把log4j2的坐标替换为下面的这个,依然要排除原有的spring-boot-starter-logging。 <dependency> <groupId>org.springframework.boot</groupId> <artifactId>spring-boot-starter-log4j</artifactId> <version>1.3.8.RELEASE</version> </dependency> Java引入log4j配置文件 class ImportConfig{ public static void main(String[] args) throws IOException { File file = new File(log4j2); BufferedInputStream in = new BufferedInputStream(new FileInputStream(file)); final ConfigurationSource source = new ConfigurationSource(in); Configurator.initialize(null, source); Logger logger = LogManager.getLogger("myLogger"); } } Springboot整合zookeeper log4j2 <dependency> <groupId>org.apache.zookeeper</groupId> <artifactId>zookeeper</artifactId> <version>3.4.14</version> <exclusions> <exclusion> <groupId>org.slf4j</groupId> <artifactId>slf4j-log4j12</artifactId> </exclusion> <exclusion> <groupId>log4j</groupId> <artifactId>log4j</artifactId> </exclusion> </exclusions> </dependency>

优秀的个人博客,低调大师

多线程基础

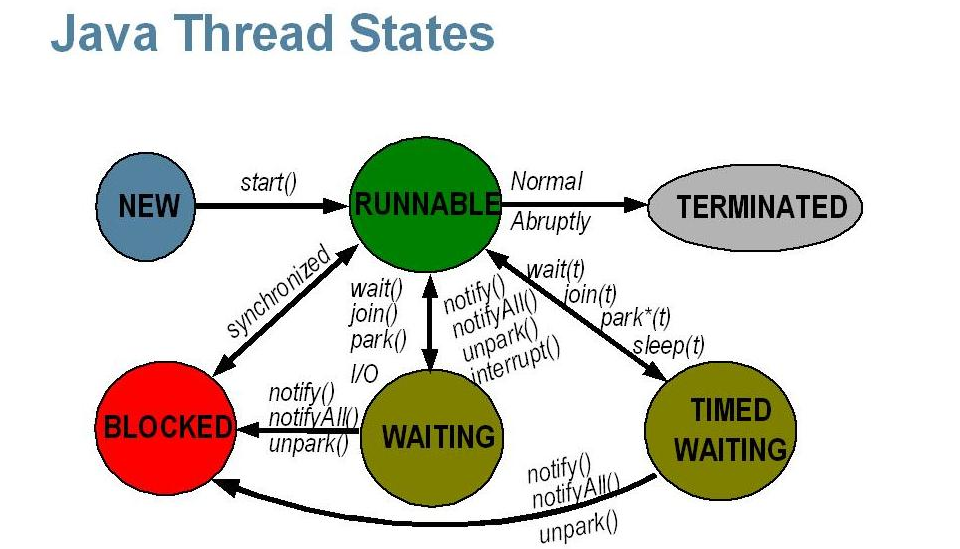
需要了解的概念 并发和并行 并发侧重于任务的交替执行,同一时间只能执行一个任务;而并行是任务的同时执行,统一时间可以有多个任务被执行。 单核CPU与多核CPU下任务表现分别为并发与并行。 临界区 临界区用于表示一种公共资源或是共享数据,可以被多个线程使用,但是同一时间内,只能有一个线程在使用它。一旦临界区资源被占用,其他线程要想使用这个资源,则必须等待。 死锁、饥饿和活锁 死锁 指两个或两个以上的进程(或线程)在执行过程中,因争夺资源而造成的一种互相等待的现象,若无外力作用,它们都将无法推进下去。 饥饿 饥饿是指线程因为种种原因无法获取所需要的资源,导致一直无法执行。比如它的线程优先级可能太低,而高优先级的线程不断抢占他需要的资源。 活锁 当其他线程要使用临界资源时,如果线程主动放弃资源供其他线程使用,而其它线程也主动放弃来使其他线程使用。这样你让我,我让你,最后无论哪个线程都无法使用资源。 线程的状态 Java 线程有6种状态,其定义在Thread.State中: public class Thread implements Runnable { /** * A thread can be in only one state at a given point in time. * These states are virtual machine states which do not reflect any operating system thread states. */ public enum State { /** * Thread state for a thread which has not yet started. */ NEW, /** * Thread state for a runnable thread. A thread in the runnable * state is executing in the Java virtual machine but it may * be waiting for other resources from the operating system such as processor. */ RUNNABLE, /** * Thread state for a thread blocked waiting for a monitor lock. * A thread in the blocked state is waiting for a monitor lock to enter a synchronized block/method or * reenter a synchronized block/method after calling {@link Object#wait() Object.wait}. */ BLOCKED, /** * Thread state for a waiting thread. * A thread is in the waiting state due to calling one of the * following methods: * <ul> * <li>{@link Object#wait() Object.wait} with no timeout</li> * <li>{@link #join() Thread.join} with no timeout</li> * <li>{@link LockSupport#park() LockSupport.park}</li> * </ul> * * <p>A thread in the waiting state is waiting for another thread to * perform a particular action. * * For example, a thread that has called <tt>Object.wait()</tt> * on an object is waiting for another thread to call * <tt>Object.notify()</tt> or <tt>Object.notifyAll()</tt> on * that object. A thread that has called <tt>Thread.join()</tt> * is waiting for a specified thread to terminate. */ WAITING, /** * Thread state for a waiting thread with a specified waiting time. * A thread is in the timed waiting state due to calling one of * the following methods with a specified positive waiting time: * <ul> * <li>{@link #sleep Thread.sleep}</li> * <li>{@link Object#wait(long) Object.wait} with timeout</li> * <li>{@link #join(long) Thread.join} with timeout</li> * <li>{@link LockSupport#parkNanos LockSupport.parkNanos}</li> * <li>{@link LockSupport#parkUntil LockSupport.parkUntil}</li> * </ul> */ TIMED_WAITING, /** * Thread state for a terminated thread. * The thread has completed execution. */ TERMINATED; } } NEW:初始状态,线程被构建,但是还没有调用start方法; RUNNABLED:运行状态,JAVA 线程把操作系统中的就绪和运行两种状态统一称为RUNNABLED; BLOCKED:阻塞状态,例如进入同步锁中; WAITING:等待状态,例如调用Object.wait、Thread.join(with no timeout)、LockSupport.park等; TIME_WAITING:超时等待状态,例如调用Thread.sleep以及带超时间的Object.wait、Thread.join等,超时以后自动返回; TERMINATED:终止状态,表示当前线程执行完毕。 示意图如下: 线程的基本使用 java中多线程使用方式主要为继承Thread类、实现Runnable接口、实现Callable接口。如果使用线程池,可以使用ExecutorService等。 线程的新建 继承Thread 示例: class ThreadDemo extends Thread { public void run() { System.out.println("run"); } public static void main(String[] args) { ThreadDemo threadDemo = new ThreadDemo(); threadDemo.start(); } } Thread类本质上是实现了Runnable接口的一个实例。启动线程的唯一方法就是通过Thread类的 start()实例方法: public class Thread implements Runnable { ... /** * Causes this thread to begin execution; the Java Virtual Machine * calls the <code>run</code> method of this thread. * <p> * The result is that two threads are running concurrently: the * current thread (which returns from the call to the * <code>start</code> method) and the other thread (which executes its * <code>run</code> method). * <p> * It is never legal to start a thread more than once. * In particular, a thread may not be restarted once it has completed * execution. */ public synchronized void start() { ... try { start0(); started = true; } finally {...} } } start()中最终调用了start0(),而start0()是一个native方法,它会启动一个新线程,并在该线程中执行run方法。 start()执行涉及两个线程:当前线程(threadDemo在该线程中调用自己的start())和新的线程(jvm会在该线程中调用run方法,并使其在在该线程中执行)。 值得注意的是,threadDemo直接调用run()不会开启新的线程,因为没有最终调用start0(),此时仅是在当前线程中普通的方法调用;threadDemo直接调用start()则会开启新线程,并让jvm调用run方法在开启的线程中执行。 另外,多次启动线程是不合法的,尤其是线程执行完成后不能重新启动。 实现Runnable接口 如果自己的类已经继承了其它类,无法直接继承Thread,此时可以实现Runnable接口: class ThreadDemo implements Runnable { public void run() { System.out.println("run"); } public static void main(String[] args) { ThreadDemo threadDemo = new ThreadDemo(); new Thread(threadDemo).start(); } } 实现方式虽然变了,但是最终还是要调用start()。 实现Callable接口 当需要新线程提供返回值给主线程时,例如主线程需要依赖该返回值进行后续的处理,此时可以使用Callable方式: class ThreadDemo implements Callable { public String call() { return "run"; } public static void main(String[] args) throws ExecutionException, InterruptedException { FutureTask<String> futureTask = new FutureTask<>(new ThreadDemo()); new Thread(futureTask).start(); String result = futureTask.get(); System.out.println(result); } } Callable和Runnable Callable方式属于Executor框架的功能类,相对于runable体系: 1. callable在任务结束时可以提供返回值,runnable无法提供; 2. run()不能抛出任何检查型异常,但是,非检查型异常会导致线程终止; 3. 运行callable可以拿到future,future能监视目标线程调用call方法的情况,当调用future的get方法以获取结果时,当前线程就会被阻塞,直到call方法结束返回结果。 对于第二条: 检查型异常(Checked Exception):指编译器要检查这类异常,这类异常的发生通常是难以避免的,编译器强制让开发者去解决掉这类异常(通过throws或try-catch),所以称为检查型异常。如果不处理这类异常则不会通过编译。 例如FileNotFoundException,编译器认为文件找不到是不可避免的,如果不处理这些异常,程序将来肯定会出错,此时编译器会提示捕获并处理这种可能发生的异常,不处理就不能通过编译。 非检查型异常(Unchecked Exception):指编译器不会检查这类异常,编译器认为此类异常不是必须处理的,因此即使不处理这类异常,编译器也不会给出错误提示。 例如数组越界、空指针异常等。 run()不能抛出检查型异常,因为接口定义中就没有throws异常: @FunctionalInterface public interface Runnable { public abstract void run(); } 并且throws是向上级调用者抛出异常,主线程调用start()后,是由jvm去调用run()方法的,因此run()的最终调用者是jvm。 但是线程依然有可能抛出unchecked exception,此类异常抛出时会导致线程终止,但是对于主线程和其他线程则完全感知不到该异常的抛出(当然也无法法catch到该异常),且该异常的抛出对主线程和其他线程完全没有影响。 因此,对于Runnable体系的线程,我们不能捕获在线程中出现的异常,因此无论是checked exception还是unchecked exception,run方法内进行try-catch并处理掉,即: class ThreadDemo0 implements Runnable { public void run() throws Exception { // throws Exception会导致编译不通过 System.out.println(1 / 0); } public static void main(String[] args) { try { ThreadDemo0 threadDemo0 = new ThreadDemo0(); new Thread(threadDemo0).start(); } catch (Exception e) { e.printStackTrace(); // 无法catch到除0异常 } } } java5之后,我们可以通过Executor来解决run()抛出的unchecked exception问题。Thread.UncaughtExceptionHandler是java5的新接口,它允许在每一个Thread对象上添加一个异常处理器: public class Thread implements Runnable { /** * Interface for handlers invoked when a <tt>Thread</tt> abruptly * terminates due to an uncaught exception. * <p>When a thread is about to terminate due to an uncaught exception * the Java Virtual Machine will query the thread for its * <tt>UncaughtExceptionHandler</tt> using * {@link #getUncaughtExceptionHandler} and will invoke the handler's * <tt>uncaughtException</tt> method, passing the thread and the * exception as arguments. * If a thread has not had its <tt>UncaughtExceptionHandler</tt> * explicitly set, then its <tt>ThreadGroup</tt> object acts as its * <tt>UncaughtExceptionHandler</tt>. If the <tt>ThreadGroup</tt> object * has no * special requirements for dealing with the exception, it can forward * the invocation to the {@linkplain #getDefaultUncaughtExceptionHandler * default uncaught exception handler}. * * @see #setDefaultUncaughtExceptionHandler * @see #setUncaughtExceptionHandler * @see ThreadGroup#uncaughtException * @since 1.5 */ @FunctionalInterface public interface UncaughtExceptionHandler { /** * Method invoked when the given thread terminates due to the * given uncaught exception. * <p>Any exception thrown by this method will be ignored by the * Java Virtual Machine. */ void uncaughtException(Thread t, Throwable e); } } 当线程因未捕获的异常而将要被终止时,则jvm首先查询当前线程是否有UncaughtExceptionHandler处理器,如果有则使用该处理器的uncaughtException()来处理,并将当前线程及其异常作为参数传递过去; 如果没有该处理器,则查看当前线程所在线程组是否设置了UncaughtExceptionHandler,如果已经设置则使用该线程组的UncaughtExceptionHandler来处理; 否则,通过getUncaughtExceptionHandler获取默认处理器: public UncaughtExceptionHandler getUncaughtExceptionHandler() { return uncaughtExceptionHandler != null ? uncaughtExceptionHandler : group; } 如果上述处理器都不存在,那么jvm将直接在console中打印Exception的StackTrace信息。 线程的停止 线程停止不能使用Thread.stop(),因为该方法是暴力停止,如果业务执行到一半被stop()终止,则可能会导致数据的不一致。 正确的停止方式应该由实际业务决定,例如: class ThreadDemo0 implements Runnable { private static volatile boolean stop = false; private static volatile int i = 0; public void run() { while(!stop) { System.out.println(i++); } } public static void main(String[] args) { new Thread(new ThreadDemo0()).start(); while(true) { if (i == 5) { stop = true; } } } } 实际上Thread提供了线程中断相关的API: public void Thread.interrupt(); public boolean Thread.isInterrupted(); public static boolean Thread.interrupted(); interrupt()用于通知线程中断,也就是设置中断标志位,中断标志位表示当前线程已经被中断了。isInterrupted()用于判断当前线程是否被中断。静态方法interrupted()也是用于判断当前线程的中断状态,但同时会清除当前线程的中断标志位。 class ThreadDemo0 implements Runnable { private static volatile int i = 0; public void run() { while(!Thread.currentThread().isInterrupted()) { System.out.println(i++); } } public static void main(String[] args) { Thread thread = new Thread(new ThreadDemo0()); thread.start(); while(true) { if (i == 5) { thread.interrupt(); break; } } } } 当发生异常时,interrupt标志位会被复位。 线程等待和通知 wait()和notify()、notifyAll()用于多线程之间的协作,这两个方法都属于Object类,这意味着任何对象都能调用这两个方法。 当在一个对象A调用wait()方法后,当前线程就会在这个对象上等待,直到其他线程调用了对象A的notify()或notifyAll()为止。 如果一个线程调用了object.wait(),那么该线程则进入object对象的等待队列。这个队列中可能会存在多个线程,当object.notify()被调用时,它就会从这个等待队列中随机选择一个线程并将其唤醒。如果执行object.notifyAll()则唤醒队列中所有线程。 需要注意的是,wait()、notify()、notifyAll()必须在synchronized代码块中使用,方法执行前都必须获取目标对象的监视器,当wait()执行时会释放当前的监视器并使得当前线程进入阻塞队列,当notify()被调用时,首先要获取到object的监视器,然后才能去唤醒其他线程。 示例: class ThreadDemo { final static Object OBJECT = new Object(); public static class T1 extends Thread { public void run() { synchronized (OBJECT) { try { System.out.println("t1 start"); OBJECT.wait(); System.out.println("t1 end"); } catch (InterruptedException e) {} } } } public static class T2 extends Thread { public void run() { synchronized (OBJECT) { System.out.println("t2 start"); OBJECT.notify(); System.out.println("t2 end"); try { Thread.sleep(2000); } catch (Exception e) {} } } } public static void main(String[] args) { new T1().start(); new T2().start();; } } 上述代码执行时,t1被唤醒后并不能立即执行,因为t2线程sleep了2秒,在这2s内t2并未释放object的监视器,所以在t2线程sleep了2s后,才会输出t1 end。 这三个方法必须在synchronized代码块中执行,因为这些操作都和监视器相关,wait必须要知道获取谁的监视器,而notify需要知道去唤醒等待在哪里的线程,而synchronized可以提供这个监视器。 监视器(monitor)和锁(lock)的关系: 在jvm中,锁的实现方式就是monitor; entermonitor就是获得某个对象的lock(owner是当前线程); leavemonitor就是释放某个对象的lock。 简单的认为,在object中,monitor就是lock。 线程挂起和继续 线程的挂起和继续执行的方法分别是suspend()和resume(),被挂起的线程,必须要等到resume()操作后才能继续执行。但这两个方法已经被废弃了。 因为suspend()在导致线程暂停的同时,并不会去释放任何锁资源。此时,其他任何线程想要访问被它占用的锁时,都会被阻塞。直到对应的线程上进行了resume()操作,被挂起的线程才能继续。但是,如果resume()操作意外地在suspend()前就执行了,那么被挂起的线程可能很难有机会被继续执行。并且它所占用的锁也不会被释放。 而且,对于被挂起的线程,从它的线程状态上看,居然还是Runnable,这也会严重影响我们对系统当前的判断。 线程join和yield join和yield的部分源码: public class Thread implements Runnable { /** * Waits for this thread to die. */ public final void join() throws InterruptedException { join(0); } /** * Waits at most {@code millis} milliseconds for this thread to * die. A timeout of {@code 0} means to wait forever. */ public final synchronized void join(long millis) throws InterruptedException { ... if (millis == 0) { while (isAlive()) { wait(0); } } else { while (isAlive()) { ... wait(delay); ... } } } /** * A hint to the scheduler that the current thread is willing to yield * its current use of a processor. The scheduler is free to ignore this * hint. */ public static native void yield(); } join 当前线程调用其他线程的join方法,会阻塞当前线程,直到其他线程执行完毕,才会继续执行。 join()表示无限期的等待,而join(long millis)则指定等待的最大时间,如果超过最大时间则不再等待该线程,继续执行。 从源码中可以发现,join()方法是通过wait()实现的,而join(long millis)则是通过wait(long timeout)实现的。当millis为0 时,会进入while(isAlive())循环,并且只要子线程是活跃的,宿主线程就不停的等待。 join方法会让宿主线程交出CPU执行权,并放弃占有的锁。 yield 调用yield()会让当前线程交出CPU资源,但是交出CPU资源后,该线程仍然会参与争夺下一轮CPU的使用权。但是,yield()不能控制具体的交出CPU的时间。 调用yield()方法并不会让线程进入阻塞状态,也不会释放锁,而是让线程重回就绪状态,它只需要等待重新得到CPU的执行权就又能继续执行了。 参考:java高并发程序设计

优秀的个人博客,低调大师

linux基础-1

1、常见Linux的发行版有哪些?并描述不同发行版之间的联系与区别SUSEUbuntumintRHELCentOS中标麒麟FedoraArchLinuxGentooAndroid所有版本都有相同的linux内核由不同的组织发行,因为组织不同所以系统的特性也不同2、打印显示当前时间,格式是:20181209211008 date +%G%m%d%N3、实现晚上20:30自动关机,并提示用户shutdown -s 20:304、总结历史命令管理以及用法history命令,可以显示曾经使用过的命令,系统会把历史命令写到用户的家目录下的一个文件里,用户登录后,系统会读取这个文件里的所有历史命令到内存。而history这个命令可以吧历史命令显示出来,显示出来的历史命令前有序号,可以通过!n 的方式执行历史命令5、总结Linux帮助用法linux上有帮助相关的命令有:whatiscommand --helpman and info/usr/share/doc/Red Hat documentation其他途径:网上搜索,与求助

优秀的个人博客,低调大师

kubernetes基础使用

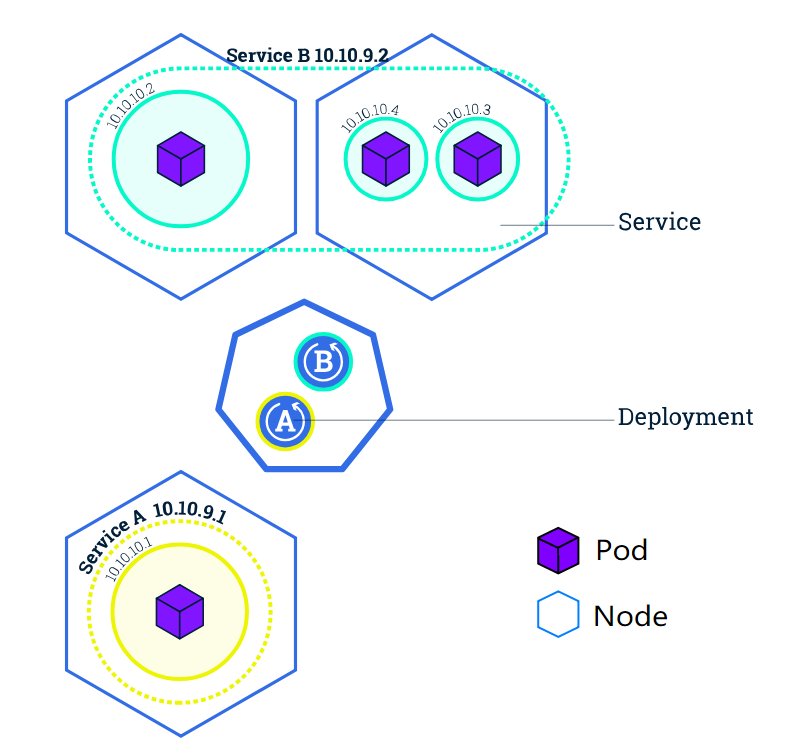
官方文档:https://v1-13.docs.kubernetes.io/zh/docs/tutorials/kubernetes-basics/pods生命周期:https://v1-13.docs.kubernetes.io/docs/concepts/workloads/pods/pod-lifecycle/配置: https://v1-13.docs.kubernetes.io/docs/concepts/configuration/labels: https://v1-13.docs.kubernetes.io/docs/concepts/overview/working-with-objects/labels/Deployments: https://v1-13.docs.kubernetes.io/docs/concepts/workloads/controllers/deployment/Services: https://v1-13.docs.kubernetes.io/docs/concepts/services-networking/service/Scaling: https://v1-13.docs.kubernetes.io/docs/tutorials/kubernetes-basics/scale/scale-intro/autoscale: https://v1-13.docs.kubernetes.io/docs/tasks/run-application/horizontal-pod-autoscale/ #查看k8s版本 kubectl version #查看所有的节点 kubectl get nodes #获取namespace kubectl get namespace #查看namespace为online的pod kubectl get pods --namespace=online #部署应用 kubectl run kubernetes-bootcamp --image=jocatalin/kubernetes-bootcamp:v1 --port=8080 #查看部署应用列表 kubectl get deployments --namespace= #查看所有pod kubectl get pods --namespace= #获取执行中的pod并设置成环境变量POD_NAME export POD_NAME=$(kubectl get pods -o go-template --template '{{range .items}}{{.metadata.name}}{{"\n"}}{{end}}') echo Name of the Pod: $POD_NAME #访问pod curl http://localhost:8001/api/v1/namespaces/default/pods/$POD_NAME/proxy/ kubectl 故障排查 kubectl get pods --namespace= #查看resources列表 kubectl describe pods --namespace= #查看具体的resources情况 kubectl logs $POD_NAME --namespace= #查看pod里的容器日志 kubectl exec --namespace= #在pod里的容器里执行命令 kubectl exec $POD_NAME env --namespace= #查看pod环境变量 kubectl exec -ti $POD_NAME bash --namespace= #进入pod终端 Service & labelsService type 类型 说明 ClusterIP 默认选项,只能集群内部访问 NodePort 使用NAT暴露每个节点的相同端口并使用<NodeIP>:<NodePort> 方式让集群外部访问ClusterIP的超集 LoadBalancer 创建负载均衡器分配一个固定的IPNodePort的超集 ExternalName 使用域名解析的CNAME来指定名字或者手动自定名字不使用proxy 需要v1.7及以上版本的kube-dns 更多的内容参考:https://v1-13.docs.kubernetes.io/docs/tutorials/services/source-ip/ https://v1-13.docs.kubernetes.io/docs/concepts/services-networking/connect-applications-service/ labelsservice通过labels把一组pods管理起来。比如通过labels指定开发、测试、生产环境比如打版本tag使用标签分类 #获取service kubectl get services --namespace= #指定service type kubectl expose deployment/kubernetes-bootcamp --type="NodePort" --port 8080 #查看指定services信息 kubectl describe services/kubernetes-bootcamp --namespace= #设置NODE_PORT端口为环境变量 export NODE_PORT=$(kubectl get services/kubernetes-bootcamp -o go-template='{{(index .spec.ports 0).nodePort}}') echo NODE_PORT=$NODE_PORT #查看部署情况 kubectl describe deployment --namespace= #-l根据label查询pods kubectl get pods -l run=kubernetes-bootcamp --namespace= #-l根据label查询services kubectl get services -l run=kubernetes-bootcamp --namespace= export POD_NAME=$(kubectl get pods -o go-template --template '{{range .items}}{{.metadata.name}}{{"\n"}}{{end}}') echo Name of the Pod: $POD_NAME #设置label,label是key/value对 kubectl label pod $POD_NAME app=v1 #根据label查询pods kubectl get pods -l app=v1 --namespace= #删除service kubectl delete service -l run=kubernetes-bootcamp --namespace= #pod里执行命令 kubectl exec -ti $POD_NAME curl localhost:8080 --namespace= 扩缩容 kubectl get deployments #扩容成4个 kubectl scale deployments/kubernetes-bootcamp --replicas=4 #查看pod是否变成4个 kubectl get pods -o wide #查看deployments详情 kubectl describe deployments/kubernetes-bootcamp #设置环境变量 export NODE_PORT=$(kubectl get services/kubernetes-bootcamp -o go-template='{{(index .spec.ports 0).nodePort}}') echo NODE_PORT=$NODE_PORT #缩容 kubectl scale deployments/kubernetes-bootcamp --replicas=2 滚动升级 #查看deployments kubectl get deployments kubectl get pods kubectl describe pods #滚动升级 kubectl set image deployments/kubernetes-bootcamp kubernetes-bootcamp=jocatalin/kubernetes-bootcamp:v2 #查看升级是否成功 kubectl describe services/kubernetes-bootcamp #查看升级状态 kubectl rollout status deployments/kubernetes-bootcamp #升级一个不存在的版本,让升级失败。 kubectl set image deployments/kubernetes-bootcamp kubernetes-bootcamp=gcr.io/google-samples/kubernetes-bootcamp:v10 #查看pods是否失败 kubectl get pods #查看失败日志 kubectl logs $POD_NAME #回退版本,然后用上面的命令查看是否回退成功 kubectl rollout undo deployments/kubernetes-bootcamp 根据上面的内容部署官网的例子:https://kubernetes.io/docs/tutorials/stateless-application/guestbook/image 从docker hub 上找,先pull下来 #在有问题的node上执行以下命令 查看问题 journalctl -f -u kubelet

优秀的个人博客,低调大师

Javascript基础之-this

this应该算是前期比较容易混淆的一个关键字了,在这里,我就打算按照我的理解来说一下 首先呢,this的值是跟运行时被调用的位置相关的,而不是词法作用域。 也就是说,他的绑定的值很可能是动态的,不同的调用位置,很可能值就不一样,比如说: function foo() { console.log(this.a); } var a = 2; var obj = { a: 3, foo, } foo(); //2 obj.foo(); //3 var c = obj.foo; c(); //2 然后你会惊讶的发现,foo()通过不同的形式调用,他最终的值是不一样的,咱们这一节主要就来讲一讲他们里面的这些绑定的规则 默认绑定 独立的函数调用,它的作用域是作用在全局的,这种绑定规则最常见并且是优先级最低的一种绑定规则。来一个例子 function foo() { console.log(this.a); //2 console.log(this === window); //true } var a = 2; foo(); 在浏览器中执行,会发现,如果foo()作为一个函数单独调用,那么this指向的就是全局对象windows。 但是呢,也有一种例外,如果函数使用的严格模式的话,那么全局对象讲无法使用默认绑定,this将会绑定到undefined,还是刚才的例子: function foo() { "use strict" console.log(this.a); console.log(this === window); } var a = 2; foo(); //Uncaught TypeError: Cannot read property 'a' of undefined 可以看到,foo直接抛出一个error,说this是undefined,取不到a,如果用到严格模式的时候,可以稍微注意下这个区别 咱们刚刚的例子,说的是函数内用严格模式的话,讲无法使用默认绑定,那么如果是在函数调用位置用严格模式,会受影响吗 function foo() { console.log(this.a); //2 console.log(this === window); //true } var a = 2; (function () { "use strict" foo(); })(); 很明显,可以看出,是不受影响的,还有一个问题,如果把var定义变成let会怎么样呢 function foo() { console.log(this.a); //undefined console.log(this === window); //true } let a = 2; (function () { "use strict" foo(); })(); 也就是说,let定义并不会加到全局变量中,这个和var的区别需要稍微留意一下 隐式绑定 这一条规则考虑的是是否有上下文对象,举个例子 function foo() { console.log(this.a); //2 console.log(this === obj); // true } var obj = { a: 2, foo, } obj.foo(); 在这种情况下,foo会使用obj的上下文对象来引用函数,此时的this指向的就是obj。 那么如果是嵌套对象这种的,会怎么处理呢? function foo() { console.log(this.a); // 1 console.log(this === obj) // true console.log(this === obj1) // fale } var obj = { a: 1, foo, }; var obj1 = { a: 2, obj, } obj1.obj.foo(); 可以看到,实际上此时foo中的this指向了离他最近的对象obj,也就是说,对象属性引用链的最后一层会影响它的调用位置 还有一种情况。 function foo() { console.log(this.a); } var obj = { a: 3, foo, } var a = 2; var f = obj.foo; f(); // 2 这种情况下,虽然f是obj.foo的引用,但是最后依然用的是默认绑定,而不是隐式绑定,所以说呢,咱们可以这么理解,虽然他是对象中函数的引用,但是在执行的时候,调用的方式确是函数调用的方式,不是对象.属性()的方式,这块在使用的时候需要注意一下 显式绑定 很简单,显式绑定就是手动直接改变其this指向的一种方式,这个主要是用几种api来实现的 function foo() { console.log(this.a); } var obj = { a: 2, }; foo.call(obj); foo.apply(obj); var f = foo.bind(obj); f(); 这个就是显式绑定的常见的三种形式 这三种形式的话,call和apply差不多,就不展开了,详情看文档就行,咱们仔细看一下bind函数,来在看一个例子 function foo(num1, num2) { console.log(num1 + num2); //5 console.log(this === obj); // true } var obj = { a: 1, }; var f = foo.bind(obj, 2); f(3); 这个可以看出,bind的用法和call以及apply还是有一些差别的。 注意,如果显式绑定传入的是null或者是undefined的话,将会使用默认绑定规则,举个例子 function foo() { console.log( this.a ); } var a = 2; foo.call( null ); // 2 new绑定 这个主要是new 函数()的绑定形式的,这个的this指向的是函数构造出的那个对象,new的时候,它的执行过程可以大概执行以下几步 创建一个全新的对象 这个新对象会被执行prototype连接 新对象绑定到函数调用的this 如果函数没有返回其他对象,那么new表达式中的函数调用会自动返回这个新对象 注意最后一句话,如果函数没有返回对象,那么就会返回函数调用的新对象,如果返回了一个对象呢,那么结果就是直接返回这个对象 var abc = { a: 10 } function foo() { return abc; } foo.prototype = { b: 20 }; var a = new foo(); console.log(a === abc); // true console.log(a.b); // undefined function bar() { this.a = 10; } bar.prototype = { b: 20 }; var b = new bar(); console.log(b.a); // 10 console.log(b.b); // 20 以上四种常见的this绑定方式已经介绍的差不多了,那么问题来了,谁的优先级更高呢 很明显,默认绑定的优先级最低,就不展开说了 显式绑定与隐式绑定哪个优先级高呢,举个例子 function foo() { console.log( this. a ); } var obj1 = { a: 2, foo: foo }; var obj2 = { a: 3, foo: foo }; obj1.foo(); // 2 obj2.foo(); // 3 obj1.foo.call( obj2 ); // 3 obj2.foo.call( obj1 ); // 2 很明显,显式绑定优先级要高于隐式绑定 那么new绑定和显式绑定谁更高呢,来再看个例子 function foo(something) { this.a = something; } var obj1 = {}; var bar = foo.bind( obj1 ); bar( 2 ); console.log( obj1.a ); // 2 var baz = new bar(3); console.log( obj1.a ); // 2 console.log( baz.a ); // 3 很明显,new的优先级会更高 所以,这样的话,优先级排序就出来了,分别为 new绑定 > 显式绑定 > 隐式绑定 > 默认绑定 以上就是大家常用到的几种,不过es6出现了一种箭头函数,箭头函数理论上不能应用上面四种的任意一种,它的this是根据代码的词法作用域来走的,比如说 function foo() { return (a) => { console.log( this.a ); }; } var obj1 = { a: 2 }; var obj2 = { a: 3 }; var bar = foo.call( obj1 ); bar.call( obj2 ); // 2 结果已经很明显了, 好了,以上内容就讲完了,通过我的一些讲解,是不是有一点理解了呢,如果有任何的不同意见,欢迎讨论哦 参考书籍《你不知道的Javascript》上卷 转载自:http://www.lht.ren/article/4/

优秀的个人博客,低调大师

Kotlin 基础语法

Kotlin 文件以 .kt 为后缀。 包声明 包的声明应处于源文件顶部: package my.demo import java.util.* // …… kotlin源文件不需要相匹配的目录和包,源文件可以放在任何文件目录。如果没有指定包,默认为default包。 默认导入 有多个包会默认导入到每个 Kotlin 文件中: kotlin.* kotlin.annotation.* kotlin.collections.* kotlin.comparisons.* kotlin.io.* kotlin.ranges.* kotlin.sequences.* kotlin.text.* 函数定义 函数定义使用关键字 fun,参数格式为: 参数 : 类型,下面给出几个例子 //带有两个 Int 参数、返回 Int 的函数 fun sum(a: Int, b: Int): Int { // Int 参数,返回值 Int return a + b } 表达式作为函数体,返回类型自动推断: fun sum(a: Int, b: Int) = a + b public fun sum(a: Int, b: Int): Int = a + b // public 方法则必须明确写出返回类型 无返回值的函数(类似Java中的void): fun printSum(a: Int, b: Int): Unit { println("sum of $a and $b is ${a + b}") } // 如果是返回 Unit类型,则可以省略(对于public方法也是这样): public fun printSum(a: Int, b: Int) { print(a + b) } 可变长参数函数 函数的变长参数可以用vararg关键字进行标识: fun vars(vararg v:Int){ for(vt in v){ print(vt) } } // 测试 fun main(args: Array<String>) { vars(1,2,3,4,5) // 输出12345 } lambda(匿名函数) lambda表达式使用实例: // 测试 fun main(args: Array<String>) { val sumLambda: (Int, Int) -> Int = {x,y -> x+y} println(sumLambda(1,2)) // 输出 3 } 定义常量与变量 不可变变量定义:val 关键字,只能赋值一次的变量(类似Java中final修饰的变量) val <标识符> : <类型> = <初始化值> 可变变量定义:var 关键字 var <标识符> : <类型> = <初始化值> 常量与变量都可以没有初始化值,但是在引用前必须初始化 编译器支持自动类型判断,即声明时可以不指定类型,由编译器判断。 val a: Int = 1 // 立即赋值 val b = 1 // 系统自动推断变量类型为Int val c: Int // 如果不在声明时初始化,则必须提供变量类型 c = 1 // 明确赋值 var x = 5 // 系统自动推断变量类型为Int x += 1 // 变量可修改 注释 Kotlin 支持单行和多行注释,实例如下: // 这是一个单行注释 /* 这是一个多行的 块注释。 */ 与 Java 不同, Kotlin 中的块注释允许嵌套。 字符串模板 $ 表示一个变量名或者变量值 $varName 表示变量值 ${varName.fun()} 表示变量的方法返回值: var a = 1 // 模板中的简单名称: val s1 = "a is $a" a = 2 // 模板中的任意表达式: val s2 = "${s1.replace("is", "was")}, but now is $a" NULL检查机制 Kotlin的空安全设计对于声明可为空的参数,在使用时要进行空判断处理,有两种处理方式,字段后加!!像Java一样抛出空异常,另一种字段后加?可不做处理返回值为 null或配合?:做空判断处理 //类型后面加?表示可为空 var age: String? = "23" //抛出空指针异常 val ages = age!!.toInt() //不做处理返回 null val ages1 = age?.toInt() //age为空返回-1 val ages2 = age?.toInt() ?: -1 当一个引用可能为 null 值时, 必须在声明处的类型后添加?来标识该引用可为空 当 str 中的字符串内容不是一个整数时, 返回 null: fun parseInt(str: String): Int? { // ... } 以下实例演示如何使用一个返回值可为 null 的函数: fun printProduct(arg1: String, arg2: String) { val x = parseInt(arg1) val y = parseInt(arg2) // 直接使用 `x * y` 会导致错误, 因为它们可能为 null. if (x != null && y != null) { // 在进行过 null 值检查之后, x 和 y 的类型会被自动转换为非 null 变量 print(x * y) } } 或者 // …… if (x == null) { println("Wrong number format in arg1: '$arg1'") return } if (y == null) { println("Wrong number format in arg2: '$arg2'") return } ​ // 在空检测后,x 与 y 会自动转换为非空值 println(x * y) 类型检测及自动类型转换 我们可以使用 is 运算符检测一个表达式是否是某类型的一个实例(类似于Java中的instanceof关键字)。如果一个不可变的局部变量或属性已经判断出为某类型,那么检测后的分支中可以直接当作该类型使用,无需显式转换: fun getStringLength(obj: Any): Int? { if (obj is String) { // 做过类型判断以后,obj会被系统自动转换为String类型 return obj.length } // 在离开类型检测分支后,`obj` 仍然是 `Any` 类型 return null } 在这里还有一种方法,与Java中instanceof不同,使用!is fun getStringLength(obj: Any): Int? { fun getStringLength(obj: Any): Int? { if (obj !is String) return null // `obj` 在这一分支自动转换为 `String` return obj.length } 甚至还可以 fun getStringLength(obj: Any): Int? { // 在 `&&` 运算符的右侧, `obj` 的类型会被自动转换为 `String` if (obj is String && obj.length > 0) return obj.length return null } 区间 区间表达式由具有操作符形式..的 rangeTo 函数辅以 in 和 !in 形成。 区间是为任何可比较类型定义的,但对于整型原生类型,它有一个优化的实现。以下是使用区间的一些示例: for (i in 1..4) print(i) // 输出“1234” for (i in 4..1) print(i) // 什么都不输出 if (i in 1..10) { // 等同于 1 <= i && i <= 10 println(i) } // 使用 step 指定步长 for (i in 1..4 step 2) print(i) // 输出“13” for (i in 4 downTo 1 step 2) print(i) // 输出“42” // 使用 until 函数排除结束元素 for (i in 1 until 10) { // i in [1, 10) 排除了 10 println(i) } 实例测试 fun main(args: Array<String>) { print("循环输出:") for (i in 1..4) print(i) // 输出“1234” println("\n----------------") print("设置步长:") for (i in 1..4 step 2) print(i) // 输出“13” println("\n----------------") print("使用 downTo:") for (i in 4 downTo 1 step 2) print(i) // 输出“42” println("\n----------------") print("使用 until:") // 使用 until 函数排除结束元素 for (i in 1 until 4) { // i in [1, 4) 排除了 4 print(i) } println("\n----------------") } 输出结果: 循环输出:1234 ---------------- 设置步长:13 ---------------- 使用 downTo:42 ---------------- 使用 until:123 ---------------- 参考: http://www.runoob.com/kotlin/kotlin-basic-syntax.html https://www.kotlincn.net/docs/reference/basic-syntax.html

优秀的个人博客,低调大师

Java基础1.1

虚拟机:vm,java虚拟机jvm。 C语言:写源码;用文本文件写的(写出来就是一个文本文件)。 源码————编译————可执行程序。 运行平台(系统+硬件)。 C;优点:与系统接触近,可以操作系统和系统API 缺点:程序不可跨平台,内存管理十分的麻烦。 内存(运行内存)又称闪存 ———速度十分的快——(一旦掉电数据全部消失)服务器(数据服务中心)服务器运行时间很长。内存运行完要回收 Java优化:如何跨平台(在所有操作系统上运行),如何管理内存(让所有的程序员不在头疼如何管理内存) 怎样跨平台; 三大系统的内核不一样:如何让程序可以跨平台运行那【源码】————【字节码】—————【翻译官】(虚拟机),字节码交给翻译官 怎样优化内存:C语言————编译——-exe————运行 虚拟机就像一个鱼缸: 你要操作内存的话交个容器,虚拟机就像是一个管家;你不用管内存,交给管家就行了,你想要内存问这个管家要就行了。 为什么要形成字节码: 把源码转换为字节码,能让虚拟机很快的认识,运行速度就快。(加快运行速度在运行的时候不用再次解析代码了)优化速度。

优秀的个人博客,低调大师

Java基础1.2

java 编译环节 源码 public .... /// 代码 文件名字后缀用java 全小写 文件1字母大写 (可以用中文命名)比较麻烦 网页下载的只是将虚拟机文件解压出去,不是java环境安装 Java编译环节虚拟机中找到一个程序。叫(javac.exe)程序形成字节码 生成一个字节码文件 如何搭建Java开发环境 :j a v a开发运行流程 java编译环境;写入代码 1名字 文件名字后缀用j a v a 全小写(规定)文件 1字母大写(可以用中文)不太好弄。 运行(java exe)程序并传递你写的文件的源码路径路径,告诉源码路径(打开cmd)磁盘管理系统 编译时时要敲空格 空格表示参数的分割 不空的话表示参数和路径是1(起).的。(不然就会报错)前面是要运行的程序 给程序传递的数据(告诉java路径要他进行编译) 如何让J a v a虚拟机运行我们的字节码 文件名,字节码文件要存在。

资源下载

更多资源
Mario

Mario

马里奥是站在游戏界顶峰的超人气多面角色。马里奥靠吃蘑菇成长,特征是大鼻子、头戴帽子、身穿背带裤,还留着胡子。与他的双胞胎兄弟路易基一起,长年担任任天堂的招牌角色。

Rocky Linux

Rocky Linux

Rocky Linux(中文名:洛基)是由Gregory Kurtzer于2020年12月发起的企业级Linux发行版,作为CentOS稳定版停止维护后与RHEL(Red Hat Enterprise Linux)完全兼容的开源替代方案,由社区拥有并管理,支持x86_64、aarch64等架构。其通过重新编译RHEL源代码提供长期稳定性,采用模块化包装和SELinux安全架构,默认包含GNOME桌面环境及XFS文件系统,支持十年生命周期更新。

Sublime Text

Sublime Text

Sublime Text具有漂亮的用户界面和强大的功能,例如代码缩略图,Python的插件,代码段等。还可自定义键绑定,菜单和工具栏。Sublime Text 的主要功能包括:拼写检查,书签,完整的 Python API , Goto 功能,即时项目切换,多选择,多窗口等等。Sublime Text 是一个跨平台的编辑器,同时支持Windows、Linux、Mac OS X等操作系统。

WebStorm

WebStorm

WebStorm 是jetbrains公司旗下一款JavaScript 开发工具。目前已经被广大中国JS开发者誉为“Web前端开发神器”、“最强大的HTML5编辑器”、“最智能的JavaScript IDE”等。与IntelliJ IDEA同源,继承了IntelliJ IDEA强大的JS部分的功能。

用户登录
用户注册