MHA架构搭建
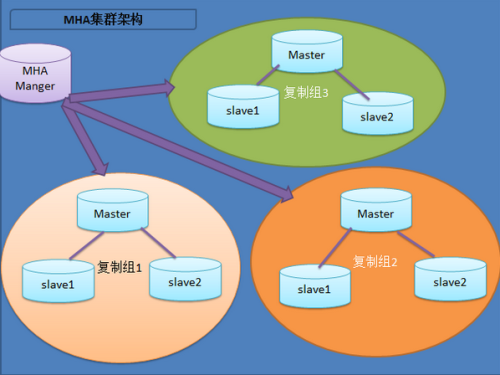
MHA工作原理总结如下: 1、配置文件检查阶段(整个集群的配置) 2、宕机奔溃的master保存二进制日志事件且摘除VIP操作 3、识别含有最新更新的slave 4、复制dead master和slave相差的中继日志,保存到mha manager具体的目录下面 5、提升一个slave为新的master 6、使其他的slave连接新的master进行复制 复制机制: 异步复制: MySQL默认是异步复制,MASTER将事件写入BINLOG,但并不知道SLAVE是否何时已经接收且处理,在异步复制的机制的情况下,如果MASTER宕机,事务在MASTER上已提交,但很可能这些事务没有传到任何的SLAVE上,此时SLAVE可能会丢失事务 同步复制: MASTER提交事务,直到事务在所有的SLAVE都已提交,此时才会返回客户端,事务执行完毕,完成一个事务可能会有很大的延迟。 半同步复制: 当SLAVE主机连接到MASTER时,能够查看其是否处于半同步复制的机制。当MASTER上开启半同步复制的功能时,至少应该有一个SLAVE开启其功能,此时,一个线程在MASTER上提交事务将受到阻塞,直到得知一个已开启半同步复制功能的SLAVE已收到此事务的所有事件,或等待超时,当一个事务都写入其relay-log中且已刷新到磁盘上,SLAVE才会告知已收到,如果等待超时,也就是MASTER没呗告知已收到,此时MASTER会自动转换为异步复制,当至少一个半同步的SLAVE赶上,MASTER与其SLAVE自动转换为半同步复制的机制 半同步复制工作机制处于同步和异步之间,MASTER的事务提交阻塞,只要一个SLAVE已收到该事务的事件且已记录,他不会等待所有的SLAVE都告知已收到,且他只是接收,并不用等其他执行且提交。 MHA的隐患: 在MHA自动故障切换的过程中,MHA试图从宕掉的主服务器上保存二进制日志,最大程度保证数据的不丢失,存在的问题是,如果主服务器硬件故障宕机或无法通过SSH访问,MHA没有办法保存二进制日志,只能进行故障转移而可能丢失最新数据。, MySQL服务挂了,可以从服务器拷贝二进制日志,若是硬件话,只能GG了,如果复制出现延迟,也只能GG了。 使用场景: MHA主要支持一主多从的架构,要求一个复制集群必须至少有3台数据库服务器。 简介:MasterHighAvailability 该软件由两部分组成:MHA Manager(管理节点)和MHA Node(数据节点) Manager工具包主要包括以下几个工具: masterha_check_ssh 检查MHA的SSH配置状况 masterha_check_repl 检查MySQL复制状况 masterha_manger 启动MHA masterha_check_status 检测当前MHA运行状态 masterha_master_monitor 检测master是否宕机 masterha_master_switch 控制故障转移(自动或者手动) masterha_conf_host 添加或删除配置的server信息 Node工具包 save_binary_logs 保存和复制master的二进制日志 apply_diff_relay_logs 识别差异的中继日志事件并将其差异的事件应用于其他的slave filter_mysqlbinlog去除不必要的ROLLBACK事件(MHA已不再使用这个工具) purge_relay_logs清除中继日志(不会阻塞SQL线程) ##关闭relay log自动清楚,set globalrelay_log_purge=0 MHA在发生切换的过程中,从库的恢复过程中依赖于RELAY LOG的相关信息,所以这里要将RELAYLOG的自动清楚设置为OFF,采用手动清楚的方式。 PURGE_RELAY_LOGS工具原理:它可以为中继日志创建硬链接,执行SET GOLBAL RELAY_LOG_PURGE=1,等待几秒钟以便SQL线程切换到新的中继日志,在执行RELAY_LOG_PURGE=0 Mha安装 1、在所有节点安装MHA node所需的perl模块(DBD:mysql) yum install perl-DBD-MySQL -y 2、在所有节点安装mha node tar -xvf mha4mysql-node-0.53.tar.gz cd mha4mysql-node-0.53 perl Makefile.PL make make install 安装后再/usr/local/bin下生成以下文件 ll /usr/local/bin/apply_diff_relay_logs/usr/local/bin/filter_mysqlbinlog /usr/local/bin/purge_relay_logs/usr/local/bin/save_binary_logs 3、安装MHA Manager 安装相关软件 yum -y install perl-DBD-MySQLperl-Config-Tiny perl-Log-Dispatch perl-Parallel-ForkManagerperl-Config-IniFiles ncftp perl-Params-Validate perl-CPAN perl-Test-Mock-LWP.noarchperl-LWP-Authen-Negotiate.noarch perl-devel perl-ExtUtils-CBuilderperl-ExtUtils-MakeMaker cd mha4mysql-manager-0.53 perl Makefile.PL make make install 拷贝相关脚本到/usr/local/bin下 cd/usr/local/mha4mysql-manager-0.53/samples/scripts scp * /usr/local/bin master_ip_failover #自动切换时vip管理的脚本,不是必须,如果我们使用keepalived的,我们可以自己编写脚本完成对vip的管理,比如监控mysql,如果mysql异常,我们停止keepalived就行,这样vip就会自动漂移 master_ip_online_change #在线切换时vip的管理,不是必须,同样可以可以自行编写简单的shell完成 power_manager #故障发生后关闭主机的脚本,不是必须 send_report #因故障切换后发送报警的脚本,不是必须,可自行编写简单的shell完成。 4、配置SSH登录无密码验证 1)在每台发服务器上执行:ssh-keygen-t rsa ssh-copy-id -i.ssh/id_rsa.pub "root@192.168.28.87" ssh-copy-id -i.ssh/id_rsa.pub "root@192.168.28.70" ssh-copy-id -i .ssh/id_rsa.pub "root@192.168.28.71” 5、两台Slave服务设置read_only set global read_only=1; 6、relay_log脚本 #!/bin/bash user=root passwd=123456 port=3306 log_dir='/data/masterha/log' work_dir='/data' purge='/usr/local/bin/purge_relay_logs' if[!-d$log_dir]then mkdir$log_dir-p Fi $purge--user=$user--password=$passwd--disable_relay_log_purge--port=$port--workdir=$work_dir>>$log_dir/purge_relay_logs.log2>&1 设置定时任务 04***/bin/bash/root/purge_relay_log.sh 7、在master库创建监控用户 grant all privileges on *.* to 'root'@'192.168.1.%'identified by '125746'; flush privileges; 8、配置mha 1)创建MHA的工作目录,并且创建相关配置文件 mkdir -p /etc/masterha cd/usr/local/mha4mysql-manager-0.53/samples/conf cp app1.cnf /etc/masterha/ 2)修改配置文件 vi/etc/masterha/app1.cnf [server default] manager_workdir=/var/log/masterha manager_log=/var/log/masterha/app1/manager.log master_binlog_dir=/data/mysql master_ip_failover_script=/usr/local/bin/master_ip_failover master_ip_online_change_script=/usr/local/bin/master_ip_online_change password=125746 user=root ping_interval=1 remote_workdir=/tmp repl_password=123 repl_user=repl report_script=/usr/local/bin/send_report ssh_user=root [server1] hostname=192.168.1.120 candidate_master=1 port=3306 [server2] hostname=192.168.1.115 port=3306 candidate_master=1 [server3] hostname=192.168.1.118 port=3307 3)检查ssh设置 masterha_check_ssh--conf=/etc/masterha/app1.cnf ln-s /usr/lib/perl5/vendor_perl/MHA /usr/lib64/perl5/vendor_perl/ 4)检查主从复制 masterha_check_repl--conf=/etc/masterha/app1.cnf 5)安装keepalived tar xfkeepalived-1.2.12.tar.gz cd keepalived-1.2.12 ./configure--prefix=/usr/local/keepalived make&& make install cp/usr/local/keepalived/etc/rc.d/init.d/keepalived /etc/init.d/ cp/usr/local/keepalived/etc/sysconfig/keepalived /etc/sysconfig/ mkdir/etc/keepalived cp/usr/local/keepalived/etc/keepalived/keepalived.conf /etc/keepalived/ cp/usr/local/keepalived/sbin/keepalived /usr/sbin/ 主库keepalived配置文件 vi/etc/keepalived/keepalived.conf global_defs { notification_email { lihong@bxjinrong.com } notification_email_fromAlexandre.Cassen@firewall.loc smtp_server 127.0.0.1 smtp_connect_timeout 30 router_id MySQL_HA } vrrp_instance VI_1{ state BACKUP interface eth0 virtual_router_id 51 nopreempt priority 150 advert_int 1 authentication { auth_type PASS auth_pass 1111 } virtual_ipaddress { 192.168.1.20 } } 备用主库的keepalived配置文件 vi/etc/keepalived/keepalived.conf global_defs { notification_email { lihong@bxjinrong.com } notification_email_fromAlexandre.Cassen@firewall.loc smtp_server 127.0.0.1 smtp_connect_timeout 30 router_id MySQL_HA } vrrp_instance VI_1{ state BACKUP interface eth0 virtual_router_id 51 priority 120 advert_int 1 authentication { auth_type PASS auth_pass 1111 } virtual_ipaddress { 192.168.1.20 } } 7)mhamanager管理 启动manager nohupmasterha_manager --conf=/etc/masterha/app1.cnf --remove_dead_master_conf--ignore_last_failover < /dev/null > /var/log/masterha/app1/manager.log2>&1 & 关闭manager masterha_stop--conf=/etc/masterha/app1.cnf 查看manager的状态 masterha_check_status--conf=/etc/masterha/app1.cnf 切换 1启动manager后,master发生故障后会自动切换 2在线切换过程 masterha_stop--conf=/etc/masterha/app1.cnf masterha_master_switch--conf=/etc/masterha/app1.cnf --master_state=alive--new_master_host=192.168.1.120 --new_master_port=3306 --orig_master_is_new_slave--running_updates_limit=10000 相关脚本 1)master_ip_failover #!/usr/bin/envperl use strict; use warnings FATAL=> 'all'; use Getopt::Long; my ( $command, $ssh_user, $orig_master_host, $orig_master_ip, $orig_master_port, $new_master_host,$new_master_ip, $new_master_port ); my $vip= '192.168.1.120'; my$ssh_start_vip = "/etc/init.d/keepalived start"; my$ssh_stop_vip = "/etc/init.d/keepalived stop"; GetOptions( 'command=s' => \$command, 'ssh_user=s' => \$ssh_user, 'orig_master_host=s' =>\$orig_master_host, 'orig_master_ip=s' => \$orig_master_ip, 'orig_master_port=i' =>\$orig_master_port, 'new_master_host=s' => \$new_master_host, 'new_master_ip=s' =>\$new_master_ip, 'new_master_port=i' => \$new_master_port, ); exit &main(); sub main { print "\n\nIN SCRIPTTEST====$ssh_stop_vip==$ssh_start_vip===\n\n"; if ( $command eq "stop" ||$command eq "stopssh" ) { my $exit_code = 1; eval { print "Disabling the VIP onold master: $orig_master_host \n"; &stop_vip(); $exit_code = 0; }; if ($@) { warn "Got Error: $@\n"; exit $exit_code; } exit $exit_code; } elsif ( $command eq "start" ) { my $exit_code = 10; eval { print "Enabling the VIP - $vipon the new master - $new_master_host \n"; &start_vip(); $exit_code = 0; }; if ($@) { warn $@; exit $exit_code; } exit $exit_code; } elsif ( $command eq "status" ) { print "Checking the Status of thescript.. OK \n"; #`ssh $ssh_user\@cluster1 \"$ssh_start_vip \"`; exit 0; } else { &usage(); exit 1; } } # A simple systemcall that enable the VIP on the new master sub start_vip() { `ssh $ssh_user\@$new_master_host \"$ssh_start_vip \"`; } # A simple systemcall that disable the VIP on the old_master sub stop_vip() { return 0unless ($ssh_user); `ssh $ssh_user\@$orig_master_host \"$ssh_stop_vip \"`; } sub usage { print "Usage: master_ip_failover--command=start|stop|stopssh|status --orig_master_host=host --orig_master_ip=ip--orig_master_port=port --new_master_host=host --new_master_ip=ip--new_master_port=port\n"; } 2)master_ip_online_change #!/usr/bin/envperl # Copyright (C) 2011 DeNA Co.,Ltd. # # This program is free software; you canredistribute it and/or modify # it under the terms of the GNU General PublicLicense as published by # the Free Software Foundation; either version2 of the License, or # (at your option) any later version. # # This program is distributed in the hope thatit will be useful, # but WITHOUT ANY WARRANTY; without even theimplied warranty of # MERCHANTABILITY or FITNESS FOR A PARTICULARPURPOSE. See the # GNU General Public License for more details. # # You should have received a copy of the GNUGeneral Public License # along with this program; if not, write tothe Free Software # Foundation, Inc., # 51 Franklin Street, Fifth Floor, Boston,MA 02110-1301 USA ## Note: This is asample script and is not complete. Modify the script based on your environment. use strict; use warnings FATAL=> 'all'; use Getopt::Long; use MHA::DBHelper; use MHA::NodeUtil; use Time::HiResqw( sleep gettimeofday tv_interval ); use Data::Dumper; my $ssh_user ="root"; my $vip ='192.168.1.20'; my $ssh_start_vip= "/etc/init.d/keepalived start"; my $ssh_stop_vip ="/etc/init.d/keepalived stop"; my $_tstart; my$_running_interval = 0.1; my ( $command, $orig_master_host, $orig_master_ip, $orig_master_port, $orig_master_user,$orig_master_password, $new_master_host, $new_master_ip, $new_master_port, $new_master_user, $new_master_password ); GetOptions( 'command=s' => \$command, 'orig_master_host=s' => \$orig_master_host, 'orig_master_ip=s' => \$orig_master_ip, 'orig_master_port=i' => \$orig_master_port, 'orig_master_user=s' => \$orig_master_user, 'orig_master_password=s' =>\$orig_master_password, 'new_master_host=s' => \$new_master_host, 'new_master_ip=s' => \$new_master_ip, 'new_master_port=i' => \$new_master_port, 'new_master_user=s' => \$new_master_user, 'new_master_password=s' => \$new_master_password, ); exit &main(); subcurrent_time_us { my ( $sec, $microsec ) = gettimeofday(); my $curdate = localtime($sec); return $curdate . " " . sprintf("%06d", $microsec ); } sub sleep_until { my $elapsed = tv_interval($_tstart); if ( $_running_interval > $elapsed ) { sleep( $_running_interval - $elapsed ); } } subget_threads_util { my $dbh = shift; my $my_connection_id = shift; my $running_time_threshold = shift; my $type = shift; $running_time_threshold = 0 unless($running_time_threshold); $type = 0 unless ($type); my @threads; my $sth = $dbh->prepare("SHOWPROCESSLIST"); $sth->execute(); while ( my $ref = $sth->fetchrow_hashref()) { my $id = $ref->{Id}; my $user = $ref->{User}; my $host = $ref->{Host}; my $command = $ref->{Command}; my$state = $ref->{State}; my $query_time = $ref->{Time}; my $info = $ref->{Info}; $info =~ s/^\s*(.*?)\s*$/$1/ ifdefined($info); next if ( $my_connection_id == $id ); next if ( defined($query_time) &&$query_time < $running_time_threshold ); next if ( defined($command) && $command eq "BinlogDump" ); next if ( defined($user) && $user eq "systemuser" ); next if ( defined($command) && $command eq "Sleep" && defined($query_time) && $query_time >= 1 ); if ( $type >= 1 ) { next if ( defined($command) &&$command eq "Sleep" ); next if ( defined($command) &&$command eq "Connect" ); } if ( $type >= 2 ) { next if ( defined($info) && $info=~ m/^select/i ); next if ( defined($info) && $info=~ m/^show/i ); } push @threads, $ref; } return @threads; } sub main { if ( $command eq "stop" ) { ## Gracefully killing connections on thecurrent master # 1. Set read_only= 1 on the new master # 2. DROP USER so that no app user canestablish new connections # 3. Set read_only= 1 on the current master # 4. Kill current queries # * Any database access failure will resultin script die. my $exit_code = 1; eval { ## Setting read_only=1 on the new master(to avoid accident) my $new_master_handler = newMHA::DBHelper(); # args: hostname, port, user, password,raise_error(die_on_error)_or_not $new_master_handler->connect($new_master_ip, $new_master_port, $new_master_user, $new_master_password,1 ); print current_time_us() . " Setread_only on the new master.. "; $new_master_handler->enable_read_only(); if ($new_master_handler->is_read_only() ) { print "ok.\n"; } else { die "Failed!\n"; } $new_master_handler->disconnect(); # Connecting to the orig master, die ifany database error happens my $orig_master_handler = newMHA::DBHelper(); $orig_master_handler->connect($orig_master_ip, $orig_master_port, $orig_master_user,$orig_master_password, 1 ); ## Drop application user so that nobodycan connect. Disabling per-session binlog beforehand $orig_master_handler->disable_log_bin_local(); print current_time_us() . " Drppingapp user on the orig master..\n"; #FIXME_xxx_drop_app_user($orig_master_handler); ## Waiting for N * 100 milliseconds sothat current connections can exit my $time_until_read_only = 15; $_tstart = [gettimeofday]; my @threads = get_threads_util($orig_master_handler->{dbh}, $orig_master_handler->{connection_id} ); while ( $time_until_read_only > 0&& $#threads >= 0 ) { if ( $time_until_read_only % 5 == 0 ) { printf "%s Waitingall running %d threads are disconnected.. (max %d milliseconds)\n", current_time_us(), $#threads + 1,$time_until_read_only * 100; if ( $#threads < 5 ) { print Data::Dumper->new( [$_])->Indent(0)->Terse(1)->Dump . "\n" foreach (@threads); } } sleep_until(); $_tstart = [gettimeofday]; $time_until_read_only--; @threads = get_threads_util($orig_master_handler->{dbh}, $orig_master_handler->{connection_id}); } ## Setting read_only=1 on the currentmaster so that nobody(except SUPER) can write print current_time_us() . " Setread_only=1 on the orig master.. "; $orig_master_handler->enable_read_only(); if ( $orig_master_handler->is_read_only()) { print "ok.\n"; } else { die "Failed!\n"; } ## Waiting for M * 100 milliseconds sothat current update queries can complete my $time_until_kill_threads = 5; @threads = get_threads_util($orig_master_handler->{dbh}, $orig_master_handler->{connection_id} ); while ( $time_until_kill_threads > 0&& $#threads >= 0 ) { if ( $time_until_kill_threads % 5 == 0) { printf "%s Waitingall running %d queries are disconnected.. (max %d milliseconds)\n", current_time_us(), $#threads + 1,$time_until_kill_threads * 100; if ( $#threads < 5 ) { print Data::Dumper->new( [$_])->Indent(0)->Terse(1)->Dump . "\n" foreach (@threads); } } sleep_until(); $_tstart = [gettimeofday]; $time_until_kill_threads--; @threads = get_threads_util($orig_master_handler->{dbh}, $orig_master_handler->{connection_id} ); } print "Disabling the VIP on oldmaster: $orig_master_host \n"; &stop_vip(); ## Terminating all threads print current_time_us() . " Killingall application threads..\n"; $orig_master_handler->kill_threads(@threads) if ( $#threads >= 0); print current_time_us() . "done.\n"; $orig_master_handler->enable_log_bin_local(); $orig_master_handler->disconnect(); ## After finishing the script, MHAexecutes FLUSH TABLES WITH READ LOCK $exit_code = 0; }; if ($@) { warn "Got Error: $@\n"; exit $exit_code; } exit $exit_code; } elsif ( $command eq "start" ) { ## Activating master ip on the new master # 1. Create app user with write privileges # 2. Moving backup script if needed # 3. Register new master's ip to thecatalog database # We don't returnerror even though activating updatable accounts/ip failed so that we don'tinterrupt slaves' recovery. # If exit code is0 or 10, MHA does not abort my $exit_code = 10; eval { my $new_master_handler = newMHA::DBHelper(); # args: hostname, port, user, password,raise_error_or_not $new_master_handler->connect($new_master_ip, $new_master_port, $new_master_user, $new_master_password,1 ); ## Set read_only=0 on the new master $new_master_handler->disable_log_bin_local(); print current_time_us() . " Setread_only=0 on the new master.\n"; $new_master_handler->disable_read_only(); ## Creating an app user on the new master print current_time_us() . " Creatingapp user on the new master..\n"; FIXME_xxx_create_app_user($new_master_handler); $new_master_handler->enable_log_bin_local(); $new_master_handler->disconnect(); ## Update master ip on the catalogdatabase, etc print "Enabling the VIP - $vip onthe new master - $new_master_host \n"; &start_vip(); $exit_code = 0; }; if ($@) { warn "Got Error: $@\n"; exit $exit_code; } exit $exit_code; } elsif ( $command eq "status" ) { # do nothing exit 0; } else { &usage(); exit 1; } } # A simple systemcall that enable the VIP on the new master sub start_vip() { `ssh $ssh_user\@$new_master_host \"$ssh_start_vip \"`; } # A simple systemcall that disable the VIP on the old_master sub stop_vip() { `ssh $ssh_user\@$orig_master_host \"$ssh_stop_vip \"`; } sub usage { print "Usage:master_ip_online_change --command=start|stop|status --orig_master_host=host--orig_master_ip=ip --orig_master_port=port --new_master_host=host--new_master_ip=ip --new_master_port=port\n"; die; } MHA测试: MHA的三种工作情况: 一、自动Failover 必须启动mha Manager监控,否则无法自动切换,切换包括以下步骤: 1、配置文件检查阶段(包括整个集群的配置文件) 2、宕机的MASTER处理,这个阶段包括虚拟IP摘除操作, 3、复制DEAD MASTER和最新SLAVE相差的RELAY LOG,并保存MHA MANAGER具体的目录下 4、识别含有最新更新的SLAVE 5、应用从MASTER保存的二进制日志事件 6、提升一个SLAVE为新的MASTER进行复制 7、使其他的SLAVE连接新的MASTER进行复制 ###在自动切换之后监控就停止了 二、手动切换 1、不需要开启mha manager监控 2、如果MHA MANAGER检测到没有DEAD的SERVER将报错,并结束FAILOVER,所以手动切换必须在主MYSQL宕掉才可以 三、在线进行切换 1、检测复制设置和确定当前主服务器 2、确定新的主服务器 3、阻塞写入到当前主服务器 4、等待所有从服务器赶上复制 5、授予写入到新的主服务器 6、重新设置从服务器 #1、自动识别MASTER和SLAVE问题,VIP的移动 3、负载均衡问题,当有机器离开集群时,负载比例 四、切换满足条件 1、所有SLAVE的IO、SQL线程都在运行 2、所有的SHOW SLAVE STATUS的输出中SECONDS_BEHIND_MASTER参数小于或等于running_updates_limit秒,如果在切换过程中不指定,默认为1秒 3、在MASTER端,通过SHOW PROCESSLIST输出,没有一个更新花费的时间大于RUNNING ##在线切换需要调用master_ip_online_change这个脚本,貌似这个脚本不够完善,,需要自己修改 软件包下载: http://down.51cto.com/data/2258543 http://down.51cto.com/data/2258544 本文转自 DBAspace 51CTO博客,原文链接:http://blog.51cto.com/dbaspace/1898371