首页 文章 精选 留言 我的

精选列表

搜索[Java库],共10000篇文章
优秀的个人博客,低调大师

Java之解压流(ZipInputStream)

一、ZipInputStream相对于ZipOutputStream而言,使用上面简单的多了,相对的,既然存在压缩流,就会存在,解压的方式。 二、解压文件,流的使用过程中也是很常用的,在读取文件,根据文件类型进行处理,这样,就可以做到,最低成本的数据传输了 三、解压例子 /** * 提供给用户使用的解压工具 * @param srcPath * @param outPath * @throws IOException */ public static void decompressionFile(String srcPath, String outPath) throws IOException { //简单判断解压路径是否合法 if (!new File(srcPath).isDirectory()) { //判断输出路径是否合法 if (new File(outPath).isDirectory()) { if (!outPath.endsWith(File.separator)) { outPath += File.separator; } //zip读取压缩文件 FileInputStream fileInputStream = new FileInputStream(srcPath); ZipInputStream zipInputStream = new ZipInputStream(fileInputStream); //解压文件 decompressionFile(outPath, zipInputStream); //关闭流 zipInputStream.close(); fileInputStream.close(); } else { throw new RuntimeException("输出路径不合法!"); } } else { throw new RuntimeException("需要解压的文件不合法!"); } } /** * ZipInputStream是逐个目录进行读取,所以只需要循环 * @param outPath * @param inputStream * @throws IOException */ private static void decompressionFile(String outPath, ZipInputStream inputStream) throws IOException { //读取一个目录 ZipEntry nextEntry = inputStream.getNextEntry(); //不为空进入循环 while (nextEntry != null) { String name = nextEntry.getName(); File file = new File(outPath+name); //如果是目录,创建目录 if (name.endsWith("/")) { file.mkdir(); } else { //文件则写入具体的路径中 FileOutputStream fileOutputStream = new FileOutputStream(file); BufferedOutputStream bufferedOutputStream = new BufferedOutputStream(fileOutputStream); int n; byte[] bytes = new byte[1024]; while ((n = inputStream.read(bytes)) != -1) { bufferedOutputStream.write(bytes, 0, n); } //关闭流 bufferedOutputStream.close(); fileOutputStream.close(); } //关闭当前布姆 inputStream.closeEntry(); //读取下一个目录,作为循环条件 nextEntry = inputStream.getNextEntry(); } } 四、测试: public static void main(String[] args) throws IOException { decompressionFile("D:\\srv.zip", "D:\\test"); }

优秀的个人博客,低调大师

java之压缩流(ZipOutputStream)

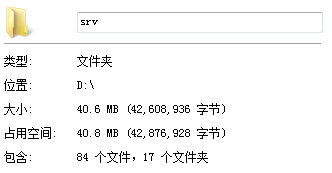
一、文件压缩,是很有必要的,我们在进行文件,传输过程中,很多时候都是,都是单个文件单个文件发送接收,但是当数据量特别大,或者文件数量比较多的时候,这个时候就可以考虑文件压缩。 二、优势:文件压缩过后,只需要进行一次文件的传输就可以了。减少频繁发送的问题。缺点:文件大小会变大,如果传输过程中断了,风险较大。 三、实现: /** * 提供给用户使用的基本压缩类 * @param srcPath * @param outPath * @throws IOException */ public static void compressFile(String srcPath, String outPath) throws IOException { //读取源文件 File srcFile = new File(srcPath); //判断输出路径是否正确 File outFile = new File(outPath); //如果只是路劲加入对应的压缩名称 if (outFile.isDirectory()) { //用"/"作文判断标准 if (outPath.endsWith(File.separator)) { outPath += srcFile.getName().split("\\.")[0] + ".zip"; } else { outPath += File.separator + srcFile.getName().split("\\.")[0] + ".zip"; } } //读取文件流 FileOutputStream fileOutputStream = new FileOutputStream(outPath); ZipOutputStream zipOutputStream = new ZipOutputStream(fileOutputStream); //压缩文件 compressFile(srcFile, srcFile.getName(),zipOutputStream); //关闭流 zipOutputStream.close(); fileOutputStream.close(); } /** * 迭代方式进行文件压缩 * @param file * @param fileName * @param outputStream * @throws IOException */ private static void compressFile(File file, String fileName, final ZipOutputStream outputStream) throws IOException { //如果是目录 if (file.isDirectory()) { //创建文件夹 outputStream.putNextEntry(new ZipEntry(fileName+"/")); //迭代判断,并且加入对应文件路径 File[] files = file.listFiles(); Iterator<File> iterator = Arrays.asList(files).iterator(); while (iterator.hasNext()) { File f = iterator.next(); compressFile(f, fileName+"/"+f.getName(), outputStream); } } else { //创建文件 outputStream.putNextEntry(new ZipEntry(fileName)); //读取文件并写出 FileInputStream fileInputStream = new FileInputStream(file); BufferedInputStream bufferedInputStream = new BufferedInputStream(fileInputStream); byte[] bytes = new byte[1024]; int n; while ((n = bufferedInputStream.read(bytes)) != -1) { outputStream.write(bytes, 0, n); } //关闭流 fileInputStream.close(); bufferedInputStream.close(); } } 四、测试: public static void main(String[] args) throws IOException { compressFile("D:\\srv", "D:\\"); } 五、效果还是可以,此方式根据需要修改!

优秀的个人博客,低调大师

java项目部署运行

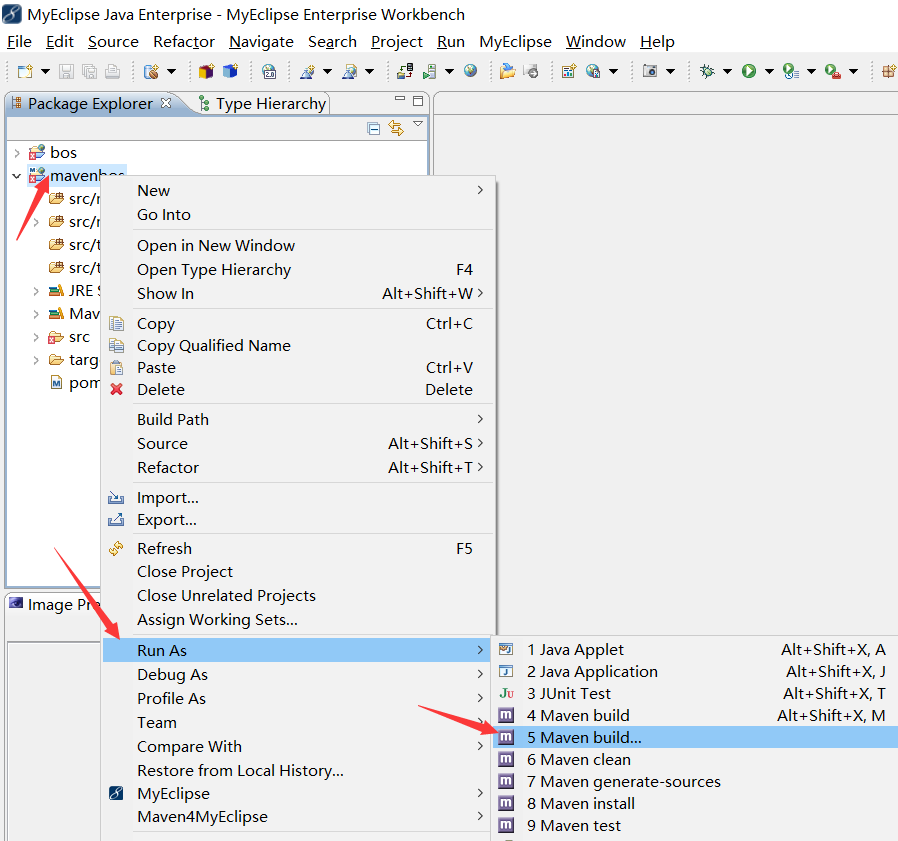
运用插件运行项目: tomcat-maven-plugin:1.1 1.右键项目--》runas --》5mavenbuild--》tomcat:run 2.name:部署名称(自定义,这里我使用maventest) basedirectory:项目文件夹路径 goals:运行命令:tomcat:run --》由于我用的是MyEclipse默认的maven 如果是tomcat6,这里就写tomcat6:run 3.打开console,可以看到部署项目的版本信息 还有部署项目的URL地址,这个URL就是你的项目的访问路径 默认:http://localhost:8080/mavenbos/

优秀的个人博客,低调大师

Java 常量池注意点

public static void main(String[] args) { Integer i0 = 0; Integer i1 = 40; Integer i2 = 40; System.out.println(i1==i2);//true Integer包装类实现了常量池技术,默认会生成一个-128~127范围的一个常量池,i1,i2都是从常量池获取的40,指针指向同一个地址 Integer i3 = new Integer(40); System.out.println(i1==i2+i0);//true 数学运算在栈中进行,运算时会进行拆箱操作,所以实际上比较的是基本数据类型40 == 40 + 0 的数值 System.out.println(i1==i3+i0);//true 数学运算在栈中进行,运算时会进行拆箱操作,所以实际上比较的是基本数据类型40 == 40 + 0 的数值 Integer i4 = new Integer(40); Integer i5 = new Integer(40); Integer i6 = new Integer(0); System.out.println(i4==i5+i6);//true 数学运算在栈中进行,运算时会进行拆箱操作,所以实际上比较的是基本数据类型40 == 40 + 0 的数值 System.out.println(i4==i5);//false 引用类型,指向不同的地址 Integer i7 = 1000; Integer i8 = 1000; System.out.println(i7==i8);//false 包装类超出了常量池范围 System.out.println("==================="); float f1 = 1.0f; float f2 = 1.0f; System.out.println(f1==f2);//true 基本数据类型浮点数比较数值 Float f3 = 1.0f; Float f4 = 1.0f; System.out.println(f3==f4);//false 包装类型,且Float没有实现常量池,所以他们指向的引用时不同的 Float f5 = 1.0f; Float f6 = 1.0f; Float f7 = 0.0f; System.out.println(f5==f6+f7);//true 基本类型的数学运算会拆包装 }

资源下载

更多资源
Mario

Mario

马里奥是站在游戏界顶峰的超人气多面角色。马里奥靠吃蘑菇成长,特征是大鼻子、头戴帽子、身穿背带裤,还留着胡子。与他的双胞胎兄弟路易基一起,长年担任任天堂的招牌角色。

腾讯云软件源

腾讯云软件源

为解决软件依赖安装时官方源访问速度慢的问题,腾讯云为一些软件搭建了缓存服务。您可以通过使用腾讯云软件源站来提升依赖包的安装速度。为了方便用户自由搭建服务架构,目前腾讯云软件源站支持公网访问和内网访问。

Nacos

Nacos

Nacos /nɑ:kəʊs/ 是 Dynamic Naming and Configuration Service 的首字母简称,一个易于构建 AI Agent 应用的动态服务发现、配置管理和AI智能体管理平台。Nacos 致力于帮助您发现、配置和管理微服务及AI智能体应用。Nacos 提供了一组简单易用的特性集,帮助您快速实现动态服务发现、服务配置、服务元数据、流量管理。Nacos 帮助您更敏捷和容易地构建、交付和管理微服务平台。

优质分享App

优质分享App

近一个月的开发和优化,本站点的第一个app全新上线。该app采用极致压缩,本体才4.36MB。系统里面做了大量数据访问、缓存优化。方便用户在手机上查看文章。后续会推出HarmonyOS的适配版本。

用户登录
用户注册