首页 文章 精选 留言 我的

精选列表

搜索[ios],共10000篇文章
优秀的个人博客,低调大师

ios swift4之kvo的使用

在swift4之前,使用kvo只需要继承NSObject 就可以了。但是swift4之后发生了变化,必须在class之前加入@objcMembers修饰,不然就没有效果了。 下面举个例子:如定义一个Person类想监听其kvo的变化除了继承NSObject之外,还必须在class之前添加@objcMembers这个修饰符,不然没有效果。 @objcMembersclassPerson:NSObject{ var name:String? var age:Int=0 overrideinit() { super.init() } init(dic:[String:Any]) { super.init() self.setValuesForKeys(dic) } overridefunc setValue(_ value:Any?, forUndefinedKey key:String) { } } 这里为了方便就使用它来进行json转模型进行验证 class ViewController:UIViewController { overridefunc viewDidLoad() { super.viewDidLoad() let json = ["name":"张三","age":"20"] let p =Person(dic:json) print("----->>",p.name) } overridefunc didReceiveMemoryWarning() { super.didReceiveMemoryWarning() // Dispose of any resources that can be recreated. } } 结果就输出了:----->>Optional("张三"),如果去掉@objcMembers这个修饰符就不起作用了,结果就输出:----->> nil。 所以在swift4中要用kvo就必须加@objcMembers否则就不起作用了。 如果项目中用到了这种kvo自己做json转模型的话就需要做相应的调整了,因为为今天遇到了这个问题,解决了之后记录下来,以便自己或他人学习参考。 博客园地址:源哥爱码

优秀的个人博客,低调大师

iOS 开发之字符串转图片

UIFont *font = [UIFont fontWithName:@"Menlo" size:12 * 2]; UIImage *wenbenImage = [self imageWithString:Str font:font width:576 textAlignment:NSTextAlignmentLeft]; - (UIImage *)imageWithString:(NSString *)string font:(UIFont *)font width:(CGFloat)width textAlignment:(NSTextAlignment)textAlignment { NSDictionary *attributeDic = @{NSFontAttributeName:font}; CGSize size = [string boundingRectWithSize:CGSizeMake(width, 10000) options:NSStringDrawingUsesLineFragmentOrigin | NSStringDrawingTruncatesLastVisibleLine attributes:attributeDic context:nil].size; if ([UIScreen.mainScreen respondsToSelector:@selector(scale)]) { if (UIScreen.mainScreen.scale == 2.0) { UIGraphicsBeginImageContextWithOptions(size, NO, 1.0); } else { UIGraphicsBeginImageContext(size); } } else { UIGraphicsBeginImageContext(size); } CGContextRef context = UIGraphicsGetCurrentContext(); [[UIColor whiteColor] set]; CGRect rect = CGRectMake(0, 0, size.width + 1, size.height + 1); CGContextFillRect(context, rect); NSMutableParagraphStyle *paragraph = [[NSMutableParagraphStyle alloc] init]; paragraph.alignment = textAlignment; NSDictionary *attributes = @ { NSForegroundColorAttributeName:[UIColor blackColor], NSFontAttributeName:font, NSParagraphStyleAttributeName:paragraph }; [string drawInRect:rect withAttributes:attributes]; UIImage *image = UIGraphicsGetImageFromCurrentImageContext(); UIGraphicsEndImageContext(); return image; }

优秀的个人博客,低调大师

iOS SSZipArchive--压缩与解压缩

配置SSZipArchive 导入SSZipArchive后,先编译,会出现如下错误: 异常.png 解决方法: 单击项目->Linked Frameworks and Libraries->点击左下角加号->输入libz.tbd->Add,再次编译即可。 图示.png 压缩 NSString *str = @"/Users/mazaiting/Desktop/tomcat.zip"; [SSZipArchive unzipFileAtPath:str toDestination:@"/Users/mazaiting/Desktop/tomcat"]; 解压缩 [SSZipArchive createZipFileAtPath:@"/Users/mazaiting/Desktop/tomcat1.zip" withContentsOfDirectory:@"/Users/mazaiting/Desktop/tomcat"];

优秀的个人博客,低调大师

iOS开发多线程篇—NSOperation基本操作

一、并发数 (1)并发数:同时执行的任务数.比如,同时开3个线程执行3个任务,并发数就是3 (2)最大并发数:同一时间最多只能执行的任务的个数。 (3)最大并发数的相关方法 - (NSInteger)maxConcurrentOperationCount; - (void)setMaxConcurrentOperationCount:(NSInteger)cnt; 说明:如果没有设置最大并发数,那么并发的个数是由系统内存和CPU决定的,可能内存多久开多一点,内存少就开少一点。 注意:num的值并不代表线程的个数,仅仅代表线程的ID。 提示:最大并发数不要乱写(5以内),不要开太多,一般以2~3为宜,因为虽然任务是在子线程进行处理的,但是cpu处理这些过多的子线程可能会影响UI,让UI变卡。 二、队列的取消,暂停和恢复 (1)取消队列的所有操作 - (void)cancelAllOperations; 提:也可以调用NSOperation的- (void)cancel法取消单个操作 (2)暂停和恢复队列 - (void)setSuspended:(BOOL)b; // YES代表暂停队列,NO代表恢复队列 - (BOOL)isSuspended; //当前状态 (3)暂停和恢复的适用场合:在tableview界面,开线程下载远程的网络界面,对UI会有影响,使用户体验变差。那么这种情况,就可以设置在用户操作UI(如滚动屏幕)的时候,暂停队列(不是取消队列),停止滚动的时候,恢复队列。 三、操作优先级 (1)设置NSOperation在queue中的优先级,可以改变操作的执优先级 - (NSOperationQueuePriority)queuePriority; - (void)setQueuePriority:(NSOperationQueuePriority)p; (2)优先级的取值 NSOperationQueuePriorityVeryLow = -8L, NSOperationQueuePriorityLow = -4L, NSOperationQueuePriorityNormal = 0, NSOperationQueuePriorityHigh = 4, NSOperationQueuePriorityVeryHigh = 8 说明:优先级高的任务,调用的几率会更大。 四、操作依赖 (1)NSOperation之间可以设置依赖来保证执行顺序,如一定要让操作A执行完后,才能执行操作B,可以像下面这么写 [operationB addDependency:operationA]; // 操作B依赖于操作 (2)可以在不同queue的NSOperation之间创建依赖关系 注意:不能循环依赖(不能A依赖于B,B又依赖于A)。 (3)代码示例 1#import"YYViewController.h"23@interfaceYYViewController()45@end67@implementationYYViewController89-(void)viewDidLoad10{11[superviewDidLoad];1213//创建NSInvocationOperation对象,封装操作14NSInvocationOperation*operation1=[[NSInvocationOperationalloc]initWithTarget:selfselector:@selector(test1)object:nil];15NSInvocationOperation*operation2=[[NSInvocationOperationalloc]initWithTarget:selfselector:@selector(test2)object:nil];16//创建对象,封装操作17NSBlockOperation*operation3=[NSBlockOperationblockOperationWithBlock:^{18for(inti=0;i<5;i++){19NSLog(@"NSBlockOperation3--1----%@",[NSThreadcurrentThread]);20}21}];22[operation3addExecutionBlock:^{23for(inti=0;i<5;i++){24NSLog(@"NSBlockOperation3--2----%@",[NSThreadcurrentThread]);25}26}];2728//设置操作依赖29//先执行operation2,再执行operation1,最后执行operation330[operation3addDependency:operation1];31[operation1addDependency:operation2];3233//不能是相互依赖34//[operation3addDependency:operation1];35//[operation1addDependency:operation3];3637//创建NSOperationQueue38NSOperationQueue*queue=[[NSOperationQueuealloc]init];39//把操作添加到队列中40[queueaddOperation:operation1];41[queueaddOperation:operation2];42[queueaddOperation:operation3];43}4445-(void)test146{47for(inti=0;i<5;i++){48NSLog(@"NSInvocationOperation--test1--%@",[NSThreadcurrentThread]);49}50}5152-(void)test253{54for(inti=0;i<5;i++){55NSLog(@"NSInvocationOperation--test2--%@",[NSThreadcurrentThread]);56}57}5859@end 打印查看: A做完再做B,B做完才做C。 注意:一定要在添加之前,进行设置。 提示:任务添加的顺序并不能够决定执行顺序,执行的顺序取决于依赖。使用Operation的目的就是为了让开发人员不再关心线程。 5.操作的监听 可以监听一个操作的执行完毕 - (void (^)(void))completionBlock; - (void)setCompletionBlock:(void (^)(void))block; 代码示例 第一种方式:可以直接跟在任务后面编写需要完成的操作,如这里在下载图片后,紧跟着下载第二张图片。但是这种写法有的时候把两个不相关的操作写到了一个代码块中,代码的可阅读性不强。 1#import"YYViewController.h"23@interfaceYYViewController()45@end67@implementationYYViewController89-(void)viewDidLoad10{11[superviewDidLoad];1213//创建对象,封装操作14NSBlockOperation*operation=[NSBlockOperationblockOperationWithBlock:^{15NSLog(@"-operation-下载图片-%@",[NSThreadcurrentThread]);16//.....下载图片后继续进行的操作17NSLog(@"--接着下载第二张图片--");18}];1920//创建队列21NSOperationQueue*queue=[[NSOperationQueuealloc]init];22//把任务添加到队列中(自动执行,自动开线程)23[queueaddOperation:operation];24}2526@end 第二种方式: 1#import"YYViewController.h"23@interfaceYYViewController()45@end67@implementationYYViewController89-(void)viewDidLoad10{11[superviewDidLoad];1213//创建对象,封装操作14NSBlockOperation*operation=[NSBlockOperationblockOperationWithBlock:^{15for(inti=0;i<10;i++){16NSLog(@"-operation-下载图片-%@",[NSThreadcurrentThread]);17}18}];1920//监听操作的执行完毕21operation.completionBlock=^{22//.....下载图片后继续进行的操作23NSLog(@"--接着下载第二张图片--");24};2526//创建队列27NSOperationQueue*queue=[[NSOperationQueuealloc]init];28//把任务添加到队列中(自动执行,自动开线程)29[queueaddOperation:operation];30}3132@end 打印查看: 说明:在上一个任务执行完后,会执行operation.completionBlock=^{}代码段,且是在当前线程执行(2)。 本文转自 卓行天下 51CTO博客,原文链接:http://blog.51cto.com/9951038/1852569,如需转载请自行联系原作者

优秀的个人博客,低调大师

【转】IOS里的多线程编程详解

以下是开发初期收集整理的一点资料 多线程之NSInvocationOperation 多线程编程是防止主线程堵塞,增加运行效率等等的最佳方法。而原始的多线程方法存在很多的毛病,包括线程锁死等。在Cocoa中,Apple提供了NSOperation这个类,提供了一个优秀的多线程编程方法。 本次介绍NSOperation的子集,简易方法的NSInvocationOperation: @implementation MyCustomClass - (void)launchTaskWithData:(id)data { //创建一个NSInvocationOperation对象,并初始化到方法 //在这里,selector参数后的值是你想在另外一个线程中运行的方法(函数,Method) //在这里,object后的值是想传递给前面方法的数据 NSInvocationOperation* theOp = [[NSInvocationOperation alloc] initWithTarget:self selector:@selector(myTaskMethod:) object:data]; // 下面将我们建立的操作“Operation”加入到本地程序的共享队列中(加入后方法就会立刻被执行) // 更多的时候是由我们自己建立“操作”队列 [[MyAppDelegate sharedOperationQueue] addOperation:theOp]; } // 这个是真正运行在另外一个线程的“方法” - (void)myTaskMethod:(id)data { // Perform the task. } @end一个NSOperationQueue 操作队列,就相当于一个线程管理器,而非一个线程。因为你可以设置这个线程管理器内可以并行运行的的线程数量等等。下面是建立并初始化一个操作队列: @interface MyViewController : UIViewController { NSOperationQueue *operationQueue; //在头文件中声明该队列 } @end @implementation MyViewController - (id)init { self = [super init]; if (self) { operationQueue = [[NSOperationQueue alloc] init]; //初始化操作队列 [operationQueue setMaxConcurrentOperationCount:1]; //在这里限定了该队列只同时运行一个线程 //这个队列已经可以使用了 } return self; } - (void)dealloc { [operationQueue release]; //正如Alan经常说的,我们是程序的好公民,需要释放内存! [super dealloc]; } @end简单介绍之后,其实可以发现这种方法是非常简单的。很多的时候我们使用多线程仅仅是为了防止主线程堵塞,而NSInvocationOperation就是最简单的多线程编程,在iPhone编程中是经常被用到的。 /////////////////////////////////////////////////////////////////////////////////////////////////// 1 在主线程里加入一个loading画面…… 2 { 3 [window addSubview:view_loading]; 4 [NSThread detachNewThreadSelector:@selector(init_backup:) toTarget:self withObject:nil]; 5 } 可以通过performSelectorOhMainThread更新UI元素,比如设置进度条等等。最后消除loading画面,载入主View。 7 - (void)init_backup:(id)sender 8 { 9 NSAutoreleasePool *pool = [[NSAutoreleasePool alloc] init]; 10 11 // ... 12 int i = status; 13 [self performSelectorOnMainThread:@selector(show_loading:) withObject:[NSNumber numberWithInt:i] waitUntil Done:NO]; 14 15 [view_loading removeFromSuperview]; 16 [window addSubview:tabcontroller_main.view]; 17 [pool release]; 18 } /////////////////////////////////////////////////////// 利用iphone的多线程实现和线程同步 从接口的定义中可以知道,NSThread和大多数iphone的接口对象一样,有两种方式可以初始化: 一种使用initWithTarget :(id)target selector:(SEL)selector object:(id)argument,但需要负责在对象的retain count为0时调用对象的release方法清理对象。 另一种则使用所谓的convenient method,这个方便接口就是detachNewThreadSelector,这个方法可以直接生成一个线程并启动它,而且无需为线程的清理负责。 #import <UIKit/UIKit.h> @interface SellTicketsAppDelegate : NSObject <UIApplicationDelegate> { int tickets; int count; NSThread* ticketsThreadone; NSThread* ticketsThreadtwo; NSCondition* ticketsCondition; UIWindow *window; } @property (nonatomic, retain) IBOutlet UIWindow *window; @end 然后在实现中添加如下代码: // SellTicketsAppDelegate.m // SellTickets // // Created by sun dfsun2009 on 09-11-10. // Copyright __MyCompanyName__ 2009. All rights reserved. // #import "SellTicketsAppDelegate.h" @implementation SellTicketsAppDelegate @synthesize window; - (void)applicationDidFinishLaunching:(UIApplication *)application { tickets = 100; count = 0; // 锁对象 ticketCondition = [[NSCondition alloc] init]; ticketsThreadone = [[NSThread alloc] initWithTarget:self selector:@selector(run) object:nil]; [ticketsThreadone setName:@"Thread-1"]; [ticketsThreadone start]; ticketsThreadtwo = [[NSThread alloc] initWithTarget:self selector:@selector(run) object:nil]; [ticketsThreadtwo setName:@"Thread-2"]; [ticketsThreadtwo start]; //[NSThread detachNewThreadSelector:@selector(run) toTarget:self withObject:nil]; // Override point for customization after application launch [window makeKeyAndVisible]; } - (void)run{ while (TRUE) { // 上锁 [ticketsCondition lock]; if(tickets > 0) { [NSThread sleepForTimeInterval:0.5]; count = 100 - tickets; NSLog(@"当前票数是:%d,售出:%d,线程名:%@",tickets,count,[[NSThread currentThread] name]); tickets--; }else { break; } [ticketsCondition unlock]; } } - (void)dealloc { [ticketsThreadone release]; [ticketsThreadtwo release]; [ticketsCondition release]; [window release]; [super dealloc]; } @end ------------------------------------------------------------------------------------- // 定义 #import <UIKit/UIKit.h> @interface ThreadSyncSampleViewController : UIViewController { int _threadCount; NSCondition *_myCondition; } @end //实现文件如下: #import "ThreadSyncSampleViewController.h" @implementation ThreadSyncSampleViewController /* // The designated initializer. Override to perform setup that is required before the view is loaded. - (id)initWithNibName:(NSString *)nibNameOrNil bundle:(NSBundle *)nibBundleOrNil { if (self = [super initWithNibName:nibNameOrNil bundle:nibBundleOrNil]) { // Custom initialization } return self; } */ /* // Implement loadView to create a view hierarchy programmatically, without using a nib. - (void)loadView { } */ // Implement viewDidLoad to do additional setup after loading the view, typically from a nib. - (void)viewDidLoad { [super viewDidLoad]; // //_myCondition = nil; // _myCondition = [[NSCondition alloc] init]; // NSTimer *timer = [NSTimer scheduledTimerWithTimeInterval:30 target:self selector:@selector(threadTester) userInfo:nil repeats:YES]; [timer fire]; } - (void)threadTester{ [_myCondition lock]; _threadCount = -2; //如果有n个要等待的thread,这里置成 -n [_myCondition unlock]; // NSLog(@""); NSLog(@"------------------------------------------------------------------------------"); [NSThread detachNewThreadSelector:@selector(threadOne) toTarget:self withObject:nil]; [NSThread detachNewThreadSelector:@selector(threadTwo) toTarget:self withObject:nil]; [NSThread detachNewThreadSelector:@selector(threadThree) toTarget:self withObject:nil]; return; } - (void)threadOne{ NSLog(@"@@@ In thread 111111 start."); [_myCondition lock]; int n = rand()%5 + 1; NSLog(@"@@@ Thread 111111 Will sleep %d seconds ,now _threadCount is : %d",n,_threadCount); sleep(n); //[NSThread sleepForTimeInterval:n]; _threadCount ++ ; NSLog(@"@@@ Thread 111111 has sleep %d seconds ,now _threadCount is : %d",n,_threadCount); [_myCondition signal]; NSLog(@"@@@ Thread 1111111 has signaled ,now _threadCount is : %d",_threadCount); [_myCondition unlock]; NSLog(@"@@@ In thread one complete."); [NSThread exit]; return; } - (void)threadTwo{ NSLog(@"### In thread 2222222 start."); [_myCondition lock]; int n = rand()%5 + 1; NSLog(@"### Thread 2222222 Will sleep %d seconds ,now _threadCount is : %d",n,_threadCount); sleep(n); // [NSThread sleepForTimeInterval:n]; _threadCount ++ ; NSLog(@"### Thread 2222222 has sleep %d seconds ,now _threadCount is : %d",n,_threadCount); [_myCondition signal]; NSLog(@"### Thread 2222222 has signaled ,now _threadCount is : %d",_threadCount); [_myCondition unlock]; //_threadCount ++ ; NSLog(@"### In thread 2222222 complete."); [NSThread exit]; return; } - (void)threadThree{ NSLog(@"<<< In thread 333333 start."); [_myCondition lock]; while (_threadCount < 0) { [_myCondition wait]; } NSLog(@"<<< In thread 333333 ,_threadCount now is %d ,will start work.",_threadCount); [_myCondition unlock]; NSLog(@"<<< In thread 333333 complete."); [NSThread exit]; return; } /* // Override to allow orientations other than the default portrait orientation. - (BOOL)shouldAutorotateToInterfaceOrientation:(UIInterfaceOrientation)interfaceOrientation { // Return YES for supported orientations return (interfaceOrientation == UIInterfaceOrientationPortrait); } */ - (void)didReceiveMemoryWarning { // Releases the view if it doesn't have a superview. [super didReceiveMemoryWarning]; // Release any cached data, images, etc that aren't in use. } - (void)viewDidUnload { // Release any retained subviews of the main view. // e.g. self.myOutlet = nil; } - (void)dealloc { [_myCondition release]; [super dealloc]; } 本文转自编程小翁博客园博客,原文链接:http://www.cnblogs.com/wengzilin/archive/2012/08/15/2639576.html,如需转载请自行联系原作者

优秀的个人博客,低调大师

iOS开发-UIWebView加载本地和网络数据

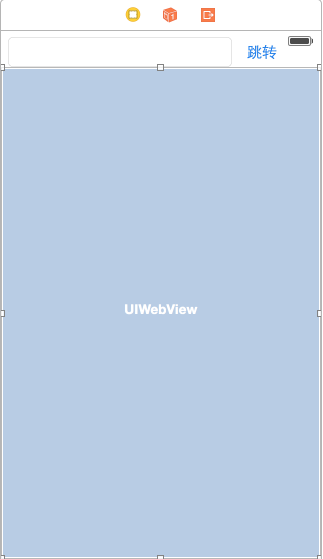
UIWebView是内置的浏览器控件,可以用它来浏览网页、打开文档,关于浏览网页榜样可以参考UC,手机必备浏览器,至于文档浏览的手机很多图书阅读软件,UIWebView是一个混合体,具体的功能控件内置的,实现一些基本的功能。UIWebView可以查看Html网页,pdf文件,docx文件,txt文件文件,系统自带的Safari就是UIWebView实现的。 基础布局 页面布局很简单就是一个文本框,一个按钮,一个UIWebView,页面布局如下: 如果想简单一点的话,其实用UIWebView也行,不过需要先准备一些文本数据,具体如下: 数据加载 ①直接拼接Html,用UIWebView显示,viewDidLoad中添加代码: 1 2 3 //直接加载Html字符串 NSString *htmlStr=@ "<html><head><title>Html加载</title></head><body>HtmlDemo-FlyElephant</body></html>" ; [ self .webView loadHTMLString:htmlStr baseURL: nil ]; ②加载本地的Html网页,Book.html中代码: 1 2 3 4 5 6 7 8 9 10 <!DOCTYPE html> <html> <head> <meta charset= "UTF-8" > <title>书籍</title> </head> <body> 少年维特之烦恼-歌德 </body> </html> viewDidLoad代码: 1 2 3 NSString *filePath = [[ NSBundle mainBundle]pathForResource:@ "Book" ofType:@ "html" ]; NSString *htmlString = [ NSString stringWithContentsOfFile:filePath encoding: NSUTF8StringEncoding error: nil ]; [ self .webView loadHTMLString:htmlString baseURL:[ NSURL URLWithString:filePath]]; ③加载本地的pdf文件,viewDidLoad代码: 1 2 3 4 5 NSURL *url = [[ NSBundle mainBundle]URLForResource:@ "Book.pdf" withExtension: nil ]; NSURLRequest *request = [ NSURLRequest requestWithURL:url]; [ self .webView loadRequest:request]; 加载pdf的第二种方式: 1 2 3 4 5 6 NSString *path = [[ NSBundle mainBundle]pathForResource:@ "Book.pdf" ofType: nil ]; //以二进制的形式加载数据 NSData *data = [ NSData dataWithContentsOfFile:path]; [ self .webView loadData:data MIMEType:@ "application/pdf" textEncodingName:@ "UTF-8" baseURL: nil ]; ④加载本地txt文件,viewDidLoad代码如下: 1 2 3 4 //加载txt NSURL *url = [[ NSBundle mainBundle]URLForResource:@ "Book.txt" withExtension: nil ]; //设置Url [ self .webView loadRequest:[ NSURLRequest requestWithURL:url]]; ⑤加载Word,viewDidLoad代码如下: 1 2 3 4 //加载Word NSURL *url = [[ NSBundle mainBundle]URLForResource:@ "Book.docx" withExtension: nil ]; //设置加载Url [ self .webView loadRequest:[ NSURLRequest requestWithURL:url]]; ⑥加载网络数据,跳转按钮事件中实现如下: 1 2 NSURLRequest *request =[ NSURLRequest requestWithURL:[ NSURL URLWithString: self .urlText.text]]; [ self .webView loadRequest:request]; ⑦设置委托,在不同的阶段处理数据,实现UIWebViewDelegate,设置自己本身为委托对象; 1 [ self .webView setDelegate: self ]; 常用的三个方法: 1 2 3 4 5 6 7 8 9 10 11 12 //加载开始 - ( void )webViewDidStartLoad:(UIWebView *)webView{ NSLog (@ "加载开始的时候的方法调用" ); } //加载完成 -( void )webViewDidFinishLoad:(UIWebView *)webView{ NSLog (@ "加载完成的时候电脑方法调用" ); } //加载出错 - ( void )webView:(UIWebView *)webView didFailLoadWithError:( NSError *)error{ NSLog (@ "加载出错的时候的调用" ); } 本文转自Fly_Elephant博客园博客,原文链接:http://www.cnblogs.com/xiaofeixiang/p/4307573.html,如需转载请自行联系原作者

优秀的个人博客,低调大师

在iOS程序中检测数字和链接

在程序中检测数字和链接 在iPhone 3.0后就支持UIDataDetectorTypes来检测数字和链接。 UIDataDetectorTypePhoneNumber UIDataDetectorTypeLink UIDataDetectorTypeNone UIDataDetectorTypeAll 通过设置dataDetectorTypes属性就可以实现功能 - (void)viewDidLoad { - self.textView.dataDetectorTypes = UIDataDetectorTypeAll; - } 同时你也可以通过Interface Builder来设置属性。 本文转自 arthurchen 51CTO博客,原文链接:http://blog.51cto.com/arthurchen/801306,如需转载请自行联系原作者

资源下载

更多资源
优质分享App

优质分享App

近一个月的开发和优化,本站点的第一个app全新上线。该app采用极致压缩,本体才4.36MB。系统里面做了大量数据访问、缓存优化。方便用户在手机上查看文章。后续会推出HarmonyOS的适配版本。

腾讯云软件源

腾讯云软件源

为解决软件依赖安装时官方源访问速度慢的问题,腾讯云为一些软件搭建了缓存服务。您可以通过使用腾讯云软件源站来提升依赖包的安装速度。为了方便用户自由搭建服务架构,目前腾讯云软件源站支持公网访问和内网访问。

Nacos

Nacos

Nacos /nɑ:kəʊs/ 是 Dynamic Naming and Configuration Service 的首字母简称,一个易于构建 AI Agent 应用的动态服务发现、配置管理和AI智能体管理平台。Nacos 致力于帮助您发现、配置和管理微服务及AI智能体应用。Nacos 提供了一组简单易用的特性集,帮助您快速实现动态服务发现、服务配置、服务元数据、流量管理。Nacos 帮助您更敏捷和容易地构建、交付和管理微服务平台。

Spring

Spring

Spring框架(Spring Framework)是由Rod Johnson于2002年提出的开源Java企业级应用框架,旨在通过使用JavaBean替代传统EJB实现方式降低企业级编程开发的复杂性。该框架基于简单性、可测试性和松耦合性设计理念,提供核心容器、应用上下文、数据访问集成等模块,支持整合Hibernate、Struts等第三方框架,其适用范围不仅限于服务器端开发,绝大多数Java应用均可从中受益。

用户登录
用户注册
修改密码
忘记密码