Kubernates集群入门(1)
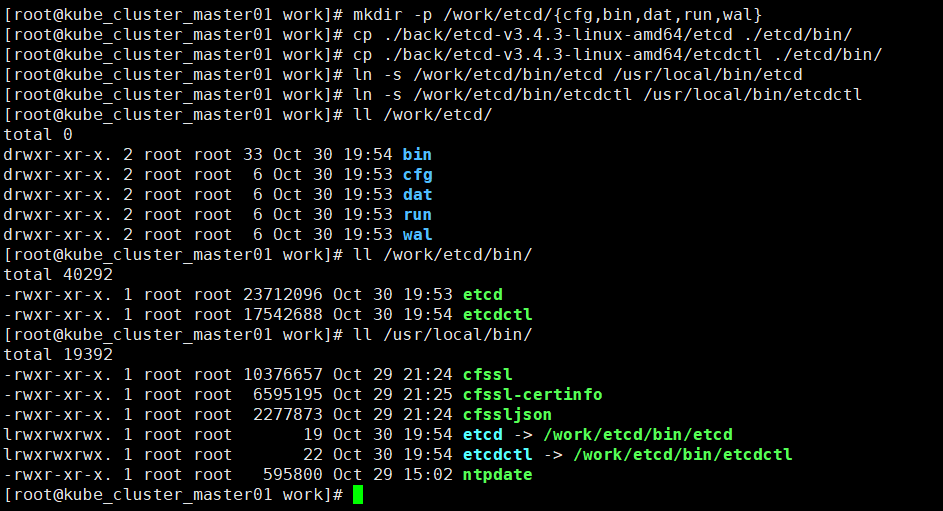
一、K8s安装准备 1.至少两台主机,一台作为master,一台作为node。两台主机需要关闭防火墙。 #centos6 service stop firewalld && service disable firewalld #centos7 systemctl stop iptables && systemctl disable iptables; 2.两台机器需要各自编辑/etc/hosts文件,互相添加hostname,然后相互ping通,以下为例 echo "192.168.18.128 centos-master 192.168.18.130 centos-minion " >> /etc/hosts 二、K8s的安装 1.两台主机都需要安装docker,kubernetes,如有docker版本冲突需要卸载重新安装docker. yum -y install docker kubernetes 2.master节点需要安装etcd数据库服务,etcd作为kubernetes的数据库 yum -y install etcd 3.每个节点,master及minion节点都需要修改kubernetes配置文件 vim /etc/kubernetes/config # How the controller-manager, scheduler, and proxy find the apiserver KUBE_MASTER="--master=http://centos-master:8080" #master节点关于指向etcd的ip可能需要改成127.0.0.1:2379,改成主机名的话kube-controller-manager可能会启动失败,不知原因 KUBE_ETCD_SERVERS="--etcd_servers=http://centos-master:2379" 示例master 下config # kubernetes system config # # The following values are used to configure various aspects of all # kubernetes services, including # # kube-apiserver.service # kube-controller-manager.service # kube-scheduler.service # kubelet.service # kube-proxy.service # logging to stderr means we get it in the systemd journal KUBE_LOGTOSTDERR="--logtostderr=true" # journal message level, 0 is debug KUBE_LOG_LEVEL="--v=0" # Should this cluster be allowed to run privileged docker containers KUBE_ALLOW_PRIV="--allow-privileged=false" # How the controller-manager, scheduler, and proxy find the apiserver KUBE_MASTER="--master=http://kube01:8080" KUBE_ETCD_SERVERS="--etcd-servers=http://kube01:2379" 4.master节点上,配置api服务给node vim /etc/kubernetes/apiserver # The address on the local server to listen to. #这个地址好像只能用0.0.0.0 KUBE_API_ADDRESS="--address=0.0.0.0" KUBE_API_PORT="--port=8080" # Comma separated list of nodes in the etcd cluster #KUBE_ETCD_SERVERS="--etcd_servers=http://127.0.0.1:2379" ##ServiceAccount这个参数删掉,会影响docker拉去镜像 # default admission control policies KUBE_ADMISSION_CONTROL="--admission-control=NamespaceLifecycle,NamespaceExists,LimitRanger,SecurityContextDeny,ServiceAccount,ResourceQuota" 示例:master节点apiserver: # kubernetes system config # # The following values are used to configure the kube-apiserver # # The address on the local server to listen to. KUBE_API_ADDRESS="--insecure-bind-address=0.0.0.0" # The port on the local server to listen on. KUBE_API_PORT="--port=8080" # Port minions listen on # KUBELET_PORT="--kubelet-port=10250" # Comma separated list of nodes in the etcd cluster KUBE_ETCD_SERVERS="--etcd-servers=http://127.0.0.1:2379" # Address range to use for services KUBE_SERVICE_ADDRESSES="--service-cluster-ip-range=10.254.0.0/16" # default admission control policies KUBE_ADMISSION_CONTROL="--admission-control=NamespaceLifecycle,NamespaceExists,LimitRanger,SecurityContextDeny,ResourceQuota" # Add your own! KUBE_API_ARGS="" 5.master节点上编写启动相关kubernetes服务的脚本 vim k8s-server.sh #!/bin/bash OPT=$1 case $1 in -s) for SERVICES in etcd kube-apiserver kube-controller-manager kube-scheduler; do systemctl restart $SERVICES systemctl enable $SERVICES systemctl status $SERVICES done ;; -k) for SERVICES in etcd kube-apiserver kube-controller-manager kube-scheduler ; do systemctl stop $SERVICES done ;; -stat) for SERVICES in etcd kube-apiserver kube-controller-manager kube-scheduler; do systemctl status $SERVICES done ;; *) echo "useage:./k8s-server.sh <-s|-k|-stat>---- '-s' is start Servers\n--- '-k' is stop Servers\n'-stat' is watch the status " ;; esac 6.node节点修改/etc/kubernetes/kubelet,配置与master的连接 ### # kubernetes kubelet (minion) config KUBELET_ADDRESS="--address=0.0.0.0" KUBELET_PORT="--port=10250" KUBELET_HOSTNAME="--hostname_override=centos-minion" KUBELET_API_SERVER="--api_servers=http://centos-master:8080“ # Add your own! KUBELET_ARGS="" minion节点 config示例 ### # kubernetes system config # # The following values are used to configure various aspects of all # kubernetes services, including # # kube-apiserver.service # kube-controller-manager.service # kube-scheduler.service # kubelet.service # kube-proxy.service # logging to stderr means we get it in the systemd journal KUBE_LOGTOSTDERR="--logtostderr=true" # journal message level, 0 is debug KUBE_LOG_LEVEL="--v=0" # Should this cluster be allowed to run privileged docker containers KUBE_ALLOW_PRIV="--allow-privileged=false" # How the controller-manager, scheduler, and proxy find the apiserver KUBE_MASTER="--master=http://kube01:8080" minion节点kubelet示例 ### # kubernetes kubelet (minion) config # The address for the info server to serve on (set to 0.0.0.0 or "" for all interfaces) KUBELET_ADDRESS="--address=0.0.0.0" # The port for the info server to serve on #KUBELET_PORT="--port=10250" # You may leave this blank to use the actual hostname KUBELET_HOSTNAME="--hostname-override=kube02" # location of the api-server KUBELET_API_SERVER="--api-servers=http://kube01:8080" # pod infrastructure container KUBELET_POD_INFRA_CONTAINER="--pod-infra-container-image=registry.access.redhat.com/rhel7/pod-infrastructure:latest" # Add your own! KUBELET_ARGS="" 7.node节点编写启动和查看服务脚本 #!/bin/bash OPT=$1 case $1 in -s) for SERVICES in kube-proxy kubelet docker; do systemctl restart $SERVICES systemctl enable $SERVICES systemctl status $SERVICES done ;; -k) for SERVICES in kube-proxy kubelet docker; do systemctl stop $SERVICES done ;; -stat) for SERVICES in kube-proxy kubelet docker; do systemctl status $SERVICES done ;; *) echo "useage:./k8s.sh <-s|-k|-stat>---- '-s' is start Servers\n--- '-k' is stop Servers\n'-stat' is watch the status " ;; esac 8.node节点查看是否成功注册到master节点,如果没关闭防火墙会报错 tail -f /var/log/messages |grep kube 9.master节点查看刚才注册的节点,节点status为ready为正常 kubectl get nodes 10.kubectl是master端的交互工具,可以通过子命令查看节点等信息 kubectl get nodes #获取节点列表 kubectl cluster-info #查看节点信息 下一节演示一个简单的kubernetes实例,master节点通过yaml文件,让node节点自动pull镜像并运行。** 如果启动docker报错,如下 当前docker版本1.13.1 执行启动命令: systemctl start docker ,报下面错误: Error starting daemon: SELinux is not supported with the overlay2 graph driver on this kernel. Either boot into a newer kernel or disable selinux in docker (--selinux-enabled=false) 重新编辑docker配置文件: vi /etc/sysconfig/docker # /etc/sysconfig/docker # Modify these options if you want to change the way the docker daemon runs OPTIONS='--selinux-enabled=false --log-driver=journald --signature-verification=false' if [ -z "${DOCKER_CERT_PATH}" ]; then DOCKER_CERT_PATH=/etc/docker fi :wq systemctl restart docker