首页 文章 精选 留言 我的

精选列表

搜索[高并发],共10000篇文章
优秀的个人博客,低调大师

mysql可用方案之主主架构(master-master)

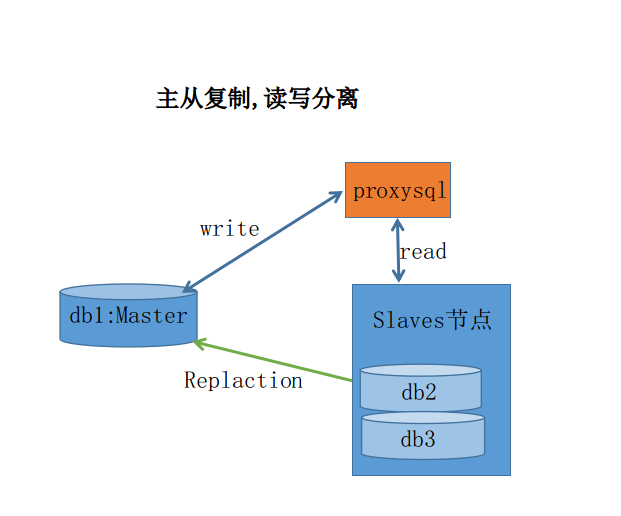
mysql的主从是将主服务器操作记录写入二进制日志文件,然后通过mysql dump线程将日志传到从服务器中继日志中,从服务器在中继日志读取信息并执行.mysql主主架构原理和主从差不多,只是两台服务器都要开启二进制日志文件,并互相传送给对方读取日志中的内容,使数据同步.两台服务器可以同时读也可以同时写,但不能解决单点故障. 环境规划: 主机名:tong2 IP:192.168.1.248 主机名:tong3 IP:192.168.1.249 数据库:mysql-5.6.21 1.配置服务器网络环境 tong2节点: [root@tong2 ~]# ifconfig eth0 eth0 Link encap:Ethernet HWaddr 10:78:D2:C7:17:E8 inet addr:192.168.1.248 Bcast:192.168.1.255 Mask:255.255.255.0 inet6 addr: fe80::1278:d2ff:fec7:17e8/64 Scope:Link UP BROADCAST RUNNING MULTICAST MTU:1500 Metric:1 RX packets:3118346 errors:0 dropped:0 overruns:0 frame:0 TX packets:16271 errors:0 dropped:0 overruns:0 carrier:0 collisions:0 txqueuelen:1000 RX bytes:201242719 (191.9 MiB) TX bytes:1754452 (1.6 MiB) [root@tong2 ~]# vim /etc/hosts 192.168.1.248 tong2 192.168.1.249 tong3 [root@tong2 ~]# tong3节点: [root@tong3 ~]# ifconfig eth0 eth0 Link encap:Ethernet HWaddr 10:78:D2:C8:F7:50 inet addr:192.168.1.249 Bcast:192.168.1.255 Mask:255.255.255.0 inet6 addr: fe80::1278:d2ff:fec8:f750/64 Scope:Link UP BROADCAST RUNNING MULTICAST MTU:1500 Metric:1 RX packets:5055594 errors:0 dropped:0 overruns:0 frame:0 TX packets:96641 errors:0 dropped:0 overruns:0 carrier:0 collisions:0 txqueuelen:1000 RX bytes:580382285 (553.4 MiB) TX bytes:7055569 (6.7 MiB) [root@tong3 ~]# vim /etc/hosts 192.168.1.248 tong2 192.168.1.249 tong3 [root@tong3 ~]# 2.下载安装mysql-5.6.21软件 tong2节点和tong3节点: http://mirrors.sohu.com/mysql/MySQL-5.6/ --下载关于mysql的软件 [root@tong2 ~]# rpm -ivh MySQL-* --安装所有的mysql软件包 3.修改配置文件 tong2节点: [root@tong2 ~]# vim /usr/my.cnf --在配置文件中添加如下内容 server_id = 10 --服务器的id号 log-bin=mysql-bin --二进制日志文件 log-bin-index=mysql-bin-index --索引文件 relay-log=relay-bin --中继日志文件 relay-log-index=relay-bin-index --中继索引文件 replicate-do-db=tong--要同步的数据库 auto_increment_offset=1 --设置服务器交叉读写数据 auto_increment_increment=2 [root@tong2 ~]# tong3节点: [root@tong3 ~]# vim /usr/my.cnf server_id = 20 log-bin=mysql-bin log-bin-index=mysql-bin-index relay-log=relay-bin relay-log-index=relay-bin-index replicate-do-db=tong auto_increment_offset=2 auto_increment_increment=2 [root@tong3 ~]# 3.登陆数据库并创建用户 tong2节点: [root@tong2 ~]# /etc/init.d/mysql restart --重启服务 Shutting down MySQL.. SUCCESS! Starting MySQL. SUCCESS! [root@tong2 ~]# netstat -antup | grep 3306 tcp 0 0 :::3306 :::* LISTEN 8508/mysqld [root@tong2 ~]# mysql -u root -p Enter password: Welcome to the MySQL monitor. Commands end with ; or \g. Your MySQL connection id is 5 Server version: 5.6.21 MySQL Community Server (GPL) Copyright (c) 2000, 2014, Oracle and/or its affiliates. All rights reserved. Oracle is a registered trademark of Oracle Corporation and/or its affiliates. Other names may be trademarks of their respective owners. Type 'help;' or '\h' for help. Type '\c' to clear the current input statement. mysql> create database tong; --创建要同步的数据库 Query OK, 1 row affected (0.00 sec) mysql> grant replication slave,replication client on *.* to'tong2'@'192.168.1.249'identified by 'system'; --创建复制用户 Query OK, 0 rows affected (0.00 sec) mysql> flush tables; Query OK, 0 rows affected (0.00 sec) mysql> tong3节点: [root@tong3 ~]# /etc/init.d/mysql restart Shutting down MySQL.. SUCCESS! Starting MySQL. SUCCESS! [root@tong3 ~]# netstat -antup | grep 3306 tcp 0 0 :::3306 :::* LISTEN 3484/mysqld [root@tong3 ~]# mysql -u root -p Enter password: Welcome to the MySQL monitor. Commands end with ; or \g. Your MySQL connection id is 3 Server version: 5.6.21 MySQL Community Server (GPL) Copyright (c) 2000, 2014, Oracle and/or its affiliates. All rights reserved. Oracle is a registered trademark of Oracle Corporation and/or its affiliates. Other names may be trademarks of their respective owners. Type 'help;' or '\h' for help. Type '\c' to clear the current input statement. mysql> create database tong; Query OK, 1 row affected (0.00 sec) mysql> grant replication slave,replication client on *.* totong3@'192.168.1.248'identified by 'system'; Query OK, 0 rows affected (0.00 sec) mysql> flush tables; Query OK, 0 rows affected (0.00 sec) mysql> 4.iptable包过滤 tong2节点和tong3节点: [root@tong2 ~]# vim /etc/sysconfig/iptables -A INPUT -m state --state NEW -m tcp -p tcp -s 192.168.1.249--dport 3306 -j ACCEPT --添加规则,放行对mysql的通行 [root@tong2 ~]# /etc/init.d/iptables restart iptables: Setting chains to policy ACCEPT: filter [ OK ] iptables: Flushing firewall rules: [ OK ] iptables: Unloading modules: [ OK ] iptables: Applying firewall rules: [ OK ] [root@tong2 ~]# 5.查看各节点的二进制日志的位置 tong2节点: mysql> show master status; +------------------+----------+--------------+------------------+-------------------+ | File | Position | Binlog_Do_DB | Binlog_Ignore_DB | Executed_Gtid_Set | +------------------+----------+--------------+------------------+-------------------+ | mysql-bin.000001 | 120 | | | | +------------------+----------+--------------+------------------+-------------------+ 1 row in set (0.00 sec) mysql> tong3节点: mysql> show master status; +------------------+----------+--------------+------------------+-------------------+ | File | Position | Binlog_Do_DB | Binlog_Ignore_DB | Executed_Gtid_Set | +------------------+----------+--------------+------------------+-------------------+ | mysql-bin.000004 | 120 | | | | +------------------+----------+--------------+------------------+-------------------+ 1 row in set (0.00 sec) mysql> 6.服务器互相连接 tong2节点: [root@tong2 ~]# mysql -u root -p Enter password: Welcome to the MySQL monitor. Commands end with ; or \g. Your MySQL connection id is 2 Server version: 5.6.21-log MySQL Community Server (GPL) Copyright (c) 2000, 2014, Oracle and/or its affiliates. All rights reserved. Oracle is a registered trademark of Oracle Corporation and/or its affiliates. Other names may be trademarks of their respective owners. Type 'help;' or '\h' for help. Type '\c' to clear the current input statement. mysql> change master to master_host='192.168.1.249',master_user='tong3',master_password='system',master_port=3306,master_log_file='mysql-bin.000004',master_log_pos=120; Query OK, 0 rows affected, 2 warnings (0.43 sec) mysql> start slave; Query OK, 0 rows affected (0.03 sec) mysql> show slave status \G *************************** 1. row *************************** Slave_IO_State: Waiting for master to send event Master_Host: 192.168.1.249 Master_User: tong3 Master_Port: 3306 Connect_Retry: 60 Master_Log_File: mysql-bin.000004 Read_Master_Log_Pos: 120 Relay_Log_File: relay-bin.000002 Relay_Log_Pos: 283 Relay_Master_Log_File: mysql-bin.000004 Slave_IO_Running: Yes --io线程启动正常 Slave_SQL_Running: Yes--sql线程启动正常 Replicate_Do_DB: tong --要同步的数据库 Replicate_Ignore_DB: Replicate_Do_Table: Replicate_Ignore_Table: Replicate_Wild_Do_Table: Replicate_Wild_Ignore_Table: Last_Errno: 0 Last_Error: Skip_Counter: 0 Exec_Master_Log_Pos: 120 Relay_Log_Space: 450 Until_Condition: None Until_Log_File: Until_Log_Pos: 0 Master_SSL_Allowed: No Master_SSL_CA_File: Master_SSL_CA_Path: Master_SSL_Cert: Master_SSL_Cipher: Master_SSL_Key: Seconds_Behind_Master: 0 Master_SSL_Verify_Server_Cert: No Last_IO_Errno: 0 Last_IO_Error: Last_SQL_Errno: 0 Last_SQL_Error: Replicate_Ignore_Server_Ids: Master_Server_Id: 20 Master_UUID: 6009ee25-7f93-11e4-8817-1078d2c8f750 Master_Info_File: /var/lib/mysql/master.info SQL_Delay: 0 SQL_Remaining_Delay: NULL Slave_SQL_Running_State: Slave has read all relay log; waiting for the slave I/O thread to update it Master_Retry_Count: 86400 Master_Bind: Last_IO_Error_Timestamp: Last_SQL_Error_Timestamp: Master_SSL_Crl: Master_SSL_Crlpath: Retrieved_Gtid_Set: Executed_Gtid_Set: Auto_Position: 0 1 row in set (0.00 sec) mysql> tong3节点: [root@tong3 ~]# mysql -u root -p Enter password: Welcome to the MySQL monitor. Commands end with ; or \g. Your MySQL connection id is 2 Server version: 5.6.21-log MySQL Community Server (GPL) Copyright (c) 2000, 2014, Oracle and/or its affiliates. All rights reserved. Oracle is a registered trademark of Oracle Corporation and/or its affiliates. Other names may be trademarks of their respective owners. Type 'help;' or '\h' for help. Type '\c' to clear the current input statement. mysql> change master to master_host='192.168.1.248',master_user='tong2',master_password='system',master_port=3306,master_log_file='mysql-bin.000001',master_log_pos=120; Query OK, 0 rows affected, 2 warnings (0.43 sec) mysql> start slave; Query OK, 0 rows affected (0.06 sec) mysql> show slave status\G *************************** 1. row *************************** Slave_IO_State: Waiting for master to send event Master_Host: 192.168.1.248 Master_User: tong2 Master_Port: 3306 Connect_Retry: 60 Master_Log_File: mysql-bin.000001 Read_Master_Log_Pos: 120 Relay_Log_File: relay-bin.000002 Relay_Log_Pos: 283 Relay_Master_Log_File: mysql-bin.000001 Slave_IO_Running: Yes Slave_SQL_Running: Yes Replicate_Do_DB: tong Replicate_Ignore_DB: Replicate_Do_Table: Replicate_Ignore_Table: Replicate_Wild_Do_Table: Replicate_Wild_Ignore_Table: Last_Errno: 0 Last_Error: Skip_Counter: 0 Exec_Master_Log_Pos: 120 Relay_Log_Space: 450 Until_Condition: None Until_Log_File: Until_Log_Pos: 0 Master_SSL_Allowed: No Master_SSL_CA_File: Master_SSL_CA_Path: Master_SSL_Cert: Master_SSL_Cipher: Master_SSL_Key: Seconds_Behind_Master: 0 Master_SSL_Verify_Server_Cert: No Last_IO_Errno: 0 Last_IO_Error: Last_SQL_Errno: 0 Last_SQL_Error: Replicate_Ignore_Server_Ids: Master_Server_Id: 10 Master_UUID: 2cb52da5-759f-11d6-bc85-1078d2c717e8 Master_Info_File: /var/lib/mysql/master.info SQL_Delay: 0 SQL_Remaining_Delay: NULL Slave_SQL_Running_State: Slave has read all relay log; waiting for the slave I/O thread to update it Master_Retry_Count: 86400 Master_Bind: Last_IO_Error_Timestamp: Last_SQL_Error_Timestamp: Master_SSL_Crl: Master_SSL_Crlpath: Retrieved_Gtid_Set: Executed_Gtid_Set: Auto_Position: 0 1 row in set (0.00 sec) mysql> 7.测试服务是否正常 tong2节点: mysql> create table a (a int); Query OK, 0 rows affected (0.26 sec) mysql> insert into a values(1),(2),(3),(4); Query OK, 4 rows affected (0.03 sec) Records: 4 Duplicates: 0 Warnings: 0 mysql> select * from a; +------+ | a | +------+ | 1 | | 2 | | 3 | | 4 | +------+ 4 rows in set (0.00 sec) mysql> tong3节点: mysql> \u tong Reading table information for completion of table and column names You can turn off this feature to get a quicker startup with -A Database changed mysql> select * from a; +------+ | a | +------+ | 1 | | 2 | | 3 | | 4 | +------+ 4 rows in set (0.00 sec) mysql>create table a1 (a1 int); Query OK, 0 rows affected (0.27 sec) mysql> insert into a1 values(11),(12),(13),(14); Query OK, 4 rows affected (0.03 sec) Records: 4 Duplicates: 0 Warnings: 0 mysql> select * from a1; +------+ | a1 | +------+ | 11 | | 12 | | 13 | | 14 | +------+ 4 rows in set (0.00 sec) mysql> tong2节点: mysql> select * from a1; +------+ | a1 | +------+ | 11 | | 12 | | 13 | | 14 | +------+ 4 rows in set (0.00 sec) mysql> 本文转自 z597011036 51CTO博客,原文链接:http://blog.51cto.com/tongcheng/1588375,如需转载请自行联系原作者

优秀的个人博客,低调大师

mysql可用方案之主从架构(master-slave)

mysql主从在目前企业中很常见的方案之一,主是将DML,DDL,DML语句用mysql dump进程将二进制日志记录,从是用thread_io线程读取主上的制日志存放中继日志中,再用thread_sql线程读取中继日志将数据写入到数据库,实现数据同步. mysqldba技术群 378190849 武汉-linux运维群 236415619 架构规划: tong1:192.168.1.247 tong2:192.168.1.248 1.配置网络 tong1节点: [root@tong1 ~]# hostname tong1 [root@tong1 ~]# cat /etc/hosts 192.168.1.247 tong1 192.168.1.248 tong2 [root@tong1 ~]# tong2节点: [root@tong2 ~]# hostname tong2 [root@tong2 ~]# cat /etc/hosts 192.168.1.247 tong1 192.168.1.248 tong2 [root@tong2 ~]# 2.下载安装mysql数据库 在两个节点安装mysql数据库 [root@tong1 ~]# wgethttp://mirrors.sohu.com/mysql/MySQL-5.6/mysql-5.6.23-linux-glibc2.5-x86_64.tar.gz [root@tong1 ~]# tar xvf mysql-5.6.23-linux-glibc2.5-x86_64.tar.gz -C /usr/local/ [root@tong1 ~]# cd /usr/local/ [root@tong1 ~]# mv mysql-5.6.23-linux-glibc2.5-x86_64/ mysql-5.6.23 [root@tong1 ~]# cd mysql-5.6.23/ [root@tong1 ~]# ./scripts/mysql_install_db --user=mysql --group=mysql --basedir=/usr/local/mysql-5.6.23 --datadir=/usr/local/mysql-5.6.23/data [root@tong1 ~]# cp -a my.cnf /etc/ [root@tong1 ~]# cp -a support-files/mysql.server /etc/init.d/mysqld [root@tong1 ~]# chkconfig --add mysqld [root@tong1 ~]# chkconfig mysqld on [root@tong1 ~]# vim /etc/my.cnf basedir = /usr/local/mysql-5.6.23 datadir = /usr/local/mysql-5.6.23/data port = 3306 server_id = 20 socket = /tmp/mysql.sock [root@tong1 ~]# pkill mysqld [root@tong1 ~]# /etc/init.d/mysqld restart [root@tong1 ~]# /usr/local/mysql-5.6.23/bin/mysqladmin -u root password 'system' [root@tong1 ~]# /usr/local/mysql-5.6.23/bin/mysql -u root -p --输入密码system Enter password: Welcome to the MySQL monitor. Commands end with ; or \g. Your MySQL connection id is 5 Server version: 5.6.23 MySQL Community Server (GPL) Copyright (c) 2000, 2015, Oracle and/or its affiliates. All rights reserved. Oracle is a registered trademark of Oracle Corporation and/or its affiliates. Other names may be trademarks of their respective owners. Type 'help;' or '\h' for help. Type '\c' to clear the current input statement. mysql> exit Bye [root@tong1 ~]# 3.在主库上开启二进制日志和防火墙 tong1节点: [root@tong1 ~]# vim /etc/my.cnf basedir = /usr/local/mysql-5.6.23 datadir = /usr/local/mysql-5.6.23/data port = 3306 server_id = 20 socket = /tmp/mysql.sock log-bin=mysql-bin log-bin-index=mysql-bin-index [root@tong1 ~]# vim /etc/sysconfig/iptables -A INPUT -m state --state NEW -m tcp -p tcp -s 192.168.1.248 --dport 3306 -j ACCEPT [root@tong1 ~]# /etc/init.d/iptables restart iptables: Setting chains to policy ACCEPT: filter [ OK ] iptables: Flushing firewall rules: [ OK ] iptables: Unloading modules: [ OK ] iptables: Applying firewall rules: [ OK ] [root@tong1 ~]# /etc/init.d/mysqld restart Shutting down MySQL.. SUCCESS! Starting MySQL. SUCCESS! [root@tong1 ~]# /usr/local/mysql-5.6.23/bin/mysql -u root -p Enter password: Welcome to the MySQL monitor. Commands end with ; or \g. Your MySQL connection id is 1 Server version: 5.6.23 MySQL Community Server (GPL) Copyright (c) 2000, 2015, Oracle and/or its affiliates. All rights reserved. Oracle is a registered trademark of Oracle Corporation and/or its affiliates. Other names may be trademarks of their respective owners. Type 'help;' or '\h' for help. Type '\c' to clear the current input statement. mysql> grant replication slave ,replication client on *.* to repl_user@'192.168.1.248' identified by 'system!#%246'; Query OK, 0 rows affected (0.00 sec) mysql> flush privileges; Query OK, 0 rows affected (0.00 sec) mysql> create database tong; Query OK, 1 row affected (0.00 sec) mysql> show master status ; +------------------+----------+--------------+------------------+-------------------+ | File | Position | Binlog_Do_DB | Binlog_Ignore_DB | Executed_Gtid_Set | +------------------+----------+--------------+------------------+-------------------+ | mysql-bin.000001 | 528 | | | | +------------------+----------+--------------+------------------+-------------------+ 1 row in set (0.00 sec) mysql> 4.在从库上配置复制主库的数据 [root@tong2 mysql-5.6.23]# vim /etc/my.cnf basedir = /usr/local/mysql-5.6.23 datadir = /usr/local/mysql-5.6.23/data port = 3306 server_id = 10 socket = /tmp/mysql.sockreplicate-do-db=tong replicate-ignore-db=mysql [root@tong2 mysql-5.6.23]# /etc/init.d/mysqld restart Shutting down MySQL.. SUCCESS! Starting MySQL. SUCCESS! [root@tong2 mysql-5.6.23]# /usr/local/mysql-5.6.23/bin/mysql -u root -p Enter password: Welcome to the MySQL monitor. Commands end with ; or \g. Your MySQL connection id is 1 Server version: 5.6.23 MySQL Community Server (GPL) Copyright (c) 2000, 2015, Oracle and/or its affiliates. All rights reserved. Oracle is a registered trademark of Oracle Corporation and/or its affiliates. Other names may be trademarks of their respective owners. Type 'help;' or '\h' for help. Type '\c' to clear the current input statement. mysql> create database tong; Query OK, 1 row affected (0.00 sec) mysql> change master to master_host='192.168.1.247',master_user='repl_user',master_password='system!#%246',master_port=3306,master_log_file='mysql-bin.000001',master_log_pos=528; Query OK, 0 rows affected, 2 warnings (0.43 sec) mysql> start slave; Query OK, 0 rows affected (0.03 sec) mysql> show slave status \G *************************** 1. row *************************** Slave_IO_State: Waiting for master to send event Master_Host: 192.168.1.247 Master_User: repl_user Master_Port: 3306 Connect_Retry: 60 Master_Log_File: mysql-bin.000001 Read_Master_Log_Pos: 528 Relay_Log_File: tong2-relay-bin.000002 Relay_Log_Pos: 283 Relay_Master_Log_File: mysql-bin.000001 Slave_IO_Running: Yes Slave_SQL_Running: Yes Replicate_Do_DB: tong Replicate_Ignore_DB: mysql Replicate_Do_Table: Replicate_Ignore_Table: Replicate_Wild_Do_Table: Replicate_Wild_Ignore_Table: Last_Errno: 0 Last_Error: Skip_Counter: 0 Exec_Master_Log_Pos: 528 Relay_Log_Space: 456 Until_Condition: None Until_Log_File: Until_Log_Pos: 0 Master_SSL_Allowed: No Master_SSL_CA_File: Master_SSL_CA_Path: Master_SSL_Cert: Master_SSL_Cipher: Master_SSL_Key: Seconds_Behind_Master: 0 Master_SSL_Verify_Server_Cert: No Last_IO_Errno: 0 Last_IO_Error: Last_SQL_Errno: 0 Last_SQL_Error: Replicate_Ignore_Server_Ids: Master_Server_Id: 20 Master_UUID: 3de2c8c6-ed4c-11e4-9392-1078d2c78303 Master_Info_File: /usr/local/mysql-5.6.23/data/master.info SQL_Delay: 0 SQL_Remaining_Delay: NULL Slave_SQL_Running_State: Slave has read all relay log; waiting for the slave I/O thread to update it Master_Retry_Count: 86400 Master_Bind: Last_IO_Error_Timestamp: Last_SQL_Error_Timestamp: Master_SSL_Crl: Master_SSL_Crlpath: Retrieved_Gtid_Set: Executed_Gtid_Set: Auto_Position: 0 1 row in set (0.00 sec) mysql> 5.验证主从同步 tong1主库: [root@tong1 mysql-5.6.23]# /usr/local/mysql-5.6.23/bin/mysql -u root -p Enter password: Welcome to the MySQL monitor. Commands end with ; or \g. Your MySQL connection id is 1 Server version: 5.6.23 MySQL Community Server (GPL) Copyright (c) 2000, 2015, Oracle and/or its affiliates. All rights reserved. Oracle is a registered trademark of Oracle Corporation and/or its affiliates. Other names may be trademarks of their respective owners. Type 'help;' or '\h' for help. Type '\c' to clear the current input statement. mysql> \u tong Database changed mysql> create table t (a int); Query OK, 0 rows affected (0.29 sec) mysql> insert into t values(1),(2),(3); Query OK, 3 rows affected (0.03 sec) Records: 3 Duplicates: 0 Warnings: 0 mysql> select * from t; +------+ | a | +------+ | 1 | | 2 | | 3 | +------+ 3 rows in set (0.00 sec) mysql> tong2从库验证数据: [root@tong2 mysql-5.6.23]# /usr/local/mysql-5.6.23/bin/mysql -u root -p Enter password: Welcome to the MySQL monitor. Commands end with ; or \g. Your MySQL connection id is 1 Server version: 5.6.23 MySQL Community Server (GPL) Copyright (c) 2000, 2015, Oracle and/or its affiliates. All rights reserved. Oracle is a registered trademark of Oracle Corporation and/or its affiliates. Other names may be trademarks of their respective owners. Type 'help;' or '\h' for help. Type '\c' to clear the current input statement. mysql> \u tong mysql> select * from t; +------+ | a | +------+ | 1 | | 2 | | 3 | +------+ 3 rows in set (0.00 sec) mysql> 本文转自 z597011036 51CTO博客,原文链接:http://blog.51cto.com/tongcheng/1340214,如需转载请自行联系原作者

优秀的个人博客,低调大师

构建docker可用私有仓库基于Harbor开源系统

操作系统及相关软件版本说明: 测试服务器IP地址: IP 1 = 192.168.85.158,简称A仓库 IP 2 = 192.168.85.157,简称B仓库 一、Harbor项目介绍 1、Harbor来源 VMware公司最近开源了企业级Registry项目Harbor,其的目标是帮助用户迅速搭建一个企业级的Docker registry 服务。 它以Docker公司开源的registry 为基础,提供了管理UI, 基于角色的访问控制(Role Based Access Control),AD/LDAP集成、以及审计日志(Audit logging) 等企业用户需求的功能,同时还原生支持中文。 2、架构介绍 1)主要组件 Harbor在架构上主要由五个组件构成: ◆Proxy:Harbor的registry, UI, token等服务,通过一个前置的反向代理统一接收浏览器、Docker客户端的请求,并将请求转发给后端不同的服务。 ◆Registry: 负责储存Docker镜像,并处理docker push/pull 命令。由于我们要对用户进行访问控制,即不同用户对Docker image有不同的读写权限,Registry会指向一个token服务,强制用户的每次docker pull/push请求都要携带一个合法的token, Registry会通过公钥对token 进行解密验证。 ◆Core services: 这是Harbor的核心功能,主要提供以下服务: ◇UI:提供图形化界面,帮助用户管理registry上的镜像(image), 并对用户进行授权。 ◇webhook:为了及时获取registry 上image状态变化的情况, 在Registry上配置webhook,把状态变化传递给UI模块。 ◇token 服务:负责根据用户权限给每个docker push/pull命令签发token. Docker 客户端向Registry服务发起的请求,如果不包含token,会被重定向到这里,获得token后再重新向Registry进行请求。 ◆Database:为core services提供数据库服务,负责储存用户权限、审计日志、Docker image分组信息等数据。 ◆Log collector:为了帮助监控Harbor运行,负责收集其他组件的log,供日后进行分析。 各个组件之间的关系如下图所示: 2)实现 Harbor的每个组件都是以Docker容器的形式构建的,所以使用Docker Compose来对它进行部署。 用于部署Harbor的Docker Compose 模板位于 /Deployer/docker-compose.yml. 打开这个模板文件,会发现Harbor由5个容器组成: ◆proxy: 由Nginx 服务器构成的反向代理。 ◆registry:由Docker官方的开源registry 镜像构成的容器实例。 ◆ui: 即架构中的core services, 构成此容器的代码是Harbor项目的主体。 ◆mysql: 由官方MySql镜像构成的数据库容器。 ◆log: 运行着rsyslogd的容器,通过log-driver的形式收集其他容器的日志。 这几个容器通过Docker link的形式连接在一起,这样,在容器之间可以通过容器名字互相访问。对终端用户而言,只需要暴露proxy (即Nginx)的服务端口。 二、安装Docker Compose 1、安装docker-compose方法一 $ sudo –i # curl -L https://github.com/docker/compose/releases/download/1.8.1/docker-compose-`uname -s`-`uname -m` > /usr/local/bin/docker-compose #chmod+x/usr/local/bin/docker-compose # docker-compose --version docker-compose version: 1.8.1 这样便安装好了docker-compose。 三、安装2台Harbor 以下操作,都是2台服务器同时操作 实现原理图: 1、下载harbor安装包 在线包: https://github.com/vmware/harbor/releases/download/0.4.5/harbor-online-installer-0.4.5.tgz 离线包: https://github.com/vmware/harbor/releases/download/0.4.5/harbor-offline-installer-0.4.5.tgz 2、解压、配置、安装harbor 在安装harbor之前,需要修改/data/harbor/harbor.cfg中的配置参数,然后执行install.sh脚本来生成harbor所有容器的配置文件及启动harbor 在文件harbor.cfg中,需要配置的参数如下: hostname:私有仓库的主机名,可以是IP地址,也可以是域名。这里是配置的域名 hostname = 192.168.85.157 ui_url_protocol:用户访问私仓时使用的协议,默认时http,也可配置成https; ui_url_protocol =http 邮箱账号配置 #Email account settings for sending out password resetting emails. email_server = smtp.xxxxx.com email_server_port = 25 email_username = channel@xxxxx.com email_password = xxxxf04 email_from = channel <channel@xxxxx.com> email_ssl = false harbor_admin_password:harbor的管理员账户密码,默认密码是: Harbor12345 用户名是:admin 其他配置参数可以参考: https://github.com/vmware/harbor/blob/master/docs/installation_guide.md 3、安装启动harbor # ./install.sh 用docker-compose ps查看下,所有容器是否都启动 四、创建docker harbor主主复制 1、在A仓库创建镜像同步策略 http://192.168.85.158 使用用户名/密码: admin/ Harbor12345 登陆 登陆后,新建项目hlg_web 点击新增策略,填写相关对端harbor信息,最后点击测试连接 返回测试连接目标成功,表示创建成功 点击完成,即可看到 2、在A仓库中上传镜像到同步项目中并验证 以下在A仓库机器执行 # docker login -u admin -p Harbor12345 192.168.85.158 Login Succeeded # docker tag c8c29d842c09 192.168.85.158/hlg_web/nginx:1.9 注:c8c29d842c09为nginx的images id # docker push 192.168.85.158/hlg_web/nginx:1.9 然后分别在A仓库、B仓库页面,进行查看验证 注:在push上传时,必须要有对应的项目名称,才能push成功 然后登陆B仓库,查看配置的复制策略,是否同步过来 从主面板看,日志也给同步过来了 3、在B仓库中上传镜像验证同步 按照上面的方法,反过来,在192.168.85.157上创建策略 项目—项目名称—点开 点击“复制”—“新增策略” 然后我们在B仓库上上传镜像到hlg_web中 # docker tag 942fd5fd357e 192.168.85.157/hlg_web/swarm # docker push 192.168.85.157/hlg_web/swarm 登陆B仓库管理系统 日志显示,已经上传成功。然后在到对应的项目中查看 然后在到A仓库中查看镜像是否一样被同步过来 五、安装过程FAQ 1、非https登陆失败 # docker login -u admin -p Pty_registry123 172.16.73.50 Error response from daemon: Get https://172.16.73.50/v1/users/: dial tcp 172.16.73.50:443: getsockopt: connection refused 编辑 /etc/default/docker 增加如下内容 DOCKER_OPTS="$DOCKER_OPTS --insecure-registry 172.16.73.50" 然后停止docker-compose执行 docker-compose stop 重启docker执行 service docker restart 最后启动docker-compose docker-compose start 以上是利用harbor,搭建的docker私有仓库主主同步方案。 本文转自 msj0905 51CTO博客,原文链接:http://blog.51cto.com/sky66/1934011

优秀的个人博客,低调大师

戴尔押宝iSCSI,由低到组合成型

戴尔(Dell)是较早接受SAS技术的主流存储厂商之一,2006年已推出采用SAS硬盘驱动器的SAS直连存储(DAS)系统PowerVault MD3000。一年之后,主机连接改用iSCSI的PowerVault MD3000i问世。 2008年1月,EMC也在替代低端AX150和CX300系统的CLARiiON AX4中采用了SAS技术。作为EMC的战略合作伙伴,戴尔随即宣布以Dell AX4-5的名称转销这款产品。AX4-5支持的硬盘驱动器数量多于MD3000i,允许SAS和SATA硬盘驱动器混合配置,主机接口可选FC(AX4-5F)或iSCSI(AX4-5I),总体定位更高一些。 Dell自家田里长出来的PowerVault MD3000i、转销EMC的AX4-5和收购EqualLogic得到的PS5000,都支持“iSCSI + SAS”,但只有红色方框里的才是纯粹的iSCSI磁盘阵列 IDC上月初发布的 2008年第三季度外部磁盘存储系统市场报告 指出,该季度表现最突出的板块是iSCSI SAN,收入增长幅度高达96.7%。戴尔在该领域以31.3%的份额位列第一,超过第二三名——EMC(13.3%)与NetApp(12.5%)——的总和。这显然不是MD3000i或AX4-5I的功劳,而应归于戴尔对EqualLogic的收购…… 戴尔两款主力iSCSI磁盘阵列主要参数对比 2008年2月,刚刚完成对EqualLogic价值14亿美元收购的戴尔,又将EqualLogic的产品重新包装之后,推出了PS5000系列。作为一款纯粹的iSCSI磁盘阵列,PS5000系列具有不同于MD3000i和AX4-5的对等架构,在整个戴尔存储产品线中的地位仅次于同样来自于EMC的CX系列。 Dell PowerVault MD3000i(上)和Dell EqualLogic PS5000XV(下) 存储时代( [url]www.Stor-Age.com[/url] )网站认为,经过几年的发展,iSCSI和SAS已经趋于成熟,到了可以检验“iSCSI + SAS”组合效果的时候。两款来自戴尔的“iSCSI + SAS”磁盘阵列——PowerVault MD3000i和EqualLogic PS5000XV不仅足够成熟,还代表着不同的磁盘阵列架构类型,具有很大的参考价值。 本文转自 Gelada 51CTO博客,原文链接:http://blog.51cto.com/gelada/155649,如需转载请自行联系原作者

优秀的个人博客,低调大师

WAF/防-高速通道跨地域回源测试

测试场景 由于链路问题,为了保障链路质量,通过高速通道跳转回源。 使用华东1的VPC模拟A区域,使用华东2的VPC模拟B区域的,服务端为真实的源站。 即: client->华东1vpc->华东2VPC->源站服务器; 部署为http服务。 测试环境 1.客户端:华北1 ECS:xx.xx.17.204 2.模拟中转环境: 地域 vpc实例ID 网段 路由接口 测试ECS实例 私网IP 公网IP 华东1 vpc-bp15quc1ec8jgbexxxx 192.168.0.0/16 ri-bp17uip06c3lxxx i-bp16bg1pf5e0ozhdrxx 192.168.100.11 xx.xx.175.46 华东2 vpc-uf6dkst3815ispzxxxxx 172.16.0.0/12 ri-uf6oh5quroxxx i-uf6itotpmd9

资源下载

更多资源
优质分享App

优质分享App

近一个月的开发和优化,本站点的第一个app全新上线。该app采用极致压缩,本体才4.36MB。系统里面做了大量数据访问、缓存优化。方便用户在手机上查看文章。后续会推出HarmonyOS的适配版本。

腾讯云软件源

腾讯云软件源

为解决软件依赖安装时官方源访问速度慢的问题,腾讯云为一些软件搭建了缓存服务。您可以通过使用腾讯云软件源站来提升依赖包的安装速度。为了方便用户自由搭建服务架构,目前腾讯云软件源站支持公网访问和内网访问。

Nacos

Nacos

Nacos /nɑ:kəʊs/ 是 Dynamic Naming and Configuration Service 的首字母简称,一个易于构建 AI Agent 应用的动态服务发现、配置管理和AI智能体管理平台。Nacos 致力于帮助您发现、配置和管理微服务及AI智能体应用。Nacos 提供了一组简单易用的特性集,帮助您快速实现动态服务发现、服务配置、服务元数据、流量管理。Nacos 帮助您更敏捷和容易地构建、交付和管理微服务平台。

Rocky Linux

Rocky Linux

Rocky Linux(中文名:洛基)是由Gregory Kurtzer于2020年12月发起的企业级Linux发行版,作为CentOS稳定版停止维护后与RHEL(Red Hat Enterprise Linux)完全兼容的开源替代方案,由社区拥有并管理,支持x86_64、aarch64等架构。其通过重新编译RHEL源代码提供长期稳定性,采用模块化包装和SELinux安全架构,默认包含GNOME桌面环境及XFS文件系统,支持十年生命周期更新。

用户登录
用户注册