首页 文章 精选 留言 我的

精选列表

搜索[Flowable流程审批],共10005篇文章
优秀的个人博客,低调大师

流程控制语句

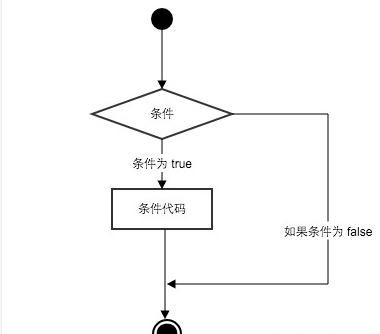
//一个引入控制台输入的代码 import java.util.Scanner; public class T2{ public static void main(String[] args) { Scanner input=new Scanner(System.in);//创建一个 控制台输入对象 赋给input变量 int i=0; System.out.println("请输入您要的数值:"); i=input.nextInt();//当前代码运行到这里是就会暂时停止,等你输入 System.out.print("您输入的值是:"+i); } } 三元运算 条件?值:值 前面必须要有一个接受者 import java.util.Scanner; public class T1{//一个三元的说明实验代码 public static void main(String[] args) { Scanner input=new Scanner(System.in); int age=0; System.out.print("请输出您的年龄:"); age=input.nextInt(); int j=age>18?1:2;//三元只有两个值true false,还有一点他要有个一接收值要不然直接打印输出也行 if(j==1){ System.out.println("您是成年人可以进入"); }else{ System.out.println("不好意思您无法进入"); } } } import java.util.Scanner; public class T1{//总的来说就是比较数值给两个boolean 真假 public static void main(String[] args) { Scanner input=new Scanner(System.in); int age=0; System.out.println("请输出您的年龄"); age=input.nextInt(); System.out.println("您的工资是"); int j=age>30?5000:3000; System.out.println("您的工资是:"+j); } } public class T1{//还可以取值比较 总的来说就是比较 public static void main(String[] args) { int age=20; System.out.println(age>18&&age<50?"您可以参加喷此活动":"您不可以参加本次活动"); } } 只要两个值true false:if(如果if的值为true他就不会往下运行) else(如果值为false他才会运行这里) import java.util.Scanner; public class T1{//if else可以理解为询问语句 public static void main(String[] args) { Scanner input=new Scanner(System.in); int cj=0; System.out.println("请输入您的成绩:"); cj=input.nextInt(); if(cj>99){ System.out.println("您的成绩是:"+'S'); }else if(cj>=90){ System.out.println("您的成绩是:"+'A'); }else if(cj>=80){ System.out.println("您的成绩是"+'B'); } else if(cj>=70){ System.out.println("您的成绩是"+'C'); }else if(cj>=60){ System.out.println("您的成绩是"+'D'); }else{//因为小于60就不用看了。 System.out.println("不好意思您不及格"); } } }

优秀的个人博客,低调大师

groovy–流程控制

在本篇文章中,我们将介绍逻辑分支,循环,以及如何从if-else以及try-catch代码块中返回值。 if – else Groovy 支持Java传统的if-else语法: 1 2 3 4 5 6 7 8 9 10 11 12 13 14 15 def x = false def y = false if ( !x ) { x = true } assert x == true if ( x ) { x = false } else { y = true } assert x == y Groovy 也支持Java传统的if-else if -else 语法: 1 if( ... ) { 2 ... 3 }elseif(...) { 4 ... 5 }else{ 6 ... 7 } 三元操作符 Groovy 也支持Java传统的三元操作符: 1 defy =5 2 defx = (y >1) ?"worked":"failed" 3 assertx =="worked" switch Groovy也支持switch语句,不过和java的switch语句还是有很大的区别的: 1 defx =1.23 2 defresult ="" 3 4 switch( x ) { 5 case"foo": 6 result ="found foo" 7 // lets fall through 8 9 case"bar": 10 result +="bar" 11 12 case[4,5,6,'inList']: 13 result ="list" 14 break 15 16 case12..30: 17 result ="range" 18 break 19 20 caseInteger: 21 result ="integer" 22 break 23 24 caseNumber: 25 result ="number" 26 break 27 28 default: 29 result ="default" 30 } 31 32 assertresult =="number" 从上面的例子可以看出switch ( x )中的x可以使用任何类型的值,而且下面的匹配值也可以使用任何的类型。 循环 Groovy也支持Java传统的while循环语法: 1 defx =0 2 defy =5 3 4 while( y-- >0) { 5 x++ 6 } 7 8 assertx ==5 for循环 在Groovy中,for循环更加的简单,而且如果你愿意的话,你也可以在Groovy中使用标准的C/Java的for循环语法。 1 for (inti =0; i <5; i++) { 2 } 3 4 // iterate over a range 5 defx =0 6 for ( iin0..9) { 7 x += i 8 } 9 assertx ==45 10 11 // iterate over a list 12 x =0 13 for ( iin[0,1,2,3,4] ) { 14 x += i 15 } 16 assertx ==10 17 18 // iterate over an array 19 array = (0..4).toArray() 20 x =0 21 for ( iinarray ) { 22 x += i 23 } 24 assertx ==10 25 26 // iterate over a map 27 defmap = ['abc':1,'def':2,'xyz':3] 28 x =0 29 for ( einmap ) { 30 x += e.value 31 } 32 assertx ==6 33 34 // iterate over values in a map 35 x =0 36 for ( vinmap.values() ) { 37 x += v 38 } 39 assertx ==6 40 41 // iterate over the characters in a string 42 deftext ="abc" 43 deflist = [] 44 for (cintext) { 45 list.add(c) 46 } 47 assertlist == ["a","b","c"] 闭包(closures) 有时候你也可以使用闭包的each()和eachWithIndex()方法来替换一些for循环代码。 1 defstringList = ["java","perl","python","ruby","c#","cobol", 2 "groovy","jython","smalltalk","prolog","m","yacc"]; 3 4 defstringMap = ["Su":"Sunday","Mo":"Monday","Tu":"Tuesday", 5 "We":"Wednesday","Th":"Thursday","Fr":"Friday", 6 "Sa":"Saturday"]; 7 8 stringList.each() {print" ${it}"};println""; 9 // java perl python ruby c# cobol groovy jython smalltalk prolog m yacc 10 11 stringMap.each() { key, value ->println"${key} == ${value}"}; 12 // Su == Sunday 13 // We == Wednesday 14 // Mo == Monday 15 // Sa == Saturday 16 // Th == Thursday 17 // Tu == Tuesday 18 // Fr == Friday 19 20 stringList.eachWithIndex() { obj, i ->println" ${i}: ${obj}"}; 21 // 0: java 22 // 1: perl 23 // 2: python 24 // 3: ruby 25 // 4: c# 26 // 5: cobol 27 // 6: groovy 28 // 7: jython 29 // 8: smalltalk 30 // 9: prolog 31 // 10: m 32 // 11: yacc 33 34 stringMap.eachWithIndex() { obj, i ->println" ${i}: ${obj}"}; 35 // 0: Su=Sunday 36 // 1: We=Wednesday 37 // 2: Mo=Monday 38 // 3: Sa=Saturday 39 // 4: Th=Thursday 40 // 5: Tu=Tuesday 41 // 6: Fr=Friday 从if-else和try-catch代码块中返回值 从 Groovy 1.6开始,在方法或者闭包中的最后一行表达式,可以从if/else和try/catch/finally代码块中返回值,而且并不需要明确的使用return关键字返回值,只需要他们是代码块的最后一个表达式就行。 下面的例子就说明了这个情况,在下面的代码块中虽然没有显示的调用return关键字,但是仍然会返回1: 1 defmethod() { 2 if(true)1else0 3 } 4 5 assertmethod() ==1 对于 try/catch/finally blocks代码块来说,如果try代码块中没有抛出异常的话,那么try代码块的最后一行的表达式将会被返回,如果try的代码块抛出异常并且被catch住的时候,那么catch代码块中的最后一个表达式的值将会被返回。 但是请注意:finally代码块不会返回值的。 1 defmethod(bool) { 2 try{ 3 if(bool)thrownewException("foo") 4 1 5 }catch(e) { 6 2 7 }finally{ 8 3 9 } 10 } 11 12 assertmethod(false) ==1 13 assertmethod(true) ==2 ============================================================================== 本文转自被遗忘的博客园博客,原文链接:http://www.cnblogs.com/rollenholt/p/3349046.html,如需转载请自行联系原作者

优秀的个人博客,低调大师

Android -- Camera聚焦流程

Camera.java autoFocus()聚焦回调函数 @Override public void autoFocus() { //记录当前聚焦开始时间 mFocusStartTime = System.currentTimeMillis(); //设置Camera的回调聚焦 mCameraDevice.autoFocus(mAutoFocusCallback); //设置Camera的状态为Focusing setCameraState(FOCUSING); } 设置相机状态 private void setCameraState(int state) { mCameraState = state; switch (state) { case SNAPSHOT_IN_PROGRESS: case FOCUSING: enableCameraControls(false); break; case IDLE: case PREVIEW_STOPPED: enableCameraControls(true); break; } } enableCameraControls,设置enable,是否可以点击 /** * 设置几个button或者view不可点击 * @param enable */ private void enableCameraControls(boolean enable) { if (mIndicatorControlContainer != null) { mIndicatorControlContainer.setEnabled(enable); } if (mModePicker != null) mModePicker.setEnabled(enable); if (mZoomControl != null) mZoomControl.setEnabled(enable); if (mThumbnailView != null) mThumbnailView.setEnabled(enable); } mIndicatorControlContainer的enable的设置 Override public void setEnabled(boolean enabled) { super.setEnabled(enabled); final int count = getChildCount(); for (int i = 0; i < count; i++) { View v = getChildAt(i); // Zoom buttons and shutter button are controlled by the activity. if (v instanceof AbstractIndicatorButton) { v.setEnabled(enabled); // Show or hide the indicator buttons during recording. if (mCurrentMode == MODE_VIDEO) { v.setVisibility(enabled ? View.VISIBLE : View.INVISIBLE); } } } if (mCameraPicker != null) { mCameraPicker.setEnabled(enabled); if (mCurrentMode == MODE_VIDEO) { mCameraPicker.setVisibility(enabled ? View.VISIBLE : View.INVISIBLE); } } } mAutoFocusCallback中的处理 private final class AutoFocusCallback implements android.hardware.Camera.AutoFocusCallback { public void onAutoFocus( boolean focused, android.hardware.Camera camera) { //如果是暂停状态,不聚焦 if (mPausing) return; //算出当前到聚焦开始的时间差 mAutoFocusTime = System.currentTimeMillis() - mFocusStartTime; Log.v(TAG, "mAutoFocusTime = " + mAutoFocusTime + "ms"); //设置Camera状态为 setCameraState(IDLE); //调用FocusManager中的AutoFocus mFocusManager.onAutoFocus(focused); } } FocusManager.java /** * 聚焦 * @param focused */ public void onAutoFocus(boolean focused) { Log.i(TAG, "focus used : " + (System.currentTimeMillis() - focusStart)); //正在进行聚焦,拍照动作必须再聚焦完之后 if (mState == STATE_FOCUSING_SNAP_ON_FINISH) { // 无论聚焦成功还是失败,都会拍照。如果要进行拍照发声,就无需AF发声了 if (focused) { //聚焦成功 mState = STATE_SUCCESS; } else { //聚焦失败 mState = STATE_FAIL; } //更新聚焦框UI&&设置人脸识别UI已经各种状态的设置 updateFocusUI(); //拍照,mState的状态变为STATE_IDLE capture(); } else if (mState == STATE_FOCUSING) {//如果是聚焦中的状态 //此状态的发生分为两种,half-pressing按压聚焦或者触摸聚焦被触发,这个时候不要发生拍照动作 if (focused) { //聚焦成功 mState = STATE_SUCCESS; //在连续聚焦状态不要发声,聚焦回调会在拍照前完成,所有状态一直为STATE_FOCUSING if (!Parameters.FOCUS_MODE_CONTINUOUS_PICTURE. equals(mFocusMode)) { mListener.playSound(CameraSound.FOCUS_COMPLETE); } } else { //聚焦失败 mState = STATE_FAIL; } //更新聚焦&&人脸UI updateFocusUI(); // If this is triggered by touch focus, cancel focus after a // while. //如果是触摸聚焦,需要延迟一下取消掉聚焦 if (mFocusArea != null) { mHandler.sendEmptyMessageDelayed(RESET_TOUCH_FOCUS, RESET_TOUCH_FOCUS_DELAY); } } else if (mState == STATE_IDLE) {//空闲 // User has released the focus key before focus completes. // Do nothing. } } 处理消息 private class MainHandler extends Handler { @Override public void handleMessage(Message msg) { switch (msg.what) { case RESET_TOUCH_FOCUS: { //取消掉聚焦 cancelAutoFocus(); //开始人脸识别 mListener.startFaceDetection(); break; } } } } /** * 再重置tap area之前调用mListener.cancelAutofocus,否则,聚焦模式将一直是自动&tap聚焦,并且驱动也不会重置 */ private void cancelAutoFocus() { //放置聚焦框到屏幕中间 resetTouchFocus(); mListener.cancelAutoFocus(); if (mFaceView != null) mFaceView.resume(); mState = STATE_IDLE; updateFocusUI(); mHandler.removeMessages(RESET_TOUCH_FOCUS); } 触摸聚焦 /** * 触摸,,这里会发生触摸聚焦 * @param e * @return */ public boolean onTouch(MotionEvent e) { //没有初始化或者拍照前的聚焦的状态,直接返回 if (!mInitialized || mState == STATE_FOCUSING_SNAP_ON_FINISH) return false; //让用户可以取消掉之前未消失的触摸聚焦 if ((mFocusArea != null) && (mState == STATE_FOCUSING || mState == STATE_SUCCESS || mState == STATE_FAIL)) { cancelAutoFocus(); } // Initialize variables. int x = Math.round(e.getX()); int y = Math.round(e.getY()); int focusWidth = mFocusIndicatorRotateLayout.getWidth(); int focusHeight = mFocusIndicatorRotateLayout.getHeight(); int previewWidth = mPreviewFrame.getWidth(); int previewHeight = mPreviewFrame.getHeight(); if (mFocusArea == null) { mFocusArea = new ArrayList<Area>(); mFocusArea.add(new Area(new Rect(), 1)); mMeteringArea = new ArrayList<Area>(); mMeteringArea.add(new Area(new Rect(), 1)); } //将坐标转换为驱动的格式。AE面积更大,因为曝光会敏感和容易,或者说曝光不足,如果面积太小了。 calculateTapArea(focusWidth, focusHeight, 1f, x, y, previewWidth, previewHeight, mFocusArea.get(0).rect); calculateTapArea(focusWidth, focusHeight, 1.5f, x, y, previewWidth, previewHeight, mMeteringArea.get(0).rect); // Use margin to set the focus indicator to the touched area. RelativeLayout.LayoutParams p = (RelativeLayout.LayoutParams) mFocusIndicatorRotateLayout.getLayoutParams(); int left = Util.clamp(x - focusWidth / 2, 0, previewWidth - focusWidth); int top = Util.clamp(y - focusHeight / 2, 0, previewHeight - focusHeight); p.setMargins(left, top, 0, 0); // Disable "center" rule because we no longer want to put it in the center. int[] rules = p.getRules(); rules[RelativeLayout.CENTER_IN_PARENT] = 0; mFocusIndicatorRotateLayout.requestLayout(); //停止人脸识别,因为要进行识别聚焦和测量area mListener.stopFaceDetection(); //设置聚焦区域&测量区域 mListener.setFocusParameters(); //如果支持触摸聚焦&&手指抬起 if (mFocusAreaSupported && (e.getAction() == MotionEvent.ACTION_UP)) { autoFocus(); } else { // Just show the indicator in all other cases. updateFocusUI(); // Reset the metering area in 3 seconds. mHandler.removeMessages(RESET_TOUCH_FOCUS); mHandler.sendEmptyMessageDelayed(RESET_TOUCH_FOCUS, RESET_TOUCH_FOCUS_DELAY); } return true; } 聚焦各个状态能做什么事不能做什么事&切换 STATE_IDLE doSnap():空闲状态可以执行拍照 onAutoFocus(boolean focused):用户再聚焦完成前放掉了聚焦按钮,所以不做任何事。 onPreviewStarted(),onPreviewStopped():状态都变为空闲 cancelAutoFocus():取消聚焦,状态变为空闲 updateFocusUI():如果空闲&有聚焦区域,显示聚焦框框 STATE_FOCUSING onShutterUp():如果是focusmode为自动聚焦,状态为正在聚焦,则取消掉聚焦 doSnap():如果是正在聚焦状态,将状态改为聚焦完拍照状态 onAutoFocus(boolean focused):判断focused,为true变为聚焦成功状态,为false变为聚焦失败状态 onTouch(MotionEvent e):如果正在聚焦&之前有手动聚焦了,则取消掉之前的聚焦 autoFocus():状态变为聚焦状态 updateFocusUI():显示聚焦的框框 STATE_FOCUSING_SNAP_ON_FINISH onShutterUp():状态不是聚焦完拍照,可以设置FocusParameters onAutoFocus(boolean focused):判断focused,为true变为聚焦成功状态,为false变为聚焦失败状态,更新聚焦框UI onTouch(MotionEvent e):直接不继续操作下去 updateFocusUI():显示聚焦的框框 STATE_SUCCESS onShutterDown():如果是自动聚焦mode,并且不为聚焦成功状态,执行聚焦 onShutterUp(): 如果是自动聚焦mode,并且为聚焦成功状态,执行取消聚焦 doSnap():拍照 onTouch(MotionEvent e):让用户可以取消掉之前未消失的触摸聚焦 updateFocusUI():聚焦框框显示成功 STATE_FAIL onShutterDown():如果是自动聚焦mode,并且不为聚焦失败状态,执行聚焦 onShutterUp(): 如果是自动聚焦mode,并且为聚焦失败状态,执行取消聚焦 doSnap():拍照 onTouch(MotionEvent e):让用户可以取消掉之前未消失的触摸聚焦 updateFocusUI():聚焦框框显示失败 我是天王盖地虎的分割线 本文转自我爱物联网博客园博客,原文链接:http://www.cnblogs.com/yydcdut/p/4133862.html,如需转载请自行联系原作者

优秀的个人博客,低调大师

Spark运行流程概述

Application 指用户编写的Spark应用程序,其中包含了一个Driver功能的代码和分布在集群中多个节点上运行的Executor代码。 Driver Spark中的Driver即运行上述Application的main()函数并创建SparkContext.创建的目的是为了初始化Spark的运行环境。SparkContext负责与ClusterManager通信,进行资源的申请、任务的分配和监控等。当Executor部分运行完毕后,Driver同时负责将SparkContext关闭,通常用SparkContext代表Driver. Executor 某个Application运行在Worker节点上的一个进程,该进程负责运行某些Task,并且负责将数据存在内存或者磁盘上。每个Application都有各自独立的一批Executor.在spark on Yarnm模式下,名为CoarseGrainedExecutor Backend进程有且只有一个executor,它负责将task包装秤taskRunner,并从线程池中抽取出一个空闲线程进行Task.这样 每个CoarseGrainedExecutro Backend能并行运行Task的数量就取决于分配给它的CPU的个数。 Cluster Manager 在Hadoop yarn上主要是指ResourceManager Worker:集群中任何可以运行Application代码的节点,类似于Yarn中的NodeManager节点,在Standalone模式中指的是通过slave文件配置的Worker节点,在Spark on Yarn模式中指的是NodeManager节点。 Task 是运行application的基本单位。多个Task组成一个stage,而Task的调度和管理等由下面的TaskScheduler负责。 Job 包含多个Task组成的并行运算,往往由Spark Action触发产生,一个Application中可能会产生多个job. Stage 每个job会被划分为很多组Task,作为一个Taskset,名为stage.stage的划分和调度由DAGScheduler负责。Stage有非最终的stage(Shuffle Map stage)和最终的Stage(Result stage)两种。Stage的边界就是发生Shuffle的地方. 共享变量 广播变量和只支持加法操作,可以实现求和的累加变量。 宽依赖 成为ShuffleDependency,与Hadoop Mapreduce中Shuffle的数据依赖相同,宽依赖需要计算好所有父RDD对应分区的数据,然后在节点之间进行Shuffle。 窄依赖 称为NarrowDependency,指具体的RDD,其分区patition a 最多被子RDD中的一个分区patition b依赖。只有map任务,不需要发生Shuffle过程。 DAGScheduler 提交Stage给TaskScheduler.

优秀的个人博客,低调大师

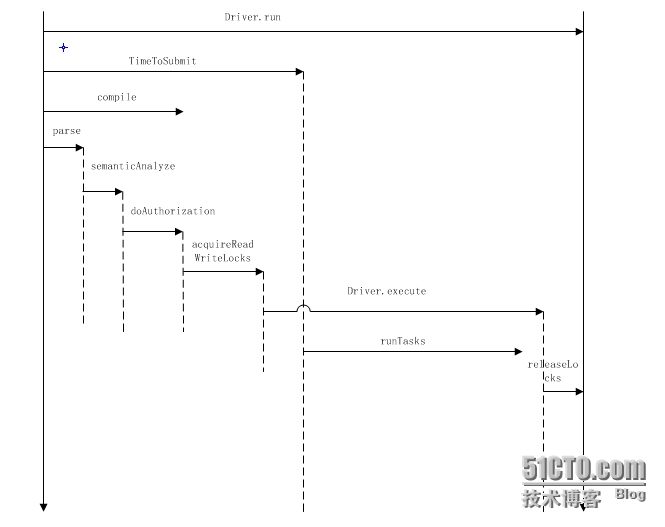
hive执行流程(3)-Driver类分析1Driver类整体流程

Driver类是对 1 org.apache.hadoop.hive.ql.processors.CommandProcessor.java 接口的实现,重写了run方法,定义了常见sql的执行方式. 1 public class Driver implements CommandProcessor 具体的方法调用顺序: 1 2 run--->runInternal--->(createTxnManager+recordValidTxns)----->compileInternal---> compile--analyzer(BaseSemanticAnalyzer)--->execute 其中compile和execute是两个比较重要的方法: compile用来完成语法和语义的分析,生成执行计划 execute执行物理计划,即提交相应的mapredjob 通过打印perflog可以看到Driver类的简单地时序图: 下面来看下Driver类的几个常用的方法实现: 1)createTxnManager 用来获取目前设置的用于实现lock的类,比如: 1 org.apache.hadoop.hive.ql.lockmgr.DummyTxnManager 2)checkConcurrency 用来判断当前hive设置是否支持并发控制: 1 boolean supportConcurrency=conf.getBoolVar(HiveConf.ConfVars.HIVE_SUPPORT_CONCURRENCY); 主要是通过判断hive.support.concurrency参数,默认是false 3)getClusterStatus 调用JobClient类的getClusterStatus方法来获取集群的状态: 1 2 3 4 5 6 7 8 9 10 11 12 13 public ClusterStatusgetClusterStatus() throws Exception{ ClusterStatuscs; try { JobConfjob= new JobConf(conf,ExecDriver. class ); JobClientjc= new JobClient(job); cs=jc.getClusterStatus(); } catch (Exceptione){ e.printStackTrace(); throw e; } LOG.info( "Returningclusterstatus:" +cs.toString()); return cs; } 4)getSchema //返回表的schema信息 5) 1 doAuthorization/doAuthorizationV2/getHivePrivObjects 用来在开启权限验证情况下对sql的权限检测操作 6) 1 getLockObjects/acquireReadWriteLocks/releaseLocks 都是和锁相关的方法 ,其中getLockObjects用来获取锁的对象(锁的路径,锁的模式等),最终返回一个包含所有锁的list,acquireReadWriteLocks用来控制获取锁,releaseLocks用来释放锁: 1 2 3 4 5 6 7 8 9 10 11 12 13 14 15 16 17 18 19 20 21 22 23 24 25 26 27 28 29 30 31 32 33 34 35 36 37 38 39 40 41 42 43 44 45 46 47 48 49 50 51 52 53 54 55 56 57 58 getLockObjects: private List<HiveLockObj>getLockObjects(Databased,Tablet,Partitionp,HiveLockModemode) throws SemanticException{ List<HiveLockObj>locks= new LinkedList<HiveLockObj>(); HiveLockObjectDatalockData= new HiveLockObjectData(plan.getQueryId(), String.valueOf(System.currentTimeMillis()), "IMPLICIT" , plan.getQueryStr()); if (d!= null ){ locks.add( new HiveLockObj( new HiveLockObject(d.getName(),lockData),mode)); //数据库层面的锁 return locks; } if (t!= null ){ //表层面的锁 locks.add( new HiveLockObj( new HiveLockObject(t.getDbName(),lockData),mode)); locks.add( new HiveLockObj( new HiveLockObject(t,lockData),mode)); mode=HiveLockMode.SHARED; locks.add( new HiveLockObj( new HiveLockObject(t.getDbName(),lockData),mode)); return locks; } if (p!= null ){ //分区层面的锁 locks.add( new HiveLockObj( new HiveLockObject(p.getTable().getDbName(),lockData),mode)); if (!(p instanceof DummyPartition)){ locks.add( new HiveLockObj( new HiveLockObject(p,lockData),mode)); } //Alltheparentsarelockedinsharedmode mode=HiveLockMode.SHARED; //Fordummypartitions,onlypartitionnameisneeded Stringname=p.getName(); if (p instanceof DummyPartition){ name=p.getName().split( "@" )[ 2 ]; } StringpartialName= "" ; String[]partns=name.split( "/" ); int len=p instanceof DummyPartition?partns.length:partns.length- 1 ; Map<String,String>partialSpec= new LinkedHashMap<String,String>(); for ( int idx= 0 ;idx<len;idx++){ Stringpartn=partns[idx]; partialName+=partn; String[]nameValue=partn.split( "=" ); assert (nameValue.length== 2 ); partialSpec.put(nameValue[ 0 ],nameValue[ 1 ]); try { locks.add( new HiveLockObj( new HiveLockObject( new DummyPartition(p.getTable(),p.getTable().getDbName() + "/" +p.getTable().getTableName() + "/" +partialName, partialSpec),lockData),mode)); partialName+= "/" ; } catch (HiveExceptione){ throw new SemanticException(e.getMessage()); } } locks.add( new HiveLockObj( new HiveLockObject(p.getTable(),lockData),mode)); locks.add( new HiveLockObj( new HiveLockObject(p.getTable().getDbName(),lockData),mode)); } return locks; } acquireReadWriteLocks调用了锁具体实现类的acquireLocks方法 releaseLocks调用了锁具体实现类的releaseLocks方法 7) run方法是Driver类的入口方法,调用了runInternal方法,我们主要来看runInternal的方法,大体步骤: 1 2 3 4 5 运行hive.exec.driver.run.hooks中设置的hook, 运行HiveDriverRunHook相关类的的preDriverRun方法---->检测是否支持并发,并获取并发实现的类 --->compileInternal---->运行锁相关的操作(判断是否只对mapredjob进行锁,获取锁等) ---->调用execute---->释放锁--->运行HiveDriverRunHook相关类的的postDriverRun方法 ---->返回CommandProcessorResponse对象 相关代码: 1 2 3 4 5 6 7 8 9 10 11 12 13 14 15 16 17 18 19 20 21 22 23 24 25 26 27 28 29 30 31 32 33 34 35 36 37 38 39 40 41 42 43 44 45 46 47 48 49 50 51 52 53 54 55 56 57 58 59 60 61 62 63 64 65 66 67 68 69 70 71 72 73 74 75 76 77 78 79 80 81 82 83 84 85 86 87 88 89 90 91 92 93 94 95 96 97 98 99 100 101 102 103 104 105 106 107 108 109 110 111 112 113 114 115 116 117 118 119 120 121 122 123 124 125 126 127 128 129 private CommandProcessorResponserunInternal(Stringcommand, boolean alreadyCompiled) throws CommandNeedRetryException{ errorMessage= null ; SQLState= null ; downstreamError= null ; if (!validateConfVariables()){ return new CommandProcessorResponse( 12 ,errorMessage,SQLState); } HiveDriverRunHookContexthookContext= new HiveDriverRunHookContextImpl(conf,command); //Getallthedriverrunhooksandpre-executethem. List<HiveDriverRunHook>driverRunHooks; try { //运行hive.exec.driver.run.hooks中设置的hook driverRunHooks=getHooks(HiveConf.ConfVars.HIVE_DRIVER_RUN_HOOKS, HiveDriverRunHook. class ); for (HiveDriverRunHookdriverRunHook:driverRunHooks){ driverRunHook.preDriverRun(hookContext); //运行HiveDriverRunHook相关类的的preDriverRun方法 } } catch (Exceptione){ errorMessage= "FAILED:HiveInternalError:" +Utilities.getNameMessage(e); SQLState=ErrorMsg.findSQLState(e.getMessage()); downstreamError=e; console.printError(errorMessage+ "\n" +org.apache.hadoop.util.StringUtils.stringifyException(e)); return new CommandProcessorResponse( 12 ,errorMessage,SQLState); } //Resettheperflogger PerfLoggerperfLogger=PerfLogger.getPerfLogger( true ); perfLogger.PerfLogBegin(CLASS_NAME,PerfLogger.DRIVER_RUN); perfLogger.PerfLogBegin(CLASS_NAME,PerfLogger.TIME_TO_SUBMIT); int ret; boolean requireLock= false ; boolean ckLock= false ; try { ckLock=checkConcurrency(); //检测是否支持并发,并获取并发实现的类,比如常用的org.apache.hadoop.hive.ql.lockmgr.DummyTxnManager createTxnManager(); } catch (SemanticExceptione){ errorMessage= "FAILED:Errorinsemanticanalysis:" +e.getMessage(); SQLState=ErrorMsg.findSQLState(e.getMessage()); downstreamError=e; console.printError(errorMessage, "\n" +org.apache.hadoop.util.StringUtils.stringifyException(e)); ret= 10 ; return new CommandProcessorResponse(ret,errorMessage,SQLState); } ret=recordValidTxns(); if (ret!= 0 ) return new CommandProcessorResponse(ret,errorMessage,SQLState); if (!alreadyCompiled){ ret=compileInternal(command); //调用compileInternal方法 if (ret!= 0 ){ return new CommandProcessorResponse(ret,errorMessage,SQLState); } } //thereasonthatwesetthetxnmanagerforthecxthereisbecauseeach //queryhasitsownctxobject.Thetxnmgrissharedacrossthe //sameinstanceofDriver,whichcanrunmultiplequeries. ctx.setHiveTxnManager(txnMgr); if (ckLock){ //断是否只对mapredjob进行锁,参数hive.lock.mapred.only.operation,默认为false boolean lockOnlyMapred=HiveConf.getBoolVar(conf,HiveConf.ConfVars.HIVE_LOCK_MAPRED_ONLY); if (lockOnlyMapred){ Queue<Task<? extends Serializable>>taskQueue= new LinkedList<Task<? extends Serializable>>(); taskQueue.addAll(plan.getRootTasks()); while (taskQueue.peek()!= null ){ Task<? extends Serializable>tsk=taskQueue.remove(); requireLock=requireLock||tsk.requireLock(); if (requireLock){ break ; } if (tsk instanceof ConditionalTask){ taskQueue.addAll(((ConditionalTask)tsk).getListTasks()); } if (tsk.getChildTasks()!= null ){ taskQueue.addAll(tsk.getChildTasks()); } //doesnotaddbackuptaskhere,becausebackuptaskshouldbethesame //typeoftheoriginaltask. } } else { requireLock= true ; } } if (requireLock){ //获取锁 ret=acquireReadWriteLocks(); if (ret!= 0 ){ try { releaseLocks(ctx.getHiveLocks()); } catch (LockExceptione){ //Notmuchtodohere } return new CommandProcessorResponse(ret,errorMessage,SQLState); } } ret=execute(); //job运行 if (ret!= 0 ){ //ifneedRequireLockisfalse,thereleaseherewilldonothingbecausethereisnolock try { releaseLocks(ctx.getHiveLocks()); } catch (LockExceptione){ //Nothingtodohere } return new CommandProcessorResponse(ret,errorMessage,SQLState); } //ifneedRequireLockisfalse,thereleaseherewilldonothingbecausethereisnolock try { releaseLocks(ctx.getHiveLocks()); } catch (LockExceptione){ errorMessage= "FAILED:HiveInternalError:" +Utilities.getNameMessage(e); SQLState=ErrorMsg.findSQLState(e.getMessage()); downstreamError=e; console.printError(errorMessage+ "\n" +org.apache.hadoop.util.StringUtils.stringifyException(e)); return new CommandProcessorResponse( 12 ,errorMessage,SQLState); } perfLogger.PerfLogEnd(CLASS_NAME,PerfLogger.DRIVER_RUN); perfLogger.close(LOG,plan); //Takeallthedriverrunhooksandpost-executethem. try { for (HiveDriverRunHookdriverRunHook:driverRunHooks){ //运行HiveDriverRunHook相关类的的postDriverRun方法 driverRunHook.postDriverRun(hookContext); } } catch (Exceptione){ errorMessage= "FAILED:HiveInternalError:" +Utilities.getNameMessage(e); SQLState=ErrorMsg.findSQLState(e.getMessage()); downstreamError=e; console.printError(errorMessage+ "\n" +org.apache.hadoop.util.StringUtils.stringifyException(e)); return new CommandProcessorResponse( 12 ,errorMessage,SQLState); } return new CommandProcessorResponse(ret); } 8) 1 2 3 4 5 6 7 8 9 10 11 12 13 14 15 16 17 再来看下compileInternal方法 private static final ObjectcompileMonitor= new Object(); private int compileInternal(Stringcommand){ int ret; synchronized (compileMonitor){ ret=compile(command); //调用compile方法 } if (ret!= 0 ){ try { releaseLocks(ctx.getHiveLocks()); } catch (LockExceptione){ LOG.warn( "Exceptioninreleasinglocks." +org.apache.hadoop.util.StringUtils.stringifyException(e)); } } return ret; } 调用了compile方法,compile方法分析命令,生成Task,关于compile的具体实现后面详细讲解 9.execute方法,提交task并等待task运行完毕,并打印task运行的信息,比如消耗的时间等 (这里信息也比较多,后面单独讲解 本文转自菜菜光 51CTO博客,原文链接:http://blog.51cto.com/caiguangguang/1571890,如需转载请自行联系原作者


资源下载

更多资源
Mario

Mario

马里奥是站在游戏界顶峰的超人气多面角色。马里奥靠吃蘑菇成长,特征是大鼻子、头戴帽子、身穿背带裤,还留着胡子。与他的双胞胎兄弟路易基一起,长年担任任天堂的招牌角色。

腾讯云软件源

腾讯云软件源

为解决软件依赖安装时官方源访问速度慢的问题,腾讯云为一些软件搭建了缓存服务。您可以通过使用腾讯云软件源站来提升依赖包的安装速度。为了方便用户自由搭建服务架构,目前腾讯云软件源站支持公网访问和内网访问。

Spring

Spring

Spring框架(Spring Framework)是由Rod Johnson于2002年提出的开源Java企业级应用框架,旨在通过使用JavaBean替代传统EJB实现方式降低企业级编程开发的复杂性。该框架基于简单性、可测试性和松耦合性设计理念,提供核心容器、应用上下文、数据访问集成等模块,支持整合Hibernate、Struts等第三方框架,其适用范围不仅限于服务器端开发,绝大多数Java应用均可从中受益。

WebStorm

WebStorm

WebStorm 是jetbrains公司旗下一款JavaScript 开发工具。目前已经被广大中国JS开发者誉为“Web前端开发神器”、“最强大的HTML5编辑器”、“最智能的JavaScript IDE”等。与IntelliJ IDEA同源,继承了IntelliJ IDEA强大的JS部分的功能。

用户登录
用户注册