首页 文章 精选 留言 我的

精选列表

搜索[基础软件],共10017篇文章
优秀的个人博客,低调大师

Springboot日志基础

Springboot配置日志配置文件位置 logging.config: classpath:logging/logback.yml Springboot日志分类 log4j: 是apache实现的一个开源日志组件 logback: 同样是由log4j的作者设计完成的,拥有更好的特性,用来取代log4j的一个日志框架,是slf4j的原生实现 log4j2: 是log4j 1.x和logback的改进版,采用了一些新技术(无锁异步、等等),使得日志的吞吐量、性能比log4j 1.x提高10倍,并解决了一些死锁的bug,而且配置更加简单灵活 slf4j+log4j和直接用log4j的区别 slf4j是对所有日志框架制定的一种规范、标准、接口,并不是一个框架的具体的实现,因为接口并不能独立使用,需要和具体的日志框架实现配合使用(如log4j、logback),使用接口的好处是当项目需要更换日志框架的时候,只需要更换jar和配置,不需要更改相关java代码。 import org.slf4j.Logger; import org.slf4j.LoggerFactory; public class TestSlf4j { //Logger和LoggerFactory导入的是org.slf4j包 private final static Logger logger = LoggerFactory.getLogger(TestSlf4j.class); } log4j、logback、log4j2都是一种日志具体实现框架,所以既可以单独使用也可以结合slf4j一起搭配使用 import org.apache.logging.log4j.LogManager; import org.apache.logging.log4j.Logger; public class TestLog4j { // Logger和LogManager导入的是org.apache.logging包 private static final Logger LOG = LogManager.getLogger(TestLog4j.class); } 导入需要使用的jar包(slf4j+log4j2) log4j2 如项目中有导入spring-boot-starter-web依赖包记得去掉spring自带的日志依赖spring-boot-starter-logging <dependency> <groupId>org.springframework.boot</groupId> <artifactId>spring-boot-starter-web</artifactId> <exclusions> <exclusion> <groupId>org.springframework.boot</groupId> <artifactId>spring-boot-starter-logging</artifactId> </exclusion> </exclusions> </dependency> springboot项目中需导入log4j2 <dependency> <groupId>org.springframework.boot</groupId> <artifactId>spring-boot-starter-log4j2</artifactId> </dependency> 如果要使用log4j,则把log4j2的坐标替换为下面的这个,依然要排除原有的spring-boot-starter-logging。 <dependency> <groupId>org.springframework.boot</groupId> <artifactId>spring-boot-starter-log4j</artifactId> <version>1.3.8.RELEASE</version> </dependency> Java引入log4j配置文件 class ImportConfig{ public static void main(String[] args) throws IOException { File file = new File(log4j2); BufferedInputStream in = new BufferedInputStream(new FileInputStream(file)); final ConfigurationSource source = new ConfigurationSource(in); Configurator.initialize(null, source); Logger logger = LogManager.getLogger("myLogger"); } } Springboot整合zookeeper log4j2 <dependency> <groupId>org.apache.zookeeper</groupId> <artifactId>zookeeper</artifactId> <version>3.4.14</version> <exclusions> <exclusion> <groupId>org.slf4j</groupId> <artifactId>slf4j-log4j12</artifactId> </exclusion> <exclusion> <groupId>log4j</groupId> <artifactId>log4j</artifactId> </exclusion> </exclusions> </dependency>

优秀的个人博客,低调大师

多线程基础

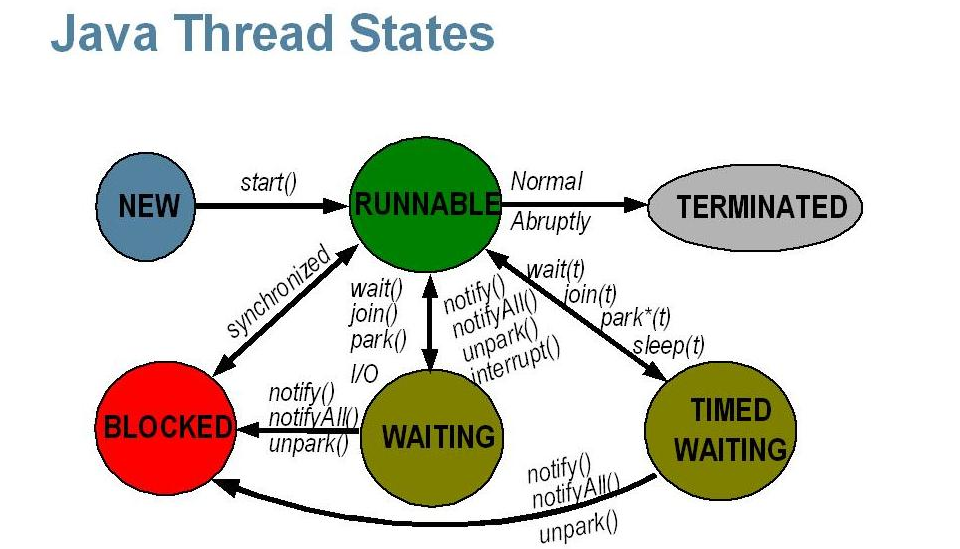
需要了解的概念 并发和并行 并发侧重于任务的交替执行,同一时间只能执行一个任务;而并行是任务的同时执行,统一时间可以有多个任务被执行。 单核CPU与多核CPU下任务表现分别为并发与并行。 临界区 临界区用于表示一种公共资源或是共享数据,可以被多个线程使用,但是同一时间内,只能有一个线程在使用它。一旦临界区资源被占用,其他线程要想使用这个资源,则必须等待。 死锁、饥饿和活锁 死锁 指两个或两个以上的进程(或线程)在执行过程中,因争夺资源而造成的一种互相等待的现象,若无外力作用,它们都将无法推进下去。 饥饿 饥饿是指线程因为种种原因无法获取所需要的资源,导致一直无法执行。比如它的线程优先级可能太低,而高优先级的线程不断抢占他需要的资源。 活锁 当其他线程要使用临界资源时,如果线程主动放弃资源供其他线程使用,而其它线程也主动放弃来使其他线程使用。这样你让我,我让你,最后无论哪个线程都无法使用资源。 线程的状态 Java 线程有6种状态,其定义在Thread.State中: public class Thread implements Runnable { /** * A thread can be in only one state at a given point in time. * These states are virtual machine states which do not reflect any operating system thread states. */ public enum State { /** * Thread state for a thread which has not yet started. */ NEW, /** * Thread state for a runnable thread. A thread in the runnable * state is executing in the Java virtual machine but it may * be waiting for other resources from the operating system such as processor. */ RUNNABLE, /** * Thread state for a thread blocked waiting for a monitor lock. * A thread in the blocked state is waiting for a monitor lock to enter a synchronized block/method or * reenter a synchronized block/method after calling {@link Object#wait() Object.wait}. */ BLOCKED, /** * Thread state for a waiting thread. * A thread is in the waiting state due to calling one of the * following methods: * <ul> * <li>{@link Object#wait() Object.wait} with no timeout</li> * <li>{@link #join() Thread.join} with no timeout</li> * <li>{@link LockSupport#park() LockSupport.park}</li> * </ul> * * <p>A thread in the waiting state is waiting for another thread to * perform a particular action. * * For example, a thread that has called <tt>Object.wait()</tt> * on an object is waiting for another thread to call * <tt>Object.notify()</tt> or <tt>Object.notifyAll()</tt> on * that object. A thread that has called <tt>Thread.join()</tt> * is waiting for a specified thread to terminate. */ WAITING, /** * Thread state for a waiting thread with a specified waiting time. * A thread is in the timed waiting state due to calling one of * the following methods with a specified positive waiting time: * <ul> * <li>{@link #sleep Thread.sleep}</li> * <li>{@link Object#wait(long) Object.wait} with timeout</li> * <li>{@link #join(long) Thread.join} with timeout</li> * <li>{@link LockSupport#parkNanos LockSupport.parkNanos}</li> * <li>{@link LockSupport#parkUntil LockSupport.parkUntil}</li> * </ul> */ TIMED_WAITING, /** * Thread state for a terminated thread. * The thread has completed execution. */ TERMINATED; } } NEW:初始状态,线程被构建,但是还没有调用start方法; RUNNABLED:运行状态,JAVA 线程把操作系统中的就绪和运行两种状态统一称为RUNNABLED; BLOCKED:阻塞状态,例如进入同步锁中; WAITING:等待状态,例如调用Object.wait、Thread.join(with no timeout)、LockSupport.park等; TIME_WAITING:超时等待状态,例如调用Thread.sleep以及带超时间的Object.wait、Thread.join等,超时以后自动返回; TERMINATED:终止状态,表示当前线程执行完毕。 示意图如下: 线程的基本使用 java中多线程使用方式主要为继承Thread类、实现Runnable接口、实现Callable接口。如果使用线程池,可以使用ExecutorService等。 线程的新建 继承Thread 示例: class ThreadDemo extends Thread { public void run() { System.out.println("run"); } public static void main(String[] args) { ThreadDemo threadDemo = new ThreadDemo(); threadDemo.start(); } } Thread类本质上是实现了Runnable接口的一个实例。启动线程的唯一方法就是通过Thread类的 start()实例方法: public class Thread implements Runnable { ... /** * Causes this thread to begin execution; the Java Virtual Machine * calls the <code>run</code> method of this thread. * <p> * The result is that two threads are running concurrently: the * current thread (which returns from the call to the * <code>start</code> method) and the other thread (which executes its * <code>run</code> method). * <p> * It is never legal to start a thread more than once. * In particular, a thread may not be restarted once it has completed * execution. */ public synchronized void start() { ... try { start0(); started = true; } finally {...} } } start()中最终调用了start0(),而start0()是一个native方法,它会启动一个新线程,并在该线程中执行run方法。 start()执行涉及两个线程:当前线程(threadDemo在该线程中调用自己的start())和新的线程(jvm会在该线程中调用run方法,并使其在在该线程中执行)。 值得注意的是,threadDemo直接调用run()不会开启新的线程,因为没有最终调用start0(),此时仅是在当前线程中普通的方法调用;threadDemo直接调用start()则会开启新线程,并让jvm调用run方法在开启的线程中执行。 另外,多次启动线程是不合法的,尤其是线程执行完成后不能重新启动。 实现Runnable接口 如果自己的类已经继承了其它类,无法直接继承Thread,此时可以实现Runnable接口: class ThreadDemo implements Runnable { public void run() { System.out.println("run"); } public static void main(String[] args) { ThreadDemo threadDemo = new ThreadDemo(); new Thread(threadDemo).start(); } } 实现方式虽然变了,但是最终还是要调用start()。 实现Callable接口 当需要新线程提供返回值给主线程时,例如主线程需要依赖该返回值进行后续的处理,此时可以使用Callable方式: class ThreadDemo implements Callable { public String call() { return "run"; } public static void main(String[] args) throws ExecutionException, InterruptedException { FutureTask<String> futureTask = new FutureTask<>(new ThreadDemo()); new Thread(futureTask).start(); String result = futureTask.get(); System.out.println(result); } } Callable和Runnable Callable方式属于Executor框架的功能类,相对于runable体系: 1. callable在任务结束时可以提供返回值,runnable无法提供; 2. run()不能抛出任何检查型异常,但是,非检查型异常会导致线程终止; 3. 运行callable可以拿到future,future能监视目标线程调用call方法的情况,当调用future的get方法以获取结果时,当前线程就会被阻塞,直到call方法结束返回结果。 对于第二条: 检查型异常(Checked Exception):指编译器要检查这类异常,这类异常的发生通常是难以避免的,编译器强制让开发者去解决掉这类异常(通过throws或try-catch),所以称为检查型异常。如果不处理这类异常则不会通过编译。 例如FileNotFoundException,编译器认为文件找不到是不可避免的,如果不处理这些异常,程序将来肯定会出错,此时编译器会提示捕获并处理这种可能发生的异常,不处理就不能通过编译。 非检查型异常(Unchecked Exception):指编译器不会检查这类异常,编译器认为此类异常不是必须处理的,因此即使不处理这类异常,编译器也不会给出错误提示。 例如数组越界、空指针异常等。 run()不能抛出检查型异常,因为接口定义中就没有throws异常: @FunctionalInterface public interface Runnable { public abstract void run(); } 并且throws是向上级调用者抛出异常,主线程调用start()后,是由jvm去调用run()方法的,因此run()的最终调用者是jvm。 但是线程依然有可能抛出unchecked exception,此类异常抛出时会导致线程终止,但是对于主线程和其他线程则完全感知不到该异常的抛出(当然也无法法catch到该异常),且该异常的抛出对主线程和其他线程完全没有影响。 因此,对于Runnable体系的线程,我们不能捕获在线程中出现的异常,因此无论是checked exception还是unchecked exception,run方法内进行try-catch并处理掉,即: class ThreadDemo0 implements Runnable { public void run() throws Exception { // throws Exception会导致编译不通过 System.out.println(1 / 0); } public static void main(String[] args) { try { ThreadDemo0 threadDemo0 = new ThreadDemo0(); new Thread(threadDemo0).start(); } catch (Exception e) { e.printStackTrace(); // 无法catch到除0异常 } } } java5之后,我们可以通过Executor来解决run()抛出的unchecked exception问题。Thread.UncaughtExceptionHandler是java5的新接口,它允许在每一个Thread对象上添加一个异常处理器: public class Thread implements Runnable { /** * Interface for handlers invoked when a <tt>Thread</tt> abruptly * terminates due to an uncaught exception. * <p>When a thread is about to terminate due to an uncaught exception * the Java Virtual Machine will query the thread for its * <tt>UncaughtExceptionHandler</tt> using * {@link #getUncaughtExceptionHandler} and will invoke the handler's * <tt>uncaughtException</tt> method, passing the thread and the * exception as arguments. * If a thread has not had its <tt>UncaughtExceptionHandler</tt> * explicitly set, then its <tt>ThreadGroup</tt> object acts as its * <tt>UncaughtExceptionHandler</tt>. If the <tt>ThreadGroup</tt> object * has no * special requirements for dealing with the exception, it can forward * the invocation to the {@linkplain #getDefaultUncaughtExceptionHandler * default uncaught exception handler}. * * @see #setDefaultUncaughtExceptionHandler * @see #setUncaughtExceptionHandler * @see ThreadGroup#uncaughtException * @since 1.5 */ @FunctionalInterface public interface UncaughtExceptionHandler { /** * Method invoked when the given thread terminates due to the * given uncaught exception. * <p>Any exception thrown by this method will be ignored by the * Java Virtual Machine. */ void uncaughtException(Thread t, Throwable e); } } 当线程因未捕获的异常而将要被终止时,则jvm首先查询当前线程是否有UncaughtExceptionHandler处理器,如果有则使用该处理器的uncaughtException()来处理,并将当前线程及其异常作为参数传递过去; 如果没有该处理器,则查看当前线程所在线程组是否设置了UncaughtExceptionHandler,如果已经设置则使用该线程组的UncaughtExceptionHandler来处理; 否则,通过getUncaughtExceptionHandler获取默认处理器: public UncaughtExceptionHandler getUncaughtExceptionHandler() { return uncaughtExceptionHandler != null ? uncaughtExceptionHandler : group; } 如果上述处理器都不存在,那么jvm将直接在console中打印Exception的StackTrace信息。 线程的停止 线程停止不能使用Thread.stop(),因为该方法是暴力停止,如果业务执行到一半被stop()终止,则可能会导致数据的不一致。 正确的停止方式应该由实际业务决定,例如: class ThreadDemo0 implements Runnable { private static volatile boolean stop = false; private static volatile int i = 0; public void run() { while(!stop) { System.out.println(i++); } } public static void main(String[] args) { new Thread(new ThreadDemo0()).start(); while(true) { if (i == 5) { stop = true; } } } } 实际上Thread提供了线程中断相关的API: public void Thread.interrupt(); public boolean Thread.isInterrupted(); public static boolean Thread.interrupted(); interrupt()用于通知线程中断,也就是设置中断标志位,中断标志位表示当前线程已经被中断了。isInterrupted()用于判断当前线程是否被中断。静态方法interrupted()也是用于判断当前线程的中断状态,但同时会清除当前线程的中断标志位。 class ThreadDemo0 implements Runnable { private static volatile int i = 0; public void run() { while(!Thread.currentThread().isInterrupted()) { System.out.println(i++); } } public static void main(String[] args) { Thread thread = new Thread(new ThreadDemo0()); thread.start(); while(true) { if (i == 5) { thread.interrupt(); break; } } } } 当发生异常时,interrupt标志位会被复位。 线程等待和通知 wait()和notify()、notifyAll()用于多线程之间的协作,这两个方法都属于Object类,这意味着任何对象都能调用这两个方法。 当在一个对象A调用wait()方法后,当前线程就会在这个对象上等待,直到其他线程调用了对象A的notify()或notifyAll()为止。 如果一个线程调用了object.wait(),那么该线程则进入object对象的等待队列。这个队列中可能会存在多个线程,当object.notify()被调用时,它就会从这个等待队列中随机选择一个线程并将其唤醒。如果执行object.notifyAll()则唤醒队列中所有线程。 需要注意的是,wait()、notify()、notifyAll()必须在synchronized代码块中使用,方法执行前都必须获取目标对象的监视器,当wait()执行时会释放当前的监视器并使得当前线程进入阻塞队列,当notify()被调用时,首先要获取到object的监视器,然后才能去唤醒其他线程。 示例: class ThreadDemo { final static Object OBJECT = new Object(); public static class T1 extends Thread { public void run() { synchronized (OBJECT) { try { System.out.println("t1 start"); OBJECT.wait(); System.out.println("t1 end"); } catch (InterruptedException e) {} } } } public static class T2 extends Thread { public void run() { synchronized (OBJECT) { System.out.println("t2 start"); OBJECT.notify(); System.out.println("t2 end"); try { Thread.sleep(2000); } catch (Exception e) {} } } } public static void main(String[] args) { new T1().start(); new T2().start();; } } 上述代码执行时,t1被唤醒后并不能立即执行,因为t2线程sleep了2秒,在这2s内t2并未释放object的监视器,所以在t2线程sleep了2s后,才会输出t1 end。 这三个方法必须在synchronized代码块中执行,因为这些操作都和监视器相关,wait必须要知道获取谁的监视器,而notify需要知道去唤醒等待在哪里的线程,而synchronized可以提供这个监视器。 监视器(monitor)和锁(lock)的关系: 在jvm中,锁的实现方式就是monitor; entermonitor就是获得某个对象的lock(owner是当前线程); leavemonitor就是释放某个对象的lock。 简单的认为,在object中,monitor就是lock。 线程挂起和继续 线程的挂起和继续执行的方法分别是suspend()和resume(),被挂起的线程,必须要等到resume()操作后才能继续执行。但这两个方法已经被废弃了。 因为suspend()在导致线程暂停的同时,并不会去释放任何锁资源。此时,其他任何线程想要访问被它占用的锁时,都会被阻塞。直到对应的线程上进行了resume()操作,被挂起的线程才能继续。但是,如果resume()操作意外地在suspend()前就执行了,那么被挂起的线程可能很难有机会被继续执行。并且它所占用的锁也不会被释放。 而且,对于被挂起的线程,从它的线程状态上看,居然还是Runnable,这也会严重影响我们对系统当前的判断。 线程join和yield join和yield的部分源码: public class Thread implements Runnable { /** * Waits for this thread to die. */ public final void join() throws InterruptedException { join(0); } /** * Waits at most {@code millis} milliseconds for this thread to * die. A timeout of {@code 0} means to wait forever. */ public final synchronized void join(long millis) throws InterruptedException { ... if (millis == 0) { while (isAlive()) { wait(0); } } else { while (isAlive()) { ... wait(delay); ... } } } /** * A hint to the scheduler that the current thread is willing to yield * its current use of a processor. The scheduler is free to ignore this * hint. */ public static native void yield(); } join 当前线程调用其他线程的join方法,会阻塞当前线程,直到其他线程执行完毕,才会继续执行。 join()表示无限期的等待,而join(long millis)则指定等待的最大时间,如果超过最大时间则不再等待该线程,继续执行。 从源码中可以发现,join()方法是通过wait()实现的,而join(long millis)则是通过wait(long timeout)实现的。当millis为0 时,会进入while(isAlive())循环,并且只要子线程是活跃的,宿主线程就不停的等待。 join方法会让宿主线程交出CPU执行权,并放弃占有的锁。 yield 调用yield()会让当前线程交出CPU资源,但是交出CPU资源后,该线程仍然会参与争夺下一轮CPU的使用权。但是,yield()不能控制具体的交出CPU的时间。 调用yield()方法并不会让线程进入阻塞状态,也不会释放锁,而是让线程重回就绪状态,它只需要等待重新得到CPU的执行权就又能继续执行了。 参考:java高并发程序设计

优秀的个人博客,低调大师

linux基础-1

1、常见Linux的发行版有哪些?并描述不同发行版之间的联系与区别SUSEUbuntumintRHELCentOS中标麒麟FedoraArchLinuxGentooAndroid所有版本都有相同的linux内核由不同的组织发行,因为组织不同所以系统的特性也不同2、打印显示当前时间,格式是:20181209211008 date +%G%m%d%N3、实现晚上20:30自动关机,并提示用户shutdown -s 20:304、总结历史命令管理以及用法history命令,可以显示曾经使用过的命令,系统会把历史命令写到用户的家目录下的一个文件里,用户登录后,系统会读取这个文件里的所有历史命令到内存。而history这个命令可以吧历史命令显示出来,显示出来的历史命令前有序号,可以通过!n 的方式执行历史命令5、总结Linux帮助用法linux上有帮助相关的命令有:whatiscommand --helpman and info/usr/share/doc/Red Hat documentation其他途径:网上搜索,与求助

优秀的个人博客,低调大师

kubernetes基础使用

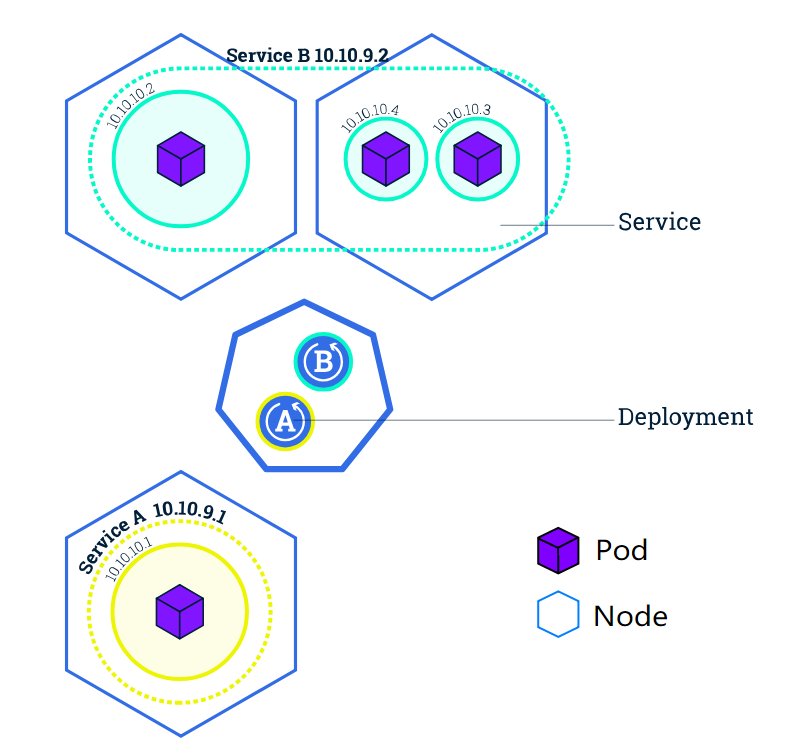
官方文档:https://v1-13.docs.kubernetes.io/zh/docs/tutorials/kubernetes-basics/pods生命周期:https://v1-13.docs.kubernetes.io/docs/concepts/workloads/pods/pod-lifecycle/配置: https://v1-13.docs.kubernetes.io/docs/concepts/configuration/labels: https://v1-13.docs.kubernetes.io/docs/concepts/overview/working-with-objects/labels/Deployments: https://v1-13.docs.kubernetes.io/docs/concepts/workloads/controllers/deployment/Services: https://v1-13.docs.kubernetes.io/docs/concepts/services-networking/service/Scaling: https://v1-13.docs.kubernetes.io/docs/tutorials/kubernetes-basics/scale/scale-intro/autoscale: https://v1-13.docs.kubernetes.io/docs/tasks/run-application/horizontal-pod-autoscale/ #查看k8s版本 kubectl version #查看所有的节点 kubectl get nodes #获取namespace kubectl get namespace #查看namespace为online的pod kubectl get pods --namespace=online #部署应用 kubectl run kubernetes-bootcamp --image=jocatalin/kubernetes-bootcamp:v1 --port=8080 #查看部署应用列表 kubectl get deployments --namespace= #查看所有pod kubectl get pods --namespace= #获取执行中的pod并设置成环境变量POD_NAME export POD_NAME=$(kubectl get pods -o go-template --template '{{range .items}}{{.metadata.name}}{{"\n"}}{{end}}') echo Name of the Pod: $POD_NAME #访问pod curl http://localhost:8001/api/v1/namespaces/default/pods/$POD_NAME/proxy/ kubectl 故障排查 kubectl get pods --namespace= #查看resources列表 kubectl describe pods --namespace= #查看具体的resources情况 kubectl logs $POD_NAME --namespace= #查看pod里的容器日志 kubectl exec --namespace= #在pod里的容器里执行命令 kubectl exec $POD_NAME env --namespace= #查看pod环境变量 kubectl exec -ti $POD_NAME bash --namespace= #进入pod终端 Service & labelsService type 类型 说明 ClusterIP 默认选项,只能集群内部访问 NodePort 使用NAT暴露每个节点的相同端口并使用<NodeIP>:<NodePort> 方式让集群外部访问ClusterIP的超集 LoadBalancer 创建负载均衡器分配一个固定的IPNodePort的超集 ExternalName 使用域名解析的CNAME来指定名字或者手动自定名字不使用proxy 需要v1.7及以上版本的kube-dns 更多的内容参考:https://v1-13.docs.kubernetes.io/docs/tutorials/services/source-ip/ https://v1-13.docs.kubernetes.io/docs/concepts/services-networking/connect-applications-service/ labelsservice通过labels把一组pods管理起来。比如通过labels指定开发、测试、生产环境比如打版本tag使用标签分类 #获取service kubectl get services --namespace= #指定service type kubectl expose deployment/kubernetes-bootcamp --type="NodePort" --port 8080 #查看指定services信息 kubectl describe services/kubernetes-bootcamp --namespace= #设置NODE_PORT端口为环境变量 export NODE_PORT=$(kubectl get services/kubernetes-bootcamp -o go-template='{{(index .spec.ports 0).nodePort}}') echo NODE_PORT=$NODE_PORT #查看部署情况 kubectl describe deployment --namespace= #-l根据label查询pods kubectl get pods -l run=kubernetes-bootcamp --namespace= #-l根据label查询services kubectl get services -l run=kubernetes-bootcamp --namespace= export POD_NAME=$(kubectl get pods -o go-template --template '{{range .items}}{{.metadata.name}}{{"\n"}}{{end}}') echo Name of the Pod: $POD_NAME #设置label,label是key/value对 kubectl label pod $POD_NAME app=v1 #根据label查询pods kubectl get pods -l app=v1 --namespace= #删除service kubectl delete service -l run=kubernetes-bootcamp --namespace= #pod里执行命令 kubectl exec -ti $POD_NAME curl localhost:8080 --namespace= 扩缩容 kubectl get deployments #扩容成4个 kubectl scale deployments/kubernetes-bootcamp --replicas=4 #查看pod是否变成4个 kubectl get pods -o wide #查看deployments详情 kubectl describe deployments/kubernetes-bootcamp #设置环境变量 export NODE_PORT=$(kubectl get services/kubernetes-bootcamp -o go-template='{{(index .spec.ports 0).nodePort}}') echo NODE_PORT=$NODE_PORT #缩容 kubectl scale deployments/kubernetes-bootcamp --replicas=2 滚动升级 #查看deployments kubectl get deployments kubectl get pods kubectl describe pods #滚动升级 kubectl set image deployments/kubernetes-bootcamp kubernetes-bootcamp=jocatalin/kubernetes-bootcamp:v2 #查看升级是否成功 kubectl describe services/kubernetes-bootcamp #查看升级状态 kubectl rollout status deployments/kubernetes-bootcamp #升级一个不存在的版本,让升级失败。 kubectl set image deployments/kubernetes-bootcamp kubernetes-bootcamp=gcr.io/google-samples/kubernetes-bootcamp:v10 #查看pods是否失败 kubectl get pods #查看失败日志 kubectl logs $POD_NAME #回退版本,然后用上面的命令查看是否回退成功 kubectl rollout undo deployments/kubernetes-bootcamp 根据上面的内容部署官网的例子:https://kubernetes.io/docs/tutorials/stateless-application/guestbook/image 从docker hub 上找,先pull下来 #在有问题的node上执行以下命令 查看问题 journalctl -f -u kubelet

优秀的个人博客,低调大师

Javascript基础之-this

this应该算是前期比较容易混淆的一个关键字了,在这里,我就打算按照我的理解来说一下 首先呢,this的值是跟运行时被调用的位置相关的,而不是词法作用域。 也就是说,他的绑定的值很可能是动态的,不同的调用位置,很可能值就不一样,比如说: function foo() { console.log(this.a); } var a = 2; var obj = { a: 3, foo, } foo(); //2 obj.foo(); //3 var c = obj.foo; c(); //2 然后你会惊讶的发现,foo()通过不同的形式调用,他最终的值是不一样的,咱们这一节主要就来讲一讲他们里面的这些绑定的规则 默认绑定 独立的函数调用,它的作用域是作用在全局的,这种绑定规则最常见并且是优先级最低的一种绑定规则。来一个例子 function foo() { console.log(this.a); //2 console.log(this === window); //true } var a = 2; foo(); 在浏览器中执行,会发现,如果foo()作为一个函数单独调用,那么this指向的就是全局对象windows。 但是呢,也有一种例外,如果函数使用的严格模式的话,那么全局对象讲无法使用默认绑定,this将会绑定到undefined,还是刚才的例子: function foo() { "use strict" console.log(this.a); console.log(this === window); } var a = 2; foo(); //Uncaught TypeError: Cannot read property 'a' of undefined 可以看到,foo直接抛出一个error,说this是undefined,取不到a,如果用到严格模式的时候,可以稍微注意下这个区别 咱们刚刚的例子,说的是函数内用严格模式的话,讲无法使用默认绑定,那么如果是在函数调用位置用严格模式,会受影响吗 function foo() { console.log(this.a); //2 console.log(this === window); //true } var a = 2; (function () { "use strict" foo(); })(); 很明显,可以看出,是不受影响的,还有一个问题,如果把var定义变成let会怎么样呢 function foo() { console.log(this.a); //undefined console.log(this === window); //true } let a = 2; (function () { "use strict" foo(); })(); 也就是说,let定义并不会加到全局变量中,这个和var的区别需要稍微留意一下 隐式绑定 这一条规则考虑的是是否有上下文对象,举个例子 function foo() { console.log(this.a); //2 console.log(this === obj); // true } var obj = { a: 2, foo, } obj.foo(); 在这种情况下,foo会使用obj的上下文对象来引用函数,此时的this指向的就是obj。 那么如果是嵌套对象这种的,会怎么处理呢? function foo() { console.log(this.a); // 1 console.log(this === obj) // true console.log(this === obj1) // fale } var obj = { a: 1, foo, }; var obj1 = { a: 2, obj, } obj1.obj.foo(); 可以看到,实际上此时foo中的this指向了离他最近的对象obj,也就是说,对象属性引用链的最后一层会影响它的调用位置 还有一种情况。 function foo() { console.log(this.a); } var obj = { a: 3, foo, } var a = 2; var f = obj.foo; f(); // 2 这种情况下,虽然f是obj.foo的引用,但是最后依然用的是默认绑定,而不是隐式绑定,所以说呢,咱们可以这么理解,虽然他是对象中函数的引用,但是在执行的时候,调用的方式确是函数调用的方式,不是对象.属性()的方式,这块在使用的时候需要注意一下 显式绑定 很简单,显式绑定就是手动直接改变其this指向的一种方式,这个主要是用几种api来实现的 function foo() { console.log(this.a); } var obj = { a: 2, }; foo.call(obj); foo.apply(obj); var f = foo.bind(obj); f(); 这个就是显式绑定的常见的三种形式 这三种形式的话,call和apply差不多,就不展开了,详情看文档就行,咱们仔细看一下bind函数,来在看一个例子 function foo(num1, num2) { console.log(num1 + num2); //5 console.log(this === obj); // true } var obj = { a: 1, }; var f = foo.bind(obj, 2); f(3); 这个可以看出,bind的用法和call以及apply还是有一些差别的。 注意,如果显式绑定传入的是null或者是undefined的话,将会使用默认绑定规则,举个例子 function foo() { console.log( this.a ); } var a = 2; foo.call( null ); // 2 new绑定 这个主要是new 函数()的绑定形式的,这个的this指向的是函数构造出的那个对象,new的时候,它的执行过程可以大概执行以下几步 创建一个全新的对象 这个新对象会被执行prototype连接 新对象绑定到函数调用的this 如果函数没有返回其他对象,那么new表达式中的函数调用会自动返回这个新对象 注意最后一句话,如果函数没有返回对象,那么就会返回函数调用的新对象,如果返回了一个对象呢,那么结果就是直接返回这个对象 var abc = { a: 10 } function foo() { return abc; } foo.prototype = { b: 20 }; var a = new foo(); console.log(a === abc); // true console.log(a.b); // undefined function bar() { this.a = 10; } bar.prototype = { b: 20 }; var b = new bar(); console.log(b.a); // 10 console.log(b.b); // 20 以上四种常见的this绑定方式已经介绍的差不多了,那么问题来了,谁的优先级更高呢 很明显,默认绑定的优先级最低,就不展开说了 显式绑定与隐式绑定哪个优先级高呢,举个例子 function foo() { console.log( this. a ); } var obj1 = { a: 2, foo: foo }; var obj2 = { a: 3, foo: foo }; obj1.foo(); // 2 obj2.foo(); // 3 obj1.foo.call( obj2 ); // 3 obj2.foo.call( obj1 ); // 2 很明显,显式绑定优先级要高于隐式绑定 那么new绑定和显式绑定谁更高呢,来再看个例子 function foo(something) { this.a = something; } var obj1 = {}; var bar = foo.bind( obj1 ); bar( 2 ); console.log( obj1.a ); // 2 var baz = new bar(3); console.log( obj1.a ); // 2 console.log( baz.a ); // 3 很明显,new的优先级会更高 所以,这样的话,优先级排序就出来了,分别为 new绑定 > 显式绑定 > 隐式绑定 > 默认绑定 以上就是大家常用到的几种,不过es6出现了一种箭头函数,箭头函数理论上不能应用上面四种的任意一种,它的this是根据代码的词法作用域来走的,比如说 function foo() { return (a) => { console.log( this.a ); }; } var obj1 = { a: 2 }; var obj2 = { a: 3 }; var bar = foo.call( obj1 ); bar.call( obj2 ); // 2 结果已经很明显了, 好了,以上内容就讲完了,通过我的一些讲解,是不是有一点理解了呢,如果有任何的不同意见,欢迎讨论哦 参考书籍《你不知道的Javascript》上卷 转载自:http://www.lht.ren/article/4/

优秀的个人博客,低调大师

Kotlin 基础语法

Kotlin 文件以 .kt 为后缀。 包声明 包的声明应处于源文件顶部: package my.demo import java.util.* // …… kotlin源文件不需要相匹配的目录和包,源文件可以放在任何文件目录。如果没有指定包,默认为default包。 默认导入 有多个包会默认导入到每个 Kotlin 文件中: kotlin.* kotlin.annotation.* kotlin.collections.* kotlin.comparisons.* kotlin.io.* kotlin.ranges.* kotlin.sequences.* kotlin.text.* 函数定义 函数定义使用关键字 fun,参数格式为: 参数 : 类型,下面给出几个例子 //带有两个 Int 参数、返回 Int 的函数 fun sum(a: Int, b: Int): Int { // Int 参数,返回值 Int return a + b } 表达式作为函数体,返回类型自动推断: fun sum(a: Int, b: Int) = a + b public fun sum(a: Int, b: Int): Int = a + b // public 方法则必须明确写出返回类型 无返回值的函数(类似Java中的void): fun printSum(a: Int, b: Int): Unit { println("sum of $a and $b is ${a + b}") } // 如果是返回 Unit类型,则可以省略(对于public方法也是这样): public fun printSum(a: Int, b: Int) { print(a + b) } 可变长参数函数 函数的变长参数可以用vararg关键字进行标识: fun vars(vararg v:Int){ for(vt in v){ print(vt) } } // 测试 fun main(args: Array<String>) { vars(1,2,3,4,5) // 输出12345 } lambda(匿名函数) lambda表达式使用实例: // 测试 fun main(args: Array<String>) { val sumLambda: (Int, Int) -> Int = {x,y -> x+y} println(sumLambda(1,2)) // 输出 3 } 定义常量与变量 不可变变量定义:val 关键字,只能赋值一次的变量(类似Java中final修饰的变量) val <标识符> : <类型> = <初始化值> 可变变量定义:var 关键字 var <标识符> : <类型> = <初始化值> 常量与变量都可以没有初始化值,但是在引用前必须初始化 编译器支持自动类型判断,即声明时可以不指定类型,由编译器判断。 val a: Int = 1 // 立即赋值 val b = 1 // 系统自动推断变量类型为Int val c: Int // 如果不在声明时初始化,则必须提供变量类型 c = 1 // 明确赋值 var x = 5 // 系统自动推断变量类型为Int x += 1 // 变量可修改 注释 Kotlin 支持单行和多行注释,实例如下: // 这是一个单行注释 /* 这是一个多行的 块注释。 */ 与 Java 不同, Kotlin 中的块注释允许嵌套。 字符串模板 $ 表示一个变量名或者变量值 $varName 表示变量值 ${varName.fun()} 表示变量的方法返回值: var a = 1 // 模板中的简单名称: val s1 = "a is $a" a = 2 // 模板中的任意表达式: val s2 = "${s1.replace("is", "was")}, but now is $a" NULL检查机制 Kotlin的空安全设计对于声明可为空的参数,在使用时要进行空判断处理,有两种处理方式,字段后加!!像Java一样抛出空异常,另一种字段后加?可不做处理返回值为 null或配合?:做空判断处理 //类型后面加?表示可为空 var age: String? = "23" //抛出空指针异常 val ages = age!!.toInt() //不做处理返回 null val ages1 = age?.toInt() //age为空返回-1 val ages2 = age?.toInt() ?: -1 当一个引用可能为 null 值时, 必须在声明处的类型后添加?来标识该引用可为空 当 str 中的字符串内容不是一个整数时, 返回 null: fun parseInt(str: String): Int? { // ... } 以下实例演示如何使用一个返回值可为 null 的函数: fun printProduct(arg1: String, arg2: String) { val x = parseInt(arg1) val y = parseInt(arg2) // 直接使用 `x * y` 会导致错误, 因为它们可能为 null. if (x != null && y != null) { // 在进行过 null 值检查之后, x 和 y 的类型会被自动转换为非 null 变量 print(x * y) } } 或者 // …… if (x == null) { println("Wrong number format in arg1: '$arg1'") return } if (y == null) { println("Wrong number format in arg2: '$arg2'") return } ​ // 在空检测后,x 与 y 会自动转换为非空值 println(x * y) 类型检测及自动类型转换 我们可以使用 is 运算符检测一个表达式是否是某类型的一个实例(类似于Java中的instanceof关键字)。如果一个不可变的局部变量或属性已经判断出为某类型,那么检测后的分支中可以直接当作该类型使用,无需显式转换: fun getStringLength(obj: Any): Int? { if (obj is String) { // 做过类型判断以后,obj会被系统自动转换为String类型 return obj.length } // 在离开类型检测分支后,`obj` 仍然是 `Any` 类型 return null } 在这里还有一种方法,与Java中instanceof不同,使用!is fun getStringLength(obj: Any): Int? { fun getStringLength(obj: Any): Int? { if (obj !is String) return null // `obj` 在这一分支自动转换为 `String` return obj.length } 甚至还可以 fun getStringLength(obj: Any): Int? { // 在 `&&` 运算符的右侧, `obj` 的类型会被自动转换为 `String` if (obj is String && obj.length > 0) return obj.length return null } 区间 区间表达式由具有操作符形式..的 rangeTo 函数辅以 in 和 !in 形成。 区间是为任何可比较类型定义的,但对于整型原生类型,它有一个优化的实现。以下是使用区间的一些示例: for (i in 1..4) print(i) // 输出“1234” for (i in 4..1) print(i) // 什么都不输出 if (i in 1..10) { // 等同于 1 <= i && i <= 10 println(i) } // 使用 step 指定步长 for (i in 1..4 step 2) print(i) // 输出“13” for (i in 4 downTo 1 step 2) print(i) // 输出“42” // 使用 until 函数排除结束元素 for (i in 1 until 10) { // i in [1, 10) 排除了 10 println(i) } 实例测试 fun main(args: Array<String>) { print("循环输出:") for (i in 1..4) print(i) // 输出“1234” println("\n----------------") print("设置步长:") for (i in 1..4 step 2) print(i) // 输出“13” println("\n----------------") print("使用 downTo:") for (i in 4 downTo 1 step 2) print(i) // 输出“42” println("\n----------------") print("使用 until:") // 使用 until 函数排除结束元素 for (i in 1 until 4) { // i in [1, 4) 排除了 4 print(i) } println("\n----------------") } 输出结果: 循环输出:1234 ---------------- 设置步长:13 ---------------- 使用 downTo:42 ---------------- 使用 until:123 ---------------- 参考: http://www.runoob.com/kotlin/kotlin-basic-syntax.html https://www.kotlincn.net/docs/reference/basic-syntax.html

优秀的个人博客,低调大师

Java基础1.1

虚拟机:vm,java虚拟机jvm。 C语言:写源码;用文本文件写的(写出来就是一个文本文件)。 源码————编译————可执行程序。 运行平台(系统+硬件)。 C;优点:与系统接触近,可以操作系统和系统API 缺点:程序不可跨平台,内存管理十分的麻烦。 内存(运行内存)又称闪存 ———速度十分的快——(一旦掉电数据全部消失)服务器(数据服务中心)服务器运行时间很长。内存运行完要回收 Java优化:如何跨平台(在所有操作系统上运行),如何管理内存(让所有的程序员不在头疼如何管理内存) 怎样跨平台; 三大系统的内核不一样:如何让程序可以跨平台运行那【源码】————【字节码】—————【翻译官】(虚拟机),字节码交给翻译官 怎样优化内存:C语言————编译——-exe————运行 虚拟机就像一个鱼缸: 你要操作内存的话交个容器,虚拟机就像是一个管家;你不用管内存,交给管家就行了,你想要内存问这个管家要就行了。 为什么要形成字节码: 把源码转换为字节码,能让虚拟机很快的认识,运行速度就快。(加快运行速度在运行的时候不用再次解析代码了)优化速度。

优秀的个人博客,低调大师

Java基础1.2

java 编译环节 源码 public .... /// 代码 文件名字后缀用java 全小写 文件1字母大写 (可以用中文命名)比较麻烦 网页下载的只是将虚拟机文件解压出去,不是java环境安装 Java编译环节虚拟机中找到一个程序。叫(javac.exe)程序形成字节码 生成一个字节码文件 如何搭建Java开发环境 :j a v a开发运行流程 java编译环境;写入代码 1名字 文件名字后缀用j a v a 全小写(规定)文件 1字母大写(可以用中文)不太好弄。 运行(java exe)程序并传递你写的文件的源码路径路径,告诉源码路径(打开cmd)磁盘管理系统 编译时时要敲空格 空格表示参数的分割 不空的话表示参数和路径是1(起).的。(不然就会报错)前面是要运行的程序 给程序传递的数据(告诉java路径要他进行编译) 如何让J a v a虚拟机运行我们的字节码 文件名,字节码文件要存在。

优秀的个人博客,低调大师

Java基础1.3

什么是批处理:批处理就是多个dos命令组成的,双击可执行里面的命令。(微软系统) 批处理:桌面文件以双击就能打开,而java一双击是打不开的因为java是一个class文件他需要虚拟机得运行才能打开。 Java不擅长做桌面程序你要是非要做你就得写一个简单的批处理操作。 run.bat:在批处理文件中运行你要运行的文件(java,javaw)加文件名。 bat(批处理的后缀)批处理就是dos的命令。javaw窗口文件运行,使用java不能关闭dos的窗口就是关闭程序的运行,这里是指窗口件。start(开启命令)犹如在dos中运行程序, 要想将你写的程序传播出去,就需要将源码(文件名.java)字节码(文件名.class)批处理(文件名.bat) 还要带上jdk 并且在批处理 bat文件中配置临时环境变量 , JAVA_HOME配置的是子目录前的路径 在配置path的时候不要在配置目录了只需要引入JAVA_HOME即可 set path=./jdk-10.0.2./bin()当前目录显得bin目录 .(代表当前目录下执行) set JAVA_HOME =./jdk-10.0.2(当前路径下的jdk) .(代表当前目录先执行) set CLASSPATH= . ;(当前目录) 这里有语法规定当前目录是(.;) 批处理就是字一个记事本中写执行代码让系统顺着去执行。 Java程序永远离不开jdk 就算你生成了exe也需要jdk才能运行。 如果想直接运行也可以就需要通过一个工具(exej4)这个工具可以直接将java打包成exe可执行程序。(这个你看到的只是假象 他只是做了一个批处理) 所以还不如我们自己写一个批处理

优秀的个人博客,低调大师

Java 基础语法

基本语法 2.1关键字 关键字是电脑语言里事先定义的,有特别意义的标识符,有时又叫保留字,还有特别意义的变量。Java的关键字对Java的编译器有特殊的意义,他们用来表示一种数据类型,或者表示程序的结构等,关键字不能用作变量名、方法名、类名、包名和参数。 Java语言规定关键字不能作为标识符。目前共有50个Java关键字,其中,"const"和"goto"这两个关键字在Java语言中并没有具体含义。Java语言把它们列为关键字,只是因为"const"和"goto"是其他某些计算机语言的关键字。2.2 标识符2.2.1 含义Java语言中,对于变量,常量,函数,语句块也有名字,我们统统称之为Java标识符.标识符是用来给类、对象、方法、变量、接口和自定义数据类型命名的。2.2.2 组成Java标识符由数字,字母和下划线(_),美元符号($)或人民币符号(¥)组成。在Java中是区分大小写的,而且还要求首位不能是数字。最重要的是,Java关键字不能当作Java标识符。2.2.3 命名规则1.类和接口名。每个字的首字母大写,含有大小写。例如MyClass,HelloWorld等。2.方法名。首字符小写,其余的首字母大写,含大小写。尽量少用下划线。例如,myName等。这种命名方法叫做驼峰式命名。3.常量名。基本数据类型的常量名使用全部大写字母,字与字之间用下划线分隔。对象常量可大小混写。例如,SIZE_NAME。 4.变量名。可大小写混写,首字符小写,字间分隔符用字的首字母大写。不用下划线,少用美元符号。给变量命名是尽量做到见名知义。 2.3 运算符2.3.1分类1.算数运算符(1)单目:+(取正)-(取负) ++(自增1) - -(自减1)(◆注:++和—既可以是前置运算符,也可以是后置运算符。前置时,变量的值先增1或先减1,然后用变量参加表达式的计算;后置时,变量的值先参加表达式的计算,然后变量再增1或减1。)(2)双目:+(加) -(减) *(乘) /(除) %(取余)2.赋值运算符(一)简单赋值运算符“=”用来将一个数据赋给一个变量(二)复合赋值运算符(1)= (2) += (3) -= (4) *= (5) /= (6) %= (7) &= (8) ^= (9)|= (10) <<= (11) >>=3.关系运算符等于符号==,不等于符号!= ,大于符号 >, 小于符号<,大于等于符号: >= ,小于等于符号: <= 。4.短路运算符短路运算符就是我们常用的“&&”、“||”,一般称为“条件操作”。5.条件运算符三目:a>b?true:false 说明:当a大于b的时候,为true(也就是冒号之前的值),否则为false;这整个运算符包括一个关系运算符(可以是“>”"<""!="等等),一个“?”,一个“:”,冒号前后需要有两个表达式或者是值或者是对象。6.位运算符(1)逻辑运算符常见的共有4种逻辑位运算符:(~)按位取反(&)按位与(|)按位或(^)按位异或(2)移位运算符(a)左移动运算符:会将操作的数向左边移动,移动的位的个数由指定,左移(b)右移动运算符:反过来,把操作数向右移动,移动的位个数同样由右操作数指定。(c)无正负号的右移运算符(>>>):7.布尔运算符布尔运算符布尔(boolean)变量或表达式的组合运算可以产生新的boolean值,fales和true(记得是小写)。单目运算符“!”是布尔非。双目运算符&,|和^是逻辑AND,OR和XOR运算符,它们强制两个操作数求布尔值。为避免右侧操作数冗余求值,用户可以使用短路求值运算符&&和||。8.其他运算符(1)instanceof(运行时的类型识别)(2). 点运算符,用来访问对象实例和访问类的成员方法和成员方法。(3)() “()”运算符,当声明或调用一个方法时,可以在()之间列出方法的参数,也可以利用“()”来指定一个空的参数。(4)new运算符 可以使用new运算符来出创建一个新对象或者一个新的数组(5)[]运算符 可以使用方括号来声明数组、创建数组以及访问数组中的元素。2.3.2 优先级按优先级从高到低排列如下:[ ] ( ) ++ -- ! ~ instanceof * / % + - << >> >>> <> < = > \ == != &^& & || ? := op= 。

优秀的个人博客,低调大师

JavaScript 基础--- (对象)

1、js的String对象 ** 创建String对象 *** var str = "abc"; ** 方法和属性(文档) *** 属性 length:字符串的长度 *** 方法 (1)与html相关的方法 - bold():加粗 - fontcolor(): 设置字符串的颜色 - fontsize(): 设置字体的大小 - link(): 将字符串显示成超链接 **** str4.link("hello.html") - sub() sup(): 下标和上标 (2)与java相似的方法 - concat(): 连接字符串 ** //concat方法 <!doctype html> <html lang="en"> <head> <meta charset="UTF-8" /> <title>对象</title> <script> var str1 = "abc"; var str2 = "dfg"; document.write(str1.concat(str2)); //连接字符串 </script> </head> <body> </body> </html> 输出: - charAt():返回指定指定位置的字符串 <!doctype html> <html lang="en"> <head> <meta charset="UTF-8" /> <title>对象</title> <script> var str3 = "abcdefg"; document.write(str3.charAt(20)); //字符位置不存在,返回空字符串 </script> </head> <body> </body> </html> 输出:空- indexOf(): 返回字符串位置 <!doctype html> <html lang="en"> <head> <meta charset="UTF-8" /> <title>对象</title> <script> var str4 = "poiuyt"; document.write(str4.indexOf("w")); //字符不存在,返回-1 </script> </head> <body> </body> </html> 输出:- split():切分字符串,成数组 <!doctype html> <html lang="en"> <head> <meta charset="UTF-8" /> <title>对象</title> <script> var str5 = "a-b-c-d"; var arr1 = str5.split("-"); document.write("length: "+arr1.length); </script> </head> <body> </body> </html> 输出: - replace() : 替换字符串 * 传递两个参数: -- 第一个参数是原始字符 -- 要替换成的字符 <!doctype html> <html lang="en"> <head> <meta charset="UTF-8" /> <title>对象</title> <script> var str6 = "abcd"; document.write(str6); document.write("<br/>"); document.write(str6.replace("a","Q")); </script> </head> <body> </body> </html> 输出:- substr()和substring() <!doctype html> <html lang="en"> <head> <meta charset="UTF-8" /> <title>对象</title> <script> var str7 = "abcdefghuiop"; document.write(str7.substr(5,5)); //从第五位开始,向后截取五个字符 document.write("<br/>"); document.write(str7.substring(3,5));//从第三位开始到第五位结束[3,5)[左闭右开] </script> </head> <body> </body> </html> 输出: 2、js的Array对象 ** 创建数组(三种) - var arr1 = [1,2,3]; - var arr2 = new Array(3); //长度是3 - var arr3 = new Array(1,2,3); //数组中的元素是1 2 3 - var arr = []; //创建一个空数组 ** 属性:length:查看数组的长度 ** 方法 - concat方法: 数组的连接 * var arr11 = [1,2,3]; var arr12 = [4,5,6]; document.write(arr11.concat(arr12)); - join():根据指定的字符分割数组 <!doctype html> <html lang="en"> <head> <meta charset="UTF-8" /> <title>对象</title> <script> var arr13 = new Array(3); arr13[0] = "a"; arr13[1] = "b"; arr13[2] = "c"; document.write(arr13); document.write("<br/>"); document.write(arr13.join("-")); </script> </head> <body> </body> </html> 输出: - push():向数组末尾添加元素,返回数组的新的长度 ** 如果添加的是一个数组,这个时候把数组当做一个整体字符串添加进去 * //push方法 <!doctype html> <html lang="en"> <head> <meta charset="UTF-8" /> <title>对象</title> <script> var arr14 = new Array(3); arr14[0] = "tom"; arr14[1] = "lucy"; arr14[2] = "jack"; document.write("old array: "+arr14); document.write("<br/>"); document.write("old length:"+arr14.length); document.write("<br/>"); document.write("new length: "+arr14.push("zhangsan")); document.write("<br/>"); document.write("new array: "+arr14); </script> </head> <body> </body> </html> 输出: <!doctype html> <html lang="en"> <head> <meta charset="UTF-8" /> <title>对象</title> <script> var arr15 = ["aaa","bbb","ccc"]; var arr16 = ["www","qqq"]; document.write("old array:"+arr15); document.write("<br/>"); document.write("old length:"+arr15.length); document.write("<br/>"); document.write("new length:"+arr15.push(arr16)); document.write("<br/>"); document.write("new array: "+arr15); for(var i=0;i<arr15.length;i++) { alert(arr15[i]); } </script> </head> <body> </body> </html> 输出: - pop():表示 删除最后一个元素,返回删除的那个元素 <!doctype html> <html lang="en"> <head> <meta charset="UTF-8" /> <title>对象</title> <script> var arr17 = ["zhangsan","lisi","wangwu","zhaoliu"]; document.write("old array: "+arr17); document.write("<br/>"); document.write("return: "+arr17.pop()); document.write("<br/>"); document.write("new array: "+arr17); </script> </head> <body> </body> </html> 输出:- reverse():颠倒数组中的元素的顺序 <!doctype html> <html lang="en"> <head> <meta charset="UTF-8" /> <title>对象</title> <script> document.write("<hr/>"); var arr18 = ["zhangsan1","lisi1","zhaoliu1","niuqi1"]; document.write("old array: "+arr18); document.write("<br/>"); document.write("new array:"+arr18.reverse()); </script> </head> <body> </body> </html> 输出: 3、js的Date对象 ** 在java里面获取当前时间 Date date = new Date(); //格式化 //toLocaleString() ** js里面获取当前时间 var date = new Date(); //获取当前时间 var date = new Date(); document.write(date); //转换成习惯的格式 document.write("<hr/>"); document.write(date.toLocaleString()); ** 获取当前的年方法 getFullYear():得到当前的年 **** document.write("year: "+date.getFullYear()); ** 获取当前的月方法 getMonth():获取当前的月 *** 返回的是 0-11月,如果想要得到准确的值,加1 **** var date1 = date.getMonth()+1; document.write("month: "+date1); ** 获取当前的星期 getDay():星期,返回的是 (0 ~ 6) ** 外国朋友,把星期日作为一周的第一天,星期日返回的是 0 而星期一到星期六 返回的是 1-6 ** document.write("week: "+date.getDay()); ** 获取当前的日 getDate():得到当前的天 1-31 ** document.write("day: "+date.getDate()); <!DOCTYPE html> <html> <head> <meta charset="UTF-8"> <title>对象</title> <script type="text/javascript"> var date = new Date(); var days = ['周日','周一','周二','周三','周四','周五','周六']; document.write(days[date.getDay()]) </script> </head> <body> </body> </html> 输出: ** 获取当前的小时 getHours():获取小时 ** document.write("hour: "+date.getHours()); ** 获取当前的分钟 getMinutes():分钟 ** document.write("minute: "+date.getMinutes()); ** 获取当前的秒 getSeconds(): 秒 ** document.write("second: "+date.getSeconds()); ** 获取毫秒数 getTime() 返回的是1970 1 1 至今的毫秒数 ** 应用场景: *** 使用毫秒数处理缓存的效果(不有缓存) 案例:输出当前年、月、日、时、分、秒(动态变化) <!DOCTYPE html> <html> <head> <meta charset="UTF-8"> <title></title> <script type="text/javascript"> document var interval = setInterval("clock()",1000); function clock(){ var date = new Date(); var div1 = document.getElementById('div1'); div1.innerHTML = formatDate(date); } function pause(){ clearInterval(interval); } function start(){ interval = setInterval("clock()",1000); } function formatDate(date){ var year = date.getFullYear(); var month = change(date.getMonth()+1); var dd = change(date.getDate()); var hour = change(date.getHours()); var min = change(date.getMinutes()); var second = change(date.getSeconds()); return year + '-' + month + '-' + dd + ' ' + hour + ':' + min + ':' + second; } function change(num){ if(num < 10){ return "0" + num; } return num; } </script> </head> <body> <div id="div1"> sdfas </div> <input type="button" value="暂停" onclick="pause()" /> <input type="button" value="开始" onclick="start()" /> </body> </html> 输出: 4、js的Math对象 * 数学的运算 ** 里面的都是静态方法,使用可以直接使用 Math.方法() ** ceil(x): 向上舍人 ** floor(x):向下舍人 ** round(x):四舍五入 ** random():得到随机数(伪随机数) - 得到0-9的随机数 Math.random()*10 Math.floor(Math.random()*10)); <!DOCTYPE html> <html> <head> <meta charset="UTF-8"> <title>对象</title> <script type="text/javascript"> var num = 5.0; for(var i = 0; i < 100; i ++){ document.write(Math.ceil(Math.random()*10)); document.write("<br />") } </script> </head> <body> </body> </html> 输出: 5、js的全局函数 * 由于不属于任何一个对象,直接写名称使用 ** eval() : 执行js代码(如果字符串是一个js代码,使用方法直接执行) **** var str = "alert('1234');"; //alert(str); eval(str); ** isNaN():判断当前字符串是否是数字 -- var str2 = "aaaa"; alert(isNaN(str2)); *** 如果是数字,返回false *** 如果不是数字,返回true ** parseInt():类型转换 ** var str3 = "123"; document.write(parseInt(str3)+1); 6、js的bom对象 ** bom:broswer object model: 浏览器对象模型 ** 包含对象: *** navigator: 获取客户机的信息(浏览器的信息) - navigator.appName - document.write(navigator.appName); *** screen: 获取屏幕的信息 - document.write(screen.width); document.write("<br/>"); document.write(screen.height); <!DOCTYPE html> <html> <head> <meta charset="UTF-8"> <title>对象</title> <script type="text/javascript"> document.write(navigator.appName); document.write(screen.width) ; document.write(screen.height) ; </script> </head> <body> </body> </html> 输出: *** location: 请求url地址 - href属性 **** 获取到请求的url地址 - document.write(location.href); **** 设置url地址 - 页面上安置一个按钮,按钮上绑定一个事件,当我点击这个按钮,页面可以跳转到另外一个页面 - location.href = "hello.html"; **** <input type="button" value="tiaozhuan" onclick="href1();"/> - 鼠标点击事件 onclick="js的方法;"案例:跳转到百度 <!DOCTYPE html> <html> <head> <meta charset="UTF-8"> <title>对象</title> <script type="text/javascript"> function tz(){ location.href = 'http://www.baidu.com'; } </script> </head> <body> <input type="button" value="跳转" onclick="tz()" /> </body> </html> 输出: *** history:请求的url的历史记录 - 创建三个页面 1、创建第一个页面 a.html 写一个超链接 到 b.html 2、创建b.html 超链接 到 c.html 3、创建c.html - 到访问的上一个页面 history.back(); history.go(-1); - 到访问的下一个页面 history.forward(); history.go(1); <!DOCTYPE html> <html> <head> <meta charset="UTF-8"> <title></title> <script type="text/javascript"> var ww ; function openWin(){ ww = open("aaa.html","","width=900,height=700"); } function closeWin(){ ww.close(); } </script> </head> <body> <input type="button" value="打开子窗口" onclick="openWin()"/> <input type="button" value="关闭子窗口" onclick="closeWin()"/> </body> </html> 输出: **** window(窗口对象) * 顶层对象(所用的bom对象都是在window里面操作的) ** 方法 - window.alert() : 页面弹出一个框,显示内容 ** 简写alert() - confirm(): 确认框 - var flag = window.confirm("显示的内容"); - open() : 打开一个新的窗口 ** open("打开的新窗口的地址url","","窗口特征,比如窗口宽度和高度") - 创建一个按钮,点击这个按钮,打开一个新的窗口 - window.open("hello.html","","width=200,height=100"); - close(): 关闭窗口(浏览器兼容性比较差) - window.close(); - 做定时器 ** setInterval("js代码",毫秒数) 1秒=1000毫秒 - 表示每三秒,执行一次alert方法 window.setInterval("alert('123');",3000); ** setTimeout("js代码",毫秒数) - 表示在毫秒数之后执行,但是只会执行一次 - 表示四秒之后执行js代码,只会执行一次 window.setTimeout("alert('abc');",4000); ** clearInterval(): 清除setInterval设置的定时器 var id1 = setInterval("alert('123');",3000);//通过setInterval会有一个返回值 clearInterval(id1); ** clearTimeout() : 清除setTimeout设置的定时器 var id2 = setTimeout("alert('abc');",4000); clearTimeout(id2); 9、document对象 * 表示整个的文档 ** 常用方法 **** write()方法: (1)向页面输出变量(值) (2)向页面输出html代码 - var str = "abc"; document.write(str); document.write("<hr/>"); **** getElementById(); - 通过id得到元素(标签) - //使用getElementById得到input标签 var input1 = document.getElementById("nameid"); //传递的参数是标签里面的id的值 //得到input里面的value值 alert(input1.name); //标签对象.属性名称 //向input里面设置一个值value input1.value = "bbbbb"; **** getElementsByName(); - 通过标签的name的属性值得到标签 - 返回的是一个集合(数组) - //使用getElementsByName得到input标签 var inputs = document.getElementsByName("name1"); //传递的参数是 标签里面的name的值 //alert(inputs.length); //遍历数组 for(var i=0;i<inputs.length;i++) { //通过遍历数组,得到每个标签里面的具体的值 var input1 = inputs[i]; //每次循环得到input对象,赋值到input1里面 alert(input1.value); //得到每个input标签里面的value值 } **** getElementsByTagName("标签名称"); - 通过标签名称得到元素 - //演示getElementsByTagName var inputs1 = document.getElementsByTagName("input"); //传递的参数,是标签名称 //alert(inputs1.length); //遍历数组,得到每个input标签 for(var m=0;m<inputs1.length;m++) { //得到每个input标签 var input1 = inputs1[m]; //得到value值 alert(input1.value); } **** 注意地方 **** 只有一个标签,这个标签只能使用name获取到,这个使用,使用getElementsByName返回的是一个数组, 但是现在只有一个元素,这个时候不需要遍历,而是可以直接通过数组的下标获取到值 //通过name得到input标签 var inputs2 = document.getElementsByName("name11")[0]; alert(inputs2.value); var inputss = document.getElementsByTagName("input")[0]; alert(inputss.value); 案例: <!DOCTYPE html> <html> <head> <meta charset="UTF-8"> <title></title> </head> <body> 用户名:<input type="text" id="username" /><br /> 密码:<input type="text" id="password" /><br /> 年龄:<input type="text" id="age" /><br /> 爱好: <input type="checkbox" name="lover" value="看书" />看书 <input type="checkbox" name="lover" value="篮球" />篮球 <input type="checkbox" name="lover" value="跑酷" />跑酷 <input type="checkbox" name="lover" value="游泳" />游泳 <input type="checkbox" name="lover" value="下棋" />下棋<br /> <input type="button" value="显示用户信息" onclick="showUserInfo()"/> <div id="showUserInfo" style="width:200px;height: 100px;border:5px dotted #000;"> </div> </body> </html> <script type="text/javascript"> function showUserInfo(){ var username = document.getElementById("username").value; var password = document.getElementById("password").value; var age = document.getElementById("age").value; var lovers = document.getElementsByName("lover"); var loverStr = ""; for(var i = 0; i < lovers.length; i++){ if(lovers[i].checked){ loverStr += lovers[i].value + ","; } } loverStr = loverStr.substring(0,loverStr.length - 1); var showUi = document.getElementById("showUserInfo"); var str = "用户名:" + username + "<br/>" + "密码:" + password + "<br/>年龄:" + age; str += "<br>爱好:" + loverStr; showUi.innerHTML = str; } </script> 输出: 方法二: <!DOCTYPE html> <html> <head> <meta charset="UTF-8"> <title></title> </head> <body> 用户名:<input type="text" id="username" /><br /> 密码:<input type="text" id="password" /><br /> 年龄:<input type="text" id="age" /><br /> 爱好: <input type="checkbox" name="lover" value="看书" />看书 <input type="checkbox" name="lover" value="篮球" />篮球 <input type="checkbox" name="lover" value="跑酷" />跑酷 <input type="checkbox" name="lover" value="游泳" />游泳 <input type="checkbox" name="lover" value="下棋" />下棋<br /> <input type="button" value="显示input value属性值信息" onclick="showUserInfo()"/> <div id="showUserInfo" style="width:200px;height: 100px;border:5px dotted #000;"> </div> </body> </html> <script type="text/javascript"> function showUserInfo(){ var inputs = document.getElementsByTagName("input"); var showUserInfo = document.getElementById("showUserInfo"); for(var i = 0; i < inputs.length; i++){ showUserInfo.innerHTML += inputs[i].value + "&nbsp;&nbsp;"; } } </script> 输出:

资源下载

更多资源
Mario

Mario

马里奥是站在游戏界顶峰的超人气多面角色。马里奥靠吃蘑菇成长,特征是大鼻子、头戴帽子、身穿背带裤,还留着胡子。与他的双胞胎兄弟路易基一起,长年担任任天堂的招牌角色。

腾讯云软件源

腾讯云软件源

为解决软件依赖安装时官方源访问速度慢的问题,腾讯云为一些软件搭建了缓存服务。您可以通过使用腾讯云软件源站来提升依赖包的安装速度。为了方便用户自由搭建服务架构,目前腾讯云软件源站支持公网访问和内网访问。

Spring

Spring

Spring框架(Spring Framework)是由Rod Johnson于2002年提出的开源Java企业级应用框架,旨在通过使用JavaBean替代传统EJB实现方式降低企业级编程开发的复杂性。该框架基于简单性、可测试性和松耦合性设计理念,提供核心容器、应用上下文、数据访问集成等模块,支持整合Hibernate、Struts等第三方框架,其适用范围不仅限于服务器端开发,绝大多数Java应用均可从中受益。

Rocky Linux

Rocky Linux

Rocky Linux(中文名:洛基)是由Gregory Kurtzer于2020年12月发起的企业级Linux发行版,作为CentOS稳定版停止维护后与RHEL(Red Hat Enterprise Linux)完全兼容的开源替代方案,由社区拥有并管理,支持x86_64、aarch64等架构。其通过重新编译RHEL源代码提供长期稳定性,采用模块化包装和SELinux安全架构,默认包含GNOME桌面环境及XFS文件系统,支持十年生命周期更新。

用户登录
用户注册