首页 文章 精选 留言 我的

精选列表

搜索[学习],共10000篇文章
优秀的个人博客,低调大师

Android开发学习笔记:浅谈WebView

WebView(网络视图)能加载显示网页,可以将其视为一个浏览器。它使用了WebKit渲染引擎加载显示网页,实现WebView有以下两种不同的方法: 第一种方法的步骤: 1.在要Activity中实例化WebView组件:WebView webView = new WebView(this); 2.调用WebView的loadUrl()方法,设置WevView要显示的网页: 互联网用:webView.loadUrl("http://www.google.com"); 本地文件用:webView.loadUrl("file:///android_asset/XX.html");本地文件存放在:assets文件中 3.调用Activity的setContentView()方法来显示网页视图 4.用WebView点链接看了很多页以后为了让WebView支持回退功能,需要覆盖覆盖Activity类的onKeyDown()方法,如果不做任何处理,点击系统回退剪键,整个浏览器会调用finish()而结束自身,而不是回退到上一页面 5.需要在AndroidManifest.xml文件中添加权限,否则会出现Web page not available错误。<uses-permissionandroid:name="android.permission.INTERNET"/> 下面是具体例子: MainActivity.java packagecom.android.webview.activity; importandroid.app.Activity; importandroid.os.Bundle; importandroid.view.KeyEvent; importandroid.webkit.WebView; publicclassMainActivityextendsActivity{ privateWebViewwebview; @Override publicvoidonCreate(BundlesavedInstanceState){ super.onCreate(savedInstanceState); //实例化WebView对象 webview=newWebView(this); //设置WebView属性,能够执行Javascript脚本 webview.getSettings().setJavaScriptEnabled(true); //加载需要显示的网页 webview.loadUrl("http://www.51cto.com/"); //设置Web视图 setContentView(webview); } @Override //设置回退 //覆盖Activity类的onKeyDown(intkeyCoder,KeyEventevent)方法 publicbooleanonKeyDown(intkeyCode,KeyEventevent){ if((keyCode==KeyEvent.KEYCODE_BACK)&&webview.canGoBack()){ webview.goBack();//goBack()表示返回WebView的上一页面 returntrue; } returnfalse; } 在AndroidManifest.xml文件中的17行添加权限 <?xml version="1.0" encoding="utf-8"?> <manifest xmlns:android="http://schemas.android.com/apk/res/android" package="com.android.webview.activity" android:versionCode="1" android:versionName="1.0"> <uses-sdk android:minSdkVersion="10" /> <application android:icon="@drawable/icon" android:label="@string/app_name"> <activity android:name=".MainActivity" android:label="@string/app_name"> <intent-filter> <action android:name="android.intent.action.MAIN" /> <category android:name="android.intent.category.LAUNCHER" /> </intent-filter> </activity> </application> <uses-permission android:name="android.permission.INTERNET"/> </manifest> 效果图: 第二种方法的步骤: 1、在布局文件中声明WebView 2、在Activity中实例化WebView 3、调用WebView的loadUrl( )方法,设置WevView要显示的网页 4、为了让WebView能够响应超链接功能,调用setWebViewClient( )方法,设置 WebView视图 5、用WebView点链接看了很多页以后为了让WebView支持回退功能,需要覆盖覆盖Activity类的onKeyDown()方法,如果不做任何处理,点击系统回退剪键,整个浏览器会调用finish()而结束自身,而不是回退到上一页面 6、需要在AndroidManifest.xml文件中添加权限,否则出现Web page not available错误。 <uses-permission android:name="android.permission.INTERNET"/> 下面是具体的例子: MainActivity.java packagecom.android.webview.activity; importandroid.app.Activity; importandroid.os.Bundle; importandroid.view.KeyEvent; importandroid.webkit.WebView; importandroid.webkit.WebViewClient; publicclassMainActivityextendsActivity{ privateWebViewwebview; @Override publicvoidonCreate(BundlesavedInstanceState){ super.onCreate(savedInstanceState); setContentView(R.layout.main); webview=(WebView)findViewById(R.id.webview); //设置WebView属性,能够执行Javascript脚本 webview.getSettings().setJavaScriptEnabled(true); //加载需要显示的网页 webview.loadUrl("http://www.51cto.com/"); //设置Web视图 webview.setWebViewClient(newHelloWebViewClient()); } @Override //设置回退 //覆盖Activity类的onKeyDown(intkeyCoder,KeyEventevent)方法 publicbooleanonKeyDown(intkeyCode,KeyEventevent){ if((keyCode==KeyEvent.KEYCODE_BACK)&&webview.canGoBack()){ webview.goBack();//goBack()表示返回WebView的上一页面 returntrue; } returnfalse; } //Web视图 privateclassHelloWebViewClientextendsWebViewClient{ @Override publicbooleanshouldOverrideUrlLoading(WebViewview,Stringurl){ view.loadUrl(url); returntrue; } } } main.xml <?xmlversion="1.0"encoding="utf-8"?> <LinearLayoutxmlns:android="http://schemas.android.com/apk/res/android" android:orientation="vertical" android:layout_width="fill_parent" android:layout_height="fill_parent" > <WebView android:id="@+id/webview" android:layout_width="fill_parent" android:layout_height="fill_parent" /> </LinearLayout> 在AndroidManifest.xml文件中的17行添加权限 <?xmlversion="1.0"encoding="utf-8"?> <manifestxmlns:android="http://schemas.android.com/apk/res/android" package="com.android.webview.activity" android:versionCode="1" android:versionName="1.0"> <uses-sdkandroid:minSdkVersion="10"/> <applicationandroid:icon="@drawable/icon"android:label="@string/app_name"> <activityandroid:name=".MainActivity" android:label="@string/app_name"> <intent-filter> <actionandroid:name="android.intent.action.MAIN"/> <categoryandroid:name="android.intent.category.LAUNCHER"/> </intent-filter> </activity> </application> <uses-permissionandroid:name="android.permission.INTERNET"/> </manifest> 效果图: 本文转自 lingdududu 51CTO博客,原文链接:http://blog.51cto.com/liangruijun/647456

优秀的个人博客,低调大师

python学习笔记文件操作(六)

1、文件操作流程: 打开文件,得到文件句柄并赋值给一个变量 通过句柄对文件进行操作 关闭文件 如下文件: 1 2 3 4 5 6 2017 - 03 - 24 11 : 25 : 06 : 349 - info:[debug][AndroidBootstrap]Sendingcommandtoandroid:{ "cmd" : "shutdown" } 2017 - 03 - 24 11 : 25 : 06 : 355 - info:[debug][AndroidBootstrap]Receivedcommandresult from bootstrap 2017 - 03 - 24 11 : 25 : 06 : 356 - info:[debug][UiAutomator]ShuttingdownUiAutomator 2017 - 03 - 24 11 : 25 : 06 : 357 - info:[debug][UiAutomator]Movingtostate 'stopping' 2017 - 03 - 24 11 : 25 : 06 : 360 - info:[AndroidBootstrap][BOOTSTRAPLOG][debug]Gotdata from client:{ "cmd" : "shutdown" } 2017 - 03 - 24 11 : 25 : 06 : 361 - info:[AndroidBootstrap][BOOTSTRAPLOG][debug]Gotcommandof type SHUTDOWN 操作流程: 1 2 3 f = open ( 'log.txt' , 'r' ) print (f.read()) f.close() 注意: 在win系统中log文件是utf8保存的,打开文件时open函数是通过操作系统打开的文件,而win操作系统默认的是gbk编码,所以直接打开会乱码,需要f=open('hello',encoding='utf8'),hello文件如果是gbk保存的,则直接打开即可。 2、文件打开模式 1 2 3 4 5 6 7 8 9 10 11 12 13 14 15 16 17 18 19 20 21 22 23 #======================================================================== # #CharacterMeaning # #------------------------------------------------------------------------ # #'r'openforreading(default) # #'w'openforwriting,truncatingthefilefirst # #'x'createanewfileandopenitforwriting # #'a'openforwriting,appendingtotheendofthefileifitexists # #'b'binarymode # #'t'textmode(default) # #'+'openadiskfileforupdating(readingandwriting) # #'U'universalnewlinemode(deprecated) # #======================================================================== 3、文件操作方法 获取文件内容 1 2 3 4 f = open ( 'log.txt' , 'r' ) data = f.read() print (data) f.close() 输出: 2017-03-24 11:25:06:349 - info: [debug] [AndroidBootstrap] Sending command to android: {"cmd":"shutdown"} 2017-03-24 11:25:06:355 - info: [debug] [AndroidBootstrap] Received command result from bootstrap 2017-03-24 11:25:06:356 - info: [debug] [UiAutomator] Shutting down UiAutomator 2017-03-24 11:25:06:357 - info: [debug] [UiAutomator] Moving to state 'stopping' 2017-03-24 11:25:06:360 - info: [AndroidBootstrap] [BOOTSTRAP LOG] [debug] Got data from client: {"cmd":"shutdown"} 2017-03-24 11:25:06:361 - info: [AndroidBootstrap] [BOOTSTRAP LOG] [debug] Got command of type SHUTDOWN =========================================================================================== 1 2 3 4 f= open ( 'log.txt' , 'r' ) data1=f. read (10) #读取10个字符。(在这里汉字也只占一个单位) print(data1) f.close() 输出: 2017-03-24 readline和readlines =========================================================================================== 1 2 3 f = open ( 'log.txt' , 'r' ) print (f.readlines()) #返回的是一个列表,注意换行符 f.close() 输出: ['2017-03-24 11:25:06:349 - info: [debug] [AndroidBootstrap] Sending command to android: {"cmd":"shutdown"}\n', '2017-03-24 11:25:06:355 - info: [debug] [AndroidBootstrap] Received command result from bootstrap\n', '2017-03-24 11:25:06:356 - info: [debug] [UiAutomator] Shutting down UiAutomator\n', "2017-03-24 11:25:06:357 - info: [debug] [UiAutomator] Moving to state 'stopping'\n", '2017-03-24 11:25:06:360 - info: [AndroidBootstrap] [BOOTSTRAP LOG] [debug] Got data from client: {"cmd":"shutdown"}\n', '2017-03-24 11:25:06:361 - info: [AndroidBootstrap] [BOOTSTRAP LOG] [debug] Got command of type SHUTDOWN'] =========================================================================================== 1 2 3 4 5 f = open ( 'log.txt' , 'r' ) print (f.readline()) #逐行读取 print (f.readline()) print (f.readline(),f.readline(),f.readline()) #逐行读取,每行末尾换行符 f.close() 输出:(注意每行末尾的换行符) 2017-03-24 11:25:06:349 - info: [debug] [AndroidBootstrap] Sending command to android: {"cmd":"shutdown"} 2017-03-24 11:25:06:355 - info: [debug] [AndroidBootstrap] Received command result from bootstrap 2017-03-24 11:25:06:356 - info: [debug] [UiAutomator] Shutting down UiAutomator 2017-03-24 11:25:06:357 - info: [debug] [UiAutomator] Moving to state 'stopping' 2017-03-24 11:25:06:360 - info: [AndroidBootstrap] [BOOTSTRAP LOG] [debug] Got data from client: {"cmd":"shutdown"} =========================================================================================== 1 2 3 4 f = open ( 'log.txt' , 'r' ) for line in f.readlines(): print (line.strip()) f.close() 输出: 2017-03-24 11:25:06:349 - info: [debug] [AndroidBootstrap] Sending command to android: {"cmd":"shutdown"} 2017-03-24 11:25:06:355 - info: [debug] [AndroidBootstrap] Received command result from bootstrap 2017-03-24 11:25:06:356 - info: [debug] [UiAutomator] Shutting down UiAutomator 2017-03-24 11:25:06:357 - info: [debug] [UiAutomator] Moving to state 'stopping' 2017-03-24 11:25:06:360 - info: [AndroidBootstrap] [BOOTSTRAP LOG] [debug] Got data from client: {"cmd":"shutdown"} 2017-03-24 11:25:06:361 - info: [AndroidBootstrap] [BOOTSTRAP LOG] [debug] Got command of type SHUTDOWN =========================================================================================== 1 2 3 4 5 f = open ( 'log.txt' , 'r' ) print (f) for i in f: print (i.strip()) f.close() 输出: <_io.TextIOWrapper name='log.txt' mode='r' encoding='cp936'> 2017-03-24 11:25:06:349 - info: [debug] [AndroidBootstrap] Sending command to android: {"cmd":"shutdown"} 2017-03-24 11:25:06:355 - info: [debug] [AndroidBootstrap] Received command result from bootstrap 2017-03-24 11:25:06:356 - info: [debug] [UiAutomator] Shutting down UiAutomator 2017-03-24 11:25:06:357 - info: [debug] [UiAutomator] Moving to state 'stopping' 2017-03-24 11:25:06:360 - info: [AndroidBootstrap] [BOOTSTRAP LOG] [debug] Got data from client: {"cmd":"shutdown"} 2017-03-24 11:25:06:361 - info: [AndroidBootstrap] [BOOTSTRAP LOG] [debug] Got command of type SHUTDOWN =========================================================================================== 1 2 3 4 5 6 7 8 n = 0 f = open ( 'log.txt' , 'r' ) for i in f: if n = = 3 : i = ' '.join([i.strip(),' this is line 4 ']) print (i.strip()) n + = 1 f.close() 输出: 2017-03-24 11:25:06:349 - info: [debug] [AndroidBootstrap] Sending command to android: {"cmd":"shutdown"} 2017-03-24 11:25:06:355 - info: [debug] [AndroidBootstrap] Received command result from bootstrap 2017-03-24 11:25:06:356 - info: [debug] [UiAutomator] Shutting down UiAutomator 2017-03-24 11:25:06:357 - info: [debug] [UiAutomator] Moving to state 'stopping' this is line 4 2017-03-24 11:25:06:360 - info: [AndroidBootstrap] [BOOTSTRAP LOG] [debug] Got data from client: {"cmd":"shutdown"} 2017-03-24 11:25:06:361 - info: [AndroidBootstrap] [BOOTSTRAP LOG] [debug] Got command of type SHUTDOWN =========================================================================================== tell和seek 1 2 3 4 5 6 f = open ( 'log.txt' , 'r' ) print (f.read( 25 )) print (f.tell()) #取出光标所在位置 print (f.seek( 0 )) #移动光标到指定的位置 print (f.read( 50 )) f.close() 输出: 2017-03-24 11:25:06:349 - 25 0 2017-03-24 11:25:06:349 - info: [debug] [AndroidBo 注意:read后不管是中文字符还是英文字符,都统一算一个单位,read(6),此刻就读了6个中文字符;而seek和tell对于英文字符就是占一个,中文字符占三个,区分与read()的不同. =========================================================================================== flush:同步把数据从缓存移动到磁盘上去 1 2 3 4 5 6 7 8 9 10 11 12 #进度条实例 import sys,time for i in range ( 30 ): sys.stdout.write( "*" ) sys.stdout.flush() time.sleep( 0.1 ) #print的flush import sys,time for i in range ( 30 ): print ( '*' ,end = '',flush = True ) time.sleep( 0.1 ) =========================================================================================== 其他扩展: #truncate():截断数据(不能在r模式下)#在w模式下:先清空,再写,再截断#在a模式下:直接将指定位置后的内容截断 # r+:光标默认在0位置开始写,从0开始覆盖数据# w+:先清空,再写读# a+:光标默认在最后位置 =========================================================================================== with: 为了避免打开文件后忘记关闭,可以通过管理上下文,即: 1 2 with open ( 'log.txt' , 'r' )asf: print (f.readline()) 在Python 2.7 后,with又支持同时对多个文件的上下文进行管理,即:如此方式,当with代码块执行完毕时,内部会自动关闭并释放文件资源。 1 2 3 4 #with同时管理多个文件对象 with open ( 'log1' , 'r' )asf_read, open ( 'log2' , 'w' )asf_write: for line in f_read: f_write.write(line) 本文转自cqtesting51CTO博客,原文链接:http://blog.51cto.com/cqtesting/1959698 ,如需转载请自行联系原作者

优秀的个人博客,低调大师

android学习之-SQLiteOpenHelper的应用

通过这个小例子大致了解了手机数据库的一些功能,见主类 packagecom.android.sucre; importandroid.app.Activity; importandroid.database.Cursor; importandroid.database.sqlite.SQLiteCursor; importandroid.os.Bundle; importandroid.util.Log; importandroid.view.Menu; importandroid.view.MenuItem; importandroid.view.View; importandroid.widget.AdapterView; importandroid.widget.EditText; importandroid.widget.ListView; importandroid.widget.SimpleCursorAdapter; /** *数据库简单应用 *@authorqiaolei * */ publicclassEX05_05_SQLiteextendsActivity{ privateToDoDBmyToDoDB; privateCursormyCursor; privateEditTextmyEditText; privateListViewmyListView; privateint_id; protectedfinalstaticintMENU_ADD=Menu.FIRST; protectedfinalstaticintMENU_EDIT=Menu.FIRST+1; protectedfinalstaticintMENU_DELETE=Menu.FIRST+2; /**Calledwhentheactivityisfirstcreated.*/ @Override publicvoidonCreate(BundlesavedInstanceState){ super.onCreate(savedInstanceState); setContentView(R.layout.main); myEditText=(EditText)findViewById(R.id.myEditText); myListView=(ListView)findViewById(R.id.myListView); myToDoDB=newToDoDB(this); myCursor=myToDoDB.select();//取得database中的数据 //R.layout.list为layout文件夹下的list文件 //R.id.listView指向list文件的ID SimpleCursorAdapteradapter=newSimpleCursorAdapter(this,R.layout.list,myCursor,newString[]{ToDoDB.FIELD_TEXT},newint[]{R.id.listView}); myListView.setAdapter(adapter); myListView.setOnItemClickListener(newAdapterView.OnItemClickListener(){ publicvoidonItemClick(AdapterView<?>arg0,Viewarg1,intarg2, longarg3){ myCursor.moveToPosition(arg2);//将myCursor移到所单击的值,这个值是数据库中的行标是固定不变的 _id=myCursor.getInt(0);//取得第0列字段_id的值,这个值相当于数据库的主键处于自增状态,相对于整个数据库而言,这个值是实际数据库中字段的真实值 Log.d("arg2:_id",arg2+":"+_id); myEditText.setText(myCursor.getString(1));//取得第1列字段的值 } }); myListView.setOnItemSelectedListener(newAdapterView.OnItemSelectedListener(){ publicvoidonItemSelected(AdapterView<?>arg0,Viewarg1, intarg2,longarg3){ SQLiteCursorsc=(SQLiteCursor)arg0.getSelectedItem(); _id=sc.getInt(0); myEditText.setText(sc.getString(1)); } publicvoidonNothingSelected(AdapterView<?>arg0){ } }); } @Override publicbooleanonCreateOptionsMenu(Menumenu){ super.onCreateOptionsMenu(menu); menu.add(Menu.NONE,MENU_ADD,0,R.string.create); menu.add(Menu.NONE,MENU_EDIT,0,R.string.edit); menu.add(Menu.NONE,MENU_DELETE,0,R.string.delete); returntrue; } @Override publicbooleanonOptionsItemSelected(MenuItemitem){ super.onOptionsItemSelected(item); switch(item.getItemId()){ caseMENU_ADD: this.addToDo(); break; caseMENU_EDIT: this.editToDo(); break; caseMENU_DELETE: this.deleteToDo(); break; } returntrue; } privatevoidaddToDo(){ if(!"".equals(myEditText.getText().toString())){ myToDoDB.insert(myEditText.getText().toString()); myCursor.requery(); myListView.invalidateViews(); myEditText.setText(""); _id=0; } } privatevoideditToDo(){ if(!"".equals(myEditText.getText().toString())){ myToDoDB.update(_id,myEditText.getText().toString()); myCursor.requery();//更新游标 myListView.invalidateViews();//更新ListView内容 myEditText.setText(""); _id=0; } } privatevoiddeleteToDo(){ if(_id!=0){ myToDoDB.delete(_id); myCursor.requery(); myListView.invalidateViews(); myEditText.setText(""); _id=0; } } } packagecom.android.sucre; importandroid.content.ContentValues; importandroid.content.Context; importandroid.database.Cursor; importandroid.database.sqlite.SQLiteDatabase; importandroid.database.sqlite.SQLiteDatabase.CursorFactory; importandroid.database.sqlite.SQLiteOpenHelper; /** *创建数据库 *@authorqiaolei * */ publicclassToDoDBextendsSQLiteOpenHelper{ privatefinalstaticStringDATABASE_NAME="todo_db"; privatefinalstaticintDATABASE_VERSION=1; privatefinalstaticStringTABLE_NAME="todo_table"; publicfinalstaticStringFIELD_id="_id"; publicfinalstaticStringFIELD_TEXT="todo_text"; publicToDoDB(Contextcontext){ super(context,DATABASE_NAME,null,DATABASE_VERSION); } @Override publicvoidonCreate(SQLiteDatabasedb){ //创建的表有两列,FIELD_ID为主键自动增长 Stringsql="createtable"+TABLE_NAME+"("+FIELD_id+"integerprimarykeyautoincrement,"+FIELD_TEXT+"text)"; db.execSQL(sql); } @Override publicvoidonUpgrade(SQLiteDatabasedb,intoldVersion,intnewVersion){ Stringsql="droptableifexists"+TABLE_NAME+""; db.execSQL(sql); onCreate(db); } publicCursorselect(){ SQLiteDatabasedb=this.getReadableDatabase(); Cursorcursor=db.query(TABLE_NAME,null,null,null,null,null,null); returncursor; } publiclonginsert(Stringtext){ SQLiteDatabasedb=this.getReadableDatabase(); ContentValuescv=newContentValues(); cv.put(FIELD_TEXT,text); longrow=db.insert(TABLE_NAME,null,cv); returnrow; } publicvoiddelete(intid){ SQLiteDatabasedb=this.getReadableDatabase(); Stringwhere=FIELD_id+"=?"; String[]whereValue={Integer.toString(id)}; db.delete(TABLE_NAME,where,whereValue); } publicvoidupdate(intid,Stringtext){ SQLiteDatabasedb=this.getReadableDatabase(); Stringwhere=FIELD_id+"=?"; String[]whereValue={Integer.toString(id)}; ContentValuescv=newContentValues(); cv.put(FIELD_TEXT,text); db.update(TABLE_NAME,cv,where,whereValue); } } 本文转自sucre03 51CTO博客,原文链接:http://blog.51cto.com/sucre/765101,如需转载请自行联系原作者


优秀的个人博客,低调大师

学习笔记-4.1用户管理命令

复习: /etc/passwd: 用户名:密码:UID:GID:注释:家目录:默认shell /etc/group: 组名:密码:GID:以此组为其附加组的用户列表 /etc/shadow: 用户名:密码:最近一次修改密码的时间:最短使用期限,最长使用期限: 警告时间:非活动时间:过期时间 useradd [options] USERNAME useradd -u 1000 user1 -u 指定其UID -g GID(基本组) 指定组一定要存在 -G GID,... (附加组) -c "COMMENT"指定注释信息 -d /path/to/directory指定家目录,默认是home下 -s SHELL useradd -s /sbin/nologin user5 su - user5 -m -k 强制复制bash配置文件到家目录 -M 创建用户,不创建家目录 -r 添加一个系统用户 /etc/login.defs /etc/shells:指定了当前系统可用的安全shell 环境变量:PATH HISTSIZE SHELL userdel: userdel [option] USERNAME 不指定选项,不会删除家目录 -r 删除用户的同时,同时删除用户的家目录 id :查看用户的账号属性信息 -u -g -G -n 上面都可用和-n合用 finger USERNAME(user1)查看用户账号相关信息 修改用户账号属性: usermod -u usermod -u 2002 user2 -g (基本组,事先存在的组) -G 附加组,已有附件组,修改了后原有附件组就没有了 -a -G:追加附件组(-a与-G联合使用) -c 注释 -d -m 为用户指定新的家目录,并移动此前新建的文件到新的家目录 -s shell -l 修改用户名 -L:锁定账号 -U:解锁 chsh:修改用户的默认shell chfn:修改用户的注释信息(fn是finger的缩写) 密码管理: passwd [USERNAME] --stdin -l 锁定账号 -u 解锁 -d 删除用户密码(禁止登录) echo "redhat" | passwd --stdin user3 pwch(passwdcheck)检查用户账号完整性 组管理: 创建组:groupadd groupadd -g GID -r 添加为系统组 groupmod -g GID -n GRPNAME groupdel gpasswd:为组设定密码 newgrp 临时切换基本组 exit退出 练习: 1 创建一个用户mandriva ,其ID号2002,基本组为distro(组ID3003),附加组 为linux: # groupadd -g 3003 distro # groupadd linux # useradd -u 2002 -g distro -G linux mandriva 2 创建一个用户fedora,其全名为Fedora Community,默认shell为tcsh # useradd -c "Fedora Community" -s /bin/tcsh/ fedora 3 修改mandriva的ID号为4004,基本组为linux,附加组为distro和Fedora # usermod -u 4004 -g linux -G distro,fedora mandriva 4 给Fedora加密码,并设定其密码最短使用期限为2天,最长为50天 # passwd -n 2 -x 50 fedora 5 将madriva的默认shell改为/bin/bash # usermod -s /bin/bash mandrira 6 添加系统用户hbase,且不允许其登陆系统 #useradd -r -s /sbin/noglogin hbase change(改变密码过期信息的) -d 最近一次的修改时间 -E 过期时间 -r: 非活动时间 -m 最短使用时间 -M 最长使用时间 -w:警告时间 本文转自飞行萌51CTO博客,原文链接: http://blog.51cto.com/8527508/1939822,如需转载请自行联系原作者

优秀的个人博客,低调大师

openstack学习笔记七 swift安装

项目--对象存储--容器 在容器里你创建的即使是一个文件夹,那么体现在硬盘里,也是一个文件,也就是对象object 1 2 3 4 5 6 7 8 9 10 11 12 13 14 15 16 [root@h1~(keystone_admin)] #openstackservicelist +----------------------------------+------------+--------------+ |ID|Name|Type| +----------------------------------+------------+--------------+ |30c62c3c0797462a8bd4ff059a71296e|swift|object-store| [root@h1~(keystone_admin)] #keystoneendpoint-list|grep30c62c3c0797462a8bd4ff059a71296e |2408bc6cb5164053b86c0983fd39961a|RegionOne|http: //192 .168.1.201:8080 /v1/AUTH_ %(tenant_id)s|http: //192 .168.1.201:8080 /v1/AUTH_ %(tenant_id)s|http: //192 .168.1.201:8080|30c62c3c0797462a8bd4ff059a71296e| [root@h1~(keystone_admin)] #swiftlist h1 [root@h1~(keystone_admin)] #swiftlisth1 test1/ test1 /k1 .pem [root@h1~(keystone_admin)] #find/srv/node/swiftloopback/-typef-name"*.data" /srv/node/swiftloopback/objects/188901/27f/b87961659e1149b7094bb52b5d60f27f/1467698512 .58656.data ##删除k1后就没有了 /srv/node/swiftloopback/objects/59261/c81/39df7c7803321e4878fdcec1ac469c81/1467698493 .15690.data 映射 :ring(环) 映射到硬盘 容器 在容器里面创建对象 对象 文件就是对象 账户 权限 ring文件 保存到硬盘 account.ring.gz 账户 container.ring.gz 容器 object.ring.gz 对象 保存到硬盘里的目录,这个目录为zone /srv/node/swiftloopback/ 挂载点 必须放在/srv/node/目录下 zone1 zone2 两个相同,备份 packstack方式安装完成后,上传一个文件,只在硬盘里保留一份 对象先映射到 虚拟节点/分区partition 2^n 再映射到zone 目的:减少数据的迁移量 swift服务 1 一致性服务 consisteny server auditor 定期扫描,如果出现问题,就把有问题的文件放隔离区 replicate 从另外的zone复制相同的文件过来,实现数据同步 update 如果replicate失效了,那么等段时间再试 2 代维服务proxy server 接受用户发送过来的请求,比如上传、删除等请求 3 存储服务 容器服务器 container server 对象服务器 object server 账户服务器 acount server 安装软件 1 2 [root@h4~] #yumlistopenstack-swift* [root@h4~] #yum-yinstallopenstack-swift.noarchopenstack-swift-account.noarchopenstack-swift-container.noarchopenstack-swift-object.noarchopenstack-swift-proxy.noarchmemcache*python-swiftclient 任何服务都要向keystone进行注册 1 2 3 [root@h4~(keystone_admin)] #keystoneuser-create--nameswift--passhequan [root@h4~(keystone_admin)] #keystonetenant-create--nameservices [root@h4~(keystone_admin)] #keystoneuser-role-add--userswift--tenantservices--roleadmin 创建服务,指定endpoint 1 2 [root@h4~(keystone_admin)] #keystoneservice-create--nameswift--typeobject-store--description"swift" keystoneendpoint-create--service- id 0995c9a9ed4847da86435bca9a7be8fc--publicurl 'http://192.168.1.204:8080/v1/AUTH_%(tenant_id)s' --internalurl 'http://192.168.1.204:8080/v1/AUTH_%(tenant_id)s' --adminurl 'http://192.168.1.204:8080' 配置swift 准备了2个分区 1 2 3 zone1zone2在 /srv/node 12 /dev/sdb1 /srv/node/zone1 xfsdefaults00 ##挂载 13 /dev/sdb2 /srv/node/zone2 xfsdefaults00 1 [root@h4~(keystone_admin)] #chown-Rswift.swift/srv/node/ 1 2 3 4 5 6 7 8 9 10 [root@h4swift(keystone_admin)] #catswift.conf [swift- hash ] swift_hash_path_suffix=%SWIFT_HASH_PATH_SUFFIX% [root@h1~(keystone_admin)] #find/srv/node/swiftloopback/-typef-name"*.data" /srv/node/swiftloopback/objects/102340/afe/63f12ea37cca17f0227381adcf93eafe/1467982747 .16551.data zone对象类型/分区的编号 /sufix/ 文件名字的 hash /上传文件的时间戳 [root@h1~(keystone_admin)] #date--date=@1467982747.16551 2016年07月08日星期五20:59:07CST 创建ring文件的准备工作 创建模板,设定有几个备份,有多少分区。 1 2 3 [root@h4swift(keystone_admin)] #swift-ring-builderaccount.buildercreate1221 [root@h4swift(keystone_admin)] #swift-ring-builderobject.buildercreate1221 [root@h4swift(keystone_admin)] #swift-ring-buildercontainer.buildercreate1221 指定映射位置 1 2 3 4 5 6 7 8 [root@h4swift] #vimaccount-server.conf#3个都要改ip 6bind_ip=192.168.1.204 [root@h4swift(keystone_admin)] #swift-ring-builderaccount.builderaddz1-192.168.1.204:6202/zone1100 [root@h4swift(keystone_admin)] #swift-ring-builderaccount.builderaddz2-192.168.1.204:6202/zone2100 [root@h4swift(keystone_admin)] #swift-ring-builderobject.builderaddz1-192.168.1.204:6200/zone1100 [root@h4swift(keystone_admin)] #swift-ring-builderobject.builderaddz2-192.168.1.204:6200/zone2100 [root@h4swift(keystone_admin)] #swift-ring-buildercontainer.builderaddz1-192.168.1.204:6201/zone1100 [root@h4swift(keystone_admin)] #swift-ring-buildercontainer.builderaddz2-192.168.1.204:6201/zone2100 创建ring文件 1 2 3 4 5 [root@h4swift(keystone_admin)] #swift-ring-builderaccount.builderrebalance [root@h4swift(keystone_admin)] #swift-ring-builderobject.builderrebalance [root@h4swift(keystone_admin)] #swift-ring-buildercontainer.builderrebalance [root@h4swift(keystone_admin)] #ls*.gz account.ring.gzcontainer.ring.gzobject.ring.gz 启动服务 1 2 3 4 5 6 [root@h4srv(keystone_admin)] #systemctlstartopenstack-swift-accountopenstack-swift-objectopenstack-swift-container [root@h4srv(keystone_admin)] #systemctlis-activeopenstack-swift-accountopenstack-swift-objectopenstack-swift-container active active active [root@h4srv(keystone_admin)] #systemctlenableopenstack-swift-accountopenstack-swift-objectopenstack-swift-container 代维服务proxy server 1 2 3 4 5 6 7 8 9 10 11 [root@h4swift(keystone_admin)] #vimproxy-server.conf 53[filter:authtoken] 54 paste .filter_factory=keystonemiddleware.auth_token:filter_factory 55admin_tenant_name=services 56admin_user=swift 57admin_password=hequan 58 # 59identity_uri=http: //192 .168.1.204:35357/ 60auth_port=35357 61auth_protocol=http 62 #auth_uri=http://192.168.1.204:5000/ 1 2 3 4 5 6 7 8 9 10 11 12 13 14 [root@h4swift(keystone_admin)] #systemctlstartopenstack-swift-proxy.service [root@h4swift(keystone_admin)] #systemctlenableopenstack-swift-proxy.service [root@h4swift(keystone_admin)] #systemctlstartmemcached.service [root@h4swift(keystone_admin)] #systemctlenablememcached.service [root@h4swift(keystone_admin)] #swiftposth1 [root@h4swift(keystone_admin)] #swiftlist h1 [root@h4swift(keystone_admin)] #swiftuploadh1/etc/hosts 任意一个分区挂了,还是可以正常查看 两个都挂了,就看不到了 本文转自 295631788 51CTO博客,原文链接:http://blog.51cto.com/hequan/1812861,如需转载请自行联系原作者

优秀的个人博客,低调大师

Nginx学习笔记(一) Nginx架构

Nginx全程是什么?Nginx ("engine x") 是一个高性能的 HTTP 和反向代理服务器,也是一个 IMAP/POP3/SMTP代理服务器。 daemon守护线程 nginx在启动后,在unix系统中会以daemon的方式在后台运行,后台进程包含一个master进程和多个worker进程。 当然nginx也是支持多线程的方式的,只是我们主流的方式还是多进程的方式,也是nginx的默认方式。 master进程主要用来管理worker进程,包含:接收来自外界的信号,向各worker进程发送信号,监控worker进程的运行状态,当worker进程退出后(异常情况下),会自动重新启动新的worker进程。 worker进程则是处理基本的网络事件。多个worker进程之间是对等的,他们同等竞争来自客户端的请求,各进程互相之间是独立的。一个请求,只可能在一个worker进程中处理,一个worker进程,不可能处理其它进程的请求。 worker进程的个数是可以设置的,一般我们会设置与机器cpu核数一致。更多的worker数,只会导致进程来竞争cpu资源了,从而带来不必要的上下文切换。而且,nginx为了更好的利用多核特性,具有cpu绑定选项,我们可以将某一个进程绑定在某一个核上,这样就不会因为进程的切换带来cache的失效。 惊群现象 每个worker进程都是从master进程fork过来。在master进程里面,先建立好需要listen的socket之后,然后再fork出多个worker进程,这样每个worker进程都可以去accept这个socket(当然不是同一个socket,只是每个进程的这个socket会监控在同一个ip地址与端口,这个在网络协议里面是允许的)。一般来说,当一个连接进来后,所有在accept在这个socket上面的进程,都会收到通知,而只有一个进程可以accept这个连接,其它的则accept失败。 相对于线程,采用进程的优点 进程之间不共享资源,不需要加锁,所以省掉了锁带来的开销。 采用独立的进程,可以让互相之间不会影响,一个进程退出后,其它进程还在工作,服务不会中断,master进程则很快重新启动新的worker进程。 编程上更加容易。 多线程的问题 而多线程在多并发情况下,线程的内存占用大,线程上下文切换造成CPU大量的开销。想想apache的常用工作方式(apache也有异步非阻塞版本,但因其与自带某些模块冲突,所以不常用),每个请求会独占一个工作线程,当并发数上到几千时,就同时有几千的线程在处理请求了。这对操作系统来说,是个不小的挑战,线程带来的内存占用非常大,线程的上下文切换带来的cpu开销很大,自然性能就上不去了,而这些开销完全是没有意义的。 异步非阻塞 异步的概念和同步相对的,也就是不是事件之间不是同时发生的。 非阻塞的概念是和阻塞对应的,阻塞是事件按顺序执行,每一事件都要等待上一事件的完成,而非阻塞是如果事件没有准备好,这个事件可以直接返回,过一段时间再进行处理询问,这期间可以做其他事情。但是,多次询问也会带来额外的开销。 总的来说,Nginx采用异步非阻塞的好处在于: 不需要创建线程,每个请求只占用少量的内存 没有上下文切换,事件处理非常轻量 淘宝tengine团队说测试结果是“24G内存机器上,处理并发请求可达200万”。 本文转自cococo点点博客园博客,原文链接:http://www.cnblogs.com/coder2012/p/3141469.html,如需转载请自行联系原作者

优秀的个人博客,低调大师

Android开发学习笔记:浅谈ToggleButton

ToggleButton(开关按钮)是Android系统中比较简单的一个组件,是一个具有选中和未选择状态双状态的按钮,并且需要为不同的状态设置不同的显示文本。 ToggleButton常用的XML属性 属性名称 描述 android:disabledAlpha 设置按钮在禁用时透明度。 android:textOff 未选中时按钮的文本 android:textOn 选中时按钮的文本 下面是具体的例子: 第一个例子是通过Toast显示ToggleButton不同的状态时的信息 MainActivity.java packagecom.android.togglebutton; importandroid.app.Activity; importandroid.os.Bundle; importandroid.view.View; importandroid.view.View.OnClickListener; importandroid.widget.Toast; importandroid.widget.ToggleButton; publicclassMainActivityextendsActivity{ //声明ToggleButton privateToggleButtontogglebutton; @Override publicvoidonCreate(BundlesavedInstanceState){ super.onCreate(savedInstanceState); setContentView(R.layout.main); togglebutton=(ToggleButton)findViewById(R.id.togglebutton); togglebutton.setOnClickListener(newOnClickListener(){ publicvoidonClick(Viewv){ //当按钮第一次被点击时候响应的事件 if(togglebutton.isChecked()){ Toast.makeText(MainActivity.this,"你喜欢球类运动",Toast.LENGTH_SHORT).show(); } //当按钮再次被点击时候响应的事件 else{ Toast.makeText(MainActivity.this,"你不喜欢球类运动",Toast.LENGTH_SHORT).show(); } } }); } } main.xml <?xmlversion="1.0"encoding="utf-8"?> <LinearLayoutxmlns:android="http://schemas.android.com/apk/res/android" android:orientation="vertical" android:layout_width="fill_parent" android:layout_height="fill_parent" > <TextView android:layout_width="fill_parent" android:layout_height="wrap_content" android:text="@string/hello" /> <ToggleButton android:id="@+id/togglebutton" android:layout_width="wrap_content" android:layout_height="wrap_content" android:textOn="喜欢" android:textOff="不喜欢" /> </LinearLayout> strings.xml <?xmlversion="1.0"encoding="utf-8"?> <resources> <stringname="hello">你喜不喜欢球类运动?</string> <stringname="app_name">测试ToggleButton</string> </resources> 效果图: 第二个例子通过图片的变化显示ToggleButton不同的状态时的图片 MainActivity.java packagecom.android.togglebutton; importandroid.app.Activity; importandroid.os.Bundle; importandroid.widget.CompoundButton; importandroid.widget.CompoundButton.OnCheckedChangeListener; importandroid.widget.ImageView; importandroid.widget.ToggleButton; publicclassMainActivityextendsActivity{ //声明ImageView,ToggleButton privateImageViewimageView; privateToggleButtontoggleButton; @Override publicvoidonCreate(BundlesavedInstanceState){ super.onCreate(savedInstanceState); setContentView(R.layout.main); //通过findViewById获得ImageView,ToggleButton imageView=(ImageView)findViewById(R.id.imageView); toggleButton=(ToggleButton)findViewById(R.id.toggleButton); toggleButton.setOnCheckedChangeListener(newOnCheckedChangeListener(){ publicvoidonCheckedChanged(CompoundButtonbuttonView,booleanisChecked){ toggleButton.setChecked(isChecked); //使用三目运算符来响应按钮变换的事件 imageView.setImageResource(isChecked?R.drawable.pic_on:R.drawable.pic_off); } }); } } main.xml <?xmlversion="1.0"encoding="utf-8"?> <LinearLayoutxmlns:android="http://schemas.android.com/apk/res/android" android:orientation="vertical" android:layout_width="fill_parent" android:layout_height="fill_parent"> <ImageView android:id="@+id/imageView" android:layout_width="wrap_content" android:layout_height="wrap_content" android:src="@drawable/pic_off" android:layout_gravity="center_horizontal" /> <ToggleButton android:id="@+id/toggleButton" android:layout_width="130dip" android:layout_height="wrap_content" android:textOn="开灯" android:textOff="关灯" android:layout_gravity="center_horizontal" /> </LinearLayout> 效果图: 本文转自 lingdududu 51CTO博客,原文链接:http://blog.51cto.com/liangruijun/655014

优秀的个人博客,低调大师

Android开发学习笔记:浅谈Toast

一.Toast的简介 Toast是Android中一种提供给用户简短信息的视图,该视图已浮于应用程序之上的形式呈现给用户。因为它并不获得焦点,即使用户正在输入什么也不会受到影响。它的目标是尽可能已不显眼的方式,使用户看到你提供的信息。显示的时间是有限制的,过一段时间后会自动消失,不过Toast本身可以控制显示时间的长短。 二.Toast的常用方法 int getDuration() 返回Toast视图显示持续的时间. int getGravity() 取得提示信息在屏幕上显示的位置. float getHorizontalMargin() 返回横向栏外空白 float getVerticalMargin() 返回纵向栏外空白. View getView() 返回View对象. int getXOffset() 返回相对于参照位置的横向偏移像素量。 int getYOffset() 返回相对于参照位置的纵向偏移像素量 staticToast makeText(Contextcontext, int resId, int duration) 生成一个从资源中取得的包含文本视图的标准Toast对象。 context使用的上下文。通常是你的Application或Activity对象 resId要使用的字符串资源ID,可以是已格式化文本。 duration该信息的存续期间。值为LENGTH_SHORT或LENGTH_LONG staticToast makeText(Contextcontext,CharSequencetext, int duration) 生成一个包含文本视图的标准Toast对象. void setDuration(int duration) 设置Toast视图显示持续的时间,LENGTH_LONG表示持续时间较长,LENGTH_SHORT表示持续时间较短 void setGravity(int gravity, int xOffset, int yOffset) 设置提示信息在屏幕上的显示位置.(自定义Toast的显示位置,例如toast.setGravity(Gravity.CENTER_VERTICAL, 0, 0)可以把Toast定位在左上角。Toast提示的位置xOffset:大于0向右移,小于0向左移) void setMargin(float horizontalMargin, float verticalMargin) 设置视图的栏外空白. horizontalMargin容器的边缘与提示信息的横向空白(与容器宽度的比) verticalMargin容器的边缘与提示信息的纵向空白(与容器高度的比)。 void setText(int resId) 更新之前通过makeText()方法生成的Toast对象的文本内容.resId为Toast指定的新的字符串资源ID。 void setText(CharSequences) 更新之前通过makeText()方法生成的Toast对象的文本内容. s为Toast指定的新的文本 void setView(Viewview) 设置要显示的View.注意这个方法可以显示自定义的toast视图,可以包含图像,文字等等。是比较常用的方法 void show() 按照指定的存续期间显示提示信息 三.Toast的不同显示样式 效果图(有五种不同的Toast显示样式): main.xml <?xmlversion="1.0"encoding="utf-8"?> <LinearLayout xmlns:android="http://schemas.android.com/apk/res/android" android:orientation="vertical" android:layout_width="fill_parent" android:layout_height="fill_parent" > <Button android:id="@+id/btn_1" android:text="@string/btn1" android:layout_width="fill_parent" android:layout_height="wrap_content" /> <Button android:id="@+id/btn_2" android:text="@string/btn2" android:layout_width="fill_parent" android:layout_height="wrap_content" /> <Button android:id="@+id/btn_3" android:text="@string/btn3" android:layout_width="fill_parent" android:layout_height="wrap_content" /> <Button android:id="@+id/btn_4" android:text="@string/btn4" android:layout_width="fill_parent" android:layout_height="wrap_content" /> <Button android:id="@+id/btn_5" android:text="@string/btn5" android:layout_width="fill_parent" android:layout_height="wrap_content" /> </LinearLayout> toast.xml <?xmlversion="1.0"encoding="utf-8"?> <LinearLayout xmlns:android="http://schemas.android.com/apk/res/android" android:orientation="horizontal" android:layout_width="fill_parent" android:layout_height="fill_parent" android:padding="5dp" android:background="#708090" > <ImageView android:id="@+id/img" android:layout_width="wrap_content" android:layout_height="wrap_content" /> <TextView android:layout_width="wrap_content" android:layout_height="wrap_content" android:text="带图片文字的Toast" /> </LinearLayout> strings.xml <?xmlversion="1.0"encoding="utf-8"?> <resources> <stringname="hello">HelloToast!</string> <stringname="app_name">ToastDemo</string> <stringname="btn1">系统默认的Toast</string> <stringname="btn2">自定义位置的Toast</string> <stringname="btn3">带只有图片的Toast</string> <stringname="btn4">有图有文字的Toast</string> <stringname="btn5">自定义布局的Toast</string> </resources> ToastDemoActivity.java packagecom.android.toast.activity; importandroid.app.Activity; importandroid.content.Context; importandroid.os.Bundle; importandroid.view.Gravity; importandroid.view.LayoutInflater; importandroid.view.View; importandroid.view.View.OnClickListener; importandroid.widget.Button; importandroid.widget.ImageView; importandroid.widget.LinearLayout; importandroid.widget.Toast; publicclassToastDemoActivityextendsActivity{ privateButtonbtn_1,btn_2,btn_3,btn_4,btn_5; privateToasttoast=null; @Override protectedvoidonCreate(BundlesavedInstanceState){ //TODOAuto-generatedmethodstub super.onCreate(savedInstanceState); setContentView(R.layout.main); btn_1=(Button)findViewById(R.id.btn_1); btn_2=(Button)findViewById(R.id.btn_2); btn_3=(Button)findViewById(R.id.btn_3); btn_4=(Button)findViewById(R.id.btn_4); btn_5=(Button)findViewById(R.id.btn_5); btn_1.setOnClickListener(newButtonClick()); btn_2.setOnClickListener(newButtonClick()); btn_3.setOnClickListener(newButtonClick()); btn_4.setOnClickListener(newButtonClick()); btn_5.setOnClickListener(newButtonClick()); } classButtonClickimplementsOnClickListener{ @Override publicvoidonClick(Viewv){ //TODOAuto-generatedmethodstub switch(v.getId()){ caseR.id.btn_1: toast.makeText(ToastDemoActivity.this,"默认的Toast显示",Toast.LENGTH_LONG).show(); break; caseR.id.btn_2: //getApplicationContext()得到程序当前的默认Context toast=Toast.makeText(getApplicationContext(),"自定义位置的Toast显示", Toast.LENGTH_LONG); //设置Toast的位置 toast.setGravity(Gravity.CENTER,toast.getXOffset()/2,toast.getYOffset()/2); toast.show(); break; caseR.id.btn_3: toast=Toast.makeText(getApplicationContext(),"只有图片的Toast显示", Toast.LENGTH_LONG); ImageViewimg=newImageView(ToastDemoActivity.this); img.setImageResource(R.drawable.android); toast.setView(img); toast.show(); break; caseR.id.btn_4: toast=Toast.makeText(getApplicationContext(),"有图有字的Toast",Toast.LENGTH_LONG); LinearLayoutlayout=(LinearLayout)toast.getView(); ImageViewimg1=newImageView(getApplicationContext()); img1.setImageResource(R.drawable.android); layout.addView(img1,0); toast.show(); break; caseR.id.btn_5: //将一个xml布局转换成一个view对象 LayoutInflaterinflater=(LayoutInflater)getSystemService(Context.LAYOUT_INFLATER_SERVICE); Viewview=inflater.inflate(R.layout.toast,null); Toasttoast=newToast(getApplicationContext()); //在view中查找查找ImageView控件 ImageViewimage=(ImageView)view.findViewById(R.id.img); image.setImageResource(R.drawable.android); toast.setView(view); toast.show(); break; default: break; } } } } 本文转自 lingdududu 51CTO博客,原文链接: http://blog.51cto.com/liangruijun/638913

优秀的个人博客,低调大师

Android学习笔记(四)Android 组件

EditText和setOnKeyListener事件实现文本处理 package com.example.test12; import android.os.Bundle; import android.app.Activity; import android.view.KeyEvent; import android.view.Menu; import android.view.MenuItem; import android.view.View; import android.widget.EditText; import android.widget.TextView; import android.support.v4.app.NavUtils; public class MainActivity extends Activity { private TextView text; private EditText edit; @Override public void onCreate(Bundle savedInstanceState) { super.onCreate(savedInstanceState); setContentView(R.layout.activity_main); text=(TextView)findViewById(R.id.textView1); edit=(EditText)findViewById(R.id.editText1); edit.setOnKeyListener(editlistener); } @Override public boolean onCreateOptionsMenu(Menu menu) { getMenuInflater().inflate(R.menu.activity_main, menu); return true; } View.OnKeyListener editlistener=new View.OnKeyListener() { public boolean onKey(View v, int keyCode, KeyEvent event) { // TODO Auto-generated method stub text.setText(edit.getText()); return false; } }; } 带背景图片的按钮 使用ImageButton来实现带背景图片的按钮。 OnFocusChangeListener焦点变化监听 ImageButton.setImageResourse()用来指定按钮的背景颜色 package com.example.test13; import android.os.Bundle; import android.app.Activity; import android.view.Menu; import android.view.MenuItem; import android.view.View; import android.widget.Button; import android.widget.ImageButton; import android.widget.TextView; import android.support.v4.app.NavUtils; public class MainActivity extends Activity { private TextView tv; private ImageButton ibt; private Button bt; @Override public void onCreate(Bundle savedInstanceState) { super.onCreate(savedInstanceState); setContentView(R.layout.activity_main); tv=(TextView)findViewById(R.id.textView1); ibt=(ImageButton)findViewById(R.id.imageButton1); bt=(Button)findViewById(R.id.button1); ibt.setOnFocusChangeListener(focusChange); bt.setOnClickListener(clicked); } @Override public boolean onCreateOptionsMenu(Menu menu) { getMenuInflater().inflate(R.menu.activity_main, menu); return true; } View.OnFocusChangeListener focusChange=new View.OnFocusChangeListener() { public void onFocusChange(View v, boolean hasFocus) { // TODO Auto-generated method stub if(hasFocus){ tv.setText("Got Focus!!!"); ibt.setImageResource(R.drawable.image1); } else{ tv.setText("Lost Focus!!!"); ibt.setImageResource(R.drawable.image2); } } }; View.OnClickListener clicked=new View.OnClickListener() { public void onClick(View v) { // TODO Auto-generated method stub if(tv.getText()=="Got Focus!!!"){ tv.setText("Lost Focus!!!"); ibt.setImageResource(R.drawable.image2); } else{ tv.setText("Got Focus!!!"); ibt.setImageResource(R.drawable.image1); } } }; } Toast实现提示条(Toast总结) Toast.makeText()让文字显示与Toast对象中,会显示一段时间后自动消失。 Toast.makeText( MainActivity.this, "这个是Toast.makeText提示", Toast.LENGTH_LONG).show(); CheckBox和RadioButton复选框 通过CheckBox.setOnCheckedChangeLister来监听CheckBox 相框的实现 可以通过ImageButton和ImageView来实现,推荐ImageButton,它可以直接添加点击监听 java.io.File实现文件搜索 在JAVA I/O的API中,提供了java.io.File对象。 package com.example.test14; import java.io.File; import android.os.Bundle; import android.app.Activity; import android.view.Menu; import android.view.MenuItem; import android.view.View; import android.widget.Button; import android.widget.EditText; import android.widget.TextView; import android.widget.Toast; import android.support.v4.app.NavUtils; public class MainActivity extends Activity { private TextView result; private Button bt; private EditText edit; @Override public void onCreate(Bundle savedInstanceState) { super.onCreate(savedInstanceState); setContentView(R.layout.activity_main); result=(TextView)findViewById(R.id.textView2); bt=(Button)findViewById(R.id.button1); edit=(EditText)findViewById(R.id.editText1); bt.setOnClickListener(new Button.OnClickListener() { public void onClick(View v) { // TODO Auto-generated method stub String keyword=edit.getText().toString(); if(keyword.equals("")){ Toast.makeText( MainActivity.this, "不能为空!", Toast.LENGTH_LONG).show(); } else{ result.setText(searchFile(keyword)); } } }); } @Override public boolean onCreateOptionsMenu(Menu menu) { getMenuInflater().inflate(R.menu.activity_main, menu); return true; } private String searchFile(String Keyword){ String searchResult=""; File[] files=new File("/").listFiles(); for(File f:files){ if(f.getName().indexOf(Keyword)>=0) searchResult+=f.getPath()+"\n";// \n换行 } if(searchResult.equals("")) searchResult="找不到文件!!!!"; return searchResult; } } 本文转自cococo点点博客园博客,原文链接:http://www.cnblogs.com/coder2012/archive/2013/05/17/3083991.html,如需转载请自行联系原作者

优秀的个人博客,低调大师

openstack学习笔记四 组件框架

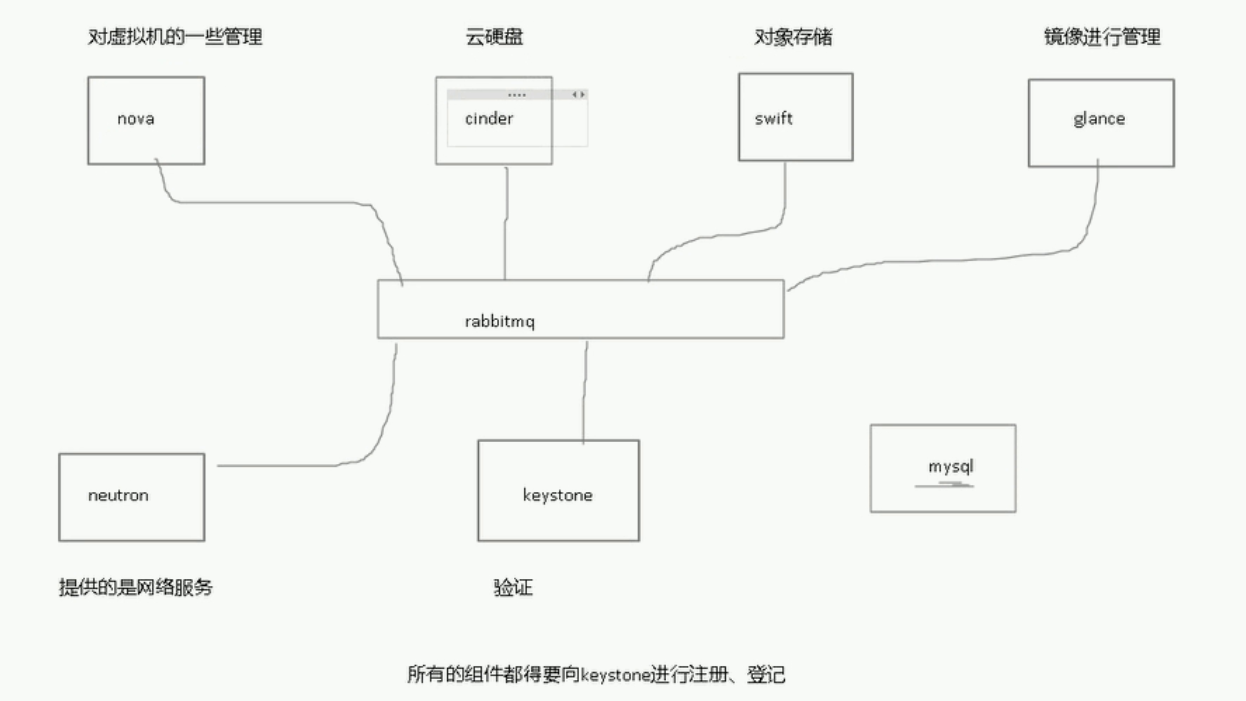
组件 nova 对虚拟机管理 cinder 云硬盘 swift 对象存储 容器 glance 镜像 neutron 网络 kestone 验证 所有的组件都得要向keystone进行注册,登记 利用 rebitmq互相通信 环境需要mysql 框架 控制节点 keystone dashboard 计算节点 跑虚拟机的机器 网络节点 为计算节点里的虚拟机提供路由 DHCP 存储节点 1 2 3 4 5 6 7 8 9 10 11 12 13 14 15 16 17 18 19 20 21 22 23 24 25 26 27 28 29 30 31 32 33 34 35 36 37 38 39 40 41 42 43 44 45 46 47 48 49 50 51 52 53 54 55 56 57 58 59 60 61 62 63 64 65 66 67 68 69 70 71 72 73 74 75 76 77 78 79 80 81 82 83 84 85 86 87 88 89 90 91 92 93 94 95 96 97 98 99 100 101 102 103 104 105 106 107 108 109 110 111 112 113 114 115 116 117 118 119 [root@h1~] #sourcekeystonerc_admin [root@h1~(keystone_admin)] #open open openstack-configopenstack-service opensslopenstack-dbopenstack-status openstackopenstack-keystone-sample-dataopenvt [root@h1~(keystone_admin)] #openstack-status ==Novaservices== openstack-nova-api:active openstack-nova-compute:active openstack-nova-network:inactive(disabledonboot) openstack-nova-scheduler:active openstack-nova-cert:active openstack-nova-conductor:active openstack-nova-console:inactive(disabledonboot) openstack-nova-consoleauth:active openstack-nova-xvpvncproxy:inactive(disabledonboot) ==Glanceservices== openstack-glance-api:active openstack-glance-registry:active ==Keystoneservice== openstack-keystone:inactive(disabledonboot) ==Horizonservice== openstack-dashboard:active ==neutronservices== neutron-server:active neutron-dhcp-agent:active neutron-l3-agent:active neutron-metadata-agent:active neutron-openvswitch-agent:active ==Swiftservices== openstack-swift-proxy:active openstack-swift-account:active openstack-swift-container:active openstack-swift-object:active ==Cinderservices== openstack-cinder-api:active openstack-cinder-scheduler:active openstack-cinder-volume:active openstack-cinder-backup:active ==Ceilometerservices== openstack-ceilometer-api:active openstack-ceilometer-central:active openstack-ceilometer-compute:active openstack-ceilometer-collector:active openstack-ceilometer-alarm-notifier:active openstack-ceilometer-alarm-evaluator:active openstack-ceilometer-notification:active ==Supportservices== mysqld:active(disabledonboot) openvswitch:active dbus:active target:active rabbitmq-server:active memcached:active ==Keystone users == /usr/lib/python2 .7 /site-packages/keystoneclient/shell .py:64:DeprecationWarning:ThekeystoneCLIisdeprecated in favorofpython-openstackclient.ForaPythonlibrary, continue usingpython-keystoneclient. 'python-keystoneclient.' ,DeprecationWarning) /usr/lib/python2 .7 /site-packages/keystoneclient/v2_0/client .py:145:DeprecationWarning:Constructinganinstanceofthekeystoneclient.v2_0.client.Clientclasswithoutasessionisdeprecatedasofthe1.7.0releaseandmayberemoved in the2.0.0release. 'the2.0.0release.' ,DeprecationWarning) /usr/lib/python2 .7 /site-packages/keystoneclient/v2_0/client .py:147:DeprecationWarning:Usingthe 'tenant_name' argumentisdeprecated in version '1.7.0' andwillberemoved in version '2.0.0' ,pleaseusethe 'project_name' argumentinstead super(Client,self).__init__(**kwargs) /usr/lib/python2 .7 /site-packages/debtcollector/renames .py:43:DeprecationWarning:Usingthe 'tenant_id' argumentisdeprecated in version '1.7.0' andwillberemoved in version '2.0.0' ,pleaseusethe 'project_id' argumentinstead return f(*args,**kwargs) /usr/lib/python2 .7 /site-packages/keystoneclient/httpclient .py:376:DeprecationWarning:ConstructinganHTTPClientinstancewithoutusingasessionisdeprecatedasofthe1.7.0releaseandmayberemoved in the2.0.0release. 'the2.0.0release.' ,DeprecationWarning) +----------------------------------+------------+---------+----------------------+ | id |name|enabled|email| +----------------------------------+------------+---------+----------------------+ |1627cc3d61c04f9db9608e9703a01371|admin|True|root@localhost| |04247710cdf34914a7f5b315ab166731|ceilometer|True|ceilometer@localhost| |cb5e12e30a4a4c1dae57255c184b8b30|cinder|True|cinder@localhost| |632fb20205ea4c40988d7d65b2844ff6|glance|True|glance@localhost| |23c4fb48a5a247d68e50c6b74fb6f035|http|True|| |80069f5c8edc454b8038e7f116df4ff5|neutron|True|neutron@localhost| |adbcaaf58d09495988b57be8e82b4e6b|nova|True|nova@localhost| |4f488ff4859e4973afefea6e7872ed83|swift|True|swift@localhost| +----------------------------------+------------+---------+----------------------+ ==Glanceimages== +--------------------------------------+-----------+ |ID|Name| +--------------------------------------+-----------+ |2a0db075-f221-4285-9ff9-38b755a322c1|centos7.2| +--------------------------------------+-----------+ ==Novamanagedservices== +----+------------------+---------------+----------+---------+-------+----------------------------+-----------------+ |Id|Binary|Host|Zone|Status|State|Updated_at|DisabledReason| +----+------------------+---------------+----------+---------+-------+----------------------------+-----------------+ |1|nova-consoleauth|h1.hequan.com|internal|enabled|up|2016-07-05T07:06:34.000000|-| |2|nova-scheduler|h1.hequan.com|internal|enabled|up|2016-07-05T07:06:34.000000|-| |3|nova-conductor|h1.hequan.com|internal|enabled|up|2016-07-05T07:06:34.000000|-| |5|nova-compute|h1.hequan.com|nova|enabled|up|2016-07-05T07:06:34.000000|-| |6|nova-cert|h1.hequan.com|internal|enabled|up|2016-07-05T07:06:34.000000|-| |7|nova-compute|h2.hequan.com|nova|enabled|up|2016-07-05T07:06:34.000000|-| +----+------------------+---------------+----------+---------+-------+----------------------------+-----------------+ ==Novanetworks== +--------------------------------------+---------+------+ |ID|Label|Cidr| +--------------------------------------+---------+------+ |bebbc903-5846-4e8d-9c19-f0248cb6e08d|put-ex|-| |494cbfae-b26d-4e29-859e-35c55f017f19|he_sub2|-| |1f8a8d0c-2e32-4aaa-83d6-3ba52a768292|quan|-| |67d35cd2-3b95-48a7-96b7-6ba1f0eb7d5d|he_sub|-| +--------------------------------------+---------+------+ ==Novainstanceflavors== +----+-----------+-----------+------+-----------+------+-------+-------------+-----------+ |ID|Name|Memory_MB|Disk|Ephemeral|Swap|VCPUs|RXTX_Factor|Is_Public| +----+-----------+-----------+------+-----------+------+-------+-------------+-----------+ |1|m1.tiny|512|1|0||1|1.0|True| |2|m1.small|2048|20|0||1|1.0|True| |3|m1.medium|4096|40|0||2|1.0|True| |4|m1.large|8192|80|0||4|1.0|True| |5|m1.xlarge|16384|160|0||8|1.0|True| +----+-----------+-----------+------+-----------+------+-------+-------------+-----------+ ==Novainstances== +--------------------------------------+------+----------------------------------+--------+------------+-------------+-----------------------------------+ |ID|Name|TenantID|Status|TaskState|PowerState|Networks| +--------------------------------------+------+----------------------------------+--------+------------+-------------+-----------------------------------+ |95311ed2-6091-4ce7-a2be-caab8e2760ce|1|43986fb013804aa0a04ca277e4d0e69c|ACTIVE|-|Running|quan=192.168.10.12,192.168.2.104| +--------------------------------------+------+------ 本文转自 295631788 51CTO博客,原文链接:http://blog.51cto.com/hequan/1795980,如需转载请自行联系原作者

优秀的个人博客,低调大师

Android UI学习 - Linear Layout, RelativeLayout

1. 一些常用的公共属性介绍 1) layout_width- 宽 fill_parent: 宽度和父元素相同,wrap_content: 宽度随本身的内容所调整,或者指定 px 值来设置宽 2) layout_height -高 fill_parent: 高度和父元素相同,wrap_content: 高度随本身的内容所调整,或者指定 px 值来设置高 3) background - 设置背景图 4) padding - 设置边距 可以具体设置paddingBottom,paddingLeft,paddingRight,paddingTop来设定不同的px值 5) id - 该object的id号 @+id/id1 代表添加新的id名为id1, @id/id1 代表引用id1的控件 6) layout_weight - 重要度 个人理解为显示的优先级。默认为0(最高),数值越大,优先级越低!参考下面的Linear Layout例子。要让layout_weight生效,需要父层或父父层的相应layout_width/layout_height = "fill_parent",否则wrap_content会压缩到最小足够空间! 7) layout_gravity -Container组件的对齐方式 组件在layout里面的对齐方式。 8)gravity - 文字在组件里的对齐方式 例如设置button里面的文字在button中居中显示。 *大多数属性是可以调用对应的函数来动态改变状态的,请查看SDK Doc。 2. Linear Layout线形布局 orientation- 容器内元素的排列方式。vertical: 子元素们垂直排列,horizontal: 子元素们水平排列。在代码里可通过setOrientation()进行动态改变,值分别为HORIZONTAL或者VERTICAL。 * 在Linear Layout, 宽度/高度都是按着组件的次序逐个占用的!所以当某个组件设置"fill_parent",在没有设置Layout_weight的情况下,该组件会占用了余下的空间,那么在它后面的组件就会显示不出来。如下图的EditText如果没有设置android:layout_weight="1", 它下面的其他组件就看不见了! baselineAligned一般情况下,这个属性默认为true,代表在同一方向的组件都基于第一个组件对齐。所以可以看到下图的text1, button1, text2是在同一水平线的。当不需要这效果时,可以设置为false。 可以参考官方网页 http://androidappdocs.appspot.com/resources/tutorials/views/hello-linearlayout.html。 xml代码: <?xmlversion="1.0"encoding="utf-8"?> <LinearLayoutxmlns:android="http://schemas.android.com/apk/res/android" android:orientation="vertical" android:layout_width="fill_parent" android:layout_height="fill_parent"> <TextView android:text="@string/hello" android:layout_width="fill_parent" android:layout_height="wrap_content" /> <EditText android:layout_width="fill_parent" android:layout_height="wrap_content" android:layout_weight="1" android:id="@+id/edittext" /> <LinearLayout android:id="@+id/LinearLayout01" android:layout_width="fill_parent" android:layout_height="wrap_content" android:orientation="horizontal"> <TextView android:text="text1" android:id="@+id/TextView01" android:layout_width="wrap_content" android:layout_height="wrap_content" /> <Buttonandroid:text="Button01" android:id="@+id/Button01" android:layout_width="fill_parent" android:layout_height="wrap_content" android:layout_weight="1" /> <TextView android:text="text2" android:id="@+id/TextView02" android:layout_width="wrap_content" android:layout_height="wrap_content" /> </LinearLayout> <TextView android:layout_width="wrap_content" android:layout_height="wrap_content" android:text="buttom" /> </LinearLayout> 3.RelativeLayout 相对定位布局 这个布局比较易懂,但组件间容易存在依赖关系,“牵一发而动全身“,所以在确定组件间布局关系不会再变动时,可以考虑采用!先看看xml代码: <?xmlversion="1.0"encoding="utf-8"?> <RelativeLayout xmlns:android="http://schemas.android.com/apk/res/android" android:layout_width="wrap_content" android:layout_height="wrap_content" android:id="@+id/relativelayout"> <ImageView android:id="@+id/image" android:layout_width="wrap_content" android:layout_height="wrap_content" android:src="@drawable/icon" /> <TextView android:id="@+id/text1" android:layout_width="fill_parent" android:layout_height="wrap_content" android:text="@string/hello" android:layout_toRightOf="@id/image" /> <Button android:id="@+id/button1" android:layout_width="fill_parent" android:layout_height="wrap_content" android:text="button1" android:layout_toRightOf="@id/image" android:layout_below="@id/text1" /> </RelativeLayout> Java代码(动态添加组件): publicclassRelativeDemoextendsActivity{ @Override publicvoidonCreate(BundlesavedInstanceState){ super.onCreate(savedInstanceState); setContentView(R.layout.relative); RelativeLayout.LayoutParamslp=newRelativeLayout.LayoutParams( ViewGroup.LayoutParams.FILL_PARENT,//width ViewGroup.LayoutParams.WRAP_CONTENT//height ); //设置editTextlayout_below="@id/button1" lp.addRule(RelativeLayout.BELOW,R.id.button1); //设置editTextlayout_alignLeft="@id/image" lp.addRule(RelativeLayout.ALIGN_LEFT,R.id.image); ((RelativeLayout)findViewById(R.id.relativelayout)).addView( newEditText(this),lp); } } 效果图: 先添加参照物(ImageView),然后就可以依次添加其他组件,定义位置规则rule!位置规则是不分先后的!另外ADT插件提供的预览图,有时候是不准的,未能及时更新,所以最好还是要到模拟器上测试! RelativeLayout的xml属性很多,总的来说分为2类: 1) 要指定参照物的,layout_alignBottom,layout_toLeftOf,layout_above,layout_alignBaseline系列的; layout_above = ”@id/text1“ 2) 以parent为参照物,设置true/false,layout_centerVertical,layout_alignParentLeft系列的。 layout_alignParentLeft = ”true“ 其中 layout_alignWithParentIfMissing是比较有用且要注意的属性,当设置为true,在指定的参照物找不到的情况下,会使用parent作为新的参照物! RelativeLayout.LayoutParams是用于设置位置规则的。上述的xml属性均来自此静态类。但它的AddRule(int verb, int anchor),参数的verb动作却是引用RelativeLayout的常量,而这些常量和部分xml属性相对应。参数anchor的值可能是参照物的id,RelativeLayout.TRUE,-1(当不需要指定anchor的verb)。可以这样理解verb和anchor: xml属性 (verb) = "value" (anchor) 其中它的构造函数之一: RelativeLayout.LayoutParams(int w, int h),参数指定所要设置子View的宽度和高度。 本文转自 Icansoft 51CTO博客,原文链接:http://blog.51cto.com/android/298345

优秀的个人博客,低调大师

测试学习资源网址收集

光荣之路Kernel大神开源的selenium自动化测试框架源码:http://pan.baidu.com/s/1mgp8ij2(限时下载) ant--Kernel大神的最佳实践(web和手机测试的最佳实践均有):http://pan.baidu.com/s/1sjNTqXn 面试的视频:http://pan.baidu.com/s/1ntqOfUD 职业发展的视频:http://pan.baidu.com/s/1kTmix07 功能测试视频:http://pan.baidu.com/s/1pJFMyCF 性能测试是视频:http://pan.baidu.com/s/1jGzGLr4 linux系列视频7讲:http://pan.baidu.com/s/1gdglskj 安全测试视频:http://pan.baidu.com/s/1c0ti3Jy python编程视频:http://pan.baidu.com/s/1c0IkIlE Html基础:http://pan.baidu.com/s/1i3BpqZF css基础:http://pan.baidu.com/s/1ER0WQ Js基础:http://pan.baidu.com/s/1dD8GpTv java基础:http://pan.baidu.com/s/1gduyAlX 自动化测试理论1:http://pan.baidu.com/s/1i3KevPV 自动化测试理论2:http://pan.baidu.com/s/1dDEgSpj Selenium的前世今生和seleniumIDE:http://pan.baidu.com/s/1o66xgTW seleniumIDE进阶:http://pan.baidu.com/s/1c0fDud6 Junit4讲解:http://pan.baidu.com/s/1gd7XEpH testng:http://pan.baidu.com/s/1i31iqsl Selenium的网页定位大秘籍:http://pan.baidu.com/s/1gdpbn39 自动化测试最佳实践实战:http://pan.baidu.com/s/1dDgsb3j 自动化测试之Maven应用:http://pan.baidu.com/s/1ntwqQ8L 手机自动化化之android系统级白盒测试与自动化测试集成:http://pan.baidu.com/s/1sjrz05n 光荣之路Android系统级白盒测试以及与自动化测试集成--数据分析、进阶操作_Karen http://pan.baidu.com/s/1i33RhKp 光荣之路Android自动化测试之Monkey--从参数讲解、脚本制作到实战技巧:http://pan.baidu.com/s/1i3xfPxb 光荣之路Android自动化测试之MonkeyRunner--从环境构建、参数讲解、脚本制作到实战技巧:http://pan.baidu.com/s/1kTpAxF5 光荣之路Android自动化测试之Robotium--基础操作(源代码精彩讲解版):http://pan.baidu.com/s/1eQ5ZMee 本文转自追光的猫博客51CTO博客,原文链接http://blog.51cto.com/ql0722/1655404如需转载请自行联系原作者 00_yatou

优秀的个人博客,低调大师

学习笔记-安装ELK5

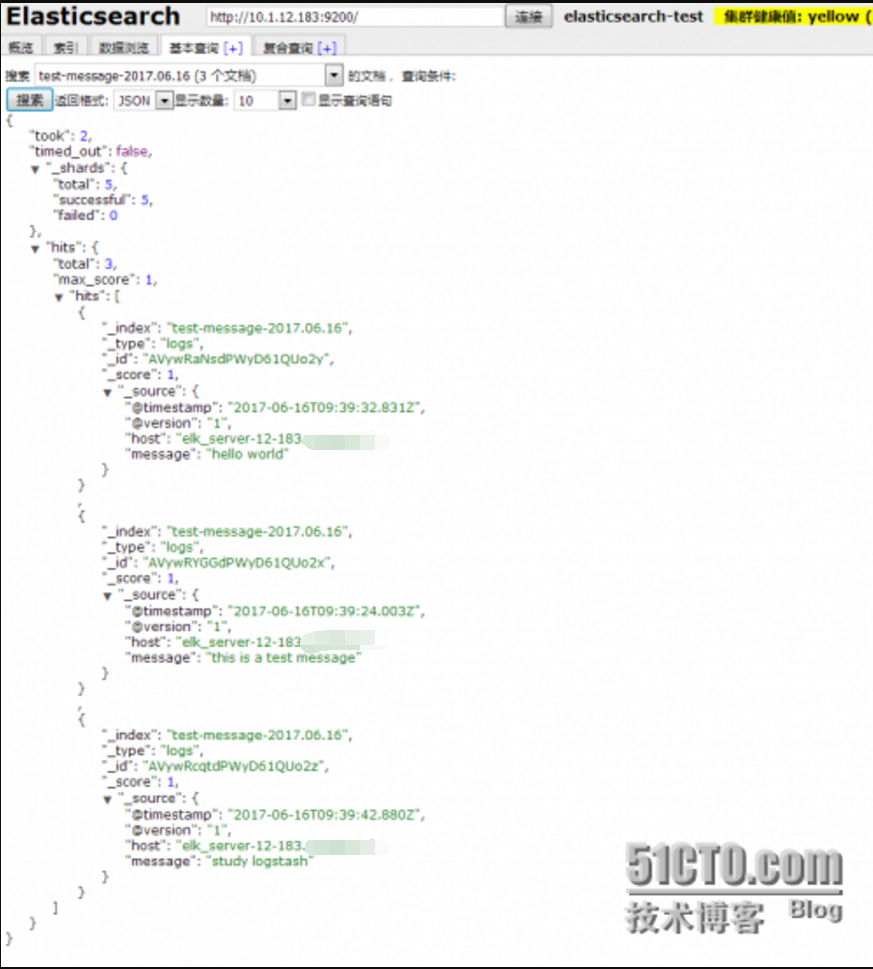
ELK日志平台是一个完整的日志分析系统,有三个开源工具构建组成,分别是:Elasticsearch、Logstash和Kibana。Elasticsearch用于数据分析和深度搜索;Logstash作用是从其他服务器上传输和转发日志,对其集中管理,进行分析;Kibana则是提供了强大的UI展示,将数据可视化。 安装ELK日志平台 ELK基础环境需要java环境,官网要求5.x版本要大于java8。而且安装方式多样化,支持zip、tar.gz、rpm包、deb包、window环境还有docker环境。根据自己喜好选择吧。 我选择的是yum安装,简单方便,系统要求的话没有辣么严格,官网说yum安装方式不再支持centos5.x系列了,非要用centos5.x就去使用tar.gz包吧,官网有具体方法,不再复述。yum安装方式centos6.x和centos7.x都可以,但是我推荐用centos7.x安装,不知道为啥,感觉centos7.x支持更好,centos6.x装完经常会出问题。 还有一点需要说下就是,ELK各个组件版本要一致,官网要求的! 在一个就是安装顺序,为的是确保每个组件相互调用时都能正常运行: 1、Elasticsearch X-Pack for Elasticsearch Kibana X-Pack for Kibana LogstashBeatsElasticsearch Hadoop 安装Elasticsearch 1、导入Elasticsearch安装包PGP Key 1 2 rpm-- import https: //artifacts .elastic.co /GPG-KEY-elasticsearch 2、创建yum源 1 2 3 4 5 6 7 8 9 10 [root@localhost~] #cat>>/etc/yum.repos.d/elasticsearch.repo<<EOF >[elasticsearch-5.x] >name=Elasticsearchrepository for 5.xpackages >baseurl=https: //artifacts .elastic.co /packages/5 .x /yum >gpgcheck=1 >gpgkey=https: //artifacts .elastic.co /GPG-KEY-elasticsearch >enabled=1 >autorefresh=1 > type =rpm-md >EOF 3、安装、启动Elasticsearch进程并开机启动 1 2 3 4 [wangpeng@localhost~]$ sudo yum install elasticsearch [wangpeng@localhost~]$ sudo /bin/systemctl daemon-reload [wangpeng@localhost~]$ sudo /bin/systemctl enable elasticsearch.service [wangpeng@localhost~]$ sudo systemctlstartelasticsearch.service 4、检查Elasticsearch是否已经启动 查看9200、9300是否已经启动 1 2 3 4 5 6 7 8 9 10 11 12 13 14 [wangpeng@localhost~]$curlhttp: //localhost :9200 { "name" : "F5Mw8Pp" , "cluster_name" : "elasticsearch" , "cluster_uuid" : "zVEeXtPNTaeH-TKah7Buzw" , "version" :{ "number" : "5.4.0" , "build_hash" : "780f8c4" , "build_date" : "2017-04-28T17:43:27.229Z" , "build_snapshot" : false , "lucene_version" : "6.5.0" }, "tagline" : "YouKnow,forSearch" } 5、配置Elasticsearch rpm包配置文件在/etc/elasticsearch下面的elasticsearch.yml 1 2 3 4 5 6 7 8 9 10 11 12 13 14 15 16 17 18 19 20 21 vim /etc/elasticsearch/elasticsearch .yml cluster.name:elasticsearch- test node.name:node-1 path.data: /var/lib/elasticsearch path.logs: /var/log/elasticsearch network.host:0.0.0.0 [wangpeng@localhost~]$ sudo systemctlrestartelasticsearch.service [wangpeng@localhost~]$curlhttp: //localhost :9200 { "name" : "node-1" , "cluster_name" : "elasticsearch-test" , "cluster_uuid" : "zVEeXtPNTaeH-TKah7Buzw" , "version" :{ "number" : "5.4.0" , "build_hash" : "780f8c4" , "build_date" : "2017-04-28T17:43:27.229Z" , "build_snapshot" : false , "lucene_version" : "6.5.0" }, "tagline" : "YouKnow,forSearch" } 6、将/etc/elasticsearch/配置拷贝到/usr/share/elasticsearch/config下面 1 2 3 4 [wangpeng@localhost~]$ sudo mkdir /usr/share/elasticsearch/config [wangpeng@localhost~]$ sudo ln -sf /etc/elasticsearch/ * /usr/share/elasticsearch/config/ [wangpeng@localhost~]$ sudo chown -Relasticsearch:elasticsearch /usr/share/elasticsearch [wangpeng@localhost~]$ sudo systemctlrestartelasticsearch.service 注意:这一点好多人不会注意,因为你不修复也不会启动失败,但是就是写不进数据进去,这个坑好久才发现,看下日志会报错,但是却能启动,我也是服了!~ 7、装个head插件 这个插件5.X官网不再支持了,插件命令没有了,因为它有自己x-pack插件了,但是我装了x-pack发现着实让人吐血,有安全认证方面的问题,导致elk各种问题出现,目前还没研究明白,时间不充裕。 这个head插件我是直接抄的网上大神制作,略有改动。 7.1、下载并配置nodejs 由于head插件本质上还是一个nodejs的工程,因此需要安装node,使用npm来安装依赖的包。(npm可以理解为maven) 去官网下载nodejs,https://nodejs.org/en/download/ 1 2 3 4 5 6 wgethttps: //nodejs .org /dist/v8 .1.1 /node-v8 .1.1-linux-x64. tar .xz tar xfnode-v8.1.1-linux-x64. tar .xz mv node-v8.1.1-linux-x64 /usr/local/node chown -Relasticsearch:elasticsearch /usr/local/node ln -sf /usr/local/node/bin/node /usr/bin/node ln -sf /usr/local/node/bin/npm /usr/bin/npm 7.2、安装grunt 1 2 npm install -ggrunt-cli ln -sf /usr/local/node/bin/grunt /usr/bin/grunt cd /var/lib/elasticsearch 7.3、下载、安装并配置head 1 2 3 4 5 6 yum-y install git cd /var/lib/elasticsearch gitclonegit: //github .com /mobz/elasticsearch-head .git chown -Relasticsearch:elasticsearchelasticsearch- head / cd elasticsearch- head / npm install 7.4、配置head文件 1 2 3 4 5 6 7 8 9 10 11 12 13 14 [root@elk-node1~] #cd/var/lib/elasticsearch/elasticsearch-head/ vimGruntfile.js connect:{ server:{ options:{ port:9100, hostname : "0.0.0.0" , base: '.' , keepalive: true } } } [root@elk-node1elasticsearch- head ] #cd_site/ [root@elk-node1_site] #vimapp.js 把localhost修改成你es的服务器地址: 1 this.base_uri=this.config.base_uri||this.prefs.get( "app-base_uri" )|| "http://10.10.10.10:9200" ; 7.5、启动head插件 1 gruntserver& 安装Kibana 1、yum安装Kibana 1 [wangpeng@localhost~]$ sudo yum install kibana rpm包配置文件在/etc/kibana下面的kibana.yml /etc/kibana/kibana.yml 2、配置Kibana文件 1 2 3 4 [wangpeng@localhost~]$vim /etc/kibana/kibana .yml server.port:5601 server.host: "0.0.0.0" elasticsearch.url: "http://localhost:9200" 3、启动并设置开机启动 1 2 3 [wangpeng@localhost~]$ sudo systemctl enable kibana.service Created symlink from /etc/systemd/system/multi-user .target.wants /kibana .serviceto /etc/systemd/system/kibana .service [wangpeng@localhost~]$ sudo systemctlstartkibana.service 安装Logstash 1、yum安装Logstash 1 2 3 4 5 [wangpeng@localhost~]$ sudo yum-y install logstash [wangpeng@localhost~]$ sudo systemctlstartlogstash.service [wangpeng@localhost~]$ sudo ln -s /usr/share/logstash/bin/logstash /usr/bin/logstash [wangpeng@localhost~]$ sudo -ulogstashsh-c 'mkdir-pv/usr/share/logstash/config' [wangpeng@localhost~]$ sudo -ulogstashsh-c 'ln-s/etc/logstash/*/usr/share/logstash/config/' 2、测试Logstash是否能正常运行 1 2 3 4 5 6 7 8 9 10 11 12 13 [wangpeng@localhost~]$ sudo logstash-e 'input{stdin{}}output{stdout{}}' helloworld 2017-06-02T07:14:13.130Zlocalhosthelloworld [wangpeng@localhost~]$ sudo logstash-e'input{stdin{}}output{ stdout{codec=>rubydebug}}' helloworld Thestdinpluginisnowwaiting for input: { "@timestamp" =>2017-06-02T07:17:44.053Z, "@version" => "1" , "host" => "localhost" , "message" => "helloworld" } 3、写个测试文件,测试一下es是否能够接受数据 1 2 3 4 5 6 7 8 9 10 11 12 13 14 15 16 17 18 19 20 21 [wangpeng@localhost~]$vim /etc/logstash/conf .d /test .conf input{ stdin{} } output{ elasticsearch{ hosts=> "127.0.0.1:9200" index=> "test-messages-%{+YYYY.MM.dd}" } } [wangpeng@localhost~]$logstash-f /etc/logstash/conf .d /test .conf-t SendingLogstash'slogsto /var/log/logstash which isnowconfiguredvialog4j2.properties ConfigurationOK [wangpeng@localhost~]$logstash-f /etc/logstash/conf .d /test .conf SendingLogstash'slogsto /var/log/logstash which isnowconfiguredvialog4j2.properties Thestdinpluginisnowwaiting for input: helloworld thisis test message studylogstash 4、Kibana里添加该索引(测试),只要es里面能产生索引,Kibana就能加在上去 安装调试先到这里。 本文转自 wangpengtai 51CTO博客,原文链接:http://blog.51cto.com/wangpengtai/1939138,如需转载请自行联系原作者

优秀的个人博客,低调大师

Nginx提升学习架构总结

1.选择nginx的理由 (1)支持高并发;(官方5w并发,实测3w并发,因为采用epoll网络IO模型) (2)内存消耗少;(nginx+php-fcgi在3w并发下开启10个nginx进程,消耗150mb内存,64个nginx进程消耗内存1280mb) (3)成本低廉;(开源免费,可用于商业,相对硬件f5成本低) (4)节省带宽; (5)稳定高; (6)内置健康检查功能; (7)支持反向代理; (8)支持负载均衡;(应用层) 2.网络IO连接方法 分2种:阻塞IO(block IO)和多路复用IO(现在服务器多用); 阻塞IO:一个请求过来,只能干这个事情,别的事情不能干;(如同学来找你,告诉他你的地址,且在宿舍门口等,在这个过程中,一直等待,直到同学找到你,期间你不能做任何事情) 多路复用IO:包含select和epoll模型;(select模型举例如同学来找你,告诉你同学地址并在宿舍等,同学来到宿舍门口还是找不到你,就找楼管,楼管挨个宿舍去找,效率很慢;epoll模型举例如同学来找你,告诉你同学地址并在宿舍等,同学来到宿舍门口还是找不到你,就找楼管,楼管处有人员登记数据库,查看登记名册,告诉你同学在哪层楼多少号房间,这样就快速找到你了) 3.nginx虚拟主机及相关配置 (1)nginx配置文件结构图 ...... event{ ...... } http{ ...... server{ ...... } server{ ...... } } (2)nginx虚拟主机 定义server,可以基于端口、ip、域名做虚拟主机。 (3)nginx匹配规则 location语法:location=[=|~|~*|^~]/uri/{...} ~ 区分大小写 ~* 不区分大小写 ^~ 禁止表达式匹配 = 精确匹配 举例如: location =/{ #只匹配/的查询 } location /{ #匹配任何以/开头的查询,但正则与一些较长字符串被首先匹配 #./document/index.html } location ^~ /images/{ #匹配任何以/images/开头的查询,且停止搜索,不检查正则 #./images/1.gif } location ^* \.(gif|jpg|jpeg)${ #匹配任何以gif,jpg,jpeg结尾的文件,但所有/images/目录的请求在上面处理,精确匹配 #./document/1.gif } 解释:url和uri url:统一资源定位符,如http://www.onon.com/news/a10.html uri:统一资源标示符,指具体的路径,如news/a10.html (4)自定义错误页面 error_page 403 404 /40x.html; location = /40x.html{ root /var/web/error/; } 解释:server中定义,其中/40x.html前面的/是指定义server指定文件root的路径。 另针对error指定专门存放路径,如上面的“root /var/web/error/”,至此就可以将40x.html页面放到改目录下。 对于50x错误也同样定义: error_page 500 502 503 504 /50x.html location = /50x.html{ root /var/web/error/; } (5)自动索引及别名功能 location /onon{ root /web/html; index index.html; autoindex on; } 解释:将/web/html目录下的文件索引显示 location /over/{ alias /data/web3/images/toto/; } 解释:访问/data/web3/images/toto/top.jpg文件时,可以使用/over/top.jpg访问 (6)控制站点访问 location /onon{ root /web/html; index index.html; autoindex on; deny 192.168.0.110; allow 192.168.0.0/24; allow 192.168.1.12; deny all; } (7)目录身份验证 /usr/local/apache/bin/htpasswd -c /home/nginx/conf/authdb webadmin nginx auth_basic认证采用apache兼容的密码文件,创建webadmin用户,输入密码即可。 当访问/onon时就会提示输入用户名和密码。 location /onon{ root /web/html; index index.html; autoindex on; auth_basic "Enter your user and password"; auth_basic_user_file /home/nginx/conf/authdb; deny 192.168.0.110; allow 192.168.0.0/24; allow 192.168.1.12; deny all; } (8)nginx状态检查 location /nginx_status{ stub_status on; access_log off; } 解释:不需要开启访问日志access_log;访问目录/nginx_status添加认证,见上;编译的时候需要添加此模块:--with-http_stub_status_module (9)nginx rewrite 编译时需要添加pcre库,prel兼容正则表达式; nginx rewrite是实现url/uri重写; 语法指令:set、if、return、break、rewrite 语法规则: =和!= ~ 区分大小写 ~* 不区分大小写 !~和!~* -f和!-f 判断文件是否存在 -d和!-d 判断目录是否存在 -e和!-e 判断文件或目录是否存在 -x和!-x 判断文件是否可以执行 $1 - $9 位置化参数 全局变量(系统已定义好) $arg_PARAMETER#这个变量包含GET请求中,如果有变量PARAMETER时的值。 $args #这个变量等于请求行中(GET请求)的参数,例如foo=123&bar=blahblah; $binary_remote_addr#二进制的客户地址。 $body_bytes_sent#响应时送出的body字节数数量。即使连接中断,这个数据也是精确的。 $content_length#请求头中的Content-length字段。 $content_type#请求头中的Content-Type字段。 $cookie_COOKIE#cookie COOKIE变量的值 $document_root#当前请求在root指令中指定的值。 $document_uri#与$uri相同。 $host#请求主机头字段,否则为服务器名称。 $hostname#Set to the machine’s hostname as returned by gethostname $http_HEADER $is_args#如果有$args参数,这个变量等于”?”,否则等于”",空值。 $http_user_agent#客户端agent信息 $http_cookie#客户端cookie信息 $limit_rate#这个变量可以限制连接速率。 $query_string#与$args相同。 $request_body_file#客户端请求主体信息的临时文件名。 $request_method#客户端请求的动作,通常为GET或POST。 $remote_addr#客户端的IP地址。 $remote_port#客户端的端口。 $remote_user#已经经过Auth Basic Module验证的用户名。 $request_completion#如果请求结束,设置为OK. 当请求未结束或如果该请求不是请求链串的最后一个时,为空(Empty)。 $request_method#GET或POST $request_filename#当前请求的文件路径,由root或alias指令与URI请求生成。 $request_uri#包含请求参数的原始URI,不包含主机名,如:”/foo/bar.php?arg=baz”。不能修改。 $scheme#HTTP方法(如http,https)。 $server_protocol#请求使用的协议,通常是HTTP/1.0或HTTP/1.1。 $server_addr#服务器地址,在完成一次系统调用后可以确定这个值。 $server_name#服务器名称。 $server_port#请求到达服务器的端口号。 $uri#不带请求参数的当前URI,$uri不包含主机名,如”/foo/bar.html”。该值有可能和$request_uri 不一致。$request_uri是浏览器发过来的值。该值是rewrite后的值。例如做了internal redirects后。 if指令: if($http_user_agent ~MSIE){ rewrite ^(.*)$ /msie/$1 break; } 解释:$http_user_agent用户代理,如浏览器ie,firefox等; ~区分大小写,MSIE浏览器ie; ^以什么开始,$以什么结尾,.*匹配任意字符串;$1位置符,/msie/$1指的是web所指向的root路径下 的/msie/$1,如/data/web3/images/toto/msie/index.html return指令: 如果访问url以“*.sh”或“*.bash”结尾,则返回状态码403 location ~.*\.(sh|bash)?$ { return 403; } 解释:“~”匹配大小写,“.*”前面不管是什么字符,“.(sh|bash)?$”以sh或bas,用$标识,“\”去掉其后面“.”的特殊意义的。403错误就是指error_page定义的错误。 rewrite指令: 最后一项参数flag标记,有以下: last:完成rewrite,相当于apache的[L]标记,浏览器url地址不变; break:本条规则匹配后就完成,终止匹配,浏览器url地址不变; redirect:返回302临时重定向,浏览器显示跳转后的url; permanent:返回301永久重定向,浏览器显示跳转后的url; 案例: 1)将/bbs目录重写到/data rewrite ^/bbs/?$ /data/ permanent; location /data{ index index.html; } location /bbs{ rewrite ~/bbs/?$ /data/ permanent; } 2)根据不同的浏览器将得到不同的结果 if($http_user_agent ~MSIE){ rewrite ^(.*)$ /msie/$1 break; } server{ listen 80 default_server; server_name www.onon.com; index index.html; root /data/www/onon; if($http_user_agent ~Firefox){ rewrite ^(.*)$ /firefox/$1 break; } if($http_user_agent ~MSIE){ rewrite ^(.*)$ /msie/$1 break; } } 3)防止盗链 所谓防盗链就是别人网站的图片引用我们的网站上的,且点击别人网站上的那个图片,使用的是我们网站的流量,只引用我们网站的图片,不会跳转到我们网站上来。 location ~ .*\.(gif|jpg|jpeg|png|bmp|swf|flv)$ { valid_referers none blocked www.onon.com *.onon.com; if ($invalid_referer) { rewrite ^/(.*) http://www.onon.com/block.html; } } 4)实现域名跳转 访问www.onon.com跳转到www.onbing.com server{ listen 80 default_server; server_name www.onon.com; index index.html; root /data/www/onon; location / { rewrite ~(.*)$ http://www.onbing.com$1 permanent; } } 5)URL rewrite和反向代理同时进行 location /news/ { proxy_pass http://10.0.0.10; } location /health/ { proxy_pass http://10.0.0.20; } (10)nginx日志管理 语法如下:log_format name format (format ....) 自定义日志格式如下: log_format main '$remote_addr - $remote_user [$time_local] "$request"' '$status $body_bytes_sent "$http_referer"'; '"$http_user_agent" "$http_x_forwarded_for"'; $http_x_forwarded_for 记录远程用户真实ip地址,不是缓存/代理服务器地址; $remote_user 记录远程客户端用户名称,一般不会记录的; $time_local 记录访问时间及地区,记录用户访问时的本地时间; $request 记录请求的URL与HTTP协议,具体访问的页面; $status 记录请求的状态,第一次成功访问状态为200,再次访问页面未更新状态为304,页面找不到时为404 $body_bytes_sent 记录发送给客户端的文件主体内容大小 $http_referer 记录是从哪个页面链接访问过来的,如百度链接过来的; $http_user_agent 记录客户端浏览器的相关信息 注意:上面定义的日志格式,跟在access_log后面,error_log后面跟错误级别,如下: access_log /data0/logs/nginx/www.onon.com-access.log main; access_log /data0/logs/$server_name.log mylogformat buffer=32k; 解释:main、mylogformat为定义日志格式时取名;$server_name为自动获取访问地址,如www.onon.com,消耗资源;buffer=32k为设置缓存区大小,只记录日志文件描述符。 error_log /data0/logs/nginx/www.onon.com-error.log warn; 解释:warn为错误级别,日志等级有8个,分别为:emerg、alert、crit、err、warn、notice、info、debug 开启日志缓存 每一条日志记录,日志文件先打开文件,写入日志记录,马上关闭。 如何提高包含变量的日志文件存放路径性能?开启open_log_file_cache open_log_file_cache max=1000 inactive=20s min_uses=2 valid=1m; 解释:max最大文件描述符数量,inactive设定时间内没有使用此文件描述符,则自动删除此描述符, min_uses在inactive指定时间范围内,若日志文件超过被使用次数,则计入缓存,默认10秒,valid多长时间检查一次,看日志文件路径和文件名是否仍然存在,默认60秒。 nginx日志分割 vim /data/sh/nginxlog_cut.sh #! /bin/bash #nginx log 存放位置 logs_path="/data/logs/nglogcut/" #将日志改名 mkdir -p ${logs_path}$(date -d "yesterday" + "%Y")/$(date -d "yesterday" + "%m")/ mv ${logs_path}access.log ${logs_path}$(date -d "yesterday" + "%Y")/$(date -d "yesterday" + "%m")/access_$(date -d "yesterday" + "%Y%m%d").log 重新加载nginx服务 service nginx reload 添加计划任务 chmod +x /data/sh/nginxlog_cut.sh #crontab -l 01 01 * * * /bin/bash /data/sh/nginxlog_cut.sh (11)nginx压缩输出 在http{}中间启用压缩 模块:HttpGzipModule和HttpGzipStaticModule 前者用于启用在文件传输过程中使用gzip压缩,而后者的作用是将一个文件以压缩的方式传递到一个支持压缩功能的客户端之前,首先检查是否已经存在相应的*.gz结尾的文件名格式,这样避免重复压缩而造成资源浪费。 对于nginx的网页压缩传输在nginx中的配置是将其分到两种模式:一种是动态的,实时压缩输出(边压缩边输出),另一种是静态的,找到同名文件的.gz格式文件就输出。 启用gzip功能需要zlib库的支持,--with-http_gzip_module; 编译时需要指定--with-http_gzip_static_module gzip(GNU-ZIP)是一种压缩技术。经过gzip压缩后页面大小可以变为原来的30%甚至更小,这样,用户浏览页面的时候速度会块得多。gzip的压缩页面需要浏览器和服务器双方都支持,实际上就是服务器端压缩,传到浏览器后浏览器解压并解析。浏览器那里不需要我们担心,因为目前的巨大多数浏览器都支持解析gzip过的页面。 #vim nginx.conf http{ gzip on; gzip_min_length 1k; gzip_buffer 4 16k; gzip_http_version 1.1; gzip_comp_level 2; gzip_types text/plain application/x-javascript text/css application/xml; gzip_vary on; } 解释:gzip on开启gzip模块,关闭使用off; gzip_min_length设置允许压缩的页面最小字节数,页面字节数从header头的content-length中进行获取。默认为0,不管页面多大都压缩。建议设为1k,小于1k可能会越压越大; gzip_buffer设置系统获取几个单位的缓存用于存储gzip的压缩结果数据流。上面的设置为以16k为单位的4倍申请内存; gzip_http_version识别http协议的版本,早期的浏览器不支持gzip压缩,用户会看到乱码,所以为了支持前期版本加了此选项,目前此项基本可以忽略; gzip_comp_level为gzip压缩比,分1-9等级,1压缩比最小处理速度最快,9压缩比最大但处理速度最慢(传输快但比较消耗cpu); gzip_types匹配mime类型进行压缩,无论是否指定,”text/html”类型总是会被压缩的; gzip_vary和http头有关系,加个vary头,给代理服务器用的,有的浏览器支持压缩,有的不支持,所以避免浪费不支持的也压缩,所以根据客户端的HTTP头来判断,是否需要压缩; (12)nginx的浏览器本地缓存设置 #vim nginx.conf location ~.*\.(gif|jpg|jpeg|png|bmp|swf|flv)${ expires 30d; } location ~.*\.(js|css|jsp)?${ expires 1h; } (13)设定限速(常见流媒体) location /download { limit_rate 256k; proxy_pass http://www.onbing.com; proxy_set_header Host $host; proxy_set_header X-Forwarded-For $remote_addr; } location /movie { limit_rate_after 10m; limit_rate 100k; } 解释:前10m不限速,之后限速为100k。 if($http_user_agent ~Google|Yahoo|baidu){ limit_rate 20k; } 解释:通过google,yahoo或baidu搜索引擎访问进来的,限速为20k。 (14)反向代理 正向代理和反向代理?正向就是一个从内向外的访问,反向则是一个从外向内的访问。正向和反向是一个相对的概念。 正向:典型应用为在防火墙内的局域网客户端提供访问Internet的途径; 相对于用户,就是正向代理,代理用户去请求; 让nginx成为正向代理,而将外网视为整个后端在给我们提供服务。 反向:典型应用为将防火墙后面的服务器提供给Internet用户访问; 相对于内部的服务那么nginx就是反向代理,代理接受用户请求; http { client_body_buffer_size 600; client_header_buffer_size 600; client_max_body_size 300M; proxy_buffering on; proxy_cache_min_uses 3; proxy_ignore_client_abort off; proxy_intercept_errors on; proxy_next_upstream error timeout invalid_header; proxy_redirect off; proxy_connect_timeout 60; proxy_send_timeout 600; proxy_read_timeout 600; proxy_buffer_size 256k; proxy_buffers 4 256k; proxy_busy_buffers_size 256k; proxy_temp_file_write_size 256k; proxy_temp_path /usr/local/nginx/proxy_temp; proxy_cache_path /usr/local/nginx/proxy_cache/ levels=1:2 keys_zone=cache_onon:10m inactive=10m max_size=1000M; location /weibo { proxy_pass http://192.168.10.213; proxy_set_header Host $host; proxy_cache cache_onon; proxy_set_header X-Forward-For $remote_addr; } location ~.*\.(gif|jpg|jpeg|png|bmp|swf|flv|js|css|html)${ #状态码 proxy_cache cache_onon; proxy_cache_valid 200 10m; proxy_cache_valid 304 1m; proxy_cache_valid 301 302 1h; proxy_cache_valid any 1m; #哈希key值 proxy_cache_key $host$uri$is_args$args; proxy_set_header Host $host; proxy_set_header X-Forward-For $remote_addr; proxy_pass http://192.168.1.66; } } (15)负载均衡 upstream news_server_pool{ server 10.0.0.21:80 weight=1 max_fails=2 fail_timeout=30s; server 10.0.0.22:80 weight=1 max_fails=2 fail_timeout=30s; } upstream tv_server_pool{ server 10.0.0.31:80 weight=1 max_fails=2 fail_timeout=30s; server 10.0.0.32:80 weight=2 max_fails=2 fail_timeout=30s; } 解释:30s内检测2次,失效就找下一个服务器。 location /news { proxy_pass http://news_server_pool; proxy_set_header Host $host; proxy_set_header X-Forward-For $remote_addr; } location /tv { proxy_pass http://tv_server_pool; proxy_set_header Host $host; proxy_set_header X-Forward-For $remote_addr; } 本文转自自由心行博客51CTO博客,原文链接http://blog.51cto.com/xiaojiang2008/1247187如需转载请自行联系原作者 xiaojiang

优秀的个人博客,低调大师

XenDesktop学习笔记3之架构

架构: 1、物理组件: DDC一台 PVS+XenCenter 一台 AD+DHCP+DNS 一台 XenServer 一台 用户设备 一台 2、软件要求 XenServer 5.5 (目前5.6还存在不稳定性) XenCenter 5.5 Xendesktop Delivery Controller Provisiong servies 5.1 citrix 联机插件11.2 操作系统 服务器为server 2003 sp2 标准版或企业版 客户机:Xp Sp3 或Win 7 3、网络要求 划分在同一个Vlan里或者一个单独的网段 4、硬件要求 服务器三台 CPU支持虚拟化 内存最少8G 硬盘:100G的本地存储 网卡:100M,千兆最好不过了。 本文转自shj1985122951CTO博客,原文链接:http://blog.51cto.com/shenhj/397523,如需转载请自行联系原作者

资源下载

更多资源
Nacos

Nacos

Nacos /nɑ:kəʊs/ 是 Dynamic Naming and Configuration Service 的首字母简称,一个易于构建 AI Agent 应用的动态服务发现、配置管理和AI智能体管理平台。Nacos 致力于帮助您发现、配置和管理微服务及AI智能体应用。Nacos 提供了一组简单易用的特性集,帮助您快速实现动态服务发现、服务配置、服务元数据、流量管理。Nacos 帮助您更敏捷和容易地构建、交付和管理微服务平台。

Spring

Spring

Spring框架(Spring Framework)是由Rod Johnson于2002年提出的开源Java企业级应用框架,旨在通过使用JavaBean替代传统EJB实现方式降低企业级编程开发的复杂性。该框架基于简单性、可测试性和松耦合性设计理念,提供核心容器、应用上下文、数据访问集成等模块,支持整合Hibernate、Struts等第三方框架,其适用范围不仅限于服务器端开发,绝大多数Java应用均可从中受益。

Rocky Linux

Rocky Linux

Rocky Linux(中文名:洛基)是由Gregory Kurtzer于2020年12月发起的企业级Linux发行版,作为CentOS稳定版停止维护后与RHEL(Red Hat Enterprise Linux)完全兼容的开源替代方案,由社区拥有并管理,支持x86_64、aarch64等架构。其通过重新编译RHEL源代码提供长期稳定性,采用模块化包装和SELinux安全架构,默认包含GNOME桌面环境及XFS文件系统,支持十年生命周期更新。

WebStorm

WebStorm

WebStorm 是jetbrains公司旗下一款JavaScript 开发工具。目前已经被广大中国JS开发者誉为“Web前端开发神器”、“最强大的HTML5编辑器”、“最智能的JavaScript IDE”等。与IntelliJ IDEA同源,继承了IntelliJ IDEA强大的JS部分的功能。

用户登录
用户注册