首页 文章 精选 留言 我的

精选列表

搜索[Java框架],共10000篇文章
优秀的个人博客,低调大师

Java SPI机制

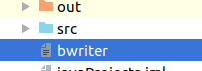
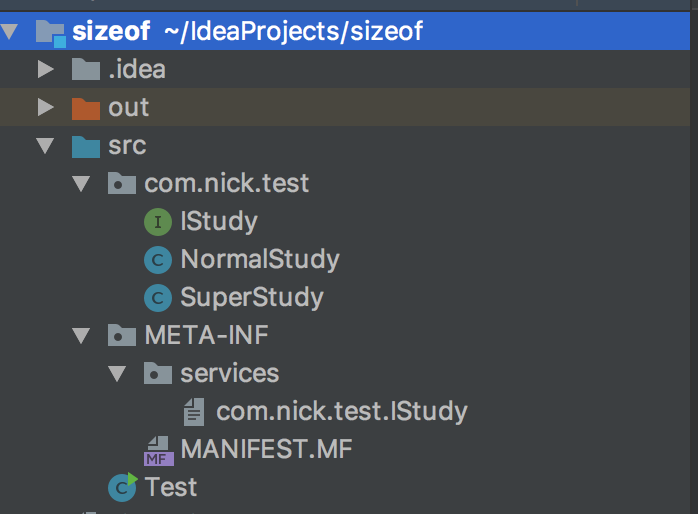
0 很久没有写博客了,这一两个月基本上就是找工作——离职——入职。到今天基本上入职近一个月了,在看公司代码的时候发现使用到了SPI技术来进行解耦,这篇文章主要写下SPI的基本使用。 1. SPI基本概念 SPI的全名叫Service Provider Interface,其主要是针对厂商或者插件的。我的理解就是上层提供接口,我们需要去实现,并且上层只需要根据我们的配置文件即可拿到我们的实现类(反射获取)。 2. SPI代码 先看下目录结构: 目录结构 2.1 接口定义 定义一个接口IStudy: public interface IStudy { void study(); } 2.2 编写实现类 编写两个实现类NormalStudy和SuperStudy: public class NormalStudy implements IStudy { @Override public void study() { System.out.println("normal study"); } } public class SuperStudy implements IStudy { @Override public void study() { System.out.println("super study"); } } 2.3 创建com.nick.test.IStudy文件 在src目录下创建META-INF\services\com.nick.test.IStudy文件,并在文件中添加两个实现类: com.nick.test.NormalStudy com.nick.test.SuperStudy 2.4 测试 public class Test { public static void main(String[] args) { ServiceLoader<IStudy> searches = ServiceLoader.load(IStudy.class); Iterator<IStudy> iterator = searches.iterator(); while (iterator.hasNext()) { iterator.next().study(); } } } 2.5 输出 结果 3 原理简单分析 大致原理其实通过上面的示例应该都知道了:通过读取META-INF/services/com.nick.test.IStudy文件的内容来确定接口对应的实现类,最终通过反射来进行实现类的加载。 核心代码: try { Enumeration<URL> resource = Test.class.getClassLoader().getResources("META-INF/services/" + IStudy.class.getName()); while (resource.hasMoreElements()) { URL url = resource.nextElement(); InputStream inputStream = url.openStream(); BufferedReader bufferedReader = new BufferedReader(new InputStreamReader(inputStream, "utf-8")); String s; while ((s = bufferedReader.readLine()) != null) { System.out.println(s); } } } catch (IOException e) { e.printStackTrace(); } 输出: com.nick.test.NormalStudy com.nick.test.SuperStudy 最后通过反射加载并创建对象即可,原理还是很简单的!

优秀的个人博客,低调大师

【Java】设计模式

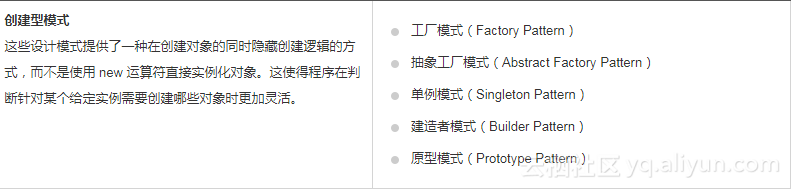
设计模式实际上就是针对某一类问题的最优解决方案,代表了最佳的实践,是开发人员经过相当一段时间的试验总结得到的。 目的是为了重用代码,让代码更容易理解,也更具可靠性,就像一个个模具。总共有23种设计模式,分为三大类:创建型:关注于对象的实例化结构型:如何组合对象与类行为型:对象之间的交互通信 六大原则:1.开闭原则:对扩展开放,对修改关闭。2.里氏代换原则3.依赖倒转原则4.接口隔离原则5.迪米特法则6.合成复用原则 常见的设计模式 【1.单例模式】 意图:保证一个类只有一个实例,并提供一个访问它的全局访问点主要解决:一个全局使用的类频繁地创建与销毁何时使用:控制实例数目,节省系统资源关键代码:构造函数是私有的优点:内存只有一个实例,减少内存的开销;避免对资源的多重占用缺点:没有接口,不能继承 实现:创建一个类,类有私有的构造函数和本身一个静态实例,该类提供一个静态方法,供外界获取静态实例。【懒汉式】声明对象,在调用getinstance()方法才创建对象【饿汉式】声明并创建对象 【2.工厂模式】 意图:定义一个创建对象的接口,让子类自己决定实例化哪个工厂类,使创建过程延迟到子类进行主要解决:接口选择问题何时使用:计划在不同条件下创建不同实例关键代码:创建过程在其子类执行优点:一个调用者想创建一个对象,只要知道其名称就可以了;扩展性高;屏蔽产品的具体实现,调用者只关心产品的接口。缺点:每次增加一个产品,就得增加一个具体类和对象实现工厂,增加系统的复杂度 实现:创建一个接口创建实现接口的实体类(多个)创建一个工厂类,生成基于给定信息的实体类的对象(你给我条件,我在工厂里生成特定的类对象) 【3.代理模式】 意图:为其他对象提供一种代理以控制对这个对象的访问主要解决:直接访问对象带来的问题,比如创建开销大,需要安全控制,需要进程外的访问等何时使用:想在访问一个类的时候做些控制关键代码:实现与被代理类的组合优点:职责清晰,高扩展,智能化缺点:请求速度变慢;实现代理模式额外工作量大 实现:创建一个接口创建实现接口的实体类创建代理类使用代理类来获取实体类的对象

优秀的个人博客,低调大师

java源码-BufferedReader

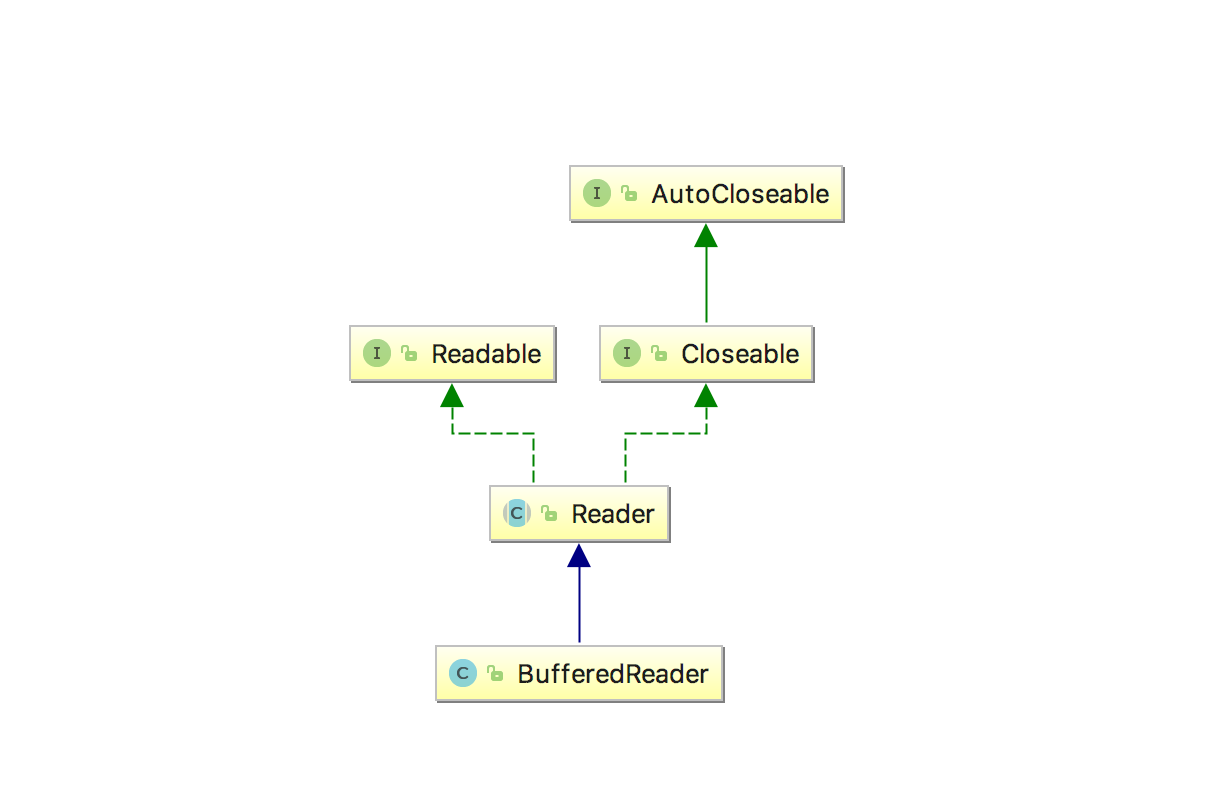
开篇 在设计模式中有一种叫做装饰者模式,刚好BufferedReader的源码是这个设计模式的最好例子,一并看下源码。 源码分析 构造函数 BufferedReader的类变量的Reader in 用以构造函数参数中的Reader in参数,BufferedReader的所有读写操作都通过Reader对象进行操作。 BufferedReader相当于针对内部的Reader对象进行了一层包装,可以理解为装饰者。 public class BufferedReader extends Reader { private Reader in; private char cb[]; //nextChar代表下次要读取的位置,nChars表示总共的字符个数 private int nChars, nextChar; private static final int INVALIDATED = -2; private static final int UNMARKED = -1; private int markedChar = UNMARKED; private int readAheadLimit = 0; /* Valid only when markedChar > 0 */ private boolean skipLF = false; private boolean markedSkipLF = false; private static int defaultCharBufferSize = 8192; private static int defaultExpectedLineLength = 80; public BufferedReader(Reader in, int sz) { super(in); if (sz <= 0) throw new IllegalArgumentException("Buffer size <= 0"); this.in = in; cb = new char[sz]; nextChar = nChars = 0; } public BufferedReader(Reader in) { this(in, defaultCharBufferSize); } } 加载数据 负责通过Reader in对象读取字符到指定数量的字符数据到cb数组当中。 dst表示保存数据的起始位置,cb.length-dst表示读取字符的个数。 在执行read和readline操作的之前如果cb当中可读字符不足会先执行fill()读取字符。 private void fill() throws IOException { int dst; if (markedChar <= UNMARKED) { /* No mark */ dst = 0; } else { // 省略一部分代码 } int n; do { // 从底层input读取数据到cb,cb中起始位置是dst, // 读取的长度是cb的lenght减去起始位置dst,理解剩余能够装的字符 n = in.read(cb, dst, cb.length - dst); } while (n == 0); if (n > 0) { // 设置最大可读字符结束位置 nChars = dst + n; // 设置可读字符的起始位置 nextChar = dst; } } read过程 读取过程中如果满足条件(nextChar 表示下一个读取字符>= nChars可用字符),代表字符已经读取完毕那么就通过fill()进行预加载。 读取当前字符并累加当前可读取字符,执行nextChar++操作。 public int read() throws IOException { synchronized (lock) { ensureOpen(); for (;;) { if (nextChar >= nChars) { fill(); if (nextChar >= nChars) return -1; } if (skipLF) { skipLF = false; if (cb[nextChar] == '\n') { nextChar++; continue; } } // 读取当前字符并累加下一个读取位置 return cb[nextChar++]; } } } readline过程 读取过程中如果满足条件(nextChar 表示下一个读取字符>= nChars可用字符),代表字符已经读取完毕那么就通过fill()进行预加载。 读取过程中如果遇到\r\n则中断循环,通过str = new String(cb, startChar, i - startChar)返回整行数据。 String readLine(boolean ignoreLF) throws IOException { //读取的数据最终放在这个s中, StringBuffer s = null; int startChar; synchronized (lock) { ensureOpen(); boolean omitLF = ignoreLF || skipLF; bufferLoop: for (;;) { if (nextChar >= nChars) fill(); if (nextChar >= nChars) { /* EOF */ if (s != null && s.length() > 0) //从这里返回,可能是因为读取的数据最后没有以\n或\r结束 return s.toString(); else // 从这里返回,是因为开始读的时候,就已经是input的末尾了, // 所以s本身就没有被初始化,只能返回null return null; } boolean eol = false; char c = 0; int i; /* Skip a leftover '\n', if necessary */ if (omitLF && (cb[nextChar] == '\n')) nextChar++; skipLF = false; omitLF = false; charLoop: for (i = nextChar; i < nChars; i++) { c = cb[i]; if ((c == '\n') || (c == '\r')) { eol = true; break charLoop; } } startChar = nextChar; nextChar = i; if (eol) { String str; // 运行到这,s为null,说明是第一次循环中就读到了行尾。 if (s == null) { str = new String(cb, startChar, i - startChar); } else { // 运行到这,起码说明是第二次循环了,s里已经有了第一次读取的数据 s.append(cb, startChar, i - startChar); str = s.toString(); } nextChar++; if (c == '\r') { skipLF = true; } // 运行到这说明读到了行尾,返回str return str; } if (s == null) s = new StringBuffer(defaultExpectedLineLength); // 运行到这说明,读取了整个cb的数据,发现一直没有\n或者\r, // 之后回到最初循环继续读取。 s.append(cb, startChar, i - startChar); } } } 类依赖图 BufferedReader的类依赖图如下图,所有的io reader都是继承自Reader作为基类。 装饰设计模式 装饰设计模式:javaIO技术中的装饰设计模式,对一组对象的功能进行增强时,就可以使用该设计模式

优秀的个人博客,低调大师

java源码 - CountDownLatch

开篇 CountDownLatch是一个同步工具类,用来协调多个线程之间的同步,或者说起到线程之间的通信(而不是用作互斥的作用)。 CountDownLatch能够使一个线程在等待另外一些线程完成各自工作之后,再继续执行。使用一个计数器进行实现。计数器初始值为线程的数量。当每一个线程完成自己任务后,计数器的值就会减一。当计数器的值为0时,表示所有的线程都已经完成了任务,然后在CountDownLatch上等待的线程就可以恢复执行任务。 CountDownLatch是一次性的,计数器的值只能在构造方法中初始化一次,之后没有任何机制再次对其设置值,当CountDownLatch使用完毕后,它不能再次被使用。 CountDownLatch的用法 CountDownLatch典型用法1:某一线程在开始运行前等待n个线程执行完毕。将CountDownLatch的计数器初始化为n new CountDownLatch(n) ,每当一个任务线程执行完毕,就将计数器减1 countdownlatch.countDown(),当计数器的值变为0时,在CountDownLatch上 await() 的线程就会被唤醒。一个典型应用场景就是启动一个服务时,主线程需要等待多个组件加载完毕,之后再继续执行。 CountDownLatch典型用法2:实现多个线程开始执行任务的最大并行性。注意是并行性,不是并发,强调的是多个线程在某一时刻同时开始执行。类似于赛跑,将多个线程放到起点,等待发令枪响,然后同时开跑。做法是初始化一个共享的CountDownLatch(1),将其计数器初始化为1,多个线程在开始执行任务前首先 coundownlatch.await(),当主线程调用 countDown() 时,计数器变为0,多个线程同时被唤醒。 CountDownLatch的demo public class CountDownLatchDemo { public static void main(String[] args) throws InterruptedException{ CountDownLatch countDownLatch = new CountDownLatch(2){ @Override public void await() throws InterruptedException { super.await(); System.out.println(Thread.currentThread().getName() + " count down is ok"); } }; Thread thread1 = new Thread(new Runnable() { @Override public void run() { //do something try { Thread.sleep(1000); } catch (InterruptedException e) { e.printStackTrace(); } System.out.println(Thread.currentThread().getName() + " is done"); countDownLatch.countDown(); } }, "thread1"); Thread thread2 = new Thread(new Runnable() { @Override public void run() { try { Thread.sleep(2000); } catch (InterruptedException e) { e.printStackTrace(); } System.out.println(Thread.currentThread().getName() + " is done"); countDownLatch.countDown(); } }, "thread2"); thread1.start(); thread2.start(); countDownLatch.await(); } CountDownLatch的类定义 CountDownLatch内部包含Sync类。 CountDownLatch内部包含Sync类的对象sync。 Sync类继承自AQS(神奇的AQS),构造函数设置AQS的state值为等待值。 public class CountDownLatch { private static final class Sync extends AbstractQueuedSynchronizer { private static final long serialVersionUID = 4982264981922014374L; Sync(int count) { setState(count); } int getCount() { return getState(); } protected int tryAcquireShared(int acquires) { return (getState() == 0) ? 1 : -1; } protected boolean tryReleaseShared(int releases) { // Decrement count; signal when transition to zero for (;;) { int c = getState(); if (c == 0) return false; int nextc = c-1; if (compareAndSetState(c, nextc)) return nextc == 0; } } } private final Sync sync; public CountDownLatch(int count) { if (count < 0) throw new IllegalArgumentException("count < 0"); this.sync = new Sync(count); } } CountDownLatch的等待过程 CountDownLatch通过await()进入等待。 CountDownLatch通过await(long timeout, TimeUnit unit)进入超时等待。 public void await() throws InterruptedException { sync.acquireSharedInterruptibly(1); } public boolean await(long timeout, TimeUnit unit) throws InterruptedException { return sync.tryAcquireSharedNanos(1, unit.toNanos(timeout)); } CountDownLatch的await()过程 await()通过sync.acquireSharedInterruptibly()获锁。 acquireSharedInterruptibly通过tryAcquireShared()尝试获锁。 tryAcquireShared()判断获锁成功与否的依据是AQS的state的值是否为零。 获锁失败后通过doAcquireSharedInterruptibly()进入锁等待队列CLH。 public void await() throws InterruptedException { sync.acquireSharedInterruptibly(1); } public final void acquireSharedInterruptibly(int arg) throws InterruptedException { if (Thread.interrupted()) throw new InterruptedException(); // 尝试获锁失败 if (tryAcquireShared(arg) < 0) // doAcquireSharedInterruptibly(arg); } protected int tryAcquireShared(int acquires) { return (getState() == 0) ? 1 : -1; } private void doAcquireSharedInterruptibly(int arg) throws InterruptedException { final Node node = addWaiter(Node.SHARED); boolean failed = true; try { for (;;) { final Node p = node.predecessor(); if (p == head) { int r = tryAcquireShared(arg); if (r >= 0) { setHeadAndPropagate(node, r); p.next = null; // help GC failed = false; return; } } if (shouldParkAfterFailedAcquire(p, node) && parkAndCheckInterrupt()) throw new InterruptedException(); } } finally { if (failed) cancelAcquire(node); } } CountDownLatch的await(long timeout, TimeUnit unit)过程 await(long timeout, TimeUnit unit)通过sync.tryAcquireSharedNanos()获锁。 tryAcquireSharedNanos()通过doAcquireSharedNanos()尝试获锁。 tryAcquireShared()判断获锁成功与否的依据是AQS的state的值是否为零。 获锁失败后通过doAcquireSharedNanos()进入锁等待队列CLH,和doAcquireSharedInterruptibly()方法相比增加了超时检测机制,通过LockSupport.parkNanos()实现超时。 public boolean await(long timeout, TimeUnit unit) throws InterruptedException { return sync.tryAcquireSharedNanos(1, unit.toNanos(timeout)); } public final boolean tryAcquireSharedNanos(int arg, long nanosTimeout) throws InterruptedException { if (Thread.interrupted()) throw new InterruptedException(); return tryAcquireShared(arg) >= 0 || doAcquireSharedNanos(arg, nanosTimeout); } private boolean doAcquireSharedNanos(int arg, long nanosTimeout) throws InterruptedException { if (nanosTimeout <= 0L) return false; final long deadline = System.nanoTime() + nanosTimeout; final Node node = addWaiter(Node.SHARED); boolean failed = true; try { for (;;) { final Node p = node.predecessor(); if (p == head) { int r = tryAcquireShared(arg); if (r >= 0) { setHeadAndPropagate(node, r); p.next = null; // help GC failed = false; return true; } } nanosTimeout = deadline - System.nanoTime(); if (nanosTimeout <= 0L) return false; if (shouldParkAfterFailedAcquire(p, node) && nanosTimeout > spinForTimeoutThreshold) LockSupport.parkNanos(this, nanosTimeout); if (Thread.interrupted()) throw new InterruptedException(); } } finally { if (failed) cancelAcquire(node); } } CountDownLatch的唤醒过程 CountDownLatch通过sync.releaseShared(1)释放锁实现state的递减 tryReleaseShared()方法判断锁状态state==0,递减后值为0说明锁已经被释放。 releaseShared()释放锁成功后通过doReleaseShared()方法唤醒所有等待线程。 doReleaseShared()唤醒锁的过程是一个传播性的唤醒,通过线程A唤醒线程B,然后由线程B唤醒线程C的传播性依次唤醒所有等待线程。 public void countDown() { sync.releaseShared(1); } public final boolean releaseShared(int arg) { if (tryReleaseShared(arg)) { doReleaseShared(); return true; } return false; } protected boolean tryReleaseShared(int releases) { for (;;) { int c = getState(); if (c == 0) return false; int nextc = c-1; if (compareAndSetState(c, nextc)) return nextc == 0; } } private void doReleaseShared() { for (;;) { Node h = head; if (h != null && h != tail) { int ws = h.waitStatus; if (ws == Node.SIGNAL) { if (!compareAndSetWaitStatus(h, Node.SIGNAL, 0)) continue; // loop to recheck cases unparkSuccessor(h); } else if (ws == 0 && !compareAndSetWaitStatus(h, 0, Node.PROPAGATE)) continue; // loop on failed CAS } if (h == head) // loop if head changed break; } } 总结 CountDownLatch的工作原理,总结起来就两点(基于AQS实现): 初始化锁状态的值为需要等待的线程数。 判断锁状态是否已经释放,如果锁未释放所有等待锁的线程就会进入等待的CLH队列。 如果锁状态已经释放,那么就会通过传播性唤醒所有的等待线程。
资源下载

更多资源
Mario

Mario

马里奥是站在游戏界顶峰的超人气多面角色。马里奥靠吃蘑菇成长,特征是大鼻子、头戴帽子、身穿背带裤,还留着胡子。与他的双胞胎兄弟路易基一起,长年担任任天堂的招牌角色。

Nacos

Nacos

Nacos /nɑ:kəʊs/ 是 Dynamic Naming and Configuration Service 的首字母简称,一个易于构建 AI Agent 应用的动态服务发现、配置管理和AI智能体管理平台。Nacos 致力于帮助您发现、配置和管理微服务及AI智能体应用。Nacos 提供了一组简单易用的特性集,帮助您快速实现动态服务发现、服务配置、服务元数据、流量管理。Nacos 帮助您更敏捷和容易地构建、交付和管理微服务平台。

Spring

Spring

Spring框架(Spring Framework)是由Rod Johnson于2002年提出的开源Java企业级应用框架,旨在通过使用JavaBean替代传统EJB实现方式降低企业级编程开发的复杂性。该框架基于简单性、可测试性和松耦合性设计理念,提供核心容器、应用上下文、数据访问集成等模块,支持整合Hibernate、Struts等第三方框架,其适用范围不仅限于服务器端开发,绝大多数Java应用均可从中受益。

Rocky Linux

Rocky Linux

Rocky Linux(中文名:洛基)是由Gregory Kurtzer于2020年12月发起的企业级Linux发行版,作为CentOS稳定版停止维护后与RHEL(Red Hat Enterprise Linux)完全兼容的开源替代方案,由社区拥有并管理,支持x86_64、aarch64等架构。其通过重新编译RHEL源代码提供长期稳定性,采用模块化包装和SELinux安全架构,默认包含GNOME桌面环境及XFS文件系统,支持十年生命周期更新。

用户登录
用户注册