首页 文章 精选 留言 我的

精选列表

搜索[学习],共10000篇文章
优秀的个人博客,低调大师

Apache Phoenix学习记录(SQL on HBase)

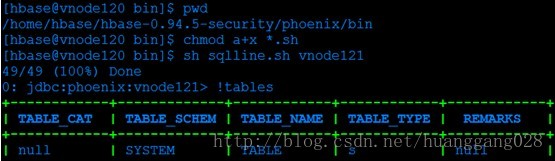
1 使用概述 Phoenix是基于HBase的SQL中间件产品,由Salesforce.com公司开源并托管于Github上。对于熟悉关系型数据库的开发人员来说,通过Phoenix可以像使用MySQL等关系型数据库一样使用HBase中的数据表。值得注意的是,它还提供了JDBC驱动包供Java程序访问数据。在实现时,充分利用了HBase协处理器和过滤器等底层 2 环境配置 首先需要安装好HBase集群,且采用的版本在0.94.4以上,JDK版本1.6以上。本文采用的phoenix版本为phoenix-2.0.1(http://phoenix-bin.github.com/client/phoenix-2.0.1-install.tar),所以如果有相关差异或更改,请以官方公布文档为准。 安装phoenix非常简单,从下载的tar包中取出phoenix-2.0.1.jar,将其放入HBase集群中所有RS节点安装目录lib中,同时记得移除之前安装的phoenix老版本,如果安装过的话。然后重启所有RS节点服务。如果采用Java代码访问,请采用与之匹配的client版本,比如本文的phoenix-2.0.1-client.jar。 为便于测试,可将下载的包内容放置到HBase集群某个节点机器上,比如本文将其放置到HMaster机器vnode120的$HBASE_HOME phoenix中,为检验phoenix是否安装成功,请进入$HBASE_HOME/phoenix/bin目录,并赋予所有*.sh可执行权限,操作如下: image sqlline.sh为其提供的命令行工具,可以在其中执行建表,查询等相关动作。运行该脚本需要跟zk参数,vnode121为某个zk节点。连上后,执行!tables会列出所有通过phoenix建的表,其中SYSTEM.TABLE这张表默认会存在,其中存放phoenix实现中的数据类型映射等信息。当能执行这些操作后,说明phoenix功能已经正常整合进现有HBase集群中,您接下来就可以体验HBase之上执行SQL功能的奇妙之旅了。 3 SQL特性详解 1)create:可以创建一张表或视图。表名如果没有用双引号括起来,默认都会使用其对应的大写字母名字表示,括起来后跟括起来的值保持一致。如果创建的表已经存在,且其不是通过phoenix create语法创建的,则可以继续使用phoenix create创建同名表,不影响原有表数据,但会影响通过phoenix select结果值存在部分不需要的值。创建视图时,需要对应的表和列族已存在,不能对表中数据进行更新操作。建表语句中,还可以附加一些HBase表、列族配置选项,如VERSIONS、MAX_FILESIZE etc. CREATETABLE IF NOT EXISTS my_table ( id char(10) not null primary key, value integer); CREATETABLE IF NOT EXISTS my_schema.my_table ( id char(10) not null primary key,value integer) DATA_BLOCK_ENCODING='NONE',VERSIONS=10,MAX_FILESIZE=20480; 2)alter:可添加或删除一列或更新表属性。被移除的列,其上数据会被删除。如果该列是主键,不能被移除,如果移除列的是一个视图,数据是不会受影响的。 ALTERTABLE my_table ADD dept_name varchar(50) ALTERTABLE my_table DROP COLUMN parent_id ALTERTABLE my_table SET IMMUTABLE_ROWS=true 3)drop:删除表或视图。如果删除表,表中数据也会被删除,如果是视图则不受影响。 DROPTABLE my_schema.my_table DROP VIEW my_view 4)upsert:更新或插入数据。如果表中不存在该数据则插入,否则更新,所以可以看出phoenix没有单独定义insert 或update命令。列列表可以省略,但后面插入的值顺序需要与表schema定义顺序保持一致,也可自己定义插入哪些column对应值,顺序与之对应即可。目前还支持一种选择性upsert的方式,它将另外一个查询的结果作为值插入表中。如果auto commit开启的话,会在服务端就提交了,否则会缓存到客户端,等着显式提交的时候进行批量upsert,通过配置” phoenix.mutate.upsertBatchSize”指定大小,默认10000行/次。 UPSERTINTO TEST VALUES('foo','bar',3); UPSERTINTO TEST(NAME,ID) VALUES('foo',123) 5)delete:删除指定行。如果auto commit开启,则会直接在服务端执行删除。 DELETE FROM TEST; DELETE FROM TEST WHERE ID=123; 6)index:二级索引。在表或视图上创建二级索引,当前版本仅支持对具有IMMUTABLE_ROWS属性的表上添加二级索引。目前实现是在数据行插入后便插入了索引。当创建了索引后,其实也会在HBase中创建一张表,表名为该二级索引名,所以还可对该index指定创建表相关参数。同时还可删除索引和修改索引。 CREATEINDEX my_idx ON sales.opportunity(last_updated_date DESC) DROPINDEX my_idx ON sales.opportunity ALTERINDEX my_idx ON sales.opportunity DISABLE 7)explain:执行计划。提供一个很简单的方式查看执行给定命令所需的逻辑步骤。每个步骤局势以单行字符串进行输出表示。这个可以很容易定位查询的性能瓶颈,或者所建二级索引是否生效等。 explain select * from test where age>0; 8)其他 constraint定义主键约束,默认按照列升序排列: CONSTRAINTmy_pk PRIMARY KEY (host,created_date) 选项,如之前用到的IMMUTABLE_ROWS=true,默认设置了这个选项的表才允许建索引。Phoenix默认是修改HBase元数据来使之生效,适用于HColumnDescriptor和HTableDescriptor相关选项。值得一提的是SALT_BUCKETS选项,它为每个rowkey预置一个字节,使其分布在不同rs上来避免写热点rs。 IMMUTABLE_ROWS=true SALT_BUCKETS=10 hint,可重置默认的查询行为。一般用于sql调优。目前支持SKIP_SCAN,RANGE_SCAN,NO_INTRA_REGION_PARALLELIZATION,NO_INDEX,INDEX5个hint。 select /*+NO_INDEX / from test where age>0 建表,建索引或alter等操作的时候,名称都可以用.分隔,如果是表,则前部分为schema名(默认null),如果是column,则前部分是family名(默认’_0’)。不用双引号括起来的时候为大小写不敏感的。 选择表达式可以用*和<familyName>.*来表示所有列都选择出来,或指定列族下所有列都选择出来,注意的时候familyName是大小写敏感的,列名是大小写不敏感的。 为表定义分割点,可以使用preparedStatement.setBinary(int,byte[])提供任意字节的分割。 目前不支持join和子查询,可以为表和列定义别名,方法是使用as或直接将别名跟在真名后面。 目前查询支持排序,比如按照某列升序,降序等。ORDER BY NAME ASC NULLSLAST。 支持的关系连接符有AND和OR。如果使用LIKE,可以用通配符_(单个字符)和%(任意字符)。若查询的字符串本身就包括则需要对其转义()。Between是个闭区间[5,10] 比较运算符有<>,<=,>=,=,<,>,!=其中<>与!=等效。字符串连接可以用||,数字和日期类型可以做+,-,*,/。 4 内置函数 支持的聚合函数有: Ø AVG:求平均,如果没有返回NULL Ø SUM: Ø COUNT:求行数,如果指定某列,则返回该列非空个数,如果为*或1,则返回所有行,加上distinct则返回不相同的行数 Ø MAX:求最大值 Ø MIN:求最小值 Ø PERCENTILE_CONT:指定?? Ø PERCENTILE_DISC:指定占比的列具体值是多少 Ø PERCENT_RANK:指定值占的百分比,PERCENT_RANK( 39 ) WITHINGROUP (ORDER BY id ASC) Ø STDDEV_SAMP:样本标准差 Ø STDDEV_POP:总体标准差 支持的字符串函数: Ø SUBSTR:取子串,默认是基于1的,如果想基于0,则指定0,如果指定为负数,则是从字符串结尾算起 Ø TRIM:去除字符串头尾空格 Ø LTRIM:去除字符串左侧空格 Ø RTRIM:去除字符串右侧空格 Ø LENGTH:返回字符串长度 Ø REGEXP_SUBSTR:通过指定正则表达式获取子串 Ø REGEXP_REPLACE:正则替换 Ø UPPER:大写转换 Ø LOWER:小写转换 Ø REVERSE:字符串反转 Ø TO_CHAR:将日期、时间、时间戳或数字格式化为一个字符串。默认日期格式为yyyy-MM-dd HH:mm:ss,数字格式为#,##0.###。 支持的时间、日期函数: Ø ROUND:四舍五入? Ø TRUNC:截断 Ø TO_DATE:转换为date类型 Ø CURRENT_DATE:返回RS上当前日期 Ø CURRENT_TIME:返回RS上当前时间 支持的时间、日期函数: Ø TO_NUMBER:转换日期、时间、时间戳为一个数字,可接受格式化串? Ø COALESCE:指定默认值,如果相应值为null 5 数据类型 Ø INTEGER:范围为-2147483648 到 2147483647,与java.lang.Integer映射。但注意的是其二进制表示需要其会把第一个符号位进行翻转,这样保证负数排列在正数前面。 Ø UNSIGNED_INT:范围为0到2147483647,这个是与java.lang.Integer对应,其二进制呈现形式和Bytes.toBytes(int)方法产生的一致。 Ø BIGINT:范围为-9223372036854775808 到9223372036854775807 ,与java.lang.Long对应。8个字节,同时也是符号位反转。 Ø UNSIGNED_LONG:可能值为0到9223372036854775807 ,与Bytes.toBytes(long)对应。 Ø TINYINT:-128到127。与java.lang.Byte对应。符号位也需要反转。 Ø UNSIGNED_TINYINT:0到127。二进制表示形式就是一个单字节,和Bytes.toBytes(byte)对应。 Ø SMALLINT:-32768到32767。与java.lang.Short对应。符号位需要反转。 Ø UNSIGNED_SMALLINT:0到32767。二进制表示形式与Bytes.toBytes(short)对应。 Ø FLOAT: -3.402823466 E + 38 到 3.402823466 E + 38,与java.lang.Float对应,首字节需要反转。 Ø UNSIGNED_FLOAT: 0 到 3.402823466 E + 38,二进制表示形式与Bytes.toBytes(float)一致。 Ø DOUBLE:范围为-1.7976931348623158 E + 308 到 1.7976931348623158 E + 308。与java.lang.Double对应,二进制形式首位需反转。 Ø UNSIGNED_DOUBLE: 0到1.7976931348623158 E + 308。二进制表示形式与Bytes.toBytes(double)对应。 Ø DECIMAL:具有固定精度。最大精度为18位,与java.math.BigDecimal对应。其二进制表示形式为可变长度格式。当用于rowkey中,其后会产生一个nullbyte,除非它是最后一列。 Ø BOOLEAN:二进制形式0表示false,1表示true Ø TIME:格式为yyyy-MM-DD hh:mm:ss,具有日期和时间两部分。与java.sql.Time对应。二进制表示形式为8个字节的long型,代表从EPOCH开始的毫秒数 Ø DATE: 格式为yyyy-MM-DD hh:mm:ss,具有日期和时间两部分。与java.sql.DATE对应。二进制表示形式为8个字节的long型,代表从EPOCH开始的毫秒数。 Ø TIMESTAMP:格式为yyyy-MM-dd hh:mm:ss[.nnnnnnnnn],与java.sql.Timestamp,二进制表示为12个字节,8个字节表示long毫秒数,4个字节表示int纳秒数 Ø VARCHAR:具有最大字节长度(可选)的可变长字符串。当用于rowkey时,会在末尾加一个null字节,而如果它正好位于rowkey最后部分则不加。 Ø CHAR:固定长度字符串。二进制表示是UTF8形式与Bytes.toBytes(string)对应。 Ø BINARY:原始固定长度二进制字节数组,与byte[]对应 Ø VARBINARY:原始可变长度二进制格式字节数组。 6 参考网页 HBase 官方:https://hbase.apache.org/ Phoenix 官方:https://github.com/forcedotcom/phoenix Phoenix综述(史上最全Phoenix中文文档) 个人主页:http://www.linbingdong.com 简书地址:http://www.jianshu.com/users/6cb45a00b49c/latest_articles 网上关于Phoenix的资料寥寥无几,中文资料更是几乎没有。本人详细阅读Phoenix官网,整理成此篇中文文档,供后人参考。如有翻译错误的地方,请批评指出。 1. Phoenix定义 Phoenix最早是saleforce的一个开源项目,后来成为Apache基金的顶级项目。 Phoenix是构建在HBase上的一个SQL层,能让我们用标准的JDBC APIs而不是HBase客户端APIs来创建表,插入数据和对HBase数据进行查询。 put the SQL back in NoSQL Phoenix完全使用Java编写,作为HBase内嵌的JDBC驱动。Phoenix查询引擎会将SQL查询转换为一个或多个HBase扫描,并编排执行以生成标准的JDBC结果集。直接使用HBase API、协同处理器与自定义过滤器,对于简单查询来说,其性能量级是毫秒,对于百万级别的行数来说,其性能量级是秒。 HBase的查询工具有很多,如:Hive、Tez、Impala、Spark SQL、Phoenix等。 Phoenix通过以下方式使我们可以少写代码,并且性能比我们自己写代码更好: 将SQL编译成原生的HBase scans。 确定scan关键字的最佳开始和结束 让scan并行执行 ... 使用Phoenix的公司 Paste_Image.png 2. 历史演进 3.0/4.0 release ARRAY Type. 支持标准的JDBC数组类型 Sequences. 支持 CREATE/DROP SEQUENCE, NEXT VALUE FOR, CURRENT VALUE FOR也实现了 Multi-tenancy. 同一张HBase物理表上,不同的租户可以创建相互独立的视图 Views. 同一张HBase物理表上可以创建不同的视图 3.1/4.1 release Apache Pig Loader . 通过pig来处理数据时支持pig加载器来利用Phoenix的性能 Derived Tables. 允许在一个FROM子句中使用SELECT子句来定义一张衍生表 Local Indexing. 后面介绍 Tracing. 后面介绍 3.2/4.2 release Subqueries 支持在WHERE和FROM子句中的独立子查询和相关子查询 Semi/anti joins. 通过标准的[NOT] IN 和 [NOT] EXISTS关键字来支持半/反连接 Optimize foreign key joins. 通过利用跳跃扫描过滤器来优化外键连接 Statistics Collection. 通过收集表的统计信息来提高并行查询能力 3.3/4.3 release Many-to-many joins. 支持两边都太大以至于无法放进内存的连接 Map-reduce Integration. 支持Map-reduce集成 Functional Indexes. 后面介绍 4.4 release User Defined Functions. 后面介绍 4.5 release Asynchronous Index Population. 通过一个Map-reduce job,索引可以被异步创建 4.6 release Time series Optimization. 优化针对时间序列数据的查询 4.7 release Transaction Support. 后面介绍 4.8 release DISTINCT Query Optimization. 使用搜索逻辑来大幅提高 SELECT DISTINCT 和 COUNT DISTINCT的查询性能 Local Index Improvements. Reworked 后面介绍 Hive Integration. 能够在Phoenix内使用Hive来支持大表和大表之间的连接 Namespace Mapping. 将Phoenix schema映射到HBase的命名空间来增强不同schema之间的隔离性 3. 特性 3.1 Transactions (beta) 事务 该特性还处于beta版,并非正式版。通过集成Tephra,Phoenix可以支持ACID特性。Tephra也是Apache的一个项目,是事务管理器,它在像HBase这样的分布式数据存储上提供全局一致事务。HBase本身在行层次和区层次上支持强一致性,Tephra额外提供交叉区、交叉表的一致性来支持可扩展性。 要想让Phoenix支持事务特性,需要以下步骤: 配置客户端hbase-site.xml <property> <name>phoenix.transactions.enabled</name> <value>true</value> </property> 配置服务端hbase-site.xml <property> <name>data.tx.snapshot.dir</name> <value>/tmp/tephra/snapshots</value> </property> <property> <name>data.tx.timeout</name> <value>60</value> <description> set the transaction timeout (time after which open transactions become invalid) to a reasonable value.</description> </property> 配置$HBASE_HOME并启动Tephra ./bin/tephra 通过以上配置,Phoenix已经支持了事务特性,但创建表的时候默认还是不支持的。如果想创建一个表支持事务特性,需要显示声明,如下: CREATE TABLE my_table (k BIGINT PRIMARY KEY, v VARCHAR) TRANSACTIONAL=true; 就是在建表语句末尾增加 TRANSACTIONAL=true。 原本存在的表也可以更改成支持事务的,需要注意的是,事务表无法改回非事务的,因此更改的时候要小心。一旦改成事务的,就改不回去了。 ALTER TABLE my_other_table SET TRANSACTIONAL=true; 3.2 User-defined functions(UDFs) 用户定义函数 3.2.1 概述 Phoenix从4.4.0版本开始支持用户自定义函数。 用户可以创建临时或永久的用户自定义函数。这些用户自定义函数可以像内置的create、upsert、delete一样被调用。临时函数是针对特定的会话或连接,对其他会话或连接不可见。永久函数的元信息会被存储在一张叫做SYSTEM.FUNCTION的系统表中,对任何会话或连接均可见。 3.2.2 配置 hive-site.xml <property> <name>phoenix.functions.allowUserDefinedFunctions</name> <value>true</value> </property> <property> <name>fs.hdfs.impl</name> <value>org.apache.hadoop.hdfs.DistributedFileSystem</value> </property> <property> <name>hbase.rootdir</name> <value>${hbase.tmp.dir}/hbase</value> <description>The directory shared by region servers and into which HBase persists. The URL should be 'fully-qualified' to include the filesystem scheme. For example, to specify the HDFS directory '/hbase' where the HDFS instance's namenode is running at namenode.example.org on port 9000, set this value to: hdfs://namenode.example.org:9000/hbase. By default, we write to whatever ${hbase.tmp.dir} is set too -- usually /tmp -- so change this configuration or else all data will be lost on machine restart.</description> </property> <property> <name>hbase.dynamic.jars.dir</name> <value>${hbase.rootdir}/lib</value> <description> The directory from which the custom udf jars can be loaded dynamically by the phoenix client/region server without the need to restart. However, an already loaded udf class would not be un-loaded. See HBASE-1936 for more details. </description> </property> 后两个配置需要跟hbse服务端的配置一致。 以上配置完后,在JDBC连接时还需要执行以下语句: Properties props = new Properties(); props.setProperty("phoenix.functions.allowUserDefinedFunctions", "true"); Connection conn = DriverManager.getConnection("jdbc:phoenix:localhost", props); 以下是可选的配置,用于动态类加载的时候把jar包从hdfs拷贝到本地文件系统 <property> <name>hbase.local.dir</name> <value>${hbase.tmp.dir}/local/</value> <description>Directory on the local filesystem to be used as a local storage.</description> </property> 3.3 Secondary Indexing 二级索引 在HBase中,只有一个单一的按照字典序排序的rowKey索引,当使用rowKey来进行数据查询的时候速度较快,但是如果不使用rowKey来查询的话就会使用filter来对全表进行扫描,很大程度上降低了检索性能。而Phoenix提供了二级索引技术来应对这种使用rowKey之外的条件进行检索的场景。 Covered Indexes 只需要通过索引就能返回所要查询的数据,所以索引的列必须包含所需查询的列(SELECT的列和WHRER的列) Functional Indexes 从Phoeinx4.3以上就支持函数索引,其索引不局限于列,可以合适任意的表达式来创建索引,当在查询时用到了这些表达式时就直接返回表达式结果 Global Indexes Global indexing适用于多读少写的业务场景。 使用Global indexing的话在写数据的时候会消耗大量开销,因为所有对数据表的更新操作(DELETE, UPSERT VALUES and UPSERT SELECT),会引起索引表的更新,而索引表是分布在不同的数据节点上的,跨节点的数据传输带来了较大的性能消耗。在读数据的时候Phoenix会选择索引表来降低查询消耗的时间。在默认情况下如果想查询的字段不是索引字段的话索引表不会被使用,也就是说不会带来查询速度的提升。 Local Indexes Local indexing适用于写操作频繁的场景。 与Global indexing一样,Phoenix会自动判定在进行查询的时候是否使用索引。使用Local indexing时,索引数据和数据表的数据是存放在相同的服务器中的避免了在写操作的时候往不同服务器的索引表中写索引带来的额外开销。使用Local indexing的时候即使查询的字段不是索引字段索引表也会被使用,这会带来查询速度的提升,这点跟Global indexing不同。一个数据表的所有索引数据都存储在一个单一的独立的可共享的表中。 3.4 Statistics Collection 统计信息收集 UPDATE STATISTICS可以更新某张表的统计信息,以提高查询性能 3.5 Row timestamp 时间戳 从4.6版本开始,Phoenix提供了一种将HBase原生的row timestamp映射到Phoenix列的方法。这样有利于充分利用HBase提供的针对存储文件的时间范围的各种优化,以及Phoenix内置的各种查询优化。 3.6 Paged Queries 分页查询 Phoenix支持分页查询: Row Value Constructors (RVC) OFFSET with limit 3.7 Salted Tables 散步表 如果row key是自动增长的,那么HBase的顺序写会导致region server产生数据热点的问题,Phoenix的Salted Tables技术可以解决region server的热点问题 3.8 Skip Scan 跳跃扫描 可以在范围扫描的时候提高性能 3.9 Views 视图 标准的SQL视图语法现在在Phoenix上也支持了。这使得能在同一张底层HBase物理表上创建多个虚拟表。 3.10 Multi tenancy 多租户 通过指定不同的租户连接实现数据访问的隔离 3.11 Dynamic Columns 动态列 Phoenix 1.2, specifying columns dynamically is now supported by allowing column definitions to included in parenthesis after the table in the FROM clause on a SELECT statement. Although this is not standard SQL, it is useful to surface this type of functionality to leverage the late binding ability of HBase. 3.12 Bulk CSV Data Loading 大量CSV数据加载 加载CSV数据到Phoenix表有两种方式:1. 通过psql命令以单线程的方式加载,数据量少的情况下适用。 2. 基于MapReduce的bulk load工具,适用于数据量大的情况 3.13 Query Server 查询服务器 Phoenix4.4引入的一个单独的服务器来提供thin客户端的连接 3.14 Tracing 追踪 从4.1版本开始Phoenix增加这个特性来追踪每条查询的踪迹,这使用户能够看到每一条查询或插入操作背后从客户端到HBase端执行的每一步。 3.15 Metrics 指标 Phoenix提供各种各样的指标使我们能够知道Phoenix客户端在执行不同SQL语句的时候其内部发生了什么。这些指标在客户端JVM中通过两种方式来收集: Request level metrics - collected at an individual SQL statement level Global metrics - collected at the client JVM level 4. 架构和组成 Phoenix架构 Phoenix Architecture.png Phoenix在Hadoop生态系统中的位置 位置.png 5. 数据存储 Phoenix将HBase的数据模型映射到关系型世界 [图片上传失败...(image-ea505f-1524447379212)] 6. 对QL的支持 支持的命令如下: SELECT Example: SELECT * FROM TEST LIMIT 1000; SELECT * FROM TEST LIMIT 1000 OFFSET 100; SELECT full_name FROM SALES_PERSON WHERE ranking >= 5.0 UNION ALL SELECT reviewer_name FROM CUSTOMER_REVIEW WHERE score >= 8.0 UPSERT VALUES Example: UPSERT INTO TEST VALUES('foo','bar',3); UPSERT INTO TEST(NAME,ID) VALUES('foo',123); UPSERT SELECT Example: UPSERT INTO test.targetTable(col1, col2) SELECT col3, col4 FROM test.sourceTable WHERE col5 < 100 UPSERT INTO foo SELECT * FROM bar; DELETE Example: DELETE FROM TEST; DELETE FROM TEST WHERE ID=123; DELETE FROM TEST WHERE NAME LIKE 'foo%'; CREATE TABLE CREATE TABLE my_schema.my_table ( id BIGINT not null primary key, date) CREATE TABLE my_table ( id INTEGER not null primary key desc, date DATE not null,m.db_utilization DECIMAL, i.db_utilization) m.DATA_BLOCK_ENCODING='DIFF' CREATE TABLE stats.prod_metrics ( host char(50) not null, created_date date not null,txn_count bigint CONSTRAINT pk PRIMARY KEY (host, created_date) ) CREATE TABLE IF NOT EXISTS "my_case_sensitive_table" ( "id" char(10) not null primary key, "value" integer) DATA_BLOCK_ENCODING='NONE',VERSIONS=5,MAX_FILESIZE=2000000 split on (?, ?, ?) CREATE TABLE IF NOT EXISTS my_schema.my_table (org_id CHAR(15), entity_id CHAR(15), payload binary(1000),CONSTRAINT pk PRIMARY KEY (org_id, entity_id) )TTL=86400 DROP TABLE Example: DROP TABLE my_schema.my_table; DROP TABLE IF EXISTS my_table; DROP TABLE my_schema.my_table CASCADE; CREATE FUNCTION Example: CREATE FUNCTION my_reverse(varchar) returns varchar as 'com.mypackage.MyReverseFunction' using jar 'hdfs:/localhost:8080/hbase/lib/myjar.jar' CREATE FUNCTION my_reverse(varchar) returns varchar as 'com.mypackage.MyReverseFunction' CREATE FUNCTION my_increment(integer, integer constant defaultvalue='10') returns integer as 'com.mypackage.MyIncrementFunction' using jar '/hbase/lib/myincrement.jar' CREATE TEMPORARY FUNCTION my_reverse(varchar) returns varchar as 'com.mypackage.MyReverseFunction' using jar 'hdfs:/localhost:8080/hbase/lib/myjar.jar' DROP FUNCTION Example: DROP FUNCTION IF EXISTS my_reverse DROP FUNCTION my_reverse CREATE VIEW Example: CREATE VIEW "my_hbase_table"( k VARCHAR primary key, "v" UNSIGNED_LONG) default_column_family='a'; CREATE VIEW my_view ( new_col SMALLINT ) AS SELECT * FROM my_table WHERE k = 100; CREATE VIEW my_view_on_view AS SELECT * FROM my_view WHERE new_col > 70; DROP VIEW Example: DROP VIEW my_view DROP VIEW IF EXISTS my_schema.my_view DROP VIEW IF EXISTS my_schema.my_view CASCADE CREATE SEQUENCE Example: CREATE SEQUENCE my_sequence; CREATE SEQUENCE my_sequence START WITH -1000 CREATE SEQUENCE my_sequence INCREMENT BY 10 CREATE SEQUENCE my_schema.my_sequence START 0 CACHE 10 DROP SEQUENCE Example: DROP SEQUENCE my_sequence DROP SEQUENCE IF EXISTS my_schema.my_sequence ALTER Example: ALTER TABLE my_schema.my_table ADD d.dept_id char(10) VERSIONS=10 ALTER TABLE my_table ADD dept_name char(50), parent_id char(15) null primary key ALTER TABLE my_table DROP COLUMN d.dept_id, parent_id; ALTER VIEW my_view DROP COLUMN new_col; ALTER TABLE my_table SET IMMUTABLE_ROWS=true,DISABLE_WAL=true; CREATE INDEX Example: CREATE INDEX my_idx ON sales.opportunity(last_updated_date DESC) CREATE INDEX my_idx ON log.event(created_date DESC) INCLUDE (name, payload) SALT_BUCKETS=10 CREATE INDEX IF NOT EXISTS my_comp_idx ON server_metrics ( gc_time DESC, created_date DESC ) DATA_BLOCK_ENCODING='NONE',VERSIONS=?,MAX_FILESIZE=2000000 split on (?, ?, ?) CREATE INDEX my_idx ON sales.opportunity(UPPER(contact_name)) DROP INDEX Example: DROP INDEX my_idx ON sales.opportunity DROP INDEX IF EXISTS my_idx ON server_metrics ALTER INDEX Example: ALTER INDEX my_idx ON sales.opportunity DISABLE ALTER INDEX IF EXISTS my_idx ON server_metrics REBUILD EXPLAIN Example: EXPLAIN SELECT NAME, COUNT(*) FROM TEST GROUP BY NAME HAVING COUNT(*) > 2; EXPLAIN SELECT entity_id FROM CORE.CUSTOM_ENTITY_DATA WHERE organization_id='00D300000000XHP' AND SUBSTR(entity_id,1,3) = '002' AND created_date < CURRENT_DATE()-1; UPDATE STATISTICS Example: UPDATE STATISTICS my_table UPDATE STATISTICS my_schema.my_table INDEX UPDATE STATISTICS my_index UPDATE STATISTICS my_table COLUMNS UPDATE STATISTICS my_table SET phoenix.stats.guidepost.width=50000000 CREATE SCHEMA Example: CREATE SCHEMA IF NOT EXISTS my_schema CREATE SCHEMA my_schema USE Example: USE my_schema USE DEFAULT DROP SCHEMA Example: DROP SCHEMA IF EXISTS my_schema DROP SCHEMA my_schema 7. 安装部署 7.1 安装预编译的Phoenix 下载并解压最新版的phoenix-[version]-bin.tar包 将phoenix-[version]-server.jar放入服务端和master节点的HBase的lib目录下 重启HBase 将phoenix-[version]-client.jar添加到所有Phoenix客户端的classpath 7.2 使用Phoenix 7.2.1 命令行 若要在命令行执行交互式SQL语句: 1.切换到bin目录 2.执行以下语句 $ sqlline.py localhost 若要在命令行执行SQL脚本 $ sqlline.py localhost ../examples/stock_symbol.sql [图片上传失败...(image-f2579c-1524447379209)] 7.2.2 客户端 SQuirrel是用来连接Phoenix的客户端。 SQuirrel安装步骤如下: 1. Remove prior phoenix-[*oldversion*]-client.jar from the lib directory of SQuirrel, copy phoenix-[*newversion*]-client.jar to the lib directory (*newversion* should be compatible with the version of the phoenix server jar used with your HBase installation) 2. Start SQuirrel and add new driver to SQuirrel (Drivers -> New Driver) 3. In Add Driver dialog box, set Name to Phoenix, and set the Example URL to jdbc:phoenix:localhost. 4. Type “org.apache.phoenix.jdbc.PhoenixDriver” into the Class Name textbox and click OK to close this dialog. 5. Switch to Alias tab and create the new Alias (Aliases -> New Aliases) 6. In the dialog box, Name: *any name*, Driver: Phoenix, User Name: *anything*, Password: *anything* 7. Construct URL as follows: jdbc:phoenix: *zookeeper quorum server*. For example, to connect to a local HBase use: jdbc:phoenix:localhost 8. Press Test (which should succeed if everything is setup correctly) and press OK to close. 9. Now double click on your newly created Phoenix alias and click Connect. Now you are ready to run SQL queries against Phoenix. Paste_Image.png 8. 测试 8.1 Pherf Pherf是可以通过Phoenix来进行性能和功能测试的工具。Pherf可以用来生成高度定制的数据集,并且测试SQL在这些数据集上的性能。 8.1.1 构建Pherf Pherf是在用maven构建Phoenix的过程中同时构建的。可以用两种不同的配置来构建: 集群(默认) This profile builds Pherf such that it can run along side an existing cluster. The dependencies are pulled from the HBase classpath. 独立 This profile builds all of Pherf’s dependencies into a single standalone jar. The deps will be pulled from the versions specified in Phoenix’s pom. 构建全部的Phoenix。包含Pherf的默认配置。 mvn clean package -DskipTests 用Pherf的独立配置来构建Phoenix。 mvn clean package -P standalone -DskipTests 8.1.2 安装 用以上的Maven命令构建完Pherf后,会在该模块的目标目录下生成一个zip文件。 将该zip文件解压到合适的目录 配置env.sh文件 ./pherf.sh -h 想要在一个真正的集群上测试,运行如下命令: ./pherf.sh -drop all -l -q -z localhost -schemaFile .*user_defined_schema.sql -scenarioFile .*user_defined_scenario.xml 8.1.3 命令示例 列出所有可运行的场景文件 $./pherf.sh -listFiles 删掉全部场景文件中存在的特定的表、加载和查询数据 $./pherf.sh -drop all -l -q -z localhost 8.1.4 参数 -h Help -l Apply schema and load data -q Executes Multi-threaded query sets and write results -z [quorum] Zookeeper quorum -m Enable monitor for statistics -monitorFrequency [frequency in Ms] _Frequency at which the monitor will snopshot stats to log file. -drop [pattern] Regex drop all tables with schema name as PHERF. Example drop Event tables: -drop .(EVENT). Drop all: -drop .* or -drop all* -scenarioFile Regex or file name of a specific scenario file to run. -schemaFile Regex or file name of a specific schema file to run. -export Exports query results to CSV files in CSV_EXPORT directory -diff Compares results with previously exported results -hint Executes all queries with specified hint. Example SMALL -rowCountOverride -rowCountOverride [number of rows] Specify number of rows to be upserted rather than using row count specified in schema 8.1.5 为数据生成增加规则 8.1.6 定义场景 8.1.7 结果 结果实时写入结果目录中。可以打开.jpg格式文件来实时可视化。 8.1.8 测试 Run unit tests: mvn test -DZK_QUORUM=localhost Run a specific method: mvn -Dtest=ClassName#methodName test More to come... 8.2 性能 Phoenix通过以下方法来奉行把计算带到离数据近的地方的哲学: 协处理器 在服务端执行操作来最小化服务端和客户端的数据传输 定制的过滤器 为了删减数据使之尽可能地靠近源数据并最小化启动代价,Phoenix使用原生的HBase APIs而不是使用Map/Reduce框架 8.2.1 Phoenix对比相近产品 8.2.1.1 Phoenix vs Hive (running over HDFS and HBase) Paste_Image.png Query: select count(1) from table over 10M and 100M rows. Data is 5 narrow columns. Number of Region Servers: 4 (HBase heap: 10GB, Processor: 6 cores @ 3.3GHz Xeon) 8.2.1.2 Phoenix vs Impala (running over HBase) Paste_Image.png Query: select count(1) from table over 1M and 5M rows. Data is 3 narrow columns. Number of Region Server: 1 (Virtual Machine, HBase heap: 2GB, Processor: 2 cores @ 3.3GHz Xeon) 8.2.2 Latest Automated Performance Run Latest Automated Performance Run | Automated Performance Runs History 8.2.3 Phoenix1.2性能提升 Essential Column Family Paste_Image.png Skip Scan Paste_Image.png Salting Paste_Image.png Top-N Paste_Image.png 9. 参考资料 http://phoenix.apache.org http://phoenix.apache.org/Phoenix-in-15-minutes-or-less.html http://hadooptutorial.info/apache-phoenix-hbase-an-sql-layer-on-hbase/ http://www.phoenixframework.org/docs/resources https://en.wikipedia.org/wiki/Apache_Phoenix

优秀的个人博客,低调大师

Gradle学习之部署上传项目

原先在公司做项目时,写了一个简单的基于gradle部署项目的脚本,今天翻出来记录一下 一、build.gradle buildscript { ext { env = System.getProperty("env") ?: "test" jvmArgs = "-server -Xms128m -Xmx128m -XX:NewRatio=4 -XX:SurvivorRatio=16 -XX:MaxTenuringThreshold=15 -XX:CMSInitiatingOccupancyFraction=80 -XX:+UseConcMarkSweepGC -XX:+CMSClassUnloadingEnabled -XX:+ExplicitGCInvokesConcurrent -XX:+DoEscapeAnalysis -XX:-HeapDumpOnOutOfMemoryError" if (env == "prod") { jvmArgs = "-server -Xms2g -Xmx2g -XX:NewRatio=4 -XX:SurvivorRatio=16 -XX:MaxTenuringThreshold=15 -XX:CMSInitiatingOccupancyFraction=80 -XX:+UseConcMarkSweepGC -XX:+CMSClassUnloadingEnabled -XX:+ExplicitGCInvokesConcurrent -XX:+DoEscapeAnalysis -XX:-HeapDumpOnOutOfMemoryError" } userHome = System.getProperty("user.home") osName = System.getProperty("os.name") } repositories { jcenter() } dependencies { classpath 'org.hidetake:gradle-ssh-plugin:2.7.0' classpath 'co.tomlee.gradle.plugins:gradle-thrift-plugin:0.0.6' } } allprojects { apply plugin: 'idea' apply plugin: 'eclipse' apply plugin: 'org.hidetake.ssh' group = 'com.mwee.information.core' version = '1.0-SNAPSHOT' ssh.settings { timeoutSec = 60 knownHosts = allowAnyHosts } defaultTasks 'clean', 'copyPartDependencies' //排除Log4j依赖 configurations { compile.exclude module: 'slf4j-log4j12' compile.exclude module: 'org.apache.logging.log4j' compile.exclude module: 'log4j' all*.exclude group: 'org.apache.logging.log4j' all*.exclude group: 'log4j' } } subprojects { apply plugin: 'java' sourceCompatibility = 1.8 targetCompatibility = 1.8 repositories { mavenLocal() maven { url "http://114.80.88.52:9001/nexus/content/groups/public/" } } sourceSets { main { java { srcDirs = ['src/main/java'] } resources { srcDirs = ["src/main/resources", "src/main/profile/$env"] } } } dependencies { compile("org.codehaus.groovy:groovy-all:2.2.1") compile 'org.codehaus.groovy:groovy-backports-compat23:2.4.5' compile("org.springframework.boot:spring-boot-starter-web:1.4.2.RELEASE") compile("org.apache.commons:commons-lang3:3.4") compile("org.apache.commons:commons-collections4:4.1") compile "org.apache.commons:commons-pool2:2.4.2" compile group: 'com.alibaba', name: 'fastjson', version: '1.2.12' // https://mvnrepository.com/artifact/com.fasterxml.jackson.core/jackson-databind compile group: 'com.fasterxml.jackson.core', name: 'jackson-databind', version: '2.8.6' // https://mvnrepository.com/artifact/com.fasterxml.jackson.core/jackson-core compile group: 'com.fasterxml.jackson.core', name: 'jackson-core', version: '2.8.6' compile group: 'org.aspectj', name: 'aspectjrt', version: '1.8.7' compile group: 'org.aspectj', name: 'aspectjweaver', version: '1.8.7' compile group: 'com.thoughtworks.xstream', name: 'xstream', version: '1.4.1' compile(group: 'org.mortbay.jetty', name: 'jetty', version: '6.1.26') compile group: 'org.projectlombok', name: 'lombok', version: '1.16.8' compile group: 'com.squareup.okhttp', name: 'okhttp', version: '2.7.5' compile group: 'com.google.guava', name: 'guava', version: '18.0' compile group: 'commons-lang', name: 'commons-lang', version: '2.6' compile group: 'com.jcraft', name: 'jsch', version: '0.1.53' testCompile group: 'junit', name: 'junit', version: '4.12' testCompile "org.springframework:spring-test:4.3.4.RELEASE" compile "javax.validation:validation-api:1.1.0.Final" compile "org.hibernate:hibernate-validator:5.2.4.Final" } //gradle utf-8 compile tasks.withType(JavaCompile) { options.encoding = 'UTF-8' } task copyAllDependencies(type: Copy, dependsOn: jar) { description = "拷贝全部依赖的jar包" from configurations.runtime into 'build/libs' } task copyPartDependencies(type: Copy, dependsOn: jar) { description = "拷贝部分依赖的jar" from configurations.runtime into 'build/libs' doLast { file("build/libs").listFiles({ !it.name.endsWith("-SNAPSHOT.jar") } as FileFilter).each { it.delete() } } } } View Code 二、对应模块下的build.gradle def mainClass = "com.hzgj.information.rest.user.run.UserServiceProvider" def appHome = "/home/appsvr/apps/rest_user" def javaCommand = "nohup java $jvmArgs -Djava.ext.dirs=$appHome/libs -Denv=$env $mainClass >$appHome/shell.log 2>&1 &" def index = System.getProperty("index") def remote = remotes { test_0 { role 'test_0' host = '10.0.21.152' if (file("$userHome/.ssh/id_rsa").exists()) { user = 'appsvr' identity = file("$userHome/.ssh/id_rsa") } else { user = 'appsvr' password = 'xxx' } } test_1 { role 'test_1' host = '10.0.146.20' if (file("$userHome/.ssh/id_rsa").exists()) { user = 'appsvr' identity = file("$userHome/.ssh/id_rsa") } else { user = 'appsvr' password = 'xxx' } } home { role 'home' host = '192.168.109.130' user = 'appsvr' password = 'xxx' // identity = file('id_rsa') } } task deploy << { description = "拷贝jar包并启动java服务" def roles = remote.findAll { def currentEnv = index == null ? "$env" : "$env" + "_" + index it['roles'][0].toString().contains(currentEnv) } ssh.run { roles.each { def role = it['roles'][0].toString() session(remotes.role(role)) { try { execute("ls $appHome") } catch (Exception e) { println("#############目录[$appHome]不存在,将自动创建############") execute("mkdir -p $appHome") } finally { def r = '$1' def pid = execute("jps -l |grep '$mainClass' |awk \'{print $r}\'") if (pid) { execute("kill -9 $pid") } put from: 'build/libs', into: "$appHome" println("###############准备启动java服务[$javaCommand]####################") execute("$javaCommand") sleep(10000) pid = execute("jps -l |grep '$mainClass' |awk \'{print $r}\'") if (pid) { println("#####$mainClass [$pid] 启动成功...######") execute("rm -f $appHome/shell.log") } else { println("#$mainClass 启动失败...输出日志如下:#") execute("cat $appHome/shell.log") } } } } } } task stop << { def roles = remote.findAll { def currentEnv = index == null ? "$env" : "$env" + "_" + index it['roles'][0].toString().contains(currentEnv) } ssh.run { roles.each { session(remotes.role("$env")) { def r = '$1' def pid = execute("jps -l |grep '$mainClass' |awk \'{print $r}\'") if (pid) { execute("kill -9 $pid") } } } } } task start << { def roles = remote.findAll { def currentEnv = index == null ? "$env" : "$env" + "_" + index it['roles'][0].toString().contains(currentEnv) } ssh.run { roles.each { def role = it['roles'][0].toString() session(remotes.role(role)) { def r = '$1' def pid = execute("jps -l |grep '$mainClass' |awk \'{print $r}\'") if (pid) { execute("kill -9 $pid") } println("###############准备启动java服务[$javaCommand]####################") execute("$javaCommand") sleep(10000) pid = execute("jps -l |grep '$main Class' |awk \'{print $r}\'") if (pid) { println("#$mainClass [$pid] 启动成功...#") execute("rm -f $appHome/shell.log") } else { println("#$mainClass 启动失败...输出日志如下:#") execute("cat $appHome/shell.log") } } } } } View Code 三、使用方式 1.先运行gradle copyAll -x test 进行打包操作,该操作会将该模块所有的依赖的jar 2.进入到对应的模块下 运行gradle deploy -Denv=xxx -Dindex=xxx ,什么意思呢?-Denv代表哪一个环境 -Dindex指定该环境下哪个节点进行发布 3.gradle start -Denv=xxx -Dindex=xxx 运行当前环境下的应用

优秀的个人博客,低调大师

实战深度学习(下)OpenCV库

在上一节中,我们讲到了OpenCV库的安装,现在我们来进行实战,看如何利用Python来调用OpenCV库。 一: 如果您的电脑是win10的系统,那么请您按下win键,再按下空格键,输入Python,进入Python的IDEA shell界面。这个时候您也可以直接进入CMD进行民命令行模式的编辑,因为第一次可我们并不会很多的代码需要您去编辑。在后期您可以使用轻量级的IDEA,比如sublime test3 或者重量级的Pycharm IDEA进行编辑,它们都是现在世界上十分常用的Python编译器,用它们进行编辑,会给你们一种视觉上的清新之感以及灵魂上的愉悦之感呢。 二:如果您的电脑是linux操作系统,这是一个主流的选择。很好,笔者现在还没有为我的linux操作系统配置上Python环境,因此具体方法您可以百度一下。 三:如果您的电脑是苹果电脑,请您赶紧卖了,因为配置太低,系统难用,价格昂贵。完全不适合编写程序搞事情。 四:开始编写代码: 现在我们输入以下代码: import cv2 #表示您引入了opencv库 import numpy as np #表示您引入了用于计算矩阵的库并且将numpy简写为了np 现在,如果您按下F5运行,编译器没有报错的话,那么把您的库文件肯定是安装好的了,嘿嘿 五:读入图片,保存图片: 在opencv库当中,最基本的一步就是读入图片和保存图片了。我们可以在读入和保存图片的时候改变图片的格式,因为里面的库函数对Python的文件读写已经进行了一定的操作。现在我们键入以下代码: # Load an color image in grayscale img = cv2.imread('呵呵.jpg',0) #表示您所读入的图片的名称和路径 cv2.imshow('image',img) #显示图像 cv2.waitKey(0) #等待键盘事件,这和我们的单片机相同 cv2.destroyAllWindows() #意思和上面的英文代码相同 六:保存图片文件: 请输入以下代码: cv2.imwrite('呵呵.png',img) #即可保存以上图片为png格式了,十分方便。 七,笔者已经自己用OpenCV尝试成功进行人脸识别的项目,其结果如下所示:(由于这是在我的公众号上复制的,本人性别男,性格:懒。因此就懒得把图片复制过来了额)

优秀的个人博客,低调大师

java基础学习_常用类小结

看看下面的类,是否都熟悉,简要说明每个类主要是干什么呢? Object:是类层次结构的根类,所有类都直接或者间接的继承自该类。 Scanner:获取键盘录入数据的类。 String:针对字符串的常见操作的类。 StringBuffer/StringBuilder:字符串缓冲区类,提高字符串的操作效率。 Arrays:针对数组进行操作的工具类。 Integer:把int基本数据类型封装成Integer引用数据类型,可以调用方法了,最主要作用是可以把String引用数据类型转换int基本数据类型了。 Character:把char基本类型封装成Character引用数据类型,可以调用方法了。了解几个方法就可以了。 Pattern:正则表达式的编译表示形式。模式对象。 Matcher:匹配器对象。 Math:针对数学运算操作的类。 Random:产生随机数的类。 System:系统类,提供了几个有用方法。 BigInteger:关于大整数的运算的类。 BigDecimal:关于浮点数的运算用这个,不会有精度的丢失。 Date:针对日期操作的类,可以精确到毫秒。 DateFormat:针对日期进行格式化或者针对字符串(文本)进行解析的类。 Calendar:日历类,把所有的日历字段(成员变量)进行了封装,要什么,自己使用获取方法,然后拼接。 Object:是类层次结构的根类,所有类都直接或者间接的继承自该类。 Scanner:获取键盘录入数据的类。 String:针对字符串的常见操作的类。 StringBuffer/StringBuilder:字符串缓冲区类,提高字符串的操作效率。 Arrays:针对数组进行操作的工具类。 Integer:把int基本数据类型封装成Integer引用数据类型,可以调用方法了,最主要作用是可以把String引用数据类型转换int基本数据类型了。 Character:把char基本类型封装成Character引用数据类型,可以调用方法了。了解几个方法就可以了。 Pattern:正则表达式的编译表示形式。模式对象。 Matcher:匹配器对象。 Math:针对数学运算操作的类。 Random:产生随机数的类。 System:系统类,提供了几个有用方法。 BigInteger:关于大整数的运算的类。 BigDecimal:关于浮点数的运算用这个,不会有精度的丢失。 Date:针对日期操作的类,可以精确到毫秒。 DateFormat:针对日期进行格式化或者针对字符串(文本)进行解析的类。 Calendar:日历类,把所有的日历字段(成员变量)进行了封装,要什么,自己使用获取方法,然后拼接。我的GitHub地址: https://github.com/heizemingjun 我的博客园地址: http://www.cnblogs.com/chenmingjun 我的蚂蚁笔记博客地址: http://blog.leanote.com/chenmingjun Copyright ©2018 黑泽明军 【转载文章务必保留出处和署名,谢谢!】

优秀的个人博客,低调大师

C++ activemq CMS 学习笔记

很早前就仓促的接触过activemq,但当时太赶时间.后面发现activemq 需要了解的东西实在是太多了. 关于activemq 一直想起一遍文章.但也一直缺少自己的见解.或许是网上这些文章太多了.也可能是自己知识还不足够. 0,activemq-cpp 能解决什么问题. 实际应用就是让开发者能从多线程,多消息通信中解救出来.更多的关注应用逻辑. CMS (stands for C++ Messaging Service) is a JMS-like API for C++ for interfacing with Message Brokers such asApache ActiveMQ. CMS helps to make your C++ client code much neater and easier to follow. To get a better feel for CMS try theAPIReference. ActiveMQ-CPP is a client only library, a message broker such asApache ActiveMQis still needed for your clients to communicate. Our implementation of CMS is called ActiveMQ-CPP, which has an architecture that allows for pluggable transports and wire formats. Currently we support theOpenWireandStompprotocols, both over TCP and SSL, we also now support a Failover Transport for more reliable client operation. In addition to CMS, ActiveMQ-CPP also provides a robust set of classes that support platform independent constructs such as threading, I/O, sockets, etc. You may find many of these utilities very useful, such as a Java like Thread class or the "synchronized" macro that let's you use a Java-like synchronization on any object that implements the activemq::concurrent::Synchronizable interface. ActiveMQ-CPP is released under theApache2.0 License 大意: CMS (C++ 消息 服务)是一个面象apache activemq 的 消息 中间层的C++接口. CMS的实现 叫做activemq-cpp ,不过当前只支持openwire,amqp,TCP,ssl. 现在还支持 主备切换功能(这个是重点,当时我不懂,结果就走了弯路!_!). -_- ,意思是 activemq\conf\activemq.xml中的stomp,mqtt,ws 是没办法的. <transportConnectors> <!-- DOS protection, limit concurrent connections to 1000 and frame size to 100MB --> <transportConnector name="openwire" uri="tcp://0.0.0.0:61616?maximumConnections=1000&amp;wireFormat.maxFrameSize=104857600"/> <transportConnector name="amqp" uri="amqp://0.0.0.0:5672?maximumConnections=1000&amp;wireFormat.maxFrameSize=104857600"/> <transportConnector name="stomp" uri="stomp://0.0.0.0:61613?maximumConnections=1000&amp;wireFormat.maxFrameSize=104857600"/> <transportConnector name="mqtt" uri="mqtt://0.0.0.0:1883?maximumConnections=1000&amp;wireFormat.maxFrameSize=104857600"/> <transportConnector name="ws" uri="ws://0.0.0.0:61614?maximumConnections=1000&amp;wireFormat.maxFrameSize=104857600"/> </transportConnectors> 1,acticvemq-cpp 的配置使用. 参考:Active MQ C++实现通讯http://blog.csdn.net/lee353086/article/details/6777261 activemq-cpp下载地址: http://activemq.apache.org/cms/download.html 相关依赖库 在http://activemq.apache.org/cms/building.html中是有介绍的.不过是en的. 还是再说下吧.本人en也特差. "With versions of ActiveMQ-CPP 2.2 and later, we have a dependency on theApache Portable Runtimeproject. You'll need to install APR on your system before you'll be able to build ActiveMQ-CPP." "The package contains a complete set of CppUnit tests. In order for you to build an run the tests, you will need to download and install the CppUnit library. Seehttp://cppunit.sourceforge.net/cppunit-wiki" 所以就包含了:apr,apr-iconv,apr-util,cppunit. http://mirrors.hust.edu.cn/apache/apr/ 中可以下载apr,apr-iconv,apr-util(版本号都找最高的,不要一高一低,不然编译会出问题). apr-1.5.1-win32-src.zip, apr-iconv-1.2.1-win32-src-r2.zip, apr-util-1.5.4-win32-src.zip. 解压后记得重命令文件夹,去掉版本号,改成如下图,不然工程编译时默认的 [附加包含目录] 是找不到的. 所有文件夹放在一个根目录下. 打开 activemq-cpp-library\vs2008-build\activemq-cpp.sln 依次添加[现在项目]:libapr.vcproj,libapriconv.vcproj,libaprutil.vcproj. 只需要lib项就行了. 最后项目图: libapriconv.vcproj,libaprutil.vcproj 的[项目依赖项]都需要libapr activemq-cpp的[项目依赖项]需要libapriconv,libaprutil,libapr. activemq-cpp 的[附加包含目录] 需要包含 这三个的的include目录. 经过漫长的编译后, 这个大lib文件就出来. activemq-cpp-example 这个工程 ,就有 hello world 的代码. 2,activemq-cpp-example 项目代码解析. 通过这个项目可以让我们更好的认识 activemq-cpp的结构. /* * Licensed to the Apache Software Foundation (ASF) under one or more * contributor license agreements. See the NOTICE file distributed with * this work for additional information regarding copyright ownership. * The ASF licenses this file to You under the Apache License, Version 2.0 * (the "License"); you may not use this file except in compliance with * the License. You may obtain a copy of the License at * * http://www.apache.org/licenses/LICENSE-2.0 * * Unless required by applicable law or agreed to in writing, software * distributed under the License is distributed on an "AS IS" BASIS, * WITHOUT WARRANTIES OR CONDITIONS OF ANY KIND, either express or implied. * See the License for the specific language governing permissions and * limitations under the License. */ // START SNIPPET: demo #include <activemq/library/ActiveMQCPP.h> #include <decaf/lang/Thread.h> #include <decaf/lang/Runnable.h> #include <decaf/util/concurrent/CountDownLatch.h> #include <decaf/lang/Integer.h> #include <decaf/lang/Long.h> #include <decaf/lang/System.h> #include <activemq/core/ActiveMQConnectionFactory.h> #include <activemq/util/Config.h> #include <cms/Connection.h> #include <cms/Session.h> #include <cms/TextMessage.h> #include <cms/BytesMessage.h> #include <cms/MapMessage.h> #include <cms/ExceptionListener.h> #include <cms/MessageListener.h> #include <stdlib.h> #include <stdio.h> #include <iostream> #include <memory> using namespace activemq::core; using namespace decaf::util::concurrent; using namespace decaf::util; using namespace decaf::lang; using namespace cms; using namespace std; class HelloWorldProducer : public Runnable { private: Connection* connection; Session* session; Destination* destination; MessageProducer* producer; int numMessages; bool useTopic; bool sessionTransacted; std::string brokerURI; private: HelloWorldProducer(const HelloWorldProducer&); HelloWorldProducer& operator=(const HelloWorldProducer&); public: HelloWorldProducer(const std::string& brokerURI, int numMessages, bool useTopic = false, bool sessionTransacted = false) : connection(NULL), session(NULL), destination(NULL), producer(NULL), numMessages(numMessages), useTopic(useTopic), sessionTransacted(sessionTransacted), brokerURI(brokerURI) { } virtual ~HelloWorldProducer(){ cleanup(); } void close() { this->cleanup(); } virtual void run() { try { // Create a ConnectionFactory auto_ptr<ConnectionFactory> connectionFactory( ConnectionFactory::createCMSConnectionFactory(brokerURI)); // Create a Connection connection = connectionFactory->createConnection(); connection->start(); // Create a Session if (this->sessionTransacted) { session = connection->createSession(Session::SESSION_TRANSACTED); } else { session = connection->createSession(Session::AUTO_ACKNOWLEDGE); } // Create the destination (Topic or Queue) if (useTopic) { destination = session->createTopic("TEST.FOO"); } else { destination = session->createQueue("TEST.FOO"); } // Create a MessageProducer from the Session to the Topic or Queue producer = session->createProducer(destination); producer->setDeliveryMode(DeliveryMode::NON_PERSISTENT); // Create the Thread Id String string threadIdStr = Long::toString(Thread::currentThread()->getId()); // Create a messages string text = (string) "Hello world! from thread " + threadIdStr; for (int ix = 0; ix < numMessages; ++ix) { std::auto_ptr<TextMessage> message(session->createTextMessage(text)); message->setIntProperty("Integer", ix); printf("Sent message #%d from thread %s\n", ix + 1, threadIdStr.c_str()); producer->send(message.get()); } } catch (CMSException& e) { e.printStackTrace(); } } private: void cleanup() { if (connection != NULL) { try { connection->close(); } catch (cms::CMSException& ex) { ex.printStackTrace(); } } // Destroy resources. try { delete destination; destination = NULL; delete producer; producer = NULL; delete session; session = NULL; delete connection; connection = NULL; } catch (CMSException& e) { e.printStackTrace(); } } }; class HelloWorldConsumer : public ExceptionListener, public MessageListener, public Runnable { private: CountDownLatch latch; CountDownLatch doneLatch; Connection* connection; Session* session; Destination* destination; MessageConsumer* consumer; long waitMillis; bool useTopic; bool sessionTransacted; std::string brokerURI; private: HelloWorldConsumer(const HelloWorldConsumer&); HelloWorldConsumer& operator=(const HelloWorldConsumer&); public: HelloWorldConsumer(const std::string& brokerURI, int numMessages, bool useTopic = false, bool sessionTransacted = false, int waitMillis = 30000) : latch(1), doneLatch(numMessages), connection(NULL), session(NULL), destination(NULL), consumer(NULL), waitMillis(waitMillis), useTopic(useTopic), sessionTransacted(sessionTransacted), brokerURI(brokerURI) { } virtual ~HelloWorldConsumer() { cleanup(); } void close() { this->cleanup(); } void waitUntilReady() { latch.await(); } virtual void run() { try { // Create a ConnectionFactory auto_ptr<ConnectionFactory> connectionFactory( ConnectionFactory::createCMSConnectionFactory(brokerURI)); // Create a Connection connection = connectionFactory->createConnection(); connection->start(); connection->setExceptionListener(this); // Create a Session if (this->sessionTransacted == true) { session = connection->createSession(Session::SESSION_TRANSACTED); } else { session = connection->createSession(Session::AUTO_ACKNOWLEDGE); } // Create the destination (Topic or Queue) if (useTopic) { destination = session->createTopic("TEST.FOO"); } else { destination = session->createQueue("TEST.FOO"); } // Create a MessageConsumer from the Session to the Topic or Queue consumer = session->createConsumer(destination); consumer->setMessageListener(this); std::cout.flush(); std::cerr.flush(); // Indicate we are ready for messages. latch.countDown(); // Wait while asynchronous messages come in. doneLatch.await(waitMillis); } catch (CMSException& e) { // Indicate we are ready for messages. latch.countDown(); e.printStackTrace(); } } // Called from the consumer since this class is a registered MessageListener. virtual void onMessage(const Message* message) { static int count = 0; try { count++; const TextMessage* textMessage = dynamic_cast<const TextMessage*> (message); string text = ""; if (textMessage != NULL) { text = textMessage->getText(); } else { text = "NOT A TEXTMESSAGE!"; } printf("Message #%d Received: %s\n", count, text.c_str()); } catch (CMSException& e) { e.printStackTrace(); } // Commit all messages. if (this->sessionTransacted) { session->commit(); } // No matter what, tag the count down latch until done. doneLatch.countDown(); } // If something bad happens you see it here as this class is also been // registered as an ExceptionListener with the connection. virtual void onException(const CMSException& ex AMQCPP_UNUSED) { printf("CMS Exception occurred. Shutting down client.\n"); ex.printStackTrace(); exit(1); } private: void cleanup() { if (connection != NULL) { try { connection->close(); } catch (cms::CMSException& ex) { ex.printStackTrace(); } } // Destroy resources. try { delete destination; destination = NULL; delete consumer; consumer = NULL; delete session; session = NULL; delete connection; connection = NULL; } catch (CMSException& e) { e.printStackTrace(); } } }; int main(int argc AMQCPP_UNUSED, char* argv[] AMQCPP_UNUSED) { activemq::library::ActiveMQCPP::initializeLibrary(); { std::cout << "=====================================================\n"; std::cout << "Starting the example:" << std::endl; std::cout << "-----------------------------------------------------\n"; // Set the URI to point to the IP Address of your broker. // add any optional params to the url to enable things like // tightMarshalling or tcp logging etc. See the CMS web site for // a full list of configuration options. // // http://activemq.apache.org/cms/ // // Wire Format Options: // ========================= // Use either stomp or openwire, the default ports are different for each // // Examples: // tcp://127.0.0.1:61616 default to openwire // tcp://127.0.0.1:61616?wireFormat=openwire same as above // tcp://127.0.0.1:61613?wireFormat=stomp use stomp instead // // SSL: // ========================= // To use SSL you need to specify the location of the trusted Root CA or the // certificate for the broker you want to connect to. Using the Root CA allows // you to use failover with multiple servers all using certificates signed by // the trusted root. If using client authentication you also need to specify // the location of the client Certificate. // // System::setProperty( "decaf.net.ssl.keyStore", "<path>/client.pem" ); // System::setProperty( "decaf.net.ssl.keyStorePassword", "password" ); // System::setProperty( "decaf.net.ssl.trustStore", "<path>/rootCA.pem" ); // // The you just specify the ssl transport in the URI, for example: // // ssl://localhost:61617 // std::string brokerURI = "failover:(tcp://localhost:61616" // "?wireFormat=openwire" // "&transport.useInactivityMonitor=false" // "&connection.alwaysSyncSend=true" // "&connection.useAsyncSend=true" // "?transport.commandTracingEnabled=true" // "&transport.tcpTracingEnabled=true" // "&wireFormat.tightEncodingEnabled=true" ")"; //============================================================ // set to true to use topics instead of queues // Note in the code above that this causes createTopic or // createQueue to be used in both consumer an producer. //============================================================ bool useTopics = true; bool sessionTransacted = false; int numMessages = 2000; long long startTime = System::currentTimeMillis(); HelloWorldProducer producer(brokerURI, numMessages, useTopics); HelloWorldConsumer consumer(brokerURI, numMessages, useTopics, sessionTransacted); // Start the consumer thread. Thread consumerThread(&consumer); consumerThread.start(); // Wait for the consumer to indicate that its ready to go. consumer.waitUntilReady(); // Start the producer thread. Thread producerThread(&producer); producerThread.start(); // Wait for the threads to complete. producerThread.join(); consumerThread.join(); long long endTime = System::currentTimeMillis(); double totalTime = (double)(endTime - startTime) / 1000.0; consumer.close(); producer.close(); std::cout << "Time to completion = " << totalTime << " seconds." << std::endl; std::cout << "-----------------------------------------------------\n"; std::cout << "Finished with the example." << std::endl; std::cout << "=====================================================\n"; } activemq::library::ActiveMQCPP::shutdownLibrary(); } // END SNIPPET: demo 从main()开始吧. 这样便简快速的实现了应用逻辑. 3,activemq的几种通信模式. 可以参考: http://shmilyaw-hotmail-com.iteye.com/blog/1897635 目前本人需要的是activemq-cpp的request-response 模式. 4,activemq-cpp的request-response 模式的应用. 服务器与客户端通信 数据的交互 和 确认. 以下是本人修改后的简单代码,bug可能存在,请指出. 复制两份,一份定义USE_COMSUMER 一份定义USE_PRODUCER 就可以生成. /* * Licensed to the Apache Software Foundation (ASF) under one or more * contributor license agreements. See the NOTICE file distributed with * this work for additional information regarding copyright ownership. * The ASF licenses this file to You under the Apache License, Version 2.0 * (the "License"); you may not use this file except in compliance with * the License. You may obtain a copy of the License at * * http://www.apache.org/licenses/LICENSE-2.0 * * Unless required by applicable law or agreed to in writing, software * distributed under the License is distributed on an "AS IS" BASIS, * WITHOUT WARRANTIES OR CONDITIONS OF ANY KIND, either express or implied. * See the License for the specific language governing permissions and * limitations under the License. */ // START SNIPPET: demo #include <activemq/library/ActiveMQCPP.h> #include <decaf/lang/Thread.h> #include <decaf/lang/Runnable.h> #include <decaf/util/concurrent/CountDownLatch.h> #include <decaf/lang/Integer.h> #include <decaf/lang/Long.h> #include <decaf/lang/System.h> #include <activemq/core/ActiveMQConnectionFactory.h> #include <activemq/util/Config.h> #include <cms/Connection.h> #include <cms/Session.h> #include <cms/TextMessage.h> #include <cms/BytesMessage.h> #include <cms/MapMessage.h> #include <cms/ExceptionListener.h> #include <cms/MessageListener.h> #include <stdlib.h> #include <stdio.h> #include <iostream> #include <memory> #include <decaf/util/Random.h> using namespace activemq::core; using namespace decaf::util::concurrent; using namespace decaf::util; using namespace decaf::lang; using namespace cms; using namespace std; #define QUEUE_NAME "eventQueue" #define NAME_BYTE_LEN 16 class HelloWorldProducer : public ExceptionListener, public MessageListener, public Runnable { private: CountDownLatch latch; CountDownLatch doneLatch; Connection* connection; Session* session; Destination* destination; MessageProducer* producer; int numMessages; bool useTopic; bool sessionTransacted; std::string brokerURI; bool bReciveMessage; long waitMillis; private: HelloWorldProducer(const HelloWorldProducer&); HelloWorldProducer& operator=(const HelloWorldProducer&); public: HelloWorldProducer(const std::string& brokerURI, int numMessages, bool useTopic = false, bool sessionTransacted = false, long waitMillis=3000) : latch(1), doneLatch(numMessages), connection(NULL), session(NULL), destination(NULL), producer(NULL), numMessages(numMessages), useTopic(useTopic), sessionTransacted(sessionTransacted), brokerURI(brokerURI) , bReciveMessage(false), waitMillis(waitMillis) { } virtual ~HelloWorldProducer(){ cleanup(); } void close() { this->cleanup(); } void waitUntilReady() { latch.await(); } virtual void run() { try { // Create a ConnectionFactory auto_ptr<ConnectionFactory> connectionFactory( ConnectionFactory::createCMSConnectionFactory(brokerURI)); // Create a Connection connection = connectionFactory->createConnection(); connection->start(); // Create a Session if (this->sessionTransacted) { session = connection->createSession(Session::SESSION_TRANSACTED); } else { session = connection->createSession(Session::AUTO_ACKNOWLEDGE); } session = connection->createSession(); // Create the destination (Topic or Queue) if (useTopic) { destination = session->createTopic(QUEUE_NAME); } else { destination = session->createQueue(QUEUE_NAME); } // Create a MessageProducer from the Session to the Topic or Queue producer = session->createProducer(destination); producer->setDeliveryMode(DeliveryMode::NON_PERSISTENT); // Create the Thread Id String string threadIdStr = Long::toString(Thread::currentThread()->getId()); // Create a messages string text = (string) "Hello world! from thread " + threadIdStr; for (int ix = 0; ix < numMessages; ++ix) { std::auto_ptr<TextMessage> message(session->createTextMessage(text)); //关键消息... std::auto_ptr<Destination> tempDest(session->createTemporaryQueue()); //cms::Destination tempDest=session->createTemporaryTopic() ; MessageConsumer * responseConsumer = session->createConsumer(tempDest.get()); responseConsumer->setMessageListener(this);//监听... message->setCMSReplyTo(tempDest.get()); Random random; char buffer[NAME_BYTE_LEN]={0}; random.nextBytes((unsigned char *)buffer,NAME_BYTE_LEN); string correlationId=""; for(int i=0;i<NAME_BYTE_LEN;++i) { char ch[NAME_BYTE_LEN*2]={0}; sprintf(ch,"%02X",(unsigned char)buffer[i]); string str(ch); correlationId+=str; } message->setCMSCorrelationID(correlationId); message->setIntProperty("Integer", ix); printf("Producer Sent message #%d from thread %s\n", ix + 1, threadIdStr.c_str()); producer->send(message.get()); // Indicate we are ready for messages. latch.countDown(); // Wait while asynchronous messages come in. doneLatch.await(waitMillis); } } catch (CMSException& e) { printf("Producer run() CMSException \n" ); // Indicate we are ready for messages. latch.countDown(); e.printStackTrace(); } } // Called from the Producer since this class is a registered MessageListener. virtual void onMessage(const Message* message) { static int count = 0; try { count++; const TextMessage* textMessage = dynamic_cast<const TextMessage*> (message); //ActiveMQMessageTransformation //std::auto_ptr<TextMessage> responsemessage(session->createTextMessage()); //responsemessage->setCMSCorrelationID(textMessage->getCMSCorrelationID()); //responsemessage->getCMSReplyTo() string text = ""; if (textMessage != NULL) { text = textMessage->getText(); } else { text = "NOT A TEXTMESSAGE!"; } printf("Producer Message #%d Received: %s\n", count, text.c_str()); //producer.send } catch (CMSException& e) { printf("Producer onMessage() CMSException \n" ); e.printStackTrace(); } // Commit all messages. if (this->sessionTransacted) { session->commit(); } // No matter what, tag the count down latch until done. doneLatch.countDown(); } // If something bad happens you see it here as this class is also been // registered as an ExceptionListener with the connection. virtual void onException(const CMSException& ex AMQCPP_UNUSED) { printf("Producer onException() CMS Exception occurred. Shutting down client. \n" ); ex.printStackTrace(); exit(1); } private: void cleanup() { if (connection != NULL) { try { connection->close(); } catch (cms::CMSException& ex) { ex.printStackTrace(); } } // Destroy resources. try { delete destination; destination = NULL; delete producer; producer = NULL; delete session; session = NULL; delete connection; connection = NULL; } catch (CMSException& e) { e.printStackTrace(); } } }; class HelloWorldConsumer : public ExceptionListener, public MessageListener, public Runnable { private: CountDownLatch latch; CountDownLatch doneLatch; Connection* connection; Session* session; Destination* destination; MessageConsumer* consumer; MessageProducer *producer; long waitMillis; bool useTopic; bool sessionTransacted; std::string brokerURI; private: HelloWorldConsumer(const HelloWorldConsumer&); HelloWorldConsumer& operator=(const HelloWorldConsumer&); public: HelloWorldConsumer(const std::string& brokerURI, int numMessages, bool useTopic = false, bool sessionTransacted = false, int waitMillis = 30000) : latch(1), doneLatch(numMessages), connection(NULL), session(NULL), destination(NULL), consumer(NULL), producer(NULL), waitMillis(waitMillis), useTopic(useTopic), sessionTransacted(sessionTransacted), brokerURI(brokerURI) { } virtual ~HelloWorldConsumer() { cleanup(); } void close() { this->cleanup(); } void waitUntilReady() { latch.await(); } virtual void run() { try { // Create a ConnectionFactory auto_ptr<ConnectionFactory> connectionFactory( ConnectionFactory::createCMSConnectionFactory(brokerURI)); // Create a Connection connection = connectionFactory->createConnection(); connection->start(); connection->setExceptionListener(this); // Create a Session if (this->sessionTransacted == true) { session = connection->createSession(Session::SESSION_TRANSACTED); } else { session = connection->createSession(Session::AUTO_ACKNOWLEDGE); } // Create the destination (Topic or Queue) if (useTopic) { destination = session->createTopic(QUEUE_NAME); } else { destination = session->createQueue(QUEUE_NAME); } producer = session->createProducer(); producer->setDeliveryMode(DeliveryMode::NON_PERSISTENT); // Create a MessageConsumer from the Session to the Topic or Queue consumer = session->createConsumer(destination); consumer->setMessageListener(this); std::cout.flush(); std::cerr.flush(); // Indicate we are ready for messages. latch.countDown(); // Wait while asynchronous messages come in. doneLatch.await(); } catch (CMSException& e) { printf("Consumer onException() CMS Exception occurred. Shutting down client. \n" ); // Indicate we are ready for messages. latch.countDown(); e.printStackTrace(); } } // Called from the consumer since this class is a registered MessageListener. virtual void onMessage(const Message* message) { static int count = 0; try { count++; // Create the Thread Id String string threadIdStr = Long::toString(Thread::currentThread()->getId()); static bool bPrintf=true; if(bPrintf) { bPrintf=false; printf("consumer Message threadid: %s\n", threadIdStr.c_str()); } string strReply="consumer return xxx,ThreadID="+threadIdStr; const TextMessage* textMessage = dynamic_cast<const TextMessage*> (message); if(NULL==textMessage) { printf("NULL==textMessage", message->getCMSType().c_str()); //const cms::MapMessage* mapMsg = dynamic_cast<const cms::MapMessage*>(message); //if(mapMsg) //{ // // std::vector<std::string> elements = mapMsg->getMapNames(); // std::vector<std::string>::iterator iter = elements.begin(); // for(; iter != elements.end() ; ++iter) // { // std::string key = *iter; // cms::Message::ValueType elementType = mapMsg->getValueType(key); // string strxxx; // int cc=0; // switch(elementType) { // case cms::Message::BOOLEAN_TYPE: // //msg->setBoolean(key, mapMsg->getBoolean(key)); // break; // case cms::Message::BYTE_TYPE: // //msg->setByte(key, mapMsg->getByte(key)); // break; // case cms::Message::BYTE_ARRAY_TYPE: // //msg->setBytes(key, mapMsg->getBytes(key)); // break; // case cms::Message::CHAR_TYPE: // //msg->setChar(key, mapMsg->getChar(key)); // break; // case cms::Message::SHORT_TYPE: // //msg->setShort(key, mapMsg->getShort(key)); // break; // case cms::Message::INTEGER_TYPE: // //msg->setInt(key, mapMsg->getInt(key)); // break; // case cms::Message::LONG_TYPE: // //msg->setLong(key, mapMsg->getLong(key)); // break; // case cms::Message::FLOAT_TYPE: // //msg->setFloat(key, mapMsg->getFloat(key)); // break; // case cms::Message::DOUBLE_TYPE: // //msg->setDouble(key, mapMsg->getDouble(key)); // break; // case cms::Message::STRING_TYPE: // //msg->setString(key, mapMsg->getString(key)); // strxxx=mapMsg->getString(key); // cc=1; // break; // default: // break; // } // } //} return; } std::auto_ptr<TextMessage> responsemessage(session->createTextMessage(strReply)); responsemessage->setCMSCorrelationID(textMessage->getCMSCorrelationID()); string text = ""; if (textMessage != NULL) { text = textMessage->getText(); } else { text = "NOT A TEXTMESSAGE!"; } int nProPerty=textMessage->getIntProperty("Integer"); printf("consumer Message #%d Received: %s,nProPerty[%d]\n", count, text.c_str(),nProPerty); const cms::Destination* destSend=textMessage->getCMSReplyTo(); if(destSend) { this->producer->send(destSend,responsemessage.get()); printf("consumer Message #%d send: %s\n", count, strReply.c_str()); } } catch (CMSException& e) { printf("Consumer onMessage() CMS Exception occurred. Shutting down client. \n" ); e.printStackTrace(); } // Commit all messages. if (this->sessionTransacted) { session->commit(); } // No matter what, tag the count down latch until done. //doneLatch.countDown(); } // If something bad happens you see it here as this class is also been // registered as an ExceptionListener with the connection. virtual void onException(const CMSException& ex AMQCPP_UNUSED) { printf("Consumer onException() CMS Exception occurred. Shutting down client. \n" ); //printf("CMS Exception occurred. Shutting down client.\n"); ex.printStackTrace(); exit(1); } private: void cleanup() { if (connection != NULL) { try { connection->close(); } catch (cms::CMSException& ex) { ex.printStackTrace(); } } // Destroy resources. try { delete destination; destination = NULL; delete consumer; consumer = NULL; delete session; session = NULL; delete connection; connection = NULL; } catch (CMSException& e) { e.printStackTrace(); } } }; int main(int argc AMQCPP_UNUSED, char* argv[] AMQCPP_UNUSED) { //if(argc<2) //{ // printf("argc<2\r\n"); // return 0; //} activemq::library::ActiveMQCPP::initializeLibrary(); { std::cout << "=====================================================\n"; std::cout << "Starting the example:" << std::endl; std::cout << "-----------------------------------------------------\n"; // Set the URI to point to the IP Address of your broker. // add any optional params to the url to enable things like // tightMarshalling or tcp logging etc. See the CMS web site for // a full list of configuration options. // // http://activemq.apache.org/cms/ // // Wire Format Options: // ========================= // Use either stomp or openwire, the default ports are different for each // // Examples: // tcp://127.0.0.1:61616 default to openwire // tcp://127.0.0.1:61616?wireFormat=openwire same as above // tcp://127.0.0.1:61613?wireFormat=stomp use stomp instead // // SSL: // ========================= // To use SSL you need to specify the location of the trusted Root CA or the // certificate for the broker you want to connect to. Using the Root CA allows // you to use failover with multiple servers all using certificates signed by // the trusted root. If using client authentication you also need to specify // the location of the client Certificate. // // System::setProperty( "decaf.net.ssl.keyStore", "<path>/client.pem" ); // System::setProperty( "decaf.net.ssl.keyStorePassword", "password" ); // System::setProperty( "decaf.net.ssl.trustStore", "<path>/rootCA.pem" ); // // The you just specify the ssl transport in the URI, for example: // // ssl://localhost:61617 // std::string brokerURI = "failover:(tcp://192.168.10.143:61616" // "?wireFormat=openwire" // "&transport.useInactivityMonitor=false" // "&connection.alwaysSyncSend=true" // "&connection.useAsyncSend=true" // "?transport.commandTracingEnabled=true" // "&transport.tcpTracingEnabled=true" // "&wireFormat.tightEncodingEnabled=true" ")"; //============================================================ // set to true to use topics instead of queues // Note in the code above that this causes createTopic or // createQueue to be used in both consumer an producer. //============================================================ bool useTopics = false; bool sessionTransacted = true; int numMessages = 1; bool useConsumer=true; bool useProducer=true; //int nSet=atoi(argv[1]); //if(1==nSet) //{ //#define USE_COMSUMER //} //else //{ //#define USE_PRODUCER // //} long long startTime = System::currentTimeMillis(); #ifdef USE_PRODUCER printf("当前 USE_PRODUCER \r\n"); int numProducerMessages = 30; int nThreadNumber=10; vector<HelloWorldProducer *> vHelloWorldProducer; for(int i=0;i<nThreadNumber;++i) { HelloWorldProducer * producerTemp=new HelloWorldProducer(brokerURI, numProducerMessages, useTopics); vHelloWorldProducer.push_back(producerTemp); } #endif #ifdef USE_COMSUMER printf("当前 USE_COMSUMER \r\n"); HelloWorldConsumer consumer(brokerURI, numMessages, useTopics, sessionTransacted); // Start the consumer thread. Thread consumerThread(&consumer); consumerThread.start(); // Wait for the consumer to indicate that its ready to go. consumer.waitUntilReady(); #endif #ifdef USE_PRODUCER // Start the producer thread. vector<Thread *> vThread; for(int i=0;i<nThreadNumber;++i) { HelloWorldProducer & ProducerTemp=*vHelloWorldProducer[i]; Thread * threadTemp=new Thread(&ProducerTemp); vThread.push_back(threadTemp); threadTemp->start(); ProducerTemp.waitUntilReady(); } for(int i=0;i<vThread.size();++i) { Thread * threadTemp=vThread[i]; //threadTemp->join(); } while(1) { Thread::sleep(10); } //Thread producerThread1(&producer1); //producerThread1.start(); //producer1.waitUntilReady(); //Thread producerThread2(&producer2); //producerThread2.start(); //producer2.waitUntilReady(); //Thread producerThread3(&producer3); //producerThread3.start(); //producer3.waitUntilReady(); #endif #ifdef USE_PRODUCER // Wait for the threads to complete. //producerThread1.join(); //producerThread2.join(); //producerThread3.join(); #endif #ifdef USE_COMSUMER consumerThread.join(); #endif long long endTime = System::currentTimeMillis(); double totalTime = (double)(endTime - startTime) / 1000.0; #ifdef USE_PRODUCER //producer1.close(); //producer2.close(); //producer3.close(); for(int i=0;i<vHelloWorldProducer.size();++i) { HelloWorldProducer * ProducerTemp=vHelloWorldProducer[i]; ProducerTemp->close(); if(ProducerTemp) { delete ProducerTemp; ProducerTemp=NULL; } } #endif #ifdef USE_COMSUMER consumer.close(); #endif std::cout << "Time to completion = " << totalTime << " seconds." << std::endl; std::cout << "-----------------------------------------------------\n"; std::cout << "Finished with the example." << std::endl; std::cout << "=====================================================\n"; } activemq::library::ActiveMQCPP::shutdownLibrary(); return 0; } // END SNIPPET: demo 程序运行结果: 关于activemq-cpp 的Message 消息转换. activemq-cpp 中的转换ActiveMQMessageTransformation.transformMessage 中是有相应的实现. //////////////////////////////////////////////////////////////////////////////// bool ActiveMQMessageTransformation::transformMessage(cms::Message* message, ActiveMQConnection* connection, Message** amqMessage) { if (message == NULL) { throw NullPointerException(__FILE__, __LINE__, "Provided source cms::Message pointer was NULL"); } if (amqMessage == NULL) { throw NullPointerException(__FILE__, __LINE__, "Provided target commands::Message pointer was NULL"); } *amqMessage = dynamic_cast<Message*>(message); if (*amqMessage != NULL) { return false; } else { if (dynamic_cast<cms::BytesMessage*>(message) != NULL) { cms::BytesMessage* bytesMsg = dynamic_cast<cms::BytesMessage*>(message); bytesMsg->reset(); ActiveMQBytesMessage* msg = new ActiveMQBytesMessage(); msg->setConnection(connection); try { for (;;) { // Reads a byte from the message stream until the stream is empty msg->writeByte(bytesMsg->readByte()); } } catch (cms::MessageEOFException& e) { // if an end of message stream as expected } catch (cms::CMSException& e) { } *amqMessage = msg; } else if (dynamic_cast<cms::MapMessage*>(message) != NULL) { cms::MapMessage* mapMsg = dynamic_cast<cms::MapMessage*>(message); ActiveMQMapMessage* msg = new ActiveMQMapMessage(); msg->setConnection(connection); std::vector<std::string> elements = mapMsg->getMapNames(); std::vector<std::string>::iterator iter = elements.begin(); for(; iter != elements.end() ; ++iter) { std::string key = *iter; cms::Message::ValueType elementType = mapMsg->getValueType(key); switch(elementType) { case cms::Message::BOOLEAN_TYPE: msg->setBoolean(key, mapMsg->getBoolean(key)); break; case cms::Message::BYTE_TYPE: msg->setByte(key, mapMsg->getByte(key)); break; case cms::Message::BYTE_ARRAY_TYPE: msg->setBytes(key, mapMsg->getBytes(key)); break; case cms::Message::CHAR_TYPE: msg->setChar(key, mapMsg->getChar(key)); break; case cms::Message::SHORT_TYPE: msg->setShort(key, mapMsg->getShort(key)); break; case cms::Message::INTEGER_TYPE: msg->setInt(key, mapMsg->getInt(key)); break; case cms::Message::LONG_TYPE: msg->setLong(key, mapMsg->getLong(key)); break; case cms::Message::FLOAT_TYPE: msg->setFloat(key, mapMsg->getFloat(key)); break; case cms::Message::DOUBLE_TYPE: msg->setDouble(key, mapMsg->getDouble(key)); break; case cms::Message::STRING_TYPE: msg->setString(key, mapMsg->getString(key)); break; default: break; } } *amqMessage = msg; } else if (dynamic_cast<cms::ObjectMessage*>(message) != NULL) { cms::ObjectMessage* objMsg = dynamic_cast<cms::ObjectMessage*>(message); ActiveMQObjectMessage* msg = new ActiveMQObjectMessage(); msg->setConnection(connection); msg->setObjectBytes(objMsg->getObjectBytes()); *amqMessage = msg; } else if (dynamic_cast<cms::StreamMessage*>(message) != NULL) { cms::StreamMessage* streamMessage = dynamic_cast<cms::StreamMessage*>(message); streamMessage->reset(); ActiveMQStreamMessage* msg = new ActiveMQStreamMessage(); msg->setConnection(connection); try { while(true) { cms::Message::ValueType elementType = streamMessage->getNextValueType(); int result = -1; std::vector<unsigned char> buffer(255); switch(elementType) { case cms::Message::BOOLEAN_TYPE: msg->writeBoolean(streamMessage->readBoolean()); break; case cms::Message::BYTE_TYPE: msg->writeBoolean(streamMessage->readBoolean()); break; case cms::Message::BYTE_ARRAY_TYPE: while ((result = streamMessage->readBytes(buffer)) != -1) { msg->writeBytes(&buffer[0], 0, result); buffer.clear(); } break; case cms::Message::CHAR_TYPE: msg->writeChar(streamMessage->readChar()); break; case cms::Message::SHORT_TYPE: msg->writeShort(streamMessage->readShort()); break; case cms::Message::INTEGER_TYPE: msg->writeInt(streamMessage->readInt()); break; case cms::Message::LONG_TYPE: msg->writeLong(streamMessage->readLong()); break; case cms::Message::FLOAT_TYPE: msg->writeFloat(streamMessage->readFloat()); break; case cms::Message::DOUBLE_TYPE: msg->writeDouble(streamMessage->readDouble()); break; case cms::Message::STRING_TYPE: msg->writeString(streamMessage->readString()); break; default: break; } } } catch (cms::MessageEOFException& e) { // if an end of message stream as expected } catch (cms::CMSException& e) { } *amqMessage = msg; } else if (dynamic_cast<cms::TextMessage*>(message) != NULL) { cms::TextMessage* textMsg = dynamic_cast<cms::TextMessage*>(message); ActiveMQTextMessage* msg = new ActiveMQTextMessage(); msg->setConnection(connection); msg->setText(textMsg->getText()); *amqMessage = msg; } else { *amqMessage = new ActiveMQMessage(); (*amqMessage)->setConnection(connection); } ActiveMQMessageTransformation::copyProperties(message, dynamic_cast<cms::Message*>(*amqMessage)); } return true; } 5,activemq 的activemq broker cluster (activemq 集群). 可以参考: http://bh-keven.iteye.com/blog/1617788 http://blog.csdn.net/jason5186/article/details/18702523 6,activemq.xml 中的配置和activemq Connection URIS 配置 Index> Apache.NMS.ActiveMQ> ActiveMQ URI Configuration http://activemq.apache.org/nms/activemq-uri-configuration.html http://activemq.apache.org/tcp-transport-reference.html 是有相应介绍,但需要花一些时间去读. //7,wireFormat=openwire 的几种方式.的优缺点. //openwire,amqp,stomp,mqtt,ws

优秀的个人博客,低调大师

2018年Kotlin学习资料汇总

目录 awesome-kotlin-android 关于 目录 开源库 框架 DSL 扩展 UI 通用库 动画 Toolbar 按钮 依赖注入 数据绑定 代理 数据库 网络 日志 函数式编程 下载 图片 拍照 工具 其他 完整 app DEMO 书籍 视频 ​ 开源库 框架 KBinding - 使用kotlin实现的Android MVVM框架 Kotlin-Android-Template - 快速生成MVP 架构的项目模板 android-clean-architecture-boilerplate - clean 框架模板 DSL anko - JetBrains 官方为Android编写的 DSL,旨在令开发 Android 更快更简单 android-drawable-dsl - 通过 kotlin 构造 drawable 而不是 XML 的 DSL MaterialDrawerKt - 不使用 XML 创建 Material Design 导航抽屉 扩展 android-ktx - google 开源的 Kotlin 扩展插件库,在 Android 框架和 Support Library 上提供相应 API 层,帮助开发者更自然编写 Kotlin 代码 KAndroid - 轻量级Kotlin 扩展插件库 kotlin-jetpack 有用的扩展方法集合 kotlin-koi - 又一个轻量级Kotlin 扩展插件库 UI 通用库 anvil - 一个受React启发的Android的最小UI库 动画 Konfetti - 轻量五彩纸屑粒子系统 效果图: transitioner - 动态、简单的View场景切换动画 效果图: Toolbar JellyToolbar - Yalantis出品,必属精品!炫酷 toolbar 实现 效果图: 按钮 Stepper-Touch - Material Design设计风格的触摸步进器 效果图: 依赖注入

优秀的个人博客,低调大师

算法学习之路|日期问题

小明正在整理一批历史文献。这些历史文献中出现了很多日期。小明知道这些日期都在1960年1月1日至2059年12月31日。令小明头疼的是,这些日期采用的格式非常不统一,有采用年/月/日的,有采用月/日/年的,还有采用日/月/年的。更加麻烦的是,年份也都省略了前两位,使得文献上的一个日期,存在很多可能的日期与其对应。 比如02/03/04,可能是2002年03月04日、2004年02月03日或2004年03月02日。 给出一个文献上的日期,你能帮助小明判断有哪些可能的日期对其对应吗? 输入 一个日期,格式是"AA/BB/CC"。 (0 <= A, B, C <= 9) 输出 输出若干个不相同的日期,每个日期一行,格式是"yyyy-MM-dd"。多个日期按从早到晚排列。 样例输入 02/03/04 样例输出 2002-03-04 2004-02-03 2004-03-02 资源约定: 峰值内存消耗(含虚拟机) < 256M CPU消耗 < 1000ms 请严格按要求输出,不要画蛇添足地打印类似:“请您输入...” 的多余内容。 注意: main函数需要返回0; 只使用ANSI C/ANSI C++ 标准; 不要调用依赖于编译环境或操作系统的特殊函数。 所有依赖的函数必须明确地在源文件中 #include 不能通过工程设置而省略常用头文件。 提交程序时,注意选择所期望的语言类型和编译器类型 解题思路: 把每一部分的功能都分开了。 先判断天数,月份,年数是否正确。 注意: 瑞年以及不是瑞年要当心。 #include<iostream> using namespace std; int day(int month,int year); bool isrui(int year);//这两个包用于给其他包用 //剩下的包只给main函数用 bool isyear(int year){ if(year<=2059&&year>=1960){ return true; } else{ return false; } } bool ismonth(int month){ if(month<=12&&month>=1){ return true; } else{ return false; } } bool isday(int year,int month,int yourday){ if(yourday>day(month,year)||yourday==0){ return false; } else return true; } bool isrui(int year){ if ((year%4==0&&year%100!=0)||year%400==0){ return true; } else{ return false; } } int day(int month,int year){ if(month==0){ return 0; } if(month==1||month==3||month==5||month==7||month==8||month==10||month==12){ return 31; } else if(month==2&&isrui(year)){ return 29; } else if(month==2&&!isrui(year)){ return 28; } else{ return 30; } } void abc(int A,int B,int C){//核心函数 if(A<60) A+=2000; else if(A>=60) A+=1900; if(isyear(A)){ if(ismonth(B)){ if(isday(A, B, C)){ printf("%d-%02d-%02d\n",A,B,C); } } } } int main(){ int A,B,C; scanf("%d/%d/%d",&A,&B,&C); abc(A,B,C); abc(C,A,B); abc(C,B,A); }

资源下载

更多资源
Mario

Mario

马里奥是站在游戏界顶峰的超人气多面角色。马里奥靠吃蘑菇成长,特征是大鼻子、头戴帽子、身穿背带裤,还留着胡子。与他的双胞胎兄弟路易基一起,长年担任任天堂的招牌角色。

腾讯云软件源

腾讯云软件源

为解决软件依赖安装时官方源访问速度慢的问题,腾讯云为一些软件搭建了缓存服务。您可以通过使用腾讯云软件源站来提升依赖包的安装速度。为了方便用户自由搭建服务架构,目前腾讯云软件源站支持公网访问和内网访问。

Nacos

Nacos

Nacos /nɑ:kəʊs/ 是 Dynamic Naming and Configuration Service 的首字母简称,一个易于构建 AI Agent 应用的动态服务发现、配置管理和AI智能体管理平台。Nacos 致力于帮助您发现、配置和管理微服务及AI智能体应用。Nacos 提供了一组简单易用的特性集,帮助您快速实现动态服务发现、服务配置、服务元数据、流量管理。Nacos 帮助您更敏捷和容易地构建、交付和管理微服务平台。

WebStorm

WebStorm

WebStorm 是jetbrains公司旗下一款JavaScript 开发工具。目前已经被广大中国JS开发者誉为“Web前端开发神器”、“最强大的HTML5编辑器”、“最智能的JavaScript IDE”等。与IntelliJ IDEA同源,继承了IntelliJ IDEA强大的JS部分的功能。

用户登录
用户注册