首页 文章 精选 留言 我的

精选列表

搜索[springboot],共4570篇文章
优秀的个人博客,低调大师

文件系统(01):基于SpringBoot框架,管理Excel和PDF文件类型

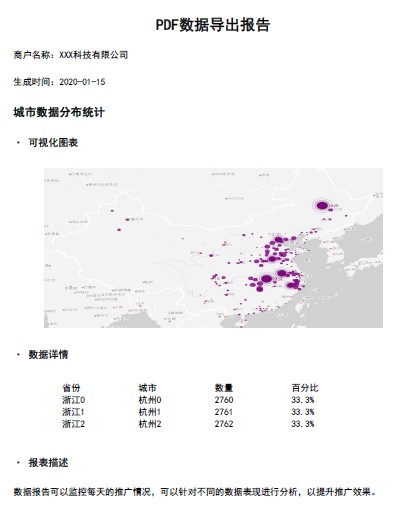
本文源码:GitHub·点这里 || GitEE·点这里 一、文档类型简介 1、Excel文档 Excel一款电子表格软件。直观的界面、出色的计算功能和图表工具,在系统开发中,经常用来把数据转存到Excel文件,或者Excel数据导入系统中,这就涉及数据转换问题。 2、PDF文档 PDF是可移植文档格式,是一种电子文件格式,具有许多其他电子文档格式无法相比的优点。PDF文件格式可以将文字、字型、格式、颜色及独立于设备和分辨率的图形图像等封装在一个文件中。该格式文件还可以包含超文本链接、声音和动态影像等电子信息,支持特长文件,集成度和安全可靠性都较高。 二、Excel文件管理 1、POI依赖 Apache POI是Apache软件基金会的开源类库,POI提供API给Java程序对Microsoft Office格式档案读和写的功能。 <!-- Excel 依赖 --> <dependency> <groupId>org.apache.poi</groupId> <artifactId>poi</artifactId> <version>3.9</version> </dependency> <!-- 2007及更高版本 --> <dependency> <groupId>org.apache.poi</groupId> <artifactId>poi-ooxml</artifactId> <version>3.9</version> </dependency> 2、文件读取 public static List<List<Object>> readExcel(String path) throws Exception { File file = new File(path) ; List<List<Object>> list = new LinkedList<>(); XSSFWorkbook xwb = new XSSFWorkbook(new FileInputStream(file)); // 读取 Sheet1 表格内容 XSSFSheet sheet = xwb.getSheetAt(0); // 读取行数:不读取Excel表头 for (int i = (sheet.getFirstRowNum()+1); i <= (sheet.getPhysicalNumberOfRows()-1); i++) { XSSFRow row = sheet.getRow(i); if (row == null) { continue; } List<Object> linked = new LinkedList<>(); for (int j = row.getFirstCellNum(); j <= row.getLastCellNum(); j++) { XSSFCell cell = row.getCell(j); if (cell == null) { continue; } Object value ; // 这里需根据实际业务情况处理 switch (cell.getCellType()) { case XSSFCell.CELL_TYPE_NUMERIC: //处理数值带{.0}问题 value = Double.valueOf(String.valueOf(cell)).longValue() ; break; default: value = cell.toString(); } linked.add(value); } if (linked.size()!= 0) { list.add(linked); } } return list; } 3、文件创建 public static void createExcel(String excelName, String[] headList,List<List<Object>> dataList) throws Exception { // 创建 Excel 工作簿 XSSFWorkbook workbook = new XSSFWorkbook(); XSSFSheet sheet = workbook.createSheet(); // 创建表头 XSSFRow row = sheet.createRow(0); for (int i = 0; i < headList.length; i++) { XSSFCell cell = row.createCell(i); cell.setCellType(XSSFCell.CELL_TYPE_STRING); cell.setCellValue(headList[i]); } //添加数据 for (int line = 0; line < dataList.size(); line++) { XSSFRow rowData = sheet.createRow(line+1); List<Object> data = dataList.get(line); for (int j = 0; j < headList.length; j++) { XSSFCell cell = rowData.createCell(j); cell.setCellType(XSSFCell.CELL_TYPE_STRING); cell.setCellValue((data.get(j)).toString()); } } FileOutputStream fos = new FileOutputStream(excelName); workbook.write(fos); fos.flush(); fos.close(); } 4、文件导出 public static void exportExcel(String[] headList, List<List<Object>> dataList, OutputStream outputStream) throws Exception { // 创建 Excel 工作簿 XSSFWorkbook workbook = new XSSFWorkbook(); XSSFSheet sheet = workbook.createSheet(); // 创建表头 XSSFRow row = sheet.createRow(0); for (int i = 0; i < headList.length; i++) { XSSFCell cell = row.createCell(i); cell.setCellType(XSSFCell.CELL_TYPE_STRING); cell.setCellValue(headList[i]); } //添加数据 for (int line = 0; line < dataList.size(); line++) { XSSFRow rowData = sheet.createRow(line+1); List<Object> data = dataList.get(line); for (int j = 0; j < headList.length; j++) { XSSFCell cell = rowData.createCell(j); cell.setCellType(XSSFCell.CELL_TYPE_STRING); cell.setCellValue((data.get(j)).toString()); } } workbook.write(outputStream); outputStream.flush(); outputStream.close(); } 5、文件导出接口 @RestController public class ExcelWeb { @RequestMapping("/web/outExcel") public void outExcel (HttpServletResponse response) throws Exception { String exportName = "2020-01-user-data" ; response.setContentType("application/vnd.ms-excel"); response.addHeader("Content-Disposition", "attachment;filename="+ URLEncoder.encode(exportName, "UTF-8") + ".xlsx"); List<List<Object>> dataList = ExcelUtil.readExcel("F:\\file-type\\user-excel.xlsx") ; String[] headList = new String[]{"用户ID", "用户名", "手机号"} ; ExcelUtil.exportExcel(headList,dataList,response.getOutputStream()) ; } } 三、PDF文件管理 1、IText依赖 iText是一种生成PDF报表的Java组件。通过在服务器端使用页面或API封装生成PDF报表,客户端可以通过超链接直接显示或下载到本地,在系统开发中通常用来生成比较正式的报告或者合同类的电子文档。 <dependency> <groupId>com.itextpdf</groupId> <artifactId>itextpdf</artifactId> <version>5.5.11</version> </dependency> <dependency> <groupId>com.itextpdf.tool</groupId> <artifactId>xmlworker</artifactId> <version>5.5.11</version> </dependency> 2、API二次封装 首先对于Itext提供的API做一下表格、段落、图片等基础样式的二次封装,可以更好的适配业务。 public class PdfFontUtil { private PdfFontUtil(){} /** * 段落样式获取 */ public static Paragraph getParagraph (String content, Font font,Integer alignment){ Paragraph paragraph = new Paragraph(content,font) ; if (alignment != null && alignment >= 0){ paragraph.setAlignment(alignment); } return paragraph ; } /** * 图片样式 */ public static Image getImage (String imgPath,float width,float height) throws Exception { Image image = Image.getInstance(imgPath); image.setAlignment(Image.MIDDLE); if (width > 0 && height > 0){ image.scaleAbsolute(width, height); } return image ; } /** * 表格生成 */ public static PdfPTable getPdfPTable01 (int numColumns,float totalWidth) throws Exception { // 表格处理 PdfPTable table = new PdfPTable(numColumns); // 设置表格宽度比例为%100 table.setWidthPercentage(100); // 设置宽度:宽度平均 table.setTotalWidth(totalWidth); // 锁住宽度 table.setLockedWidth(true); // 设置表格上面空白宽度 table.setSpacingBefore(10f); // 设置表格下面空白宽度 table.setSpacingAfter(10f); // 设置表格默认为无边框 table.getDefaultCell().setBorder(0); table.setPaddingTop(50); table.setSplitLate(false); return table ; } /** * 表格内容 */ public static PdfPCell getPdfPCell (Phrase phrase){ return new PdfPCell (phrase) ; } /** * 表格内容带样式 */ public static void addTableCell (PdfPTable dataTable,Font font,List<String> cellList){ for (String content:cellList) { dataTable.addCell(getParagraph(content,font,-1)); } } } 3、生成PDF文件 这里基于上面的工具类,画一个PDF页面作为参考。 public class PdfPage01 { // 基础配置 private static String PDF_SITE = "F:\\file-type\\PDF页面2020-01-15.pdf" ; private static String FONT = "C:/Windows/Fonts/simhei.ttf"; private static String PAGE_TITLE = "PDF数据导出报告" ; // 基础样式 private static Font TITLE_FONT = FontFactory.getFont(FONT, BaseFont.IDENTITY_H,20, Font.BOLD); private static Font NODE_FONT = FontFactory.getFont(FONT, BaseFont.IDENTITY_H,15, Font.BOLD); private static Font BLOCK_FONT = FontFactory.getFont(FONT, BaseFont.IDENTITY_H,13, Font.BOLD, BaseColor.BLACK); private static Font INFO_FONT = FontFactory.getFont(FONT, BaseFont.IDENTITY_H,12, Font.NORMAL,BaseColor.BLACK); private static Font CONTENT_FONT = FontFactory.getFont(FONT, BaseFont.IDENTITY_H, BaseFont.NOT_EMBEDDED); private static void createPdfPage () throws Exception { // 创建文档 Document document = new Document(); PdfWriter writer = PdfWriter.getInstance(document, new FileOutputStream(PDF_SITE)); document.open(); // 报告标题 document.add(PdfFontUtil.getParagraph(PAGE_TITLE,TITLE_FONT,1)) ; document.add(PdfFontUtil.getParagraph("\n商户名称:XXX科技有限公司",INFO_FONT,-1)) ; document.add(PdfFontUtil.getParagraph("\n生成时间:2020-01-15\n\n",INFO_FONT,-1)) ; // 报告内容 // 段落标题 + 报表图 document.add(PdfFontUtil.getParagraph("城市数据分布统计",NODE_FONT,-1)) ; document.add(PdfFontUtil.getParagraph("\n· 可视化图表\n\n",BLOCK_FONT,-1)) ; // 设置图片宽高 float documentWidth = document.getPageSize().getWidth() - document.leftMargin() - document.rightMargin(); float documentHeight = documentWidth / 580 * 320; document.add(PdfFontUtil.getImage("F:\\file-type\\myChart.jpg",documentWidth-80,documentHeight-80)) ; // 数据表格 document.add(PdfFontUtil.getParagraph("\n· 数据详情\n\n",BLOCK_FONT,-1)) ; PdfPTable dataTable = PdfFontUtil.getPdfPTable01(4,400) ; // 设置表格 List<String> tableHeadList = tableHead () ; List<List<String>> tableDataList = getTableData () ; PdfFontUtil.addTableCell(dataTable,CONTENT_FONT,tableHeadList); for (List<String> tableData : tableDataList) { PdfFontUtil.addTableCell(dataTable,CONTENT_FONT,tableData); } document.add(dataTable); document.add(PdfFontUtil.getParagraph("\n· 报表描述\n\n",BLOCK_FONT,-1)) ; document.add(PdfFontUtil.getParagraph("数据报告可以监控每天的推广情况," + "可以针对不同的数据表现进行分析,以提升推广效果。",CONTENT_FONT,-1)) ; document.newPage() ; document.close(); writer.close(); } private static List<List<String>> getTableData (){ List<List<String>> tableDataList = new ArrayList<>() ; for (int i = 0 ; i < 3 ; i++){ List<String> tableData = new ArrayList<>() ; tableData.add("浙江"+i) ; tableData.add("杭州"+i) ; tableData.add("276"+i) ; tableData.add("33.3%") ; tableDataList.add(tableData) ; } return tableDataList ; } private static List<String> tableHead (){ List<String> tableHeadList = new ArrayList<>() ; tableHeadList.add("省份") ; tableHeadList.add("城市") ; tableHeadList.add("数量") ; tableHeadList.add("百分比") ; return tableHeadList ; } public static void main(String[] args) throws Exception { createPdfPage () ; } } 4、页面效果 四、网页转PDF 1、页面Jar包依赖 <dependency> <groupId>org.springframework.boot</groupId> <artifactId>spring-boot-starter-thymeleaf</artifactId> </dependency> <dependency> <groupId>org.springframework.boot</groupId> <artifactId>spring-boot-starter-freemarker</artifactId> </dependency> 2、编写页面样式 <!DOCTYPE html> <html lang="en" xmlns:th="http://www.w3.org/1999/xhtml"> <head> <meta charset="UTF-8"/> <title>Title</title> <style> body{font-family:SimSun;} </style> </head> <body> 项目信息:<br/> 名称:${name}<br/> 作者:${author}<br/><br/> <img src="https://img2018.cnblogs.com/blog/1691717/201906/1691717-20190603213911854-1098366582.jpg"/> <br/> </body> </html> 3、核心配置类 public class PageConfig { private static final String DEST = "F:\\file-type\\HTML页面2020-01-15.pdf"; private static final String HTML = "/pdf_page_one.html"; private static final String FONT = "C:/Windows/Fonts/simsun.ttc"; private static Configuration freemarkerCfg = null ; static { freemarkerCfg = new Configuration(Configuration.DEFAULT_INCOMPATIBLE_IMPROVEMENTS); //freemarker的模板目录 try { String path = "TODO:模板路径{自定义}" ; freemarkerCfg.setDirectoryForTemplateLoading(new File(path)); } catch (IOException e) { e.printStackTrace(); } } /** * 创建文档 */ private static void createPdf(String content,String dest) throws Exception { Document document = new Document(); PdfWriter writer = PdfWriter.getInstance(document, new FileOutputStream(dest)); document.open(); XMLWorkerFontProvider fontImp = new XMLWorkerFontProvider(XMLWorkerFontProvider.DONTLOOKFORFONTS); fontImp.register(FONT); XMLWorkerHelper.getInstance().parseXHtml(writer, document, new ByteArrayInputStream(content.getBytes()), null, Charset.forName("UTF-8"), fontImp); document.close(); } /** * 页面渲染 */ private static String freeMarkerRender(Map<String, Object> data, String htmlTmp) throws Exception { Writer out = new StringWriter(); Template template = freemarkerCfg.getTemplate(htmlTmp,"UTF-8"); template.process(data, out); out.flush(); out.close(); return out.toString(); } /** * 方法入口 */ public static void main(String[] args) throws Exception { Map<String,Object> data = new HashMap<> (); data.put("name","smile"); data.put("author","知了") ; String content = PageConfig.freeMarkerRender(data,HTML); PageConfig.createPdf(content,DEST); } } 4、转换效果图 五、源代码地址 文中涉及文件类型,在该章节源码ware18-file-parent/case-file-type目录下。 GitHub·地址 https://github.com/cicadasmile/middle-ware-parent GitEE·地址 https://gitee.com/cicadasmile/middle-ware-parent 推荐往期阅读: 微服务架构专题 《1、项目技术选型简介,架构图解说明》 《2、业务架构设计,系统分层管理》 《3、数据库选型简介,业务数据规划设计》 《4、中间件集成,公共服务封装》 《5、SpringCloud 基础组件应用设计》 《6、通过业务、应用、技术、存储方面,聊聊架构》
优秀的个人博客,低调大师

阿里架构师用一篇文章带你详解SpringBoot注解

一、注解(annotations)列表@SpringBootApplication:包含了@ComponentScan、@Configuration和@EnableAutoConfiguration注解。其中@ComponentScan让Spring Boot扫描到Configuration类并把它加入到程序上下文。 @Configuration 等同于spring的XML配置文件;使用java代码可以检查类型安全。 @EnableAutoConfiguration 自动配置。 @ComponentScan 组件扫描,可自动发现和装配一些Bean。 @Component可配合CommandLineRunner使用,在程序启动后执行一些基础任务。 @RestController注解是@Controller和@ResponseBody的合集,表示这是个控制器bean,并且是将函数的返回值直 接填入HTTP响应体中,是REST风格的控制器。 @Autowired自动导入。 @PathVariable获取参数。 @JsonBackReference解决嵌套外链问题。 @RepositoryRestResourcepublic配合spring-boot-starter-data-rest使用。 二、注解(annotations)详解@SpringBootApplication:申明让spring boot自动给程序进行必要的配置,这个配置等同于:@Configuration ,@EnableAutoConfiguration 和 @ComponentScan 三个配置。 package com.example.myproject; import org.springframework.boot.SpringApplication; import org.springframework.boot.autoconfigure.SpringBootApplication; @SpringBootApplication // same as @Configuration @EnableAutoConfiguration @ComponentScan public class Application { public static void main(String[] args) { SpringApplication.run(Application.class, args); } } @ResponseBody:表示该方法的返回结果直接写入HTTP response body中,一般在异步获取数据时使用,用于构建RESTful的api。在使用@RequestMapping后,返回值通常解析为跳转路径,加上@responsebody后返回结果不会被解析为跳转路径,而是直接写入HTTP response body中。比如异步获取json数据,加上@responsebody后,会直接返回json数据。该注解一般会配合@RequestMapping一起使用。示例代码: @RequestMapping(“/test”) @ResponseBody public String test(){ return”ok”; } @Controller:用于定义控制器类,在spring 项目中由控制器负责将用户发来的URL请求转发到对应的服务接口(service层),一般这个注解在类中,通常方法需要配合注解@RequestMapping。示例代码: @Controller @RequestMapping(“/demoInfo”) publicclass DemoController { @Autowired private DemoInfoService demoInfoService; @RequestMapping("/hello") public String hello(Map map){ System.out.println("DemoController.hello()"); map.put("hello","from TemplateController.helloHtml"); //会使用hello.html或者hello.ftl模板进行渲染显示. return"/hello"; } @RestController:用于标注控制层组件(如struts中的action),@ResponseBody和@Controller的合集。示例代码: package com.kfit.demo.web; import org.springframework.web.bind.annotation.RequestMapping; import org.springframework.web.bind.annotation.RestController; /** * @author Angel(QQ交流群:193341332,QQ:412887952) @version v.0.1 @date 2016年7月29日下午7:26:04 */ @RestController @RequestMapping(“/demoInfo2”) publicclass DemoController2 { @RequestMapping("/test") public String test(){ return"ok"; } @RequestMapping:提供路信息,负责URL到Controller中的具体函数的映射。 @EnableAutoConfiguration:Spring Boot自动配置(auto-configuration):尝试根据你添加的jar依赖自动配置你的Spring应用。例如,如果你的classpath下存在HSQLDB,并且你没有手动配置任何数据库连接beans,那么我们将自动配置一个内存型(in-memory)数据库”。你可以将@EnableAutoConfiguration或者@SpringBootApplication注解添加到一个@Configuration类上来选择自动配置。如果发现应用了你不想要的特定自动配置类,你可以使用@EnableAutoConfiguration注解的排除属性来禁用它们。 @ComponentScan:表示将该类自动发现扫描组件。个人理解相当于,如果扫描到有@Component、@Controller、@Service等这些注解的类,并注册为Bean,可以自动收集所有的Spring组件,包括@Configuration类。我们经常使用@ComponentScan注解搜索beans,并结合@Autowired注解导入。可以自动收集所有的Spring组件,包括@Configuration类。我们经常使用@ComponentScan注解搜索beans,并结合@Autowired注解导入。如果没有配置的话,Spring Boot会扫描启动类所在包下以及子包下的使用了@Service,@Repository等注解的类。 @Configuration:相当于传统的xml配置文件,如果有些第三方库需要用到xml文件,建议仍然通过@Configuration类作为项目的配置主类——可以使用@ImportResource注解加载xml配置文件。 @Import:用来导入其他配置类。 @ImportResource:用来加载xml配置文件。 @Autowired:自动导入依赖的bean @Service:一般用于修饰service层的组件 @Repository:使用@Repository注解可以确保DAO或者repositories提供异常转译,这个注解修饰的DAO或者repositories类会被ComponetScan发现并配置,同时也不需要为它们提供XML配置项。 @Bean:用@Bean标注方法等价于XML中配置的bean。 @Value:注入Spring boot application.properties配置的属性的值。示例代码: @Value(value = “#{message}”) private String message; @Inject:等价于默认的@Autowired,只是没有required属性; @Component:泛指组件,当组件不好归类的时候,我们可以使用这个注解进行标注。 @Bean:相当于XML中的,放在方法的上面,而不是类,意思是产生一个bean,并交给spring管理。 @AutoWired:自动导入依赖的bean。byType方式。把配置好的Bean拿来用,完成属性、方法的组装,它可以对类成员变量、方法及构造函数进行标注,完成自动装配的工作。当加上(required=false)时,就算找不到bean也不报错。 @Qualifier:当有多个同一类型的Bean时,可以用@Qualifier(“name”)来指定。与@Autowired配合使用。@Qualifier限定描述符除了能根据名字进行注入,但能进行更细粒度的控制如何选择候选者,具体使用方式如下: @Autowired @Qualifier(value = “demoInfoService”) private DemoInfoService demoInfoService; @Resource(name=”name”,type=”type”):没有括号内内容的话,默认byName。与@Autowired干类似的事。 三、JPA注解@Entity:@Table(name=”“):表明这是一个实体类。一般用于jpa这两个注解一般一块使用,但是如果表名和实体类名相同的话,@Table可以省略 @MappedSuperClass:用在确定是父类的entity上。父类的属性子类可以继承。 @NoRepositoryBean:一般用作父类的repository,有这个注解,spring不会去实例化该repository。 @Column:如果字段名与列名相同,则可以省略。 @Id:表示该属性为主键。 @GeneratedValue(strategy = GenerationType.SEQUENCE,generator = “repair_seq”):表示主键生成策略是sequence(可以为Auto、IDENTITY、native等,Auto表示可在多个数据库间切换),指定sequence的名字是repair_seq。 @SequenceGeneretor(name = “repair_seq”, sequenceName = “seq_repair”, allocationSize = 1):name为sequence的名称,以便使用,sequenceName为数据库的sequence名称,两个名称可以一致。 @Transient:表示该属性并非一个到数据库表的字段的映射,ORM框架将忽略该属性。如果一个属性并非数据库表的字段映射,就务必将其标示为@Transient,否则,ORM框架默认其注解为@Basic。@Basic(fetch=FetchType.LAZY):标记可以指定实体属性的加载方式 @JsonIgnore:作用是json序列化时将java bean中的一些属性忽略掉,序列化和反序列化都受影响。 @JoinColumn(name=”loginId”):一对一:本表中指向另一个表的外键。一对多:另一个表指向本表的外键。 @OneToOne、@OneToMany、@ManyToOne:对应Hibernate配置文件中的一对一,一对多,多对一。 四、springMVC相关注解@RequestMapping:@RequestMapping(“/path”)表示该控制器处理所有“/path”的UR L请求。RequestMapping是一个用来处理请求地址映射的注解,可用于类或方法上。 用于类上,表示类中的所有响应请求的方法都是以该地址作为父路径。该注解有六个属性: params:指定request中必须包含某些参数值是,才让该方法处理。 headers:指定request中必须包含某些指定的header值,才能让该方法处理请求。 value:指定请求的实际地址,指定的地址可以是URI Template 模式 method:指定请求的method类型, GET、POST、PUT、DELETE等 consumes:指定处理请求的提交内容类型(Content-Type),如application/json,text/html; produces:指定返回的内容类型,仅当request请求头中的(Accept)类型中包含该指定类型才返回 @RequestParam:用在方法的参数前面。 @RequestParam String a =request.getParameter(“a”)。 @PathVariable:路径变量。如 RequestMapping(“user/get/mac/{macAddress}”) public String getByMacAddress(@PathVariable String macAddress){ //do something; } 参数与大括号里的名字一样要相同。 五、全局异常处理@ControllerAdvice:包含@Component。可以被扫描到。统一处理异常。 @ExceptionHandler(Exception.class):用在方法上面表示遇到这个异常就执行以下方法。 喜欢这篇文章的可以给笔者点个赞同,关注一下,每天都会分享Java相关文章!还有不定时的福利赠送,包括整理的学习资料,面试题,源码等~~

优秀的个人博客,低调大师

30分钟极速通关react mobx react-router及打通springboot

内容导航 简单开发react 将react与mobx结合开发 使用react-router进行多页面开发 将项目打包到后端项目中进行部署 将完成的项目做成脚手架,避免重复的环境搭建 需要环境 确保node已经安装 确保npm已经安装 创建项目 github项目地址 npx create-react-app test # test 为你需要创建项目的名字,会在命令当前目录下创建test的目录,包含项目所有的文件 你已经完成了创建,开始跑起来 npm start 你可以看到react已经能够在local host:3000访问了,只有一个欢迎页面 目录结构 node_modules 是当前目录安装的模块存放的地方 public index.html 是单页面的入口 src 可存放自己编写的代码,App是默认生成的欢迎页面逻辑,index 是js的主入口 开始更改你的代码 A. react简单开发 1.将App.js的代码更改如下 import React, {Component} from 'react'; import './App.css'; class App extends Component { constructor(props) { super(props) this.state = {todos: [{checked: false, text: "hello"}, {checked: true, text: "world"}]} this.handleClick=this.handleClick.bind(this) } handleClick(index) { let todos = this.state.todos todos[index].checked = !todos[index].checked this.setState({todos:todos}) } render() { let todos = this.state.todos let todosDiv = todos.map((item, index) => { return (<Todo index={index} checked={item.checked} text={item.text} handleClick={this.handleClick}/>) }) return ( <div className="App"> {todosDiv} </div> ); } } class Todo extends Component { constructor(props){ super(props) this.handleClick=this.handleClick.bind(this) } handleClick() { let index = this.props.index this.props.handleClick(index) }; render() { return ( <p><input type={'checkbox'} checked={this.props.checked} onClick={this.handleClick}/> {this.props.text}:{this.props.index} </p> ) } } export default App; 再次npm start一下看看效果吧~ 可以看到我们组件已经能够响应点击了 B. 引入mobx作为状态管理 提出问题 在上面我们可以看到想要更改状态是比较困难的,首先要将handClick方法由子组件传给父组件,再进行处理。如果我们的组件是四五层组件的时候得一步一步的往上级传递,这就会导致组件传递写的很臃肿。这个时候就需要一个将状态(即state这个值)独立开来。 react有很多状态管理的组件,比如redux,mobx。但redux写起来还是不如mobx简单明了。下面我们就来接入mobx。 接入步骤 安装依赖 npm install mobx --save npm install mobx-react --save 启用装饰器语法 # 如果有git的话,要将没有保存的文件上传之后或者删除之后才能跑eject命令 yarn run eject npm install --save-dev babel-preset-mobx 在package.json中找到babel项目,在presets里面增加"mobx" "babel": { "presets": [ "react-app", "mobx" ]}, 加入core-decorators npm install core-decorators --save 在src下增加store.AppStore.js文件 import {action, observable} from "mobx"; class AppStore { @observable todos; constructor() { this.todos = [{checked: false, text: "hello"}, {checked: true, text: "world"}] } @action.bound handleClick(index) { let todos = this.todos todos[index].checked = !todos[index].checked } } export default AppStore; 改写index.js import React from 'react'; import ReactDOM from 'react-dom'; import './index.css'; import App from './App'; import * as serviceWorker from './serviceWorker'; import {Provider} from "mobx-react"; import AppStore from './store/AppStore' let rootStore = {} rootStore['app'] = new AppStore() ReactDOM.render( <Provider {...rootStore}> <App/> </Provider>, document.getElementById('root')); // If you want your app to work offline and load faster, you can change // unregister() to register() below. Note this comes with some pitfalls. // Learn more about service workers: https://bit.ly/CRA-PWA serviceWorker.unregister(); 改写App.js import React, {Component} from 'react'; import './App.css'; import {inject, observer} from "mobx-react"; import {autobind} from "core-decorators"; @inject("app") @autobind @observer class App extends Component { constructor(props) { super(props) } render() { let todos = this.props.app.todos let todosDiv = todos.map((item, index) => { return (<Todo index={index}/>) }) return ( <div className="App"> {todosDiv} </div> ); } } @inject("app") @autobind @observer class Todo extends Component { constructor(props) { super(props) } handleClick() { let index = this.props.index this.props.app.handleClick(index) }; render() { let index = this.props.index let todo = this.props.app.todos[index] return ( <p><input type={'checkbox'} checked={todo.checked} onClick={this.handleClick}/> {todo.text}:{index} </p> ) } } export default App; npm start一下,来看看效果吧 简要说明 @inject("app")表示注入在index.js中的rootStore的属性app。是由这个标签来实现动态的注入的 @autobind 将组件之间的绑定自动完成 @observer mobx用来将react组件转换为响应式组件的注解,详情查看mobx的文档 上面可以看出,将原本的state的属性抽离到AppStore中了,对值得更改方法也是直接调用AppStore的方法,从而避免了react组件的一级一级往上传递 C. 引入react-router作为多页面管理 提出问题 上面我们完成了单页面的开发。当需要多个页面时我们就需要使用react-router来对不同路径进行渲染了 接入react-router步骤 安装依赖 npm install react-router mobx-react-router --save 增加新的页面,在src中增加component/Test.js import * as React from "react"; class Test extends React.Component{ render() { return(<p>welcome!</p>) } } export default Test; 更改index.js import React from 'react'; import ReactDOM from 'react-dom'; import './index.css'; import App from './App'; import * as serviceWorker from './serviceWorker'; import {Provider} from "mobx-react"; import AppStore from './store/AppStore' import {Route, Router, Switch} from "react-router"; import {RouterStore, syncHistoryWithStore} from "mobx-react-router"; import createHashHistory from "history/createHashHistory" import Test from "./component/Test" let rootStore = {} const hashHistory = createHashHistory() const routerStore = new RouterStore() const history = syncHistoryWithStore(hashHistory, routerStore) rootStore['app'] = new AppStore() routerStore['routing'] = routerStore ReactDOM.render( <Provider {...rootStore}> <Router history={history}> <p>here is the menu</p> <Switch> <Route path={"/test"} component={Test}/> <Route path={"/"} component={App}/> </Switch> </Router> </Provider>, document.getElementById('root')); // If you want your app to work offline and load faster, you can change // unregister() to register() below. Note this comes with some pitfalls. // Learn more about service workers: https://bit.ly/CRA-PWA serviceWorker.unregister(); npm start一下,访问下/#/test,和/#/路径,看看效果吧 简要说明 createHashHistory是单页面的访问,会在url加个#号作为定位,这个对于要打包到后台作为页面时是很方便的。 如果你直接使用node部署的话可以直接使用createBrowserHistory,url就会是没有#号的url。 D. 结合ui框架 接入步骤 找到一个合适的react ui框架,install之后按照ui框架的教程就可以开发一个相对比较好看的页面了 常见的框架有semantic,bootstrap,ant等。 E. 结合maven打包进spring boot项目 提出问题 当我们需要跟spring boot等后端项目结合,而又不想单独部署前端页面时,就需要打包进后端项目了 接入步骤 新建一个多模块的maven项目 按照之前创建的步骤,创建前端的模块,假设模块名字为view,并在前端模块的目录下增加pom.xml <build> <plugins> <plugin> <groupId>com.github.eirslett</groupId> <artifactId>frontend-maven-plugin</artifactId> <version>1.2</version> <executions> &lt;-- Install our node and npm version to run npm/node scripts--> <execution> <id>install node and npm</id> <goals> <goal>install-node-and-npm</goal> </goals> <configuration> &lt;-- 指定node的版本例如 v6.9.1 --> <nodeVersion>${nodeVersion}</nodeVersion> <npmVersion>${npmVersion}</npmVersion> <nodeDownloadRoot>https://npm.taobao.org/mirrors/node/</nodeDownloadRoot> <npmDownloadRoot>http://registry.npmjs.org/npm/-/</npmDownloadRoot> </configuration> </execution> &lt;-- Set NPM Registry --> <execution> <id>npm set registry</id> <goals> <goal>npm</goal> </goals> <configuration> &lt;--<arguments>config set registry https://registry.npmjs.org</arguments>--> <arguments>config set registry https://registry.npm.taobao.org</arguments> </configuration> </execution> &lt;-- Set SSL privilege --> <execution> <id>npm set non-strict ssl</id> <goals> <goal>npm</goal> </goals> &lt;-- Optional configuration which provides for running any npm command --> <configuration> <arguments>config set strict-ssl false</arguments> </configuration> </execution> &lt;-- Install all project dependencies --> <execution> <id>npm install</id> <goals> <goal>npm</goal> </goals> &lt;-- optional: default phase is "generate-resources" --> <phase>generate-resources</phase> &lt;-- Optional configuration which provides for running any npm command --> <configuration> <arguments>install</arguments> </configuration> </execution> &lt;-- Build and minify static files --> <execution> <id>npm run build</id> <goals> <goal>npm</goal> </goals> <configuration> <arguments>run build</arguments> </configuration> </execution> </executions> </plugin> </plugins> </build> 当进行mvn package时就会在目录下生成build目录,包含所有的页面和脚本了。 在spring boot后端项目中,将前端打包好的页面拷贝到后端目录中 <build> <plugins> <plugin> <artifactId>maven-resources-plugin</artifactId> <executions> <execution> <id>Copy App Content</id> <phase>generate-resources</phase> <goals> <goal>copy-resources</goal> </goals> <configuration> <outputDirectory>src/main/resources/public</outputDirectory> <overwrite>true</overwrite> <resources> <resource> <directory>${project.parent.basedir}/view/build</directory> <includes> <include>static/</include> <include>index.html</include> </includes> </resource> </resources> </configuration> </execution> </executions> </plugin> <plugin> <groupId>org.springframework.boot</groupId> <artifactId>spring-boot-maven-plugin</artifactId> </plugin> </plugins> </build> 其中outputDirectory指明要放入的文件夹 directory指明要拷贝哪里的资源文件,需要根据你的前端模块名进行相应的修改 mvn package 一下,后端模块的打包jar里面就会有相应的资源文件啦 F. 前后端联调 步骤 在前端项目package.json中指明接口的代理 "proxy":"http://localhost:8080/" 如果servletPath不为/,则需要在后面补上相应的servletPath 当你的后端项目有设置servletPath的时候,需要相应配置前端的打包的servletPath,否则默认为/的servletpath 方法1: package.json 增加 "homepage": "." 方法2: config.paths.js文件下修改配置 function getServedPath(appPackageJson) { const publicUrl = getPublicUrl(appPackageJson); //将/修改为./ const servedUrl = envPublicUrl || (publicUrl ? url.parse(publicUrl).pathname : './'); return ensureSlash(servedUrl, true); } G. 将你创建好的项目做成脚手架 提出问题 如果每个项目都要经历上面的步骤,才能完成,那前期工作量是在太繁琐又重复 借助maven的archetype来帮你自动生成一个初始项目吧 接入步骤 按照上面的流程我们已经建好了项目 在项目目录下执行 mvn archetype:create-from-project,生成的target就是你的脚手架项目 cd target/generated-sources/archetype 目录下,执行mvn install 就把archetype放入了本地仓库了,可以进行使用了 为了deploy到远程仓库中,需要在target/generated-sources/archetype 目录下的pom.xml中加入自己的远程仓库的地址,然后在target/generated-sources/archetype 目录下mvn deploy就可以了 屏蔽掉部分不想打包进archetype的文件 要屏蔽部分文件夹时在pom中加入plugin <plugin> <artifactId>maven-archetype-plugin</artifactId> <version>3.0.1</version> <configuration> <propertyFile>archetype.properties</propertyFile> </configuration> </plugin> 新建archetype.properties文件,配置要忽略的通配符excludePatterns=/.idea/,**.iml 怎么使用archetype 创建项目在idea中,在点击file-> new-> project后弹出的对话框中选择maven 在create from archetype打勾,点击Add archetype加入创建好的archetype 填写对应的groupId,artifaceId,version后在列表中选择已有的archetype 按引导进行后续步骤的创建,然后就会自动生成跟你项目一样的啦 跨store的访问 什么是跨store访问 在上面我们有这样的代码 const routerStore = new RouterStore() rootStore['app'] = new AppStore() routerStore['routing'] = routerStore 有时候我们往往需要在一个store的方法中去访问下别的store的内容,这个时候就是跨store的访问,就需要在初始化时将rootStore传给这个store,通过rootStore去访问,改写index.js rootStore['app'] = new AppStore(rootStore) 改写AppStore.js,增加构造函数 constructor(rootStore) { this.rootStore = rootStore } 这样就可以在AppStore.js的函数中通过this.rootStore 去获取所有store的json,从而访问所有的store了

优秀的个人博客,低调大师

这10道springboot常见面试题你需要了解下

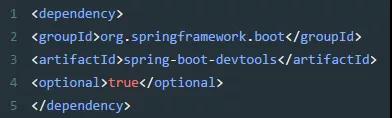
1、什么是Spring Boot? 多年来,随着新功能的增加,spring变得越来越复杂。只需访问https://spring.io/projects页面,我们就会看到可以在我们的应用程序中使用的所有Spring项目的不同功能。 如果必须启动一个新的Spring项目,我们必须添加构建路径或添加Maven依赖关系,配置应用程序服务器,添加spring配置。 因此,开始一个新的spring项目需要很多努力,因为我们现在必须从头开始做所有事情。 Spring Boot是解决这个问题的方法。Spring Boot已经建立在现有spring框架之上。使用spring启动,我们避免了之前我们必须做的所有样板代码和配置。 因此,Spring Boot可以帮助我们以最少的工作量,更加健壮地使用现有的Spring功能。 2、Spring Boot有哪些优点? 减少开发,测试时间和努力。 使用JavaConfig有助于避免使用XML。 避免大量的Maven导入和各种版本冲突。 提供意见发展方法。 通过提供默认值快速开始开发。 没有单独的Web服务器需要。这意味着你不再需要启动Tomcat,Glassfish或其他任何东西。 需要更少的配置 因为没有web.xml文件。只需添加用@ Configuration注释的类,然后添加用@Bean注释的方法,Spring将自动加载对象并像以前一样对其进行管理。您甚至可以将@Autowired添加到bean方法中,以使Spring自动装入需要的依赖关系中。 基于环境的配置 使用这些属性,您可以将您正在使用的环境传递到应用程序:-Dspring.profiles.active = {enviornment}。在加载主应用程序属性文件后,Spring将在(application{environment} .properties)中加载后续的应用程序属性文件。 3、什么是JavaConfig? Spring JavaConfig是Spring社区的产品,它提供了配置Spring IoC容器的纯Java方法。因此它有助于避免使用XML配置。使用JavaConfig的优点在于: 面向对象的配置。由于配置被定义为JavaConfig中的类,因此用户可以充分利用Java中的面向对象功能。一个配置类可以继承另一个,重写它的@Bean方法等。 减少或消除XML配置。基于依赖注入原则的外化配置的好处已被证明。但是,许多开发人员不希望在XML和Java之间来回切换。 JavaConfig为开发人员提供了一种纯Java方法来配置与XML配置概念相似的Spring容器。 从技术角度来讲,只使用JavaConfig配置类来配置容器是可行的,但实际上很多人认为将JavaConfig与XML混合匹配是理想的。 类型安全和重构友好。JavaConfig提供了一种类型安全的方法来配置Spring容器。由于Java 5.0对泛型的支持,现在可以按类型而不是按名称检索bean,不需要任何强制转换或基于字符串的查找。 4、如何重新加载Spring Boot上的更改,而无需重新启动服务器? 这可以使用DEV工具来实现。通过这种依赖关系,您可以节省任何更改,嵌入式tomcat将重新启动。 Spring Boot有一个开发工具(DevTools)模块,它有助于提高开发人员的生产力。Java开发人员面临的一个主要挑战是将文件更改自动部署到服务器并自动重启服务器。 开发人员可以重新加载Spring Boot上的更改,而无需重新启动服务器。这将消除每次手动部署更改的需要。Spring Boot在发布它的第一个版本时没有这个功能。 这是开发人员最需要的功能。DevTools模块完全满足开发人员的需求。该模块将在生产环境中被禁用。它还提供H2数据库控制台以更好地测试应用程序。 5、Spring Boot中的监视器是什么? Spring boot actuator是spring启动框架中的重要功能之一。Spring boot监视器可帮助您访问生产环境中正在运行的应用程序的当前状态。 有几个指标必须在生产环境中进行检查和监控。即使一些外部应用程序可能正在使用这些服务来向相关人员触发警报消息。监视器模块公开了一组可直接作为HTTP URL访问的REST端点来检查状态。 6、如何在Spring Boot中禁用Actuator端点安全性? 默认情况下,所有敏感的HTTP端点都是安全的,只有具有ACTUATOR角色的用户才能访问它们。 安全性是使用标准的HttpServletRequest.isUserInRole方法实施的。 我们可以使用management.security.enabled = false 来禁用安全性。只有在执行机构端点在防火墙后访问时,才建议禁用安全性。 如何在自定义端口上运行Spring Boot应用程序? 为了在自定义端口上运行Spring Boot应用程序,您可以在application.properties中指定端口。 server.port = 8090 7、什么是YAML? YAML是一种人类可读的数据序列化语言。它通常用于配置文件。 与属性文件相比,如果我们想要在配置文件中添加复杂的属性,YAML文件就更加结构化,而且更少混淆。可以看出YAML具有分层配置数据。 8、如何实现Spring Boot应用程序的安全性? 为了实现Spring Boot的安全性,我们使用 spring-boot-starter-security依赖项,并且必须添加安全配置。它只需要很少的代码。配置类将必须扩展WebSecurityConfigurerAdapter并覆盖其方法。 9、如何集成Spring Boot和ActiveMQ? 对于集成Spring Boot和ActiveMQ,我们使用spring-boot-starter-activemq 依赖关系。 它只需要很少的配置,并且不需要样板代码。 10、如何使用Spring Boot实现分页和排序? 使用Spring Boot实现分页非常简单。使用Spring Data-JPA可以实现将可分页的org.springframework.data.domain.Pageable传递给存储库方法。

资源下载

更多资源
Mario

Mario

马里奥是站在游戏界顶峰的超人气多面角色。马里奥靠吃蘑菇成长,特征是大鼻子、头戴帽子、身穿背带裤,还留着胡子。与他的双胞胎兄弟路易基一起,长年担任任天堂的招牌角色。

Spring

Spring

Spring框架(Spring Framework)是由Rod Johnson于2002年提出的开源Java企业级应用框架,旨在通过使用JavaBean替代传统EJB实现方式降低企业级编程开发的复杂性。该框架基于简单性、可测试性和松耦合性设计理念,提供核心容器、应用上下文、数据访问集成等模块,支持整合Hibernate、Struts等第三方框架,其适用范围不仅限于服务器端开发,绝大多数Java应用均可从中受益。

Rocky Linux

Rocky Linux

Rocky Linux(中文名:洛基)是由Gregory Kurtzer于2020年12月发起的企业级Linux发行版,作为CentOS稳定版停止维护后与RHEL(Red Hat Enterprise Linux)完全兼容的开源替代方案,由社区拥有并管理,支持x86_64、aarch64等架构。其通过重新编译RHEL源代码提供长期稳定性,采用模块化包装和SELinux安全架构,默认包含GNOME桌面环境及XFS文件系统,支持十年生命周期更新。

Sublime Text

Sublime Text

Sublime Text具有漂亮的用户界面和强大的功能,例如代码缩略图,Python的插件,代码段等。还可自定义键绑定,菜单和工具栏。Sublime Text 的主要功能包括:拼写检查,书签,完整的 Python API , Goto 功能,即时项目切换,多选择,多窗口等等。Sublime Text 是一个跨平台的编辑器,同时支持Windows、Linux、Mac OS X等操作系统。

用户登录
用户注册