一、Mybatis框架
1、mybatis简介
MyBatis 是一款优秀的持久层框架,它支持定制化 SQL、存储过程以及高级映射。MyBatis 避免了几乎所有的 JDBC 代码和手动设置参数以及获取结果集。MyBatis 可以使用简单的 XML 或注解来配置和映射原生类型、接口和 Java 的 POJO(Plain Old Java Objects,普通老式 Java 对象)为数据库中的记录。
2、mybatis特点
1)sql语句与代码分离,存放于xml配置文件中,方便管理
2)用逻辑标签控制动态SQL的拼接,灵活方便
3)查询的结果集与java对象自动映射
4)编写原生态SQL,接近JDBC
5)简单的持久化框架,框架不臃肿简单易学
3、适用场景
MyBatis专注于SQL本身,是一个足够灵活的DAO层解决方案。
对性能的要求很高,或者需求变化较多的项目,MyBatis将是不错的选择。
二、与SpringBoot2.0整合
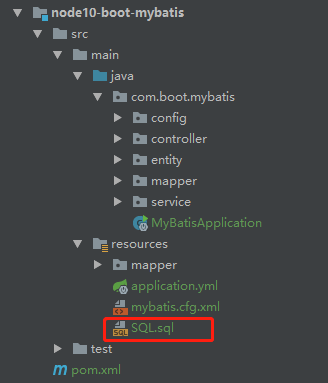
1、项目结构图
![10_1 10_1]()
采用druid连接池,该连接池。
2、核心依赖
<!-- mybatis依赖 -->
<dependency>
    <groupId>org.mybatis.spring.boot</groupId>
    <artifactId>mybatis-spring-boot-starter</artifactId>
    <version>1.3.2</version>
</dependency>
<!-- mybatis的分页插件 -->
<dependency>
    <groupId>com.github.pagehelper</groupId>
    <artifactId>pagehelper</artifactId>
    <version>4.1.6</version>
</dependency>
3、核心配置
mybatis:
  # mybatis配置文件所在路径
  config-location: classpath:mybatis.cfg.xml
  type-aliases-package: com.boot.mybatis.entity
  # mapper映射文件
  mapper-locations: classpath:mapper/*.xml
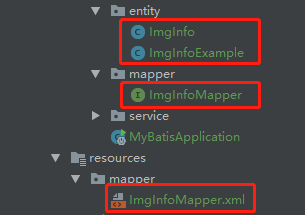
4、逆向工程生成的文件
![10_2 10_2]()
这里就不贴代码了。
5、编写基础测试接口
// 增加
int insert(ImgInfo record);
// 组合查询
List<ImgInfo> selectByExample(ImgInfoExample example);
// 修改
int updateByPrimaryKeySelective(ImgInfo record);
// 删除
int deleteByPrimaryKey(Integer imgId);
6、编写接口实现
@Service
public class ImgInfoServiceImpl implements ImgInfoService {
    @Resource
    private ImgInfoMapper imgInfoMapper ;
    @Override
    public int insert(ImgInfo record) {
        return imgInfoMapper.insert(record);
    }
    @Override
    public List<ImgInfo> selectByExample(ImgInfoExample example) {
        return imgInfoMapper.selectByExample(example);
    }
    @Override
    public int updateByPrimaryKeySelective(ImgInfo record) {
        return imgInfoMapper.updateByPrimaryKeySelective(record);
    }
    @Override
    public int deleteByPrimaryKey(Integer imgId) {
        return imgInfoMapper.deleteByPrimaryKey(imgId);
    }
}
7、控制层测试类
@RestController
public class ImgInfoController {
    @Resource
    private ImgInfoService imgInfoService ;
    // 增加
    @RequestMapping("/insert")
    public int insert(){
        ImgInfo record = new ImgInfo() ;
        record.setUploadUserId("A123");
        record.setImgTitle("博文图片");
        record.setSystemType(1) ;
        record.setImgType(2);
        record.setImgUrl("https://avatars0.githubusercontent.com/u/50793885?s=460&v=4");
        record.setLinkUrl("https://avatars0.githubusercontent.com/u/50793885?s=460&v=4");
        record.setShowState(1);
        record.setCreateDate(new Date());
        record.setUpdateDate(record.getCreateDate());
        record.setRemark("知了");
        record.setbEnable("1");
        return imgInfoService.insert(record) ;
    }
    // 组合查询
    @RequestMapping("/selectByExample")
    public List<ImgInfo> selectByExample(){
        ImgInfoExample example = new ImgInfoExample() ;
        example.createCriteria().andRemarkEqualTo("知了") ;
        return imgInfoService.selectByExample(example);
    }
    // 修改
    @RequestMapping("/updateByPrimaryKeySelective")
    public int updateByPrimaryKeySelective(){
        ImgInfo record = new ImgInfo() ;
        record.setImgId(11);
        record.setRemark("知了一笑");
        return imgInfoService.updateByPrimaryKeySelective(record);
    }
    // 删除
    @RequestMapping("/deleteByPrimaryKey")
    public int deleteByPrimaryKey() {
        Integer imgId = 11 ;
        return imgInfoService.deleteByPrimaryKey(imgId);
    }
}
8、测试顺序
http://localhost:8010/insert
http://localhost:8010/selectByExample
http://localhost:8010/updateByPrimaryKeySelective
http://localhost:8010/deleteByPrimaryKey
三、集成分页插件
1、mybatis配置文件
<?xml version="1.0" encoding="UTF-8" ?>
<!DOCTYPE configuration
        PUBLIC "-//mybatis.org//DTD Config 3.0//EN"
        "http://mybatis.org/dtd/mybatis-3-config.dtd">
<configuration>
    <plugins>
        <!--mybatis分页插件-->
        <plugin interceptor="com.github.pagehelper.PageHelper">
            <property name="dialect" value="mysql"/>
        </plugin>
    </plugins>
</configuration>
2、分页实现代码
@Override
public PageInfo<ImgInfo> queryPage(int page,int pageSize) {
    PageHelper.startPage(page,pageSize) ;
    ImgInfoExample example = new ImgInfoExample() ;
    // 查询条件
    example.createCriteria().andBEnableEqualTo("1").andShowStateEqualTo(1);
    // 排序条件
    example.setOrderByClause("create_date DESC,img_id ASC");
    List<ImgInfo> imgInfoList = imgInfoMapper.selectByExample(example) ;
    PageInfo<ImgInfo> pageInfo = new PageInfo<>(imgInfoList) ;
    return pageInfo ;
}
3、测试接口
http://localhost:8010/queryPage
四、源代码地址
GitHub地址:知了一笑
https://github.com/cicadasmile
码云地址:知了一笑
https://gitee.com/cicadasmile
![gzh20190804 gzh20190804]()


