高可用Hadoop平台-运行MapReduce程序
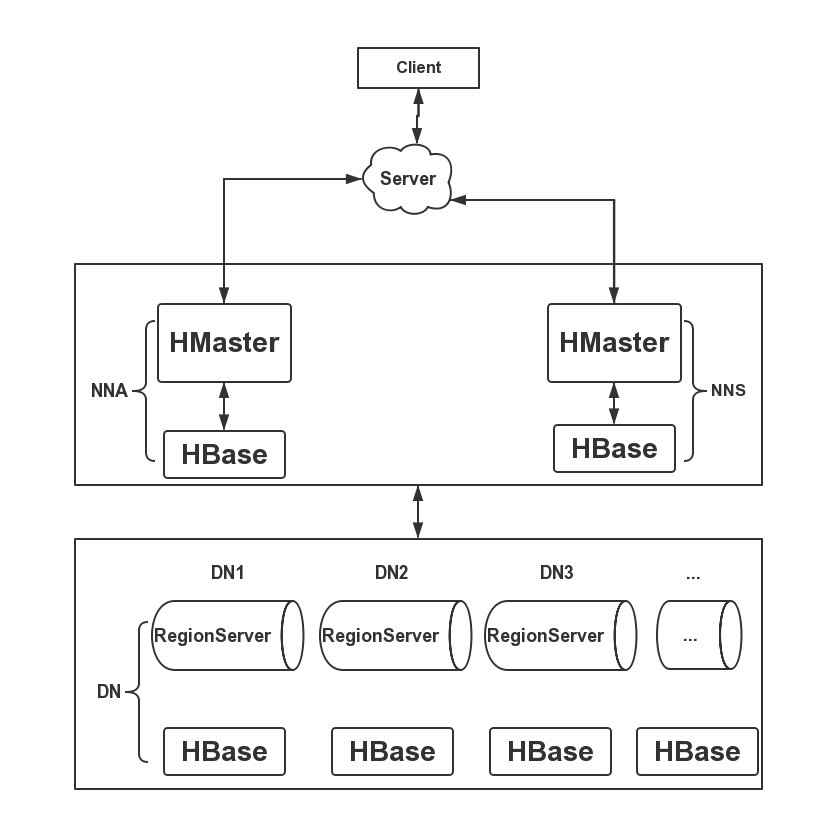
1.概述 最近有同学反应,如何在配置了HA的Hadoop平台运行MapReduce程序呢?对于刚步入Hadoop行业的同学,这个疑问却是会存在,其实仔细想想,如果你之前的语言功底不错的,应该会想到自动重连,自动重连也可以帮我我们解决运行MapReduce程序的问题。然后,今天我赘述的是利用Hadoop的Java API 来实现。 2.介绍 下面直接附上代码,代码中我都有注释。 2.1Java操作HDFS HA的API 代码如下: /** * */ package cn.hdfs.mr.example; import java.io.IOException; import org.apache.hadoop.conf.Configuration; import org.apache.hadoop.fs.FileStatus; import org.apache.hadoop.fs.FileSystem; import org.apache.hadoop.fs.Path; /** * @author dengjie * @date 2015年3月24日 * @description TODO */ public class DFS { public static void main(String[] args) { Configuration conf = new Configuration(); conf.set("fs.defaultFS", "hdfs://cluster1");//指定hdfs的nameservice为cluster1,是NameNode的URI conf.set("dfs.nameservices", "cluster1");//指定hdfs的nameservice为cluster1 conf.set("dfs.ha.namenodes.cluster1", "nna,nns");//cluster1下面有两个NameNode,分别是nna,nns conf.set("dfs.namenode.rpc-address.cluster1.nna", "10.211.55.26:9000");//nna的RPC通信地址 conf.set("dfs.namenode.rpc-address.cluster1.nns", "10.211.55.27:9000");//nns的RPC通信地址 conf.set("dfs.client.failover.proxy.provider.cluster1", "org.apache.hadoop.hdfs.server.namenode.ha.ConfiguredFailoverProxyProvider");//配置失败自动切换实现方式 FileSystem fs = null; try { fs = FileSystem.get(conf);//获取文件对象 FileStatus[] list = fs.listStatus(new Path("/"));//文件状态集合 for (FileStatus file : list) { System.out.println(file.getPath().getName());//打印目录名 } } catch (IOException e) { e.printStackTrace(); } finally { try { if (fs != null) { fs.close(); } } catch (IOException e) { e.printStackTrace(); } } } } 接下来,附上 Java 运行 MapReduce 程序的 API 代码。 2.2Java 运行 MapReduce 程序的 API 以 WordCount 为例子,代码如下: package cn.jpush.hdfs.mr.example; import java.io.IOException; import java.util.Random; import java.util.StringTokenizer; import org.apache.hadoop.conf.Configuration; import org.apache.hadoop.fs.Path; import org.apache.hadoop.io.IntWritable; import org.apache.hadoop.io.Text; import org.apache.hadoop.mapreduce.Job; import org.apache.hadoop.mapreduce.Mapper; import org.apache.hadoop.mapreduce.Reducer; import org.apache.hadoop.mapreduce.lib.input.FileInputFormat; import org.apache.hadoop.mapreduce.lib.output.FileOutputFormat; import org.slf4j.Logger; import org.slf4j.LoggerFactory; import cn.jpush.hdfs.utils.ConfigUtils; /** * * @author dengjie * @date 2014年11月29日 * @description Wordcount的例子是一个比较经典的mapreduce例子,可以叫做Hadoop版的hello world。 * 它将文件中的单词分割取出,然后shuffle,sort(map过程),接着进入到汇总统计 * (reduce过程),最后写道hdfs中。基本流程就是这样。 */ public class WordCount { private static Logger log = LoggerFactory.getLogger(WordCount.class); public static class TokenizerMapper extends Mapper<Object, Text, Text, IntWritable> { private final static IntWritable one = new IntWritable(1); private Text word = new Text(); /* * 源文件:a b b * * map之后: * * a 1 * * b 1 * * b 1 */ public void map(Object key, Text value, Context context) throws IOException, InterruptedException { StringTokenizer itr = new StringTokenizer(value.toString());// 整行读取 while (itr.hasMoreTokens()) { word.set(itr.nextToken());// 按空格分割单词 context.write(word, one);// 每次统计出来的单词+1 } } } /* * reduce之前: * * a 1 * * b 1 * * b 1 * * reduce之后: * * a 1 * * b 2 */ public static class IntSumReducer extends Reducer<Text, IntWritable, Text, IntWritable> { private IntWritable result = new IntWritable(); public void reduce(Text key, Iterable<IntWritable> values, Context context) throws IOException, InterruptedException { int sum = 0; for (IntWritable val : values) { sum += val.get(); } result.set(sum); context.write(key, result); } } @SuppressWarnings("deprecation") public static void main(String[] args) throws Exception { Configuration conf = new Configuration(); conf.set("fs.defaultFS", "hdfs://cluster1"); conf.set("dfs.nameservices", "cluster1"); conf.set("dfs.ha.namenodes.cluster1", "nna,nns"); conf.set("dfs.namenode.rpc-address.cluster1.nna", "10.211.55.26:9000"); conf.set("dfs.namenode.rpc-address.cluster1.nns", "10.211.55.27:9000"); conf.set("dfs.client.failover.proxy.provider.cluster1", "org.apache.hadoop.hdfs.server.namenode.ha.ConfiguredFailoverProxyProvider"); long random1 = new Random().nextLong();// 重定下输出目录 log.info("random1 -> " + random1); Job job1 = new Job(conf, "word count"); job1.setJarByClass(WordCount.class); job1.setMapperClass(TokenizerMapper.class);// 指定Map计算的类 job1.setCombinerClass(IntSumReducer.class);// 合并的类 job1.setReducerClass(IntSumReducer.class);// Reduce的类 job1.setOutputKeyClass(Text.class);// 输出Key类型 job1.setOutputValueClass(IntWritable.class);// 输出值类型 FileInputFormat.addInputPath(job1, new Path("/home/hdfs/test/hello.txt"));// 指定输入路径 FileOutputFormat.setOutputPath(job1, new Path(String.format(ConfigUtils.HDFS.WORDCOUNT_OUT, random1)));// 指定输出路径 System.exit(job1.waitForCompletion(true) ? 0 : 1);// 执行完MR任务后退出应用 } } 3.运行结果 下面附上部分运行 Log 日志,如下所示: [Job.main] - Running job: job_local551164419_0001 2015-03-24 11:52:09 INFO [LocalJobRunner.Thread-12] - OutputCommitter set in config null 2015-03-24 11:52:09 INFO [LocalJobRunner.Thread-12] - OutputCommitter is org.apache.hadoop.mapreduce.lib.output.FileOutputCommitter 2015-03-24 11:52:10 INFO [LocalJobRunner.Thread-12] - Waiting for map tasks 2015-03-24 11:52:10 INFO [LocalJobRunner.LocalJobRunner Map Task Executor #0] - Starting task: attempt_local551164419_0001_m_000000_0 2015-03-24 11:52:10 INFO [ProcfsBasedProcessTree.LocalJobRunner Map Task Executor #0] - ProcfsBasedProcessTree currently is supported only on Linux. 2015-03-24 11:52:10 INFO [Task.LocalJobRunner Map Task Executor #0] - Using ResourceCalculatorProcessTree : null 2015-03-24 11:52:10 INFO [MapTask.LocalJobRunner Map Task Executor #0] - Processing split: hdfs://cluster1/home/hdfs/test/hello.txt:0+24 2015-03-24 11:52:10 INFO [MapTask.LocalJobRunner Map Task Executor #0] - Map output collector class = org.apache.hadoop.mapred.MapTask$MapOutputBuffer 2015-03-24 11:52:10 INFO [MapTask.LocalJobRunner Map Task Executor #0] - (EQUATOR) 0 kvi 26214396(104857584) 2015-03-24 11:52:10 INFO [MapTask.LocalJobRunner Map Task Executor #0] - mapreduce.task.io.sort.mb: 100 2015-03-24 11:52:10 INFO [MapTask.LocalJobRunner Map Task Executor #0] - soft limit at 83886080 2015-03-24 11:52:10 INFO [MapTask.LocalJobRunner Map Task Executor #0] - bufstart = 0; bufvoid = 104857600 2015-03-24 11:52:10 INFO [MapTask.LocalJobRunner Map Task Executor #0] - kvstart = 26214396; length = 6553600 2015-03-24 11:52:10 INFO [LocalJobRunner.LocalJobRunner Map Task Executor #0] - 2015-03-24 11:52:10 INFO [MapTask.LocalJobRunner Map Task Executor #0] - Starting flush of map output 2015-03-24 11:52:10 INFO [MapTask.LocalJobRunner Map Task Executor #0] - Spilling map output 2015-03-24 11:52:10 INFO [MapTask.LocalJobRunner Map Task Executor #0] - bufstart = 0; bufend = 72; bufvoid = 104857600 2015-03-24 11:52:10 INFO [MapTask.LocalJobRunner Map Task Executor #0] - kvstart = 26214396(104857584); kvend = 26214352(104857408); length = 45/6553600 2015-03-24 11:52:10 INFO [MapTask.LocalJobRunner Map Task Executor #0] - Finished spill 0 2015-03-24 11:52:10 INFO [Task.LocalJobRunner Map Task Executor #0] - Task:attempt_local551164419_0001_m_000000_0 is done. And is in the process of committing 2015-03-24 11:52:10 INFO [LocalJobRunner.LocalJobRunner Map Task Executor #0] - map 2015-03-24 11:52:10 INFO [Task.LocalJobRunner Map Task Executor #0] - Task 'attempt_local551164419_0001_m_000000_0' done. 2015-03-24 11:52:10 INFO [LocalJobRunner.LocalJobRunner Map Task Executor #0] - Finishing task: attempt_local551164419_0001_m_000000_0 2015-03-24 11:52:10 INFO [LocalJobRunner.Thread-12] - map task executor complete. 2015-03-24 11:52:10 INFO [LocalJobRunner.Thread-12] - Waiting for reduce tasks 2015-03-24 11:52:10 INFO [LocalJobRunner.pool-6-thread-1] - Starting task: attempt_local551164419_0001_r_000000_0 2015-03-24 11:52:10 INFO [ProcfsBasedProcessTree.pool-6-thread-1] - ProcfsBasedProcessTree currently is supported only on Linux. 2015-03-24 11:52:10 INFO [Task.pool-6-thread-1] - Using ResourceCalculatorProcessTree : null 2015-03-24 11:52:10 INFO [ReduceTask.pool-6-thread-1] - Using ShuffleConsumerPlugin: org.apache.hadoop.mapreduce.task.reduce.Shuffle@1197414 2015-03-24 11:52:10 INFO [MergeManagerImpl.pool-6-thread-1] - MergerManager: memoryLimit=1503238528, maxSingleShuffleLimit=375809632, mergeThreshold=992137472, ioSortFactor=10, memToMemMergeOutputsThreshold=10 2015-03-24 11:52:10 INFO [EventFetcher.EventFetcher for fetching Map Completion Events] - attempt_local551164419_0001_r_000000_0 Thread started: EventFetcher for fetching Map Completion Events 2015-03-24 11:52:10 INFO [LocalFetcher.localfetcher#1] - localfetcher#1 about to shuffle output of map attempt_local551164419_0001_m_000000_0 decomp: 50 len: 54 to MEMORY 2015-03-24 11:52:10 INFO [InMemoryMapOutput.localfetcher#1] - Read 50 bytes from map-output for attempt_local551164419_0001_m_000000_0 2015-03-24 11:52:10 INFO [MergeManagerImpl.localfetcher#1] - closeInMemoryFile -> map-output of size: 50, inMemoryMapOutputs.size() -> 1, commitMemory -> 0, usedMemory ->50 2015-03-24 11:52:10 INFO [EventFetcher.EventFetcher for fetching Map Completion Events] - EventFetcher is interrupted.. Returning 2015-03-24 11:52:10 INFO [LocalJobRunner.pool-6-thread-1] - 1 / 1 copied. 2015-03-24 11:52:10 INFO [MergeManagerImpl.pool-6-thread-1] - finalMerge called with 1 in-memory map-outputs and 0 on-disk map-outputs 2015-03-24 11:52:10 INFO [Merger.pool-6-thread-1] - Merging 1 sorted segments 2015-03-24 11:52:10 INFO [Merger.pool-6-thread-1] - Down to the last merge-pass, with 1 segments left of total size: 46 bytes 2015-03-24 11:52:10 INFO [MergeManagerImpl.pool-6-thread-1] - Merged 1 segments, 50 bytes to disk to satisfy reduce memory limit 2015-03-24 11:52:10 INFO [MergeManagerImpl.pool-6-thread-1] - Merging 1 files, 54 bytes from disk 2015-03-24 11:52:10 INFO [MergeManagerImpl.pool-6-thread-1] - Merging 0 segments, 0 bytes from memory into reduce 2015-03-24 11:52:10 INFO [Merger.pool-6-thread-1] - Merging 1 sorted segments 2015-03-24 11:52:10 INFO [Merger.pool-6-thread-1] - Down to the last merge-pass, with 1 segments left of total size: 46 bytes 2015-03-24 11:52:10 INFO [LocalJobRunner.pool-6-thread-1] - 1 / 1 copied. 2015-03-24 11:52:10 INFO [deprecation.pool-6-thread-1] - mapred.skip.on is deprecated. Instead, use mapreduce.job.skiprecords 2015-03-24 11:52:10 INFO [Task.pool-6-thread-1] - Task:attempt_local551164419_0001_r_000000_0 is done. And is in the process of committing 2015-03-24 11:52:10 INFO [LocalJobRunner.pool-6-thread-1] - 1 / 1 copied. 2015-03-24 11:52:10 INFO [Task.pool-6-thread-1] - Task attempt_local551164419_0001_r_000000_0 is allowed to commit now 2015-03-24 11:52:10 INFO [FileOutputCommitter.pool-6-thread-1] - Saved output of task 'attempt_local551164419_0001_r_000000_0' to hdfs://cluster1/output/result/-3636988299559297154/_temporary/0/task_local551164419_0001_r_000000 2015-03-24 11:52:10 INFO [LocalJobRunner.pool-6-thread-1] - reduce > reduce 2015-03-24 11:52:10 INFO [Task.pool-6-thread-1] - Task 'attempt_local551164419_0001_r_000000_0' done. 2015-03-24 11:52:10 INFO [LocalJobRunner.pool-6-thread-1] - Finishing task: attempt_local551164419_0001_r_000000_0 2015-03-24 11:52:10 INFO [LocalJobRunner.Thread-12] - reduce task executor complete. 2015-03-24 11:52:10 INFO [Job.main] - Job job_local551164419_0001 running in uber mode : false 2015-03-24 11:52:10 INFO [Job.main] - map 100% reduce 100% 2015-03-24 11:52:10 INFO [Job.main] - Job job_local551164419_0001 completed successfully 2015-03-24 11:52:10 INFO [Job.main] - Counters: 35 File System Counters FILE: Number of bytes read=462 FILE: Number of bytes written=466172 FILE: Number of read operations=0 FILE: Number of large read operations=0 FILE: Number of write operations=0 HDFS: Number of bytes read=48 HDFS: Number of bytes written=24 HDFS: Number of read operations=13 HDFS: Number of large read operations=0 HDFS: Number of write operations=4 Map-Reduce Framework Map input records=2 Map output records=12 Map output bytes=72 Map output materialized bytes=54 Input split bytes=105 Combine input records=12 Combine output records=6 Reduce input groups=6 Reduce shuffle bytes=54 Reduce input records=6 Reduce output records=6 Spilled Records=12 Shuffled Maps =1 Failed Shuffles=0 Merged Map outputs=1 GC time elapsed (ms)=13 Total committed heap usage (bytes)=514850816 Shuffle Errors BAD_ID=0 CONNECTION=0 IO_ERROR=0 WRONG_LENGTH=0 WRONG_MAP=0 WRONG_REDUCE=0 File Input Format Counters Bytes Read=24 File Output Format Counters Bytes Written=24 原文件如下所示: a a c v d d a d d s s x Reduce 结果图,如下所示: 4.总结 我们可以按以下步骤进行验证代码的可用性: 保证 NNA( active 状态)和 NNS( standby 状态)。注意,DN 节点都是正常运行的。 然后,我们运行 WordCount 程序,看能否统计出结果。 若安上述步骤下来,可以统计;我们接着往下执行。若不行,请排查错误,然后继续。 然后,我们 kill 掉 NNA 节点的 NameNode 进程,此时,NNS 的状态会由 standby 转变为 active 接着我们在支持 WordCount 程序,看能否统计结果;若是能统计结果,表示代码可用。 以上就是整个验证的流程。 5.结束语 这篇文章就分享到这里,如果在验证的过程当中有什么问题,可以加群进行讨论或发送邮件给我,我会尽我所能为您解答,与君共勉!