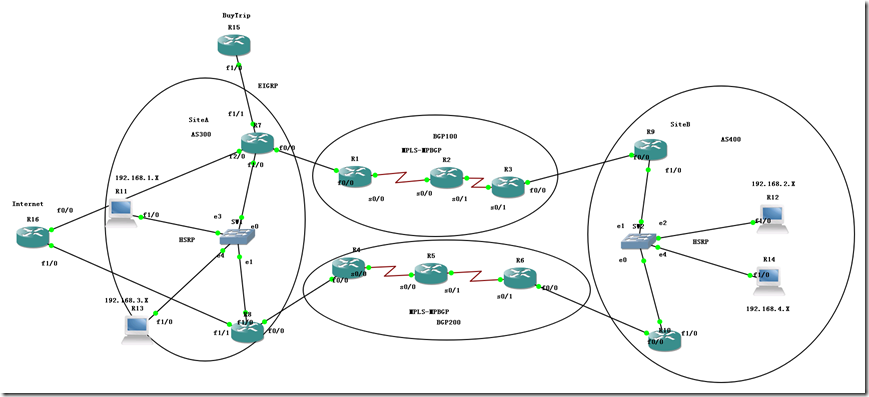
模拟WALMART网络架构-双栈冗余
SiteA and Site B 通信 SiteA: 192.168.1.X 192.168.3.X SiteB: 192.168.2.X 192.168.4.X =====MPLS Router Configuration===== R1 2 3 4 5 6 ====〉代表不同的MPLS 供应商 Step1:--MPLS域启用MPLS ip cef mpls ip mpls ldp router-id lo0 force mpls label protocol ldp int s0/0 mpls ip int s0/1 mpls ip Step2:---MPLS域 IGP通 router eigrp 80 no auto net 0.0.0.0 passive-interface f0/0 Step3:---MPLS域 PE接口启用VRF R1: ip vrf walmart rd 100:13 --->对方可以不一致,本地意义区分私网路由 route-target 100:79 -----〉对方必须一致 int f0/0 ip vrf forwarding walmart ip add R3: ip vrf walmart rd 100:31 route-target 100:79 int f0/0 ip vrf forwarding walmart ip add 验证show ip vrf detail [brief] R4:/R6: ip vrf walmart rd 200:46[200:64] route-target 200:81 int f0/0 ip vrf forwarding walmart ip add Step4:----MPLS域 MBGP R1: router bgp 100 bgp router-id 1.1.1.1 bgp log-neighbor-changes no bgp default ipv4-unicast \\起手配 neighbor 3.3.3.3 remote-as 100 neighbor 3.3.3.3 update-source Loopback0 ! ! address-family vpnv4------\\MP BGP neighbor 3.3.3.3 activate neighbor 3.3.3.3 send-community extended exit-address-family address-family ipv4 vrf walmart----- EBGP neighbor 17.1.1.7 remote-as 300 neighbor 17.1.1.7 activate exit-address-family R3: router bgp 100 bgp router-id 3.3.3.3 bgp log-neighbor-changes no bgp default ipv4-unicast neighbor 1.1.1.1 remote-as 100 neighbor 1.1.1.1 update-source Loopback0 ! ! address-family vpnv4 neighbor 1.1.1.1 activate neighbor 1.1.1.1 send-community extended exit-address-family address-family ipv4 vrf walmart----- EBGP neighbor 39.1.1.9 remote-as 300 neighbor 39.1.1.9 activate exit-address-family 验证: sh ip bgp vpnv4 vrf walmart summary R3#sh ip bgp vpnv4 all summary ============================================= R4: router bgp 200 bgp router-id 4.4.4.4 bgp log-neighbor-changes no bgp default ipv4-unicast neighbor 6.6.6.6 remote-as 200 neighbor 6.6.6.6 update-source Loopback0 ! ! address-family vpnv4 neighbor 6.6.6.6 activate neighbor 6.6.6.6 send-community extended address-family ipv4 vrf walmart neighbor 48.1.1.8 remote-as 300 neighbor 48.1.1.8 activate R6: router bgp 200 bgp router-id 6.6.6.6 bgp log-neighbor-changes no bgp default ipv4-unicast neighbor 4.4.4.4 remote-as 200 neighbor 4.4.4.4 update-source Loopback0 ! ! address-family vpnv4 neighbor 4.4.4.4 activate neighbor 4.4.4.4 send-community extended address-family ipv4 vrf walmart neighbor 61.1.1.1 remote-as 400 neighbor 61.1.1.1 activate =============================================== Step5:-CE BGP 300 /400 R7-CE#sh run | b r b router bgp 300 bgp router-id 7.7.7.7 bgp log-neighbor-changes neighbor 17.1.1.1 remote-as 100 no network 7.7.7.7 mask 255.255.255.255 R9-CE#sh run | b r b router bgp 400 bgp router-id 9.9.9.9 bgp log-neighbor-changes neighbor 39.1.1.3 remote-as 100 no network 9.9.9.9 mask 255.255.255.255 R7-CE#traceroute 9.9.9.9 source 7.7.7.7 Type escape sequence to abort. Tracing the route to 9.9.9.9 VRF info: (vrf in name/id, vrf out name/id) 1 17.1.1.1 60 msec 32 msec 52 msec 2 12.1.1.2 [MPLS: Labels 19/18 Exp 0] 44 msec 40 msec 52 msec 3 39.1.1.3 [MPLS: Label 18 Exp 0] 48 msec 52 msec 52 msec 4 39.1.1.9 48 msec 48 msec 52 msec 察看标签 R1#sh ip bgp vpnv4 vrf walmart 9.9.9.9 BGP routing table entry for 100:13:9.9.9.9/32, version 3 Paths: (1 available, best #1, table walmart) Advertised to update-groups: 2 400, imported path from 100:31:9.9.9.9/32 3.3.3.3 (metric 2809856) from 3.3.3.3 (3.3.3.3) Origin IGP, metric 0, localpref 100, valid, internal, best Extended Community: RT:100:79 mpls labels in/out nolabel/18 R1#sh ip bgp vpnv4 vrf walmart 7.7.7.7 BGP routing table entry for 100:13:7.7.7.7/32, version 4 Paths: (1 available, best #1, table walmart) Advertised to update-groups: 1 300 17.1.1.7 from 17.1.1.7 (7.7.7.7) Origin IGP, metric 0, localpref 100, valid, external, best Extended Community: RT:100:79 mpls labels in/out 18/nolabel R1#show mpls forwarding-table Local Outgoing Prefix Bytes tag Outgoing Next Hop tag tag or VC or Tunnel Id switched interface 16 Pop tag 23.1.1.0/24 0 Se0/0 point2point 17 Pop tag 2.2.2.2/32 0 Se0/0 point2point 18 Untagged 7.7.7.7/32[V] 2796 Fa0/0 17.1.1.7 19 19 3.3.3.3/32 0 Se0/0 point2point =================================内网HSRP====================== R7-CE#sh run int f1/0.1 Building configuration... Current configuration : 206 bytes ! interface FastEthernet1/0.1 encapsulation dot1Q 1 native ip address 192.168.1.251 255.255.255.0 standby 1 ip 192.168.1.1 standby 1 priority 120 standby 1 preempt standby 1 track 1 decrement 30 end R7-CE#sh run int f1/0.3 Building configuration... Current configuration : 199 bytes ! interface FastEthernet1/0.3 encapsulation dot1Q 3 ip address 192.168.3.251 255.255.255.0 standby 3 ip 192.168.3.1 standby 3 priority 120 standby 3 preempt //开启抢占 standby 3 track 1 decrement 30 \\如果接口down了优先级减30 end R8-CE#sh run int f1/0.1 Building configuration... Current configuration : 182 bytes ! interface FastEthernet1/0.1 encapsulation dot1Q 1 native ip address 192.168.1.252 255.255.255.0 standby 1 ip 192.168.1.1 standby 1 preempt //standby 1 track 1 decrement 30 R8-CE#sh run int f1/0.3 Building configuration... Current configuration : 175 bytes ! interface FastEthernet1/0.3 encapsulation dot1Q 3 ip address 192.168.3.253 255.255.255.0 standby 3 ip 192.168.3.1 standby 3 preempt //standby 3 track 1 decrement 30 end =================CE IBGP============================= R7-CE#sh run | b r r router rip version 2 network 7.0.0.0 network 78.0.0.0 no auto-summary ! router bgp 300 bgp router-id 7.7.7.7 bgp log-neighbor-changes network 192.168.1.0 network 192.168.3.0 neighbor 8.8.8.8 remote-as 300 neighbor 8.8.8.8 update-source Loopback0 neighbor 8.8.8.8 next-hop-self neighbor 17.1.1.1 remote-as 100 R8-CE#sh run | b r r router rip version 2 network 8.0.0.0 network 78.0.0.0 no auto-summary ! router bgp 300 bgp router-id 8.8.8.8 bgp log-neighbor-changes neighbor 7.7.7.7 remote-as 300 neighbor 7.7.7.7 update-source Loopback0 neighbor 7.7.7.7 next-hop-self neighbor 48.1.1.4 remote-as 200 R7-CE#sh ip bgp BGP table version is 5, local router ID is 7.7.7.7 Status codes: s suppressed, d damped, h history, * valid, > best, i - internal, r RIB-failure, S Stale, m multipath, b backup-path, f RT-Filter, x best-external, a additional-path, c RIB-compressed, Origin codes: i - IGP, e - EGP, ? - incomplete RPKI validation codes: V valid, I invalid, N Not found Network Next Hop Metric LocPrf Weight Path * i 192.168.1.0 8.8.8.8 0 100 0 i *> 0.0.0.0 0 32768 i *> 192.168.2.0 17.1.1.1 0 100 400 i * i 8.8.8.8 0 100 0 200 400 i * i 192.168.3.0 8.8.8.8 0 100 0 i *> 0.0.0.0 0 32768 i *> 192.168.4.0 17.1.1.1 0 100 400 i * i 8.8.8.8 0 100 0 200 400 i 但R7-R8不希望学习到内部路由192.168.1.0 192.168.3.0,我们可以过滤掉 IBGP 过滤内网路由 R7-CE#sh run | be ip prefix-list ip prefix-list deny seq 5 permit 192.168.1.0/24 ip prefix-list deny seq 10 permit 192.168.3.0/24 R7-CE#sh run | be route-map route-map block deny 10 match ip address prefix-list deny ! route-map block permit 20 R7: router bgp 300 neighbor 8.8.8.8 route-map block in R8: router bgp 300 neighbor 7.7.7.7 route-map block in R7-CE#sh ip bgp BGP table version is 5, local router ID is 7.7.7.7 Status codes: s suppressed, d damped, h history, * valid, > best, i - internal, r RIB-failure, S Stale, m multipath, b backup-path, f RT-Filter, x best-external, a additional-path, c RIB-compressed, Origin codes: i - IGP, e - EGP, ? - incomplete RPKI validation codes: V valid, I invalid, N Not found Network Next Hop Metric LocPrf Weight Path *> 192.168.1.0 0.0.0.0 0 32768 i * i 192.168.2.0 8.8.8.8 0 100 0 200 400 i *> 17.1.1.1 0 100 400 i *> 192.168.3.0 0.0.0.0 0 32768 i * i 192.168.4.0 8.8.8.8 0 100 0 200 400 i *> 17.1.1.1 0 100 400 i ======BUYTRIP场地 & internet========= R15: R15#sh run | b r e router eigrp 80 network 15.0.0.0 network 57.0.0.0 no auto-summary R7: ip route 0.0.0.0 0.0.0.0 61.1.1.6 R7-CE#sh run | b r b router bgp 300 redistribute eigrp 80 metric 400 network 0.0.0.0 mask 0.0.0.0 R7-CE#sh run | b r e router eigrp 80 network 57.0.0.0 redistribute bgp 300 metric 1000 100 255 1 1500 redistribute static R8: router bgp 300 bgp router-id 8.8.8.8 bgp log-neighbor-changes network 192.168.1.0 network 192.168.3.0 redistribute static metric 300 neighbor 7.7.7.7 remote-as 300 neighbor 7.7.7.7 update-source Loopback0 neighbor 7.7.7.7 next-hop-self neighbor 7.7.7.7 route-map block in neighbor 48.1.1.4 remote-as 200 EIGRP本地优化: access-list 10 permit 0.0.0.0 0.0.0.0 router ei 80 distribute-list 10 in fastEthernet 1/0 本文转自 bilinyee博客,原文链接: http://blog.51cto.com/ericfu/1963262 如需转载请自行联系原作者