首页 文章 精选 留言 我的

精选列表

搜索[网站开发],共10000篇文章
优秀的个人博客,低调大师

iOS开发实战 - 完美解决UIScrollView嵌套滑动手势冲突

我们应该都有用过这个功能,你的朋友微信给你分享了一个淘宝里面的商品链接,然后当你复制这个链接打开淘宝APP的时候,就会弹出一个弹窗,像这样: example.PNG 这个功能想必大家都挺熟悉,受这个启发我们产品也想在我们APP上添加这样一个功能,与这个不一样的是,当我们复制一段网址的时候打开我们的APP会弹出框填一些信息后上传到我们的“资源库”。大体功能就这样,所以记录一下实现的过程。 一、弹窗视图功能 .h中:两个信号一个是确定信号一个是取消信号 两个方法,一个显示一个隐藏方法 1 2 3 4 5 @property(nonatomic,strong)RACSubject*uploadSureSignal; //确定上传信号 @property(nonatomic,strong)RACSubject*hideSucSignal; //隐藏 -( void )show; -( void )hide; .m中:主要是两个textview,还有涉及到在keywindow上,IQKeyboard的一些操作 1 2 3 @property(nonatomic,assign)CGFloatkeyboardHeight; //键盘高度 @property(nonatomic,strong)CustomUITextView*nameTV; @property(nonatomic,strong)CustomUITextView*desTV; 因为发现IQKeyboard在这个弹出界面有问题,所以在显示这个界面的时候,将IQKeyboard禁用取之使用系统的keyboard监听方法 在(void)show方法中: 1 2 3 4 5 6 7 8 -( void )show{ //键盘通知 NSNotificationCenter*defaultCenter=[NSNotificationCenterdefaultCenter]; [defaultCenteraddObserver:selfselector:@selector(keyboardWillShowOrHide:)name:UIKeyboardWillShowNotificationobject:nil]; [defaultCenteraddObserver:selfselector:@selector(keyboardWillShowOrHide:)name:UIKeyboardWillHideNotificationobject:nil]; } 1 2 3 4 5 6 7 8 9 10 11 12 13 14 15 16 17 18 19 20 21 22 23 24 25 26 27 28 29 30 //监听方法 -( void )keyboardWillShowOrHide:(NSNotification*)notification{ //获取通知名 NSString*notificationName=notification.name; //获取通知内容 NSDictionary*keyboardInfo=notification.userInfo; //键盘弹出时,让画面整体稍稍上移,并伴随动画 //键盘回收时反之 CGRectkeyboardFrame=[notification.userInfo[UIKeyboardFrameEndUserInfoKey]CGRectValue]; CGFloatheight=keyboardFrame.size.height; self.keyboardHeight=height; //动画结束后self.view的frame值 CGRectselfViewFrame=self.bgView.frame; //通过通知名字判断弹出还是回收 if ([notificationNameisEqualToString:UIKeyboardWillShowNotification]){ selfViewFrame.origin.y=SCREEN_HEIGHT-PANELHEIGHT-height; } else { selfViewFrame.origin.y=SCREEN_HEIGHT-PANELHEIGHT; } //取出动画时长 NSTimeIntervalduration=[keyboardInfo[UIKeyboardAnimationDurationUserInfoKey]doubleValue]; //使用动画更改self.view.frame [UIViewanimateWithDuration:durationanimations:^{ //这里填入一些view的最终状态属性设置,即会自动产生过渡动画 self.bgView.frame=selfViewFrame; }]; } 同时在show方法中显示keyWindow,进而改变界面的frame进行显示 1 2 3 4 5 6 7 8 9 10 -( void )show{ UIWindow*keyWindow=[UIApplicationsharedApplication].keyWindow; [keyWindowaddSubview:self]; CGRectframe=self.bgView.frame; if (frame.origin.y==SCREEN_HEIGHT){ frame.origin.y=SCREEN_HEIGHT-PANELHEIGHT; [UIViewanimateWithDuration: 0.4 animations:^{ self.bgView.frame=frame; }]; } hide方法这里要考虑到键盘弹出后将self.bgView向上提高后frame的变化。 1 2 3 4 5 6 7 8 9 10 11 12 13 CGRectselfFrame=self.bgView.frame; if (selfFrame.origin.y==SCREEN_HEIGHT-PANELHEIGHT||selfFrame.origin.y==SCREEN_HEIGHT-PANELHEIGHT-self.keyboardHeight){ [selfresignFirstResponder]; selfFrame.origin.y=SCREEN_HEIGHT; [UIViewanimateWithDuration: 0.4 animations:^{ self.bgView.frame=selfFrame; }completion:^(BOOLfinished){ [IQKeyboardManagersharedManager].enable=YES; [[NSNotificationCenterdefaultCenter]removeObserver:self]; //[self.hideSucSignalsendNext:nil]; [selfremoveFromSuperview]; }]; } delegate中的操作 这里首先要弄懂APPdelegate中的这几个代理方法的意思: 1 2 3 4 5 6 7 8 9 10 11 12 13 14 15 16 17 18 19 20 21 22 23 24 25 26 27 28 29 30 31 32 //App已经启动 -(BOOL)application:(UIApplication*)applicationdidFinishLaunchingWithOptions:(NSDictionary*)launchOptions{ //Overridepointforcustomizationafterapplicationlaunch. return YES; } //App挂起状态 -( void )applicationWillResignActive:(UIApplication*)application{ //Sentwhentheapplicationisabouttomovefromactivetoinactivestate.Thiscanoccurforcertaintypesoftemporaryinterruptions(suchasanincomingphonecallorSMSmessage)orwhentheuserquitstheapplicationanditbeginsthetransitiontothebackgroundstate. //Usethismethodtopauseongoingtasks,disabletimers,andinvalidategraphicsrenderingcallbacks.Gamesshouldusethismethodtopausethegame. } //APP进入后台 -( void )applicationDidEnterBackground:(UIApplication*)application{ //Usethismethodtoreleasesharedresources,saveuserdata,invalidatetimers,andstoreenoughapplicationstateinformationtorestoreyourapplicationtoitscurrentstateincaseitisterminatedlater. //Ifyourapplicationsupportsbackgroundexecution,thismethodiscalledinsteadofapplicationWillTerminate:whentheuserquits. } //APP将重新回到前台 -( void )applicationWillEnterForeground:(UIApplication*)application{ //Calledaspartofthetransitionfromthebackgroundtotheactivestate;hereyoucanundomanyofthechangesmadeonenteringthebackground. } //APP进入活跃状态 -( void )applicationDidBecomeActive:(UIApplication*)application{ //Restartanytasksthatwerepaused(ornotyetstarted)whiletheapplicationwasinactive.Iftheapplicationwaspreviouslyinthebackground,optionallyrefreshtheuserinterface. } //系统时间发生改变时执行 -( void )applicationWillTerminate:(UIApplication*)application{ //Calledwhentheapplicationisabouttoterminate.Savedataifappropriate.SeealsoapplicationDidEnterBackground:. } 在上面的这些代理方法中,我们需要用到的是 applicationDidBecomeActive方法。在这个方法中我们去检查系统的粘贴板UIPasteboard *pasteboard = [UIPasteboard generalPasteboard]; 1 2 3 4 5 6 7 8 9 10 11 12 13 14 15 16 17 18 19 20 21 22 23 24 25 26 27 if (pasteboard.string){ NSLog(@ "string:%@" ,pasteboard.string); NSString*urlStr=pasteboard.string; if ([urlStrhasPrefix:@ "https://" ]||[urlStrhasPrefix:@ "http://" ]){ //如果粘贴板中的字符串包含https或http字段,我们去检查当前的控制器如果当前的控制器是我们弹出做操作的控制器的话isPopVC=NO; BOOLisPopVC=NO; UIViewController*Rootvc=self.window.rootViewController; if ([RootvcisKindOfClass:[UINavigationController class ]]){ UINavigationController*nav=(UINavigationController*)Rootvc; UIViewController*v=[nav.viewControllerslastObject]; if ([visKindOfClass:[UploadResCofingVC class ]]){ isPopVC=YES; } } //如果popView==nil并且isPopVC==NO弹出popView弹窗视图进行操作 if (!self.popView&&!isPopVC){ UploadResourcesPopupView*popView=[UploadResourcesPopupView new ]; [popViewshow]; self.popView=popView; [self.popView.hideSucSignalsubscribeNext:^(idx){ @strongify(self); self.popView=nil; }]; } } } } 总结 以上大体就是实现这个功能的基本思路,细节方面因项目而异了,比如我们需要判断当前用户的角色,当前用户是否登录,对弹窗视图后续的一些操作。当然并不完美,欢迎批评指正。 转自:http://www.cocoachina.com/ios/20180508/23307.html

优秀的个人博客,低调大师

Unity与安卓开发的一些路径知识

文章目录[点击展开](?)[+] APK安装之后找不到路径 公司的测试机(安卓)基本都是不带SD卡的。 APK在安卓手机上安装之后,使用手机助手类的软件打开文件管理,打开内置SDK卡/Android/data/ 在这个目录下却发现找不到以应用的包名(com.xxx.xxx) 开头的文件夹,那比如要打开这个目录查看里面的文件呢? 但是却能看到一些其它APP的目录,那么请检查以下设置: 1、打开File-Build Settings- 选择Player Settings,请确认已经切换到了Android 平台,找到Configuration这一部分设置 2、Install Location 选择 Automatic Write Permission 选择 External (SDCard) 3、重新打包APK,并安装,就可以在文件管理中找到这个目录了。 安卓的写入路径 比如你想在安装目录下创建一个目录并往里面写入文件,路径建议这样写:(和windows下的路径符号不同,而是和浏览器中网络的路径符号相同) string savePath = Application.persistentDataPath + "/" + "SaveTextures/"; 而如果你这样写,那么极有可能出现错误! string savePath = Application.persistentDataPath + "\\SaveTextures\\" 我在安卓上测试,会出现文件名变成:files\SaveTextures\2017-01-13_02-12-54.png也就是说文件名变成了路径,所以当你使用路径加载时,就会报文件不存在。 WWW加载的文件协议 使用WWW 加载非Assetbundle文件,比如原始的音乐文件(mp3,wav),原始的贴图文件(png,jpg) 比如这个文件放在应用程序的沙盒内或SD卡内:Application.persistentDataPath public static string GetFileProtocol() { string fileProtocol = "file://"; if (Application.platform == RuntimePlatform.WindowsEditor || Application.platform == RuntimePlatform.WindowsPlayer #if !UNITY_5_4_OR_NEWER || Application.platform == RuntimePlatform.WindowsWebPlayer #endif ) { fileProtocol = "file:///"; } return fileProtocol; } 使用 www 加载示例: public static IEnumerator LoadByWWW(string fullFilePath, Action<Texture2D> callback) { string loadPath = GetFileProtocol() + fullFilePath; WWW www = new WWW(loadPath); yield return www; if (www != null && string.IsNullOrEmpty(www.error)) { //获取Texture Texture2D texture = www.texture; if (callback != null) callback(texture); } else { Log.LogError("www 加载图片失败:{0}", www.error); if (callback != null) callback(null); } } 测试环境 本文的测试环境如下: Unity 5.5.0f3 安卓4.2.3 本文转自赵青青博客园博客,原文链接:http://www.cnblogs.com/zhaoqingqing/p/6283763.html,如需转载请自行联系原作者 posted @ 2017-01-13 18:31 赵青青阅读( 315) 评论( 0) 编辑 收藏

优秀的个人博客,低调大师

SpringBoot+MyBatis开发环境搭建并实现登录权限过滤

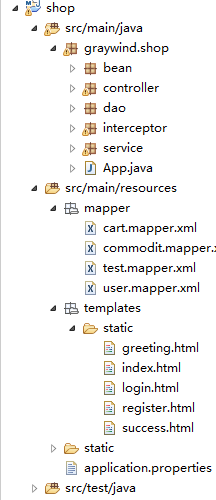
最近尝试了一下SpringBoot,发现在controller和service数量相同的时候,比之前用Tomcat启动SpringMVC快了一大半,配置也更少了,很多东西不去重新覆盖设置的话直接会以默认配置启动。 首先搭建一个同时支持RESTful和传统MVC的服务。完成后的项目目录结构如下: 建一个默认Maven工程,新建src/main/resources目录,并添加到classpath。修改pom.xml,这里说明一下,以下设定是基于1.5.X版本的,由于2.0.0版本开始使用的是Spring5,设置会不一样。SpringBoot不建议使用JSP,thymeleaf模板是SpringBoot使用的一种前端静态模板,当然也可以不要前端模板,直接通过前端框架搭建一个。 <properties> <project.build.sourceEncoding>UTF-8</project.build.sourceEncoding> <java.version>1.8</java.version> <mybatis-spring-boot>1.2.0</mybatis-spring-boot> <mysql-connector>5.1.39</mysql-connector> </properties> <!-- Spring Boot 启动父依赖 --> <parent> <groupId>org.springframework.boot</groupId> <artifactId>spring-boot-starter-parent</artifactId> <version>1.5.1.RELEASE</version> </parent> <dependencies> <!-- Spring Boot Web 依赖 --> <dependency> <groupId>org.springframework.boot</groupId> <artifactId>spring-boot-starter-web</artifactId> </dependency> <!-- Spring Boot Test 依赖 --> <dependency> <groupId>org.springframework.boot</groupId> <artifactId>spring-boot-starter-test</artifactId> <scope>test</scope> </dependency> <!-- thymeleaf模板 --> <dependency> <groupId>org.springframework.boot</groupId> <artifactId>spring-boot-starter-thymeleaf</artifactId> </dependency> <!-- Spring Boot Mybatis 依赖 --> <dependency> <groupId>org.mybatis.spring.boot</groupId> <artifactId>mybatis-spring-boot-starter</artifactId> <version>${mybatis-spring-boot}</version> </dependency> <!-- MySQL 连接驱动依赖 --> <dependency> <groupId>mysql</groupId> <artifactId>mysql-connector-java</artifactId> </dependency> </dependencies> SpringBoot默认会使用Tomcat容器启动,要设置一个启动类 1 //Spring Boot 应用的标识 2 @SpringBootApplication 3 public class App { 4 public static void main(String[] args) { 5 SpringApplication.run(App.class, args); 6 } 7 } 然后是controller层,同样的如果@RestController则所有请求会自动返回json对象,如果是@Controller则默认会返回页面模板,如果再加上@ResponseBody则是json对象。 1 @RestController 2 public class HelloController { 3 4 @RequestMapping("/HelloWorld") 5 public String hello() { 6 return "Hello World!"; 7 } 8 9 @RequestMapping("/HelloBean") 10 public HelloBean hellobean() { 11 HelloBean hello = new HelloBean(); 12 hello.setId("123"); 13 hello.setPassword("456"); 14 hello.setName("小明"); 15 return hello; 16 } 17 18 @RequestMapping("/HelloBean/{id}") 19 public HelloBean hellobean(@PathVariable("id") String id) { 20 HelloBean hello = new HelloBean(); 21 hello.setId(id); 22 hello.setPassword("456"); 23 hello.setName("小明"); 24 return hello; 25 } 26 } 1 @Controller 2 public class HtmlController { 3 4 @GetMapping("/login") 5 public String login(Model model) { 6 model.addAttribute("success", true); 7 return "static/login"; 8 } 9 10 @GetMapping("/register") 11 public String register(Model model) { 12 return "static/register"; 13 } 14 } thymeleaf模板的默认路径是src/main/resources/templates,而首页会自动设置为/static/index,所以我把所有模板放在了static目录下,上面controller返回的路径也就是static/login这样的格式。添加login.html 1 <!DOCTYPE HTML> 2 <html xmlns:th="http://www.thymeleaf.org"> 3 <head> 4 <title>Login</title> 5 <meta http-equiv="Content-Type" content="text/html; charset=UTF-8" /> 6 </head> 7 <body> 8 <form class="form-signin" role="form" th:action="@{/user/login}" 9 th:method="post"> 10 <input type="text" class="form-control" placeholder="用户名" 11 required="required" name="username" /> <input type="password" 12 class="form-control" placeholder="密码" required="required" 13 name="password" /> 14 <button class="btn btn-lg btn-warning btn-block" type="submit">登录</button> 15 <label class="checkbox"> <input type="checkbox" 16 value="remember-me" /> 记住我 17 </label> 18 </form> 19 <a href="/register">注册</a> 20 <p th:if="${success} == false">登录失败</p> 21 <p th:text="${info}" /> 22 </body> 23 </html> 因为默认设置下模板是不能热修改启动的,所以要把它打开,recources目录下添加文件application.properties ## 页面动态编译 spring.thymeleaf.cache=false 直接对启动类运行启动,效果如下: 然后是MyBatis的集成。application.properties再添加设置如下,mybatis.mapperLocations是xml文件在recources目录下的路径 ## 数据源配置 spring.datasource.url=jdbc:mysql://localhost:3306/demo?useUnicode=true&characterEncoding=utf8 spring.datasource.username=root spring.datasource.password=123456 spring.datasource.driver-class-name=com.mysql.jdbc.Driver ## Mybatis 配置 mybatis.typeAliasesPackage=org.spring.springboot.domain mybatis.mapperLocations=classpath:mapper/*.xml 启动类添加对dao层的扫描 1 //Spring Boot 应用的标识 2 @SpringBootApplication 3 //mapper 接口类扫描包配置 4 @MapperScan("graywind.shop.dao") 5 public class App { 6 public static void main(String[] args) { 7 SpringApplication.run(App.class, args); 8 } 9 } 添加Mapper类和Bean类,以及xml文件 1 package graywind.shop.dao; 2 3 import java.util.List; 4 5 import graywind.shop.bean.TestBean; 6 7 public interface TestMapper { 8 public List<TestBean> getTest(); 9 } 1 package graywind.shop.bean; 2 3 public class TestBean { 4 private String id; 5 private String txt; 6 7 public String getId() { 8 return id; 9 } 10 11 public void setId(String id) { 12 this.id = id; 13 } 14 15 public String getTxt() { 16 return txt; 17 } 18 19 public void setTxt(String txt) { 20 this.txt = txt; 21 } 22 } <?xml version="1.0" encoding="UTF-8" ?> <!DOCTYPE mapper PUBLIC "-//mybatis.org//DTD Mapper 3.0//EN" "http://mybatis.org/dtd/mybatis-3-mapper.dtd"> <mapper namespace="graywind.shop.dao.TestMapper"> <select id="getTest" resultType="graywind.shop.bean.TestBean"> select id,txt from test </select> </mapper> 然后就和以前一样注入使用 @Autowired private TestMapper testMapper; @Override public void test() { List<TestBean> list = testMapper.getTest(); } 接下来做一个权限过滤,我们希望某些页面是登录后才能查看的,需要用到过滤器。首先定义@Auth,在类或方法上添加该注解之后,就会被过滤器拦截验证。 package graywind.shop.interceptor; import java.lang.annotation.Documented; import java.lang.annotation.ElementType; import java.lang.annotation.Retention; import java.lang.annotation.RetentionPolicy; import java.lang.annotation.Target; /** * 在类或方法上添加@Auth就验证登录 * @author Administrator * */ @Target({ElementType.TYPE, ElementType.METHOD}) @Retention(RetentionPolicy.RUNTIME) @Documented public @interface Auth { } 然后添加过滤器LoginInterceptor和一些辅助类,这里拦截之后会进入preHandle方法,如果返回true,则页面会继续执行,否则会被重定向到login页面。验证通过的方法是session里面有username信息,后续可以扩展成通过从缓存中取session信息验证达到分布式服务登录验证。 1 package graywind.shop.interceptor; 2 3 import org.springframework.beans.factory.annotation.Autowired; 4 import org.springframework.stereotype.Component; 5 import org.springframework.web.method.HandlerMethod; 6 import org.springframework.web.servlet.handler.HandlerInterceptorAdapter; 7 8 import graywind.shop.bean.SessionData; 9 import graywind.shop.service.UserService; 10 11 import javax.servlet.http.HttpServletRequest; 12 import javax.servlet.http.HttpServletResponse; 13 import java.lang.reflect.Method; 14 import java.util.Optional; 15 16 import static graywind.shop.interceptor.Constants.MOBILE_NUMBER_SESSION_KEY; 17 import static graywind.shop.interceptor.Constants.SESSION_KEY; 18 import static graywind.shop.interceptor.Constants.USER_CODE_SESSION_KEY; 19 20 @Component 21 public class LoginInterceptor extends HandlerInterceptorAdapter { 22 private final static String SESSION_KEY_PREFIX = "session:"; 23 24 @Autowired 25 private UserService userSvc; 26 27 public boolean preHandle(HttpServletRequest request, HttpServletResponse response, Object handler) 28 throws Exception { 29 String username = (String) request.getSession().getAttribute("username"); 30 if (Optional.ofNullable(username).map(String::length).orElse(0) > 0) { 31 return true; 32 } 33 34 if (!handler.getClass().isAssignableFrom(HandlerMethod.class)) { 35 return true; 36 } 37 38 final HandlerMethod handlerMethod = (HandlerMethod) handler; 39 final Method method = handlerMethod.getMethod(); 40 final Class<?> clazz = method.getDeclaringClass(); 41 if (clazz.isAnnotationPresent(Auth.class) || method.isAnnotationPresent(Auth.class)) { 42 if (request.getAttribute(USER_CODE_SESSION_KEY) == null) { 43 response.sendRedirect(request.getContextPath() + "/login"); 44 return false; 45 } else { 46 return true; 47 } 48 } 49 return true; 50 } 51 } package graywind.shop.interceptor; public interface Constants { int MAX_FILE_UPLOAD_SIZE = 5242880; String MOBILE_NUMBER_SESSION_KEY = "sessionMobileNumber"; String USER_CODE_SESSION_KEY = "userCode"; String SESSION_KEY = "sessionId"; } package graywind.shop.bean; public class SessionData { private Integer userCode; private String mobileNumber; public Integer getUserCode() { return userCode; } public void setUserCode(Integer userCode) { this.userCode = userCode; } public String getMobileNumber() { return mobileNumber; } public void setMobileNumber(String mobileNumber) { this.mobileNumber = mobileNumber; } } 最后添加一个MVC设置,代替原先的web.xml 1 package graywind.shop.interceptor; 2 3 import org.slf4j.Logger; 4 import org.slf4j.LoggerFactory; 5 import org.springframework.beans.factory.annotation.Autowired; 6 import org.springframework.context.annotation.ComponentScan; 7 import org.springframework.context.annotation.Configuration; 8 import org.springframework.context.annotation.PropertySource; 9 import org.springframework.web.servlet.config.annotation.CorsRegistry; 10 import org.springframework.web.servlet.config.annotation.EnableWebMvc; 11 import org.springframework.web.servlet.config.annotation.InterceptorRegistry; 12 import org.springframework.web.servlet.config.annotation.WebMvcConfigurerAdapter; 13 14 @Configuration 15 @EnableWebMvc 16 @ComponentScan(basePackages = "graywind.shop.controller") 17 @PropertySource(value = "classpath:application.properties", 18 ignoreResourceNotFound = true,encoding = "UTF-8") 19 public class MvcConfig extends WebMvcConfigurerAdapter { 20 private static final Logger logger = LoggerFactory.getLogger(MvcConfig.class); 21 22 @Autowired 23 LoginInterceptor loginInterceptor; 24 25 @Override 26 public void addInterceptors(InterceptorRegistry registry) { 27 // 注册监控拦截器 28 registry.addInterceptor(loginInterceptor) 29 .addPathPatterns("/**") 30 .excludePathPatterns("/configuration/ui"); 31 32 } 33 34 @Override 35 public void addCorsMappings(CorsRegistry registry) { 36 registry.addMapping("/**") 37 .allowedOrigins("*") 38 .allowedHeaders("*/*") 39 .allowedMethods("*") 40 .maxAge(120); 41 } 42 } 现在就可以在controller层通过@Auth注解来控制权限。最后还要在登录验证成功之后将用户信息写入到session里面,这个比较常规就不写了。个人GitHub地址: https://github.com/GrayWind33

优秀的个人博客,低调大师

06.Eclipse下Ndk开发(使用fmod播放声音)

(创建于2017/12/26) 1.搜索fmod,并下载代码 5199906.png 2.拿到Android相关的代码后,打开目录结构 5291234.png 5307203.png 我们首先使用lowlevel中的代码先将程序运行起来,后续实现变声功能 3.创建eclipse中的安卓项目,将jar包fmod.jar拷贝到libs文件夹下并添加到build path 4.创建jni目录(eclipse项目根目录),将下载代码中的so库拷贝到jni目录,以armeabi中的一个为例,然后将inc中的头文件全部拷贝到jni目录下, 本次只实现播放声音,所以我们拷贝example中的play_sound.cpp文件到jni目录下,此时目录结构为: 5667781.png 5.点击进入play_sound.cpp,看到两个头文件: 5845234.png fmod在inc目录下,需要加上路径,common.h还没有引入,所以我们拷贝common.h到jni目录下 5967734.png jni目录: 5986921.png 6.点击进入common.h中,发现它还引用了common_platform.h 头文件,所以拷贝common_platform到jni目录下,(拷贝头文件的时候,将相应的cpp文件也拷贝进来,常识),修改不正确的头文件路径,每个新引入的头文件或者源文件,都要首先检查它引入的其他的头文件或源文件的引入路径是否正确,不正确的做修改 7.将example中的MainActivity拷贝到我们项目中并覆盖,修改类中报错的地方,发现一段关键代码: org.fmod.FMOD.init(this); 可以猜想,这段代码就是jar包中的,解压查看可以证实 往下可以看到加载动态库的代码: static { /* * To simplify our examples we try to load all possible FMOD * libraries, the Android.mk will copy in the correct ones * for each example. For real products you would just load * 'fmod' and if you use the FMOD Studio tool you would also * load 'fmodstudio'. */ // Try debug libraries... try { System.loadLibrary("fmodD"); System.loadLibrary("fmodstudioD"); } catch (UnsatisfiedLinkError e) { } // Try logging libraries... try { System.loadLibrary("fmodL"); System.loadLibrary("fmodstudioL"); } catch (UnsatisfiedLinkError e) { } // Try release libraries... try { System.loadLibrary("fmod"); System.loadLibrary("fmodstudio"); } catch (UnsatisfiedLinkError e) { } System.loadLibrary("stlport_shared"); System.loadLibrary("example"); } 目前我们就只是引入了libfmod.so和libfmodL.so,所以,多余的可以去掉,得到结果: static { /* * To simplify our examples we try to load all possible FMOD * libraries, the Android.mk will copy in the correct ones * for each example. For real products you would just load * 'fmod' and if you use the FMOD Studio tool you would also * load 'fmodstudio'. */ try { System.loadLibrary("fmodL"); } catch (UnsatisfiedLinkError e) { } try { System.loadLibrary("fmod"); } catch (UnsatisfiedLinkError e) { } //我们自己的添加本地支持时生成的so名字 System.loadLibrary("qq_voice"); } 再往下可以看到一系列的native方法,有native方法,就必然有cpp文件中有对应的jni方法,所以我们需要将包名改成正确的,这里 简单粗暴一点,直接将项目包名改成jni方法中的包名,这样就不必修改cpp和头文件中的代码了 private native String getButtonLabel(int index); private native void buttonDown(int index); private native void buttonUp(int index); private native void setStateCreate(); private native void setStateStart(); private native void setStateStop(); private native void setStateDestroy(); private native void main(); 对应的jni方法位于common_platform.cpp中: jstring Java_org_fmod_example_MainActivity_getButtonLabel(JNIEnv *env, jobject thiz, jint index) { return env->NewStringUTF(Common_BtnStr((Common_Button)index)); } void Java_org_fmod_example_MainActivity_buttonDown(JNIEnv *env, jobject thiz, jint index) { gDownButtons |= (1 << index); } void Java_org_fmod_example_MainActivity_buttonUp(JNIEnv *env, jobject thiz, jint index) { gDownButtons &= ~(1 << index); } void Java_org_fmod_example_MainActivity_setStateCreate(JNIEnv *env, jobject thiz) { } void Java_org_fmod_example_MainActivity_setStateStart(JNIEnv *env, jobject thiz) { gSuspendState = false; } void Java_org_fmod_example_MainActivity_setStateStop(JNIEnv *env, jobject thiz) { gSuspendState = true; } void Java_org_fmod_example_MainActivity_setStateDestroy(JNIEnv *env, jobject thiz) { gQuitState = true; } void Java_org_fmod_example_MainActivity_main(JNIEnv *env, jobject thiz) { gJNIEnv = env; gMainActivityObject = thiz; FMOD_Main(); } 7.文件拷贝差不多了,我们就添加native支持,右键->Android tools ->add native support,设置so文件名,打开Android.mk文件: 7252328.png 我们需要将LOCAL_SRC_FILES := qq_voice2.cpp 改成 LOCAL_SRC_FILES :=play_sound.cpp build project一下,发现报错,从第一个错误开始 jni/play_sound.cpp:23: error: undefined reference to 'Common_Init(void**)' Common_Init 是common_platform.cpp中的方法,但是却提示找不到,是因为我们的Android.mk文件中没有配置编译,它需要和 play_sound.cpp一同编译才行,因为play_sound依赖common_platform 修改之前: LOCAL_PATH := $(call my-dir) include $(CLEAR_VARS) LOCAL_MODULE := qq_voice2 LOCAL_SRC_FILES := play_sound.cpp include $(BUILD_SHARED_LIBRARY) 修改添加之后: LOCAL_PATH := $(call my-dir) include $(CLEAR_VARS) LOCAL_MODULE := qq_voice2 LOCAL_SRC_FILES := play_sound.cpp common_platform.cpp include $(BUILD_SHARED_LIBRARY) build一下,common_platform.cpp仍然报错,是因为这两个 8048718.png 说明它使用了STL,标准模板库 需要在Application.mk中设置支持 ##支持C++异常处理,标准莫板块 APP_STL := gnustl_static build之后,不在爆红 然后解决这个问题 jni/play_sound.cpp:29: error: undefined reference to 'ERRCHECK_fn(FMOD_RESULT, char const*, int)' 异常处理,需要引入[common.cpp](file://C:\gaoyuan\code\workspace-android\qq_voice2\jni\common.cpp) LOCAL_PATH := $(call my-dir) include $(CLEAR_VARS) LOCAL_MODULE := qq_voice2 LOCAL_SRC_FILES := play_sound.cpp common_platform.cpp common.cpp include $(BUILD_SHARED_LIBRARY) 在Android.mk中添加预编译的两个so文件 LOCAL_PATH := $(call my-dir) include $(CLEAR_VARS) LOCAL_MODULE := fmod LOCAL_SRC_FILES := libfmod.so include $(PREBUILT_SHARED_LIBRARY) include $(CLEAR_VARS) LOCAL_MODULE := fmodL LOCAL_SRC_FILES := libfmodL.so include $(PREBUILT_SHARED_LIBRARY) include $(CLEAR_VARS) LOCAL_MODULE := qq_voice2 LOCAL_SRC_FILES := play_sound.cpp common_platform.cpp common.cpp LOCAL_SHARED_LIBRARIES := fmod fmodL include $(BUILD_SHARED_LIBRARY) 在build,编译已经成功了,但是运行崩溃,是因为需要的音频文件没有导入,可以看play_sound中 8567015.png 这三个文件需要导入,点击Common_MediaPath可以看到这些文件放入assets目录下即可 8624484.png 我们在下载的代码中的media文件夹下找到这三个并拷贝进来,运行发现报错,原来是加载动态库的时候, //我添加本地支持时生成的so名字 System.loadLibrary("qq_voice");这样写的,而实际上生成的so是qq_void2所以导致加载不到,修改即可 System.loadLibrary("qq_voice2") 到此,已经可以运行成功并且播放声音了

优秀的个人博客,低调大师

Mac下使用Sublime Text3 搭建Java开发环境

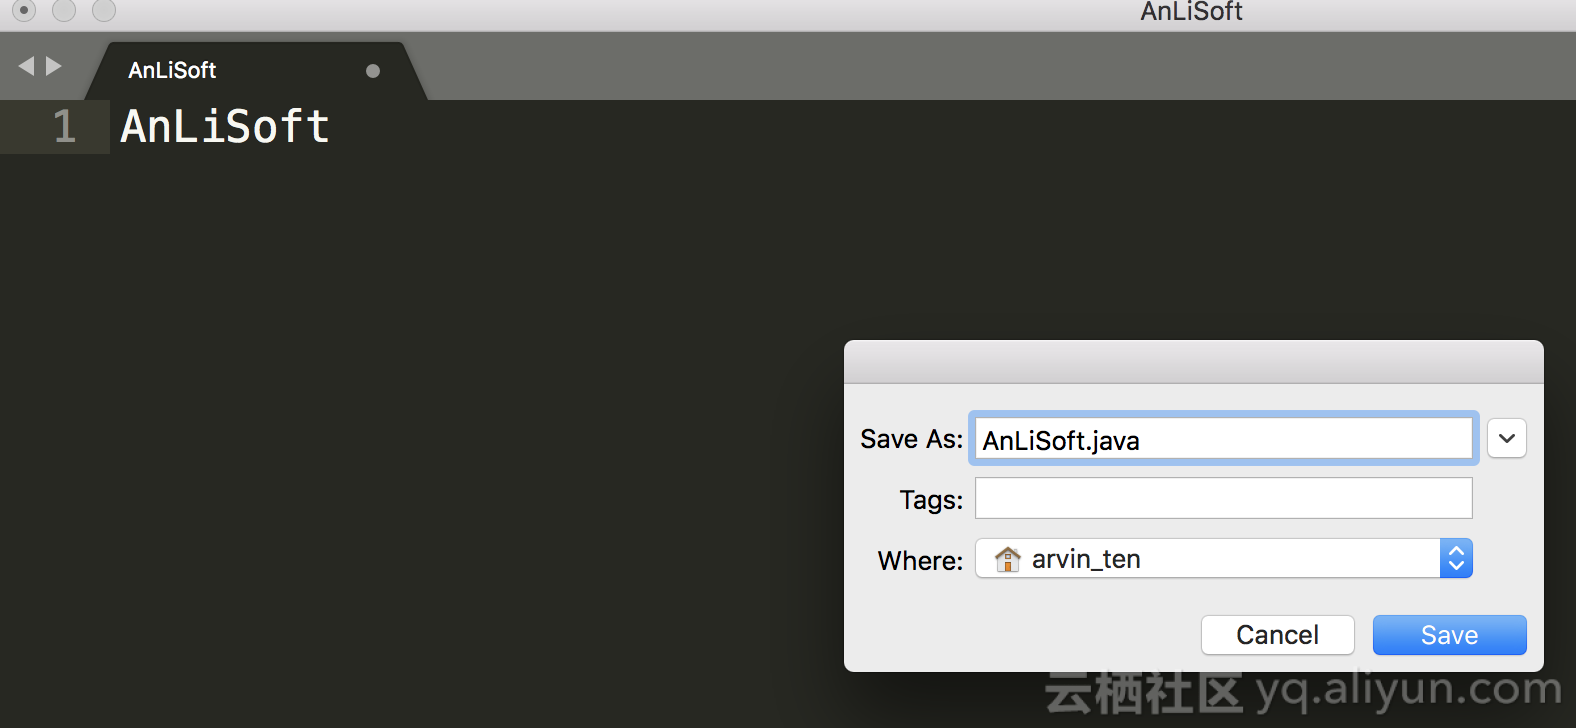
在学习Java的道路上,有很多流行的IDE,IDEA,Eclipse…很多优秀的环境,但是插件太多,加载太慢,不太适合我这种轻量的编程学习者,今天安利一款软件,(Sublime Text3),一个贼好用的文本编辑器,也是被别人安利的,下面说一下怎么配置java的环境。 下载软件都是傻瓜式的,直接dmg挂载就可以了。 打开软件,写好一个类名,然后command+s;它会让你保存文件,在save as这儿再加文件类型,这样做的好处是在文本编辑器中不用回删.java的后缀,直接写class就可以,很方便,如图。 save(保存)where(你保存的路径)2.点击你的标题栏 Tools—Build System—New Build System 注意在这儿Java文件在编译的时候会产生一个.class文件,它只会编译还没有去运行,如果要让文件编译还要运行,改一下这个写入文件就行了。 配置文件怎么写?粘贴过去就可以了 ` **{"shell_cmd": "javac -encoding utf-8 $file_name && java $file_base_name", "file_regex": "^ \javac\:([0-9]+):() (.)$", "selector": "source.java", "encoding": "utf-8"}** 这里我说个事情,我是不喜欢很多class文件跟java文件混在一起的,你可以通过一些命令只让Java文件留在你的文件夹里。 "shell_cmd": "javac -encoding utf-8 $file_name && java $file_base_name && rm -rf $file_base_name.class”,用这一行把上面的第一行替换了就行了。保存就可以了。 3.选择Build System,在run上面打勾就可以了。

优秀的个人博客,低调大师

iOS 开发之指定 UIView 的某几个角为圆角

如果需要将 UIView 的 4 个角全部都为圆角,做法相当简单,只需设置其 Layer的 cornerRadius 属性即可(项目需要使用QuartzCore框架)。而若要指定某几个角(小于4)为圆角而别的不变时,这种方法就不好用了。 对于这种情况,Stackoverflow 上提供了几种解决方案。其中最简单优雅的方案,就是使用 UIBezierPath。下面给出一段示例代码。 UIView *view2 = [[UIView alloc] initWithFrame:CGRectMake(120, 10, 80, 80)]; view2.backgroundColor = [UIColor redColor]; [self.view addSubview:view2]; UIBezierPath *maskPath = [UIBezierPath bezierPathWithRoundedRect:view2.bounds byRoundingCorners:UIRectCornerBottomLeft | UIRectCornerBottomRight cornerRadii:CGSizeMake(10, 10)]; CAShapeLayer *maskLayer = [[CAShapeLayer alloc] init]; maskLayer.frame = view2.bounds; maskLayer.path = maskPath.CGPath; view2.layer.mask = maskLayer; 其中, byRoundingCorners:UIRectCornerBottomLeft | UIRectCornerBottomRight 指定了需要成为圆角的角。该参数是 UIRectCorner 类型的,可选的值有: * UIRectCornerTopLeft * UIRectCornerTopRight * UIRectCornerBottomLeft * UIRectCornerBottomRight * UIRectCornerAllCorners 从名字很容易看出来代表的意思,使用“ | ”来组合就好了。

资源下载

更多资源
腾讯云软件源

腾讯云软件源

为解决软件依赖安装时官方源访问速度慢的问题,腾讯云为一些软件搭建了缓存服务。您可以通过使用腾讯云软件源站来提升依赖包的安装速度。为了方便用户自由搭建服务架构,目前腾讯云软件源站支持公网访问和内网访问。

Nacos

Nacos

Nacos /nɑ:kəʊs/ 是 Dynamic Naming and Configuration Service 的首字母简称,一个易于构建 AI Agent 应用的动态服务发现、配置管理和AI智能体管理平台。Nacos 致力于帮助您发现、配置和管理微服务及AI智能体应用。Nacos 提供了一组简单易用的特性集,帮助您快速实现动态服务发现、服务配置、服务元数据、流量管理。Nacos 帮助您更敏捷和容易地构建、交付和管理微服务平台。

Spring

Spring

Spring框架(Spring Framework)是由Rod Johnson于2002年提出的开源Java企业级应用框架,旨在通过使用JavaBean替代传统EJB实现方式降低企业级编程开发的复杂性。该框架基于简单性、可测试性和松耦合性设计理念,提供核心容器、应用上下文、数据访问集成等模块,支持整合Hibernate、Struts等第三方框架,其适用范围不仅限于服务器端开发,绝大多数Java应用均可从中受益。

Rocky Linux

Rocky Linux

Rocky Linux(中文名:洛基)是由Gregory Kurtzer于2020年12月发起的企业级Linux发行版,作为CentOS稳定版停止维护后与RHEL(Red Hat Enterprise Linux)完全兼容的开源替代方案,由社区拥有并管理,支持x86_64、aarch64等架构。其通过重新编译RHEL源代码提供长期稳定性,采用模块化包装和SELinux安全架构,默认包含GNOME桌面环境及XFS文件系统,支持十年生命周期更新。

用户登录
用户注册