Android Fragment使用全解析
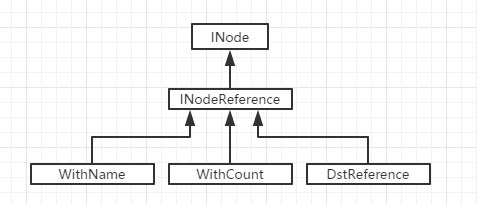
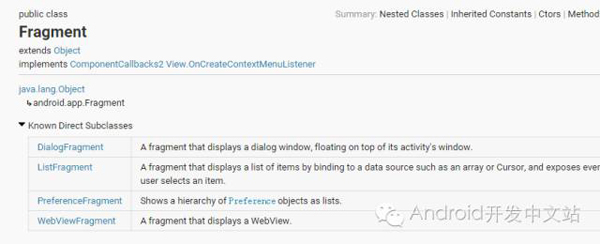
Fragment的使用可谓是老生常谈了~~~ 1、概述 自API 11引入Fragment之后,Fragment可谓风靡一时,现在大部分项目都或多或少的用到了Fragment,其更轻量级,更加适用屏幕,更加方便UI设计等优势。说了这么多什么是Fragment呢? Fragment:碎片,碎片是一个应用程序的用户界面和行为能够被放置在一个活动上。在其核心,它代表了一个特定的操作或界面,运行在一个更大的活动上。代表界面是因为可作为View在布局中进行使用,代表特定操作是因为包含生命周期可进行逻辑操作。简言之,Fragment就是一个带生命周期的组件。(若有问题恳请指正!) Fragment的特点: 生命周期必须依赖于Activity,当Activity被销毁,所有的碎片将被摧毁。(自己曾经踩坑) 轻量级,轻量切换。 方便处理平板、Phone的界面差异。 2、继承结构和生命周期 继承结构: Fragment直接继承Object,有四个直接子类,我个人对它的子类使用甚少。 生命周期: Fragment的生命周期在图上标注的很清楚了就不赘述了。该图是很久之前收藏的,已忘记原出处,在此感谢原作者! 3、基本使用 1).静态使用 静态使用就是Fragment相当于控件一样在布局中使用。 TestFragment.java 继承Fragment重写onCreateView方法 /** *Createdbymagicon2016年9月27日. */ publicclassTestFragmentextendsFragment{ @Override publicViewonCreateView(LayoutInflaterinflater,ViewGroupcontainer, BundlesavedInstanceState){ Viewview=inflater.inflate(R.layout.fragment_main,container); ImageViewimg=(ImageView)view.findViewById(R.id.img); img.setOnClickListener(newView.OnClickListener(){ @Override publicvoidonClick(Viewv){ Toast.makeText(getActivity(),"这是一个fragment",Toast.LENGTH_SHORT).show(); } }); returnview; } } fragment_main.xml <RelativeLayoutxmlns:android="http://schemas.android.com/apk/res/android" xmlns:tools="http://schemas.android.com/tools" android:layout_width="match_parent" android:layout_height="match_parent"> <ImageView android:id="@+id/img" android:layout_width="wrap_content" android:layout_height="wrap_content" android:layout_centerInParent="true" android:src="@drawable/img"/> </RelativeLayout> MainActivity.java 里面其实什么也没干。 /** *Createdbymagicon2016年9月27日. */ publicclassMainActivityextendsActivity{ @Override protectedvoidonCreate(BundlesavedInstanceState){ super.onCreate(savedInstanceState); setContentView(R.layout.activity_main); } } activity_main.xml <RelativeLayoutxmlns:android="http://schemas.android.com/apk/res/android" xmlns:tools="http://schemas.android.com/tools" android:layout_width="match_parent" android:layout_height="match_parent"> <fragment android:id="@+id/id_fragment" android:layout_width="match_parent" android:layout_height="match_parent" class="com.magic.test_fragment.TestFragment"/> </RelativeLayout> 使用 fragment 标签添加碎片,通过class指定碎片的完整类名。 运行效果: 2).动态使用 动态使用就是向Fragment布局容器中动态添加、替换、移除、隐藏、显示Fragment。 CommonFragment.java /** *Createdbymagicon2016年9月27日.通用Fragment */ @SuppressLint("ValidFragment") publicclassCommonFragmentextendsFragment{ Stringdesc; publicCommonFragment(Stringdesc){ super(); this.desc=desc; } @Override publicViewonCreateView(LayoutInflaterinflater,ViewGroupcontainer, BundlesavedInstanceState){ Viewview=inflater.inflate(R.layout.fragment_common,container,false); TextViewtev=(TextView)view.findViewById(R.id.tev); System.out.println(desc); tev.setText(desc); returnview; } } 通过构造方法传递数据的形式向TextView上设置内容。 fragment_common.xml <?xmlversion="1.0"encoding="utf-8"?> <LinearLayoutxmlns:android="http://schemas.android.com/apk/res/android" android:layout_width="match_parent" android:layout_height="match_parent" android:orientation="vertical"> <TextView android:id="@+id/tev" android:layout_width="match_parent" android:layout_height="match_parent" android:gravity="center" android:textColor="@color/mainOrange"/> </LinearLayout> MainActivity.java /** *Createdbymagicon2016年9月27日.底部tab+fragment */ publicclassMainActivityextendsActivityimplementsOnClickListener{ TextViewtev_tab1,tev_tab2,tev_tab3,tev_tab4; //fragment事务类 FragmentTransactionft; //fragment CommonFragmenttabFragment1,tabFragment2,tabFragment3,tabFragment4; @SuppressLint("CommitTransaction") @Override protectedvoidonCreate(BundlesavedInstanceState){ super.onCreate(savedInstanceState); setContentView(R.layout.activity_main2); initView(); ft=getFragmentManager().beginTransaction(); tabFragment1=newCommonFragment("Tab1"); //替换 ft.replace(R.id.container,tabFragment1); //提交 ft.commit(); } //初始化控件 privatevoidinitView(){ tev_tab1=(TextView)findViewById(R.id.tev_tab1); tev_tab2=(TextView)findViewById(R.id.tev_tab2); tev_tab3=(TextView)findViewById(R.id.tev_tab3); tev_tab4=(TextView)findViewById(R.id.tev_tab4); tev_tab1.setOnClickListener(this); tev_tab2.setOnClickListener(this); tev_tab3.setOnClickListener(this); tev_tab4.setOnClickListener(this); } @Override publicvoidonClick(Viewv){ FragmentTransactionft=getFragmentManager().beginTransaction(); switch(v.getId()){ caseR.id.tev_tab1: ft.replace(R.id.container,tabFragment1); break; caseR.id.tev_tab2: if(tabFragment2==null){ tabFragment2=newCommonFragment("Tab2"); } ft.replace(R.id.container,tabFragment2); break; caseR.id.tev_tab3: if(tabFragment3==null){ tabFragment3=newCommonFragment("Tab3"); } ft.replace(R.id.container,tabFragment3); break; caseR.id.tev_tab4: if(tabFragment4==null){ tabFragment4=newCommonFragment("Tab4"); } ft.replace(R.id.container,tabFragment4); break; } //提交 ft.commit(); } } activity_main2.xml <?xmlversion="1.0"encoding="utf-8"?> <LinearLayoutxmlns:android="http://schemas.android.com/apk/res/android" android:layout_width="match_parent" android:layout_height="match_parent" android:orientation="vertical"> <FrameLayout android:id="@+id/container" android:layout_width="match_parent" android:layout_height="0dp" android:layout_weight="1"/> <LinearLayout android:layout_width="match_parent" android:layout_height="50dp" android:background="@color/mainTextBlack" android:orientation="horizontal"> <TextView android:id="@+id/tev_tab1" android:layout_width="0dp" android:layout_height="match_parent" android:layout_weight="1" android:gravity="center" android:text="Tab1" android:textColor="@color/white"/> <TextView android:id="@+id/tev_tab2" android:layout_width="0dp" android:layout_height="match_parent" android:layout_weight="1" android:gravity="center" android:text="Tab2" android:textColor="@color/white"/> <TextView android:id="@+id/tev_tab3" android:layout_width="0dp" android:layout_height="match_parent" android:layout_weight="1" android:gravity="center" android:text="Tab3" android:textColor="@color/white"/> <TextView android:id="@+id/tev_tab4" android:layout_width="0dp" android:layout_height="match_parent" android:layout_weight="1" android:gravity="center" android:text="Tab4" android:textColor="@color/white"/> </LinearLayout> </LinearLayout> 通过 FrameLayout 标签创建Fragment的容器,底部四个Tab添加监听事件用于动态更换FrameLayout容器中的Fragment。 运行效果: 4、相关类及主要方法 FragmentManager碎片管理器,抽象类,具体实现在Android-support-v4.jar中的FragmentManagerImpl类中。 //获取FragmentManager对象 FragmentManagermanager=getFragmentManager(); FragmentTransaction碎片事务类,抽象类,具体实现在BackStackRecord类中。添加、删除、替换等操作其实最终的实现还是在FragmentManagerImpl类中。 //获取FragmentTransaction对象 FragmentTransactiontransaction=manager.beginTransaction(); //添加fragment transaction.add(); transaction.add(containerViewId,fragment,tag); //将被添加到容器的现有fragment替换 transaction.replace(); //删除一个现有的fragment transaction.remove(); //保存当前fragment数据,避免视图重绘 transaction.hide(); //显示以前隐藏的fragment transaction.show(); //这两个方法会触发fragment中的onHiddenChanged(booleanhidden)回调 //显示之前数据实例不会被销毁,但是视图层次依然会被销毁,即会调用onDestoryView和onCreateView transaction.addToBackStack(null); //事务提交 transaction.commit(); Fragment 碎片类 Fragmentfragment=newFragment(); //返回此fragment当前关联的Activity fragment.getActivity(); //设置数据 fragment.setArguments(newBundle()); //获取数据 fragment.getArguments(); //返回与该fragment作用的FragmentManager fragment.getFragmentManager(); //获取标签名 fragment.getTag(); //当隐藏状态改变的时候回调 //onHiddenChanged(true); 有兴趣大家可以去Read The Fucking Source,反正我看的比较头大……. 5、其它 未完待续…… 本文作者:佚名 来源:51CTO