首页 文章 精选 留言 我的

精选列表

搜索[整合],共10000篇文章
优秀的个人博客,低调大师

【SpringBoot技术专题】「JWT技术专区」SpringSecurity整合JWT授权和认证实现

JWT基本概念 JWT,即 JSON Web Tokens(RFC 7519),是一个广泛用于验证 REST APIs 的标准。虽说是一个新兴技术,但它却得以迅速流行。 JWT的验证过程是: 前端(客户端)首先发送一些凭证来登录(我们编写的是 web 应用,所以这里使用用户名和密码来做验证)。 后端(服务端)这里指Spring应用校验这些凭证,如果校验通过则生成并返回一个 JWT。 客户端需要在请求头的Authorization字段中以 “Bearer TOKEN” 的形式携带获取到的token,服务端会检查这个token是否可用并决定授权访问或拒绝请求。 token中可能保存了用户的角色信息,服务端可以根据用户角色来确定访问权限。 实现 我们来看一下在实际的 Spring 项目中是如何实现JWT登录和保存机制的。 依赖 下面是我们示例代码的 Maven 依赖列表,注意,截图中并未包含Spring Boot、Hibernate等核心依赖(你需要自行添加)。 用户模型 创建一个包含保存用户信息、基于用户名和密码验证用户权限功能的 controller。 创建一个名为 User 的实体类,它是数据库中 USER 表的映射。需要的话,可以在其中添加其他属性。 还需要定义一个 UserRepository 类来保存用户信息,重写其 findByUsername 方法,在验证过程中会用到。 public interface UserRepository extends JpaRepository<User, String>{ User findByUsername(String username); } 千万不能在数据库中保存明文密码,因为很多用户喜欢在各种网站上使用相同的密码。 哈希算法有很多,BCrypt是最常用的之一,它也是推荐用于安全加密的算法。关于这个话题的更多内容,可以查看 这篇文章。 为了加密密码,我们在 @bean 注解标记的主类中定义一个 BCrypt Bean,如下所示: @Bean public BCryptPasswordEncoder bCryptPasswordEncoder() { return new BCryptPasswordEncoder(); } 加密密码的时候将会调用这个Bean里面的方法。 创建一个名为 UserController 的类,为其添加 @RestController 注解并定义路由映射。 在这个应用中,我们接收前端传入的 UserDto 对象来保存用户信息。你也可以选择在 @RequestBody 参数中接收 User 对象。 @RestController @RequestMapping("/api/services/controller/user") @AllArgsConstructor public class UserController { private UserService userService; @PostMapping() public ResponseEntity<String> saveUser(@RequestBody UserDto userDto) { return new ResponseEntity<>(userService.saveDto(userDto), HttpStatus.OK); } } 我们使用之前定义的 BCrypt Bean 来加密传入的 UserDto 对象的 password 字段。这个操作也可以在 controller 之中执行,但是把逻辑操作集中到 service 类中是更好的做法。 @Transactional(rollbackFor = Exception.class) public String saveDto(UserDto userDto) { userDto.setPassword(bCryptPasswordEncoder.encode(userDto.getPassword())); return save(new User(userDto)).getId(); } 验证过滤器 需要通过权限验证来确定用户的真实身份。这里我们使用经典的【用户名-密码对】的形式来完成。 验证步骤: 创建继承 UsernamePasswordAuthenticationFilter 的验证过滤器 创建继承 WebSecurityConfigurerAdapter 的安全配置类并应用过滤器 验证过滤器的代码如下——也许你已经知道了,过滤器是 Spring Security 的核心。 public class JWTAuthenticationFilter extends UsernamePasswordAuthenticationFilter { private AuthenticationManager authenticationManager; public JWTAuthenticationFilter(AuthenticationManager authenticationManager) { this.authenticationManager = authenticationManager; setFilterProcessesUrl("/api/services/controller/user/login"); } @Override public Authentication attemptAuthentication(HttpServletRequest req, HttpServletResponse res) throws AuthenticationException { try { User creds = new ObjectMapper().readValue(req.getInputStream(), User.class); return authenticationManager.authenticate( new UsernamePasswordAuthenticationToken( creds.getUsername(), creds.getPassword(), new ArrayList<>()) ); } catch (IOException e) { throw new RuntimeException(e); } } @Override protected void successfulAuthentication(HttpServletRequest req, HttpServletResponse res, FilterChain chain, Authentication auth) throws IOException { String token = JWT.create() .withSubject(((User) auth.getPrincipal()).getUsername()) .withExpiresAt(new Date(System.currentTimeMillis() + EXPIRATION_TIME)) .sign(Algorithm.HMAC512(SECRET.getBytes())); String body = ((User) auth.getPrincipal()).getUsername() + " " + token; res.getWriter().write(body); res.getWriter().flush(); } } Spring Security 默认使用继承了 UsernamePasswordAuthenticationFilter 的子类进行密码验证 ,我们可以在其中编写自定义的验证逻辑。 我们在构造函数中调用setFilterProcessesUrl 方法,设置默认登录地址。 如果删除这行代码,Spring Security 会生成一个默认的 “/login” 端点,我们可以不用在 controller 中显式地定义登录端点。 这行代码执行之后,我们的登录端点将被设置为 /api/services/controller/user/login,你可以根据自己的实际代码来设置。 我们重写了 UsernameAuthenticationFilter 类的 attemptAuthentication 和 successfulAuthentication 方法。 用户登录时会执行 attemptAuthentication方法,它会读取凭证信息、创建用户 POJO、校验凭证并授权。 我们传入用户名、密码以及一个空列表。我们还没有定义用户角色,所以把这个表示用户权限(角色)的列表留空就行。 如果验证成功,就会执行 successfulAuthentication 方法,它的参数由Spring Security自动注入。 attemptAuthentication返回Authentication对象,这个对象包含了我们传入的权限信息。 我们想在验证成功之后返回一个使用用户名、密钥和过期时间创建的 token。先定义SECRET和 EXPIRATION_DATE。 public class SecurityConstants { public static final String SECRET = "SECRET_KEY"; public static final long EXPIRATION_TIME = 900_000; // 15 mins public static final String TOKEN_PREFIX = "Bearer "; public static final String HEADER_STRING = "Authorization"; public static final String SIGN_UP_URL = "/api/services/controller/user"; } 创建一个类作为常量的容器,SECRET 的值可以任意设置,最佳的做法是在 hash 算法支持的范围内使用尽可能长的字符串。例如我们使用的是 HS256 算法,SECRET 字符串的最佳长度即为 256 bits/32 个字符。 超时时间设置为 15 分钟,这是防御暴力破解密码的最佳实践。此处使用的时间单位为毫秒。 验证过滤器准备好了,但还不可用,我们还要创建一个授权过滤器,再通过一个配置类来应用它们。 授权过滤器会校验 Authorization 请求头中的 token 是否存在及其可用性。在配置类中指明哪些端点需要使用这个过滤器。 授权过滤器 doFilterInternal 方法拦截请求并校验 Authorization 请求头,如果不存在或者它的值不是以 “BEARER” 开头,则直接转到下一个过滤器。 如果这个请求头携带了合法的值,会调用 getAuthentication 方法,校验这个 JWT,如果这个 token 是可用的,它会返回一个Spring内部使用的 token。 这个新生成的 token 会被保存在 SecurityContext 中,如果需要基于用户角色进行授权的话,可以向这个 token 传入用户权限。 过滤器都准备好了,现在要通过配置类把它们投入使用。 public class JWTAuthorizationFilter extends BasicAuthenticationFilter { public JWTAuthorizationFilter(AuthenticationManager authManager) { super(authManager); } @Override protected void doFilterInternal(HttpServletRequest req, HttpServletResponse res, FilterChain chain) throws IOException, ServletException { String header = req.getHeader(HEADER_STRING); if (header == null || !header.startsWith(TOKEN_PREFIX)) { chain.doFilter(req, res); return; } UsernamePasswordAuthenticationToken authentication = getAuthentication(req); SecurityContextHolder.getContext().setAuthentication(authentication); chain.doFilter(req, res); } // Reads the JWT from the Authorization header, and then uses JWT to validate the token private UsernamePasswordAuthenticationToken getAuthentication(HttpServletRequest request) { String token = request.getHeader(HEADER_STRING); if (token != null) { // parse the token. String user = JWT.require(Algorithm.HMAC512(SECRET.getBytes())) .build() .verify(token.replace(TOKEN_PREFIX, "")) .getSubject(); if (user != null) { // new arraylist means authorities return new UsernamePasswordAuthenticationToken(user, null, new ArrayList<>()); } return null; } return null; } 配置处理 给这个类添加 @EnableWebSecurity 注解,同时让它继承 WebSecurityConfigureAdapter 并实现自定义的安全逻辑。 自动注入之前定义的 BCrypt Bean,同时自动注入 UserDetailsService 用来获取用户账户信息。 最重要的是那个接收一个 HttpSecurity 对象作为参数的方法,其中声明了如何在各个端点中应用过滤器、配置了 CORS、放行了所有对注册接口的 POST 请求。 可以添加其他匹配器来基于 URL 模式和角色进行过滤,你也可以 查看 StackOverflow 上这个问题的相关示例。另一个方法配置了 AuthenticationManager 在登录校验时使用我们指定的编码器。 @EnableWebSecurity public class WebSecurity extends WebSecurityConfigurerAdapter { private UserDetailsServiceImpl userDetailsService; private BCryptPasswordEncoder bCryptPasswordEncoder; public WebSecurity(UserDetailsServiceImpl userService, BCryptPasswordEncoder bCryptPasswordEncoder) { this.userDetailsService = userService; this.bCryptPasswordEncoder = bCryptPasswordEncoder; } @Override protected void configure(HttpSecurity http) throws Exception { http.cors().and().authorizeRequests() .antMatchers(HttpMethod.POST, SIGN_UP_URL).permitAll() .anyRequest().authenticated() .and() .addFilter(new JWTAuthenticationFilter(authenticationManager())) .addFilter(new JWTAuthorizationFilter(authenticationManager())) // this disables session creation on Spring Security .sessionManagement().sessionCreationPolicy(SessionCreationPolicy.STATELESS); } @Override public void configure(AuthenticationManagerBuilder auth) throws Exception { auth.userDetailsService(userDetailsService).passwordEncoder(bCryptPasswordEncoder); } @Bean CorsConfigurationSource corsConfigurationSource() { final UrlBasedCorsConfigurationSource source = new UrlBasedCorsConfigurationSource(); CorsConfiguration corsConfiguration = new CorsConfiguration().applyPermitDefaultValues(); source.registerCorsConfiguration("/**", corsConfiguration); return source; } } 测试实现 发送一些请求来测试应用是否正常工作。 使用 GET 请求访问受保护的资源,服务端返回了 403 状态码。 这是程序设计预期的行为,因为我们没有在请求头中携带 token 信息。 现在创建一个用户: 发送一个携带了用户信息数据的 POST 请求,以创建用户。稍后将登陆这个账户来获取 token。 获取到 token 了,现在可以用这个 token 来访问受保护的资源。 在 Authorization 请求头中携带 token,就可以访问受保护的端点了。 总结 Spring 中实现 JWT 授权和密码认证的步骤,同时学习了如何安全地保存用户信息。 参考内容 How to Set Up Java Spring Boot JWT Authorization and

优秀的个人博客,低调大师

JPA项目多数据源模式整合Sharding-jdbc实现数据脱敏

引言 前一篇博文,已经完整的介绍了数据库脱敏的场景及方案,来自京东数科的Sharding-JDBC开源项目通过对数据源中间代理的方式透明化的实现了这个功能,但是,功能虽然实现了,sql兼容的小问题还是很多,比如目前不支持子查询,数据库定义的关键字不允许使用,等等问题,反观我们需要加解密的字段,其实相比业务的sql来说占比非常小,即使遇到了和组件不兼容的地方也可以稍加改动解决掉,所以最后博主给出了一个比较完善的组件集成方案:多数据源模式,需要加解密的数据源和业务其他数据源隔离。即解决了数据库字段加解密的问题,同时也解决了组件对sql的兼容问题。下面是具体的集成步骤以及需要注意的点 引入依赖 <dependency> <groupId>org.apache.shardingsphere</groupId> <artifactId>sharding-jdbc-spring-boot-starter</artifactId> <version>${sharding.jdbc.version}</version> </dependency> 这里需要说明下,虽然采用多数据源兼容后,不能使用组件基于spring boot自动装配功能,但是这里还是建议导入sharding-spring-boot-starter包,因为这个包下内置了配置映射的类,在自定义数据源的时候非常有用 添加sharding数据源配置 #数据库源配置 spring.shardingsphere.datasource.name = ds spring.shardingsphere.datasource.ds.type = com.zaxxer.hikari.HikariDataSource spring.shardingsphere.datasource.ds.driver-class-name = com.mysql.jdbc.Driver spring.shardingsphere.datasource.ds.jdbc-url = jdbc:mysql://xxx?autoReconnect=true&useUnicode=true&characterEncoding=utf-8 spring.shardingsphere.datasource.ds.username = root spring.shardingsphere.datasource.ds.password = xxx spring.shardingsphere.encrypt.encryptors.encryptor_aes.type = aes spring.shardingsphere.encrypt.encryptors.encryptor_aes.props.aes.key.value = 123456 spring.shardingsphere.encrypt.tables.account.columns.password.plainColumn = password spring.shardingsphere.encrypt.tables.account.columns.password.cipherColumn = password_encrypt spring.shardingsphere.encrypt.tables.account.columns.password.encryptor = encryptor_aes spring.shardingsphere.props.sql.show = true spring.shardingsphere.props.query.with.cipher.column = true 排除自动装配 @SpringBootApplication(exclude = SpringBootConfiguration.class) 由于导入了starter包,所以这里需要手动排除自动装载类, 业务数据源配置 多数据源后,业务本身的数据源也需要手动配置,默认的spring boot jpa自动转载类会判断上线文中是否存在EntityManagerFactory类,如果有就不会初始化了,所以两个数据源都需要手动配置 @Configuration @EnableConfigurationProperties(JpaProperties.class) public class DataSourceConfiguration{ private final JpaProperties jpaProperties; private final Environment environment; public DataSourceConfiguration(JpaProperties jpaProperties, Environment environment) { this.jpaProperties = jpaProperties; this.environment = environment; } @Primary @Bean public DataSource dataSource(){ String prefix = "spring.shardingsphere.datasource."; String each = getDataSourceNames(prefix).get(0); try { return getDataSource(prefix, each); } catch (final ReflectiveOperationException ex) { throw new ShardingSphereException("Can't find datasource type!", ex); } } @Primary @Bean public EntityManagerFactory entityManagerFactory() { HibernateJpaVendorAdapter vendorAdapter = new HibernateJpaVendorAdapter(); vendorAdapter.setDatabase(Database.MYSQL); vendorAdapter.setGenerateDdl(true); vendorAdapter.setShowSql(true); LocalContainerEntityManagerFactoryBean factory = new LocalContainerEntityManagerFactoryBean(); factory.setJpaVendorAdapter(vendorAdapter); factory.setPersistenceUnitName("default"); factory.setPackagesToScan(Constants.BASE_PACKAGES); factory.setDataSource(dataSource()); factory.setJpaPropertyMap(jpaProperties.getProperties()); factory.afterPropertiesSet(); return factory.getObject(); } @Bean @Primary public EntityManager entityManager(EntityManagerFactory entityManagerFactory){ return SharedEntityManagerCreator.createSharedEntityManager(entityManagerFactory); } @Primary @Bean public PlatformTransactionManager transactionManager(EntityManagerFactory entityManagerFactory){ JpaTransactionManager txManager = new JpaTransactionManager(); txManager.setEntityManagerFactory(entityManagerFactory); return txManager; } private ListgetDataSourceNames(final String prefix) { StandardEnvironment standardEnv = (StandardEnvironment) environment; standardEnv.setIgnoreUnresolvableNestedPlaceholders(true); return null == standardEnv.getProperty(prefix + "name") ? new InlineExpressionParser(standardEnv.getProperty(prefix + "names")).splitAndEvaluate() : Collections.singletonList(standardEnv.getProperty(prefix + "name")); } @SuppressWarnings("unchecked") private DataSource getDataSource(final String prefix, final String dataSourceName) throws ReflectiveOperationException { Map dataSourceProps = PropertyUtil.handle(environment, prefix + dataSourceName.trim(), Map.class); Preconditions.checkState(!dataSourceProps.isEmpty(), "Wrong datasource properties!"); DataSource result = DataSourceUtil.getDataSource(dataSourceProps.get("type").toString(), dataSourceProps); DataSourcePropertiesSetterHolder.getDataSourcePropertiesSetterByType(dataSourceProps.get("type").toString()).ifPresent( dataSourcePropertiesSetter -> dataSourcePropertiesSetter.propertiesSet(environment, prefix, dataSourceName, result)); return result; } } 上面代码需要注意三个地方,一是数据源的配置,是以sharding的配置来解析获得的,是因为我们已经集成过了,不想改动配置,所以如此,如果还没集成过,可以直接使用spring 配置数据源的方式配置即可。二是EntityManager的初始化,通过SharedEntityManagerCreator包装了下,是因为我们业务的查询通过继承SimpleJpaRepository来扩展功能的,通过SharedEntityManagerCreator包装保留了SimpleJpaRepository内部定义的事务功能。三是需要给所有的业务数据源的配置添加@Primary注解,让sprign上下文默认使用业务数据源 加解密数据源配置 /** * @author: kl @kailing.pub * @date: 2020/5/18 */ @Configuration @EnableConfigurationProperties({JpaProperties.class,SpringBootEncryptRuleConfigurationProperties.class, SpringBootPropertiesConfigurationProperties.class}) @AutoConfigureAfter({DataSourceAutoConfiguration.class, DataSourceConfiguration.class}) public class EncryptDataSourceConfiguration { private final SpringBootPropertiesConfigurationProperties props; private final SpringBootEncryptRuleConfigurationProperties encryptRule; private final JpaProperties jpaProperties; private final DataSource dataSource; public EncryptDataSourceConfiguration(SpringBootPropertiesConfigurationProperties props, SpringBootEncryptRuleConfigurationProperties encryptRule, JpaProperties jpaProperties, DataSource dataSource) { this.props = props; this.encryptRule = encryptRule; this.jpaProperties = jpaProperties; this.dataSource = dataSource; } @Bean public DataSource encryptDataSource() throws SQLException { return EncryptDataSourceFactory.createDataSource(dataSource, new EncryptRuleConfigurationYamlSwapper().swap(encryptRule), props.getProps()); } @Bean public EntityManagerFactory encryptEntityManagerFactory() throws SQLException { HibernateJpaVendorAdapter vendorAdapter = new HibernateJpaVendorAdapter(); vendorAdapter.setDatabase(Database.MYSQL); LocalContainerEntityManagerFactoryBean factory = new LocalContainerEntityManagerFactoryBean(); factory.setJpaVendorAdapter(vendorAdapter); factory.setPersistenceUnitName("encryptPersistenceUnit"); factory.setPackagesToScan(Constants.BASE_PACKAGES); factory.setDataSource(encryptDataSource()); factory.setJpaPropertyMap(jpaProperties.getProperties()); factory.afterPropertiesSet(); return factory.getObject(); } @Bean public EntityManager encryptEntityManager() throws SQLException { return SharedEntityManagerCreator.createSharedEntityManager(encryptEntityManagerFactory()); } @Bean public PlatformTransactionManager encryptTransactionManager() throws SQLException { JpaTransactionManager txManager = new JpaTransactionManager(); txManager.setEntityManagerFactory(encryptEntityManagerFactory()); return txManager; } } 加解密数据源的源来自于业务数据源,只是在这里给业务数据源又代理了一层加解密的逻辑。加解密的规则配置采用了sharding-spring-boot-starter包中的映射类,所以可以保留和spring boot配置方式一致。 加解密数据源的使用 在使用时,因为默认使用的是业务数据源,所以需要在需要加解密的地方通过@Qualifier("encryptEntityManager")显示的注入加解密的数据源代理,如: @Repository public class AccountRepository extends AbstractJpaRepository { public AccountRepository(@Qualifier("encryptEntityManager") EntityManager em) { super(AccountModel.class, em); } @Override @Transactional(transactionManager = "encryptTransactionManager") public S save(S entity) { return super.save(entity); } } 另,需要手动指定加解密数据源的事务管理器。 如果你使用了JpaRepository等接口,在启用@EnableJpaRepositories的注解里,默认装载的业务数据源配置的EntityManagerFactory实例,需要加解密时,要设置如下参数: @EnableJpaRepositories(basePackages = "com.xxx",entityManagerFactoryRef = "encryptEntityManagerFactory",transactionManagerRef = "encryptTransactionManager") 结语 没有十全十美的组件,Sharding-JDBC的数据脱敏方案已经趋向于完美了。由于组件本身的架构设计,确实不好做到100%的兼容。在发现加解密组件不支持子查询时,博主发现实现这个功能很简单,尝试过向官方提交这个功能的pr。经过对组件的进一步了解发现,从全局考虑实现这个功能非常复杂,也就放弃了,熟悉java的DBA有志之士可以去试试。目前这个多数据源模式可以很好的解决了sql兼容问题,如果有更好的集成方案,欢迎在下面留言交流 作者简介: 陈凯玲,2016年5月加入凯京科技。负责基础架构中间件的迭代,救火队队长。独立博客KL博客(http://www.kailing.pub)博主。

优秀的个人博客,低调大师

将物联网整合到医疗保健,农业和运输用例中

云栖号资讯:【点击查看更多行业资讯】在这里您可以找到不同行业的第一手的上云资讯,还在等什么,快来! 物联网技术每天都在扩展到新的领域。尤其是医疗,农业和运输行业,将从这些新技术中获得不可思议的收益。 当你把一个传统的设备,比如手表,加上计算、连接和一层智能,你最终会改变用户体验,这难道不是很吸引人吗? 什么是物联网?我们将物理设备连接到internet以改变用户体验。对于物联网用例,你可以想象出一系列的可能性。智能家居可能是大众媒体最常讨论的话题。想象一下你的车库门,家里的灯和音响都在一起工作,当你到家的时候,它们能创造一个更好的氛围,根据你的喜好和需要调节你的环境。 现在,对于商业用例,可以想象一个农民通过智能手机管理整个农场。安全摄像头、灌溉设备、温度传感器都可以连接起来,这样它们就能更好地协同工作。在一个城市的公共交通系统中,你可以管理交通、公共汽车时刻表、停车点和维护,你可以为生活在城市中的人们创造更好的体验。 将物联网和机器学习带入医疗保健 当今的医疗保健机构越来越多地采用可提供多种远程监控,医疗保健交付和家庭诊断功能的技术,这些技术可以利用机器学习和物联网。如今,智能医疗系统集成了全天候的实时数据流,用药提醒和实时医疗诊断,所有这些都减少了对医院就诊的需求。 IoT在医疗保健行业有时被称为“医疗物联网(IoMT)”。它由医疗设备,患者监视工具,可穿戴设备和其他传感器组成,这些设备可以通过互联网将信号发送到其他设备。这些工具生成大量数据,必须对其进行存储,集成和分析,以便针对慢性病管理和急诊患者护理需求生成可行的见解。 预测住院环境中患者的恶化或感染需要床边设备的持续反馈,而诸如蓝牙的血压袖带,体重计和药瓶之类的家庭监控工具可以使患者遵守诊所以外的慢性病管理协议。传感器,机器学习,大数据分析和区块链可能都是IoMT潜在有用的技术。 农业行业的物联网用例 借助物联网,农民可以监控和管理每一个细微的细节,从土壤和单个植物的水分,营养和酸度含量到有害生物和当地天气模式,再到牛的健康和每分钟的运动情况。 随着这些元素之间的联系,农民可以从大数据分析中获得巨大的洞察力,从而可以做出更好的决策。 物联网和遥感技术有助于发掘新的创新。例如,GroundCover使用农场图像来绘制和预测马铃薯的产量;其CanopyCheck应用程序使用智能手机向农民添加地理位置信息。孟山都的综合农业系统(IFS)使用分析工具,例如 “ FieldScript”,提供有关种植,精确播种和遗传增益的建议。GrowSafe Systems使用传感器和分析来跟踪牛的运动和健康状况,并帮助农民应对疾病的检测和预防。 农业物联网可以带来一系列好处。它可以通过自动化过程(例如打开远程农业设备)来提高农业工人的生产率,这也降低了差旅成本。还可以为牲畜提供响应速度更快的医疗保健服务,并且可以通过无线传感器跟踪其健康指标。物联网以及随附的分析解决方案可以揭示对作物季节计划的新见解,提高食品安全性并减轻作物歉收风险。 运输中的物联网用例 随着物联网继续连接我们周围的世界,一些最激动人心的数字化转型正在运输行业中出现。我们已经看到城市和州正在试行和部署基于IoT的技术,这些技术将运输基础设施,公共交通系统,道路,高速公路,标牌和路灯连接到车辆以及介于两者之间的所有内容。这些连接在一起有望创造出简化的运输方式,同时提高安全性和可持续性。 未来,人工智能和机器学习将在交通运输领域变得越来越重要,从而可以实现更自动化,更具预测性的分析和更好的决策制定。AI和ML可以预测何时部署应急车辆,拖车,扫雪机等,从而提高道路和高速公路的安全性和效率。例如,通过汇总和分析当前和历史天气,小气候和交通数据,运输机构可以提前将撒盐的卡车部署到经常结冰的道路上。随后,他们可以预测何时在道路的超局部区域可能出现雾气并警告驾驶员。 这些类型的预测性决策,由人工智能和人工智能驱动,使得交通运输在减少干扰的情况下运行,降低成本,确保更安全的出行。 【云栖号在线课堂】每天都有产品技术专家分享!课程地址:https://yqh.aliyun.com/zhibo 立即加入社群,与专家面对面,及时了解课程最新动态!【云栖号在线课堂 社群】https://c.tb.cn/F3.Z8gvnK 原文发布时间:2020-04-13本文作者:物联网IoT996本文来自:“今日头条”,了解相关信息可以关注“今日头条”

优秀的个人博客,低调大师

SpringBoot 2.0 整合sharding-jdbc中间件,实现数据分库分表

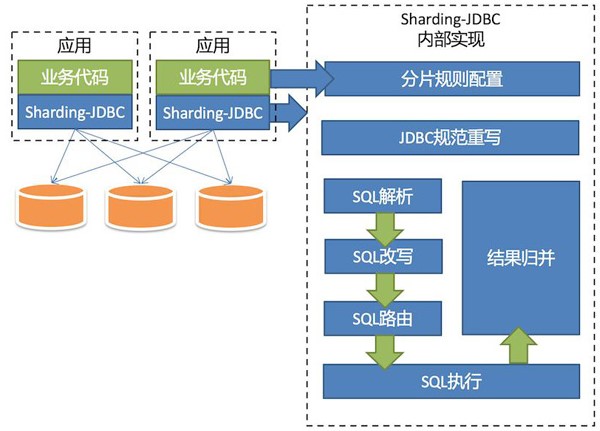
一、水平分割 1、水平分库1)、概念:以字段为依据,按照一定策略,将一个库中的数据拆分到多个库中。2)、结果每个库的结构都一样;数据都不一样;所有库的并集是全量数据;2、水平分表1)、概念以字段为依据,按照一定策略,将一个表中的数据拆分到多个表中。2)、结果每个表的结构都一样;数据都不一样;所有表的并集是全量数据; 二、Shard-jdbc 中间件 1、架构图 2、特点 1)、Sharding-JDBC直接封装JDBC API,旧代码迁移成本几乎为零。 2)、适用于任何基于Java的ORM框架,如Hibernate、Mybatis等 。 3)、可基于任何第三方的数据库连接池,如DBCP、C3P0、 BoneCP、Druid等。 4)、以jar包形式提供服务,无proxy代理层,无需额外部署,无其他依赖。 5)、分片策略灵活,可支持等号、between、in等多维度分片,也可支持多分片键。 6)、SQL解析功能完善,支持聚合、分组、排序、limit、or等查询。 三、项目演示 1、项目结构 springboot 2.0 版本 druid 1.1.13 版本 sharding-jdbc 3.1 版本 2、数据库配置 一台基础库映射(shard_one) 两台库做分库分表(shard_two,shard_three)。 表使用:table_one,table_two 3、核心代码块 数据源配置文件 spring: datasource: # 数据源:shard_one dataOne: type: com.alibaba.druid.pool.DruidDataSource druid: driverClassName: com.mysql.jdbc.Driver url: jdbc:mysql://localhost:3306/shard_one?useUnicode=true&characterEncoding=UTF8&zeroDateTimeBehavior=convertToNull&useSSL=false username: root password: 123 initial-size: 10 max-active: 100 min-idle: 10 max-wait: 60000 pool-prepared-statements: true max-pool-prepared-statement-per-connection-size: 20 time-between-eviction-runs-millis: 60000 min-evictable-idle-time-millis: 300000 max-evictable-idle-time-millis: 60000 validation-query: SELECT 1 FROM DUAL # validation-query-timeout: 5000 test-on-borrow: false test-on-return: false test-while-idle: true connectionProperties: druid.stat.mergeSql=true;druid.stat.slowSqlMillis=5000 # 数据源:shard_two dataTwo: type: com.alibaba.druid.pool.DruidDataSource druid: driverClassName: com.mysql.jdbc.Driver url: jdbc:mysql://localhost:3306/shard_two?useUnicode=true&characterEncoding=UTF8&zeroDateTimeBehavior=convertToNull&useSSL=false username: root password: 123 initial-size: 10 max-active: 100 min-idle: 10 max-wait: 60000 pool-prepared-statements: true max-pool-prepared-statement-per-connection-size: 20 time-between-eviction-runs-millis: 60000 min-evictable-idle-time-millis: 300000 max-evictable-idle-time-millis: 60000 validation-query: SELECT 1 FROM DUAL # validation-query-timeout: 5000 test-on-borrow: false test-on-return: false test-while-idle: true connectionProperties: druid.stat.mergeSql=true;druid.stat.slowSqlMillis=5000 # 数据源:shard_three dataThree: type: com.alibaba.druid.pool.DruidDataSource druid: driverClassName: com.mysql.jdbc.Driver url: jdbc:mysql://localhost:3306/shard_three?useUnicode=true&characterEncoding=UTF8&zeroDateTimeBehavior=convertToNull&useSSL=false username: root password: 123 initial-size: 10 max-active: 100 min-idle: 10 max-wait: 60000 pool-prepared-statements: true max-pool-prepared-statement-per-connection-size: 20 time-between-eviction-runs-millis: 60000 min-evictable-idle-time-millis: 300000 max-evictable-idle-time-millis: 60000 validation-query: SELECT 1 FROM DUAL # validation-query-timeout: 5000 test-on-borrow: false test-on-return: false test-while-idle: true connectionProperties: druid.stat.mergeSql=true;druid.stat.slowSqlMillis=5000 数据库分库策略 /** * 数据库映射计算 */ public class DataSourceAlg implements PreciseShardingAlgorithm<String> { private static Logger LOG = LoggerFactory.getLogger(DataSourceAlg.class); @Override public String doSharding(Collection<String> names, PreciseShardingValue<String> value) { LOG.debug("分库算法参数 {},{}",names,value); int hash = HashUtil.rsHash(String.valueOf(value.getValue())); return "ds_" + ((hash % 2) + 2) ; } } 数据表1分表策略 /** * 分表算法 */ public class TableOneAlg implements PreciseShardingAlgorithm<String> { private static Logger LOG = LoggerFactory.getLogger(TableOneAlg.class); /** * 该表每个库分5张表 */ @Override public String doSharding(Collection<String> names, PreciseShardingValue<String> value) { LOG.debug("分表算法参数 {},{}",names,value); int hash = HashUtil.rsHash(String.valueOf(value.getValue())); return "table_one_" + (hash % 5+1); } } 数据表2分表策略 /** * 分表算法 */ public class TableTwoAlg implements PreciseShardingAlgorithm<String> { private static Logger LOG = LoggerFactory.getLogger(TableTwoAlg.class); /** * 该表每个库分5张表 */ @Override public String doSharding(Collection<String> names, PreciseShardingValue<String> value) { LOG.debug("分表算法参数 {},{}",names,value); int hash = HashUtil.rsHash(String.valueOf(value.getValue())); return "table_two_" + (hash % 5+1); } } 数据源集成配置 /** * 数据库分库分表配置 */ @Configuration public class ShardJdbcConfig { // 省略了 druid 配置,源码中有 /** * Shard-JDBC 分库配置 */ @Bean public DataSource dataSource (@Autowired DruidDataSource dataOneSource, @Autowired DruidDataSource dataTwoSource, @Autowired DruidDataSource dataThreeSource) throws Exception { ShardingRuleConfiguration shardJdbcConfig = new ShardingRuleConfiguration(); shardJdbcConfig.getTableRuleConfigs().add(getTableRule01()); shardJdbcConfig.getTableRuleConfigs().add(getTableRule02()); shardJdbcConfig.setDefaultDataSourceName("ds_0"); Map<String,DataSource> dataMap = new LinkedHashMap<>() ; dataMap.put("ds_0",dataOneSource) ; dataMap.put("ds_2",dataTwoSource) ; dataMap.put("ds_3",dataThreeSource) ; Properties prop = new Properties(); return ShardingDataSourceFactory.createDataSource(dataMap, shardJdbcConfig, new HashMap<>(), prop); } /** * Shard-JDBC 分表配置 */ private static TableRuleConfiguration getTableRule01() { TableRuleConfiguration result = new TableRuleConfiguration(); result.setLogicTable("table_one"); result.setActualDataNodes("ds_${2..3}.table_one_${1..5}"); result.setDatabaseShardingStrategyConfig(new StandardShardingStrategyConfiguration("phone", new DataSourceAlg())); result.setTableShardingStrategyConfig(new StandardShardingStrategyConfiguration("phone", new TableOneAlg())); return result; } private static TableRuleConfiguration getTableRule02() { TableRuleConfiguration result = new TableRuleConfiguration(); result.setLogicTable("table_two"); result.setActualDataNodes("ds_${2..3}.table_two_${1..5}"); result.setDatabaseShardingStrategyConfig(new StandardShardingStrategyConfiguration("phone", new DataSourceAlg())); result.setTableShardingStrategyConfig(new StandardShardingStrategyConfiguration("phone", new TableTwoAlg())); return result; } } 测试代码执行流程 @RestController public class ShardController { @Resource private ShardService shardService ; /** * 1、建表流程 */ @RequestMapping("/createTable") public String createTable (){ shardService.createTable(); return "success" ; } /** * 2、生成表 table_one 数据 */ @RequestMapping("/insertOne") public String insertOne (){ shardService.insertOne(); return "SUCCESS" ; } /** * 3、生成表 table_two 数据 */ @RequestMapping("/insertTwo") public String insertTwo (){ shardService.insertTwo(); return "SUCCESS" ; } /** * 4、查询表 table_one 数据 */ @RequestMapping("/selectOneByPhone/{phone}") public TableOne selectOneByPhone (@PathVariable("phone") String phone){ return shardService.selectOneByPhone(phone); } /** * 5、查询表 table_one 数据 */ @RequestMapping("/selectTwoByPhone/{phone}") public TableTwo selectTwoByPhone (@PathVariable("phone") String phone){ return shardService.selectTwoByPhone(phone); } } 四、项目源码 GitHub地址:知了一笑 https://github.com/cicadasmile/middle-ware-parent 码云地址:知了一笑 https://gitee.com/cicadasmile/middle-ware-parent

优秀的个人博客,低调大师

Spring Boot Security 整合 JWT 实现 无状态的分布式API接口

文章首发于公众号《程序员果果》地址:https://mp.weixin.qq.com/s/QO5L1-RCR-jmIuHlZIfkqQ 简介 JSON Web Token(缩写 JWT)是目前最流行的跨域认证解决方案。JSON Web Token 入门教程 - 阮一峰,这篇文章可以帮你了解JWT的概念。本文重点讲解Spring Boot 结合 jwt ,来实现前后端分离中,接口的安全调用。 快速上手 之前的文章已经对 Spring Security 进行了讲解,这一节对涉及到 Spring Security 的配置不详细讲解。若不了解 Spring Security 先移步到 Spring Boot Security 详解。 建表 DROP TABLE IF EXISTS `user`; DROP TABLE IF EXISTS `role`; DROP TABLE IF EXISTS `user_role`; DROP TABLE IF EXISTS `role_permission`; DROP TABLE IF EXISTS `permission`; CREATE TABLE `user` ( `id` bigint(11) NOT NULL AUTO_INCREMENT, `username` varchar(255) NOT NULL, `password` varchar(255) NOT NULL, PRIMARY KEY (`id`) ); CREATE TABLE `role` ( `id` bigint(11) NOT NULL AUTO_INCREMENT, `name` varchar(255) NOT NULL, PRIMARY KEY (`id`) ); CREATE TABLE `user_role` ( `user_id` bigint(11) NOT NULL, `role_id` bigint(11) NOT NULL ); CREATE TABLE `role_permission` ( `role_id` bigint(11) NOT NULL, `permission_id` bigint(11) NOT NULL ); CREATE TABLE `permission` ( `id` bigint(11) NOT NULL AUTO_INCREMENT, `url` varchar(255) NOT NULL, `name` varchar(255) NOT NULL, `description` varchar(255) NULL, `pid` bigint(11) NOT NULL, PRIMARY KEY (`id`) ); INSERT INTO user (id, username, password) VALUES (1,'user','e10adc3949ba59abbe56e057f20f883e'); INSERT INTO user (id, username , password) VALUES (2,'admin','e10adc3949ba59abbe56e057f20f883e'); INSERT INTO role (id, name) VALUES (1,'USER'); INSERT INTO role (id, name) VALUES (2,'ADMIN'); INSERT INTO permission (id, url, name, pid) VALUES (1,'/user/hi','',0); INSERT INTO permission (id, url, name, pid) VALUES (2,'/admin/hi','',0); INSERT INTO user_role (user_id, role_id) VALUES (1, 1); INSERT INTO user_role (user_id, role_id) VALUES (2, 1); INSERT INTO user_role (user_id, role_id) VALUES (2, 2); INSERT INTO role_permission (role_id, permission_id) VALUES (1, 1); INSERT INTO role_permission (role_id, permission_id) VALUES (2, 1); INSERT INTO role_permission (role_id, permission_id) VALUES (2, 2); 项目结构 resources |___application.yml java |___com | |____gf | | |____SpringbootJwtApplication.java | | |____config | | | |____.DS_Store | | | |____SecurityConfig.java | | | |____MyFilterSecurityInterceptor.java | | | |____MyInvocationSecurityMetadataSourceService.java | | | |____MyAccessDecisionManager.java | | |____entity | | | |____User.java | | | |____RolePermisson.java | | | |____Role.java | | |____mapper | | | |____PermissionMapper.java | | | |____UserMapper.java | | | |____RoleMapper.java | | |____utils | | | |____JwtTokenUtil.java | | |____controller | | | |____AuthController.java | | |____filter | | | |____JwtTokenFilter.java | | |____service | | | |____impl | | | | |____AuthServiceImpl.java | | | | |____UserDetailsServiceImpl.java | | | |____AuthService.java 关键代码 pom.xml <dependency> <groupId>org.springframework.boot</groupId> <artifactId>spring-boot-starter-web</artifactId> </dependency> <dependency> <groupId>org.springframework.boot</groupId> <artifactId>spring-boot-starter-security</artifactId> </dependency> <dependency> <groupId>io.jsonwebtoken</groupId> <artifactId>jjwt</artifactId> <version>0.9.0</version> </dependency> <dependency> <groupId>mysql</groupId> <artifactId>mysql-connector-java</artifactId> <scope>runtime</scope> </dependency> <dependency> <groupId>org.mybatis.spring.boot</groupId> <artifactId>mybatis-spring-boot-starter</artifactId> <version>2.0.0</version> </dependency> application.yml spring: datasource: driver-class-name: com.mysql.cj.jdbc.Driver url: jdbc:mysql://localhost:3306/spring-security-jwt?useUnicode=true&characterEncoding=utf-8&useSSL=false username: root password: root SecurityConfig @Configuration @EnableWebSecurity public class SecurityConfig extends WebSecurityConfigurerAdapter { @Autowired private UserDetailsService userDetailsService; @Autowired public void configureGlobal(AuthenticationManagerBuilder auth) throws Exception { //校验用户 auth.userDetailsService( userDetailsService ).passwordEncoder( new PasswordEncoder() { //对密码进行加密 @Override public String encode(CharSequence charSequence) { System.out.println(charSequence.toString()); return DigestUtils.md5DigestAsHex(charSequence.toString().getBytes()); } //对密码进行判断匹配 @Override public boolean matches(CharSequence charSequence, String s) { String encode = DigestUtils.md5DigestAsHex(charSequence.toString().getBytes()); boolean res = s.equals( encode ); return res; } } ); } @Override protected void configure(HttpSecurity http) throws Exception { http.csrf().disable() //因为使用JWT,所以不需要HttpSession .sessionManagement().sessionCreationPolicy( SessionCreationPolicy.STATELESS).and() .authorizeRequests() //OPTIONS请求全部放行 .antMatchers( HttpMethod.OPTIONS, "/**").permitAll() //登录接口放行 .antMatchers("/auth/login").permitAll() //其他接口全部接受验证 .anyRequest().authenticated(); //使用自定义的 Token过滤器 验证请求的Token是否合法 http.addFilterBefore(authenticationTokenFilterBean(), UsernamePasswordAuthenticationFilter.class); http.headers().cacheControl(); } @Bean public JwtTokenFilter authenticationTokenFilterBean() throws Exception { return new JwtTokenFilter(); } @Bean @Override public AuthenticationManager authenticationManagerBean() throws Exception { return super.authenticationManagerBean(); } } JwtTokenUtil /** * JWT 工具类 */ @Component public class JwtTokenUtil implements Serializable { private static final String CLAIM_KEY_USERNAME = "sub"; /** * 5天(毫秒) */ private static final long EXPIRATION_TIME = 432000000; /** * JWT密码 */ private static final String SECRET = "secret"; /** * 签发JWT */ public String generateToken(UserDetails userDetails) { Map<String, Object> claims = new HashMap<>(16); claims.put( CLAIM_KEY_USERNAME, userDetails.getUsername() ); return Jwts.builder() .setClaims( claims ) .setExpiration( new Date( Instant.now().toEpochMilli() + EXPIRATION_TIME ) ) .signWith( SignatureAlgorithm.HS512, SECRET ) .compact(); } /** * 验证JWT */ public Boolean validateToken(String token, UserDetails userDetails) { User user = (User) userDetails; String username = getUsernameFromToken( token ); return (username.equals( user.getUsername() ) && !isTokenExpired( token )); } /** * 获取token是否过期 */ public Boolean isTokenExpired(String token) { Date expiration = getExpirationDateFromToken( token ); return expiration.before( new Date() ); } /** * 根据token获取username */ public String getUsernameFromToken(String token) { String username = getClaimsFromToken( token ).getSubject(); return username; } /** * 获取token的过期时间 */ public Date getExpirationDateFromToken(String token) { Date expiration = getClaimsFromToken( token ).getExpiration(); return expiration; } /** * 解析JWT */ private Claims getClaimsFromToken(String token) { Claims claims = Jwts.parser() .setSigningKey( SECRET ) .parseClaimsJws( token ) .getBody(); return claims; } } JwtTokenFilter @Component public class JwtTokenFilter extends OncePerRequestFilter { @Autowired private UserDetailsService userDetailsService; @Autowired private JwtTokenUtil jwtTokenUtil; /** * 存放Token的Header Key */ public static final String HEADER_STRING = "Authorization"; @Override protected void doFilterInternal(HttpServletRequest request, HttpServletResponse response, FilterChain chain) throws ServletException, IOException { String token = request.getHeader( HEADER_STRING ); if (null != token) { String username = jwtTokenUtil.getUsernameFromToken(token); if (username != null && SecurityContextHolder.getContext().getAuthentication() == null) { UserDetails userDetails = this.userDetailsService.loadUserByUsername(username); if (jwtTokenUtil.validateToken(token, userDetails)) { UsernamePasswordAuthenticationToken authentication = new UsernamePasswordAuthenticationToken( userDetails, null, userDetails.getAuthorities()); authentication.setDetails(new WebAuthenticationDetailsSource().buildDetails( request)); SecurityContextHolder.getContext().setAuthentication(authentication); } } } chain.doFilter(request, response); } } AuthServiceImpl @Service public class AuthServiceImpl implements AuthService { @Autowired private AuthenticationManager authenticationManager; @Autowired private UserDetailsService userDetailsService; @Autowired private JwtTokenUtil jwtTokenUtil; @Override public String login(String username, String password) { UsernamePasswordAuthenticationToken upToken = new UsernamePasswordAuthenticationToken( username, password ); Authentication authentication = authenticationManager.authenticate(upToken); SecurityContextHolder.getContext().setAuthentication(authentication); UserDetails userDetails = userDetailsService.loadUserByUsername( username ); String token = jwtTokenUtil.generateToken(userDetails); return token; } } 关键代码就是这些,其他类代码参照后面提供的源码地址。 验证 登录,获取token curl -X POST -d "username=admin&password=123456" http://127.0.0.1:8080/auth/login 返回 eyJhbGciOiJIUzUxMiJ9.eyJzdWIiOiJhZG1pbiIsImV4cCI6MTU1NDQ1MzUwMX0.sglVeqnDGUL9pH1oP3Lh9XrdzJIS42VKBApd2nPJt7e1TKhCEY7AUfIXnzG9vc885_jTq4-h8R6YCtRRJzl8fQ 不带token访问资源 curl -X POST -d "name=zhangsan" http://127.0.0.1:8080/admin/hi 返回,拒绝访问 { "timestamp": "2019-03-31T08:50:55.894+0000", "status": 403, "error": "Forbidden", "message": "Access Denied", "path": "/auth/login" } 携带token访问资源 curl -X POST -H "Authorization: eyJhbGciOiJIUzUxMiJ9.eyJzdWIiOiJhZG1pbiIsImV4cCI6MTU1NDQ1MzUwMX0.sglVeqnDGUL9pH1oP3Lh9XrdzJIS42VKBApd2nPJt7e1TKhCEY7AUfIXnzG9vc885_jTq4-h8R6YCtRRJzl8fQ" -d "name=zhangsan" http://127.0.0.1:8080/admin/hi 返回正确 hi zhangsan , you have 'admin' role 源码 https://github.com/gf-huanchupk/SpringBootLearning/tree/master/springboot-jwt

优秀的个人博客,低调大师

SpringBoot 2.0整合jackson配置日期格式化和反序列化

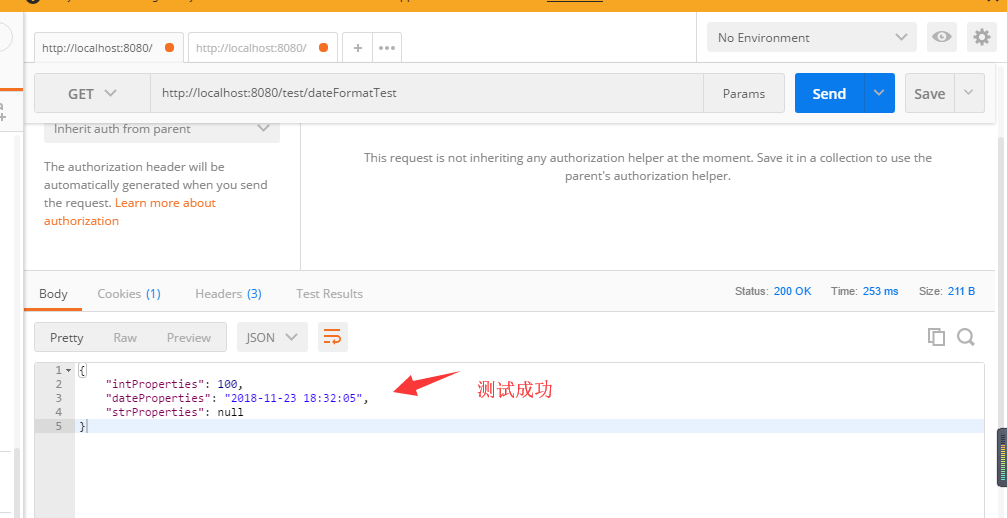
网上杂七杂八的说法不一,大多数都是抄来抄去,没有实践,近期在项目频繁遇到boot+jackson处理日期的问题,故开此贴。 首先是POM <?xml version="1.0" encoding="UTF-8"?> <project xmlns="http://maven.apache.org/POM/4.0.0" xmlns:xsi="http://www.w3.org/2001/XMLSchema-instance" xsi:schemaLocation="http://maven.apache.org/POM/4.0.0 http://maven.apache.org/xsd/maven-4.0.0.xsd"> <modelVersion>4.0.0</modelVersion> <groupId>io.cj.learning</groupId> <artifactId>boot2exam</artifactId> <version>0.0.1-SNAPSHOT</version> <packaging>jar</packaging> <name>boot2exam</name> <description>Demo project for Spring Boot</description> <parent> <groupId>org.springframework.boot</groupId> <artifactId>spring-boot-starter-parent</artifactId> <version>2.0.0.RELEASE</version> <relativePath/> <!-- lookup parent from repository --> </parent> <properties> <project.build.sourceEncoding>UTF-8</project.build.sourceEncoding> <project.reporting.outputEncoding>UTF-8</project.reporting.outputEncoding> <java.version>1.8</java.version> </properties> <dependencies> <dependency> <groupId>org.springframework.boot</groupId> <artifactId>spring-boot-starter-data-redis</artifactId> </dependency> <dependency> <groupId>org.springframework.boot</groupId> <artifactId>spring-boot-starter-web</artifactId> </dependency> <dependency> <groupId>org.springframework.boot</groupId> <artifactId>spring-boot-starter-test</artifactId> <scope>test</scope> </dependency> <dependency> <groupId>org.springframework.boot</groupId> <artifactId>spring-boot-starter-web</artifactId> <version>RELEASE</version> <scope>compile</scope> </dependency> <dependency> <groupId>org.springframework.boot</groupId> <artifactId>spring-boot-starter-web</artifactId> <version>RELEASE</version> <scope>compile</scope> </dependency> </dependencies> <build> <plugins> <plugin> <groupId>org.springframework.boot</groupId> <artifactId>spring-boot-maven-plugin</artifactId> </plugin> </plugins> </build> </project> 然后是yml文件 (当然yml这东西很多人不喜欢,我也写了个properties版本的) spring: jackson: #参数意义: #JsonInclude.Include.ALWAYS 默认 #JsonInclude.Include.NON_DEFAULT 属性为默认值不序列化 #JsonInclude.Include.NON_EMPTY 属性为 空(””) 或者为 NULL 都不序列化 #JsonInclude.Include.NON_NULL 属性为NULL 不序列化 default-property-inclusion: ALWAYS time-zone: GMT+8 date-format: yyyy-MM-dd HH:mm:ss 上面配置对应的properties文件版本: #jackson相关配置 spring.jackson.date-format = yyyy-MM-dd HH:mm:ss #时区必须要设置 spring.jackson.time-zone= GMT+8 #ALWAYS的意思是即时属性为null,仍然也会输出这个key spring.jackson.default-property-inclusion=ALWAYS 然后来定义一个Controller和JAVA Bean Controller: package io.cj.learning.boot2exam.controller; import io.cj.learning.boot2exam.model.DateFormatTest; import org.springframework.web.bind.annotation.*; import java.text.SimpleDateFormat; import java.util.Date; @RestController @RequestMapping(value="/test") public class TestController { /** * 测试时间序列化, java.util.date 类型 -> String * @return */ @RequestMapping(value="/dateFormatTest", method = RequestMethod.GET) @ResponseBody public DateFormatTest dateFormatTest(){ DateFormatTest dateFormatTest = new DateFormatTest(); dateFormatTest.setIntProperties(100); dateFormatTest.setDateProperties(new Date()); return dateFormatTest; } /** * 测试时间反序列化 String -> java.util.date 类型 */ @RequestMapping(value="/dateFormatTest2" ,method = RequestMethod.POST) public void dateFormatTest2(@RequestBody DateFormatTest model){ SimpleDateFormat sdf = new SimpleDateFormat("yyyy-MM-dd HH:mm:ss"); System.out.println(model.getIntProperties()); System.out.println(sdf.format(model.getDateProperties())); System.out.println(model.getStrProperties()); } } Java Bean: package io.cj.learning.boot2exam.model; import java.util.Date; /** * 一个model,里面带一个日期类型 */ public class DateFormatTest { private Integer intProperties; private Date dateProperties; private String strProperties; public Integer getIntProperties() { return intProperties; } public void setIntProperties(Integer intProperties) { this.intProperties = intProperties; } public Date getDateProperties() { return dateProperties; } public void setDateProperties(Date dateProperties) { this.dateProperties = dateProperties; } public String getStrProperties() { return strProperties; } public void setStrProperties(String strProperties) { this.strProperties = strProperties; } } 启动主类: package io.cj.learning.boot2exam; import org.springframework.boot.SpringApplication; import org.springframework.boot.autoconfigure.SpringBootApplication; @SpringBootApplication public class Boot2examApplication { public static void main(String[] args) { SpringApplication.run(Boot2examApplication.class, args); } } 测试: 试一下,首先是日期序列化, 请求一下试试 然后是反序列化,也请求一个试试:

资源下载

更多资源
Mario

Mario

马里奥是站在游戏界顶峰的超人气多面角色。马里奥靠吃蘑菇成长,特征是大鼻子、头戴帽子、身穿背带裤,还留着胡子。与他的双胞胎兄弟路易基一起,长年担任任天堂的招牌角色。

腾讯云软件源

腾讯云软件源

为解决软件依赖安装时官方源访问速度慢的问题,腾讯云为一些软件搭建了缓存服务。您可以通过使用腾讯云软件源站来提升依赖包的安装速度。为了方便用户自由搭建服务架构,目前腾讯云软件源站支持公网访问和内网访问。

Spring

Spring

Spring框架(Spring Framework)是由Rod Johnson于2002年提出的开源Java企业级应用框架,旨在通过使用JavaBean替代传统EJB实现方式降低企业级编程开发的复杂性。该框架基于简单性、可测试性和松耦合性设计理念,提供核心容器、应用上下文、数据访问集成等模块,支持整合Hibernate、Struts等第三方框架,其适用范围不仅限于服务器端开发,绝大多数Java应用均可从中受益。

Rocky Linux

Rocky Linux

Rocky Linux(中文名:洛基)是由Gregory Kurtzer于2020年12月发起的企业级Linux发行版,作为CentOS稳定版停止维护后与RHEL(Red Hat Enterprise Linux)完全兼容的开源替代方案,由社区拥有并管理,支持x86_64、aarch64等架构。其通过重新编译RHEL源代码提供长期稳定性,采用模块化包装和SELinux安全架构,默认包含GNOME桌面环境及XFS文件系统,支持十年生命周期更新。

用户登录
用户注册