[Spring cloud 一步步实现广告系统] 15. Binlog 增量准备
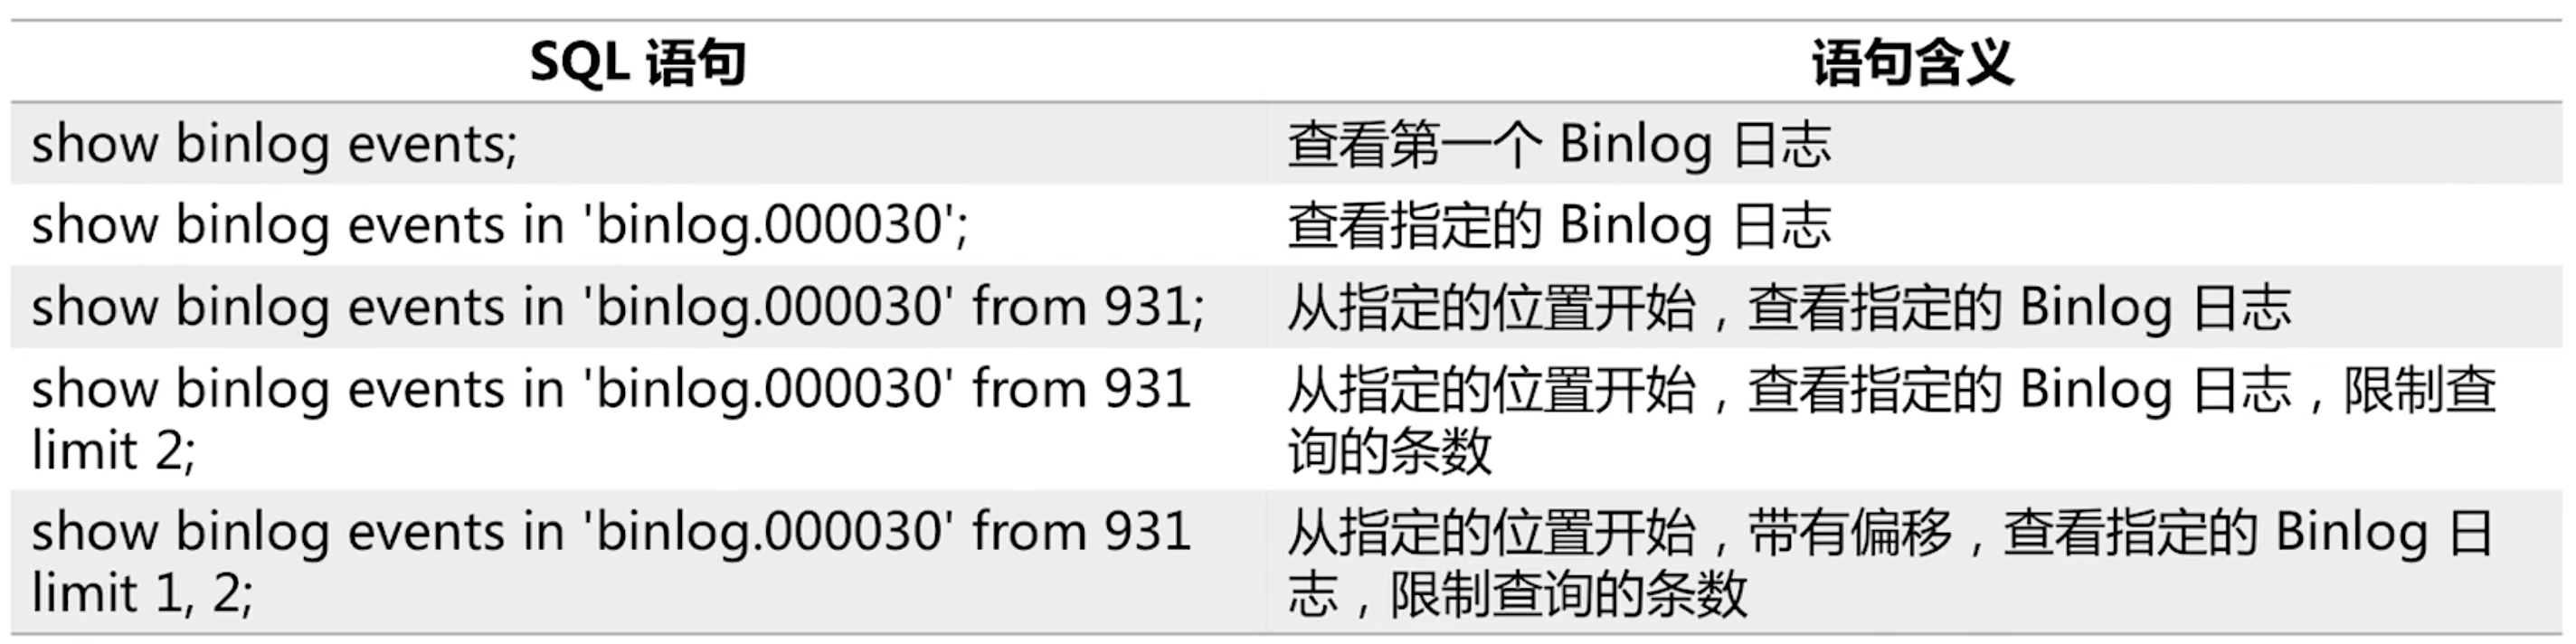
MySQL Binlog简介 什么是binlog? 一个二进制日志,用来记录对数据发生或潜在发生更改的SQL语句,并以而进行的形式保存在磁盘中。 binlog 的作用? 最主要有3个用途: 数据复制(主从同步) Mysql 的Master-Slave协议,让Slave可以通过监听binlog实现数据复制,达到数据一致性目的 数据恢复 通过mysqlbinlog工具恢复数据 增量备份 Binlog 变量 log_bin (Binlog 开关,使用show variables like 'log_bin';查看) binlog_format (Binlog 日志格式,使用show variables like 'binlog_format';查看) 日志格式总共有三种: ROW, 仅保存记录被修改的细节,不记录SQL语句上下文相关信息。(能清晰的记录下每行数据的修改细节,不需要记录上下文相关信息,因此不会发生某些特定情况下的procedure、function以及trigger 的调用无法被准确复制的问题,任何情况下都可以被复制,且能加快从库重放日志的效率,保证从库数据的一致性) STATEMENT,每一条修改数据的SQL都会被记录。(只记录执行语句的细节和上下文环境,避免了记录每一行的变化,在一些修改记录较多的情况下,相比ROW类型能大大减少binlog的日志量,节约IO,提高性能。还可以用于实时的还原,同时主从版本可以不一样,从服务器版本可以比主服务器版本高) MIXED, 上述2种的混合使用 Binlog 管理 show master logs; 查看所有binlog的日志列表 show master status; 查看最后一个binlog日志编号名称,以及最后一个事件技术的位置(position) Flush logs; 刷新binlog,此刻开始产生一个新编号的binlog日志文件 reset master; 清空所有的binlog日志 Binlog 相关SQL show binlog events[in 'log_name'][from position][limit [offset,]row_count] 常用的Binlog event QUERY - 与数据无关的操作,begin、drop table、truncate table等等 TABLE_MAP - 记录下一个操作所对应的表信息,存储了数据库名称和表名称 XID - 标记事务提交 WRITE_ROWS 插入数据,即insert操作 UPDATE_ROWS 更新数据,即update操作 DELETE_ROWS 删除数据,即delete操作 Event包含header和data两部分,header提供了event的创建时间,哪个服务器等信息,data部分提供的是针对该event的具体信息,如具体数据的修改。 Tip: binlog不会记录数据表的列名 在接下来的实现中,我们会将自己的系统包装成一个假的Mysql Slave,通过开源工具mysql-binlog-connector-java来实现监听binlog。 开源工具mysql-binlog-connector-java 工具源码:Github传送门 组件使用 1.加依赖 <!-- binlog 日志监听,解析开源工具类库 --> <dependency> <groupId>com.github.shyiko</groupId> <artifactId>mysql-binlog-connector-java</artifactId> <version>0.18.1</version> </dependency> 2.创建一个测试接口 package com.sxzhongf.ad.service; import com.github.shyiko.mysql.binlog.BinaryLogClient; import com.github.shyiko.mysql.binlog.event.DeleteRowsEventData; import com.github.shyiko.mysql.binlog.event.EventData; import com.github.shyiko.mysql.binlog.event.UpdateRowsEventData; import com.github.shyiko.mysql.binlog.event.WriteRowsEventData; import java.io.IOException; /** * BinlogServiceTest for 测试Mysql binlog 监控 * {@code * Mysql8 连接提示 Client does not support authentication protocol requested by server; consider upgrading MySQL client 解决方法 * USE mysql; * ALTER USER 'root'@'localhost' IDENTIFIED WITH mysql_native_password BY 'password'; * FLUSH PRIVILEGES; * } * * @author <a href="mailto:magicianisaac@gmail.com">Isaac.Zhang | 若初</a> */ public class BinlogServiceTest { /** * --------Update----------- * UpdateRowsEventData{tableId=90, includedColumnsBeforeUpdate={0, 1, 2, 3, 4, 5, 6, 7}, includedColumns={0, 1, 2, 3, 4, 5, 6, 7}, rows=[ * {before=[11, 10, Test Bin Log, 1, Tue Jun 25 08:00:00 CST 2019, Tue Jun 25 08:00:00 CST 2019, Tue Jun 25 08:00:00 CST 2019, Tue Jun 25 08:00:00 CST 2019], after=[11, 10, zhangpan test Binlog, 1, Tue Jun 25 08:00:00 CST 2019, Tue Jun 25 08:00:00 CST 2019, Tue Jun 25 08:00:00 CST 2019, Tue Jun 25 08:00:00 CST 2019]} * ]} * * --------Insert----------- * WriteRowsEventData{tableId=91, includedColumns={0, 1, 2, 3, 4, 5, 6, 7}, rows=[ * [10, 11, ad unit test binlog, 1, 0, 1236.7655, Thu Jun 27 08:00:00 CST 2019, Thu Jun 27 08:00:00 CST 2019] * ]} */ public static void main(String[] args) throws IOException { // //构造BinaryLogClient,填充mysql链接信息 BinaryLogClient client = new BinaryLogClient("127.0.0.1", 3306, "root", "12345678" ); //设置需要读取的Binlog的文件以及位置,否则,client会从"头"开始读取Binlog并监听 // client.setBinlogFilename("binlog.000035"); // client.setBinlogPosition(); //给客户端注册监听器,实现对Binlog的监听和解析 //event 就是监听到的Binlog变化信息,event包含header & data 两部分 client.registerEventListener(event -> { EventData data = event.getData(); if (data instanceof UpdateRowsEventData) { System.out.println("--------Update-----------"); System.out.println(data.toString()); } else if (data instanceof WriteRowsEventData) { System.out.println("--------Insert-----------"); System.out.println(data.toString()); } else if (data instanceof DeleteRowsEventData) { System.out.println("--------Delete-----------"); System.out.println(data.toString()); } }); client.connect(); } } 运行: 八月 08, 2019 9:13:32 上午 com.github.shyiko.mysql.binlog.BinaryLogClient connect 信息: Connected to 127.0.0.1:3306 at binlog.000038/951 (sid:65535, cid:336) ... 执行sql update ad_user set user_status=1 where user_id=10; 我们需要知道的是,我们的目的是实现对Mysql数据表的变更实现监听,并解析成我们想要的格式,也就是我们的java对象。根据上面我们看到的监听结果,我们知道了返回信息的大概内容,既然我们已经学会了简单的使用BinaryLogClient 来监听binlog,接下来,我们需要定义一个监听器,来实现我们自己的业务内容。 因为我们只需要Event中的内容,那么我们也就只需要通过实现com.github.shyiko.mysql.binlog.BinaryLogClient.EventListener接口,来自定义一个监听器实现我们的业务即可。通过Event的内容,来判定是否需要处理当前event以及如何处理。 构造解析binlog的模版文件 我们监听binlog来构造增量数据的根本原因,是为了将我们的广告投放系统和广告检索系统 业务解耦,由于我们的检索系统中没有定义数据库以及数据表的相关,所以,我们通过定义一份模版文件,通过解析模版文件来得到我们需要的数据库和表信息,因为binlog的监听是不区分是哪个数据库和哪个数据表信息的,我们可以通过模版来指定我们想要监听的部分。 { "database": "advertisement", "tableList": [ { "tableName": "ad_plan", "level": 2, "insert": [ { "column": "plan_id" }, { "column": "user_id" }, { "column": "plan_status" }, { "column": "start_date" }, { "column": "end_date" } ], "update": [ { "column": "plan_id" }, { "column": "user_id" }, { "column": "plan_status" }, { "column": "start_date" }, { "column": "end_date" } ], "delete": [ { "column": "plan_id" } ] }, { "tableName": "ad_unit", "level": 3, "insert": [ { "column": "unit_id" }, { "column": "unit_status" }, { "column": "position_type" }, { "column": "plan_id" } ], "update": [ { "column": "unit_id" }, { "column": "unit_status" }, { "column": "position_type" }, { "column": "plan_id" } ], "delete": [ { "column": "unit_id" } ] }, { "tableName": "ad_creative", "level": 2, "insert": [ { "column": "creative_id" }, { "column": "type" }, { "column": "material_type" }, { "column": "height" }, { "column": "width" }, { "column": "audit_status" }, { "column": "url" } ], "update": [ { "column": "creative_id" }, { "column": "type" }, { "column": "material_type" }, { "column": "height" }, { "column": "width" }, { "column": "audit_status" }, { "column": "url" } ], "delete": [ { "column": "creative_id" } ] }, { "tableName": "relationship_creative_unit", "level": 3, "insert": [ { "column": "creative_id" }, { "column": "unit_id" } ], "update": [ ], "delete": [ { "column": "creative_id" }, { "column": "unit_id" } ] }, { "tableName": "ad_unit_district", "level": 4, "insert": [ { "column": "unit_id" }, { "column": "province" }, { "column": "city" } ], "update": [ ], "delete": [ { "column": "unit_id" }, { "column": "province" }, { "column": "city" } ] }, { "tableName": "ad_unit_hobby", "level": 4, "insert": [ { "column": "unit_id" }, { "column": "hobby_tag" } ], "update": [ ], "delete": [ { "column": "unit_id" }, { "column": "hobby_tag" } ] }, { "tableName": "ad_unit_keyword", "level": 4, "insert": [ { "column": "unit_id" }, { "column": "keyword" } ], "update": [ ], "delete": [ { "column": "unit_id" }, { "column": "keyword" } ] } ] } 上面的模版文件中,指定了一个数据库为advertisement,大家可以方便添加多个监听库。在数据库下面,我们监听了几个表的CUD操作以及每个操作所需要的字段信息。 实现模版 —> Java Entity 定义模版文件对应的实体 @Data @AllArgsConstructor @NoArgsConstructor public class BinlogTemplate { //单数据库对应 private String database; //多表 private List<JsonTable> tableList; } 对应的json 中 table信息 /** * JsonTable for 用于表示template.json中对应的表信息 * * @author <a href="mailto:magicianisaac@gmail.com">Isaac.Zhang | 若初</a> */ @Data @AllArgsConstructor @NoArgsConstructor public class JsonTable { private String tableName; private Integer level; private List<Column> insert; private List<Column> update; private List<Column> delete; @Data @AllArgsConstructor @NoArgsConstructor public static class Column { private String columnName; } } 读取的对应表信息对象(最主要目的就是为了能将字段索引 映射到 字段名称) @Data @AllArgsConstructor @NoArgsConstructor public class TableTemplate { private String tableName; private String level; //操作类型 -> 多列 private Map<OperationTypeEnum, List<String>> opTypeFieldSetMap = new HashMap<>(); /** * Binlog日志中 字段索引 -> 字段名称 的一个转换映射 * 因为binlog中不会显示更新的列名是什么,它只会展示字段的索引,因此我们需要实现一次转换 */ private Map<Integer, String> posMap = new HashMap<>(); } 解析模版文件到java对象 @Data public class ParseCustomTemplate { private String database; /** * key -> TableName * value -> {@link TableTemplate} */ private Map<String, TableTemplate> tableTemplateMap; public static ParseCustomTemplate parse(BinlogTemplate _template) { ParseCustomTemplate template = new ParseCustomTemplate(); template.setDatabase(_template.getDatabase()); for (JsonTable jsonTable : _template.getTableList()) { String name = jsonTable.getTableName(); Integer level = jsonTable.getLevel(); TableTemplate tableTemplate = new TableTemplate(); tableTemplate.setTableName(name); tableTemplate.setLevel(level.toString()); template.tableTemplateMap.put(name, tableTemplate); //遍历操作类型对应的列信息 Map<OperationTypeEnum, List<String>> operationTypeListMap = tableTemplate.getOpTypeFieldSetMap(); for (JsonTable.Column column : jsonTable.getInsert()) { getAndCreateIfNeed( OperationTypeEnum.ADD, operationTypeListMap, ArrayList::new ).add(column.getColumnName()); } for (JsonTable.Column column : jsonTable.getUpdate()) { getAndCreateIfNeed( OperationTypeEnum.UPDATE, operationTypeListMap, ArrayList::new ).add(column.getColumnName()); } for (JsonTable.Column column : jsonTable.getDelete()) { getAndCreateIfNeed( OperationTypeEnum.DELETE, operationTypeListMap, ArrayList::new ).add(column.getColumnName()); } } return template; } /** * 从Map中获取对象,如果不存在,创建一个 */ private static <T, R> R getAndCreateIfNeed(T key, Map<T, R> map, Supplier<R> factory) { return map.computeIfAbsent(key, k -> factory.get()); } } 解析 字段索引 -> 字段名称 的一个转换映射 首先,我们来看一下binlog的具体日志信息: --------Insert----------- WriteRowsEventData{tableId=91, includedColumns={0, 1, 2, 3, 4, 5, 6, 7}, rows=[ [10, 11, ad unit test binlog, 1, 0, 1236.7655, Thu Jun 27 08:00:00 CST 2019, Thu Jun 27 08:00:00 CST 2019] --------Update----------- UpdateRowsEventData{tableId=81, includedColumnsBeforeUpdate={0, 1, 2, 3, 4, 5}, includedColumns={0, 1, 2, 3, 4, 5}, rows=[ {before=[10, Isaac Zhang, 2D3ABB6F2434109A105170FB21D00453, 0, Fri Jun 21 15:07:53 CST 2019, Fri Jun 21 15:07:53 CST 2019], after=[10, Isaac Zhang, 2D3ABB6F2434109A105170FB21D00453, 1, Fri Jun 21 15:07:53 CST 2019, Fri Jun 21 15:07:53 CST 2019]} 可以看到,在日志中includedColumns只包含了{0, 1, 2, 3, 4, 5}位置信息,那么我们怎么能知道它具体代表的是哪个字段呢,接下来我们来实现这步映射关系,在实现之前,我们先来查询一下数据库中我们的表中字段所处的具体位置: sql> SELECT table_schema,table_name,column_name,ordinal_position FROM information_schema.COLUMNS WHERE TABLE_SCHEMA = 'advertisement' AND TABLE_NAME='ad_user' 我们可以看到ordinal_position对应的是1-6,可是上面监听到的binlog日志索引是0-5,所以我们就可以看出来之间的对应关系。 我们开始编码实现,我们使用JdbcTemplate进行查询数据库信息: @Slf4j @Component public class TemplateHolder { private ParseCustomTemplate template; private final JdbcTemplate jdbcTemplate; private String SQL_SCHEMA = "SELECT TABLE_SCHEMA,TABLE_NAME,COLUMN_NAME,ORDINAL_POSITION FROM information_schema.COLUMNS " + "WHERE TABLE_SCHEMA = ? AND TABLE_NAME = ?"; @Autowired public TemplateHolder(JdbcTemplate jdbcTemplate) { this.jdbcTemplate = jdbcTemplate; } /** * 需要在容器加载的时候,就载入数据信息 */ @PostConstruct private void init() { loadJSON("template.json"); } /** * 对外提供加载服务 */ public TableTemplate getTable(String tableName) { return template.getTableTemplateMap().get(tableName); } /** * 加载需要监听的binlog json文件 */ private void loadJSON(String path) { ClassLoader classLoader = Thread.currentThread().getContextClassLoader(); InputStream inputStream = classLoader.getResourceAsStream(path); try { BinlogTemplate binlogTemplate = JSON.parseObject( inputStream, Charset.defaultCharset(), BinlogTemplate.class ); this.template = ParseCustomTemplate.parse(binlogTemplate); loadMeta(); } catch (IOException ex) { log.error((ex.getMessage())); throw new RuntimeException("fail to parse json file"); } } /** * 加载元信息 * 使用表索引到列名称的映射关系 */ private void loadMeta() { for (Map.Entry<String, TableTemplate> entry : template.getTableTemplateMap().entrySet()) { TableTemplate table = entry.getValue(); List<String> updateFields = table.getOpTypeFieldSetMap().get( OperationTypeEnum.UPDATE ); List<String> insertFields = table.getOpTypeFieldSetMap().get( OperationTypeEnum.ADD ); List<String> deleteFields = table.getOpTypeFieldSetMap().get( OperationTypeEnum.DELETE ); jdbcTemplate.query(SQL_SCHEMA, new Object[]{ template.getDatabase(), table.getTableName() }, (rs, i) -> { int pos = rs.getInt("ORDINAL_POSITION"); String colName = rs.getString("COLUMN_NAME"); if ((null != updateFields && updateFields.contains(colName)) || (null != insertFields && insertFields.contains(colName)) || (null != deleteFields && deleteFields.contains(colName))) { table.getPosMap().put(pos - 1, colName); } return null; } ); } } } 监听binlog实现 定义Event 解析所需要转换的java对象 @Data public class BinlogRowData { private TableTemplate tableTemplate; private EventType eventType; private List<Map<String, String>> before; private List<Map<String, String>> after; } - 定义binlog client `BinaryLogClient` /** * CustomBinlogClient for 自定义Binlog Client * * @author <a href="mailto:magicianisaac@gmail.com">Isaac.Zhang | 若初</a> * @since 2019/6/27 */ @Slf4j @Component public class CustomBinlogClient { private BinaryLogClient client; private final BinlogConfig config; private final AggregationListener listener; @Autowired public CustomBinlogClient(BinlogConfig config, AggregationListener listener) { this.config = config; this.listener = listener; } public void connect() { new Thread(() -> { client = new BinaryLogClient( config.getHost(), config.getPort(), config.getUsername(), config.getPassword() ); if (!StringUtils.isEmpty(config.getBinlogName()) && !config.getPosition().equals(-1L)) { client.setBinlogFilename(config.getBinlogName()); client.setBinlogPosition(config.getPosition()); } try { log.info("connecting to mysql start..."); client.connect(); log.info("connecting to mysql done!"); } catch (IOException e) { e.printStackTrace(); } }).start(); } public void disconnect() { try { log.info("disconnect to mysql start..."); client.disconnect(); log.info("disconnect to mysql done!"); } catch (IOException e) { e.printStackTrace(); } } } - 使用client注册事件监听器`com.github.shyiko.mysql.binlog.BinaryLogClient.EventListener` /** * Ilistener for 为了后续扩展不同的实现 * * @author <a href="mailto:magicianisaac@gmail.com">Isaac.Zhang | 若初</a> */ public interface Ilistener { void register(); void onEvent(BinlogRowData eventData); } - *监听Binlog, 收集mysql binlog datas* @Slf4j @Component public class AggregationListener implements BinaryLogClient.EventListener { private String dbName; private String tbName; private Map<String, Ilistener> listenerMap = new HashMap<>(); @Autowired private TemplateHolder templateHolder; private String genKey(String dbName, String tbName) { return dbName + ":" + tbName; } /** * 根据表实现注册信息 */ public void register(String dbName, String tbName, Ilistener listener) { log.info("register : {}-{}", dbName, tbName); this.listenerMap.put(genKey(dbName, tbName), listener); } @Override public void onEvent(Event event) { EventType type = event.getHeader().getEventType(); log.info("Event type: {}", type); //数据库增删改之前,肯定有一个table_map event 的binlog if (type == EventType.TABLE_MAP) { TableMapEventData data = event.getData(); this.tbName = data.getTable(); this.dbName = data.getDatabase(); return; } //EXT_UPDATE_ROWS 是Mysql 8以上的type if (type != EventType.EXT_UPDATE_ROWS && type != EventType.EXT_WRITE_ROWS && type != EventType.EXT_DELETE_ROWS ) { return; } // 检查表名和数据库名是否已经正确填充 if (StringUtils.isEmpty(dbName) || StringUtils.isEmpty(tbName)) { log.error("Meta data got error. tablename:{},database:{}", tbName, dbName); return; } //找出对应数据表敏感的监听器 String key = genKey(this.dbName, this.tbName); Ilistener ilistener = this.listenerMap.get(key); if (null == ilistener) { log.debug("skip {}", key); } log.info("trigger event:{}", type.name()); try { BinlogRowData rowData = convertEventData2BinlogRowData(event.getData()); if (null == rowData) { return; } rowData.setEventType(type); ilistener.onEvent(rowData); } catch (Exception e) { e.printStackTrace(); log.error(e.getMessage()); } finally { this.dbName = ""; this.tbName = ""; } } /** * 解析Binlog数据到Java实体对象的映射 * * @param data binlog * @return java 对象 */ private BinlogRowData convertEventData2BinlogRowData(EventData data) { TableTemplate tableTemplate = templateHolder.getTable(tbName); if (null == tableTemplate) { log.warn("table {} not found.", tbName); return null; } List<Map<String, String>> afterMapList = new ArrayList<>(); for (Serializable[] after : getAfterValues(data)) { Map<String, String> afterMap = new HashMap<>(); int columnLength = after.length; for (int i = 0; i < columnLength; ++i) { //取出当前位置对应的列名 String colName = tableTemplate.getPosMap().get(i); //如果没有,则说明不需要该列 if (null == colName) { log.debug("ignore position: {}", i); continue; } String colValue = after[i].toString(); afterMap.put(colName, colValue); } afterMapList.add(afterMap); } BinlogRowData binlogRowData = new BinlogRowData(); binlogRowData.setAfter(afterMapList); binlogRowData.setTableTemplate(tableTemplate); return binlogRowData; } /** * 获取不同事件的变更后数据 * Add & Delete变更前数据假定为空 */ private List<Serializable[]> getAfterValues(EventData eventData) { if (eventData instanceof WriteRowsEventData) { return ((WriteRowsEventData) eventData).getRows(); } if (eventData instanceof UpdateRowsEventData) { return ((UpdateRowsEventData) eventData).getRows() .stream() .map(Map.Entry::getValue) .collect(Collectors.toList() ); } if (eventData instanceof DeleteRowsEventData) { return ((DeleteRowsEventData) eventData).getRows(); } return Collections.emptyList(); } } - 解析binlog 数据对象`BinlogRowData` ,用于增量索引的后续处理 /** * MysqlRowData for 简化{@link BinlogRowData} 以方便实现增量索引的实现 * * @author <a href="mailto:magicianisaac@gmail.com">Isaac.Zhang | 若初</a> */ @Data @AllArgsConstructor @NoArgsConstructor public class MysqlRowData { //实现多数据的时候,需要传递数据库名称 //private String database; private String tableName; private String level; private OperationTypeEnum operationTypeEnum; private List<Map<String, String>> fieldValueMap = new ArrayList<>(); } 因为我们需要将Binlog `EventType`转换为我们的操作类型`OperationTypeEnum`,所以,我们在`OperationTypeEnum`中添加一个转换方法: public enum OperationTypeEnum { ... public static OperationTypeEnum convert(EventType type) { switch (type) { case EXT_WRITE_ROWS: return ADD; case EXT_UPDATE_ROWS: return UPDATE; case EXT_DELETE_ROWS: return DELETE; default: return OTHER; } } } 我们还需要定义一个表包含的各个列名称的java类,方便我们后期对数据表的CUD操作: package com.sxzhongf.ad.mysql.constant; import java.util.HashMap; import java.util.Map; /** * Constant for 各个列名称的java类,方便我们后期对数据表的CUD操作 * * @author <a href="mailto:magicianisaac@gmail.com">Isaac.Zhang | 若初</a> */ public class Constant { private static final String DATABASE_NAME = "advertisement"; public static class AD_PLAN_TABLE_INFO { public static final String TABLE_NAME = "ad_plan"; public static final String COLUMN_PLAN_ID = "plan_id"; public static final String COLUMN_USER_ID = "user_id"; public static final String COLUMN_PLAN_STATUS = "plan_status"; public static final String COLUMN_START_DATE = "start_date"; public static final String COLUMN_END_DATE = "end_date"; } public static class AD_CREATIVE_TABLE_INFO { public static final String TABLE_NAME = "ad_creative"; public static final String COLUMN_CREATIVE_ID = "creative_id"; public static final String COLUMN_TYPE = "type"; public static final String COLUMN_MATERIAL_TYPE = "material_type"; public static final String COLUMN_HEIGHT = "height"; public static final String COLUMN_WIDTH = "width"; public static final String COLUMN_AUDIT_STATUS = "audit_status"; public static final String COLUMN_URL = "url"; } public static class AD_UNIT_TABLE_INFO { public static final String TABLE_NAME = "ad_unit"; public static final String COLUMN_UNIT_ID = "unit_id"; public static final String COLUMN_UNIT_STATUS = "unit_status"; public static final String COLUNN_POSITION_TYPE = "position_type"; public static final String COLUNN_PLAN_ID = "plan_id"; } public static class RELATIONSHIP_CREATIVE_UNIT_TABLE_INFO { public static final String TABLE_NAME = "relationship_creative_unit"; public static final String COLUMN_CREATIVE_ID = "creative_id"; public static final String COLUMN_UNIT_ID = "unit_id"; } public static class AD_UNIT_DISTRICT_TABLE_INFO { public static final String TABLE_NAME = "ad_unit_district"; public static final String COLUMN_UNIT_ID = "unit_id"; public static final String COLUMN_PROVINCE = "province"; public static final String COLUMN_CITY = "city"; } public static class AD_UNIT_KEYWORD_TABLE_INFO { public static final String TABLE_NAME = "ad_unit_keyword"; public static final String COLUMN_UNIT_ID = "unit_id"; public static final String COLUMN_KEYWORD = "keyword"; } public static class AD_UNIT_HOBBY_TABLE_INFO { public static final String TABLE_NAME = "ad_unit_hobby"; public static final String COLUMN_UNIT_ID = "unit_id"; public static final String COLUMN_HOBBY_TAG = "hobby_tag"; } //key -> 表名 //value -> 数据库名 public static Map<String, String> table2db; static { table2db = new HashMap<>(); table2db.put(AD_PLAN_TABLE_INFO.TABLE_NAME, DATABASE_NAME); table2db.put(AD_CREATIVE_TABLE_INFO.TABLE_NAME, DATABASE_NAME); table2db.put(AD_UNIT_TABLE_INFO.TABLE_NAME, DATABASE_NAME); table2db.put(RELATIONSHIP_CREATIVE_UNIT_TABLE_INFO.TABLE_NAME, DATABASE_NAME); table2db.put(AD_UNIT_DISTRICT_TABLE_INFO.TABLE_NAME, DATABASE_NAME); table2db.put(AD_UNIT_HOBBY_TABLE_INFO.TABLE_NAME, DATABASE_NAME); table2db.put(AD_UNIT_KEYWORD_TABLE_INFO.TABLE_NAME, DATABASE_NAME); } }