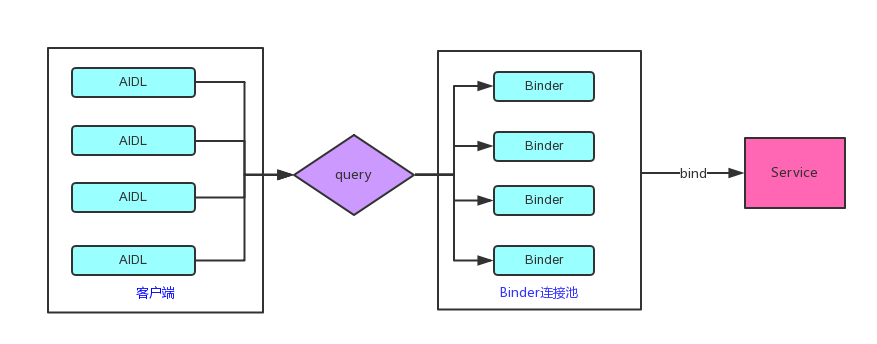
BinderPool — Andorid端的“服务发现治理工具”
导语 最近在学习微服务相关知识,突然想到:微服务的思想虽然是在server端的场景下提出来的,但是无论是server,还是移动端,思想是相通的,移动端也会有多服务的场景,就同样面临多服务需要整合治理的问题。 1. 背景 随着公司业务的发展,项目规模会越来越大,可能会遇到多多服务IPC的场景,有很多模块,而每一个模块都需要和服务端通讯,那么我们也要为每一个模块创建特定的AIDL文件,那么服务端service也会产生很多个。作为四大组件之一,过多使用也会造成性能资源消耗。所以我们可以设计只有一个Service,对于不同可客户端我们只是去返回一个不同的Binder即可,这样就避免了创建了大量的Service。 2. AIDL 模拟Binder连接池, 使用两个简单的AIDL接口与实现, 一个是加解密, 一个是加法。 package com.mantoudev.binderpooldemo; interface ISecurityCenter { String encrypt(String content); String decrypt(String pwd); } 加密和解密的实现, 这里使用简单的异或运算处理。 public class SecurityCenterImpl extends ISecurityCenter.Stub { private static final char CODE_SECRET = 'z'; @Override public String encrypt(String content) throws RemoteException { char[] chars = content.toCharArray(); for (int i = 0; i < chars.length; i++) { chars[i] ^= CODE_SECRET; } return new String(chars); } @Override public String decrypt(String password) throws RemoteException { return encrypt(password); } } 求和的AIDL接口: package com.mantoudev.binderpooldemo; interface ICompute { int add(int a, int b); } 求和的实现: public class ComputeImpl extends ICompute.Stub { @Override public int add(int a, int b) throws RemoteException { return a + b; } } Binder连接池通过ID查找Bidner, 查询并返回匹配的Binder: package com.mantoudev.binderpooldemo; interface IBinderPool { IBinder queryBinder(int binderCode); } 3. Binder 连接池 Service服务通过Binder连接池动态选择Binder请求: private Binder mBinderPool = new BinderPool.BinderPoolImpl(); @Override public IBinder onBind(Intent intent) { Log.e(TAG, "onBind"); return mBinderPool; } Binder连接池的具体实现, 创建BinderPool单例, 连接服务: private BinderPool(Context context) { mContext = context.getApplicationContext(); connectBinderPoolService(); // 连接服务 } public static BinderPool getInstance(Context context) { if (sInstance == null) { synchronized (BinderPool.class) { if (sInstance == null) { sInstance = new BinderPool(context); } } } return sInstance; } 绑定服务, 通过CountDownLatch类, 把异步操作转换为同步操作, 防止绑定冲突,对通过CountDownLatch类不了解的请自行百度: private synchronized void connectBinderPoolService() { mCountDownLatch = new CountDownLatch(1); // 只保持一个绑定服务 Intent service = new Intent(mContext, BinderPoolService.class); mContext.bindService(service, mBinderPoolConnection, Context.BIND_AUTO_CREATE); try { mCountDownLatch.await(); } catch (InterruptedException e) { e.printStackTrace(); } } 通过DeathRecipient处理Binder连接池死亡重联机制: 很多人喜欢在servierConnection的onServiceDisconnected()回调中做重连处理,这里我简单介绍下DeathRecipient DeathRecipient Binder有可以让对端的进程得到意外退出通知的机制:Link-To-Death。我这里以我们这里Service被通知Client意外退出的情况为例,实现的方法如下: Client传递一个Binder对象给Service,此Binder对象与Client的进程关联; 在Sevice中接受到这个Binder对象,并且使用binder.linkToDeath(),注册一个DeathRecipient回调; 实现DeathRecipient。当Client意外退出的时候,DeathRecipient.binderDied()将被回调,我们可以在这里释放相关的资源。 // 失效重联机制, 当Binder死亡时, 重新连接 private IBinder.DeathRecipient mDeathRecipient = new IBinder.DeathRecipient() { @Override public void binderDied() { Log.e(TAG, "binderDied@DeathRecipient()"); mBinderPool.asBinder().unlinkToDeath(mDeathRecipient, 0); mBinderPool = null; connectBinderPoolService(); } }; // Binder的服务连接 private ServiceConnection mBinderPoolConnection = new ServiceConnection() { @Override public void onServiceConnected(ComponentName name, IBinder service) { Log.e(TAG, "onServiceConnected@ServiceConnection()"); mBinderPool = IBinderPool.Stub.asInterface(service); try { mBinderPool.asBinder().linkToDeath(mDeathRecipient, 0); } catch (RemoteException e) { e.printStackTrace(); } mCountDownLatch.countDown(); } @Override public void onServiceDisconnected(ComponentName name) { Log.e(TAG, "onServiceDisconnected@ServiceConnection()"); } }; 通过ID连接不同的Binder请求. public IBinder queryBinder(int binderCode) { Log.e(TAG, "queryBinder---BinderCode:" + binderCode ); IBinder binder = null; try { if (mBinderPool != null) { binder = mBinderPool.queryBinder(binderCode); } } catch (RemoteException e) { e.printStackTrace(); } return binder; } Binder连接池AIDL的具体实现, 通过ID选择Binder. public static class BinderPoolImpl extends IBinderPool.Stub { public BinderPoolImpl() { super(); } @Override public IBinder queryBinder(int binderCode) throws RemoteException { IBinder binder = null; switch (binderCode) { case BINDER_COMPUTE: binder = new ComputeImpl(); break; case BINDER_SECURITY_CENTER: binder = new SecurityCenterImpl(); break; default: break; } return binder; } } 1.4 Binder客户端 我们在子线程进行耗时操作: //测试 private void doTest(){ new Thread(new Runnable() { @Override public void run(){ encryptTest(); } }).start(); } private void encryptTest() { BinderPool binderPool = BinderPool.getInstance(getApplicationContext()); IBinder securityBinder = binderPool.queryBinder(BinderPool.BINDER_SECURITY_CENTER); mISecurityCenter = SecurityCenterImpl.asInterface(securityBinder); String msg = "BinderPool Test Msg!~~~"; try { String encryptMsg = mISecurityCenter.encrypt(msg); Log.e(TAG, "加密了: " + encryptMsg); String decryptMsg = mISecurityCenter.decrypt(encryptMsg); Log.e(TAG, "解密了: " + decryptMsg); Message hm = new Message(); hm.what = 0; hm.obj = encryptMsg + "\n" + decryptMsg; mHandler.sendMessage(hm); } catch (RemoteException e) { e.printStackTrace(); } } 1.5 总结 使用BinderPool我们就只需要建立一个Service就足够了。当我们添加一个AIDL接口的时候只需要在BinderPool中添加一个id,然后根据这个id,在BinderPoolImpl中创建一个对应的Binder对象即可。这样就很大程度上简化了我们的工作,同时也节省了系统资源开销,要知道,在移动端,资源、性能的要求要做到更高。