首页 文章 精选 留言 我的

精选列表

搜索[Hyper-V虚拟机],共9653篇文章
优秀的个人博客,低调大师

微信语音遥控Windows Azure云虚拟机

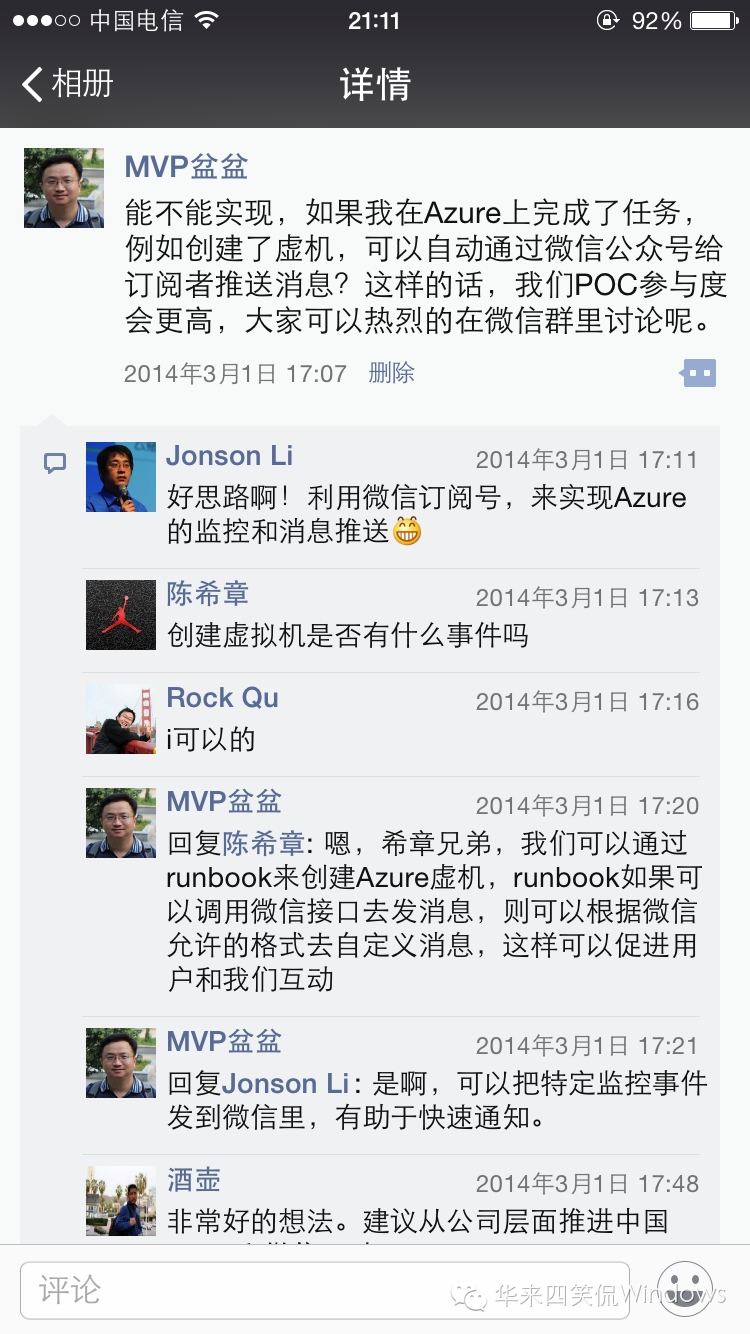
去年3月份时,我和朋友陈希章老师合作过一个微信语音操控云服务的场景。敝帚不敢自珍,我想简单交代一下这个策划的源起和经历。 先来看一下视频(抱歉被优酷压缩得很厉害,不太清晰)哈,里面有功能演示和原理介绍。 为什么会有这个想法? 最初只是想到网上常见的应答机器人(例如大家常用的微信天气订阅),例如客户问: -买了你们的Cloud,我能获得什么服务呀? -可以自动回复一段非常地道的官方解答,甚至可以播放音频视频等 后来就想:为什么不能我发一条微信,让它自动代我们控制Windows Azure -例如我发条微信说创建虚机,它就真的替我们创建虚机? -例如我说启动虚机,它就真的替我们启动,而且还不需要麻烦IT部门? 这想必会受到BU(业务部门)的喜爱,因为他们可以直接利用社交端对Windows Azure做一些最简单的管理,而不再需要IT部门干预。 BU难道不就是期待自己能做一些最简单的事情?业务来了开一下机器,业务拓展了,我也能发条消息自动扩展Azure架构。而且完全是用微信上的自然语言,多棒啊? IT部门的价值在哪里?后端的自动化架构都是他们利用云计算的自动化架构搭建的,这才是他们的价值。混合云的价值! 社交2.0 整个过程完全符合社交2.0的定义: -在社交圈里想出点子 -在社交圈里设计策划/在社交圈里组织讨论 -同事和客户IT积极参与 -在社交圈里形成方案 -最终成果在社交圈里发布 -甚至产品都和社交有关 我们自信这是一个很2.0的产品。 微信里倡议,并立刻得到反馈。当时还只是想到把消息回送到微信里,当时立马讨论,形成可行性分析。 后来逆向思维,既然回送消息是可能的,那么能否反过来,通过微信消息来操控IT系统、或者云服务? 移动互联网的精髓,就是快速迭代、快速发布,很快陈希章老师就开发出微信接口,而盆盆则做出runbook和微信接口程序对接,很快搞定了这个产品。 这只是一个开始 这只是一道开胃菜而已,仅从技术层面,就能拓展很多东西: - BU用户创建Azure虚机,领导直接在微信上批准,后端自动化架构收到消息,自动创建虚机 - BU用户查看虚机状态,是不是过载啊等等,后端自动化架构收到消息,立即反馈虚机的健康和性能消息 本文转自 ahpeng 51CTO博客,原文链接:http://blog.51cto.com/markwin/1623252,如需转载请自行联系原作者

优秀的个人博客,低调大师

在 KVM 上安装 Win7 虚拟机

之前都是在用Linux 虚机,现在有需要用到Win7 虚机,才发现在 KVM 上安装 Win7 的过程远比想象中的复杂。本文就把其过程做个简单总结。 1. 在 Virtual Machine Manager 里面安装 首先尝试在 Virtual Machine Manager 里面安装。遇到的问题如下: (1)一直停留在 starting windows 界面。 解决方法:修改 video model 为 Cirrus,问题解决。 (2)开始安装后,对鼠标和键盘无响应。 google,发现需要使用<input type=’tablet’ bus=’usb’/>。添加一个: 但是键盘还是不好使。。算了,还是转到使用 qemu-system-x86_64 命令启动虚机吧。 2. 使用qemu-system-x86_64 启动 Win 7 虚机 2.1 环境准备 (1)下载 Windows virtio driver iso:https://fedorapeople.org/groups/virt/virtio-win/direct-downloads/archive-virtio/virtio-win-0.1.102/,因为要将磁盘挂接为 virtio 磁盘。 (2)创建系统盘qemu-img create -f raw win7.img 30G,这将作为Win7的操作系统盘。 (3)创建启动脚本 #!/bin/sh DISKIMG=/home/s1/win7.img WIN7IMG=/home/s1/en_windows_7_enterprise_x64_dvd_x15-70749.iso VIRTIMG=/home/s1/virtio-win-0.1.102.iso qemu-system-x86_64 --enable-kvm -drive file=${DISKIMG},if=virtio -m 2048 \ -net nic,model=virtio -net user -cdrom ${WIN7IMG} \ -drive file=${VIRTIMG},index=3,media=cdrom \ -rtc base=localtime,clock=host -smp cores=2,threads=4 \ -usbdevice tablet -cpu host -name win7 -vnc :5 -device cirrus-vga,id=video0,bus=pci.0,addr=0x4 (4)可以运行脚本了,然后通过 VNC 进入界面,进入下面部分。 2.2 安装 Win 7 (1)选择 Custom(advanced) (2)选择 virtio 磁盘 (3)选择 virtio disk driver (4)安装 Win7 Virtio SCSI Driver (5)安装好以后,就可以看到安装的目标磁盘了 (6)进入常规的 Win7 安装流程 3. 安装其它 Virtio 驱动 (1)网络驱动 但是安装失败: 尝试 device manager: 但是还是失败: (2)Baloon driver Device manager, 右键 root device, add legacy hardware, next, install manually (advanced), next, have disk, browse, select inf, install. 改成此方法安装 network 驱动成功。注意将虚机重启从而使得安装生效。 (3)诡异的问题 通过上面方法得到的 Win7 raw 格式的镜像文件可以直接使用来创建新的虚机,这些新的虚机会使用 virtio network driver。 但是,在 OpenStack 环境和中,Nova 首先将 qcow2 格式的镜像从glance 中下载到计算节点上,然后将它转化为 raw 格式作为 backfing file,再创建一个 qcow2 文件,它使用 raw 文件作为 backing file。如下图所示: root@linuxkvm1:/home/s1# qemu-img info /var/lib/nova/instances/1d157798-848d-4dc0-9663-7343083ec943/disk image: /var/lib/nova/instances/1d157798-848d-4dc0-9663-7343083ec943/disk file format: qcow2 virtual size: 30G (32212254720 bytes) disk size: 1.3G cluster_size: 65536 backing file: /var/lib/nova/instances/_base/d074d3233a25bf3d10fdc4915e2c7913aebf39ee Format specific information: compat: 1.1 lazy refcounts: false refcount bits: 16 corrupt: false root@linuxkvm1:/home/s1# qemu-img info /var/lib/nova/instances/_base/d074d3233a25bf3d10fdc4915e2c7913aebf39ee image: /var/lib/nova/instances/_base/d074d3233a25bf3d10fdc4915e2c7913aebf39ee file format: raw virtual size: 30G (32212254720 bytes) disk size: 7.1G 诡异的是,OpenStack 中新建的虚机不能使用 virtio network driver: 但是, 如果使用backing file 直接启动虚机,则没有这个问题。 使用同样的 backing file 创建一个新的 qcow2 文件,则没有这个问题 具体原因应该和 Nova 的具体逻辑有关,将来再查,现在暂时使用 SCSI network driver。 参考文档: https://pve.proxmox.com/wiki/Windows_7_guest_best_practices 本文转自SammyLiu博客园博客,原文链接:http://www.cnblogs.com/sammyliu/p/5740129.html ,如需转载请自行联系原作者


优秀的个人博客,低调大师

OpenStack —— 虚拟机的启动过程简述(八)

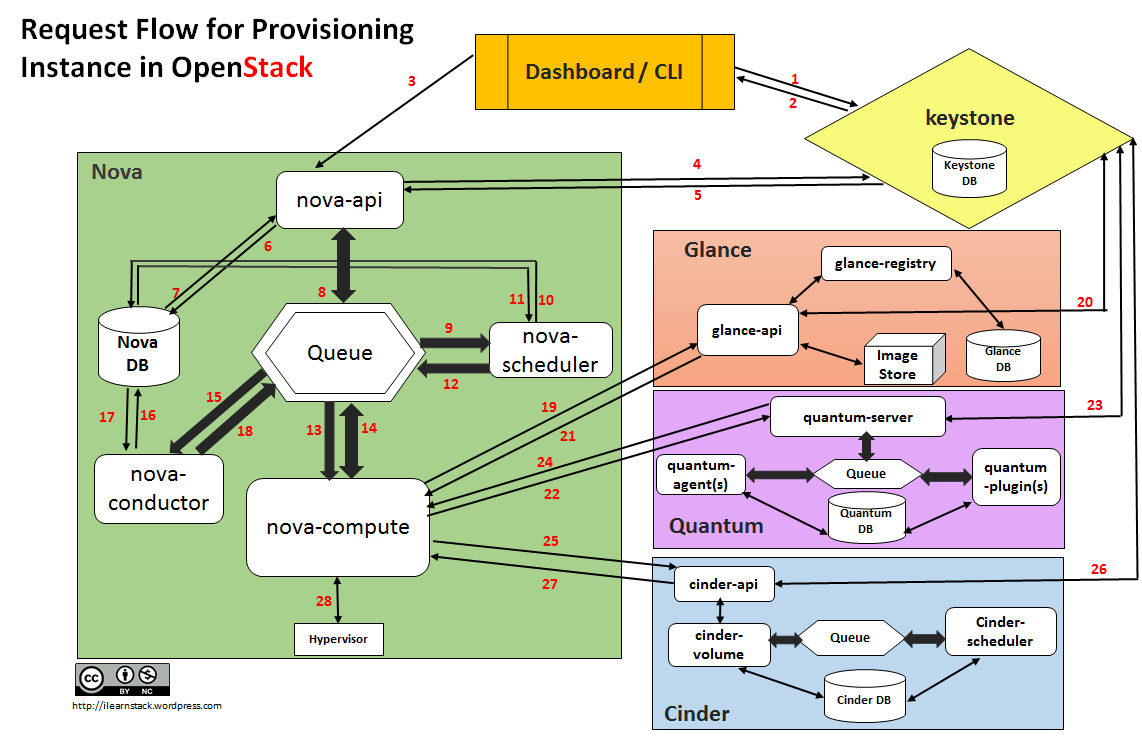
DashboardorCLIgets the user credential and does the REST call toKeystonefor authentication. Keystoneauthenticate the credentials and generate & send back auth-token which will be used for sending request to other Components through REST-call. DashboardorCLIconvert the new instance request specified in ‘launch instance’ or ‘nova-boot’ form to REST API request and send it tonova-api. nova-apireceive the request and sends the request for validation auth-token and access permission tokeystone. Keystonevalidates the token and sends updated auth headers with roles and permissions. nova-apiinteracts withnova-database. Creates initial db entry for new instance. nova-apisends therpc.callrequest tonova-schedulerexcepting to get updated instance entry with host ID specified. nova-schedulerpicks the request from thequeue. nova-schedulerinteracts withnova-databaseto find an appropriate host via filtering and weighing. Returns the updated instance entry with appropriate host ID after filtering and weighing. nova-schedulersends therpc.castrequest tonova-computefor ‘launching instance’ on appropriate host . nova-computepicks the request from thequeue. nova-computesend therpc.callrequest tonova-conductorto fetch the instance information such ashost ID and flavor( Ram , CPU ,Disk). nova-conductorpicks the request from thequeue. nova-conductorinteracts withnova-database. Return the instance information. nova-computepicks the instance information from thequeue. nova-computedoes the REST call by passing auth-token toglance-apito get the Image URI by Image ID from glance and upload image from image storage. glance-apivalidates the auth-token withkeystone. nova-computeget the image metadata. nova-computedoes the REST-call by passing auth-token toNetwork APIto allocate and configure the network such that instance gets the IP address. quantum-servervalidates theauth-token withkeystone. nova-computeget the network info. nova-computedoes the REST call by passingauth-token toVolume APIto attach volumes to instance. cinder-apivalidates the auth-token withkeystone. nova-computegets the block storage info. nova-computegenerates data for hypervisor driver and executes request on Hypervisor( vialibvirtorapi). 本文转自 wzlinux 51CTO博客,原文链接:http://blog.51cto.com/wzlinux/1964195,如需转载请自行联系原作者

资源下载

更多资源
Spring

Spring

Spring框架(Spring Framework)是由Rod Johnson于2002年提出的开源Java企业级应用框架,旨在通过使用JavaBean替代传统EJB实现方式降低企业级编程开发的复杂性。该框架基于简单性、可测试性和松耦合性设计理念,提供核心容器、应用上下文、数据访问集成等模块,支持整合Hibernate、Struts等第三方框架,其适用范围不仅限于服务器端开发,绝大多数Java应用均可从中受益。

Rocky Linux

Rocky Linux

Rocky Linux(中文名:洛基)是由Gregory Kurtzer于2020年12月发起的企业级Linux发行版,作为CentOS稳定版停止维护后与RHEL(Red Hat Enterprise Linux)完全兼容的开源替代方案,由社区拥有并管理,支持x86_64、aarch64等架构。其通过重新编译RHEL源代码提供长期稳定性,采用模块化包装和SELinux安全架构,默认包含GNOME桌面环境及XFS文件系统,支持十年生命周期更新。

Sublime Text

Sublime Text

Sublime Text具有漂亮的用户界面和强大的功能,例如代码缩略图,Python的插件,代码段等。还可自定义键绑定,菜单和工具栏。Sublime Text 的主要功能包括:拼写检查,书签,完整的 Python API , Goto 功能,即时项目切换,多选择,多窗口等等。Sublime Text 是一个跨平台的编辑器,同时支持Windows、Linux、Mac OS X等操作系统。

WebStorm

WebStorm

WebStorm 是jetbrains公司旗下一款JavaScript 开发工具。目前已经被广大中国JS开发者誉为“Web前端开发神器”、“最强大的HTML5编辑器”、“最智能的JavaScript IDE”等。与IntelliJ IDEA同源,继承了IntelliJ IDEA强大的JS部分的功能。

用户登录
用户注册