Java描述设计模式(14):解释器模式
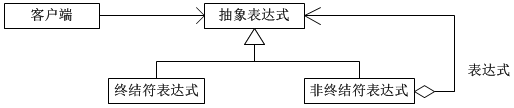
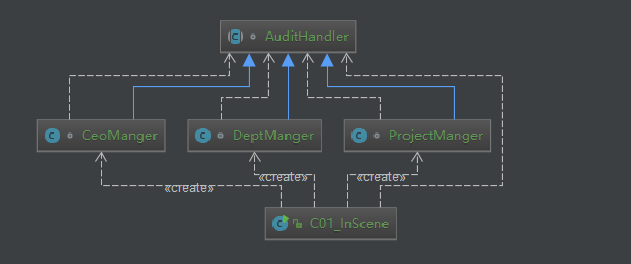
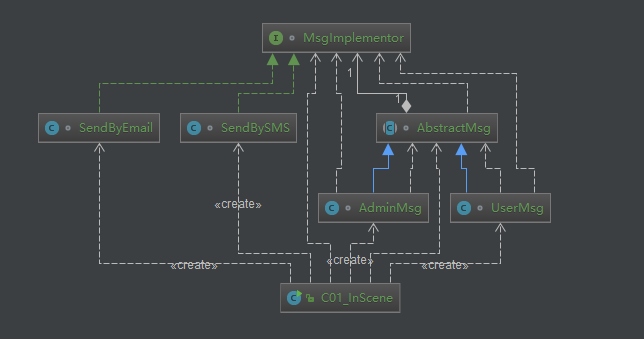
本文源码:GitHub·点这里 || GitEE·点这里 一、解释器模式 1、基础概念 解释器模式是对象的行为模式。给定一个语言之后,解释器模式可以定义出其文法的一种表示,并同时提供一个解释器。客户端可以使用这个解释器来解释这个语言中的表达式。 2、模式图解 3、核心角色 (1)、抽象表达式 Express:声明具体表达式角色需要实现的抽象接口,该接口主要提供一个interpret()方法,称做解释操作。 (2)、终结符表达式 TerminalExpress:实现抽象表达式角色接口,主要是一个interpret()方法;每个终结符都有一个具体终结表达式与之相对应。比如解析c=a+b,a和b是终结符,解析a和b的解释器就是终结符表达式。 (3)、非终结符表达式 NotTerminalExpress:每一条规则都需要一个具体的非终结符表达式用来衔接,一般是指运算符或者逻辑判断,比如c=a+b,“+"就是非终结符,解析“+”的解释器就是一个非终结符表达式。 (4)、环境容器 DataMap:一般是用来存放各个终结符所对应的具体值,比如c=a+b转换为c=1+2。这些信息需要一个存放环境。 4、源代码实现 类图结构 源码实现 public class C01_InScene { public static void main(String[] args) { DataMap dataMap = new DataMap(); TerminalExpress terminalExpress1 = new TerminalExpress("num1"); TerminalExpress terminalExpress2 = new TerminalExpress("num2"); TerminalExpress terminalExpress3 = new TerminalExpress("num3"); dataMap.putData(terminalExpress1, 1); dataMap.putData(terminalExpress2, 2); dataMap.putData(terminalExpress3, 3); // 1+2-3 = 0 System.out.println(new Minus( new Add(terminalExpress1,terminalExpress2), terminalExpress3) .interpret(dataMap)); } } // 解释器接口 interface Express { Integer interpret(DataMap dataMap) ; } // 非终结符表达式 abstract class NotTerminalExpress implements Express { Express express1,express2; public NotTerminalExpress(Express express1, Express express2){ this.express1 = express1; this.express2 = express2; } } // 终结符表达式: 1+2 终结符: 1 和 2 class TerminalExpress implements Express { public String field ; public TerminalExpress (String field){ this.field = field ; } @Override public Integer interpret(DataMap dataMap) { return dataMap.getData(this); } } // 加法表达式 class Add extends NotTerminalExpress { public Add (Express e1, Express e2) { super(e1, e2); } // 将两个表达式相减 @Override public Integer interpret(DataMap context) { return this.express1.interpret(context) + this.express2.interpret(context); } } // 减法表达式 class Minus extends NotTerminalExpress { public Minus (Express e1, Express e2) { super(e1, e2); } // 将两个表达式相减 @Override public Integer interpret(DataMap context) { return this.express1.interpret(context) - this.express2.interpret(context); } } // 数据容器 class DataMap { private Map<Express,Integer> dataMap = new HashMap<>() ; public void putData (Express key,Integer value){ dataMap.put(key,value) ; } public Integer getData (Express key){ return dataMap.get(key) ; } } 二、Spring框架应用 1、源码案例 import org.springframework.expression.Expression; import org.springframework.expression.spel.standard.SpelExpressionParser; public class SpringTest { public static void main(String[] args) { SpelExpressionParser parser = new SpelExpressionParser () ; Expression expression = parser.parseExpression("(1+3-2)*3") ; Integer result = (Integer)expression.getValue() ; System.out.println("result="+result); } } 2、代码分析 (1)Expression结构 表达式接口:具有不同的实现类。 interface Expression class CompositeStringExpression implements Expression class LiteralExpression implements Expression class SpelExpression implements Expression 核心方法: Object getValue() throws EvaluationException; (2)SpelExpressionParser结构 SpelExpressionParser extends TemplateAwareExpressionParser TemplateAwareExpressionParser implements ExpressionParser interface ExpressionParser (3)ExpressionParser接口 public interface ExpressionParser { Expression parseExpression(String var1) ; Expression parseExpression(String var1, ParserContext var2) ; } (4)Expression获取 根据不同的条件获取不同的Expression对象。这里产生类的依赖关系。 源码位置:TemplateAwareExpressionParser public Expression parseExpression(String expressionString, ParserContext context) throws ParseException { if (context == null) { context = NON_TEMPLATE_PARSER_CONTEXT; } return context.isTemplate() ? this.parseTemplate(expressionString, context) : this.doParseExpression(expressionString, context); } 三、模式总结 场景 编译器、运算符表达式、正则表达式、机器人等。 优点 当有一个表达式或者语言需要解释执行,该场景下的内容可以考虑使用解释器模式,使程序具有良好的扩展性。 缺点 解释器模式会引起类膨胀,会导致程序执行和调试非常复杂,不容易理解。 四、源代码地址 GitHub·地址 https://github.com/cicadasmile/model-arithmetic-parent GitEE·地址 https://gitee.com/cicadasmile/model-arithmetic-parent