Rafy 领域实体框架演示(3) - 快速使用 C/S 架构部署
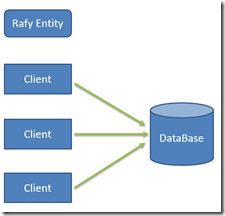
前言 截止到上一篇,我们开发的应用程序都是采用直接连接数据库的模式: 接下来,将通过一些简单的调整,使得这个应用程序支持以 C/S 架构部署。整个过程只需要少量的代码: 包含以下步骤: 添加服务端控制台应用程序项目 修改客户端应用程序连接方式 配置客户端应用程序 运行示例 代码下载 添加服务端控制台应用程序项目 在整个解决方案中添加一个新的控制台应用程序,取名为 ServerConsole: 为项目添加所有 Rafy 程序集、CS 实体程序集以及 System.ServiceModel 程序集的引用: 在 Main 函数中添加以下代码,启动服务端领域项目,并开始监听 WCF 端口: 1: using System; 2: using System.Collections.Generic; 3: using System.Linq; 4: using System.ServiceModel; 5: using System.Text; 6: using CS; 7: using Rafy; 8: using Rafy.Domain; 9: 10: namespace ServerConsole 11: { 12: class Program 13: { 14: static void Main(string[] args) 15: { 16: PluginTable.DomainLibraries.AddPlugin<CSPlugin>(); 17: new DomainApp().Startup(); 18: 19: using (ServiceHost serviceHost = new ServiceHost(typeof(Rafy.DataPortal.WCF.ServerPortal))) 20: { 21: serviceHost.Open(); 22: Console.WriteLine("Press <enter> to terminate service"); 23: Console.ReadLine(); 24: serviceHost.Close(); 25: } 26: } 27: } 28: } 然后,为本项目添加应用程序配置文件 App.config,代码如下: 1: <?xml version="1.0" encoding="utf-8" ?> 2: <configuration> 3: <appSettings> 4: <add key="SQL_TRACE_FILE" value="D:\SQLTraceLog.txt"/> 5: </appSettings> 6: <connectionStrings> 7: <add name="CS" connectionString="server=.\SQLExpress;database=ClothesSys;uid=sa;pwd=GIX4" providerName="System.Data.SqlClient"/> 8: </connectionStrings> 9: <system.serviceModel> 10: <services> 11: <service name="Rafy.DataPortal.WCF.ServerPortal" behaviorConfiguration="includesException"> 12: <endpoint address="/Text" binding="basicHttpBinding" contract="Rafy.DataPortal.WCF.IWcfPortal"/> 13: <host> 14: <baseAddresses> 15: <add baseAddress="http://localhost:8000/RafyServer" /> 16: </baseAddresses> 17: </host> 18: </service> 19: </services> 20: <behaviors> 21: <serviceBehaviors> 22: <behavior name="includesException"> 23: <serviceMetadata httpGetEnabled="true" /> 24: <serviceDebug includeExceptionDetailInFaults="true" /> 25: </behavior> 26: </serviceBehaviors> 27: </behaviors> 28: </system.serviceModel> 29: </configuration> 修改客户端应用程序连接方式 接下来需要把界面程序变更为连接服务端。打开 ClothesSys 项目中的 Program.cs 文件,修改为以下代码: 1: static class Program 2: { 3: /// <summary> 4: /// 应用程序的主入口点。 5: /// </summary> 6: [STAThread] 7: static void Main() 8: { 9: PluginTable.DomainLibraries.AddPlugin<CSPlugin>(); 10: new ClientDomainApp().Startup(); 11: 12: Application.EnableVisualStyles(); 13: Application.SetCompatibleTextRenderingDefault(false); 14: Application.Run(new formLogin()); 15: } 16: } 17: 18: /// <summary> 19: /// 客户端使用的应用程序类型。 20: /// </summary> 21: public class ClientDomainApp : DomainApp 22: { 23: protected override void InitEnvironment() 24: { 25: RafyEnvironment.Location.DataPortalMode = DataPortalMode.ThroughService; 26: 27: base.InitEnvironment(); 28: } 29: } RafyEnvironment.Location.DataPortalMode 表示连接数据的模式,默认值是DataPortalMode.ConnectDirectly(直接连接数据库),ClientDomainApp 类把该值变更为 DataPortalMode. ThroughService(通过服务连接数据)。 配置客户端应用程序 在客户端配置文件中,删除数据库连接配置,并添加 WCF 连接配置,如下: 1: <?xml version="1.0"?> 2: <configuration> 3: <configSections> 4: <section name="rafy" type="Rafy.Configuration.RafyConfigurationSection, Rafy" /> 5: </configSections> 6: <rafy 7: dataPortalProxy="Rafy.DataPortal.WCF.ClientProxy, Rafy.Domain" 8: collectDevLanguages="IsDebugging"> 9: </rafy> 10: <system.serviceModel> 11: <client> 12: <endpoint name="ClientProxyEndPoint" address="http://localhost:8000/RafyServer/Text" 13: binding="basicHttpBinding" bindingConfiguration="basicHttpBindingConfig" 14: contract="Rafy.DataPortal.WCF.IWcfPortal" /> 15: </client> 16: <bindings> 17: <basicHttpBinding> 18: <binding name="basicHttpBindingConfig" receiveTimeout="00:20:00" sendTimeout="02:00:00" maxReceivedMessageSize="1000000000"> 19: <readerQuotas maxDepth="64" maxStringContentLength="2147483647" maxArrayLength="2147483647" maxBytesPerRead="4096" maxNameTableCharCount="16384"/> 20: </binding> 21: </basicHttpBinding> 22: </bindings> 23: </system.serviceModel> 24: </configuration> 运行程序 先运行 ServerConsole,成功运行界面: 再运行 ClothesSys,点击登录。登录成功,即说明已经成功使用 C/S 进行部署。 代码下载 下载地址:http://pan.baidu.com/s/1AB9TL 本文的代码在“3.使用 CS 部署程序”文件夹中。 本文转自BloodyAngel博客园博客,原文链接:http://www.cnblogs.com/zgynhqf/p/3421517.html,如需转载请自行联系原作者