首页 文章 精选 留言 我的

精选列表

搜索[android jetpack],共10000篇文章
优秀的个人博客,低调大师

Android -- CursorAdapter

CursorAdapter CursorAdapter继承于BaseAdapter,它是个虚类,它为cursor和ListView提供了连接的桥梁。 public abstract class CursorAdapter extends BaseAdapter 注意cursor的必须要有个命名为"_id"的列。比如Contacts._ID就为"_id" 必须实现以下函数: abstract View newView(Context context, Cursor cursor, ViewGroup parent) abstract void bindView(View view, Context context, Cursor cursor) newView该函数第一次回调用后,如果数据增加后也会再调用,但是重绘是不会调用的。 数据增加后,回调用该函数来生成与新增数据相对应的view。 bindView函数第一次回调用后,如果数据更新也会再调用,但重绘会再次调用的。 总的来说应该是在调用bindView如果发现view为空会先调用newView来生成view。 Code public class MySqliteOpenhelper extends SQLiteOpenHelper { public MySqliteOpenhelper(Context context, int version) { super(context, "dianhuaben.db", null, version); } @Override public void onCreate(SQLiteDatabase db) {//注意:使用CursorAdapter时,创建表必须有以_id为列名的列 String sql = "CREATE TABLE dhb (_id INTEGER PRIMARY KEY AUTOINCREMENT,name VARCHAR(20),phone VARCHAR(20))"; db.execSQL(sql); } @Override public void onUpgrade(SQLiteDatabase db, int oldVersion, int newVersion) { } } public void createCursorAdapter(Cursor cursor) { //游标适配器,构造方法,传入cursor mAdapter = new CursorAdapter(this, cursor) {//重写两个方法 @Override public View newView(Context context, Cursor cursor, ViewGroup parent) {//找到布局和控件 ViewHolder holder = new ViewHolder(); LayoutInflater inflater = getLayoutInflater(); View inflate = inflater.inflate(R.layout.listview_item, null); holder.item_tv_name = (TextView) inflate.findViewById(R.id.item_tv_name); holder.item_tv_phone = (TextView) inflate.findViewById(R.id.item_tv_phone); inflate.setTag(holder); return inflate;//返回的view传给bindView。 } @Override public void bindView(View view, Context context, Cursor cursor) { // 把数据设置到界面上 ViewHolder holder = (ViewHolder) view.getTag(); String name = cursor.getString(cursor.getColumnIndex("name")); String phone = cursor.getString(cursor.getColumnIndex("phone")); holder.item_tv_name.setText(name); holder.item_tv_phone.setText(phone); } }; }; SimpleCursorAdapter 简单提及一下 public void createSimpleCursorAdapter(Cursor cursor) {// SimpleCursorAdapter继承了CursorAdapter继承了BaseAdapter String[] from = {TABLE_NAME_NAME,TABLE_NAME_PHONE};//列名与控件id一一对应 int[] to = {R.id.item_tv_name,R.id.item_tv_phone}; //用的是SimpleCursorAdapter,用法和simpleAdapter相似 mAdapter = new SimpleCursorAdapter(MainActivity.this, R.layout.listview_item, cursor, from, to); } 使用SimpleCursorAdapter,时,创建表必须有以_id为列名的列 我是天王盖地虎的分割线 本文转自我爱物联网博客园博客,原文链接:http://www.cnblogs.com/yydcdut/p/4090723.html,如需转载请自行联系原作者


优秀的个人博客,低调大师

Android SoundPool

SoundPool SoundPool 主要用于播放一些较短的声音片段,与 MediaPlayer 相比, SoundPool 的优势在于 CPU 资源占用量低和反应延迟小。另外, SoundPool 还支持自行设置声音的品质、音量、 播放比率等参数。 SoundPool(int maxStreams, int streamType, int srcQuality) :第一个参数指定支持多少个声音;第二个参数指定声音类型:第三个参数指定声音品质。 使用 SoundPool 播放声音的步骤如下: 1)调用 SoundPool 的构造器创建 SoundPool 的对象。 2)调用 SoundPool 对象的 load() 方法从指定资源、文件中加载声音。最好使用 HashMap< Integer, Integer> 来管理所加载的声音。 3)调用 SoundPool 的 play 方法播放声音。 1.初始化对象SoundPool soundPool;HashMap<Integer, Integer> musicId = new HashMap<Integer, Integer>(); 2.创建SoundPool对象添加声音文件// 初始化 soundPool, 设置可容纳 12 个音频流,音频流的质量为 5 ,soundPool = new SoundPool(12, 0, 5);// 通过 load 方法加载指定音频流,并将返回的音频 ID 放入 musicId 中musicId.put(1, soundPool.load(this, R.raw.if1, 1));musicId.put(2, soundPool.load(this, R.raw.if2, 1));musicId.put(3, soundPool.load(this, R.raw.if3, 1)); 3.调用播放/*** SoundPool 提供的播放指定声音的方法:** int play(int soundID, float leftVolume, float rightVolume, int* priority, int loop, float rate) :该方法的第一个参数指定播放哪个声音; leftVolume 、* rightVolume 指定左、右的音量: priority 指定播放声音的优先级,数值越大,优先级越高; loop* 指定是否循环, 0 为不循环, -1 为循环; rate 指定播放的比率,数值可从 0.5 到 2 , 1 为正常比率。*/soundPool.play(musicId.get(1), 1, 1, 0, 0, 1); 注意 soundPool.play() 返回一个当前播放音乐的 int soundID 这个Id用于停止使用 如果 soundPool.stop(soundID); soundPool.pause(soundID);

优秀的个人博客,低调大师

【Android学习笔记】Android Studio简单断点调试

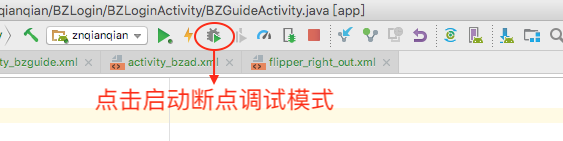
首先点击断点调试按钮运行App 启动之后,会弹出如下图的提示框,不要管,几秒之后这个弹框会自动消失,然后App会成功运行。 下面介绍一下断点调试的相关操作按钮对应的功能: 按钮1的功能:从当前断点跳到下一个断点,如果当前断点为最后一个断点则点击后断点结束,App正常运行。 按钮2(step over)的功能:一步步往下走,及按代码逻辑一行一行代码往下走。 按钮3(step into)的功能:遇到方法就往方法里走。 按钮4(force step into )的功能:所有方法看完整,即可以看到你所调用的所有方法的实现会让你跟着它走一遍。 按钮5(step out )的功能:有断点下一个,走完断点继续走,断点走完之后会一直往下跳,无法结束断点而让App正常运行。 按钮6(run to Cursor)的功能:下个断点我们见,同按钮1的功能。 按钮7的功能:停止App的运行。

资源下载

更多资源
腾讯云软件源

腾讯云软件源

为解决软件依赖安装时官方源访问速度慢的问题,腾讯云为一些软件搭建了缓存服务。您可以通过使用腾讯云软件源站来提升依赖包的安装速度。为了方便用户自由搭建服务架构,目前腾讯云软件源站支持公网访问和内网访问。

Nacos

Nacos

Nacos /nɑ:kəʊs/ 是 Dynamic Naming and Configuration Service 的首字母简称,一个易于构建 AI Agent 应用的动态服务发现、配置管理和AI智能体管理平台。Nacos 致力于帮助您发现、配置和管理微服务及AI智能体应用。Nacos 提供了一组简单易用的特性集,帮助您快速实现动态服务发现、服务配置、服务元数据、流量管理。Nacos 帮助您更敏捷和容易地构建、交付和管理微服务平台。

Spring

Spring

Spring框架(Spring Framework)是由Rod Johnson于2002年提出的开源Java企业级应用框架,旨在通过使用JavaBean替代传统EJB实现方式降低企业级编程开发的复杂性。该框架基于简单性、可测试性和松耦合性设计理念,提供核心容器、应用上下文、数据访问集成等模块,支持整合Hibernate、Struts等第三方框架,其适用范围不仅限于服务器端开发,绝大多数Java应用均可从中受益。

Rocky Linux

Rocky Linux

Rocky Linux(中文名:洛基)是由Gregory Kurtzer于2020年12月发起的企业级Linux发行版,作为CentOS稳定版停止维护后与RHEL(Red Hat Enterprise Linux)完全兼容的开源替代方案,由社区拥有并管理,支持x86_64、aarch64等架构。其通过重新编译RHEL源代码提供长期稳定性,采用模块化包装和SELinux安全架构,默认包含GNOME桌面环境及XFS文件系统,支持十年生命周期更新。

用户登录
用户注册