RF Analyzer for Android 安卓平台连接HackRF的App
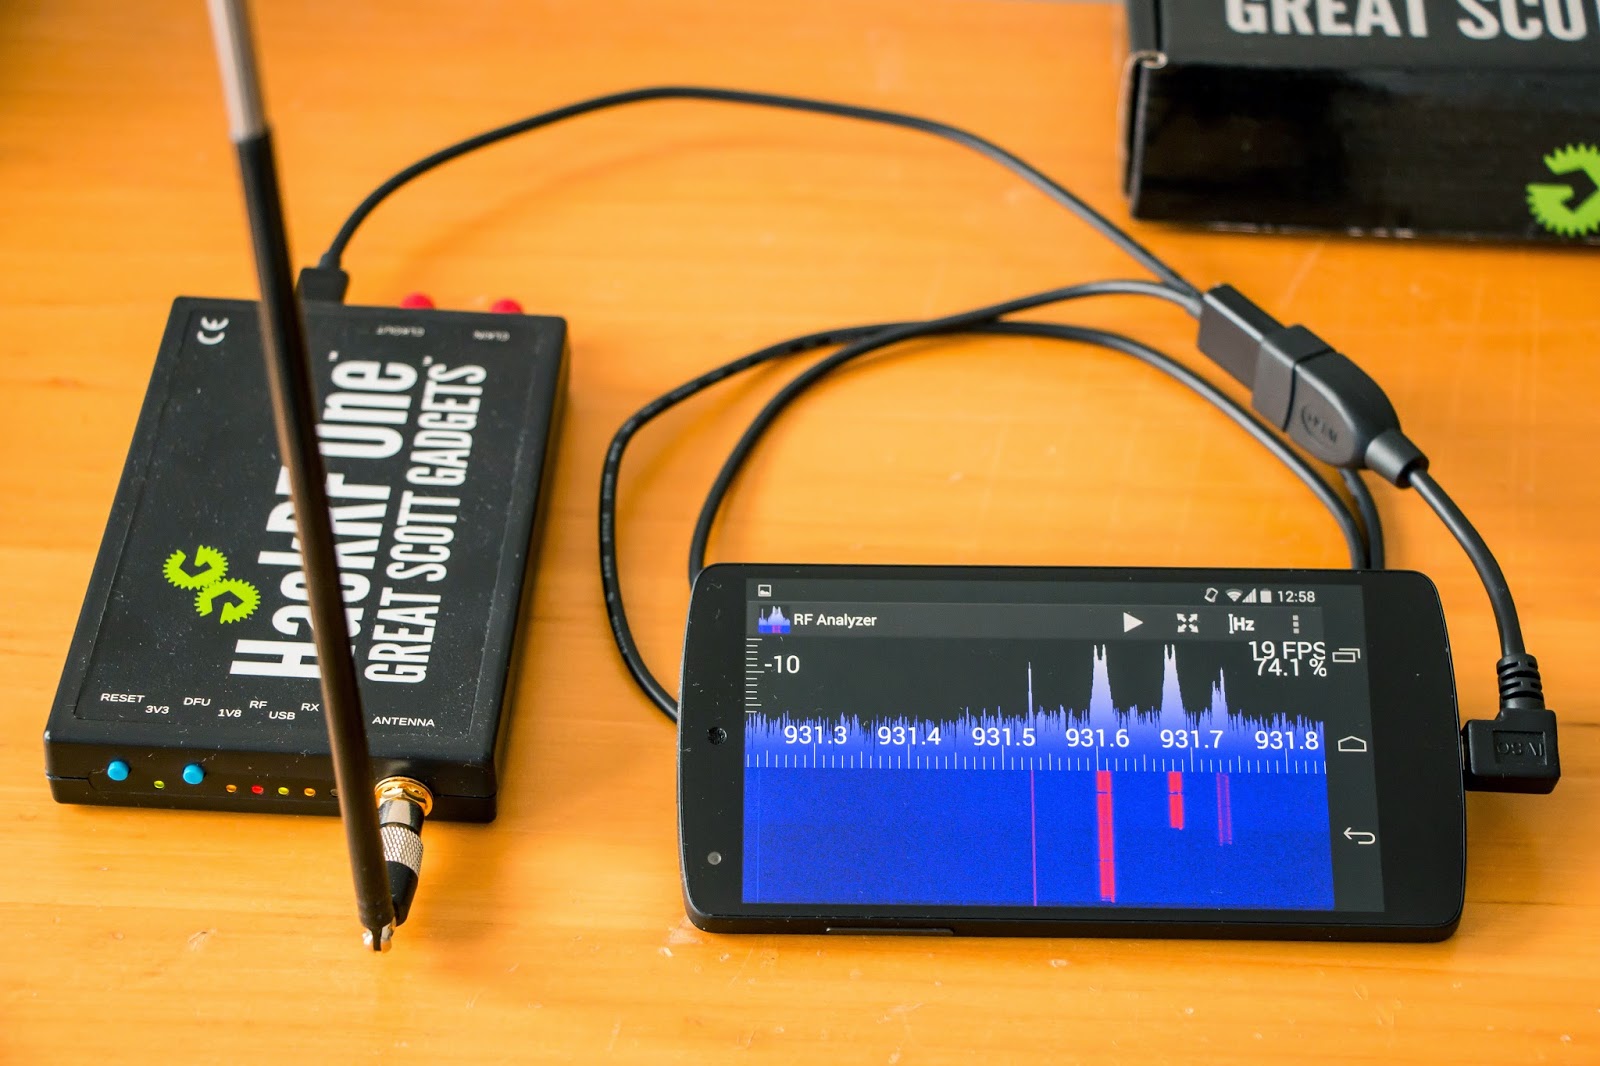
Over the last week I've been working on a new project, trying to build a spectrum analyzer for Android that works with my hackrf_android library. Now I finally reached the point were it is stable enough to be useful and I created the GitHub repository today: https://github.com/demantz/RFAnalyzer It is still very basic and I have a lot of ideas to extend its functionality, but I thought it's better to have testers involved as early as possible. Eventually it should evolve in something similar to GQRX, supporting different modes and devices. But that will take some time! The new version of RF Analyzer (1.07) has now support for AM/FM demodulation! It is now also available on Google Play: See the readme on GitHub for a more detailed description! RF Analyzer running on a Nexus 5 In this blog I'm going to show what you can do with the app and in the end I explain how it is working internally for those who like to play with the source code. I also tried to document the code as good as possible, but it is always easier if the basic flow of the program is explained before looking at it. What you can do with it Right now there aren't many fancy features. The app will present you with a simple UI showing the frequency spectrum including a waterfall plot. Here is a list of what you can do right now with version 1.00: Browse the spectrum by scrolling horizontally Zoom in and out, both horizontally and vertically Adjust the sample rate and center frequency to match the current view of the screen by double tapping Auto scale the vertical axis Jump directly to a frequency Adjust the gain settings of the HackRF Select a pre-recorded file as source instead of a real HackRF Change the FFT size Setting the frame rate either to a fixed value or to automatic control Activate logging and showing the log file I'm planning to also support the rtl-sdr in the future and of course I want to include the actual demodulation for common analog modes like AM, FM, SSB, ... But so far you can only browse the spectrum. Here is how you get it to work: Plug the HackRF into your Android device using an OTG (on-the-go) cable. You can get those cables for around 3$ and you can also find them as Y-version which enables external powering the HackRF, for those phones/tablets that don't deliver enough power. After you start RF Analyzer you can hit the start button in the action bar and it should prompt you for the permission to access the USB device. Once you did that the FFT will start: FFT at 20 Msps showing FLEX pagers at 931 MHz Use common gestures to zoom and scroll both vertically and horizontally. Note that the vertical axis of the FFT plot also affects the colors of the waterfall plot: Zoomed in(both vertical and horizontal)view If you scroll outside the current range of the FFT or if you zoom so that the resolution of the FFT is too low you can simply double tap the screen. RF Analyzer will re-tune the HackRF to the frequency currently centered on the screen and also ajust the sample rate so that the FFT covers exactly the frequency range that is currently visible: The resolution of the FFT is too low when zoomed in too closely. And we scrolled to far right that we can see the end of the FFT on the right site After double tapping the HackRF is tuned to 931,61 MHz (note the DC offset peak!) and the sample rate is now adjusted to about 2.5 Msps so that we see the full FFT resolution again You can also use the autoscale button in the action bar to adjust the vertical scale so that it ranges from the minimum to the maximum of the currently visible values of the FFT: If you want to jump to a certain frequency, use the 'set frequency' button and it will prompt you to enter a new frequency: The gain settings of the HackRF (both VGA and LNA gain) can be accessed through the 'set gain' button in the overflow menu: In the settings activity you can: Select other source types (currently only HackRF or file source) Set the FFT size Set the screen orientation (auto / landscape / portrait) Turn autostart on and off (so that you don't have to hit the start button every time) Set the frame rate to auto or a fixed value (useful if you want a linear time axis in the waterfall plot) Deactivate vertical zoom and scrolling (so that you don't accidentally alter the vertical scale while scrolling through frequencies) Turn on logging and set the location of the log file. Show the log file Settings Activity of RF Analyzer on a Nexus 7 Implementing the file source was helpful for debugging the application. It is also a way to test the app if you don't have an OTG cable or your phone/tablet doesn't output enough power for the HackRF. Selecting the file source type will allow you to use RF Analyzer with recorded samples from hackrf_transfer or Test_HackRF. I've uploaded a short capture of some FLEX pager signals for testing:FLEX Pager at 931MHz (2Msps) How it works For those who want to play with the sources of RF Analyzer (GPLv2) I want to quickly explain the internal structure of the app: (Uncomplete) class diagram of RF Analyzer. Underlined classes are running in seperate threads. Gray elements are external modules. To support different devices I defined a common interface that is implemented by all classes which represent sources of IQ samples. The Scheduler will continuously read samples from the source to prevent the receive buffers of the device to fill up. It forwards samples in packets of the size of the FFT to the AnalyzerProcessingLoop by inserting them in a queue. If the queue is full, the samples are thrown away in order to not block the input device. The AnalyzerProcessingLoop also runs in a separate thread and reads the sample packets from the queue, processes them with the help of the FFT class and then calls draw() on the AnalyzerSurface. This method draws the given FFT samples on a SurfaceView and also draws a new line of the waterfall plot as well as the horizontal and vertical axis. For a more detailed impression of how the app works, have a look into the sources onGitHub. I tried my best to add helpful comments to understand the flow of the program. If you have any questions, comments or any other input, don't hesitate to leave a comment or contact me directly on Twitter:@dennismantz Have fun testing it! ;) Here is the video were I demonstrate the old version of RF Analyzer: 原文地址:http://tech.mantz-it.com/2014/10/rf-analyzer-explore-frequency-spectrum.html 本文转自 K1two2 博客园博客,原文链接: http://www.cnblogs.com/k1two2/p/5705149.html ,如需转载请自行联系原作者