首页 文章 精选 留言 我的

精选列表

搜索[windows10],共231篇文章
优秀的个人博客,低调大师

公司环境搭建(windows10

安装java运行环境 资源列表 idea webstorm git sourceTree edas alibaba tomcat apache tomcat xshell xftp jdk maven 安装环境变量 JAVA_HOME C:\Program Files\Java\jdk1.8.0_144 PATH %JAVA_HOME%\bin; CLASSPATH .;%JAVA_HOME%\lib\dt.jar;%JAVA_HOME%\lib\tools.jar; 安装maven MAVEN_HOME D:\Java\maven\apache-maven-3.3.9 maven 配置文件详见资源列表 安装edas运行环境 简易版配置中心edas-config-center startup.bat 中添加两句话避免重启手动删除文件的问题 rd /s /q .\config-center-db rd /s /q .\logs hosts 中配置域名 C:\Windows\System32\drivers\etc\hosts 192.168.1.100 jmenv.tbsite.net 或 127.0.0.1 jmenv.tbsite.net 如果第二个不生效换用第一个, 这里偶尔会有坑 idea配置 -Dpandora.location=D:\Java\EDAS\hsf\taobao-hsf.sar idea的配置详见资源列表 安装zookeeper 下载 http://mirrors.cnnic.cn/apache/zookeeper/zookeeper-3.3.6/zookeeper-3.3.6.tar.gz 解压 D:\Java\zookeeper-3.4.6 配置 zoo.cfg # The number of milliseconds of each tick tickTime=2000 # The number of ticks that the initial # synchronization phase can take initLimit=10 # The number of ticks that can pass between # sending a request and getting an acknowledgement syncLimit=5 # the directory where the snapshot is stored. # do not use /tmp for storage, /tmp here is just # example sakes. dataDir=/tmp/zookeeper # the port at which the clients will connect clientPort=2181 # the maximum number of client connections. # increase this if you need to handle more clients #maxClientCnxns=60 # # Be sure to read the maintenance section of the # administrator guide before turning on autopurge. # # http://zookeeper.apache.org/doc/current/zookeeperAdmin.html#sc_maintenance # # The number of snapshots to retain in dataDir #autopurge.snapRetainCount=3 # Purge task interval in hours # Set to "0" to disable auto purge feature #autopurge.purgeInterval=1 安装worker运行环境 安装tomcat http://mirrors.tuna.tsinghua.edu.cn/apache/tomcat/tomcat-7/v7.0.82/bin/apache-tomcat-7.0.82-windows-x64.zip 下载worker war包 http://code.taobao.org/p/tbschedule/src/trunk/console/ScheduleConsole.war 启动worker 改ROOT http://localhost:8080/index.jsp?manager=ture 配置worker 自己解决这里只提供配置环境的搭建 安装git 下载 https://github.com/git-for-windows/git/releases/download/v2.15.1.windows.2/Git-2.15.1.2-64-bit.exe git最佳实践 http://jiongks.name/blog/a-successful-git-branching-model/ SourceTree 个人比较喜欢的软件,喜欢自行安装 配置SSH 公钥 $ git config --global user.name "user.name" $ git config --global user.email "yourmail@gmail.com" $ cd ~/.ssh $ssh-keygen -t rsa -C "paascloud.net@gmail.com" 一路回车 这里提示一下,由于笔者比较喜欢中文名,建议大家使用中文名,id_rsa.pub里是你需要的公钥, 直接在gitlab的ssh配置页增加配置就好 安装前端环境 安装node 下载 https://nodejs.org/download/release/v6.12.2/node-v6.12.2-win-x64.zip 友情提示一定不要安装过高的版本,笔者提供的版本足够使用 配置npm node路径D:\Java\nodejs,在nodejs下立"node_global"及"node_cache"两个文件夹 $ npm config set prefix "D:\Java\nodejs\node_global" $ npm config set cache "D:\Java\nodejs\node_cache" 配置系统环境变量 NODE_PATH D:\Java\nodejs\node_global\node_modules 配置用户环境变量 PATH D:\Java\nodejs\node_global\ 安装vue # 最新稳定版 $ npm install vue # 全局安装 vue-cli $ npm install --global vue-cli # 创建一个基于 webpack 模板的新项目 $ vue init webpack my-project # 安装依赖,走你 $ cd my-project $ npm install $ npm run dev

优秀的个人博客,低调大师

windows10/2016上使用docker

该文章是在一个物理主机使用windows server 2016或windows 10上使用docker非hyper-v虚拟机。 首先搭建一个容器主机。 按照微软的官方文档搭建该容器主机,步骤如下: 安装容器功能 PS C:\> start-process powershell -verb runas PS C:\> install-windowsfeature containers PS C:\> shutdown -r -t 0 PS C:\> get-containerhost 启用hyper-v角色 PS C:\> install-windowsfeature hyper-v 创建虚拟交换机 PS C:\> new-vmswitch -name "DHCP" -switchtype external(这是使用的桥接方式,还可以使用nat方式) PS C:\> new-vmswitch -name "virtual switch" -switchtype nat -natsubnetaddress 172.16.0.1/24 如果虚拟交换机配置的是nat类型,则需要创建nat对象。 PS C:\> new-netnat -name containernat -internalipinterfaceaddressprefix "172.16.0.1/24" 安装操作系统镜像 PS C:\> install-packageprovider containerprovider -force ps C:\> find-containerimage ps C:\> install-containerimage -name nanoserver ps C:\> install-containerimage -name windowservercore 安装操作系统镜像的原理是使用微软提供的BITS服务,从其网站上下载一个.wim的文件然后进行转换成该容器的镜像的方式,存放的目录默认在C:\programdata\microsoft\windows\image。下载的目录在C:\Windows\winsxs\ 如果找到在哪个下载地址的话请告诉我。 ps C:\> get-containerimage Name Publisher Version IsOSImage ---- --------- ------- --------- NanoServer CN=Microsoft 10.0.10586.0 True WindowsServerCore CN=Microsoft 10.0.10586.0 True 然后按照该文档在windows上安装docker及docker服务。 https://msdn.microsoft.com/zh-cn/virtualization/windowscontainers/deployment/docker_windows 容器主机和docker准备完以后就可以在该主机上运行容器了,一种方法是使用powershell运行一个容器,一种方法是使用docker运行容器。两种方法都差不多。具体的见如下命令。 PS C:\> get-containerimage PS C:\> new-container -name tst -containerimagename windowsservercore ps c:\> add-containernetworkadapter -containername tst ps c:\> get-vmswitch ps c:\> connect-containernetworkadapter -containername tst -switchname DHCP ps c:\> $container=get-container -name tst(如果这里不定义改变量,则在使用该容器的时候powershell会提示字符串不合法的错误) ps c:\> start-container $container ps c:\> get-container | start-container(启动所有的容器) ps c:\> enter-pssession -containername tst -runasadministrator(使用powershell用户名为administrator的用户进入名为tst的容器,持久性powershell会话,还可以使用一次性操作容器) ps c:\> invoke-command -containername tst -scriptblock {new-item -itemtype directory -path C:\application} (该命令为一次性在tst容器中在C盘下创建一个application的目录。) ps c:\> stop-container $container ps c:\> get-container | stop-container (停止所有容器) ps c:\> remove-container $container -force ps c:\> get-container | remove-container -force 以上命令使用powershell创建、使用、删除容器。具体的命令使用请get-help command 由于用习惯了linux的操作,在windows上一样的喜欢使用command-line的方式。 以下是使用docker的方式创建、使用、删除容器(具体的docker方式请help)。 PS C:\> docker images C:\> docker run --name iisbase -it windowsservercore cmd C:\> powershell.exe Install-WindowsFeature web-server C:\> exit C:\> docker commit iisbase windowsservercoreiis C:\> docker images if (!(Get-NetFirewallRule | where {$_.Name -eq "TCP80"})) { New-NetFirewallRule -Name "TCP80" -DisplayName "HTTP on TCP/80" -Protocol tcp -LocalPort 80 -Action Allow -Enabled True } C:\> docker run --name iisdemo -it -p 80:80 windowsservercoreiis cmd C:\> del C:\inetpub\wwwroot\iisstart.htm PS C:\> docker run -p 80:80 windowsservercoreiis PS C:\> docker stop tender_panini PS C:\> docker stop $(docker ps -q) PS C:\> docker rm prickly_pike PS C:\> docker rm $(docker ps -a -q) 本文转自ting2junshui51CTO博客,原文链接:http://blog.51cto.com/ting2junshui/1739751,如需转载请自行联系原作者

优秀的个人博客,低调大师

Windows10 VS2017 C++信号处理

版权声明:本文可能为博主原创文章,若标明出处可随便转载。 https://blog.csdn.net/Jailman/article/details/85250506 #include "pch.h" #include <iostream> #include <csignal> #include <windows.h> using namespace std; int i; void signalHandle(int signum) { cout << "Interrupt signal(" << signum << ")received" << endl; i = signum; } int main() { //注册信号以及信号处理程序 signal(SIGINT, signalHandle); while (1) { if (i == 2) { break; } cout << "hello..." << endl; Sleep(1000);//暂停1s } system("pause"); return 0; } 参考https://blog.csdn.net/qq_28796345/article/details/51290493

优秀的个人博客,低调大师

windows10 vs2017 C++连接MySQL

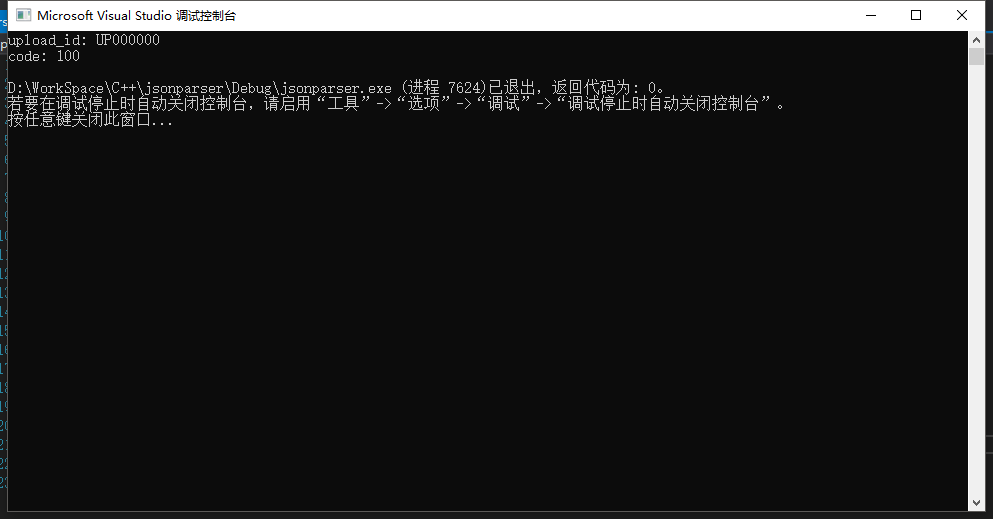
版权声明:本文可能为博主原创文章,若标明出处可随便转载。 https://blog.csdn.net/Jailman/article/details/85234743 安装mysql8.0 x64 创建test数据库,user表,插入数据如下: +----+------+----------+-----------------+ | id | name | password | email | +----+------+----------+-----------------+ | 1 | jack | 111 | jack@foobar.com | | 2 | mary | 222 | mary@foobar.com | | 3 | john | 333 | john@foobar.com | | 4 | lesk | 444 | lesk@foobar.com | | 5 | bety | 555 | bety@foobar.com | +----+------+----------+-----------------+ 创建控制台C++项目 工程–属性–VC++目录–包含目录,将mysql server 8.0\include的绝对路径添加进去,例如C:\Program Files\MySQL\MySQL Server 8.0\include。将MySQL Server 8.0\lib文件夹下的libmysql.lib和libmysql.dll拷贝到工程目录下。 项目要改为x64,否则报错和库不兼容。 写码: #include "pch.h" #include <WinSock.h> //一定要包含这个,或者winsock2.h #include "mysql.h" //引入mysql头文件(一种方式是在vc目录里面设置,一种是文件夹拷到工程目录,然后这样包含) #include <Windows.h> #include <iostream> using namespace std; //包含附加依赖项,也可以在工程--属性里面设置 #pragma comment(lib,"wsock32.lib") #pragma comment(lib,"libmysql.lib") MYSQL mysql; //mysql连接 MYSQL_FIELD *fd; //字段列数组 char field[32][32]; //存字段名二维数组 MYSQL_RES *res; //这个结构代表返回行的一个查询结果集 MYSQL_ROW column; //一个行数据的类型安全(type-safe)的表示,表示数据行的列 char query[150]; //查询语句 bool ConnectDatabase(); //函数声明 void FreeConnect(); bool QueryDatabase1(); //查询1 bool QueryDatabase2(); //查询2 bool InsertData(); bool ModifyData(); bool DeleteData(); int main(int argc, char **argv) { ConnectDatabase(); QueryDatabase1(); InsertData(); QueryDatabase2(); ModifyData(); QueryDatabase2(); DeleteData(); QueryDatabase2(); FreeConnect(); system("pause"); return 0; } //连接数据库 bool ConnectDatabase() { //初始化mysql mysql_init(&mysql); //连接mysql,数据库 //返回false则连接失败,返回true则连接成功 if (!(mysql_real_connect(&mysql, "localhost", "root", "root", "test", 0, NULL, 0))) //中间分别是主机,用户名,密码,数据库名,端口号(可以写默认0或者3306等),可以先写成参数再传进去 { printf("Error connecting to database:%s\n", mysql_error(&mysql)); return false; } else { printf("Connected...\n"); return true; } } //释放资源 void FreeConnect() { //释放资源 mysql_free_result(res); mysql_close(&mysql); } /***************************数据库操作***********************************/ //其实所有的数据库操作都是先写个sql语句,然后用mysql_query(&mysql,query)来完成,包括创建数据库或表,增删改查 //查询数据 bool QueryDatabase1() { sprintf_s(query, "select * from user"); //执行查询语句,这里是查询所有,user是表名,不用加引号,用strcpy也可以 mysql_query(&mysql, "set names gbk"); //设置编码格式(SET NAMES GBK也行),否则cmd下中文乱码 //返回0 查询成功,返回1查询失败 if (mysql_query(&mysql, query)) //执行SQL语句 { printf("Query failed (%s)\n", mysql_error(&mysql)); return false; } else { printf("query success\n"); } //获取结果集 if (!(res = mysql_store_result(&mysql))) //获得sql语句结束后返回的结果集 { printf("Couldn't get result from %s\n", mysql_error(&mysql)); return false; } //打印数据行数 printf("number of dataline returned: %d\n", mysql_affected_rows(&mysql)); //获取字段的信息 char *str_field[32]; //定义一个字符串数组存储字段信息 for (int i = 0; i < 4; i++) //在已知字段数量的情况下获取字段名 { str_field[i] = mysql_fetch_field(res)->name; } for (int i = 0; i < 4; i++) //打印字段 printf("%10s\t", str_field[i]); printf("\n"); //打印获取的数据 while (column = mysql_fetch_row(res)) //在已知字段数量情况下,获取并打印下一行 { printf("%10s\t%10s\t%10s\t%10s\n", column[0], column[1], column[2], column[3]); //column是列数组 } return true; } bool QueryDatabase2() { mysql_query(&mysql, "set names gbk"); //返回0 查询成功,返回1查询失败 if (mysql_query(&mysql, "select * from user")) //执行SQL语句 { printf("Query failed (%s)\n", mysql_error(&mysql)); return false; } else { printf("query success\n"); } res = mysql_store_result(&mysql); //打印数据行数 printf("number of dataline returned: %d\n", mysql_affected_rows(&mysql)); for (int i = 0; fd = mysql_fetch_field(res); i++) //获取字段名 strcpy_s(field[i], fd->name); int j = mysql_num_fields(res); // 获取列数 for (int i = 0; i < j; i++) //打印字段 printf("%10s\t", field[i]); printf("\n"); while (column = mysql_fetch_row(res)) { for (int i = 0; i < j; i++) printf("%10s\t", column[i]); printf("\n"); } return true; } //插入数据 bool InsertData() { sprintf_s(query, "insert into user values (6, 'lily', '666','lily@sina.cn');"); //可以想办法实现手动在控制台手动输入指令 if (mysql_query(&mysql, query)) //执行SQL语句 { printf("Query failed (%s)\n", mysql_error(&mysql)); return false; } else { printf("Insert success\n"); return true; } } //修改数据 bool ModifyData() { sprintf_s(query, "update user set email='lesk@163.com' where name='lesk'"); if (mysql_query(&mysql, query)) //执行SQL语句 { printf("Query failed (%s)\n", mysql_error(&mysql)); return false; } else { printf("Insert success\n"); return true; } } //删除数据 bool DeleteData() { /*sprintf(query, "delete from user where id=6");*/ char query[100]; printf("please input the sql:\n"); cin >> query; //这里手动输入sql语句 if (mysql_query(&mysql, query)) //执行SQL语句 { printf("Query failed (%s)\n", mysql_error(&mysql)); return false; } else { printf("Insert success\n"); return true; } } 参考地址:https://www.cnblogs.com/47088845/p/5706496.html 显示如图:

优秀的个人博客,低调大师

微软将把iOS软件移植到Windows10

众所周知,Windows 10 Mobile仍旧存在软件问题,对于这个,微软自己也是知道的,所以它在2015年的时候披露了两个不同方面的项目,它们分别是Astoria和Islandwood,前者是将Android软件带到Win10设备上,后者则是把iOS软件带到Win10设备上。 Windows 10 Mobile 据了解,Astoria似乎已经进入了一个死胡同,知情人士暗示,微软目前搁置了Android应用转Win10应用的开发计划,而Islandwood看起来一切进展顺利,并且微软很快就要带来一个新的里程碑。 近期,外媒发现了由微软开发的一套网页工具,它可以让iOS开发者检查由他们开发的软件在Win10运行时遇到的兼容问题。工具描述写称,除了可以一窥软件能在Win10能走多远,而且它还能获得一些建议、技巧以及解决方案。 目前,微软方面并未对Android或iOS软件项目做出任何回应,但很明显,这家公司至少已经放缓了其中一个项目。耐人寻味的是,在早前的Windows 10 Mobile build版本中曾出现过对Android软件的兼容,这一度让用户认为一切都将水到渠成。 本文转自d1net(转载)

优秀的个人博客,低调大师

Windows10 VS2017 C++编译Linux程序

版权声明:本文可能为博主原创文章,若标明出处可随便转载。 https://blog.csdn.net/Jailman/article/details/85326660 #include <cstdio> #include <iostream> #include "unistd.h" using namespace std; int main() { while (true) { cout << "hello linux!" << endl; sleep(1); } return 0; } 开启Linux虚拟机,运行以上代码,弹出连接框,输入地址,用户名和密码,Linux需要安装g++和GDB。 有一些库和函数include之后vs会报错,但是编译可以正常进行。 vs2017持续打开一定时间后,会提示rsync.exe和devenv.exe需要联网,这时允许之后,再看编辑提示,报错消失……

优秀的个人博客,低调大师

Windows10 VS2017 C++模拟点击按键

版权声明:本文可能为博主原创文章,若标明出处可随便转载。 https://blog.csdn.net/Jailman/article/details/85279137 #include "pch.h" #include <Windows.h> #include <stdio.h> #include <iostream> using namespace std; int main() { Sleep(3000); system("start notepad"); Sleep(3000); // 模拟点击右键 //mouse_event(MOUSEEVENTF_RIGHTDOWN, 0, 0, 0, 0); //mouse_event(MOUSEEVENTF_RIGHTUP, 0, 0, 0, 0); // 模拟按下'A'键 for (int i = 0; i < 100; i++) { keybd_event('A', 0, 0, 0); keybd_event('A', 0, KEYEVENTF_KEYUP, 0); } // 模拟按下 CTRL + S keybd_event(VK_CONTROL, (BYTE)0, 0, 0); keybd_event('S', (BYTE)0, 0, 0); keybd_event('S', (BYTE)0, KEYEVENTF_KEYUP, 0); keybd_event(VK_CONTROL, (BYTE)0, KEYEVENTF_KEYUP, 0); cout << "Input over, press any key to exit." << endl; getchar(); return 0; } 参考文章:https://blog.csdn.net/dxk539687357/article/details/69668936/

优秀的个人博客,低调大师

Windows10 VS2017 C++ Json解析(使用jsoncpp库)

版权声明:本文可能为博主原创文章,若标明出处可随便转载。 https://blog.csdn.net/Jailman/article/details/85259297 1.项目必须是win32 2.生成的lib_json.lib放到工程目录下 3.incldue的头文件放到工程目录,然后设置工程->属性->配置属性->vc++目录->包含目录 4.工程->属性->配置属性->c/c+±>代码生成->运行库,设置运行库为多线程调试 (/MTd) 首先从github下载最新版jsoncpp,0.10.7https://github.com/open-source-parsers/jsoncpp/releases 在makefile目录的msvc2010打开工程进行编译,将库文件makefiles\msvc2010\Debug\lib_json.lib添加到工程目录,如上步骤2,然后将include目录拷贝到工程目录,按照上边步骤3设置,然后如上步骤4调整设置 解析字符串json,写码: #include "pch.h" #include <iostream> #include <json.h> #pragma comment(lib, "lib_json.lib") using namespace std; int main() { const char* str = "{\"uploadid\": \"UP000000\",\"code\": 100,\"msg\": \"\",\"files\": \"\"}"; Json::Reader reader; Json::Value root; if (reader.parse(str, root)) // reader将Json字符串解析到root,root将包含Json里所有子元素 { std::string upload_id = root["uploadid"].asString(); // 访问节点,upload_id = "UP000000" int code = root["code"].asInt(); // 访问节点,code = 100 cout << "upload_id: " << upload_id << endl; cout << "code: " << code << endl; } } 参考文章:http://www.cnblogs.com/liaocheng/p/4243731.htmlhttps://blog.csdn.net/shufac/article/details/52710100

优秀的个人博客,低调大师

Windows10环境下使用Laravel任务调度(代替Corntab)

打开计划任务 image.png 创建任务 image.png 设置常规 image.png 设置触发器 image.png 设置操作 image.png 执行文件corn.bat内容如下: cd /d E:/wwwroot/floribook E:/BtSoft/WebSoft/php/7.1/php.exe artisan schedule:run 1>> NUL 2>&1 如果设置不成功需要留意以下几个点: 第一句中/d不能去掉,盘符后面要有冒号和斜杠 PHP命令使用绝对路径,盘符后面要有冒号和斜杠 其他部分原样复制即可,不要修改

优秀的个人博客,低调大师

解决windows10下安装dlib与face-recognition的问题

以后博客更新内容都会在oldpan.me中 github中相关问题解决方法:https://github.com/ageitgey/face_recognition/issues/175#issue-257710508 对于安装face-recognition在window的方法,在dlib的github中的issue中已经有人进行了回答,但是回答者较为复杂,且有些步骤可以简化一下。 问题原因 安装face-recognition需要首先安装dlib windows无法直接安装dlib的原因主要是因为缺少相应的编译环境,只要安装好相应的编译环境即可。 相关软件 1、VS 2015 C++相关组件,注意,需要的是2015而不是2017,VS2017的相关组件对C++编译的支持并不好,因此必须下载安装好VS2015的C++相关组件。 注意:VS 2015 安装器默认不安装C++相关组件,需要自己选择添加安装!! 2、Boost C++ Libraries,下载好Third Party Downloads-Windows Binaries中的boost_1_66_0-msvc-14.0-64.exe,点击exe安装到C盘,到期安装目录,点击b2进行编译,编译好的文件放到了stage中。 3、安装cmake,百度直接安装即可,cmake在安装过程中切记选择添加路径到环境变量中。 问题解决 安装好上面说的三个部件后,直接运行pip install face-recognition即可,会将dlib一并安装。 出现以下信息说明安装成功。 C:\Users\dell\PycharmProjects\Pytorch-Learn>C:\Users\dell\Anaconda3\envs\my-pytorch\Scripts\pip install face-recognition Collecting face-recognition Using cached https://pypi.tuna.tsinghua.edu.cn/packages/fa/2d/dbb78acb411de238869451afae8387ae8200d3fe0672f6817a918e03ca49/face_recognition-1.0.0-py2.py3-none-any.whl Requirement already satisfied: Pillow in c:\users\dell\anaconda3\envs\my-pytorch\lib\site-packages (from face-recognition) Requirement already satisfied: numpy in c:\users\dell\anaconda3\envs\my-pytorch\lib\site-packages (from face-recognition) Requirement already satisfied: face-recognition-models>=0.2.0 in c:\users\dell\anaconda3\envs\my-pytorch\lib\site-packages (from face-recognition) Requirement already satisfied: scipy>=0.17.0 in c:\users\dell\anaconda3\envs\my-pytorch\lib\site-packages (from face-recognition) Collecting dlib>=19.5 (from face-recognition) Using cached https://pypi.tuna.tsinghua.edu.cn/packages/23/7a/891d4c46cdf755fb69eec0f06a53033d3754bf68ace5342ad56aeb540aa1/dlib-19.9.0.tar.gz Requirement already satisfied: Click>=6.0 in c:\users\dell\anaconda3\envs\my-pytorch\lib\site-packages (from face-recognition) Requirement already satisfied: olefile in c:\users\dell\anaconda3\envs\my-pytorch\lib\site-packages (from Pillow->face-recognition) Building wheels for collected packages: dlib Running setup.py bdist_wheel for dlib ... done Stored in directory: C:\Users\dell\AppData\Local\pip\Cache\wheels\5d\94\db\0ddfd06142fc4ee80b89d1e6cd158185a9bf40d93b8d92e2ee Successfully built dlib Installing collected packages: dlib, face-recognition Successfully installed dlib-19.9.0 face-recognition-1.0.0

优秀的个人博客,低调大师

更安全:Windows10 将阻止安装未经认证的驱动程序

随着2020年10月补丁周二累积更新,微软做出了一项改变,旨在加强 Windows 对驱动软件的验证。引入这一变化是为了防止恶意软件利用硬件驱动程序来破坏 Windows 10设备。 作为这些新的安全改进措施的一部分,微软表示,如果 Windows 无法验证软件发布商,Windows 10将阻止用户安装 OEM 或制造商的驱动程序。 虽然新的驱动程序验证模式对安全性很重要,但如果微软无法验证驱动程序,这一变化可能会导致 Windows 10的驱动程序错误。 当验证失败时,所有支持的 Windows 10版本的用户可能会看到两条驱动程序错误信息。第一个错误信息是 “Windows 无法验证该驱动软件的发布者”,第二个错误信息是 “主题中没有签名”。 这两条错误信息都意味着 Windows 在驱动程序验证中发现了格式不正确的目录文件,安装驱动程序将失败。 如果你在从 OEM 或驱动厂商网站安装驱动时出现以上两个错误,微软表示,你需要联系厂商,要求他们上传经过适当修复的驱动。 用户只有在应用旧版驱动更新时才有可能遇到这些问题。英特尔、AMD 或 Nvidia 发布的新驱动已经兼容 Windows 10的新验证模式。 另外值得一提的是,微软正在研究一些改进,以阻止驱动程序破坏 Windows 10的安装。例如,微软现在允许硬件合作伙伴 (戴尔、惠普、英特尔等)在测试过程中发现驱动兼容性问题时,可以要求 Windows 10功能升级块。 同样,微软也在探索新的机器学习技术,以减少 Windows 10上的驱动程序更新造成的兼容性问题。

资源下载

更多资源
Mario

Mario

马里奥是站在游戏界顶峰的超人气多面角色。马里奥靠吃蘑菇成长,特征是大鼻子、头戴帽子、身穿背带裤,还留着胡子。与他的双胞胎兄弟路易基一起,长年担任任天堂的招牌角色。

Oracle

Oracle

Oracle Database,又名Oracle RDBMS,或简称Oracle。是甲骨文公司的一款关系数据库管理系统。它是在数据库领域一直处于领先地位的产品。可以说Oracle数据库系统是目前世界上流行的关系数据库管理系统,系统可移植性好、使用方便、功能强,适用于各类大、中、小、微机环境。它是一种高效率、可靠性好的、适应高吞吐量的数据库方案。

Apache Tomcat

Apache Tomcat

Tomcat是Apache 软件基金会(Apache Software Foundation)的Jakarta 项目中的一个核心项目,由Apache、Sun 和其他一些公司及个人共同开发而成。因为Tomcat 技术先进、性能稳定,而且免费,因而深受Java 爱好者的喜爱并得到了部分软件开发商的认可,成为目前比较流行的Web 应用服务器。

Sublime Text

Sublime Text

Sublime Text具有漂亮的用户界面和强大的功能,例如代码缩略图,Python的插件,代码段等。还可自定义键绑定,菜单和工具栏。Sublime Text 的主要功能包括:拼写检查,书签,完整的 Python API , Goto 功能,即时项目切换,多选择,多窗口等等。Sublime Text 是一个跨平台的编辑器,同时支持Windows、Linux、Mac OS X等操作系统。