首页 文章 精选 留言 我的

精选列表

搜索[ps],共6012篇文章
优秀的个人博客,低调大师

不用 PS 抠图,Python + OpenCV 实现自动海报场景替换!

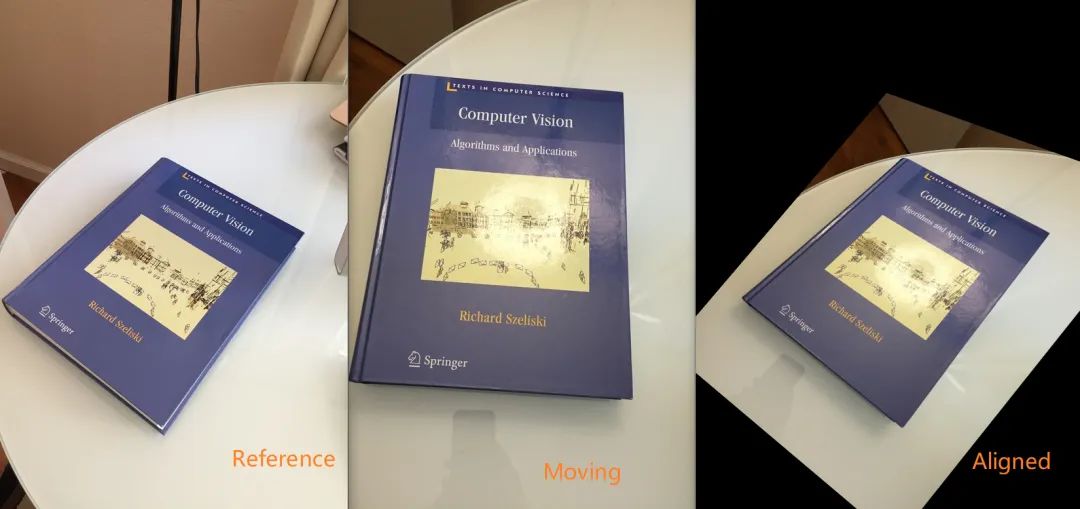
现存在一个问题,就下面图片中的两本书而言,怎样快速让中间边的书本与左边书本对齐(最终效果能实现两张图片重叠(最终结果为右图)),进行的图像转变可旋转、平移、缩放、形变。 本文主要内容就是介绍利用 Opencv 来怎样解决上面的问题,解决这个问题需要三步 确定至少四组对应点坐标 找到一个转换矩阵; 把找到的转换矩阵应用到 Moving Image(需要移动的图片)上,实现图像对齐 图片旋转、平移、缩放等操作的主要目的,就是要最终实现两图像中点对点一一映射关系,图像映射本质上就是像素点转换 图中标记了其中四组对应点,分别标为不同的颜色,分别标为红、橙、黄和绿四种颜色;比如这里的 和 是就是一组对应点,图片经过转换之后 点 必须映射到 点位置。 涉及图片中点坐标变换,都需要借助于 矩阵 运算,这里探究的图像维度都属于二维,坐标只需要 即可 面向此类转换问题,Homography 转换 ( 3 × 3 矩阵) 可用于解决此类转化问题,用来解决点对点映射问题,Homography 矩阵可写作下列方式:则 、 作为对应点,则 Homography 的的应用 如下:而矩阵 H 参数的确定至少需要 4 组对应点,因此在计算 H 时至少要找到 4 组对应点;找到的对应点组数越多,计算得到的 H 会越精确,最终的转换效果也就会越好。 下面用 Opencv + Python 来实现上面图片中的书籍的对齐, importcv2importnumpyasnpif__name__=='__main__':#图片读取img_src=cv2.imread("D:/book2.jpg")position_src=np.array([[141,131],[480,159],[493,630],[64,601]],dtype=float)img_dst=cv2.imread("D:/book1.jpg")position_dst=np.array([[318,256],[543,372],[316,670],[73,473]],dtype=float)#计算转换矩阵h,status=cv2.findHomography(position_src,position_dst)#对图片进行仿射变换out_img=cv2.warpPerspective(img_src,h,(img_dst.shape[1],img_dst.shape[0]))#Displayimages;cv2.imshow("Sourceimage",img_src)cv2.imshow("DestinationImage",img_dst)cv2.imshow("WarpedSourceImage",out_img)cv2.waitKey(0) 这里事先已经确定好对应的四个点的坐标,然后把这四个点的坐标带入 cv2.findHomography() 计算出转换矩阵,最后把矩阵应用到两图像中,得到最终的转换结果, 这里提醒一点,warpPerspective 函数进行对图像像素进行矩阵变换时,隐藏了一个参数 Interpolator ,默认为线性插值,功能是防止像素点像素值缺失 上面小案例不方便的一点需要确定对应四个点的坐标,这个步骤是比较繁琐的,下面案例将在程序中加入交互功能,实现某个图片的自动标记点收集、标记点点转换: 首先需要准备两张图片,其中一张为海报,一张为需要替换的海报;关于确定点的坐标时,被替换的图片的坐标非常好确定,只需知道图片的长宽即可; 但的海报图像区域四个点是不好确定的, 这里利用 Opencv 的鼠标回调函数,监视鼠标响应,根据用户点击来收集 PIck 得到的坐标; defmouse_handler(event,x,y,flags,data):ifevent==cv2.EVENT_LBUTTONDOWN:cv2.circle(data['im'],(x,y),3,(0,0,255),5,16)cv2.namedWindow("Image",0)cv2.imshow("Image",data['im'])iflen(data['points'])<4:data['points'].append([x,y])defget_four_points(im):data={}data['im']=im.copy()data['points']=[]#Setthecallbackfunctionforanymouseeventcv2.namedWindow("Image",0)cv2.imshow('Image',im)#请注意你标记点的数据,是顺时针,需要与pst_src方向一致cv2.setMouseCallback("Image",mouse_handler,data)cv2.waitKey(0)#Convertarraytonp.array#竖直方向堆叠起来;;;points=np.vstack(data['points']).astype(float)returnpoints 坐标确定以后,接下来就很简单了,跟上个案例一样,计算变换矩阵,矩阵应用到图像旋转,最终更换海报内容也就轻松完成啦 需要注意一点,坐标 Pick 点的顺序须与记录替换图像顶点顺序一致,否则转换图会有偏差,案例完整代码如下: if__name__=='__main__':img_src=cv2.imread("D:/first-image.jpg")size=img_src.shape#取得四个坐标pst_src=np.array([[0,0],[size[1]-1,0],[size[1]-1,size[0]-1],[0,size[0]-1]],dtype=float)#Readthedestinationimageimg_dst=cv2.imread("D:/times-square.jpg")print("ClickonfourcornersofbllboardandthepressENTER")four_point=get_four_points(img_dst)#CalculateHomographybetweensourceanddestinationpointsh,status=cv2.findHomography(pst_src,four_point)im_temp=cv2.warpPerspective(img_src,h,(img_dst.shape[1],img_dst.shape[0]))cv2.fillConvexPoly(img_dst,four_point.astype(int),0,16)#addwrapedsourceimagetodestinationimageimg_dst=img_dst+im_tempcv2.namedWindow("Image",0)cv2.imshow("Image",img_dst)cv2.waitKey(0) 推荐阅读: 用 Python 对图片主体轮廓进行提取、颜色标记、并计算区域面积 本文分享自微信公众号 - Z先生点记(gh_683d048a482a)。如有侵权,请联系 support@oschina.cn 删除。本文参与“OSC源创计划”,欢迎正在阅读的你也加入,一起分享。

优秀的个人博客,低调大师

HeyUI组件库发布vscode插件,PS教程: 如何开发vscode插件?

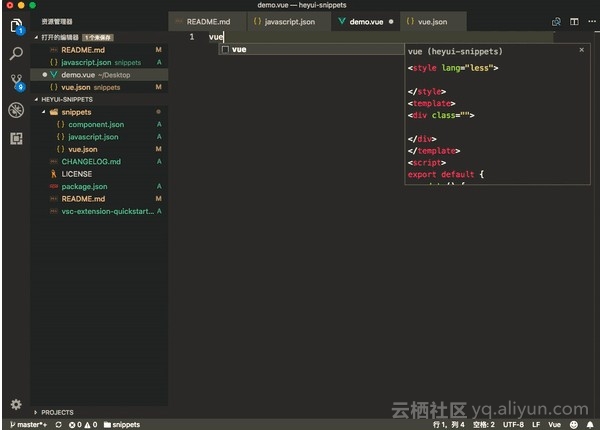
前沿 HeyUI组件库,我们项目组已经用了一年多了。 一直没有对应的组件库插件,我一直耿耿于怀。 所以,抽时间查阅了vscode的插件开发教程,终于把vscode的插件完成了。 在此奉上我们的插件库链接,多谢大家提建议。 git: github.com/heyui/heyui…vscode: marketplace.visualstudio.com/items?itemN… 或者大家可以通过在vscode插件库中搜索 heyui-snippets进行安装。 HeyUI 如果对我们组件库不熟悉的小伙伴可以参见我们官网:heyui.top 或者围观我们的github:github.com/heyui/heyui 用例 其他不说,先把效果奉上。 vue单文件结构 首先:我提供了一个vue的输入提示,类似于emmit的!,生成vue单文件的基本结构。 heyui组件库的组件输入提示 heyui组件库有很多组件,如果没有组件的输入提示,基本上,我们都需要手写很多组件的标签,这里我们提供所有的组件库输入提示,以方便程序编写中的效率。 Component 输入提示 Component Affix BackTop Badge Checkbox Circle Category Datetime DropdownCustom DropdownMenu Form FormItem Menu Modal ModalComponent Pagination Poptip Progress Radio Rate Slider Loading Steps Search Select Switch SwitchList Tabs TagInput Tree TreePicker NumberInput Tooltip Uploader AutoComplete Timeline TextEllipsis Table TableItem Row Col Button ButtonGroup Method 输入提示 Method $Message $Notice $Confirm $Loading $ScrollIntoView 教程 写了这么多,如果大家对于如何开发vscode的插件比较好奇的话,可以往下接着看。 其实heyui-snippets是比较简单的插件,就是单纯的输入提示。 这种输入提示,大家其实可以在vscode中自定义,方便自己的开发。 自定义输入提示 我首先把自定义输入提示的教程放出来: 首先 Shift+Command+P,打开命令输入框,输入snippet,点击首选项:配置用户代码片段 由于我是用来做vue文件的输入提示,系统中并没有默认的配置项,我们可以通过新建的方式创建配置项。 创建vue.code-snippets的文件 系统会自动生成配置文件,你可以通过修改配置文件来达到snippet的功能。 "TestSnippet": { "prefix": "TestSnippet", "body": [ "<TestSnippet v-model=\"$1\"></TestSnippet>" ], "description": "insert a TestSnippet component" } 如上段代码所示,我配置了一个TestSnippet组件的输入提示,那在vue代码中应用是这个样子的: 但是,这个有一个不好的问题,就是在javascript代码中也会出现提示。 于是我们就要配置scope属性,这里就遇到了一个坑,vue的template代码片段,在vscode官网中,是没有文档的。 而且,对于scope的定义与配置也是模糊不清,总之,我尝试了很久,才弄清楚。 vscode中,我们会安装vetur,这个基本上算是vue语言插件,在这个插件中,对于vue是这么定义的: "text.html.basic": "html", "text.html.vue-html": "vue-html", "text.pug": "pug", "text.haml": "haml", "source.css": "css", "source.css.scss": "scss", "source.css.less": "less", "source.css.postcss": "postcss", "source.sass": "sass", "source.stylus": "stylus", "source.js": "javascript", "source.ts": "typescript", "source.coffee": "coffeescript", "text.html.markdown": "md", "source.yaml": "yaml", "source.json": "json", "source.php": "php" 一开始,如果参考sublime的snippet配置,scope是使用text.html.vue-html这种定义的,于是我在插件库的定义中使用这一种,发现不行,总之最后,终于尝试很久,把发现用的是后面的那一种配置。 在自定义的配置文档中: "TestSnippet": { "scope": "vue-html", //设置scope "prefix": "TestSnippet", "body": [ "<TestSnippet v-model=\"$1\"></TestSnippet>", "$2" ], "description": "insert a TestSnippet component" } 就可以正确的使用snippet了。 插件的开发 在知道正确配置的情况下,转移到snippet插件的开发中,还是走了一些弯路,过程就叙述了,把正确的配置放出来: package.json scope定义在language属性上,是的,就是这么坑DIE "contributes": { "snippets": [ { "language": "vue", "path": "./snippets/vue.json" }, { "language": "vue-html", //scope定义在language属性上 "path": "./snippets/component.json" }, { "language": "javascript", "path": "./snippets/javascript.json" } ] } component.json就按照正常的配置就可以了。 至于插件的上传,就不多描述了,大家直接注册账号发布就可以了。 支持 说了这么多,也希望大家多支持我的组件库 HeyUI组件库 下一步 下一步,我会补充我们HeyUI的ADMIN系统,就是不知道,大家希望有哪一些功能?如果大家有时间,希望大家在给我一些反馈: 原文发布时间为:2018年07月02日 本文作者: vvpvvp 本文来源:掘金如需转载请联系原作者

优秀的个人博客,低调大师

我要做 Android 第四弹 ps(Q:如何启动其他应用的Activity?)

一、打开第三方应用 (1) Intent intent=new Intent(); //包名 包名+类名(全路径) intent.setClassName("com.jack", "com.jack.PlaneActivity"); startActivity(intent); (2) Intent intent = new Intent(); ComponentName comp = new ComponentName("com.jack","com.jack.PlaneActivity"); intent.setComponent(comp); intent.setAction("android.intent.action.MAIN"); intent.setFlags(Intent.FLAG_ACTIVITY_NEW_TASK); startActivity(intent); (3)转载自https://blog.csdn.net/aaa111/article/details/41833189 public static final String APP_PACKAGE_NAME = "com.*.*";//包名 /** * 启动薄荷App * @param context */ public static void launchapp(Context context) { // 判断是否安装过App,否则去市场下载 if (isAppInstalled(context, APP_PACKAGE_NAME)) { context.startActivity(context.getPackageManager().getLaunchIntentForPackage(APP_PACKAGE_NAME)); } else { goToMarket(context, APP_PACKAGE_NAME); } } /** * 检测某个应用是否安装 * * @param context * @param packageName * @return */ public static boolean isAppInstalled(Context context, String packageName) { try { context.getPackageManager().getPackageInfo(packageName, 0); return true; } catch (NameNotFoundException e) { return false; } } /** * 去市场下载页面 */ public static void goToMarket(Context context, String packageName) { Uri uri = Uri.parse("market://details?id=" + packageName); Intent goToMarket = new Intent(Intent.ACTION_VIEW, uri); try { context.startActivity(goToMarket); } catch (ActivityNotFoundException e) { } } 调用系统应用 (1)从 google 搜索内容 Intent intent = new Intent(); intent.setAction(Intent.ACTION_WEB_SEARCH); intent.putExtra(SearchManager.QUERY, "搜索内容") startActivity(intent); (2)浏览网页 Uri uri = Uri.parse("http://www.google.com"); Intent it = new Intent(Intent.ACTION_VIEW, uri); startActivity(it); (3)显示地图 Uri uri = Uri.parse("geo:38.899533,-77.036476"); Intent it = newIntent(Intent.Action_VIEW,uri); startActivity(it); (4)拨打电话 Uri uri =Uri.parse("tel:xxxxxx"); Intent it = new Intent(Intent.ACTION_DIAL,uri); startActivity(it); (5)发短信 //方法1: Intent it = newIntent(Intent.ACTION_VIEW); it.putExtra("sms_body", "TheSMS text"); it.setType("vnd.android-dir/mms-sms"); startActivity(it); //方法2: Uri uri =Uri.parse("smsto:0800000123"); Intent it = newIntent(Intent.ACTION_SENDTO, uri); it.putExtra("sms_body", "TheSMS text"); startActivity(it); //方法三: String body="this is sms demo"; Intent mmsintent = newIntent(Intent.ACTION_SENDTO, Uri.fromParts("smsto", number, null)); mmsintent.putExtra(Messaging.KEY_ACTION_SENDTO_MESSAGE_BODY,body); mmsintent.putExtra(Messaging.KEY_ACTION_SENDTO_COMPOSE_MODE,true); mmsintent.putExtra(Messaging.KEY_ACTION_SENDTO_EXIT_ON_SENT,true); startActivity(mmsintent); (6)发 Email Uri uri = Uri.parse("mailto:xxx@abc.com"); Intent it = newIntent(Intent.ACTION_SENDTO, uri); startActivity(it); Intent it = new Intent(Intent.ACTION_SEND); it.putExtra(Intent.EXTRA_EMAIL,"me@abc.com"); it.putExtra(Intent.EXTRA_TEXT, "Theemail body text"); it.setType("text/plain"); startActivity(Intent.createChooser(it,"Choose Email Client")); Intent it=new Intent(Intent.ACTION_SEND); String[] tos={"me@abc.com"}; String[]ccs={"you@abc.com"}; it.putExtra(Intent.EXTRA_EMAIL, tos); it.putExtra(Intent.EXTRA_CC, ccs); it.putExtra(Intent.EXTRA_TEXT, "Theemail body text"); it.putExtra(Intent.EXTRA_SUBJECT, "Theemail subject text"); it.setType("message/rfc822"); startActivity(Intent.createChooser(it,"Choose Email Client")); Intent it = newIntent(Intent.ACTION_SEND); it.putExtra(Intent.EXTRA_SUBJECT, "Theemail subject text"); it.putExtra(Intent.EXTRA_STREAM,"file:///sdcard/mysong.mp3"); sendIntent.setType("audio/mp3"); startActivity(Intent.createChooser(it,"Choose Email Client")); (7)播放多媒体 Intent it = new Intent(Intent.ACTION_VIEW); Uri uri =Uri.parse("file:///sdcard/song.mp3"); it.setDataAndType(uri,"audio/mp3"); startActivity(it); Uri uri =Uri.withAppendedPath(MediaStore.Audio.Media.INTERNAL_CONTENT_URI,"1"); Intent it = new Intent(Intent.ACTION_VIEW,uri); startActivity(it); (8)卸载 apk Uri uri =Uri.fromParts("package", strPackageName, null); Intent it = newIntent(Intent.ACTION_DELETE, uri); startActivity(it); (9)安装 apk Uri installUri = Uri.fromParts("package","xxx", null); returnIt = newIntent(Intent.ACTION_PACKAGE_ADDED, installUri); Intent intent = new Intent(Intent.ACTION_VIEW); intent.setDataAndType(Uri.parse("file://" + filepath),"application/vnd.android.package-archive"); startActivity(intent);// 安装 (10)显示应用详细列表 Uri uri =Uri.parse("market://details?id=app_id"); Intent it = new Intent(Intent.ACTION_VIEW,uri); startActivity(it); //where app_id is the application ID, findthe ID //by clicking on your application on Markethome //page, and notice the ID from the addressbar //发现用package name也可以 //Uri uri =Uri.parse("market://details?id=<packagename>"); (11)寻找应用 Uri uri =Uri.parse("market://search?q=pname:pkg_name"); Intent it = new Intent(Intent.ACTION_VIEW,uri); startActivity(it); //where pkg_name is the full package pathfor an application (12)打开联系人列表 //1 Intent i = new Intent(); i.setAction(Intent.ACTION_GET_CONTENT); i.setType("vnd.android.cursor.item/phone"); startActivityForResult(i, REQUEST_TEXT); //2 Uri uri = Uri.parse("content://contacts/people"); Intent it = new Intent(Intent.ACTION_PICK, uri); startActivityForResult(it, REQUEST_TEXT); 这篇文章是转载的,出处在这 https://blog.csdn.net/aaa111/article/details/41833189,随着 Android 版本的提高,权限也有很多的变化,所以可能会有一些方法不能使用,不过这里可以作为参考。也算是弥补了以下基本知识。再说了,记不得 Google 不就 OK 了是吧。 愿我们成为真实的自己。

资源下载

更多资源
Mario

Mario

马里奥是站在游戏界顶峰的超人气多面角色。马里奥靠吃蘑菇成长,特征是大鼻子、头戴帽子、身穿背带裤,还留着胡子。与他的双胞胎兄弟路易基一起,长年担任任天堂的招牌角色。

腾讯云软件源

腾讯云软件源

为解决软件依赖安装时官方源访问速度慢的问题,腾讯云为一些软件搭建了缓存服务。您可以通过使用腾讯云软件源站来提升依赖包的安装速度。为了方便用户自由搭建服务架构,目前腾讯云软件源站支持公网访问和内网访问。

Nacos

Nacos

Nacos /nɑ:kəʊs/ 是 Dynamic Naming and Configuration Service 的首字母简称,一个易于构建 AI Agent 应用的动态服务发现、配置管理和AI智能体管理平台。Nacos 致力于帮助您发现、配置和管理微服务及AI智能体应用。Nacos 提供了一组简单易用的特性集,帮助您快速实现动态服务发现、服务配置、服务元数据、流量管理。Nacos 帮助您更敏捷和容易地构建、交付和管理微服务平台。

Rocky Linux

Rocky Linux

Rocky Linux(中文名:洛基)是由Gregory Kurtzer于2020年12月发起的企业级Linux发行版,作为CentOS稳定版停止维护后与RHEL(Red Hat Enterprise Linux)完全兼容的开源替代方案,由社区拥有并管理,支持x86_64、aarch64等架构。其通过重新编译RHEL源代码提供长期稳定性,采用模块化包装和SELinux安全架构,默认包含GNOME桌面环境及XFS文件系统,支持十年生命周期更新。

用户登录
用户注册