现存在一个问题,就下面图片中的两本书而言,怎样快速让中间边的书本与左边书本对齐(最终效果能实现两张图片重叠(最终结果为右图)),进行的图像转变可旋转、平移、缩放、形变。

本文主要内容就是介绍利用 Opencv 来怎样解决上面的问题,解决这个问题需要三步
图片旋转、平移、缩放等操作的主要目的,就是要最终实现两图像中点对点一一映射关系,图像映射本质上就是像素点转换

图中标记了其中四组对应点,分别标为不同的颜色,分别标为红、橙、黄和绿四种颜色;比如这里的![]() 和
和 ![]() 是就是一组对应点,图片经过转换之后 点 必须映射到 点位置。
是就是一组对应点,图片经过转换之后 点 必须映射到 点位置。
涉及图片中点坐标变换,都需要借助于 矩阵 运算,这里探究的图像维度都属于二维,坐标只需要 即可
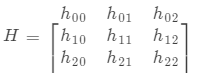
面向此类转换问题,Homography 转换 ( 3 × 3 矩阵) 可用于解决此类转化问题,用来解决点对点映射问题,Homography 矩阵可写作下列方式:
![]()
则 ![]() 、
、![]() 作为对应点,则 Homography 的的应用 如下:
作为对应点,则 Homography 的的应用 如下:
![]()
而矩阵 H 参数的确定至少需要 4 组对应点,因此在计算 H 时至少要找到 4 组对应点;找到的对应点组数越多,计算得到的 H 会越精确,最终的转换效果也就会越好。
下面用 Opencv + Python 来实现上面图片中的书籍的对齐,
import cv2
import numpy as np

if __name__ =='__main__':

    #图片读取
    img_src = cv2.imread("D:/book2.jpg")
    position_src = np.array([[141,131],[480,159],[493,630],[64,601]],dtype = float)

    img_dst = cv2.imread("D:/book1.jpg")
    position_dst = np.array([[318,256],[543,372],[316,670],[73,473]],dtype = float)

    #计算转换矩阵
    h,status = cv2.findHomography(position_src,position_dst)

    #对图片进行仿射变换
    out_img = cv2.warpPerspective(img_src,h,(img_dst.shape[1],img_dst.shape[0]))

    #Display images;
    cv2.imshow("Source image",img_src)
    cv2.imshow("Destination Image",img_dst)
    cv2.imshow("Warped Source Image",out_img)

    cv2.waitKey(0)
这里事先已经确定好对应的四个点的坐标,然后把这四个点的坐标带入 cv2.findHomography() 计算出转换矩阵,最后把矩阵应用到两图像中,得到最终的转换结果,

这里提醒一点,warpPerspective 函数进行对图像像素进行矩阵变换时,隐藏了一个参数 Interpolator ,默认为线性插值,功能是防止像素点像素值缺失
上面小案例不方便的一点需要确定对应四个点的坐标,这个步骤是比较繁琐的,下面案例将在程序中加入交互功能,实现某个图片的自动标记点收集、标记点点转换:

首先需要准备两张图片,其中一张为海报,一张为需要替换的海报;关于确定点的坐标时,被替换的图片的坐标非常好确定,只需知道图片的长宽即可;
但的海报图像区域四个点是不好确定的, 这里利用 Opencv 的鼠标回调函数,监视鼠标响应,根据用户点击来收集 PIck 得到的坐标;
def mouse_handler(event,x,y,flags,data):
    if event ==cv2.EVENT_LBUTTONDOWN:
        cv2.circle(data['im'],(x,y),3,(0,0,255),5,16)
        cv2.namedWindow("Image",0)
        cv2.imshow("Image",data['im'])
        if len(data['points']) <4:
            data['points'].append([x,y])

def get_four_points(im):

    data = {}
    data['im'] = im.copy()
    data['points'] = []
    # Set the callback function for any mouse event
    cv2.namedWindow("Image", 0)
    cv2.imshow('Image',im)
    #请注意你标记点的数据,是顺时针,需要与pst_src 方向一致
    cv2.setMouseCallback("Image",mouse_handler,data)
    cv2.waitKey(0)
    # Convert array to np.array
    #竖直方向堆叠起来;;;
    points = np.vstack(data['points']).astype(float)
    return points
坐标确定以后,接下来就很简单了,跟上个案例一样,计算变换矩阵,矩阵应用到图像旋转,最终更换海报内容也就轻松完成啦
![]()
需要注意一点,坐标 Pick 点的顺序须与记录替换图像顶点顺序一致,否则转换图会有偏差,案例完整代码如下:
if __name__ =='__main__':

    img_src = cv2.imread("D:/first-image.jpg")
    size = img_src.shape
    # 取得四个坐标
    pst_src = np.array(
        [
            [0,0],[size[1]-1,0],
            [size[1]-1,size[0]-1],
            [0,size[0]-1]
         ],dtype=float
    )

    #Read the destination image
    img_dst = cv2.imread("D:/times-square.jpg")

    print("Click on four corners of bllboard and the press ENTER")
    four_point  = get_four_points(img_dst)

    # Calculate  Homography between  source and destination points
    h,status = cv2.findHomography(pst_src,four_point)

    im_temp = cv2.warpPerspective(img_src,h,(img_dst.shape[1],img_dst.shape[0]))

    cv2.fillConvexPoly(img_dst,four_point.astype(int),0,16)

    #add wraped source image to destination image

    img_dst = img_dst + im_temp
    cv2.namedWindow("Image", 0)
    cv2.imshow("Image",img_dst)
    cv2.waitKey(0)