首页 文章 精选 留言 我的

精选列表

搜索[centos6],共273篇文章
优秀的个人博客,低调大师

CentOS8,CentOS7,CentOS6编译安装Redis5.0.7

安装准备 1.编译环境准备 sh 复制代码 yum -y install gcc tcl 注:已经安装就无需重复操作 2.下载Redis 下载地址:http://www.redis.io/download 安装 1.解压到指定目录 如:/data0/redis sh 复制代码 tar -zxvf redis-5.0.7.tar.gz 2.编译安装 进入解压后的目录 sh 复制代码 cd /data0/redis/redis-5.0.7 编译安装 sh 复制代码 make PREFIX=/data0/redis install 注:/data0/redis为安装目录 安装结果 3.配置Redis...

优秀的个人博客,低调大师

centos6搭建elk

ELK由Elasticsearch、Logstash和Kibana三部分组件组成; Elasticsearch是个开源分布式搜索引擎,它的特点有:分布式,零配置,自动发现,索引自动分片,索引副本机制,restful风格接口,多数据源,自动搜索负载等。 Logstash是一个完全开源的工具,它可以对你的日志进行收集、分析,并将其存储供以后使用 kibana 是一个开源和免费的工具,它可以为 Logstash 和 ElasticSearch 提供的日志分析友好的 Web 界面,可以帮助您汇总、分析和搜索重要数据日志。 四大组件 Logstash: logstash server端用来搜集日志; Elasticsearch: 存储各类日志; Kibana: web化接口用作查寻和可视化日志; Logstash Forwarder: logstash client端用来通过lumberjack 网络协议发送日志到logstash server; 实验环境 centos6.5_x64 实验软件 jdk elasticsearch-1.4.2.tar.gz master.tar.gz logstash-1.4.2.tar.gz kibana-3.1.2.tar.gz 软件安装 yum install -y java-1.7.0-openjdk* java -version java version "1.7.0_111" OpenJDK Runtime Environment (rhel-2.6.7.2.el6_8-x86_64 u111-b01) OpenJDK 64-Bit Server VM (build 24.111-b01, mixed mode) tar zxvf elasticsearch-1.4.2.tar.gz mv elasticsearch-1.4.2 /usr/local/ ln -s /usr/local/elasticsearch-1.4.2 /usr/local/elasticsearc tar zxvf master.tar.gz mv elasticsearch-servicewrapper-master/service/ /usr/local/elasticsearch/bin/ /usr/local/elasticsearch/bin/service/elasticsearch start Starting Elasticsearch... Waiting for Elasticsearch...... running: PID:2496 netstat -tuplna | grep 9300 tcp 0 0 :::9300 :::* LISTEN 2498/java tcp 0 0 ::ffff:192.168.31.103:44390 ::ffff:192.168.31.103:9300 ESTABLISHED 2498/java ps -ef | grep 9300 root 2566 2161 0 20:04 pts/0 00:00:00 grep 9300 curl -X GET http://localhost:9200 { "status" : 200, "name" : "Time Bomb", "cluster_name" : "elasticsearch", "version" : { "number" : "1.4.2", "build_hash" : "927caff6f05403e936c20bf4529f144f0c89fd8c", "build_timestamp" : "2014-12-16T14:11:12Z", "build_snapshot" : false, "lucene_version" : "4.10.2" }, "tagline" : "You Know, for Search" } tar zxvf logstash-1.4.2.tar.gz mv logstash-1.4.2 /usr/local/ ln -s /usr/local/logstash-1.4.2 /usr/local/logstash /usr/local/logstash/bin/logstash -e 'input { stdin { } } output { stdout {} }' mkdir -p /usr/local/logstash/etc vim /usr/local/logstash/etc/hello_search.conf 默认没有这个配置文件需要手动编辑 input stdin { type => "human" } } output { stdout { codec => rubydebug } elasticsearch { host => "192.168.31.243" port => 9300 } } /usr/local/logstash/bin/logstash -f /usr/local/logstash/etc/hello_search.conf & { "message" => "hello word", "@version" => "1", "@timestamp" => "2016-09-24T12:40:42.081Z", "type" => "human", "host" => "0.0.0.0" } tar zxvf kibana-3.1.2.tar.gz mv kibana-3.1.2 /var/www/html/kibana vim /var/www/html/kibana/config.js elasticsearch: "http://"+window.location.hostname+":9200" elasticsearch: "http://192.168.31.243:9200",修改为 vim /usr/local/elasticsearch/config/elasticsearch.yml http.cors.enabled: true 配置文件最后加载一行 /usr/local/elasticsearch/bin/service/elasticsearch restart 重启读取配置文件 service httpd restart vim /usr/local/logstash/etc/logstash_agent.conf input { file { type => "http.access" path => ["/var/log/httpd/access_log"] } file { type => "http.error" path => ["/var/log/httpd/error_log"] } file { type => "messages" path => ["/var/log/messages"] } } output { elasticsearch { host => "192.168.31.243" port => 9300 } nohup /usr/local/logstash/bin/logstash -f /usr/local/logstash/etc/logstash_agent.conf & ps -ef | grep 9292 root 10834 2682 0 21:03 pts/1 00:00:00 grep 9292 ps -ef | grep 9300 root 10838 2682 0 21:04 pts/1 00:00:00 grep 9300 ps -ef | grep 9200 root 10840 2682 0 21:04 pts/1 00:00:00 grep 9200 http://服务端ip/kibana 本文转自 mailfile 51CTO博客,原文链接:http://blog.51cto.com/mailfile/1856217,如需转载请自行联系原作者

优秀的个人博客,低调大师

centos6搭建私有云

网盘,又叫“云存储”。国内的有百度云、华为网盘等。云,分公有云和私有云以及混合云。 实验环境 centos6.9_x64 实验软件 latest.rpm owncloud-7.0.2.tar.bz2 软件安装 wgethttp://mirror.webtatic.com/yum/el6/latest.rpm rpm -ivh latest.rpm yum clean all yum makecache -y yum -y install httpd mysql mysql-server yum -y install httpd-manual mod_ssl mod_perl mod_auth_mysql yum -y install php55w php55w-bcmath php55w-cli php55w-common php55w-devel php55w-fpm php55w-gd php55w-imap php55w-ldap php55w-mbstring php55w-mcrypt php55w-mysql php55w-odbc php55w-pdophp55w-pearphp55w-pecl-igbinary php55w-xml php55w-xmlrpc php55w-opcache php55w-intl php55w-pecl-memcache service mysqld restart mysqladmin -uroot password数据库密码 mysql -uroot -p数据库密码 Welcome to the MySQLmonitor. Commands end with ; or \g. Your MySQL connection idis 3 Server version: 5.1.73Source distribution Copyright (c) 2000, 2013,Oracle and/or its affiliates. All rights reserved. Oracle is a registeredtrademark of Oracle Corporation and/or its affiliates. Other namesmay be trademarks of their respective owners. Type 'help;' or '\h' forhelp. Type '\c' to clear the current input statement. mysql> vim /etc/httpd/conf/httpd.conf #ServerNamewww.example.com:80 ServerName *:80 #AddTypeapplication/x-tar .tgz #AddTypeapplication/x-tar .tgz AddType application/x-tar.tgz AddType application/x-httpd-php .php <Directory /> Options FollowSymLinks AllowOverride None </Directory> <Directory /> Options FollowSymLinks AllowOverride All </Directory> touch /var/www/html/test.php vim /var/www/html/test.php <?php phpinfo(); ?> service httpd restart (生产环境建议使用reload) mysql -uroot -p数据库密码 mysql> create database ownclouddb; Query OK, 1 rowaffected (0.00 sec) mysql> GRANT ALL ON ownclouddb.* TO ownclouduser@localhost IDENTIFIED BY '123456'; 123456为数据库密码 Query OK, 0 rowsaffected (0.01 sec) mysql> flush privileges; Query OK, 0 rowsaffected (0.00 sec) mysql -uownclouduser -p数据库密码 Welcome to the MySQLmonitor. Commands end with ; or \g. Your MySQL connection idis 5 Server version: 5.1.73Source distribution Copyright (c) 2000, 2013,Oracle and/or its affiliates. All rights reserved. Oracle is a registeredtrademark of Oracle Corporation and/or its affiliates. Other namesmay be trademarks of their respective owners. Type 'help;' or '\h' forhelp. Type '\c' to clear the current input statement. mysql> http://192.168.1.128/test.php tar xvf owncloud-7.0.2.tar.bz2 mv owncloud /var/www/html/ chown -R apache:apache /var/www/html/owncloud/ chmod -R 777 /var/www/html/owncloud/ http://服务器ip/owncloud/ vim /etc/php.ini ; This directive allows you to disable certain classes for security reasons. ; It receives a comma-delimited list of class names. This directive is ; *NOT* affected by whether Safe Mode is turned On or Off. ; http://php.net/disable-classes disable_classes =删除此行 本文转自 mailfile 51CTO博客,原文链接:http://blog.51cto.com/mailfile/1933216,如需转载请自行联系原作者

优秀的个人博客,低调大师

centos6 - elk基础入门搭建

1 2 3 4 5 6 7 [root@host-192-168-53-108~] #rm-rf/etc/yum.repos.d/* [root@host-192-168-53-108~] #wget-O/etc/yum.repos.d/CentOS-Base.repohttp://mirrors.aliyun.com/repo/Centos-6.repo [root@host-192-168-53-108~] #yumcleanall [root@host-192-168-53-108~] #yum-yinstalljava-1.8.0-openjdk* [root@host-192-168-53-108~] #wgethttps://artifacts.elastic.co/downloads/elasticsearch/elasticsearch-5.5.0.rpm [root@host-192-168-53-108~] #rpm-ivhelasticsearch-5.5.0.rpm [root@host-192-168-53-108~] #chkconfig--addelasticsearch 1 2 [root@host-192-168-53-108~] #cat/etc/hosts 192.168.53.108elk1 1 2 3 4 5 6 7 8 9 [root@host-192-168-53-108~] #cat/etc/elasticsearch/elasticsearch.yml node.name:elk1 network.host:192.168.53.108 http.port:9200 bootstrap.memory_lock: false bootstrap.system_call_filter: false discovery.zen. ping .unicast.hosts:[elk1] http.cors.enabled: true http.cors.allow-origin: "*" 1 2 3 4 [root@host-192-168-53-108~] #cat/etc/elasticsearch/jvm.options|grep-v'^#'|grep-v^$ #修改 -Xms6g -Xmx6g 1 2 3 4 5 [root@host-192-168-53-108~] #vim/etc/security/limits.conf *softnofile1000000 *hardnofile1000000 *softnproc1000000 *hardnproc1000000 1 2 3 [root@host-192-168-53-108~] #cat/etc/security/limits.d/90-nproc.conf *softnproc100000 rootsoftnprocunlimited 1 2 3 4 5 6 [root@host-192-168-53-108~] #cd/usr/local/ [root@host-192-168-53-108 local ] #gitclonegit://github.com/mobz/elasticsearch-head.git [root@host-192-168-53-108 local ] #wgethttps://nodejs.org/dist/v8.2.0/node-v8.2.0-linux-x64.tar.gz--no-check-certificate [root@host-192-168-53-108 local ] #tarzxfnode-v8.2.0-linux-x64.tar.gz [root@host-192-168-53-108 local ] #ln-s/usr/local/node-v8.2.0-linux-x64/bin/node/usr/sbin/node [root@host-192-168-53-108 local ] #ln-s/usr/local/node-v8.2.0-linux-x64/bin/npm/usr/sbin/npm 1 2 3 4 5 #设置npm代理镜像 [root@host-192-168-53-108 local ] #npmconfigsetregistryhttps://registry.npm.taobao.org [root@host-192-168-53-108 local ] #npminstall-ggrunt [root@host-192-168-53-108 local ] #ln-s/usr/local/node-v8.2.0-linux-x64/lib/node_modules/grunt/bin/grunt/usr/sbin/grunt [root@host-192-168-53-108 local ] #cdelasticsearch-head/ 1 2 3 4 5 6 7 8 9 10 11 12 13 14 15 16 17 18 19 [root@host-192-168-53-108elasticsearch- head ] #npminstall Errormakingrequest. Error:connectETIMEDOUT52.216.1.0:443 atObject.exports._errnoException(util.js:1024:11) atexports._exceptionWithHostPort(util.js:1047:20) atTCPConnectWrap.afterConnect[asoncomplete](net.js:1150:14) Pleasereportthisfulllogathttps: //github .com /Medium/phantomjs npmWARNelasticsearch- head @0.0.0licenseshouldbeavalidSPDXlicenseexpression npmWARNoptionalSKIPPINGOPTIONALDEPENDENCY:fsevents@1.1.2(node_modules /fsevents ): npmWARNnotsupSKIPPINGOPTIONALDEPENDENCY:Unsupportedplatform for fsevents@1.1.2:wanted{ "os" : "darwin" , "arch" : "any" }(current:{ "os" : "linux" , "arch" : "x64" }) npmERR!codeELIFECYCLE npmERR!errno1 npmERR!phantomjs-prebuilt@2.1.14 install :`node install .js` npmERR!Exitstatus1 npmERR! npmERR!Failedatthephantomjs-prebuilt@2.1.14 install script. npmERR!Thisisprobablynotaproblemwithnpm.Thereislikelyadditionalloggingoutputabove. npmERR!Acompletelogofthisruncanbefound in : npmERR! /root/ .npm /_logs/2017-07-26T11_29_47_063Z-debug .log 1 2 [root@host-192-168-53-108elasticsearch- head ] #npminstallphantomjs-prebuilt@2.1.14--ignore-scripts [root@host-192-168-53-108elasticsearch- head ] #npminstall 1 2 3 4 [root@host-192-168-53-108elasticsearch- head ] #vim/usr/local/elasticsearch-head/_site/app.js #把localhost改为ip this.base_uri=this.config.base_uri||this.prefs.get( "app-base_uri" )|| "http://localhost:9200" ; this.base_uri=this.config.base_uri||this.prefs.get( "app-base_uri" )|| "http://192.168.53.108:9200" ; 1 2 3 4 5 6 7 8 9 10 11 [root@host-192-168-53-108elasticsearch- head ] #vim/usr/local/elasticsearch-head/Gruntfile.js connect:{ server:{ options:{ hostname : "0.0.0.0" , #添加此行 port:9100, base: '.' , keepalive: true } } } 1 2 3 4 [root@host-192-168-53-108elasticsearch- head ] #gruntserver& [root@host-192-168-53-108elasticsearch- head ] #echo"cd/usr/local/elasticsearch-head;gruntserver&">>/etc/rc.local [root@host-192-168-53-108elasticsearch- head ] #cd [root@host-192-168-53-108~] #wgethttps://artifacts.elastic.co/downloads/logstash/logstash-5.5.0.rpm 1 2 3 4 5 6 7 8 9 10 11 12 13 14 15 [root@host-192-168-53-108~] #vim/etc/logstash/conf.d/system.conf input{ file { path=> "/var/log/messages" type => "systemlog" start_position=> "beginning" stat_interval=> "2" } } output{ elasticsearch{ hosts=>[ "192.168.53.108:9200" ] index=> "logstash-systemlog-%{+YYYY.MM.dd}" } } 1 [root@host-192-168-53-108~] #/usr/share/logstash/bin/logstash-f/etc/logstash/conf.d/system.conf 1 2 #在Elasticsearch中查看 #浏览器访问http://192.168.53.108:9100/选择基本查询搜素 1 2 [root@host-192-168-53-108~] #wgethttps://artifacts.elastic.co/downloads/kibana/kibana-5.5.0-x86_64.rpm [root@host-192-168-53-108~] #rpm-ivhkibana-5.5.0-x86_64.rpm 1 2 3 4 [root@host-192-168-53-108~] #cat/etc/kibana/kibana.yml|grep-v'^#'|grep-v^$ server.port:5601 server.host: "0.0.0.0" elasticsearch.url: "http://elk1:9200" 1 2 [root@host-192-168-53-108~] #/etc/init.d/kibanastart [root@host-192-168-53-108~] #chkconfig--addkibana 本文转自谢无赖51CTO博客,原文链接:http://blog.51cto.com/xieping/1951765,如需转载请自行联系原作者

优秀的个人博客,低调大师

centos6搭建本地openstack软件源

1、把相关软件包所有下载到本地机器 wget -np -nH –cut-dirs=1 -r -c -L –exclude-directories=repodata –accept=rpm,gz,xml http://repos.fedorapeople.org/repos/openstack/openstack-icehouse/epel-6/ -P /opt/epel6 wget參数介绍 -r,–recursive 下载整个站点、文件夹 -nH, –no-host-directories 不创建主机文件夹 -P, –directory-prefix=PREFIX 将文件保存到文件夹PREFIX/… –cut-dirs=NUMBER 忽略 NUMBER层远程文件夹 -k, –convert-links 转换非相对链接为相对链接 -I, –include-directories=LIST 同意文件夹的列表 -X, –exclude-directories=LIST 不被包括文件夹的列表 -np, –no-parent 不要追溯到父文件夹 -A, –accept=LIST 分号分隔的被接受扩展名的列表 -R, –reject=LIST 分号分隔的不被接受的扩展名的列表 -c, –continue 接着下载没下载完的文件 -L, –relative 只跟踪相对链接 2、创建repodata信息 createrepo -p -d -o /opt/epel6 /opt/epel6 3、配置httpserver。将根文件夹指到/opt/epel6 yum install -y httpd rm -rf /var/www/html ln -s /opt/epel6/var/www/html service httpd start 4. 创建rdo-release.repo文件[openstack-icehouse] name=OpenStack Icehouse Repository baseurl=http://10.0.0.137/epel6/ enabled=1 gpgcheck=05、把生成的rdo-release.repo文件传到client的/etc/yum.repos.d/文件夹下,就可以 本文转自mfrbuaa博客园博客,原文链接:http://www.cnblogs.com/mfrbuaa/p/5075570.html,如需转载请自行联系原作者

优秀的个人博客,低调大师

烂泥:centos6 yum方式升级内核

最近没有时间好久没有写文章了,今天由于需要安装docker学习虚拟容器的知识,需要升级OS的内核。目前我这边使用的OS是centos6.5,内核是2.6版本的,如下: cat /etc/issue uname -r 因为docker的使用需要3.0以上内核的支持,当然也是可以使用2.6的内核,当时可能会出现不可控制的问题,所以需要我们升级内核版本。 要升级内核OS到3.1以上,需要以下几个步骤。 一、安装elrepo的yum源 升级内核需要使用elrepo的yum源,在安装yum源之前还需要我们导入elrepo的key,如下: rpm --import https://www.elrepo.org/RPM-GPG-KEY-elrepo.org rpm -Uvh http://www.elrepo.org/elrepo-release-6-6.el6.elrepo.noarch.rpm elrepo的key安装完毕后,我们下面开始正式升级内核。 二、升级内核 在yum的elrepo源中有ml和lt两种内核,其中ml(mainline)为最新版本的内核,lt为长期支持的内核。 如果要安装ml内核,使用如下命令: yum --enablerepo=elrepo-kernel -y install kernel-ml 如果要安装lt内核,使用如下命令: yum --enablerepo=elrepo-kernel -y install kernel-lt 在此我们安装的是lt内核,如下: 内核升级完毕后,不会立即生效,还需要我们修改grub.conf文件。 三、修改grub.conf文件 内核升级完毕后,需要我们修改内核的启动顺序,默认启动的顺序应该为1,升级以后内核是往前面插入为0,如下: vim /etc/grub.conf default=0 四、重启系统并查看系统内核 grub.conf文件修改完毕后,还需要重启系统,如下: shutdown -r now 系统启动完毕后,我们来查看内核版本,如下: uname -r 通过上图,我们可以很容易的看出centos6.5已经升级内核到3.10版本。 本文转自 烂泥行天下 51CTO博客,原文链接:http://blog.51cto.com/ilanni/1881565

优秀的个人博客,低调大师

memcached--------基于centos6源码安装

1. 背景 许多Web应用程序都将数据保存到RDBMS中,应用服务器从中读取数据并在浏览器中显示。但随着数据量的增大,访问的集中,就会出现REBMS的负担加重,数据库响应恶化,网站显示延迟等重大影响。Memcached是高性能的分布式内存缓存服务器。一般的使用目的是通过缓存数据库查询结果,减少数据库的访问次数,以提高动态Web应用的速度、提高扩展性。如图: Memcached作为高速运行的分布式缓存服务器具有以下特点。 1. 协议简单 memcached的服务器客户端通信并不使用复杂的MXL等格式,而是使用简单的基于文本的协议。 2. 基于libevent的事件处理 libevent是个程序库,他将Linux的epoll、BSD类操作系统的kqueue等时间处理功能封装成统一的接口。memcached使用这个libevent库,因此能在Linux、BSD、Solaris等操作系统上发挥其高性能。 3. 内置内存存储方式 为了提高性能,memcached中保存的数据都存储在memcached内置的内存存储空间中。由于数据仅存在于内存中,因此重启memcached,重启操作系统会导致全部数据消失。另外,内容容量达到指定的值之后memcached回自动删除不适用的缓存。 4. Memcached不互通信的分布式 memcached尽管是“分布式”缓存服务器,但服务器端并没有分布式功能。各个memcached不会互相通信以共享信息。他的分布式主要是通过客户端实现的。 5. Memcached的内存管理 最近的memcached默认情况下采用了名为Slab Allocatoion的机制分配,管理内存。在改机制出现以前,内存的分配是通过对所有记录简单地进行malloc和free来进行的。但是这中方式会导致内存碎片,加重操作系统内存管理器的负担。 Slab Allocator的基本原理是按照预先规定的大小,将分配的内存分割成特定长度的块,已完全解决内存碎片问题。Slab Allocation的原理相当简单。将分配的内存分割成各种尺寸的块(chucnk),并把尺寸相同的块分成组(chucnk的集合)如图: 而且slab allocator还有重复使用已分配内存的目的。也就是说,分配到的内存不会释放,而是重复利用。 Slab Allocation的主要术语 Page :分配给Slab的内存空间,默认是1MB。分配给Slab之后根据slab的大小切分成chunk. Chunk :用于缓存记录的内存空间。 Slab Class:特定大小的chunk的组。 2. 环境 3. 安装(下载源码包全部放至/usr/local/src目录下,先cd切换到/usr/local/src目录下工作) 安装libevent(memcache网络库部分基于libevent库开发,解决了不同平台的差异性) 下载:wgethttps://github.com/libevent/libevent/releases/download/release-2.1.8-stable/libevent-2.1.8-stable.tar.gz 解压: tar xf libevent-2.1.8-stable.tar.gz 进入目录: cd libevent-2.1.8-stable 安装: ./configure --prefix=/usr/local/libevent-2.1.8 && make && make install 做软链接 ln -s /usr/local/libevent-2.1.8 /usr/local/libevent 安装memcached 下载: wgethttp://www.memcached.org/files/memcached-1.4.35.tar.gz 解压: tar xf memcached-1.4.35.tar.gz 进入目录: cd memcached-1.4.35 编译安装:./configure --prefix=/usr/local/memcached-1.4.35--with-libevent=/usr/local/libevent && make && make install 做软链接: ln -s /usr/local/memcached-1.4.35 /usr/local/memcached 创建系统用户, 并且不创建家目录 useradd -r -s /sbin/nologin -M memcached 编辑并添加memcached启动脚本(当前路径还在memcached-1.4.35源码包目录里) 进入脚本目录: cd scripts 复制脚本至init.d目录下: cp memcached.sysv /etc/init.d/memcached 创建memcached运行目录, 并改变其用户与用户组为memcached mkdir /var/run/memcached chown memcached.memcached /var/run/memcached 编辑脚本: (/etc/init.d/memcached) daemon memcached -d -p $PORT -u $USER -m $CACHESIZE -c $MAXCONN -P /var/run/memcached/memcached.pid $OPTIONS 改为 daemon /usr/local/memcached/bin/memcached -d -p $PORT -u $USER -m $CACHESIZE -c $MAXCONN -P /var/run/memcached/memcached.pid $OPTIONS (可选)删除脚本中以下内容 PORT=11211 USER=nobody MAXCONN=1024 CACHESIZE=64 OPTIONS="" 创建参数脚本并添加参数 创建touch /etc/sysconfig/memcached 更改用户与用户组 chown memcached.memcached /etc/sysconfig/memcached 添加内容 PORT=11211 USER=memcached MAXCONN=1024 CACHESIZE=64 OPTIONS="-l 0.0.0.0,::1" 将memcached添加进service管理,并开机启动 chkconfig --add memcached chkconfig memcached on 4. 测试 启动: /etc/init.d/memcached start 或者 service memcached start 启动成功 5. 连接(通过telnet测试连接) telnet 127.0.0.1 11211 6. 总结 以需求驱动技术,技术本身没有优略之分,只有业务之分。

优秀的个人博客,低调大师

停止维护的CentOS6,怎么使用yum?

距离CentOS 6在2020年11月结束进入EOL(Reaches End of Life)已经有大半年时间了,由于历史原因,还有一些项目无法迁移到7+系统,但是yum源还需要用,而官方于2020年12月2日已经正式将CentOS 6相关的软件源移出官方源,随后各个镜像站也逐渐将其删除 目前使用yum已经无法正常更新,资源都是404 官方给提供了一个vault的源,提供历史所有发行的CentOS版本镜像,但是官方使用的是aws北美的服务,使用体验很差,国内阿里、腾讯也都提供vault源,国内使用更方便 CentOS官方:https://vault.centos.org/ 阿里云镜像:https://mirrors.aliyun.com/centos-vault/ 腾讯云镜像:https://mirrors.cloud.tencent.com/centos-vault 现在需要手动修改CentOS-Base.repo,在CentOS-Base.repo中,有三个地方需要修改,原本的CentOS-Base.repo中,目录是centos,需要替换为centos-vault $releasever原本是表示当前系统的发行版本的,通常只有大版本号,也就是6,这里需要根据自己的系统版本,修改,通过cat /etc/redhat-release查看 $basearch原本是系统硬件架构,i386、x86_64、arm等,通常不需要修改,需要查看的话,可以通过arch命令查看 通过批量修改,把centos改为centos-vault,$releasever改为版本号比如6.10,保存CentOS-Base.repo,之后执行yum clean all清除之前的yum缓存,重新yum makecache 现在yum源可以正常工作了,但是只能保证基本的使用,毕竟已经失去官方的更新和维护,所以最好还是尽快更新到新版本 另外,如果觉得阿里、腾讯源不可靠,哪天关闭了不可用,可以自己做一个本地的源,如何同步在http://vault.centos.org/readme.txt中有详细的说明,在本地创建一个需要同步的目录,然后执行下面的命令即可自动同步 rsync -a -v --exclude=debug --exclude=x86_64 rsync://archive.kernel.org/centos-vault/6.10/ /data/centos-vault/6.10/ 因为是国外的资源,所以同步时间和稳定性取决于自己的网络情况,之后可以通过定时任务进行自动同步更新 话题 你常用的第三方yum源有哪些?epel?remi?centalt?rpmforge?Percona?webmin? 欢迎文末留言 运维技术交流群 「运维研习社」建立了运维技术交流群,大家可以添加小编微信进行加群。欢迎有想法、乐于分享的朋友们一起进群交流学习。 扫描添加好友邀您进运维交流群 ●DevOps中你是否漏了这一环? ●他清除了我的历史命令 ●漫画Nginx的subfilter ●没有lrzsz,怎么传文件到服务器? 本文分享自微信公众号 - 运维研习社(gh_4135e2716ad3)。如有侵权,请联系 support@oschina.cn 删除。本文参与“OSC源创计划”,欢迎正在阅读的你也加入,一起分享。

优秀的个人博客,低调大师

centos6 docker1.7 存储方式修改

自己生成docker存储 lvm创建docker存储 1 lvcreate-L4G-ndocker-poolmeta /dev/VolGroup00 1 lvcreate-L200G-ndocker-pool /dev/VolGroup00 转换lvm格式 1 lvconvert-- type thin-pool--poolmetadataVolGroup00 /docker-poolmeta VolGroup00 /docker-pool 三种方式启动,随你喜欢 命令行启动 1 /usr/bin/docker -d-Hunix: ///var/run/docker .sock--storage-driver=devicemapper--storage-optdm.fs=ext4--storage-optdm.thinpooldev= /dev/mapper/VolGroup00-docker--pool 修改 init的docker 改为如下格式 /etc/init.d/docker 1 $ exec -d-Hunix: ///var/run/docker .sock--storage-driver=devicemapper--storage-optdm.fs=ext4--storage-optdm.thinpooldev= /dev/mapper/VolGroup00-docker--pool &>>$logfile& 配置文件启动 vi /etc/sysconfig/docker 1 2 3 4 docker_own= "root:dockerroot" docker_sock= "/var/run/docker.sock" docker_listen= "0.0.0.0:2375" other_args= "-Hunix://$docker_sock-H$docker_listen--storage-driver=devicemapper--storage-optdm.fs=ext4--storage-optdm.thinpooldev=/dev/mapper/VolGroup00-docker--pool" 本文转自银狐博客51CTO博客,原文链接http://blog.51cto.com/foxhound/1834851如需转载请自行联系原作者 战狐

优秀的个人博客,低调大师

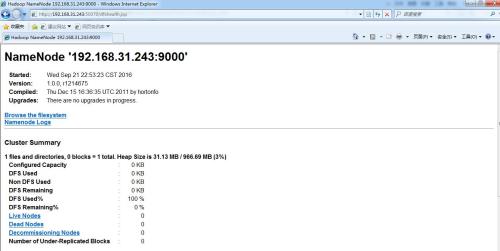
centos6 多段Ip添加shell脚本

#!/bin/bash export device=`ifconfig|grep eth0|head -n 1|awk '{print ($1)}'` export ipcfg_pre="/etc/sysconfig/network-scripts/ifcfg-eth1-range" awktmp=`mktemp` msg=`mktemp` ip_txt=`mktemp` ifcfgs="$(find ${ipcfg_pre%/*} -name ${ipcfg_pre##*/}*)" if test ! -z "$ifcfgs";then echo "发现如下已有配置文件是否删除(yes/no)?" echo "$ifcfgs" select var in "yes" "no" do if test "$var" = "yes";then rm -f $ifcfgs break; else break; fi done fi #脚本保存进 临时文件 不再使用a.awk文件。 cat >$awktmp <<EOF #!/usr/bin/awk -f BEGIN{ ipcfg_pre="${ipcfg_pre}" #你需要修改 ipcfg_pre 为自己的路径前缀 device=ENVIRON["device"] clone_num=1; numofpc[24]=253 numofpc[24]=125 numofpc[26]=61 numofpc[27]=29 numofpc[28]=13 numofpc[29]=5 } function ip_str(iplist){ return sprintf("%s.%s.%s.%s",ip_list[1],ip_list[2],ip_list[3],ip_list[4]); } function gen_mask(num,mask_bin, _ARGVEND_,sum,bits){ #把掩码由数字转换成数组 _i=1; mask_bin[1]=0; for (;_i*8 <=num && _i<=4;_i++){ mask_bin[_i]=255; } bits=num-(_i-1)*8; sum=0; for(;bits>0;bits--){ sum=sum+2^(8-bits); } mask_bin[_i]=sum; _i++; for(;_i<=4;_i++){ mask_bin[_i]=0; } } { ipfile=sprintf("%s%s",ipcfg_pre,NR); split(\$0,ip,"/"); ip_mask=ip[2]; split(ip[1],ip_list,"."); #ip_list 列表保存了 ip 的四个 字节值 ip_start=ip_list[4]+2; ip_end=ip_start+numofpc[ip_mask]-1; printf("DEVICE=%s\n",device)>ipfile printf("BOOTPROTO=static\n")>>ipfile printf("CLONENUM_START=%d\n",clone_num)>>ipfile ip_list[4]=ip_start; printf("IPADDR_START=%s\n",ip_str(ip_list))>>ipfile ip_list[4]=ip_end; printf("IPADDR_END=%s\n",ip_str(ip_list))>>ipfile clone_num+=numofpc[ip_mask]; printf("ONBOOT=yes\n")>>ipfile gen_mask(ip_mask,ip_list) netmask=ip_str(ip_list) printf("NETMASK=%s\n",netmask)>>ipfile } EOF chmod a+x $awktmp msg=`mktemp` cat >$msg <<EOF 请输入IP地址和掩码每行一行(不可出现空白行) 如: 45.34.89.40/29 23.91.3.0/28 23.91.8.32/28 23.91.18.160/28 23.91.28.128/28 EOF vi +":!cat $msg" $ip_txt #service network restart test -e $ip_txt && awk -f $awktmp $ip_txt service network restart rm -f $awktmp $msg $ip_txt rm -f ipcfg.sh ===================================================== 此脚本只适用于 45.34.89.40/29 23.91.3.0/28 23.91.8.32/28 23.91.18.160/28 23.91.28.128/28 这种格式IP段添加,请注意脚本网卡名称和机器网卡名称是否一致 使用方法,命名为ipcfg.sh 1. 会提示IP文件是否已经存在,让选择是否删除。我们只用于第一次添加。尽量不要去补充添加。 2. 按回车键,然后按 i 进入编辑模式,输入IP段。iP段一个一行,不要有空格。 保存。

优秀的个人博客,低调大师

Linux CentOS6编译安装Python2.7

CentOS6.x系统中一直沿用的都是Python2.6.x(目前最新版本是python-2.6.6),有时不能满足某些应用生产环境和开发环境的需要,直接从yum官方仓库和epel中安装Python2.7(目前最新版本是python-2.7.12)似乎也是没有什么可能,除非使用更三方的软件源。CentOS6.x系统中有很多系统组件是使用Python2.6的,比如刚才提到的yum,但yum不一定是唯一依赖Python2.6的程序,尽管一般的生产环境中不会使用到特别混杂的运行环境,但在使用的过程中需要留意某些工具&程序是否能在Python2.7下正常运行。 安装Python2.7.x实际上非常简单,唯一需要了解的是,编译安装Python2.7.x时必须将使用--enable-shared (enable building shared python library)选项用来安装python动态链接库(share object, /usr/lib64/libpython2.7.so.1.0),这一文件会被很多python模块(甚至python本身)所用到,当没有使用这一选项时可以加上这个选项重新编译Python,步骤见下文。 下载地址:https://www.python.org/downloads/ wget-chttps://www.python.org/ftp/python/2.7.12/Python-2.7.12.tgz wget-chttps://www.python.org/ftp/python/2.7.12/Python-2.7.12.tgz.asc wgethttps://www.python.org/static/files/pubkeys.txt gpg--importpubkeys.txt gpg--recv-keys6A45C816365802887D9DC8D218ADD4FFA4135B38A74B06BFEA5BBD71ED9D77D5E6DF025CAA65421D6F5E1540F73C700D487034E5 gpg--verifyPython-2.7.12.tgz.asc#Goodsignature tarzxfPython-2.7.12.tgz cdPython-2.7.12/ yuminstall-ygccgcc-c++openssl-devel ./configure--enable-shared make&&makeinstall echo'/usr/local/lib'>/etc/ld.so.conf.d/libpython2.7.conf ldconfig python--version sed-i'1s/python/python2.6/g'/usr/bin/yum wgethttps://bootstrap.pypa.io/ez_setup.py pythonez_setup.py#setuptools easy_install--version wgethttps://bootstrap.pypa.io/get-pip.py pythonget-pip.py#pip pip--version tag: CentOS Python2.7,centos安装python2.7,编译安装python2.7--end--

资源下载

更多资源
优质分享App

优质分享App

近一个月的开发和优化,本站点的第一个app全新上线。该app采用极致压缩,本体才4.36MB。系统里面做了大量数据访问、缓存优化。方便用户在手机上查看文章。后续会推出HarmonyOS的适配版本。

Mario

Mario

马里奥是站在游戏界顶峰的超人气多面角色。马里奥靠吃蘑菇成长,特征是大鼻子、头戴帽子、身穿背带裤,还留着胡子。与他的双胞胎兄弟路易基一起,长年担任任天堂的招牌角色。

Apache Tomcat

Apache Tomcat

Tomcat是Apache 软件基金会(Apache Software Foundation)的Jakarta 项目中的一个核心项目,由Apache、Sun 和其他一些公司及个人共同开发而成。因为Tomcat 技术先进、性能稳定,而且免费,因而深受Java 爱好者的喜爱并得到了部分软件开发商的认可,成为目前比较流行的Web 应用服务器。

Eclipse

Eclipse

Eclipse 是一个开放源代码的、基于Java的可扩展开发平台。就其本身而言,它只是一个框架和一组服务,用于通过插件组件构建开发环境。幸运的是,Eclipse 附带了一个标准的插件集,包括Java开发工具(Java Development Kit,JDK)。