首页 文章 精选 留言 我的

精选列表

搜索[部署],共10000篇文章
优秀的个人博客,低调大师

阿里云 Centos7 部署Java web [jar/war/virmach+vps+域名服务]

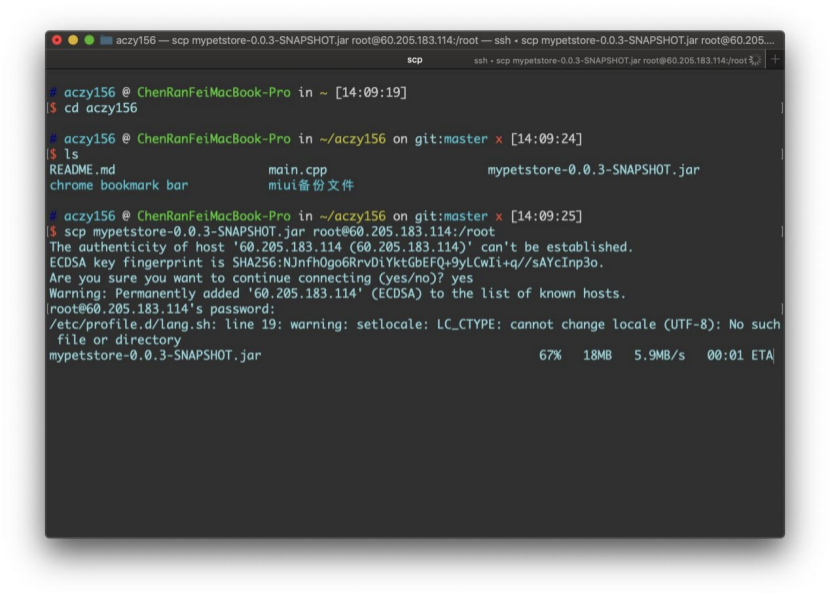
(一)第一部分:最基本的jar包运行(无需配置tomcat) [http://60.205.183.114:8081/] 1、配置阿里云(Esc学生服务器、镜像Centos7.7),并远程连接进入终端。 2、安装并配置JDK(参考https://www.jianshu.com/p/093413f2a04f)a)安装jdk。 b)寻找jdk路径配置环境变量。c)简单的Java hello world测试确保安装成功。 3、安装并配置mysql(mariadb)(参考https://blog.csdn.net/DaSo_CSDN/article/details/54754936)a)安装mysql、mariadb server。 b)systemctl 开启服务。c) 打开端口。(阿里云要在控制台打开,参考https://yq.aliyun.com/articles/701181)d) 更改mysql 的root密码,对应于项目配置文件中的密码。 4、利用scp进行文件传输(参考https://www.cnblogs.com/tugenhua0707/p/8278772.html)a)传输spring maven 的快照版本用于测试。 b)传输数据库sql文件。 5、导入数据库a)创建sql文件对应的数据库。 b)利用文件重定向运行sql文件。c)检查数据库是否导入成功 6、运行jar文件,控制台获取公网IP,本机输入IP:8081测试。 7、设置后台运行(已设置:http://60.205.183.114:8081/)a)contrl+c中止。 b)然后通过nohup 和 & 来后台运行。c)ps通过pid来停止后台运行进程。 运行结果整体过程: [root@iZ2ze4r3b4xcztbcsey08cZ ~]# history 1 MAKRER=SHOW_LOCALE;printf $MAKRER""; locale; MAKRER=SHOW_LOCALE;printf $MAKRER""; 2 yum install -y mysql 3 yum install -y mariadb-server mariadb 4 systemctl start mariadb 5 systemctl enable mariadb 6 yum install -y mysql-devel 7 firewall-cmd --zone=public --add-port=3306/tcp --permanent 8 CHECK_TYPE=SHELL; echo "INFO=${CHECK_TYPE} PID=$$ PPID=$PPID TTY=$(tty) SHELL=$0 HOME=$HOME PWD=$PWD| CHECK_SHELL_END" 9 ls 10 ifconfig 11 ls 12 yum list 13 java -version 14 ls 15 yum search java-1.8 16 yum -y install java-1.8.0-openjdk-devel.x86_64 17 java -version 18 cd /usr/lib/jvm/java-1.8.0-openjdk-1.8.0.252.b09-2.el7_8.x86_64/ 19 pwd 20 vim /etc/profile 21 . /etc/profile 22 vim Demo.java 23 javac Demo.java 24 java Demo 25 su 26 MAKRER=SHOW_LOCALE;printf $MAKRER""; locale; MAKRER=SHOW_LOCALE;printf $MAKRER""; 27 CHECK_TYPE=SHELL; echo "INFO=${CHECK_TYPE} PID=$$ PPID=$PPID TTY=$(tty) SHELL=$0 HOME=$HOME PWD=$PWD| CHECK_SHELL_END" 28 mysql -u root 29 ls 30 pwd 31 ifconfig 32 ls 33 mysql 34 mysql -u root jpetstore < jpetstore.sql 35 mariadb 36 mysql 37 java -jar mypetstore-0.0.3-SNAPSHOT.jar 38 nohup java -jar mypetstore-0.0.3-SNAPSHOT.jar & 39 ps 40 history [root@iZ2ze4r3b4xcztbcsey08cZ ~]# 控制台开端口 利用scp传文件 运行mysql 文件 [root@iZ2ze4r3b4xcztbcsey08cZ ~]# mysql Welcome to the MariaDB monitor. Commands end with ; or \g. Your MariaDB connection id is 3 Server version: 5.5.65-MariaDB MariaDB Server Copyright (c) 2000, 2018, Oracle, MariaDB Corporation Ab and others. Type 'help;' or '\h' for help. Type '\c' to clear the current input statement. MariaDB [(none)]> create database jpetstore; Query OK, 1 row affected (0.00 sec) MariaDB [(none)]> quit Bye [root@iZ2ze4r3b4xcztbcsey08cZ ~]# mysql -u root jpetstore < jpetstore.sql [root@iZ2ze4r3b4xcztbcsey08cZ ~]# mariadb -bash: mariadb: command not found [root@iZ2ze4r3b4xcztbcsey08cZ ~]# mysql Welcome to the MariaDB monitor. Commands end with ; or \g. Your MariaDB connection id is 5 Server version: 5.5.65-MariaDB MariaDB Server Copyright (c) 2000, 2018, Oracle, MariaDB Corporation Ab and others. Type 'help;' or '\h' for help. Type '\c' to clear the current input statement. MariaDB [(none)]> show databases; +--------------------+ | Database | +--------------------+ | information_schema | | jpetstore | | mysql | | performance_schema | | test | +--------------------+ 5 rows in set (0.00 sec) MariaDB [(none)]> use jpetstore; Reading table information for completion of table and column names You can turn off this feature to get a quicker startup with -A Database changed MariaDB [jpetstore]> show tables; +---------------------+ | Tables_in_jpetstore | +---------------------+ | account | | addlog | | bannerdata | | browselog | | cart | | cartitem | | category | | inventory | | item | | lineitem | | orders | | orderstatus | | product | | profile | | sequence | | signon | | supplier | +---------------------+ 17 rows in set (0.00 sec) 访问http://60.205.183.114:8081/ (二)第二部分:利用Tomcat容器对war包进行处理(需要Tomcat) [http://60.205.183.114:8080/myJPetStore_war/index.jsp] 1、安装Tomcat(参考https://www.digitalocean.com/community/tutorials/how-to-install-apache-tomcat-8-on-centos-7)a)本地下载tomcat,然后利用scp文件传输 b)设置访问权限c)设置服务配置d)输入IP:8080测试是否已经开启服务 2、数据库/端口配置a)数据库root 密码 和服务器对应 b)端口配置,在上面已经开启了8080端口 3、利用scp传输war包,放到webapp里边(直接会解析出文件) 4、重启tomcat服务a)bin下的shutdown.sh b)bin下的startup.sh 5、本机测试访问a)注意要添加访问的资源的路径/myJPetStore_war/index.jsp,然后tomcat容器会自动到webapp下去寻找 b) 已设置tomcat容器:http://60.205.183.114:8080/myJPetStore_war/index.jsp 运行结果整体过程 52 ls 53 sudo mkdir /opt/tomcat 54 sudo tar xvf apache-tomcat-8*tar.gz -C /opt/tomcat --strip-components=1 55 cd /opt/tomcat 56 sudo chgrp -R tomcat /opt/tomcat 57 sudo chmod -R g+r conf 58 sudo chmod g+x conf 59 sudo chown -R tomcat webapps/ work/ temp/ logs/ 60 sudo vi /etc/systemd/system/tomcat.service 61 sudo systemctl daemon-reload 62 sudo systemctl start tomcat 63 sudo systemctl status tomcat 64 sudo systemctl enable tomcat 65 ls 66 cd webapps/ 67 pwd 68 ls 69 sudo systemctl restart tomcat 70 cd ../bin/ 71 ls 72 sh shutdown.sh 73 sh startup.sh 74 history [root@iZ2ze4r3b4xcztbcsey08cZ bin]# 利用systemctl查看tomcat的状态 验证是否开启tomcat服务 将war包直接传入webapp中 然后webapp会自动解析war包(即myJPetStore_war) [root@iZ2ze4r3b4xcztbcsey08cZ webapps]# pwd /opt/tomcat/webapps [root@iZ2ze4r3b4xcztbcsey08cZ webapps]# ls docs examples host-manager manager myJPetStore_war myJPetStore_war.war ROOT 访问http://60.205.183.114:8080/myJPetStore_war/index.jsp (三)第三部分:指定域名进行访问 [http://crf.codes/] 1、配置virmach vps,达到可以通过IP进行访问a)过程同第一步,最后设置为后台运行。 b) 已配置:http://198.12.120.212:8081/ 2、服务器安装web server (安装nginx,参考http://blog.kenyang.net/2019/02/26/upgrade-nginx-to-latest-version-on-centos) 3、在域名提供商 name(或者cloudflare)进行DNS域名解析,进行请求中转。a)ping 域名(ping crf.codes)查看是否绑定成功。 4、修改nginx 配置文件a)Web server 设定域名 b)Location 配置index界面c)开放Linux系统防火墙d)访问crf.code http://crf.codes/ 运行结果域名提供商(name)配置dns 验证dns是否配置成功ping crf.codes,可以看到 修改nginx配置文件 server { listen 80; server_name crf.codes; #charset koi8-r; access_log /var/log/nginx/host.access.log main; location / { # root /usr/share/nginx/html; index index.html index.htm; proxy_pass http://127.0.0.1:8081/; # proxy_set_header X-Forwarded-For $proxy_add_x_forwarded_for; } #error_page 404 /404.html; # redirect server error pages to the static page /50x.html # error_page 500 502 503 504 /50x.html; location = /50x.html { root /usr/share/nginx/html; } # proxy the PHP scripts to Apache listening on 127.0.0.1:80 # #location ~ \.php$ { # proxy_pass http://127.0.0.1; #} # pass the PHP scripts to FastCGI server listening on 127.0.0.1:9000 # #location ~ \.php$ { # root html; # fastcgi_pass 127.0.0.1:9000; # fastcgi_index index.php; # fastcgi_param SCRIPT_FILENAME /scripts$fastcgi_script_name; # include fastcgi_params; #} # deny access to .htaccess files, if Apache's document root # concurs with nginx's one # #location ~ /\.ht { # deny all; #} } 访问crf.codes

优秀的个人博客,低调大师

spring boot在linux部署到/etc/init.d/app.jar 实现原理揭秘

从spring boot的文档知道,spring boot打包一个可以在systemV,直接执行的jar文件。操作也很简单,只需要在pom.xml中加入 <plugin> <groupId>org.springframework.boot</groupId> <artifactId>spring-boot-maven-plugin</artifactId> <configuration> <executable>true</executable> </configuration> </plugin> 通过配置后, 进行打包,生成的jar文件就可以放到 /etc/init.d/ 里面(ln -s 的软引用也可以)。这样配置之后java应用, 就可以和mysql等等的服务一样使用/etc/init.d/app.jar {start|stop|status|restart|force-reload} 进行操作了。 我们来探究一下,它是如何实现的 通过查阅资料systemV目录 /etc/init.d/ 中的文件得知, /etc/init.d/中全部是shell脚本,但是我们的app.jar是一个jar文件,对jar文件的认识它的真实格式是zip压缩文件,这个jar有什么魔力呢?把app.jar,拖入到jd-gui.exe , 看看它到底长什么样,结果报错说文件是无效的,这明明就是个jar文件, 为什么会这样, 难道是jd-gui.exe的bug ?尝试使用360压缩打开这个app.jar, 成功打开, 看到里面有一些spring boot引导启动的class和自己写的class以及第三方库的class文件,但是它到底怎么实现的原理还没找到 最后我们把jar文件拖入 winhex (一个文件二进制查看器) 我们可以看到,这个文件开头是 #!/bin/bash ,那么它是一个bash脚本文件,继续往下看 看到pk 这是zip格式的开头,到这里明白了, 这个jar文件是一个 bash shell和 jar文件的合体文件, spring boot 打包时候把 /etc/init.d/用到脚本加在了文件前面,这个实现方法确实巧妙。 来看看这个脚本的真容 #!/bin/bash # # . ____ _ __ _ _ # /\\ / ___'_ __ _ _(_)_ __ __ _ \ \ \ \ # ( ( )\___ | '_ | '_| | '_ \/ _` | \ \ \ \ # \\/ ___)| |_)| | | | | || (_| | ) ) ) ) # ' |____| .__|_| |_|_| |_\__, | / / / / # =========|_|==============|___/=/_/_/_/ # :: Spring Boot Startup Script :: # ### BEGIN INIT INFO # Provides: xxxx # Required-Start: $remote_fs $syslog $network # Required-Stop: $remote_fs $syslog $network # Default-Start: 2 3 4 5 # Default-Stop: 0 1 6 # Short-Description: xxxx # Description: log collect system # chkconfig: 2345 99 01 ### END INIT INFO [[ -n "$DEBUG" ]] && set -x # Initialize variables that cannot be provided by a .conf file WORKING_DIR="$(pwd)" # shellcheck disable=SC2153 [[ -n "$JARFILE" ]] && jarfile="$JARFILE" [[ -n "$APP_NAME" ]] && identity="$APP_NAME" # Follow symlinks to find the real jar and detect init.d script cd "$(dirname "$0")" || exit 1 [[ -z "$jarfile" ]] && jarfile=$(pwd)/$(basename "$0") while [[ -L "$jarfile" ]]; do if [[ "$jarfile" =~ init\.d ]]; then init_script=$(basename "$jarfile") else configfile="${jarfile%.*}.conf" # shellcheck source=/dev/null [[ -r ${configfile} ]] && source "${configfile}" fi jarfile=$(readlink "$jarfile") cd "$(dirname "$jarfile")" || exit 1 jarfile=$(pwd)/$(basename "$jarfile") done jarfolder="$( (cd "$(dirname "$jarfile")" && pwd -P) )" cd "$WORKING_DIR" || exit 1 # Inline script specified in build properties # Source any config file configfile="$(basename "${jarfile%.*}.conf")" # Initialize CONF_FOLDER location defaulting to jarfolder [[ -z "$CONF_FOLDER" ]] && CONF_FOLDER="${jarfolder}" # shellcheck source=/dev/null [[ -r "${CONF_FOLDER}/${configfile}" ]] && source "${CONF_FOLDER}/${configfile}" # ANSI Colors echoRed() { echo $'\e[0;31m'"$1"$'\e[0m'; } echoGreen() { echo $'\e[0;32m'"$1"$'\e[0m'; } echoYellow() { echo $'\e[0;33m'"$1"$'\e[0m'; } # Initialize PID/LOG locations if they weren't provided by the config file [[ -z "$PID_FOLDER" ]] && PID_FOLDER="/var/run" [[ -z "$LOG_FOLDER" ]] && LOG_FOLDER="/var/log" ! [[ "$PID_FOLDER" == /* ]] && PID_FOLDER="$(dirname "$jarfile")"/"$PID_FOLDER" ! [[ "$LOG_FOLDER" == /* ]] && LOG_FOLDER="$(dirname "$jarfile")"/"$LOG_FOLDER" ! [[ -x "$PID_FOLDER" ]] && echoYellow "PID_FOLDER $PID_FOLDER does not exist. Falling back to /tmp" && PID_FOLDER="/tmp" ! [[ -x "$LOG_FOLDER" ]] && echoYellow "LOG_FOLDER $LOG_FOLDER does not exist. Falling back to /tmp" && LOG_FOLDER="/tmp" # Set up defaults [[ -z "$MODE" ]] && MODE="auto" # modes are "auto", "service" or "run" [[ -z "$USE_START_STOP_DAEMON" ]] && USE_START_STOP_DAEMON="true" # Create an identity for log/pid files if [[ -z "$identity" ]]; then if [[ -n "$init_script" ]]; then identity="${init_script}" else identity=$(basename "${jarfile%.*}")_${jarfolder//\//} fi fi # Initialize log file name if not provided by the config file [[ -z "$LOG_FILENAME" ]] && LOG_FILENAME="${identity}.log" # Initialize stop wait time if not provided by the config file [[ -z "$STOP_WAIT_TIME" ]] && STOP_WAIT_TIME="60" # Utility functions checkPermissions() { touch "$pid_file" &> /dev/null || { echoRed "Operation not permitted (cannot access pid file)"; return 4; } touch "$log_file" &> /dev/null || { echoRed "Operation not permitted (cannot access log file)"; return 4; } } isRunning() { ps -p "$1" &> /dev/null } await_file() { end=$(date +%s) let "end+=10" while [[ ! -s "$1" ]] do now=$(date +%s) if [[ $now -ge $end ]]; then break fi sleep 1 done } # Determine the script mode action="run" if [[ "$MODE" == "auto" && -n "$init_script" ]] || [[ "$MODE" == "service" ]]; then action="$1" shift fi # Build the pid and log filenames PID_FOLDER="$PID_FOLDER/${identity}" pid_file="$PID_FOLDER/${identity}.pid" log_file="$LOG_FOLDER/$LOG_FILENAME" # Determine the user to run as if we are root # shellcheck disable=SC2012 [[ $(id -u) == "0" ]] && run_user=$(ls -ld "$jarfile" | awk '{print $3}') # Run as user specified in RUN_AS_USER if [[ -n "$RUN_AS_USER" ]]; then if ! [[ "$action" =~ ^(status|run)$ ]]; then id -u "$RUN_AS_USER" || { echoRed "Cannot run as '$RUN_AS_USER': no such user" exit 2 } [[ $(id -u) == 0 ]] || { echoRed "Cannot run as '$RUN_AS_USER': current user is not root" exit 4 } fi run_user="$RUN_AS_USER" fi # Issue a warning if the application will run as root [[ $(id -u ${run_user}) == "0" ]] && { echoYellow "Application is running as root (UID 0). This is considered insecure."; } # Find Java if [[ -n "$JAVA_HOME" ]] && [[ -x "$JAVA_HOME/bin/java" ]]; then javaexe="$JAVA_HOME/bin/java" elif type -p java > /dev/null 2>&1; then javaexe=$(type -p java) elif [[ -x "/usr/bin/java" ]]; then javaexe="/usr/bin/java" else echo "Unable to find Java" exit 1 fi arguments=(-Dsun.misc.URLClassPath.disableJarChecking=true $JAVA_OPTS -jar "$jarfile" $RUN_ARGS "$@") # Action functions start() { if [[ -f "$pid_file" ]]; then pid=$(cat "$pid_file") isRunning "$pid" && { echoYellow "Already running [$pid]"; return 0; } fi do_start "$@" } do_start() { working_dir=$(dirname "$jarfile") pushd "$working_dir" > /dev/null if [[ ! -e "$PID_FOLDER" ]]; then mkdir -p "$PID_FOLDER" &> /dev/null if [[ -n "$run_user" ]]; then chown "$run_user" "$PID_FOLDER" fi fi if [[ ! -e "$log_file" ]]; then touch "$log_file" &> /dev/null if [[ -n "$run_user" ]]; then chown "$run_user" "$log_file" fi fi if [[ -n "$run_user" ]]; then checkPermissions || return $? if [ $USE_START_STOP_DAEMON = true ] && type start-stop-daemon > /dev/null 2>&1; then start-stop-daemon --start --quiet \ --chuid "$run_user" \ --name "$identity" \ --make-pidfile --pidfile "$pid_file" \ --background --no-close \ --startas "$javaexe" \ --chdir "$working_dir" \ -- "${arguments[@]}" \ >> "$log_file" 2>&1 await_file "$pid_file" else su -s /bin/sh -c "$javaexe $(printf "\"%s\" " "${arguments[@]}") >> \"$log_file\" 2>&1 & echo \$!" "$run_user" > "$pid_file" fi pid=$(cat "$pid_file") else checkPermissions || return $? "$javaexe" "${arguments[@]}" >> "$log_file" 2>&1 & pid=$! disown $pid echo "$pid" > "$pid_file" fi [[ -z $pid ]] && { echoRed "Failed to start"; return 1; } echoGreen "Started [$pid]" } stop() { working_dir=$(dirname "$jarfile") pushd "$working_dir" > /dev/null [[ -f $pid_file ]] || { echoYellow "Not running (pidfile not found)"; return 0; } pid=$(cat "$pid_file") isRunning "$pid" || { echoYellow "Not running (process ${pid}). Removing stale pid file."; rm -f "$pid_file"; return 0; } do_stop "$pid" "$pid_file" } do_stop() { kill "$1" &> /dev/null || { echoRed "Unable to kill process $1"; return 1; } for i in $(seq 1 $STOP_WAIT_TIME); do isRunning "$1" || { echoGreen "Stopped [$1]"; rm -f "$2"; return 0; } [[ $i -eq STOP_WAIT_TIME/2 ]] && kill "$1" &> /dev/null sleep 1 done echoRed "Unable to kill process $1"; return 1; } force_stop() { [[ -f $pid_file ]] || { echoYellow "Not running (pidfile not found)"; return 0; } pid=$(cat "$pid_file") isRunning "$pid" || { echoYellow "Not running (process ${pid}). Removing stale pid file."; rm -f "$pid_file"; return 0; } do_force_stop "$pid" "$pid_file" } do_force_stop() { kill -9 "$1" &> /dev/null || { echoRed "Unable to kill process $1"; return 1; } for i in $(seq 1 $STOP_WAIT_TIME); do isRunning "$1" || { echoGreen "Stopped [$1]"; rm -f "$2"; return 0; } [[ $i -eq STOP_WAIT_TIME/2 ]] && kill -9 "$1" &> /dev/null sleep 1 done echoRed "Unable to kill process $1"; return 1; } restart() { stop && start } force_reload() { working_dir=$(dirname "$jarfile") pushd "$working_dir" > /dev/null [[ -f $pid_file ]] || { echoRed "Not running (pidfile not found)"; return 7; } pid=$(cat "$pid_file") rm -f "$pid_file" isRunning "$pid" || { echoRed "Not running (process ${pid} not found)"; return 7; } do_stop "$pid" "$pid_file" do_start } status() { working_dir=$(dirname "$jarfile") pushd "$working_dir" > /dev/null [[ -f "$pid_file" ]] || { echoRed "Not running"; return 3; } pid=$(cat "$pid_file") isRunning "$pid" || { echoRed "Not running (process ${pid} not found)"; return 1; } echoGreen "Running [$pid]" return 0 } run() { pushd "$(dirname "$jarfile")" > /dev/null "$javaexe" "${arguments[@]}" result=$? popd > /dev/null return "$result" } # Call the appropriate action function case "$action" in start) start "$@"; exit $?;; stop) stop "$@"; exit $?;; force-stop) force_stop "$@"; exit $?;; restart) restart "$@"; exit $?;; force-reload) force_reload "$@"; exit $?;; status) status "$@"; exit $?;; run) run "$@"; exit $?;; *) echo "Usage: $0 {start|stop|force-stop|restart|force-reload|status|run}"; exit 1; esac exit 0

资源下载

更多资源
优质分享App

优质分享App

近一个月的开发和优化,本站点的第一个app全新上线。该app采用极致压缩,本体才4.36MB。系统里面做了大量数据访问、缓存优化。方便用户在手机上查看文章。后续会推出HarmonyOS的适配版本。

Mario

Mario

马里奥是站在游戏界顶峰的超人气多面角色。马里奥靠吃蘑菇成长,特征是大鼻子、头戴帽子、身穿背带裤,还留着胡子。与他的双胞胎兄弟路易基一起,长年担任任天堂的招牌角色。

Nacos

Nacos

Nacos /nɑ:kəʊs/ 是 Dynamic Naming and Configuration Service 的首字母简称,一个易于构建 AI Agent 应用的动态服务发现、配置管理和AI智能体管理平台。Nacos 致力于帮助您发现、配置和管理微服务及AI智能体应用。Nacos 提供了一组简单易用的特性集,帮助您快速实现动态服务发现、服务配置、服务元数据、流量管理。Nacos 帮助您更敏捷和容易地构建、交付和管理微服务平台。

Spring

Spring

Spring框架(Spring Framework)是由Rod Johnson于2002年提出的开源Java企业级应用框架,旨在通过使用JavaBean替代传统EJB实现方式降低企业级编程开发的复杂性。该框架基于简单性、可测试性和松耦合性设计理念,提供核心容器、应用上下文、数据访问集成等模块,支持整合Hibernate、Struts等第三方框架,其适用范围不仅限于服务器端开发,绝大多数Java应用均可从中受益。

用户登录
用户注册