首页 文章 精选 留言 我的

精选列表

搜索[自动装配],共10000篇文章
优秀的个人博客,低调大师

自动编译代码】陈天奇团队TVM重磅更新:直接在浏览器使用GPU

今天,华盛顿大学陈天奇团队开发的TVM发布了更新,不需要写任何JavaScript代码,直接就能把深度学习模型编译到WebGL/OpenGL,然后在浏览器运行。 深度学习离不开TensorFlow,MXNet,Caffe和PyTorch这些可扩展深度学习系统,但它们大多专门针对小范围的硬件平台(例如服务器级GPU)进行优化,要适应其他平台需要付出相当大的工程成本和费用,这对深度学习系统的灵活部署提出了挑战。 大量不同的深度学习框架(编程语言),越来越多的硬件架构,两者之间需要一个桥梁。TVM框架正是为此而生,旨在让研究人员和开发者能够在各种不同的硬件,从手机、嵌入式设备到低功耗专用芯片这些不同的系统上,快速轻松地部署深度学习应用,而且不会牺牲电池电量或速度。 TVM是神经网络和硬件后端之间一个共同的层(a common layer),无

优秀的个人博客,低调大师

Appium+python自动化27-等待activity出现(android特有的wait_activity)

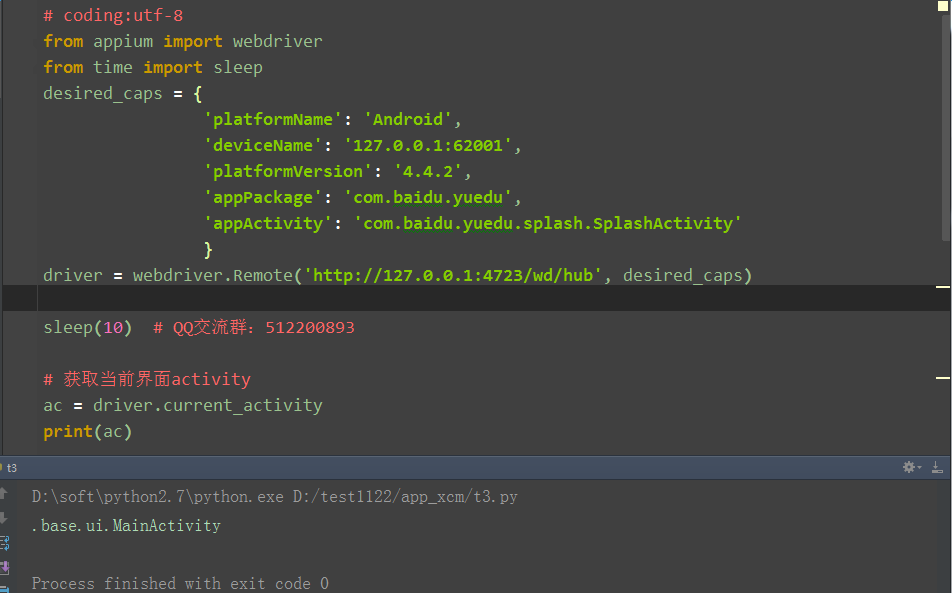
前言 在启动app的时候,如果直接做下一步点击操作,经常会报错,于是我们会在启动完成的时候加sleep。 那么问题来了,这个sleep时间到底设置多少合适呢?设置长了,就浪费时间,设置短了,就会找不到元素报错了。 这个时候我们可以用wait_activity的语法,等到你想点击的页面activity出现了,再点击,可以有效的节省时间。 wait_activity 1.查看源码 def wait_activity(self, activity, timeout, interval=1): """Wait for an activity: block until target activity presents or time out. This is an Android-only method. :Agrs: - activity - target activity - timeout - max wait time, in seconds - interval - sleep interval between retries, in seconds """ try: WebDriverWait(self, timeout, interval).until( lambda d: d.current_activity == activity) return True except TimeoutException: return False 2.解释说明: wait_activity(self, activity, timeout, interval=1): 等待指定的activity出现直到超时,interval为扫描间隔1秒 即每隔几秒获取一次当前的activity android特有的 返回的True 或 False :Agrs: - activity - 需等待的目标 activity - timeout - 最大超时时间,单位是s - interval - 循环查询时间 用法:driver.wait_activity(‘.activity.xxx’,5,2) 获取current_activity 1.打开app后,先sleep10秒,等app完全启动完成进入主页面,然后获取当前界面的activity # coding:utf-8 from appium import webdriver from time import sleep desired_caps = { 'platformName': 'Android', 'deviceName': '127.0.0.1:62001', 'platformVersion': '4.4.2', 'appPackage': 'com.baidu.yuedu', 'appActivity': 'com.baidu.yuedu.splash.SplashActivity' } driver = webdriver.Remote('http://127.0.0.1:4723/wd/hub', desired_caps) sleep(10) # 获取当前界面activity ac = driver.current_activity print(ac) 2.运行结果: 等待activity 1.用sleep太浪费时间了,并且不知道什么时候能启动完成,所以尽量不用sleep 2.上一步已经获取当主页面的activity了,那就可以用wait_activity等它出现了,再做下一步的点击操作 3.参考代码 # coding:utf-8 from appium import webdriver from time import sleep desired_caps = { 'platformName': 'Android', 'deviceName': '127.0.0.1:62001', 'platformVersion': '4.4.2', 'appPackage': 'com.baidu.yuedu', 'appActivity': 'com.baidu.yuedu.splash.SplashActivity' } driver = webdriver.Remote('http://127.0.0.1:4723/wd/hub', desired_caps) # sleep(10) # 不用sleep # 获取当前界面activity ac = driver.current_activity print(ac) # 等主页面activity出现,30秒内 driver.wait_activity(".base.ui.MainActivity", 30) # 点知道了 driver.find_element_by_id("com.baidu.yuedu:id/positive").click()

优秀的个人博客,低调大师

关于项目自动化测试架构的改良计划 - 对于内容文件动作指令信息

我们分为3个方法依次对于<add_elements>,<update_elements>,<remove_elements>进行解析: 对于<add_elements>内部遍历解析的代码如下: 1 2 3 4 5 6 7 8 9 10 11 12 13 14 15 16 17 18 19 20 21 22 23 24 25 26 27 28 29 30 /** * add the new information which configured in original xml and finally generate the new xml */ publicstaticString addElementToXML(String xmlString ,XMLModifyInfoExtractor extractor,String originalFilePath) throwsException{ Document doc = null ; doc = DocumentHelper.parseText(xmlString); extractor.extractModifyInfo(originalFilePath); //All the add information are provided by XMLModifyInfoExtractor List<AddElement> addElementInfoList = extractor.getAddElementInfoList(); List<Node> nodes ; for (AddElement addElement : addElementInfoList){ String testcaseXPath =addElement.getTestcaseXPath(); String path =addElement.getPath(); String value=addElement.getValue(); //make the value as a Element block Element newElementSnippet = DocumentHelper.parseText(value).getRootElement(); nodes = doc.selectNodes(path); for (Node node :nodes){ //if in the node is in matching testcase ,then remove it String nodeUniquePath = node.getUniquePath(); if (nodeUniquePath.indexOf(testcaseXPath) !=- 1 ){ //node.getParent().remove(node); //node.setText(value); Element addingPointElement = (Element) node; addingPointElement.add(newElementSnippet); } } } returndoc.asXML(); } 对于<update_elements>内部元素进行遍历的代码如下: 1 2 3 4 5 6 7 8 9 10 11 12 13 14 15 16 17 18 19 20 21 22 23 24 25 /** * update the information which configured in original xml and finally generate the new xml */ publicstaticString updateElementFromXML(String xmlString ,XMLModifyInfoExtractor extractor,String originalFilePath) throwsException{ Document doc = null ; doc = DocumentHelper.parseText(xmlString); extractor.extractModifyInfo(originalFilePath); //All the update information are provided by XMLModifyInfoExtractor List<UpdateElement> updateElementInfoList = extractor.getUpdateElementInfoList(); List<Node> nodes ; for (UpdateElement updateElement : updateElementInfoList){ String testcaseXPath =updateElement.getTestcaseXPath(); String path =updateElement.getPath(); String value=updateElement.getValue(); nodes = doc.selectNodes(path); for (Node node :nodes){ //if in the node is in matching testcase ,then remove it String nodeUniquePath = node.getUniquePath(); if (nodeUniquePath.indexOf(testcaseXPath) !=- 1 ){ node.setText(value); } } } returndoc.asXML(); } 对于<remove_elements>中元素进行遍历解析的代码如下: 1 2 3 4 5 6 7 8 9 10 11 12 13 14 15 16 17 18 19 20 21 22 23 24 /** * remove the information which configured in original xml and finally generate the new xml */ publicstaticString removeElementFromXML(String xmlString ,XMLModifyInfoExtractor extractor,String originalFilePath) throwsException{ Document doc = null ; doc = DocumentHelper.parseText(xmlString); extractor.extractModifyInfo(originalFilePath); //All the remove information are provided by XMLModifyInfoExtractor List<RemoveElement> removeElementInfoList = extractor.getRemoveElementInfoList(); List<Node> nodes ; for (RemoveElement removeElement : removeElementInfoList){ String testcaseXPath =removeElement.getTestcaseXPath(); String path =removeElement.getPath(); nodes = doc.selectNodes(path); for (Node node :nodes){ //if in the node is in matching testcase ,then remove it String nodeUniquePath = node.getUniquePath(); if (nodeUniquePath.indexOf(testcaseXPath) !=- 1 ){ node.getParent().remove(node); } } } returndoc.asXML(); } 最后,当执行3步骤动作系列转化之后,最终的xml文件就是包含最终的我们修改后的结果了。 本文转自 charles_wang888 51CTO博客,原文链接:http://blog.51cto.com/supercharles888/1221752,如需转载请自行联系原作者

资源下载

更多资源
Mario

Mario

马里奥是站在游戏界顶峰的超人气多面角色。马里奥靠吃蘑菇成长,特征是大鼻子、头戴帽子、身穿背带裤,还留着胡子。与他的双胞胎兄弟路易基一起,长年担任任天堂的招牌角色。

腾讯云软件源

腾讯云软件源

为解决软件依赖安装时官方源访问速度慢的问题,腾讯云为一些软件搭建了缓存服务。您可以通过使用腾讯云软件源站来提升依赖包的安装速度。为了方便用户自由搭建服务架构,目前腾讯云软件源站支持公网访问和内网访问。

Nacos

Nacos

Nacos /nɑ:kəʊs/ 是 Dynamic Naming and Configuration Service 的首字母简称,一个易于构建 AI Agent 应用的动态服务发现、配置管理和AI智能体管理平台。Nacos 致力于帮助您发现、配置和管理微服务及AI智能体应用。Nacos 提供了一组简单易用的特性集,帮助您快速实现动态服务发现、服务配置、服务元数据、流量管理。Nacos 帮助您更敏捷和容易地构建、交付和管理微服务平台。

Sublime Text

Sublime Text

Sublime Text具有漂亮的用户界面和强大的功能,例如代码缩略图,Python的插件,代码段等。还可自定义键绑定,菜单和工具栏。Sublime Text 的主要功能包括:拼写检查,书签,完整的 Python API , Goto 功能,即时项目切换,多选择,多窗口等等。Sublime Text 是一个跨平台的编辑器,同时支持Windows、Linux、Mac OS X等操作系统。

用户登录
用户注册