首页 文章 精选 留言 我的

精选列表

搜索[命令行界面],共10007篇文章
优秀的个人博客,低调大师

阿里云 centos 安装图形化界面

CentOS 7 系统下,本文以 MATE 桌面环境安装进行安装配置说明: 登录服务器,执行如下指令安装桌面环境: #先安装MATEDesktopyumgroupsinstall"MATEDesktop"命令输入之后,会列出一大堆文字的,然后显示这个y/d/n,输入y,按回车下载安装;安装完成,显示下面图片complete #安装好MATEDesktop后,再安装XWindowSystem。 yumgroupsinstall"XWindowSystem"命令输入之后,会列出一大堆文字的,然后显示这个y/d/n,输入y,按回车下载安装; 安装完成 设置默认通过桌面环境启动服务器: systemctlset-defaultgraphical.target systemctlset-defaultmulti-user.target //设置成命令模式 systemctlset-defaultgraphical.target //设置成图形模式 安装完成后,通过 reboot 等指令重启服务器,或者在ECS 服务器控制台重启服务器。 选择第一个,按回车 通过管理终端连接服务器,验证测试安装情况。在ECS控制台,用管理终端登录服务器,查看安装好的桌面。

优秀的个人博客,低调大师

应用程序内部任意界面退出程序

创建工具类如下: package com.example.hxd.gittest; import android.app.Activity; import java.util.ArrayList; import java.util.List; /** * 统一退出程序的操作 */ class ActivitySetting { //创建集合存储打开的Activity static List<Activity> activityList = new ArrayList<>(); //添加打开的Activity到集合 static void addActivity(Activity activity) { activityList.add(activity); } //移除集合内部的Activity static void removeActivity(Activity activity) { activityList.remove(activity); } //关闭所有的Activity static void finishAllActivity() { for (Activity activity : activityList) { if (!activity.isFinishing()) { activity.finish(); //杀死当前应用进程 android.os.Process.killProcess(android.os.Process.myPid()); } } } } 在BaseActivity内部添加如下代码: package com.example.hxd.gittest; import android.support.v7.app.AppCompatActivity; import android.os.Bundle; public class BaseActivity extends AppCompatActivity { @Override protected void onCreate(Bundle savedInstanceState) { super.onCreate(savedInstanceState); setContentView(R.layout.activity_base); //添加当前操作的Activity到集合内部 ActivitySetting.addActivity(this); } @Override protected void onDestroy() { super.onDestroy(); //移除无用的Activity ActivitySetting.removeActivity(this); } } 具体Activity内部代码如下: btnSecond.setOnClickListener(new View.OnClickListener() { @Override public void onClick(View v) { //点击按钮退出程序,杀死进程 ActivitySetting.finishAllActivity(); } });

优秀的个人博客,低调大师

android搞的一个登录界面

还是先上传图片把。设计的很丑,脏了大家的眼球了。实现的基本需求,没有详细的设计高度,宽度什么的。还没添加验证功能,待完善。 代码如下: 1 2 3 4 5 6 7 8 9 10 11 12 13 14 15 16 17 18 19 20 21 22 23 24 25 26 27 28 29 30 31 32 33 34 35 36 37 38 39 40 41 42 43 44 45 46 47 48 49 50 51 52 53 54 55 56 57 58 59 60 61 62 63 64 65 66 67 68 69 70 71 72 73 74 <? xml version="1.0" encoding="utf-8"?> < TableLayout xmlns:android="http://schemas.android.com/apk/res/android" android:layout_width="fill_parent" android:layout_height="fill_parent" android:orientation="vertical" > < TableRow android:id="@+id/tableRow1" android:layout_width="wrap_content" android:layout_height="wrap_content" > < TextView android:id="@+id/textView1" android:layout_width="wrap_content" android:layout_height="wrap_content" android:text="TextView" /> < EditText android:layout_width="fill_parent" android:layout_height="wrap_content" android:hint="请填写登陆账号" android:selectAllOnFocus="true" /> </ TableRow > < TableRow android:id="@+id/tableRow2" android:layout_width="wrap_content" android:layout_height="wrap_content" > < TextView android:id="@+id/textView2" android:layout_width="wrap_content" android:layout_height="wrap_content" android:text="密码" android:textSize="10pt" android:background="@drawable/image" /> < EditText android:layout_width="fill_parent" android:layout_height="wrap_content" android:password="true" /> </ TableRow > < TableRow android:id="@+id/tableRow3" android:layout_width="wrap_content" android:layout_height="wrap_content" > < TextView android:id="@+id/textView3" android:layout_width="fill_parent" android:layout_height="wrap_content" android:text="电话号码" android:textSize="10pt" android:background="@drawable/image" /> < EditText android:layout_height="wrap_content" android:layout_width="fill_parent" android:hint="请输入您的电话号码" android:selectAllOnFocus="true" android:phoneNumber="true" /> </ TableRow > < Button android:id="@+id/button1" android:layout_width="wrap_content" android:layout_height="wrap_content" android:text="注册" /> </ TableLayout > ============================================================================== 本文转自被遗忘的博客园博客,原文链接:http://www.cnblogs.com/rollenholt/archive/2012/05/17/2505925.html,如需转载请自行联系原作者

优秀的个人博客,低调大师

RHCS图形界面建立GFS共享中

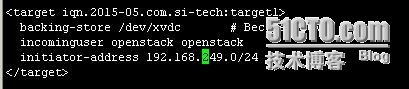
六、安装存储管理管理软件,并导出磁盘 [root@manager ~]# fdisk /dev/xvdc \\存储节点挂有磁盘,空间1T [root@manager ~]# yum installscsi-target-utils -y \\安装target管理端 [root@manager ~]# vim /etc/tgt/targets.conf \\配置导出磁盘的信息 其中backing-store指定共享的磁盘,incominguser指定用于验证的用户和密码,initiator-address允许连接的地址 [root@storage1 ~]# /etc/rc.d/init.d/tgtd start &&chkconfig tgtd on [root@storage1 ~]# tgtadm --lld iscsi --mode target --op show\\查看是否导出成功 [root@manager ~]# for i in {1..3}; do ssh openstack.node$i "yum -yinstall iscsi-initiator-utils"; done \\节点安装iscsi客户端软件 [root@node1 ~]# vim /etc/iscsi/iscsid.conf \\所有节点配置文件加上以下3行,设置账户密码 node.session.auth.authmethod = CHAP node.session.auth.username = openstack node.session.auth.password =oepnstack [root@node1 ~] iscsiadm -mdiscovery -t st -p 192.168.249.64 //发现共享设备 192.168.249.64:3260,1 iqn.2015-05.com.si-tech:target1 [root@node1 ~]iscsiadm -m node –liqn.2015-05.com.si-tech:target1\\注册iscsi共享设备 [root@manager ~]tgtadm --lld iscsi --op show --mode conn --tid 1 \\iscsi服务器端查看共享情况 [root@node1 ~]# netstat -nlatp | grep 3260连接情况 [root@node1 ~]# fdisk -l \\在各个节点上面都会多出个iscsi设备 Disk /dev/sda: 1073.7 GB, 1073741824000 bytes 255 heads, 63 sectors/track, 130541 cylinders Units = cylinders of 16065 * 512 = 8225280 bytes Sector size (logical/physical): 512 bytes / 512 bytes I/O size (minimum/optimal): 512 bytes / 512 bytes Disk identifier: 0x00000000 七、在节点上创建clvm逻辑卷并创建gfs2集群文件系统 [root@node1 ~]# pvcreate /dev/sda \\创建pv Physical volume"/dev/sda" successfully created [root@node1 ~]# vgcreate openstackvg0 /dev/sda\\创建vg Clustered volume group "openstackvg0"successfully created [root@node1 ~]# lvcreate -L +1000Gopenstackvg0 -n openstacklv0 \\创建大小为1T的lv [root@openstack iscsi]# lvmconf--enable-cluster每个节点开启集群LVM功能,才能mklv [root@openstack iscsi]# lvcreate-L +100G openstackvg0 -n openstacklv0 Logical volume "openstacklv0" created 登陆其他节点验证,可以看到已经都有了 [root@node2 ~]# mkfs.gfs2 -j 3 -p lock_dlm -t openstack:gfs2/dev/openstackvg0/openstacklv0 -p:用来指定gfs的锁机制 -j:指定journal个数(可加入节点数),一般情况下应留有冗余,否则后期还得再调整 查看journals:# gfs2_tool journals /openstack 增加journals:# gfs2_jadd –j 1 /openstack ##增加一个journals -t:格式为ClusterName:FS_Path_Name ClusterName:应与前面cluster.conf中指定的集群名称相同; FS_Path_Name:这个块设备mount的路径; 最后一个参数是指定逻辑卷的详细路径 \\创建gfs2集群文件系统,并设置节点为3个,锁协议为lock_dlm,openstack为我们的集群名,gfs2为一个标志也可以任意 [root@openstack usr]# mount/dev/openstackvg0/openstacklv0 /openstack/ fs is for a different cluster error mounting lockproto lock_dlm 这是因为我们使用的集群时gfs所以改为gfs [root@openstack usr]# mount /dev/openstackvg0/openstacklv0 /openstack/ [root@openstack usr]# df -h FilesystemSize Used Avail Use% Mounted on /dev/mapper/vg_openstack-lv_root35G 4.5G 29G14% / tmpfs7.6G 32M 7.6G1% /dev/shm /dev/xvda1 485M 35M426M 8% /boot /dev/xvdd14.2G 4.2G 0 100% /mnt /dev/mapper/openstackvg0-openstacklv0110G 388M 110G1% /openstack echo "/dev/openstackvg0/openstacklv0 /openstack gfs2 defaults 00" >> /etc/fstab 八、集群管理 1)、当基于clvm的gfs2文件系统不够用时,如何增加 [root@node1~]# lvextend -L +10G /dev/openstackvg0/openstacklv0 Extending logical volume openstacklv0 to 110.00 GiB Logical volume openstacklv0successfully resized [root@node1 ~]# gfs2_grow /openstack \\同步文件系统 FS: Mount Point: /openstack FS: Device: /dev/dm-2 FS: Size: 28835838(0x1b7fffe) FS: RG size: 65533 (0xfffd) DEV: Size: 31457280(0x1e00000) The file system grew by 10240MB. gfs2_grow complete. gfs2_grow complete. [root@openstack ~]#df -h FilesystemSize Used Avail Use% Mounted on /dev/mapper/vg_openstack-lv_root35G 4.5G 29G14% / tmpfs7.6G 32M 7.6G1% /dev/shm /dev/xvda1485M 35M 426M8% /boot /dev/xvdd14.2G 4.2G 0 100% /mnt /dev/mapper/openstackvg0-openstacklv0110G 388M 110G1% /openstack 2)、当节点不够用时,如果添加一个新的节点加入集群 步骤如下: 1)、安装ricci [root@node4 ~]# yum install ricci -y 2)、登录luciweb,添加ricci 3)、导入共享存储设备 [root@node4 ~]# iscsiadm -m discovery -t st -p 192.168.249.64 [root@node1~]# scp/etc/iscsi/iscsid.conf node4:/etc/iscsi/ [root@node4 ~]# iscsiadm -m node–l iqn.2015-05.com.si-tech:target1 4)、在已成功挂载的节点上增加节点数,并实现挂载使用 (注意:如果系统看不到/dev/openstackvg0/openstacklv0,则重新启动节点系统即可生效) [root@node4 ~]# mount /dev/cvg0/clv0 /openstack/ \ \节点数不够 Too many nodes mounting filesystem, no free journals [root@node2 ~]# gfs2_jadd -j 1 /optenstack \\增加一个节点数 Filesystem:/opt Old Journals3 NewJournals 4 [root@node4 ~]# mount /dev/cvg0/clv0 /opt/ [root@node4 ~]# ll /opt/ total 4 -rw-r--r-- 1 root root 210 Jun 8 00:42 test.txt [root@node4 ~]# 3、)、测试基于gfs2文件系统的集群节点是否支持同时读写操作 [root@node1 ~]# echo node1 >>/openstack/test.txt\\节点1模拟向test.txt文件写入node1 [root@node2 ~]#echo node2 >>/openstack/test.txt \\节点2模拟向test.txt文件写入node2 [root@node3 ~]# tail -f /openstack/test.txt \\节点3模拟读出节点1和节点2同时写入的数据 node1 node2 4)、如果数据很重要并且磁盘空间也充足可以考虑使用cmirror实现存储高可用这里简述一下步骤 存储节点添加备份磁盘,修改targets.conf文件 数据节点使用iscsiadm命令发现并使用备份磁盘 数据节点需要按cmirror软件,并备份:yum install cmirror –y lvconvert -m 1 /dev/openstackvg0/openstacklv0 /dev/sda /dev/sdb \\创建先有lv的mirror [root@node1 ~]# dmsetup ls–tree \\查看现有iscsi导出设备的状态为mirror型 cvg0-clv0 (253:1) ├─cvg0-clv0_mimage_1 (253:5) │└─iscsi2 (253:2) │├─(8:48) │└─(8:64) ├─cvg0-clv0_mimage_0 (253:4) │└─iscsi1 (253:0) │├─(8:32) │└─(8:16) └─cvg0-clv0_mlog (253:3) └─iscsi2 (253:2) ├─(8:48) └─(8:64) 本文转自zsaisai 51CTO博客,原文链接:http://blog.51cto.com/3402313/1656133

优秀的个人博客,低调大师

android用户界面-组件Widget-常用组件

用户会员注册实例 介绍控件 文本框TextView 编辑框EditText 密码文本框EditText 单选按钮RadioButton 复选框CheckBox 开关按钮ToggleButton 下拉列表Spinner 实例: 注册页面 /Chapter04_UI_CommonWidget/src/com/amaker/test/MainActivity.java 代码 packagecom.amaker.test; importandroid.app.Activity; importandroid.content.Intent; importandroid.os.Bundle; importandroid.view.View; importandroid.view.View.OnClickListener; importandroid.widget.ArrayAdapter; importandroid.widget.Button; importandroid.widget.CheckBox; importandroid.widget.EditText; importandroid.widget.RadioButton; importandroid.widget.Spinner; importandroid.widget.ToggleButton; publicclassMainActivityextendsActivity{ privateButtonregister,cancel; privateToggleButtonmarriged; privateRadioButtonmale,female; privateEditTextusername,password; privateSpinnerposition; privateCheckBoxreading,swimming; @Override publicvoidonCreate(BundlesavedInstanceState){ super.onCreate(savedInstanceState); setContentView(R.layout.main); username=(EditText)findViewById(R.id.username); password=(EditText)findViewById(R.id.password); male=(RadioButton)findViewById(R.id.male); female=(RadioButton)findViewById(R.id.female); reading=(CheckBox)findViewById(R.id.reading); swimming=(CheckBox)findViewById(R.id.swimming); marriged=(ToggleButton)findViewById(R.id.marriged); position=(Spinner)findViewById(R.id.position); String[]str={"CEO","CFO","PM"}; ArrayAdapteraa=newArrayAdapter(this,android.R.layout.simple_spinner_dropdown_item,str); position.setAdapter(aa); register=(Button)findViewById(R.id.register); cancel=(Button)findViewById(R.id.cancel); register.setOnClickListener(newOnClickListener(){ publicvoidonClick(Viewv){ Bundleb=newBundle(); b.putString("username","用户名称:"+username.getText().toString()); b.putString("password","用户密码:"+password.getText().toString()); if(male.isChecked()){ b.putString("gender","性别:男"); }else{ b.putString("gender","性别:女"); } Stringtemp="爱好:"; if(reading.isChecked()){ temp+="阅读"; } if(swimming.isChecked()){ temp+=""; temp+="游泳"; } b.putString("hobby",temp); if(marriged.isChecked()){ b.putString("marriged","婚否:已婚"); }else{ b.putString("marriged","婚否:未婚"); } b.putString("position","职位:"+position.getSelectedItem().toString()); Intentintent=newIntent(MainActivity.this,ResultActivity.class); intent.putExtra("data",b); startActivity(intent); } }); } } 注册结果页面 /Chapter04_UI_CommonWidget/src/com/amaker/test/ResultActivity.java 代码 packagecom.amaker.test; importjava.util.ArrayList; importjava.util.List; importandroid.app.Activity; importandroid.content.Intent; importandroid.os.Bundle; importandroid.widget.ArrayAdapter; importandroid.widget.ListView; publicclassResultActivityextendsActivity{ privateListViewlistView; protectedvoidonCreate(BundlesavedInstanceState){ super.onCreate(savedInstanceState); setContentView(R.layout.result); listView=(ListView)findViewById(R.id.ListView01); Intentintent=this.getIntent(); Bundleb=intent.getBundleExtra("data"); System.out.println(b.getString("username")); Listlist=newArrayList(); list.add(b.getString("username")); list.add(b.getString("password")); list.add(b.getString("position")); list.add(b.getString("gender")); list.add(b.getString("hobby")); list.add(b.getString("marriged")); ArrayAdapteradapter=newArrayAdapter(this,android.R.layout.simple_list_item_1,list); listView.setAdapter(adapter); } } 布局文件 /Chapter04_UI_CommonWidget/res/layout/main.xml 代码 <?xmlversion="1.0"encoding="utf-8"?> <LinearLayoutxmlns:android="http://schemas.android.com/apk/res/android" android:orientation="vertical" android:layout_width="fill_parent" android:layout_height="fill_parent" > <TableLayout android:id="@+id/TableLayout01" android:layout_width="wrap_content" android:layout_height="wrap_content" android:stretchColumns="1" > <TableRow android:id="@+id/TableRow01" android:layout_width="wrap_content" android:layout_height="wrap_content"> <TextView android:text="用户名称" android:id="@+id/TextView01" android:layout_width="wrap_content" android:layout_height="wrap_content"></TextView> <EditText android:text="" android:id="@+id/username" android:layout_width="wrap_content" android:layout_height="wrap_content" ></EditText> </TableRow> <TableRow android:id="@+id/TableRow02" android:layout_width="wrap_content" android:layout_height="wrap_content"> <TextView android:text="用户密码" android:id="@+id/TextView02" android:layout_width="wrap_content" android:layout_height="wrap_content"></TextView> <EditText android:text="" android:id="@+id/password" android:layout_width="wrap_content" android:layout_height="wrap_content" android:password="true" ></EditText> </TableRow> <TableRow android:id="@+id/TableRow03" android:layout_width="wrap_content" android:layout_height="wrap_content"> <TextView android:text="性别" android:id="@+id/TextView03" android:layout_width="wrap_content" android:layout_height="wrap_content"></TextView> <RadioGroup android:id="@+id/gender_g" android:layout_width="wrap_content" android:layout_height="wrap_content"> <RadioButton android:text="男" android:id="@+id/male" android:layout_width="wrap_content" android:layout_height="wrap_content"></RadioButton> <RadioButton android:text="女" android:id="@+id/female" android:layout_width="wrap_content" android:layout_height="wrap_content"></RadioButton> </RadioGroup> </TableRow> <TableRow android:id="@+id/TableRow04" android:layout_width="wrap_content" android:layout_height="wrap_content"> <TextView android:text="婚否" android:id="@+id/TextView04" android:layout_width="wrap_content" android:layout_height="wrap_content"></TextView> <ToggleButton android:text="@+id/ToggleButton01" android:id="@+id/marriged" android:layout_width="wrap_content" android:layout_height="wrap_content"></ToggleButton> </TableRow> <TableRow android:id="@+id/TableRow05" android:layout_width="wrap_content" android:layout_height="wrap_content" > <TextView android:text="爱好" android:id="@+id/hobby" android:layout_width="wrap_content" android:layout_height="wrap_content"></TextView> <CheckBox android:text="阅读" android:id="@+id/reading" android:layout_width="wrap_content" android:layout_height="wrap_content" android:layout_column="1" ></CheckBox> <CheckBox android:text="游泳" android:id="@+id/swimming" android:layout_width="wrap_content" android:layout_height="wrap_content" android:layout_column="1" ></CheckBox> </TableRow> <TableRow android:id="@+id/TableRow06" android:layout_width="wrap_content" android:layout_height="wrap_content"> <TextView android:text="职务" android:id="@+id/TextView05" android:layout_width="wrap_content" android:layout_height="wrap_content"></TextView> <Spinner android:id="@+id/position" android:layout_width="wrap_content" android:layout_height="wrap_content"></Spinner> </TableRow> <TableRow android:id="@+id/TableRow07" android:layout_width="wrap_content" android:layout_height="wrap_content"> <Button android:text="取消" android:id="@+id/cancel" android:layout_width="wrap_content" android:layout_height="wrap_content"></Button> <Button android:text="注册" android:id="@+id/register" android:layout_width="wrap_content" android:layout_height="wrap_content"></Button> </TableRow> </TableLayout> </LinearLayout> /Chapter04_UI_CommonWidget/res/layout/result.xml 代码 <?xmlversion="1.0"encoding="utf-8"?> <LinearLayoutxmlns:android="http://schemas.android.com/apk/res/android" android:orientation="vertical" android:layout_width="fill_parent" android:layout_height="fill_parent" > <ListView android:id="@+id/ListView01" android:layout_width="wrap_content" android:layout_height="wrap_content"></ListView> </LinearLayout> 本文转自linzheng 51CTO博客,原文链接:http://blog.51cto.com/linzheng/1080698

优秀的个人博客,低调大师

android用户界面之Widget教程实例汇总

一、Widget基础教程1.Android 桌面组件【widget】初探http://www.apkbus.com/android-20-1-1.html2.Android GUI Widget 可视化指导http://www.apkbus.com/android-14266-1-1.html3.Android Widget开发模板http://www.apkbus.com/android-19382-1-1.html4.Android 简单谈谈widgethttp://www.apkbus.com/android-15379-1-1.html5.Android Widget工具箱http://www.apkbus.com/android-3924-1-1.html6.Android Widget开发的相关技术点记录http://www.apkbus.com/android-42501-1-1.html7.Android App Widget初探http://www.apkbus.com/android-12712-1-1.html二、Widget简单应用1.Android Widget开发http://www.apkbus.com/android-51670-1-1.html2.android widget 小程序开发步骤http://www.apkbus.com/android-51672-1-1.html3.android widget桌面时钟http://www.apkbus.com/android-18165-1-1.html4.android 一个便签的Widget例子http://www.apkbus.com/android-18084-1-1.html5.android之App Widget开发实例http://www.apkbus.com/android-39872-1-1.html三、Widget实例源码1.桌面简易小时钟(Widget+Service+AlarmManager+Thread)http://www.apkbus.com/android-48403-1-1.html2.Android 桌面组件【app widget】 进阶项目--心情记录器http://www.apkbus.com/android-21-1-1.html3.Android 天气预报加widget源码http://www.apkbus.com/android-20950-1-1.html4.android widget 开发实例 : 桌面便签程序的实现详解和源码http://www.apkbus.com/android-17801-1-1.html5.漂亮的快捷拨打电话的widget程序http://www.apkbus.com/android-51657-1-1.html6.一个自定义config的widget与短信接收功能实现的代码http://www.apkbus.com/android-51661-1-1.html7.Android Widget 电池插件的开发实现http://www.apkbus.com/android-51664-1-1.html8.一个简单的显示天气状况的Widget(附带代码和图)http://www.apkbus.com/android-51665-1-1.html9.Google Weather Widget + 数据库读入城市http://www.apkbus.com/android-51668-1-1.html 本文转自qianqianlianmeng博客园博客,原文链接:http://www.cnblogs.com/aimeng/archive/2012/05/18/2508211.html ,如需转载请自行联系原作者

资源下载

更多资源
Mario

Mario

马里奥是站在游戏界顶峰的超人气多面角色。马里奥靠吃蘑菇成长,特征是大鼻子、头戴帽子、身穿背带裤,还留着胡子。与他的双胞胎兄弟路易基一起,长年担任任天堂的招牌角色。

腾讯云软件源

腾讯云软件源

为解决软件依赖安装时官方源访问速度慢的问题,腾讯云为一些软件搭建了缓存服务。您可以通过使用腾讯云软件源站来提升依赖包的安装速度。为了方便用户自由搭建服务架构,目前腾讯云软件源站支持公网访问和内网访问。

Rocky Linux

Rocky Linux

Rocky Linux(中文名:洛基)是由Gregory Kurtzer于2020年12月发起的企业级Linux发行版,作为CentOS稳定版停止维护后与RHEL(Red Hat Enterprise Linux)完全兼容的开源替代方案,由社区拥有并管理,支持x86_64、aarch64等架构。其通过重新编译RHEL源代码提供长期稳定性,采用模块化包装和SELinux安全架构,默认包含GNOME桌面环境及XFS文件系统,支持十年生命周期更新。

WebStorm

WebStorm

WebStorm 是jetbrains公司旗下一款JavaScript 开发工具。目前已经被广大中国JS开发者誉为“Web前端开发神器”、“最强大的HTML5编辑器”、“最智能的JavaScript IDE”等。与IntelliJ IDEA同源,继承了IntelliJ IDEA强大的JS部分的功能。

用户登录
用户注册