MySQL 5.6通过Keepalived+互为主从实现高可用架构
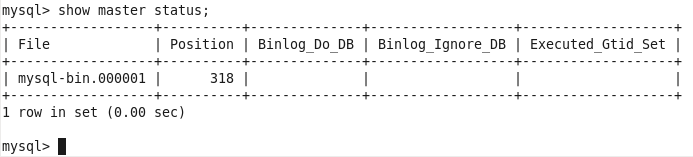
本文将介绍两台Mysql如何实现高可用架构。通常我们会配置主从同步,但这样若主的Mysql挂掉,还需要手动干预,例如把指向主库的IP地址修改为指向从库的IP,为了实现自动切换到从数据库,我们可以使用Keepalived配置一个浮动的VIP出来供前端访问,主的Mysql故障了VIP会立即自动切换到从的Mysql,省去了人工干预的时间,但要想故障的那台Mysql起来后也能作为从Mysql自动去同步数据,就需要配置成互为主从。拥有VIP的Mysql可认为是主库,才能进行数据的写入,由于VIP可以在两台Mysql之间浮动切换,因此这两台mysql是互为主从。 一、测试环境 操作系统版本:Red Hat Enterprise Linux Server release 6.5 (Santiago) Mysql版本:MySQL-5.6.38-1.el6.x86_64.rpm-bundle.tar keepalived版本:keepalived-1.2.7-3.el6.x86_64.rpm node01:192.168.10.71 node02:192.168.10.72 VIP:192.168.10.70 二、配置node01为主、node02为从的主从同步 1、node01和node02分别安装好Mysql 5.6.38,安装方法请参考上一篇博文《MySQL 5.6.38在RedHat 6.5上通过RPM包安装》。 2、在node01和node02分别编辑/etc/my.cnf,配置如下: [mysqld] log-bin=mysql-bin server-id = 1 [mysqld_safe] log-error = /var/log/mysqld.log pid-file = /var/run/mysqld/mysqld.pid replicate-do-db = all 3、重启mysql服务 [root@node01 ~]# service mysql restart [root@node02 ~]# service mysql restart 4、登录node01的mysql,创建用于同步的账户repl,密码为123456,并查询master状态,记下file名称和posttion数值 mysql> GRANT REPLICATION SLAVE ON *.* to 'repl'@'%' identified by '123456'; Query OK, 0 rows affected (0.00 sec) mysql> show master status; 5、登录node02的mysql,执行以下语句开启从服务器,注意master_host要填写node01的IP mysql> change master to master_host='192.168.10.71',master_user='repl',master_password='123456',master_log_file='mysql-bin.000001',master_log_pos=318; Query OK, 0 rows affected, 2 warnings (0.36 sec) 1 2 3 4 5 6 7 命令参数解释: master_host='192.168.10.71'##Master的IP地址 master_user='repl'##用于同步数据的用户(在Master中授权的用户) master_password='123456'##同步数据用户的密码 master_log_file='mysql-bin.000001'##指定Slave从哪个日志文 件开始读复制数据(可在Master上使用showmasterstatus查看到日志文件名) master_log_pos=429##从哪个POSITION号开始读 mysql> start slave; Query OK, 0 rows affected (0.03 sec) 6、查询从服务的状态,状态正常 7、在node01创建一个数据库、一个表并插入一行数据,用于测试node02是否能同步过去 mysql> create database mysql_long; Query OK, 1 row affected (0.00 sec) mysql> use mysql_long; Database changed mysql> create table test(id int(3),name char(5)); Query OK, 0 rows affected (0.13 sec) mysql> insert into test values (001,'jlong'); Query OK, 1 row affected (0.01 sec) 8、登录到node02的Mysql,同步正常 三、配置node02为主、node01为从的主从同步 1、登录node02的mysql,创建用于同步的账户repl,密码为123456,并查询master状态,记下file名称和posttion数值,并查询master状态 mysql> GRANT REPLICATION SLAVE ON *.* to 'repl'@'%' identified by '123456'; Query OK, 0 rows affected (0.00 sec) Query OK, 0 rows affected (0.10 sec) 2、登录node01的mysql,执行以下语句开启从服务器,注意这里master_host要填写node02的IP mysql> change master to master_host='192.168.10.72',master_user='repl',master_password='123456',master_log_file='mysql-bin.000001',master_log_pos=318; Query OK, 0 rows affected, 2 warnings (0.36 sec) mysql> start slave; Query OK, 0 rows affected (0.03 sec) 3、查询从服务的状态,状态正常 4、在node02创建一个数据库、一个表并插入一行数据,用于测试node01是否能同步过去 mysql> create database mysql_long2; Query OK, 1 row affected (0.00 sec) mysql> use mysql_long2; Database changed mysql> create table test2(id int(3),name char(10)); Query OK, 0 rows affected (0.71 sec) mysql> insert into test2 values (001,'jianlong'); Query OK, 1 row affected (0.00 sec 5、node01同步正常。 这样互为主从就配置好了,两台机既是对方的Master,又是对方的Slave,无论在哪一台机上数据发生了变化,另一台都能及时进行同步数据,下面我们开始配置keepalived实现高可用。 四、keepalived配置 1、在node01上使用yum安装keepalived [root@node01 ~]# yum install keepalived -y 2、在node02上也使用yum安装keepalived [root@node02 ~]# yum install keepalived -y 3、编辑node01的keepalived的配置文件 1 2 3 4 5 6 7 8 9 10 11 12 13 14 15 16 17 18 19 20 21 22 23 24 25 26 27 28 29 30 31 32 33 34 35 36 37 38 39 40 41 42 43 44 45 46 47 48 49 50 51 52 53 [root@node01~] #cat/etc/keepalived/keepalived.conf !ConfigurationFile for keepalived global_defs{ notification_email{ acassen@firewall.loc failover@firewall.loc sysadmin@firewall.loc } notification_email_from Alexandre.Cassen@firewall.loc smtp_server192.168.200.1 smtp_connect_timeout30 router_idLVS_DEVEL } vrrp_instanceVI_1{ stateBACKUP ##node01和node02都配置成BACKUP,角色由优先级确定 interfaceeth2 virtual_router_id71 priority100 ##node01的优先级设置比node02的高 advert_int1 nopreempt ##设置不抢占(需在BACKUP状态下设置才有效) authentication{ auth_typePASS auth_pass1111 } virtual_ipaddress{ 192.168.10.70 } } virtual_server 192.168.10.703306{ delay_loop6 lb_algowrr lb_kindDR nat_mask255.255.255.0 persistence_timeout50 protocolTCP real_server192.168.10.713306{ weight100 notify_down /etc/keepalived/stopkeepalived .sh #3306端口不可用则执行脚本 TCP_CHECK{ connect_timeout10 nb_get_retry3 delay_before_retry3 connect_port3306 } } } 4、编辑node02的keepalived的配置文件 1 2 3 4 5 6 7 8 9 10 11 12 13 14 15 16 17 18 19 20 21 22 23 24 25 26 27 28 29 30 31 32 33 34 35 36 37 38 39 40 41 42 43 44 45 46 47 48 49 50 51 52 53 54 55 [root@node02~] #cat/etc/keepalived/keepalived.conf !ConfigurationFile for keepalived global_defs{ notification_email{ acassen@firewall.loc failover@firewall.loc sysadmin@firewall.loc } notification_email_from Alexandre.Cassen@firewall.loc smtp_server192.168.200.1 smtp_connect_timeout30 router_idLVS_DEVEL } vrrp_instanceVI_1{ stateBACKUP ##node01和node02都配置成BACKUP,角色由优先级确定 interfaceeth3 virtual_router_id71 priority90 ##node02的优先级设置比node01的低 advert_int1 nopreempt ##设置不抢占(需在BACKUP状态下设置才有效) authentication{ auth_typePASS auth_pass1111 } virtual_ipaddress{ 192.168.10.70 } } virtual_server 192.168.10.703306{ delay_loop6 lb_algowrr lb_kindDR nat_mask255.255.255.0 persistence_timeout50 protocolTCP real_server192.168.10.723306{ weight100 notify_down /etc/keepalived/stopkeepalived .sh #3306端口不可用则执行脚本 TCP_CHECK{ connect_timeout10 nb_get_retry3 delay_before_retry3 connect_port3306 } } } [root@node02~] # 5、node01和node02都编辑一个keepalived的自杀脚本/etc/keepalived/stopalived.sh,一旦检测到Mysql的3306端口不通,便执行此脚本触发vip的切换,脚本内容很简单,就是service keepalived stop就行,因为keepalived服务停止便会触发高可用的切换动作。 6、启动keepalived服务 [root@node01 ~]# service keepalived start Starting keepalived: [ OK ] [root@node02 ~]# service keepalived start Starting keepalived: [ OK ] 7、观察node01的message日志,由于node01的优先级高,因此进入了master角色,vip也已经加上了 1 2 3 4 5 6 7 8 9 10 11 12 13 14 15 16 17 18 19 20 21 22 23 24 25 26 27 28 29 30 31 32 33 34 35 36 37 38 39 40 41 42 43 44 45 46 47 48 49 50 51 52 53 54 55 56 57 58 59 60 61 62 63 64 65 66 67 68 69 [root@node01~] #tail-f/var/log/messages Oct3022:47:46 node01Keepalived[3170]:StartingKeepalivedv1.2.7(09 /26 ,2012) Oct3022:47:46 node01Keepalived[3171]:StartingHealthcheckchildprocess,pid=3173 Oct3022:47:46 node01Keepalived[3171]:StartingVRRPchildprocess,pid=3174 Oct3022:47:46 node01Keepalived_vrrp[3174]:Interfacequeueisempty Oct3022:47:46 node01Keepalived_vrrp[3174]:NetlinkreflectorreportsIP192.168.10.71added Oct3022:47:46 node01Keepalived_vrrp[3174]:NetlinkreflectorreportsIP fe80::20c:29ff:fe20:a6c8added Oct3022:47:46 node01Keepalived_vrrp[3174]:RegisteringKernelnetlinkreflector Oct3022:47:46 node01Keepalived_vrrp[3174]:RegisteringKernelnetlink command channel Oct3022:47:46 node01Keepalived_vrrp[3174]:RegisteringgratuitousARPsharedchannel Oct3022:47:46 node01kernel:IPVS:Registeredprotocols(TCP,UDP,SCTP,AH,ESP) Oct3022:47:46 node01kernel:IPVS:Connection hash tableconfigured(size=4096,memory=64Kbytes) Oct3022:47:46 node01kernel:IPVS:ipvsloaded. Oct3022:47:46 node01Keepalived_vrrp[3174]:Opening file '/etc/keepalived/keepalived.conf' . Oct3022:47:46 node01Keepalived_vrrp[3174]:Configurationisusing:63319Bytes Oct3022:47:46 node01Keepalived_vrrp[3174]:UsingLinkWatchkernelnetlinkreflector... Oct3022:47:46 node01Keepalived_healthcheckers[3173]:Interfacequeueisempty Oct3022:47:46 node01Keepalived_healthcheckers[3173]:NetlinkreflectorreportsIP 192.168.10.71added Oct3022:47:46 node01Keepalived_healthcheckers[3173]:NetlinkreflectorreportsIP fe80::20c:29ff:fe20:a6c8added Oct3022:47:46 node01Keepalived_healthcheckers[3173]:RegisteringKernelnetlinkreflector Oct3022:47:46 node01Keepalived_healthcheckers[3173]:RegisteringKernelnetlink command channel Oct3022:47:46 node01Keepalived_healthcheckers[3173]:Opening file '/etc/keepalived/keepalived.conf' Oct3022:47:46 node01Keepalived_healthcheckers[3173]:Configurationisusing:11970Bytes Oct3022:47:46 node01Keepalived_vrrp[3174]:VRRPsockpool:[ifindex(2),proto(112),fd(11,12)] Oct3022:47:46 node01Keepalived_healthcheckers[3173]:UsingLinkWatchkernelnetlinkreflector... Oct3022:47:46 node01Keepalived_healthcheckers[3173]:Activatinghealthchecker for service [192.168.10.71]:3306 Oct3022:47:46 node01kernel:IPVS:[wrr]schedulerregistered. Oct3022:47:47 node01Keepalived_vrrp[3174]:VRRP_Instance(VI_1)TransitiontoMASTERSTATE Oct3022:47:48 node01Keepalived_vrrp[3174]:VRRP_Instance(VI_1)EnteringMASTERSTATE Oct3022:47:48 node01Keepalived_vrrp[3174]:VRRP_Instance(VI_1)settingprotocolVIPs. Oct3022:47:48 node01Keepalived_vrrp[3174]:VRRP_Instance(VI_1)SendinggratuitousARPson eth2 for 192.168.10.70 Oct3022:47:48 node01Keepalived_healthcheckers[3173]:NetlinkreflectorreportsIP 192.168.10.70added 8、观察node02的message日志,node02进入了BACKUP角色,VIP自然不会加上。 1 2 3 4 5 6 7 8 9 10 11 12 13 14 15 16 17 18 19 20 21 22 23 24 25 26 27 28 29 30 31 32 33 34 35 36 37 38 39 40 41 42 43 44 45 46 47 48 49 50 51 [root@node02~] #tail-f/var/log/messages Oct3022:48:54 node02Keepalived[16633]:StartingKeepalivedv1.2.7(09 /26 ,2012) Oct3022:48:54 node02Keepalived[16634]:StartingHealthcheckchildprocess,pid=16636 Oct3022:48:54 node02Keepalived[16634]:StartingVRRPchildprocess,pid=16637 Oct3022:48:54 node02Keepalived_vrrp[16637]:Interfacequeueisempty Oct3022:48:54 node02Keepalived_healthcheckers[16636]:Interfacequeueisempty Oct3022:48:54 node02Keepalived_vrrp[16637]:NetlinkreflectorreportsIP192.168.10.72added Oct3022:48:54 node02Keepalived_vrrp[16637]:NetlinkreflectorreportsIP fe80::250:56ff:fe34:ca7added Oct3022:48:54 node02Keepalived_vrrp[16637]:RegisteringKernelnetlinkreflector Oct3022:48:54 node02Keepalived_vrrp[16637]:RegisteringKernelnetlink command channel Oct3022:48:54 node02Keepalived_vrrp[16637]:RegisteringgratuitousARPsharedchannel Oct3022:48:54 node02Keepalived_vrrp[16637]:Opening file '/etc/keepalived/keepalived.conf' . Oct3022:48:54 node02Keepalived_healthcheckers[16636]:NetlinkreflectorreportsIP 192.168.10.72added Oct3022:48:54 node02Keepalived_healthcheckers[16636]:NetlinkreflectorreportsIP fe80::250:56ff:fe34:ca7added Oct3022:48:54 node02Keepalived_healthcheckers[16636]:RegisteringKernelnetlinkreflector Oct3022:48:54 node02Keepalived_healthcheckers[16636]:RegisteringKernelnetlink command channel Oct3022:48:54 node02Keepalived_healthcheckers[16636]:Opening file '/etc/keepalived/keepalived.conf' . Oct3022:48:54 node02Keepalived_healthcheckers[16636]:Configurationisusing:11988Bytes Oct3022:48:54 node02Keepalived_vrrp[16637]:Configurationisusing:63337Bytes Oct3022:48:54 node02Keepalived_vrrp[16637]:UsingLinkWatchkernelnetlinkreflector... Oct3022:48:54 node02Keepalived_vrrp[16637]:VRRP_Instance(VI_1)EnteringBACKUPSTATE Oct3022:48:54 node02Keepalived_healthcheckers[16636]:UsingLinkWatchkernelnetlinkreflector... Oct3022:48:54 node02Keepalived_vrrp[16637]:VRRPsockpool:[ifindex(2),proto(112),fd(10,11)] Oct3022:48:54 node02Keepalived_healthcheckers[16636]:Activatinghealthchecker for service[192.168.10.72]:3306 9、测试vip是否可能用来登录mysql,由于此时vip在node01上,我们就在node02上使用vip来测试登录,可见是没有问题的 五、Mysql高可用测试 1、停止node01的mysql服务,3306端口自然不通,keepalived检测到3306端口不通后执行自杀脚本停止自身服务,VIP被移除释放出来 1 2 [root@node01~] #servicemysqlstop ShuttingdownMySQL..[OK] 2、观察node01的messages日志可以明显看出整个过程,VIP也已经不见了 1 2 3 4 5 6 7 8 9 10 11 12 13 14 15 16 17 18 19 20 21 [root@node01~] #tail-f/var/log/messages Oct3023:06:42 node01Keepalived_healthcheckers[3173]:TCPconnectionto[192.168.10.71]:3306failed!!! Oct3023:06:42 node01Keepalived_healthcheckers[3173]:Removingservice[192.168.10.71]:3306 fromVS[192.168.10.70]:3306 Oct3023:06:42 node01Keepalived_healthcheckers[3173]:Executing[ /etc/keepalived/stopkeepalived .sh] for service[192.168.10.71]:3306 in VS[192.168.10.70]:3306 Oct3023:06:42 node01Keepalived_healthcheckers[3173]:Lostquorum1-0=1>0 for VS[192.168.10.70]:3306 Oct3023:06:42 node01Keepalived_healthcheckers[3173]:SMTPconnectionERRORto[192.168.200.1]:25. Oct3023:06:42 node01kernel:IPVS:__ip_vs_del_service:enter Oct3023:06:42 node01Keepalived[3171]:StoppingKeepalivedv1.2.7(09 /26 ,2012) Oct3023:06:42 node01Keepalived_vrrp[3174]:VRRP_Instance(VI_1)sending0priority Oct3023:06:42 node01Keepalived_vrrp[3174]:VRRP_Instance(VI_1)removingprotocolVIPs. 3、观察node02的messages日志,可以看到node02进入了MASTER角色,接管了VIP,VIP已经加上,从日志的时间看,切换的过程不过花了1秒,可说是秒级切换了。 1 2 3 4 5 6 7 8 9 10 11 12 [root@node02~] #tail-f/var/log/messages Oct3023:06:42 node02Keepalived_vrrp[16637]:VRRP_Instance(VI_1)TransitiontoMASTERSTATE Oct3023:06:43 node02Keepalived_vrrp[16637]:VRRP_Instance(VI_1)EnteringMASTERSTATE Oct3023:06:43 node02Keepalived_vrrp[16637]:VRRP_Instance(VI_1)settingprotocolVIPs. Oct3023:06:43 node02Keepalived_vrrp[16637]:VRRP_Instance(VI_1)SendinggratuitousARPs oneth3 for 192.168.10.70 Oct3023:06:43 node02Keepalived_healthcheckers[16636]:NetlinkreflectorreportsIP192.168.10.70added 由于node01的keepalived进程被自杀脚本停止了,因此需要手动启动。之前我想是否需要跑一个监控脚本把keepalived服务自动开起来呢,后来我觉得不必要,因为如果mysql的服务依然异常,就算keepalived的服务起来了,它检测到本机的3306端口不通,还是会再次自杀。而既然mysql服务已经异常、端口都不通了,一般也是需要手动检查干预把mysql启动起来的,因此在mysql服务正常后再顺便手动起一下keepalived就好了。 本文转自Mr大表哥jianlong1990 博客,原文链接: http://blog.51cto.com/jiangjianlong/1981994 如需转载请自行联系原作者