HarmonyOS实战—实现相亲APP
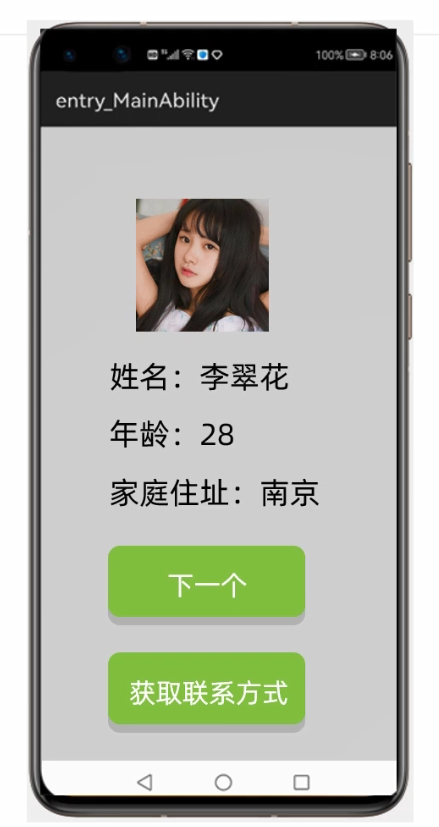
简易版 相亲APP 实现如下效果: 如果喜欢就点击下面的“联系方式”,不喜欢就点击“下一个” 1. 布局实现 新建项目:MakeFriendsApplication 把以下九个girl图片复制到 media 文件夹下 有需要上面图片素材的小伙伴可以自取:https://www.aliyundrive.com/s/j59dy5redPR 当然也可以自己在网上找,图片信息如下: 可以在上面的实现看到布局是由:一个图片+三个文本+两个按钮 组成的 布局实现: ability_main <?xml version="1.0" encoding="utf-8"?> <DirectionalLayout xmlns:ohos="http://schemas.huawei.com/res/ohos" ohos:height="match_parent" ohos:width="match_parent" ohos:alignment="center" ohos:orientation="vertical"> <Image ohos:id="$+id:img" ohos:height="match_content" ohos:width="match_content" ohos:image_src="$media:girl1"/> <Text ohos:id="$+id:name" ohos:height="50vp" ohos:width="150vp" ohos:text="姓名:王美花" ohos:text_size="20fp"/> <Text ohos:id="$+id:age" ohos:height="50vp" ohos:width="150vp" ohos:text="年龄:29" ohos:text_size="20fp"/> <Text ohos:id="$+id:address" ohos:height="50vp" ohos:width="150vp" ohos:text="地址:南京" ohos:text_size="20fp"/> <Button ohos:id="$+id:next" ohos:height="50vp" ohos:width="150vp" ohos:background_element="#92D050" ohos:text="下一个" ohos:text_size="20fp" ohos:text_color="#FFFFFF"/> <Button ohos:id="$+id:get" ohos:height="50vp" ohos:width="150vp" ohos:background_element="#92D050" ohos:text="获取联系方式" ohos:text_size="20fp" ohos:text_color="#FFFFFF" ohos:top_margin="10vp"/> </DirectionalLayout> 运行: 2. 核心业务逻辑实现 先找到组件对象 业务:点击了按钮“下一个”就要修改上面的信息,能不能把上面的信息看作成一个整体的对象? 现在有9个相亲对象,点击“下一个”的时候,就会随机把一个相亲对象的信息去显示在上面。 创建一个Javabean类去描述女朋友信息,有了Javabean类后才能在代码中创建对象 在domain中新建类名为:GirlFriend,在类中的属性有哪些? 如:图片、姓名、地址、年龄都是GirlFriend类中的属性 在资源管理器中获取图片,发现girl图片是int类型的 所以在JavaBean中GirlFriend类中图片类型使用int类型 其他属性使用对应的类型 最后生成标准的JavaBean即可 package com.xdr630.makefriendsapplication.domain; public class GirlFriend { //照片 private int photoID; //姓名 private String name; //年龄 private int age; //地址 private String address; //空参 + 全参:alt + insert public GirlFriend() { } public GirlFriend(int photoID, String name, int age, String address) { this.photoID = photoID; this.name = name; this.age = age; this.address = address; } public int getPhotoID() { return photoID; } public void setPhotoID(int photoID) { this.photoID = photoID; } public String getName() { return name; } public void setName(String name) { this.name = name; } public int getAge() { return age; } public void setAge(int age) { this.age = age; } public String getAddress() { return address; } public void setAddress(String address) { this.address = address; } } 创建好了Javabean,就可以创建一个集合装9个相亲的对象,使用集合来存储了,ArrayList,泛型就可以直接写创建好的GirlFriend 类 在以后学习了和服务器交互之后,这些数据都是从服务器获取的,就不是一个一个添加了 下面就是手动添加数据来源 创建一个女朋友对象(new GirlFriend )并添加到 list 当中 为了方便,省的去查看Javabean中属性的排序,Ctrl + P 就可以查看参数了 添加完成9个对象 接着给按钮添加点击事件,两个按钮都要添加,分别是“next”和“get”按钮 实现本类中点击事件 当next按钮被点击后,就会执行本类中的onClick方法 get 按钮同上也要添加单击事件 然后在 onClick 方法中判断点击是 next 按钮 或 get 按钮 因为在 onClick 方法中要用到按钮的对象,所以把按钮的对象提升为 成员变量 才能在onClick方法中被访问的到,用到哪个就提哪个,这些组件都用的到,所以都提为成员变量。 在下面onClick方法当中,要从集合中获取girl信息,所以集合也要提为成员变量 Random对象也放在成员位置,表示在程序启动之后就创建了一个,如果放在onClick方法中,当点击一次就创建一次,内存冗余。 MainAbilitySlice package com.xdr630.makefriendsapplication.slice; import com.xdr630.makefriendsapplication.ResourceTable; import com.xdr630.makefriendsapplication.domain.GirlFriend; import ohos.aafwk.ability.AbilitySlice; import ohos.aafwk.content.Intent; import ohos.agp.components.Button; import ohos.agp.components.Component; import ohos.agp.components.Image; import ohos.agp.components.Text; import java.util.ArrayList; import java.util.Random; public class MainAbilitySlice extends AbilitySlice implements Component.ClickedListener { Image img; Text name; Text age; Text address; Button next; Button get; ArrayList<girlfriend> list = new ArrayList<>(); @Override public void onStart(Intent intent) { super.onStart(intent); super.setUIContent(ResourceTable.Layout_ability_main); //1.找到组件对象 img = (Image) findComponentById(ResourceTable.Id_img); name = (Text) findComponentById(ResourceTable.Id_name); age = (Text) findComponentById(ResourceTable.Id_age); address = (Text) findComponentById(ResourceTable.Id_address); next = (Button) findComponentById(ResourceTable.Id_next); get = (Button) findComponentById(ResourceTable.Id_get); //2.创建一个集合装9个相亲的对象 //添加9个对象 //在以后学习了和服务器交互之后,这些数据都是从服务器获取的 list.add(new GirlFriend(ResourceTable.Media_girl1,"王美花1",29,"南京")); list.add(new GirlFriend(ResourceTable.Media_girl2,"王美花2",30,"上海")); list.add(new GirlFriend(ResourceTable.Media_girl3,"王美花3",31,"武汉")); list.add(new GirlFriend(ResourceTable.Media_girl4,"王美花4",28,"长沙")); list.add(new GirlFriend(ResourceTable.Media_girl5,"王美花5",25,"南昌")); list.add(new GirlFriend(ResourceTable.Media_girl6,"王美花6",26,"杭州")); list.add(new GirlFriend(ResourceTable.Media_girl7,"王美花7",23,"深圳")); list.add(new GirlFriend(ResourceTable.Media_girl8,"王美花8",22,"北京")); list.add(new GirlFriend(ResourceTable.Media_girl9,"王美花9",24,"广州")); //3.给按钮添加点击事件 next.setClickedListener(this); get.setClickedListener(this); } @Override public void onActive() { super.onActive(); } @Override public void onForeground(Intent intent) { super.onForeground(intent); } Random r = new Random(); @Override public void onClick(Component component) { if (component == next){ //点击的是下一个 --- 换一个girl的信息 //从集合中获取一个随机的girl的信息 //获取一个随机索引 int randomIndex = r.nextInt(list.size()); //通过随机索引获取随机girl信息 GirlFriend girlFriend = list.get(randomIndex); //把随机出来的信息设置到界面当中 img.setImageAndDecodeBounds(girlFriend.getPhotoID()); name.setText("姓名:" + girlFriend.getName()); age.setText("年龄:" + girlFriend.getAge()); address.setText("地址:" + girlFriend.getAddress()); }else if (component == get){ //获取联系方式 //扩展:可以跳转到界面让用户充值界面,充值后才能看到girl信息 } } } 运行: 点击“下一个” 当点击“下一个”按钮时,信息也会随之一起获取的到,所以有需求的小伙伴可以扩展下,当点击“下一个”按钮时信息是隐藏的,只有当点击“获取联系方式”时才能显示出对应的信息,或也可以添加充值页面,当点击“获取联系方式”时,就跳转到充值页面,只有充值完后才能看到对应的信息。