Java并发编程-撸一个数据库连接池
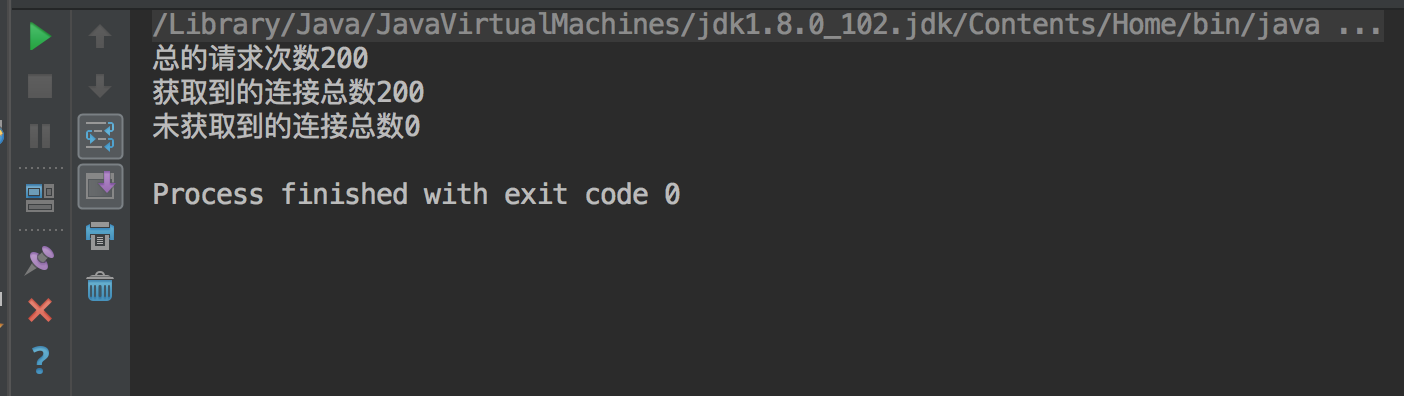
章节目录 等待超时模式的使用场景 可以掌握的技能 等待/通知 消费者/生产者模式 CountDownLatch、AtomicInteger、静态内部类、LinkedList、动态代理的使用 1.等待超时模式 场景 当我们调用方法时,这个方法返回的资源比较重要,比如获取数据库连接池中连接句柄。但是这个资源的返回随着业务量的增加,那么获取资源(连接池连接)的时间就会增加,那么调用一个方法时就要等待一段时间(一般来说是给定一个时间段),如果该方法能够在一段时间内获取到结果,那么将结果立刻返回,反之,超时返回默认结果。 等待/通知的经典范式,即加锁、条件循环、处理逻辑3个步骤,这种范式没办法做到超时等待,对经典范式做很小的改动,就可以实现超时等待。 等待超时模式伪代码: public synchronized Object get(long mills) throws InterruptedException { Object result = null; long future = System.currentTimeMills() + mills; long remaining = mills; while (result == null && remaining > 0) { wait(remaining);//释放锁,阻塞 mills 毫秒 remaining = future - System.currentTimeMills(); } return result;//如果超时之后获取到result则不返回null } 超时等待的作用就是不会永远阻塞调用者,但是 超时之后被唤醒,知识将线程从等待队列移动至阻塞队列,继续向下进行返回result还是要重新获取锁,如果一直获取不到锁,那么result也不会打印。只是增加了灵活性。 2.可以掌握的技能 实战 使用等待超时模式撸一个简单数据库连接池,在示例中模拟: 从连接池获取连接 RunnerThread 使用连接 RunnerThread 释放连接 RunnerThread注意:客户端获取(消费)连接的过程被设定为等待超时、等待/通知两种模式ConnectionPool.java-数据库连接池 package org.seckill.DBConnection; import java.sql.Connection; import java.util.LinkedList; /** * 数据库连接池对象 */ public class ConnectionPool { //链表list(池)维护 connection 连接对象 private LinkedList<Connection> pool = new LinkedList<Connection>(); //构造方法 初始化池中连接 public ConnectionPool(int initialSize) { if (initialSize > 0) { for (int i = 0; i < initialSize; i++) { pool.addLast(ConnectionDriver.createConnection());//创建initialSize个代理Connection对象 } } } //释放connection ,相当于-生产者 public void releaseConnection(Connection connection) { if (connection != null) {//有效归还连接 synchronized (pool) { pool.addLast(connection); //生产者动作完毕后,需要唤醒所有消费者 pool.notifyAll(); } } } //获取connection句柄,相当于消费者,采用超时等待与等待/通知两种策略 public Connection fetchConnection(long mills) throws InterruptedException { synchronized (pool) { if (mills < 0) {//非超时等待模式,采用等待/通知模式 while (pool.isEmpty()) { pool.wait();//本示例中不演示这种模式下获取连接的情景 } return pool.removeFirst(); } else {//超时等待模式 long future = System.currentTimeMillis() + mills; long remaining = mills; while (pool.isEmpty() && remaining > 0) { pool.wait(remaining); remaining = future - System.currentTimeMillis(); } Connection connection = null; if (!pool.isEmpty()) { connection = pool.removeFirst();//返回头结点对象 } return connection; } } } } ConnectionDriver.java-动态生成Connection代理对象 package org.seckill.DBConnection; import java.lang.reflect.InvocationHandler; import java.lang.reflect.Method; import java.lang.reflect.Proxy; import java.sql.Connection; /** * 数据库连接驱动, * 动态代理获取实现java.sql.Connection 接口的代理对象 */ public class ConnectionDriver { static class ConnectionHandler implements InvocationHandler { public Object invoke(Object proxy, Method method, Object[] args) throws Throwable { if (method.getName() == "commit") { Thread.sleep(100); } return null; } } //获取Connection的动态代理类 public static final Connection createConnection() { return (Connection) Proxy.newProxyInstance( ConnectionDriver.class.getClassLoader(),//类加载器 new Class<?>[]{Connection.class},//Connection实现的接口列表,包含Connection接口 new ConnectionHandler());//与代理对象绑定的handler } } ConnectionPoolTest.java--测试类 package org.seckill.DBConnection; import java.sql.Connection; import java.util.concurrent.CountDownLatch; import java.util.concurrent.atomic.AtomicInteger; public class ConnectionPoolTest { //线程池中初始化10个连接 static ConnectionPool connectionPool = new ConnectionPool(10); //保证所有的ConnectionRunner 能够同时开始 static CountDownLatch start = new CountDownLatch(1); //main线程将等待所有的Connection Runner结束后才开始执行 static CountDownLatch end; public static void main(String[] args) throws Exception { //ConnectionRunner 线程数量,可以修改线程数量进行观察 int threadCount = 50; end = new CountDownLatch(threadCount); int count = 20;//每个线程进行20次fetchConnetion动作 AtomicInteger got = new AtomicInteger(); AtomicInteger notGot = new AtomicInteger(); for (int i = 0; i < threadCount; i++) { Thread thread = new Thread(new ConnectionRunner(count, got, notGot), "ConnectionRunnerThread"); thread.start(); } start.countDown();//使所有线程同时运行 end.await();//主线程等待所有线程运行完 System.out.println("总的请求次数" + threadCount * count); System.out.println("获取到的连接总数" + got); System.out.println("未获取到的连接总数" + notGot); } static class ConnectionRunner implements Runnable { int count;//每个线程fetchConnetion的次数 AtomicInteger got;//记录fetchConnection 成功的次数 AtomicInteger notGot;//记录fetchConnetion 未成功的次数 public ConnectionRunner(int count, AtomicInteger got, AtomicInteger notGot) { this.count = count; this.got = got; this.notGot = notGot; } public void run() { try { start.await();//等待 所有ConnectionRunner 初始化成功且处于Runnable状态,同时开始运行,由主线程控制的 } catch (InterruptedException e) { e.printStackTrace(); } while (count > 0) { try { //从连接池中获取连接,如果1000ms内无法获取到,将会返回null。 Connection connection = connectionPool.fetchConnection(1000); if (connection != null) { try { connection.createStatement(); connection.commit(); } finally { //归还连接 connectionPool.releaseConnection(connection); got.incrementAndGet();//对获取次数状态进行更改 } } else { notGot.incrementAndGet();//对未获取次数状态进行更改 } } catch (Exception e) { } finally { count--;//运行次数递减 } } end.countDown(); } } } 运行结果 1.设置RunnerConnection threadCount数为10 threadCount = 10 2.设置RunnerConnection threadCount数为20 threadCount = 20 3.设置RunnerConnection threadCount数为50 threadCount = 50 4.设置RunnerConnection threadCount数为100 threadCount = 50 可以看到随着 runnerConnection 连接线程数的递增,连接的稳定性是越来越低的。但用户调用不会长时间阻塞到connect fetch 上,而是按时返回。