首页 文章 精选 留言 我的

精选列表

搜索[运维产品],共10007篇文章
优秀的个人博客,低调大师

MongoDB日常操作命令小结

总所周知,MongoDB是一个NoSQL非数据库系统,即一个数据库可以包含多个集合(Collection),每个集合对应于关系数据库中的表;而每个集合中可以存储一组由列标识的记录,列是可以自由定义的,非常灵活,由一组列标识的实体的集合对应于关系数据库表中的行。下面通过熟悉MongoDB的基本管理命令,来了解MongoDB提供的DBMS的基本功能和行为。 0)MongoDB的安装 [root@centos6-vm01~]#curl-Ohttps://fastdl.mongodb.org/linux/mongodb-linux-x86_64-3.0.6.tgz [root@centos6-vm01~]#tar-zxvfmongodb-linux-x86_64-3.0.6.tgz [root@centos6-vm01~]#mvmongodb-linux-x86_64-3.0.6//usr/local/mongodb [root@centos6-vm01~]#vim/etc/profile ...... exportPATH=$PATH:/usr/local/mongodb/bin/ [root@centos6-vm01~]#source/etc/profile 启动mongodb [root@centos6-vm01~]#mkdir-p/data/db [root@centos6-vm01~]#cd/usr/local/mongodb/bin/ [root@centos6-vm01bin]#./mongod& [root@centos6-vm01bin]#lsof-i:27017 COMMANDPIDUSERFDTYPEDEVICESIZE/OFFNODENAME mongod24304root5uIPv41873600t0TCP*:27017(LISTEN) mongod24304root12uIPv41874560t0TCPlocalhost:27017->localhost:48742(ESTABLISHED) mongo24319root3uIPv41874550t0TCPlocalhost:48742->localhost:27017(ESTABLISHED) ----------------------------------------------------- 连接mongodb报错: Failedglobalinitialization:BadValueInvalidornouserlocaleset.PleaseensureLANGand/orLC_*environmentvariablesaresetcorrectly. 解决办法: [root@centos6-vm01~]#vim/etc/profile ...... exportLC_ALL=C [root@centos6-vm01~]#source/etc/profile ----------------------------------------------------- 1)MongoDB命令帮助系统在安装MongoDB后,启动服务器进程(mongod),可以通过在客户端命令mongo实现对MongoDB的管理和监控。看一下MongoDB的命令帮助系统: [root@centos6-vm01~]#mongo MongoDBshellversion:3.0.6 connectingto:test WelcometotheMongoDBshell. Forinteractivehelp,type"help". Formorecomprehensivedocumentation,see http://docs.mongodb.org/ Questions?Trythesupportgroup http://groups.google.com/group/mongodb-user Serverhasstartupwarnings: 2018-01-02T23:24:23.304+0000ICONTROL[initandlisten]**WARNING:Youarerunningthisprocessastherootuser,whichisnotrecommended. 2018-01-02T23:24:23.304+0000ICONTROL[initandlisten] 2018-01-02T23:24:23.307+0000ICONTROL[initandlisten] 2018-01-02T23:24:23.307+0000ICONTROL[initandlisten]**WARNING:/sys/kernel/mm/transparent_hugepage/enabledis'always'. 2018-01-02T23:24:23.307+0000ICONTROL[initandlisten]**Wesuggestsettingitto'never' 2018-01-02T23:24:23.307+0000ICONTROL[initandlisten] 2018-01-02T23:24:23.307+0000ICONTROL[initandlisten]**WARNING:/sys/kernel/mm/transparent_hugepage/defragis'always'. 2018-01-02T23:24:23.307+0000ICONTROL[initandlisten]**Wesuggestsettingitto'never' 2018-01-02T23:24:23.307+0000ICONTROL[initandlisten] >help db.help()helpondbmethods db.mycoll.help()helponcollectionmethods sh.help()shardinghelpers rs.help()replicasethelpers helpadminadministrativehelp helpconnectconnectingtoadbhelp helpkeyskeyshortcuts helpmiscmiscthingstoknow helpmrmapreduce showdbsshowdatabasenames showcollectionsshowcollectionsincurrentdatabase showusersshowusersincurrentdatabase showprofileshowmostrecentsystem.profileentrieswithtime>=1ms showlogsshowtheaccessibleloggernames showlog[name]printsoutthelastsegmentofloginmemory,'global'isdefault use<db_name>setcurrentdatabase db.foo.find()listobjectsincollectionfoo db.foo.find({a:1})listobjectsinfoowherea==1 itresultofthelastlineevaluated;usetofurtheriterate DBQuery.shellBatchSize=xsetdefaultnumberofitemstodisplayonshell exitquitthemongoshell > 这是MongoDB最顶层的命令列表,主要告诉我们管理数据库相关的一些抽象的范畴:数据库操作帮助、集合操作帮助、管理帮助。如果你想了解数据库操作更详细的帮助命令,可以直接使用db.help(),如下所示: >db.help() DBmethods: db.adminCommand(nameOrDocument)-switchesto'admin'db,andrunscommand[justcallsdb.runCommand(...)] db.auth(username,password) db.cloneDatabase(fromhost) db.commandHelp(name)returnsthehelpforthecommand db.copyDatabase(fromdb,todb,fromhost) db.createCollection(name,{size:...,capped:...,max:...}) db.createUser(userDocument) db.currentOp()displayscurrentlyexecutingoperationsinthedb db.dropDatabase() db.eval()-deprecated db.fsyncLock()flushdatatodiskandlockserverforbackups db.fsyncUnlock()unlocksserverfollowingadb.fsyncLock() db.getCollection(cname)sameasdb['cname']ordb.cname db.getCollectionInfos() db.getCollectionNames() db.getLastError()-justreturnstheerrmsgstring db.getLastErrorObj()-returnfullstatusobject db.getLogComponents() db.getMongo()gettheserverconnectionobject db.getMongo().setSlaveOk()allowqueriesonareplicationslaveserver db.getName() db.getPrevError() db.getProfilingLevel()-deprecated db.getProfilingStatus()-returnsifprofilingisonandslowthreshold db.getReplicationInfo() db.getSiblingDB(name)getthedbatthesameserverasthisone db.getWriteConcern()-returnsthewriteconcernusedforanyoperationsonthisdb,inheritedfromserverobjectifset db.hostInfo()getdetailsabouttheserver'shost db.isMaster()checkreplicaprimarystatus db.killOp(opid)killsthecurrentoperationinthedb db.listCommands()listsallthedbcommands db.loadServerScripts()loadsallthescriptsindb.system.js db.logout() db.printCollectionStats() db.printReplicationInfo() db.printShardingStatus() db.printSlaveReplicationInfo() db.dropUser(username) db.repairDatabase() db.resetError() db.runCommand(cmdObj)runadatabasecommand.ifcmdObjisastring,turnsitinto{cmdObj:1} db.serverStatus() db.setLogLevel(level,<component>) db.setProfilingLevel(level,<slowms>)0=off1=slow2=all db.setWriteConcern(<writeconcerndoc>)-setsthewriteconcernforwritestothedb db.unsetWriteConcern(<writeconcerndoc>)-unsetsthewriteconcernforwritestothedb db.setVerboseShell(flag)displayextrainformationinshelloutput db.shutdownServer() db.stats() db.version()currentversionoftheserver 对数据库进行管理和操作的基本命令,可以从上面获取到。如果想要得到更多,而且每个命令的详细用法,可以使用上面列出的db.listCommands()查询。另一个比较基础的是对指定数据库的集合进行操作、管理和监控,可以通过查询db.mycoll.help()获取到: >db.mycoll.help() DBCollectionhelp db.mycoll.find().help()-showDBCursorhelp db.mycoll.count() db.mycoll.copyTo(newColl)-duplicatescollectionbycopyingalldocumentstonewColl;noindexesarecopied. db.mycoll.convertToCapped(maxBytes)-calls{convertToCapped:'mycoll',size:maxBytes}}command db.mycoll.dataSize() db.mycoll.distinct(key)-e.g.db.mycoll.distinct('x') db.mycoll.drop()dropthecollection db.mycoll.dropIndex(index)-e.g.db.mycoll.dropIndex("indexName")ordb.mycoll.dropIndex({"indexKey":1}) db.mycoll.dropIndexes() db.mycoll.ensureIndex(keypattern[,options]) db.mycoll.explain().help()-showexplainhelp db.mycoll.reIndex() db.mycoll.find([query],[fields])-queryisanoptionalqueryfilter.fieldsisoptionalsetoffieldstoreturn. e.g.db.mycoll.find({x:77},{name:1,x:1}) db.mycoll.find(...).count() db.mycoll.find(...).limit(n) db.mycoll.find(...).skip(n) db.mycoll.find(...).sort(...) db.mycoll.findOne([query]) db.mycoll.findAndModify({update:...,remove:bool[,query:{},sort:{},'new':false]}) db.mycoll.getDB()getDBobjectassociatedwithcollection db.mycoll.getPlanCache()getqueryplancacheassociatedwithcollection db.mycoll.getIndexes() db.mycoll.group({key:...,initial:...,reduce:...[,cond:...]}) db.mycoll.insert(obj) db.mycoll.mapReduce(mapFunction,reduceFunction,<optionalparams>) db.mycoll.aggregate([pipeline],<optionalparams>)-performsanaggregationonacollection;returnsacursor db.mycoll.remove(query) db.mycoll.renameCollection(newName,<dropTarget>)renamesthecollection. db.mycoll.runCommand(name,<options>)runsadbcommandwiththegivennamewherethefirstparamisthecollectionname db.mycoll.save(obj) db.mycoll.stats({scale:N,indexDetails:true/false,indexDetailsKey:<indexkey>,indexDetailsName:<indexname>}) db.mycoll.storageSize()-includesfreespaceallocatedtothiscollection db.mycoll.totalIndexSize()-sizeinbytesofalltheindexes db.mycoll.totalSize()-storageallocatedforalldataandindexes db.mycoll.update(query,object[,upsert_bool,multi_bool])-insteadoftwoflags,youcanpassanobjectwithfields:upsert,multi db.mycoll.validate(<full>)-SLOW db.mycoll.getShardVersion()-onlyforusewithsharding db.mycoll.getShardDistribution()-printsstatisticsaboutdatadistributioninthecluster db.mycoll.getSplitKeysForChunks(<maxChunkSize>)-calculatessplitpointsoverallchunksandreturnssplitterfunction db.mycoll.getWriteConcern()-returnsthewriteconcernusedforanyoperationsonthiscollection,inheritedfromserver/dbifset db.mycoll.setWriteConcern(<writeconcerndoc>)-setsthewriteconcernforwritestothecollection db.mycoll.unsetWriteConcern(<writeconcerndoc>)-unsetsthewriteconcernforwritestothecollection 有关数据库和集合管理的相关命令,是最基础和最常用的,如集合查询、索引操作等。下面通过实际的例子来演示一些常见的命令: 一、基本命令1)show dbs显示当前数据库服务器上的数据库 2)use pagedb切换到指定数据库pagedb的上下文,可以在此上下文中管理pagedb数据库以及其中的集合等 3)show collections显示数据库中所有的集合(collection) 4)db.serverStatus() 查看数据库服务器的状态。有时,通过查看数据库服务器的状态,可以判断数据库是否存在问题,如果有问题,如数据损坏,可以及时执行修复。 5)查询指定数据库统计信息use fragmentdb.stats()查询结果示例如下所示: >usefragment switchedtodbfragment >db.stats() { "db":"fragment", "collections":0, "objects":0, "avgObjSize":0, "dataSize":0, "storageSize":0, "numExtents":0, "indexes":0, "indexSize":0, "fileSize":0, "ok":1 } 6)查询指定数据库包含的集合名称列表db.getCollectionNames()结果如下所示: >db.getCollectionNames() [ "17u", "baseSe", "bytravel", "daodao", "go2eu", "lotour", "lvping", "mafengwo", "sina", "sohu", "system.indexes" ] 二、基本DDL和DML1)创建数据库如果你习惯了关系型数据库,你可能会寻找相关的创建数据库的命令。在MongoDB中,你可以直接通过use dbname来切换到这个数据库上下文下面,系统会自动延迟创建该数据库,例如: >showdbs local0.078GB >useLuceneIndexDB switchedtodbLuceneIndexDB >showdbs local0.078GB >db LuceneIndexDB >db.storeCollection.save({'version':'3.5','segment':'e3ol6'}) WriteResult({"nInserted":1}) >showdbs LuceneIndexDB0.078GB local0.078GB > 可见,在use指定数据库后,并且向指定其中的一个集合并插入数据后,数据库和集合都被创建了。 2)删除数据库直接使用db.dropDatabase()即可删除数据库。 3)创建集合可以使用命令db.createCollection(name, { size : ..., capped : ..., max : ... } )创建集合,示例如下所示: >db.createCollection('replicationColletion',{'capped':true,'size':10240,'max':17855200}) {"ok":1} >showcollections replicationColletion storeCollection system.indexes 4)删除集合删除集合,可以执行db.mycoll.drop()。 5)插入更新记录直接使用集合的save方法,如下所示: >db.storeCollection.save({'version':'3.5','segment':'e3ol6'}) WriteResult({"nInserted":1}) 更新记录,使用save会将原来的记录值进行覆盖实现记录更新。 6)查询一条记录使用findOne()函数,参数为查询条件,可选,系统会随机查询获取到满足条件的一条记录(如果存在查询结果数量大于等于1)示例如下所示: >db.storeCollection.findOne({'version':'3.5'}) { "_id":ObjectId("5a4c1733f5c45f057ae82292"), "version":"3.5", "segment":"e3ol6" } 7)查询多条记录使用find()函数,参数指定查询条件,不指定条件则查询全部记录。 8)删除记录使用集合的remove()方法,参数指定为查询条件,示例如下所示: >db.storeCollection.remove({'version':'3.5'}) WriteResult({"nRemoved":2}) >db.storeCollection.findOne() null 9)创建索引可以使用集合的ensureIndex(keypattern[,options])方法,示例如下所示: >usepagedb switchedtodbpagedb >db.page.ensureIndex({'title':1,'url':-1}) { "createdCollectionAutomatically":true, "numIndexesBefore":1, "numIndexesAfter":2, "ok":1 } >db.system.indexes.find() {"v":1,"key":{"_id":1},"name":"_id_","ns":"pagedb.page"} {"v":1,"key":{"title":1,"url":-1},"name":"title_1_url_-1","ns":"pagedb.page"} 上述,ensureIndex方法参数中,数字1表示升序,-1表示降序。使用db.system.indexes.find()可以查询全部索引。 10)查询索引我们为集合建立的索引,那么可以通过集合的getIndexes()方法实现查询,示例如下所示: >db.page.getIndexes() [ { "v":1, "key":{ "_id":1 }, "name":"_id_", "ns":"pagedb.page" }, { "v":1, "key":{ "title":1, "url":-1 }, "name":"title_1_url_-1", "ns":"pagedb.page" } ] 当然,如果需要查询系统中全部的索引,可以使用db.system.indexes.find()函数。 11)删除索引删除索引给出了两个方法: >db.mycoll.dropIndex(name) 2018-01-02T23:45:50.155+0000EQUERYReferenceError:nameisnotdefined at(shell):1:21 >db.mycoll.dropIndexes() {"ok":0,"errmsg":"nsnotfound"} > 第一个通过指定索引名称,第二个删除指定集合的全部索引。 12)索引重建可以通过集合的reIndex()方法进行索引的重建,示例如下所示: >db.page.reIndex() { "nIndexesWas":2, "nIndexes":2, "indexes":[ { "key":{ "_id":1 }, "name":"_id_", "ns":"pagedb.page" }, { "key":{ "title":1, "url":-1 }, "name":"title_1_url_-1", "ns":"pagedb.page" } ], "ok":1 } 13)统计集合记录数 >usefragment switchedtodbfragment >db.baseSe.count() 36749 上述统计了数据库fragment的baseSe集合中记录数。 14)查询并统计结果记录数 >usefragment switchedtodbfragment >db.baseSe.find().count() 36749 find()可以提供查询参数,然后查询并统计结果。上述执行先根据查询条件查询结果,然后统计了查询数据库fragment的baseSe结果记录集合中记录数。 15)查询指定数据库的集合当前可用的存储空间 >usefragment switchedtodbfragment >db.baseSe.storageSize() 142564096 16)查询指定数据库的集合分配的存储空间 >db.baseSe.totalSize() 144096000 上述查询结果中,包括为集合(数据及其索引存储)分配的存储空间。 三、启动与终止 1)正常启动[root@centos6-vm01 ~]# mongod --dbpath /data/db --logfile /var/mongo.log说明:指定数据存储目录和日志目录 如果采用安全认证模式,需要加上--auth选项,如:[root@centos6-vm01 ~]# mongod --auth --dbpath /data/db --logfile /var/mongo.log 2)以修复模式启动[root@centos6-vm01 ~]# mongod --repair以修复模式启动数据库。 实际很可能数据库数据损坏或数据状态不一致,导致无法正常启动MongoDB服务器,根据启动信息可以看到需要进行修复。或者执行:[root@centos6-vm01 ~]# mongod -f /etc/mongodb.conf --repair 3)终止服务器进程> db.shutdownServer()终止数据库服务器进程。或者,可以直接kill掉mongod进程即可。 四、安全管理 1)以安全认证模式启动[root@centos6-vm01 ~]# mongod --auth --dbpath /usr/mongo/data --logfile /var/mongo.log使用--auth选项启动mongod进程即可启用认证模式。或者,也可以修改/etc/mongodb.conf,设置auth=true,重启mongod进程。 2)添加用户>db.createUser({user: "admin",pwd: "1234!@#$qwer",roles: [ "readWrite", "dbAdmin" ]})添加数据库用户,添加成功,则显示结果如下所示: >db.createUser({user:"admin",pwd:"1234!@#$qwer",roles:["readWrite","dbAdmin"]}) Successfullyaddeduser:{"user":"admin","roles":["readWrite","dbAdmin"]} 3)安全认证前提是必须进入该用户对应的database才行,出现1代表成功> db.auth("admin", "1234!@#$qwer")数据库安全认证。认证成功显示结果: >useadmin switchedtodbadmin >db.auth("admin","1234!@#$qwer") 1 如果是认证用户,执行某些命令,可以看到正确执行结果,如下所示: >db.system.users.find() {"_id":"fragment.admin","user":"admin","db":"fragment","credentials":{"SCRAM-SHA-1":{"iterationCount":10000,"salt":"/QZtFAvcavqZIm15FmbToA==","storedKey":"t91XZuIrnUYtuN1bG+hNg58R+w0=","serverKey":"vZLGW0nVpGSKfUHsS2RABOXhOb4="}},"roles":[{"role":"readWrite","db":"fragment"},{"role":"dbAdmin","db":"fragment"}]} 4、为数据库写数据(同步到磁盘)加锁> db.runCommand({fsync:1,lock:1})说明:该操作已经对数据库上锁,不允许执行写数据操作,一般在执行数据库备份时有用。执行命令,结果示例如下: >db.runCommand({fsync:1,lock:1}) { "info":"nowlockedagainstwrites,usedb.fsyncUnlock()tounlock", "seeAlso":"http://dochub.mongodb.org/core/fsynccommand", "ok":1 } 5)查看当前锁状态> db.currentOp()说明:查询结果如下所示: >db.currentOp() { "inprog":[], "fsyncLock":true, "info":"usedb.fsyncUnlock()toterminatethefsyncwrite/snapshotlock" } 其中,fsyncLock为1表示MongoDB的fsync进程(负责将写入改变同步到磁盘)不允许其他进程执行写数据操作 6)解锁> use admin> db.$cmd.sys.unlock.findOne()说明:执行解锁,结果如下所示: >useadmin switchedtodbadmin >db.$cmd.sys.unlock.findOne() {"ok":1,"info":"unlockcompleted"} 可以执行命令查看锁状态:db.currentOp()状态信息如下: >db.currentOp() {"inprog":[]} 说明当前没有锁,可以执行写数据操作。 五、据备份、恢复与迁移管理 1)备份全部数据库[root@centos6-vm01 ~]# mkdir testbak[root@centos6-vm01 ~]# cd testbak[root@centos6-vm01 ~]# mongodump说明:默认备份目录及数据文件格式为./dump/[databasename]/[collectionname].bson 2)备份指定数据库[root@centos6-vm01 ~]# mongodump -d pagedb说明:备份数据库pagedb中的数据。 3)备份一个数据库中的某个集合[root@centos6-vm01 ~]# mongodump -d pagedb -c page说明:备份数据库pagedb的page集合。 4)恢复全部数据库[root@centos6-vm01 ~]# cd testbak[root@centos6-vm01 ~]# mongorestore --drop说明:将备份的所有数据库恢复到数据库,--drop指定恢复数据之前删除原来数据库数据,否则会造成回复后的数据中数据重复。 5)恢复某个数据库的数据[root@centos6-vm01 ~]# cd testbak[root@centos6-vm01 ~]# mongorestore -d pagedb --drop说明:将备份的pagedb的数据恢复到数据库。 6)恢复某个数据库的某个集合的数据[root@centos6-vm01 ~]# cd testbak[root@centos6-vm01 ~]# mongorestore -d pagedb -c page --drop说明:将备份的pagedb的的page集合的数据恢复到数据库。 7)向MongoDB导入数据[root@centos6-vm01 ~]# mongoimport -d pagedb -c page --type csv --headerline --drop < csvORtsvFile.csv说明:将文件csvORtsvFile.csv的数据导入到pagedb数据库的page集合中,使用cvs或tsv文件的列名作为集合的列名。 需要注意的是,使用--headerline选项时,只支持csv和tsv文件。--type支持的类型有三个:csv、tsv、json其他各个选项的使用,可以查看帮助: [root@centos6-vm01~]#mongoimport--help Usage: mongoimport<options><file> ImportCSV,TSVorJSONdataintoMongoDB.Ifnofileisprovided,mongoimportreadsfromstdin. Seehttp://docs.mongodb.org/manual/reference/program/mongoimport/formoreinformation. generaloptions: --helpprintusage --versionprintthetoolversionandexit verbosityoptions: -v,--verbosemoredetailedlogoutput(includemultipletimesformoreverbosity,e.g.-vvvvv) --quiethidealllogoutput connectionoptions: -h,--host=mongodbhosttoconnectto(setname/host1,host2forreplicasets) --port=serverport(canalsouse--hosthostname:port) authenticationoptions: -u,--username=usernameforauthentication -p,--password=passwordforauthentication --authenticationDatabase=databasethatholdstheuser'scredentials --authenticationMechanism=authenticationmechanismtouse namespaceoptions: -d,--db=databasetouse -c,--collection=collectiontouse inputoptions: -f,--fields=commaseparatedlistoffieldnames,e.g.-fname,age --fieldFile=filewithfieldnames-1perline --file=filetoimportfrom;ifnotspecified,stdinisused --headerlineusefirstlineininputsourceasthefieldlist(CSVandTSVonly) --jsonArraytreatinputsourceasaJSONarray --type=inputformattoimport:json,csv,ortsv(defaultsto'json') ingestoptions: --dropdropcollectionbeforeinsertingdocuments --ignoreBlanksignorefieldswithemptyvaluesinCSVandTSV --maintainInsertionOrderinsertdocumentsintheorderoftheirappearanceintheinputsource -j,--numInsertionWorkers=numberofinsertoperationstorunconcurrently(defaultsto1) --stopOnErrorstopimportingatfirstinsert/upserterror --upsertinsertorupdateobjectsthatalreadyexist --upsertFields=comma-separatedfieldsforthequerypartoftheupsert --writeConcern=writeconcernoptionse.g.--writeConcernmajority,--writeConcern'{w:3,wtimeout:500,fsync: true,j:true}'(defaultsto'majority') 8)从向MongoDB导出数据[root@centos6-vm01 ~]# mongoexport -d pagedb -c page -q {} -f _id,title,url,spiderName,pubDate --csv > pages.csv 说明:将pagedb数据库中page集合的数据导出到pages.csv文件,其中各选项含义:-f 指定cvs列名为_id,title,url,spiderName,pubDate-q 指定查询条件其他各个选项的使用,可以查看帮助: [root@centos6-vm01~]#mongoexport--help Usage: mongoexport<options> ExportdatafromMongoDBinCSVorJSONformat. Seehttp://docs.mongodb.org/manual/reference/program/mongoexport/formoreinformation. generaloptions: --helpprintusage --versionprintthetoolversionandexit verbosityoptions: -v,--verbosemoredetailedlogoutput(includemultipletimesformoreverbosity,e.g.-vvvvv) --quiethidealllogoutput connectionoptions: -h,--host=mongodbhosttoconnectto(setname/host1,host2forreplicasets) --port=serverport(canalsouse--hosthostname:port) authenticationoptions: -u,--username=usernameforauthentication -p,--password=passwordforauthentication --authenticationDatabase=databasethatholdstheuser'scredentials --authenticationMechanism=authenticationmechanismtouse namespaceoptions: -d,--db=databasetouse -c,--collection=collectiontouse outputoptions: -f,--fields=commaseparatedlistoffieldnames(requiredforexportingCSV)e.g.-f"name,age" --fieldFile=filewithfieldnames-1perline --type=theoutputformat,eitherjsonorcsv(defaultsto'json') -o,--out=outputfile;ifnotspecified,stdoutisused --jsonArrayoutputtoaJSONarrayratherthanoneobjectperline --prettyoutputJSONformattedtobehuman-readable queryingoptions: -q,--query=queryfilter,asaJSONstring,e.g.,'{x:{$gt:1}}' -k,--slaveOkallowsecondaryreadsifavailable(defaulttrue) --forceTableScanforceatablescan(donotuse$snapshot) --skip=numberofdocumentstoskip --limit=limitthenumberofdocumentstoexport --sort=sortorder,asaJSONstring,e.g.'{x:1}' 注意:如果上面的选项-q指定一个查询条件,需要使用单引号括起来,如下所示: [root@centos6-vm01~]#mongoexport-dpage-cArticle-q'{"spiderName":"mafengwoSpider"}'-f_id,title,content,images,publishDate,spiderName,url--jsonArray>mafengwoArticle.txt 2018-01-03T08:12:41.234+0800connectedto:localhost 2018-01-03T08:12:41.234+0800exported0records [root@centos6-vm01~]#llmafengwoArticle.txt -rw-r--r--.1rootroot3Jan300:12mafengwoArticle.txt 否则,就会出现下面的错误: ERROR:toomanypositionaloptions 六、远程连接管理 1)基于mongo实现远程连接[root@centos6-vm01 ~]# mongo 192.168.10.220:27017/pagedb或者[root@centos6-vm01 ~]# mongo 192.168.10.220:27017/pagedb -ukevin -p123456kevin 通过mongo实现连接,可以非常灵活的选择参数选项,参看命令帮助,如下所示: [root@centos6-vm01~]#mongo--help MongoDBshellversion:3.0.6 usage:mongo[options][dbaddress][filenames(endingin.js)] dbaddresscanbe: foofoodatabaseonlocalmachine 192.169.0.5/foofoodatabaseon192.168.0.5machine 192.169.0.5:9999/foofoodatabaseon192.168.0.5machineonport9999 Options: --shellruntheshellafterexecutingfiles --nodbdon'tconnecttomongodonstartup-no 'dbaddress'argexpected --norcwillnotrunthe".mongorc.js"fileon startup --quietbelesschatty --portargporttoconnectto --hostargservertoconnectto --evalargevaluatejavascript -h[--help]showthisusageinformation --versionshowversioninformation --verboseincreaseverbosity --ipv6enableIPv6support(disabledbydefault) AuthenticationOptions: -u[--username]argusernameforauthentication -p[--password]argpasswordforauthentication --authenticationDatabaseargusersource(defaultstodbname) --authenticationMechanismargauthenticationmechanism --gssapiServiceNamearg(=mongodb)Servicenametousewhenauthenticating usingGSSAPI/Kerberos --gssapiHostNameargRemotehostnametouseforpurposeof GSSAPI/Kerberosauthentication filenames:alistoffilestorun.fileshavetoendin.jsandwillexitafterunless--shellisspecified 2)基于MongoDB支持的javascript实现远程连接当你已经连接到一个远程的MongoDB数据库服务器(例如,通过mongo连接到192.168.0.184),现在想要在这个会话中连接另一个远程的数据库服务器(192.168.0.197),可以执行如下命令: >varx=newMongo('192.168.10.220:27017') >varydb=x.getDB('pagedb'); >useydb switchedtodbydb >db ydb >ydb.page.findOne() { "_id":ObjectId("4eded6a5bf3bfa0014000003"), "content":"巴黎是浪漫的城市,可是...", "pubdate":"2006-03-19", "title":"巴黎:从布鲁塞尔赶到巴黎", "url":"http://france.bytravel.cn/Scenery/528/cblsegdbl.html" } 上述通过MongoDB提供的JavaScript脚本,实现对另一个远程数据库服务器进行连接,操作指定数据库pagedb的page集合。 如果启用了安全认证模式,可以在获取数据库连接实例时,指定认证账号,例如: >varx=newMongo('192.168.0.197:27017') >varydb=x.getDB('pagedb','shirdrn','(jkfFS$343$_\=\,.F@3'); >useydb switchedtodbydb ==========================扩展知识==========================节点角色 MongoDB读写分离MongoDB副本集对读写分离的支持是通过Read Preferences特性进行支持的,这个特性非常复杂和灵活。设置读写分离需要先在从节点SECONDARY设置setSlaveOk。应用程序驱动通过read reference来设定如何对副本集进行读取操作,默认的,客户端驱动所有的读操作都是直接访问primary节点的,从而保证了数据的严格一致性。有如下几种模式: mongo shell中复制相关方法 复制数据库的命令 用户管理和认证方法官方详细档:https://docs.mongodb.com/master/reference/security/#security-methods-in-the-mongo-shell 角色管理方法官方详细档:https://docs.mongodb.com/master/reference/security/#security-methods-in-the-mongo-shell


优秀的个人博客,低调大师

自动化之PSSH

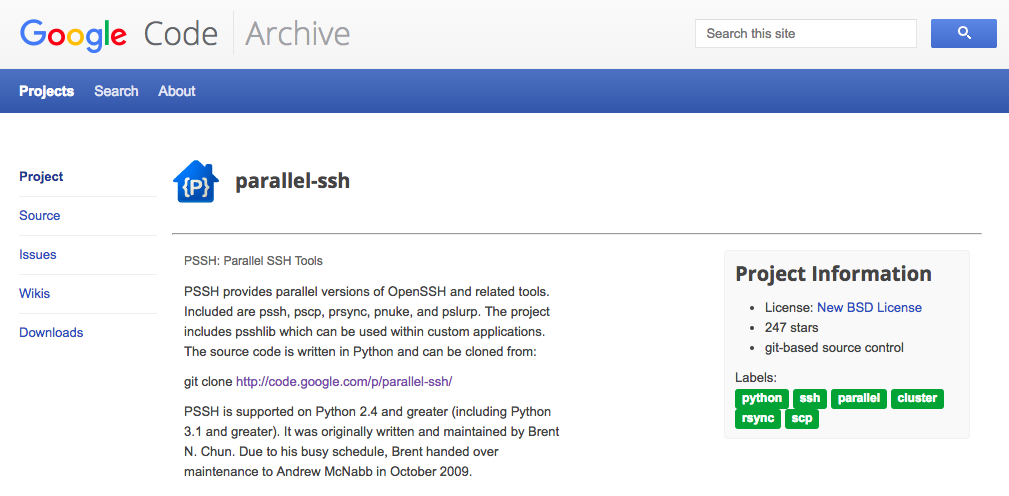
1.PSSH简介 PSSH提供OpenSSH和相关工具的并行版本。包括pssh,pscp,prsync,pnuke和pslurp。该项目包括psshlib,可以在自定义应用程序中使用。 pssh是python写的可以并发在多台机器上批量执行命令的工具,它的用法可以媲美ansible的一些简单用法,执行起来速度比ansible快它支持文件并行复制,远程命令执行,杀掉远程主机上的进程等等。杀手锏是文件并行复制,,当进行再远程主机批量上传下载的时候,最好使用它。 项目地址: https://code.google.com/archive/p/parallel-ssh/ 2.PSSH使用 2.1 安装PSSH 前提条件:注意需要安装 python 2.4 或以上版本 wget https://clsn.io/files/pssh/pssh-2.3.1.tar.gz tar zxf pssh-2.3.1.tar.gz cd pssh-2.3.1 python setup.py install 安装过程 [root@clsn.io /opt/pssh-2.3.1] #python setup.py install running install running build running build_py creating build creating build/lib creating build/lib/psshlib copying psshlib/task.py -> build/lib/psshlib copying psshlib/askpass_server.py -> build/lib/psshlib copying psshlib/__init__.py -> build/lib/psshlib copying psshlib/cli.py -> build/lib/psshlib copying psshlib/psshutil.py -> build/lib/psshlib copying psshlib/manager.py -> build/lib/psshlib copying psshlib/askpass_client.py -> build/lib/psshlib copying psshlib/version.py -> build/lib/psshlib copying psshlib/color.py -> build/lib/psshlib running build_scripts creating build/scripts-2.6 copying and adjusting bin/pssh -> build/scripts-2.6 copying and adjusting bin/pnuke -> build/scripts-2.6 copying and adjusting bin/prsync -> build/scripts-2.6 copying and adjusting bin/pslurp -> build/scripts-2.6 copying and adjusting bin/pscp -> build/scripts-2.6 copying and adjusting bin/pssh-askpass -> build/scripts-2.6 changing mode of build/scripts-2.6/pssh from 644 to 755 changing mode of build/scripts-2.6/pnuke from 644 to 755 changing mode of build/scripts-2.6/prsync from 644 to 755 changing mode of build/scripts-2.6/pslurp from 644 to 755 changing mode of build/scripts-2.6/pscp from 644 to 755 changing mode of build/scripts-2.6/pssh-askpass from 644 to 755 running install_lib creating /usr/lib/python2.6/site-packages/psshlib copying build/lib/psshlib/task.py -> /usr/lib/python2.6/site-packages/psshlib copying build/lib/psshlib/askpass_server.py -> /usr/lib/python2.6/site-packages/psshlib copying build/lib/psshlib/__init__.py -> /usr/lib/python2.6/site-packages/psshlib copying build/lib/psshlib/cli.py -> /usr/lib/python2.6/site-packages/psshlib copying build/lib/psshlib/psshutil.py -> /usr/lib/python2.6/site-packages/psshlib copying build/lib/psshlib/manager.py -> /usr/lib/python2.6/site-packages/psshlib copying build/lib/psshlib/askpass_client.py -> /usr/lib/python2.6/site-packages/psshlib copying build/lib/psshlib/version.py -> /usr/lib/python2.6/site-packages/psshlib copying build/lib/psshlib/color.py -> /usr/lib/python2.6/site-packages/psshlib byte-compiling /usr/lib/python2.6/site-packages/psshlib/task.py to task.pyc byte-compiling /usr/lib/python2.6/site-packages/psshlib/askpass_server.py to askpass_server.pyc byte-compiling /usr/lib/python2.6/site-packages/psshlib/__init__.py to __init__.pyc byte-compiling /usr/lib/python2.6/site-packages/psshlib/cli.py to cli.pyc byte-compiling /usr/lib/python2.6/site-packages/psshlib/psshutil.py to psshutil.pyc byte-compiling /usr/lib/python2.6/site-packages/psshlib/manager.py to manager.pyc byte-compiling /usr/lib/python2.6/site-packages/psshlib/askpass_client.py to askpass_client.pyc byte-compiling /usr/lib/python2.6/site-packages/psshlib/version.py to version.pyc byte-compiling /usr/lib/python2.6/site-packages/psshlib/color.py to color.pyc running install_scripts copying build/scripts-2.6/pscp -> /usr/bin copying build/scripts-2.6/prsync -> /usr/bin copying build/scripts-2.6/pnuke -> /usr/bin copying build/scripts-2.6/pssh -> /usr/bin copying build/scripts-2.6/pssh-askpass -> /usr/bin copying build/scripts-2.6/pslurp -> /usr/bin changing mode of /usr/bin/pscp to 755 changing mode of /usr/bin/prsync to 755 changing mode of /usr/bin/pnuke to 755 changing mode of /usr/bin/pssh to 755 changing mode of /usr/bin/pssh-askpass to 755 changing mode of /usr/bin/pslurp to 755 running install_data creating /usr/man creating /usr/man/man1 copying man/man1/pssh.1 -> /usr/man/man1 copying man/man1/pscp.1 -> /usr/man/man1 copying man/man1/prsync.1 -> /usr/man/man1 copying man/man1/pslurp.1 -> /usr/man/man1 copying man/man1/pnuke.1 -> /usr/man/man1 running install_egg_info Writing /usr/lib/python2.6/site-packages/pssh-2.3.1-py2.6.egg-info 2.2 安装完成 使用yum安装后,只能使用pssh,但是编译安装后会包括其他命令也安装了(pscp prsync pnuke pslurp) pssh:在远程多台主机上并行运行命令 Example: pssh -h hosts.txt -l irb2 -o /tmp/foo uptime pscp :把文件并行复制到多台远程主机上 Example: pscp -h hosts.txt -l irb2 foo.txt /home/irb2/foo.txt prsync:使用rsync协议本地文件同步到远程多台主机上。 Example: prsync -r -h hosts.txt -l irb2 foo /home/irb2/foo pnuke:在远程多台主机上并行killall某一进程 Example: pnuke -h hosts.txt -l irb2 java pslurp:把文件从远程多台主机上复制到本地主机上 Example: pslurp -h hosts.txt -L /tmp/outdir -l irb2 /home/irb2/foo.txt foo.txt 2.3 pssh参数说明 -h HOST_FILE 后边跟远程主机列表(ip) -H HOST_STRING 后边跟远程主机名或者ip地址 -l USER 指定远程主机的用户名-p PAR 指定pssh最大的并行线程数。 -o 将输出的内容重定向到一个指定的文件中 -O 指定ssh参数的具体配置 -e 将执行错误重定向到一个指定的文件中 -t 设定命令执行超时时间 -x 传递ssh命令的一些参数 -i 在远程主机上执行命令完成后显示标准输出和标准错误 -P 在执行远程命令时,输出执行结果 2.4 其他常用的方法 pssh使用帮助 pssh --help pssh查看所有服务器的uptime -h list 指定了执行命令的机器列表 -A表示提示输入密码(如果机器都是ssh key打通的则无需加-A) pssh -i -A -h list 'uptime' 使用pscp向一堆机器分发文件 pscp -h list localfile remote_dir 从一堆机器中拷贝文件到中心机器 pslurp -h list /etc/hosts local_dir 2.5 常见问题 如果你遇到这样的错误: IOError: [Errno 4] Interrupted system call 建议升级python版本到python2.7 3.附录 3.1 pssh CLSN站点镜像地址 本站将pssh软件包镜像到本地,以防丢失,有需求的可以执行下载,下载后注意校验MD5值。 File Summary + Labels Uploaded Size pssh-2.3.1.tar.gz PSSH 2.3.1 Source Feb 3, 2012 22.88KB pssh-2.3.tar.gz PSSH 2.3 Source Jan 25, 2012 21.62KB pssh-2.2.2.tar.gz PSSH 2.2.2 Source Feb 3, 2011 20.94KB pssh-2.2.1.tar.gz PSSH 2.2.1 Source Jan 27, 2011 20.88KB pssh-2.2.tar.gz PSSH 2.2 Source Jan 27, 2011 20.84KB pssh-2.1.1.tar.gz PSSH 2.1.1 Source Mar 5, 2010 17.94KB pssh-2.1.tar.gz PSSH 2.1 Source Feb 26, 2010 17.65KB pssh-2.0.tar.gz PSSH 2.0 Source Oct 21, 2009 15.03KB 3.2 pssh GOOGLE源 File Summary + Labels Uploaded Size pssh-2.3.1.tar.gz​ PSSH 2.3.1 Source Feb 3, 2012 22.88KB ​pssh-2.3.tar.gz​ PSSH 2.3 Source Jan 25, 2012 21.62KB ​pssh-2.2.2.tar.gz​ PSSH 2.2.2 Source Feb 3, 2011 20.94KB ​pssh-2.2.1.tar.gz​ PSSH 2.2.1 Source Jan 27, 2011 20.88KB ​pssh-2.2.tar.gz​ PSSH 2.2 Source Jan 27, 2011 20.84KB ​pssh-2.1.1.tar.gz​ PSSH 2.1.1 Source Mar 5, 2010 17.94KB ​pssh-2.1.tar.gz​ PSSH 2.1 Source Feb 26, 2010 17.65KB ​pssh-2.0.tar.gz​ PSSH 2.0 Source Oct 21, 2009 15.03KB 3.3 文件包MD5值 下载完成后务必校验MD5值 MD5值 文件名 dbdbfda5681b82d4c64abdb3668e88bc pssh-2.3.tar.gz 53e70d53064f658bf8f44880340e8e5c pssh-2.3.1.tar.gz 689207677b260a7e4178174295b1389e pssh-2.2.tar.gz 865305ae39647884bc54a42e9f9554bb pssh-2.2.2.tar.gz f7583259976ef64bf3cae957a0b66e41 pssh-2.2.1.tar.gz 725f902bb7e128cc7aa1322551f7ca37 pssh-2.1.tar.gz 4b355966da91850ac530f035f7404cd5 pssh-2.1.1.tar.gz 07474f9f9dbefedc809e997f04e1dee5 pssh-2.0.tar.gz 4.参考文献 https://code.google.com/archive/p/parallel-ssh/http://opstool.com/article/266https://www.cnblogs.com/Dicky-Zhang/p/5988415.htmlhttps://help.aliyun.com/knowledge_detail/38835.html 作者: 惨绿少年 出处: http://clsn.io 本文版权归作者所有,欢迎转载,但未经作者同意必须保留此段声明,且在文章页面明显位置给出原文连接,否则保留追究法律责任的权利。

优秀的个人博客,低调大师

《老男孩Linux笔记》笔记

centos7为基准 1、更改YUM源: /bin/mv CentOS-Base.repo CentOS-Base.repo.ori //备份 yum 源 7 wget http://mirrors.sohu.com/help/CentOS-Base-sohu.repo //下载soho 源 /bin/mv CentOS-Base-sohu.repo CentOS-Base.repo 打补丁: yum upgrade 安装必要的软件包: yum -y install lrzsz 2、关闭selinux: vi /etc/sysconfig/selinux disabled 重启 3、设定运行级别: systemctl get-default systemctl set-default shutdown.target(0) emergency.target rescure.target multi-user.target(3) graphical.target(5) 4、关闭不必要的服务 systemctl list-units --type=service 开机启动:systemctl enable crond network sshd syslog 5、授权服务:visudo root ALL=(ALL) ALL %wheel ALL=(ALL) ALL %wheel ALL=(ALL) NOPASSWD: ALL 6、ssh优化:vi /etc/ssh/sshd_config 52113#→ssh 连接默认的端口,谁都知道,必须要改。 PermitRootLogin no#→root 用户黑客都知道的,禁止它远程登陆。 PermitEmptyPasswords no #→禁止空密码登陆 UseDNSno#→不使用DNS GSSAPIAuthentication no 重启sshd 服务#/etc/init.d/sshd restart 7、修改默认字符集: locale -a vi /etc/locale.conf source /etc/locale.conf 8、同步时间服务: echo '*/5 * * * * /usr/sbin/ntpdate time.nist.gov >/dev/null 2>&1' >>/var/spool/cron/root 9、修改文件描述符: ulimit -n echo '* - nofile 65535 ' >>/etc/security/limits.conf 10、清理clientmqueue垃圾文件防止inode被占满 find /var/spool/clientmqueue/ -type -f |xargs rm -f 11、内核优化:vi /etc/sysctl.conf net.ipv4.tcp_fin_timeout = 2 net.ipv4.tcp_tw_reuse = 1 net.ipv4.tcp_tw_recycle = 1 net.ipv4.tcp_syncookies = 1 net.ipv4.tcp_keepalive_time = 600 net.ipv4.ip_local_port_range = 4000 65000 net.ipv4.tcp_max_syn_backlog = 16384 net.ipv4.tcp_max_tw_buckets = 36000 net.ipv4.route.gc_timeout = 100 net.ipv4.tcp_syn_retries = 1 net.ipv4.tcp_synack_retries = 1 net.core.somaxconn = 16384 12 net.core.netdev_max_backlog = 16384 net.ipv4.tcp_max_orphans = 16384 net.ipv4.ip_conntrack_max = 25000000 net.ipv4.netfilter.ip_conntrack_max=25000000 net.ipv4.netfilter.ip_conntrack_tcp_timeout_established=180 net.ipv4.netfilter.ip_conntrack_tcp_timeout_time_wait=120 net.ipv4.netfilter.ip_conntrack_tcp_timeout_close_wait=60 net.ipv4.netfilter.ip_conntrack_tcp_timeout_fin_wait=120 12、grep高亮显示: vi /etc/profile alias grep='grep --color=auto' source /etc/profile 13、锁定关键文件 chattr +i /etc/passwd chattr +i /etc/inittab chattr +i /etc/group chattr +i /etc/shadow chattr +i /etc/gshadow 14、更改登录后的信息:/etc/motd 15、内核参数: 16、NFS:yum install -y nfs-utils rpcbind vi /etc/exports xx ip(rw) exportfs -r mount -t nfs xx:/xx /yy mount -t nfs -o nosuid,noexec,nodev,rw,bg,soft,rsize=32768,wsize=32768 192.168.1.4:/home/test /usr/local/live/ 17、apache安装调优参数: ./configure \ --prefix=/application/apache2.2.27 \#安装的目录 --enable-deflate \ #压缩文件文本一般 html/js/css 等内容的站点,使用此参数功能会大大提高传输速度,提示访问者访问体验,在生产环境中,这是apache 调优的重要选项之一 --enable-expires \ #激活允许通过配置文件控制http 的“expires”和“cache-control” 头内容,即对网站图片,js,css 等内容,提供在客户端浏览器缓存的设置,这是apache 调优的重 要选项之一 --enable-headers \ #提供允许http 请求头的控制 --enable-moudles=most \ #激活多数模块 --enable-so \ #激活apache 服务的DSO 支持,即在以后可以以DSO 的方式编译 安装共享模块,这个模块本身不能以DSO 方式编译 --with-mpm=worker \ #选择apache mpm 的模式为worker 模式,因为worker 模式原 理是更多的使用线程来处理请求,所以可以处理更多的并发请求,而系统资源的开销小于基于进程 的MPM prefork,如果不指定此参数,默认得到模式是prefork 进程模式。这是apache 调优的一 个重要选项之一。 --enable-rewrite #提供基于URL 规则的重写功能,根据已知URL 地址,转换其他想 要的url 地址,如伪静态功能就是这个模块实现的,这是apache 在生产环节中必用的一个重要功能 检查语法:apachectl -t 启用: apachectl start 平滑重启:apachectl graceful 18、apache配置文件:Httpd.conf ServerRoot "/usr/local/xxx" #安装目录 Listen 80 <ifModule !mpm_netware_moudle> User daemon #执行者 Group daemon ServerAdmin xx@qq.com DocumentRoot "/xx" #网站根目录 #设置根目录访问权限 <Directory /> Options FollowSymLinks AllowOverride None Order allow,deny Allow from all </Direcotry> <ifModule dir_module> DirectoryIndex index.html </ifModule> #AllowOverride:允许存在.htaccess 文件中的指令类型None:当AllowOverride 设置None 时,不搜索该目录下的.htaccessAll:在.htaccess 文件中使用所有指令 #Allow:允许访问的主机列表(可用域名或子网,例如:Allow from 192.168.0.0/16)。 #DirectoryIndex index.html index.htm index.php #主页文件的设置(本例将主页文件设置为: index.html,index.htm 和index.php) #Options特性:ExecCGI 在该目录下执行CGI脚本FollowSymLinks:在该目录下允许文件系统使用符号连接Indexes: 当用户访问该目录时,如果用户找不到DirectoryIndex 指定的主页文件(例如index.html),则返回该目录下的文件列表给用户。SymLinksIfOwnerMatch: 当使用符号连接时,只有当符号连接的文件拥有者与实际文件的拥有者相同时才可以访问。 #设置其他目录权限 <Direcotry "/usr/local"> Options Indexes FollowSymLinks AllowOverride None Order allow,deny Allow from all 19、apache的PHP.INI配置 /application/php/lib/php.ini [PHP] engine = On ——→ 是否启用PHP 解析引擎 short_open_tag = Off ——→ 是否使用简介标志 asp_tags = Off ——→ 不允许asp 类标志 precision = 14 ——→ 浮点型数据显示的有效期 y2k_compliance = On output_buffering = 4096 ——→ 输出缓冲区大小(字节)。建议值为4096~8192。 zlib.output_compression = Off ——→ 是否开启zlib 输出压缩 implicit_flush = Off ——→ 是否要求PHP 输出层在每个输出块之后自动刷新数据 这等效于在每个print()、echo()、HTML 块之后自动调用flush()函数。打开这个选项对程序执行 的性能有严重的影响,通常只推荐在调试时使用。在CLI SAPI 的执行模式下,该指令默认为On 。 serialize_precision = 17 safe_mode = Off ——→ 安全模式 safe_mode_gid = Off safe_mode_exec_dir = ——→ 安全模式下的可执行文件存放目录 safe_mode_allowed_env_vars = PHP_ ####在安全模式下,用户仅可以更改的环境变量的前缀列表(逗号分隔)。允许用户设置某些环境变 量,可能会导致潜在的安全漏洞。注意: 如果这一参数值为空,PHP 将允许用户更改任意环境变量。 safe_mode_protected_env_vars = LD_LIBRARY_PATH ####在安全模式下,用户不能更改的环境变量列表(逗号分隔)。这些变量即使在safe_mode_allowed_env_vars 指令设置为允许的情况下也会得到保护。 disable_functions = ——→ 该指令接受一个用逗号分隔的函数名列表,以禁用特定的函数。 disable_classes = ——→ 该指令接受一个用逗号分隔的类名列表,以禁用特定的类 expose_php = On ——→ 在网页头部显示php 信息 max_execution_time = 30 ——→ 每个脚本最大执行秒数 max_input_time = 60 ——→ 每个脚本用来分析请求数据的最大限制时间 memory_limit = 128M ——→ 每个脚本执行的内存限制 72 display_errors = Off ——→ #显示失误(该关闭,换成日志显示) display_startup_errors = Off ——→ #显示启动失误 log_errors = On ——→ 生成错误错误日志显示 log_errors_max_len = 1024 ——→ 设定error_log 最大长度 ignore_repeated_errors = Off ——→ 打开后,不记录重复的信息 ignore_repeated_source = Off ——→ 打开后当记录重复的信息时忽略来源 report_memleaks = On ——→ 报告内存泄露,仅在debug 编译模式下有效 html_errors = Off ——→ 是否开启静态网页错误提示 register_globals = Off ——→ ##是否打开register 全局变量 register_long_arrays = Off ####是否注册老形式的输入数组, HTTP_GET_VARS 和相关数组;如果你不使用他们,建议为了提 高性能关闭他们. register_argc_argv = Off ####此指令让PHP 确认是否申明argv&argc 变量(这些变量会包含GET 信息). ;如果你不使用这 些变量,为了提升性能应该关闭此选项. auto_globals_jit = On ####当打开此项, SERVER 和 ENV 变量将在第一次被使用时而不是脚本一开始时创建(运行时);如 73 果这些变量在脚本中没有被使用过, 打开此项会增加一点性能.;为了使此指令有效,PHP 指令 register_globals, register_long_arrays,;以及register_argc_argv 必须被关闭. post_max_size = 8M ——→ #PHP 可以接受的最大的POST 数据大小 magic_quotes_sybase = Off ##使用Sybase 风格的magic quotes (使用"来引导'替代\'). auto_prepend_file = ——→ #在任何PHP 文档之前或之后自动增加文件 auto_append_file = ####两个有趣的变量是auto_prepend_file 以及auto_append_file。这些变量指定PHP 自动添加 到任何PHP 文档文件头或文件尾的其他文件。这对于为PHP 产生的页面添加页眉或页脚非常有用, 可以节省为每个PHP 文档添加代码的时间。但需要注意这里的指定文件将会添加到所有的PHP 文 档中,所以这些变量必须适合单应用程序(single-application)的服务器。所包含的文件要么是 PHP 脚本,要么是普通的HTML 文档。嵌入式PHP 代码必须用标准标记括起来。 default_mimetype = "text/html" ——→ #PHP 内建默认为text/html doc_root = ——→ #PHP 的"根目录"。仅在非空时有效。 file_uploads = On 是否开启上传功能 upload_max_filesize = 2M #最大可上传文件,2M max_file_uploads = 20 最大同时可以上传20 个文件 allow_url_fopen = On #是否允许打开远程文件 allow_url_include = Off #是否允许include/require 远程文件 default_socket_timeout = 60 默认的socket 超时时间 pdo_mysql.cache_size = 2000 ——→ Ped_mysql 的缓存大小 pdo_mysql.default_socket= ——→ 默认的socket 时间 [Phar] [Syslog] define_syslog_variables = Off ——→ 是否定义各种的系统日志变量 [mail function] ——→ 邮件功能 SMTP = localhost ——→ 本地作为邮件服务器 smtp_port = 25 邮件端口号默认是25 mail.add_x_header = On ——→ 是否开启最大的header [ODBC] odbc.allow_persistent = On ——→ 允许或阻止持久连接. odbc.check_persistent = On ——→ 在重用前检查连接是否可用 odbc.max_persistent = -1 ——→ 持久连接的最大数目,-1 意味着没有限制. odbc.max_links = -1 ——→ 最大连接数(持久+ 非持久).-1 意味着没有限制. odbc.defaultlrl = 4096 ——→ 长字段处理.返回变量的字节数.0 意味着略过. odbc.defaultbinmode = 1 ####二进制数据处理.0 意味着略过,1 按照实际返回,2 转换到字符.;查看odbc_binmode 和 odbc_longreadlen 的文档来获取针对uodbc.defaultlrl 和uodbc.defaultbinmode 的解释 [Interbase] ——→ Interbase 数据库 75 ibase.allow_persistent = 1 ——→ 允许或组织持久连接。 ibase.max_persistent = -1 ——→ 持久连接的最大数目,-1 意味着没有限制. ibase.max_links = -1 ——→ 最大连接数(持久+ 非持久).-1 意味着没有限制. ibase.timestampformat = "%Y-%m-%d %H:%M:%S" ——→ 数据库时间记录模式 ibase.dateformat = "%Y-%m-%d" ibase.timeformat = "%H:%M:%S" [MySQL] mysql.allow_local_infile = On ——→ 是否允许本地文件连接数据库 mysql.allow_persistent = On ——→ 允许或禁止持久连接 mysql.cache_size = 2000 ——→ mysql 缓存大小 mysql.max_persistent = -1 ——→ 持久连接的最大数目. -1 意味着没有限制. mysql.max_links = -1 ——→ 连接的最大数目(持久和非持久)。-1 代表无限制 mysql.default_port = ####mysql_connect() 使用的默认端口,如不设置,mysql_connect() ;将使用变量$MYSQL_TCP_PORT,或在/etc/services 下的mysql-tcp 条目(unix), ;或在编译是定义的MYSQL_PORT(按这样的顺序) mysql.default_socket = ####用于本地MySql 连接的默认的套接字名。为空,使用MYSQL 内建值 mysql.default_host = ——→ mysql_connect() 默认使用的主机(安全模式下无效) mysql.default_user = ——→ mysql_connect() 默认使用的用户名(安全模式下无效) mysql.default_password = ——→ mysql_connect() 默认使用的密码(安全模式下无效 mysql.connect_timeout = 60 ——→ 连接超时时间,默认是60s mysql.trace_mode = Off [MySQLi] mysqli.max_persistent = -1 ——→ 持久连接的最大数目. -1 意味着没有限制. mysqli.allow_persistent = On ——→ 允许或拒绝之久连接 76 mysqli.max_links = -1 ——→ 最大连接数. -1 意味着没有限制. mysqli.cache_size = 2000 ——→ 连接缓存大小 mysqli.default_port = 3306 ——→ 连接端口号 ####mysqli_connect()默认的端口号.如果没有设置, mysql_connect() 会使用 $MYSQL_TCP_PORT;或者位于/etc/services 的mysql-tcp 入口或者编译时定义的 MYSQL_PORT 值(按照此顺序查找).;Win32 只会查找MYSQL_PORT 值. mysqli.default_socket = ####对于本地MySQL 连接的默认socket 名称. 如果为空, 则使用MySQL 内建默认值. mysqli.default_host = ####mysqli_connect()的默认host 值(在安全模式中不会生效) mysqli.default_user = ####mysqli_connect()的默认user 值(在安全模式中不会生效). mysqli.default_pw = ####mysqli_connect() 的默认password 值(在安全模式中不会生效). ; 注意在此文件中保存密码一般来说是*糟糕* 的主义. ; *任何* 使用PHP 的用户可以执行'echo get_cfg_var("mysqli.default_password") ; 并且获取到此密码! 而且理所当然, 任何有对此文件读权限的用户都可以获取到此密码. mysqli.reconnect = Off ——→ 允许或阻止持久连接 [mysqlnd] mysqlnd.collect_statistics = On mysqlnd.collect_memory_statistics = Off [OCI8] [PostgreSQL] pgsql.allow_persistent = On ——→ 允许或阻止持久连接. pgsql.auto_reset_persistent = Off ####总是在pg_pconnect() 时检测断开的持久连接.;自动重置特性会引起一点开销. pgsql.max_persistent = -1 ——→ 持久连接的最大数目. -1 意味着没有限制. 77 pgsql.max_links = -1 ——→ 最大连接数(持久+ 非持久). -1 意味着没有限制 pgsql.ignore_notice = 0 ——→ 是否忽略PostgreSQL 后端通告消息.;通告消息记录会需要 一点开销. pgsql.log_notice = 0 ####是否记录PostgreSQL 后端通告消息.;除非pgsql.ignore_notice=0, 否则模块无法记录通 告消息。 [Sybase-CT] sybct.allow_persistent = On ——→ 允许或阻止持久连接. sybct.max_persistent = -1 ——→ 持久连接的最大数目. -1 意味着没有限制. sybct.max_links = -1 ——→ 最大连接数(持久+ 非持久). -1 意味着没有限制. sybct.min_server_severity = 10 ——→ 显示出的错误最小严重程度. sybct.min_client_severity = 10 ——→ 显示出的消息最小严重程度 [bcmath] bcmath.scale = 0 ——→ #用于所有bcmath 函数的10 十进制数数字的个数 [browscap] [Session] session.save_handler = files ——→ 用于保存/取回数据的控制方式 session.use_cookies = 1 ——→ 是否使用cookies session.use_only_cookies = 1 ####这个选项允许管理员去保护那些在URL 中传送session id 的用户免于被攻击;默认是0. session.name = PHPSESSID ——→ session 的名字(同时作为cookie 的名称 session.auto_start = 0 ——→ 在请求开始时初始化session session.cookie_lifetime = 0 ——→ cookie 的存活秒数,如果为0,则是直到浏览器重新启动 session.cookie_path = / ——→ cookie 的有效路径 session.cookie_domain = ——→ cookie 的有效域名 session.cookie_httponly = ####是否将httpOnly 标志增加到cookie 上,增加后则 cookie 无法被浏览器的脚本语言(例如 JavaScript)存取. 78 session.serialize_handler = php 用于序列化数据的处理器. php 是标准的PHP 序列化器. session.gc_probability = 1 ####; 定义'垃圾回收'进程在每次session 初始化时开始的比例. ; 比例由gc_probability/gc_divisor 来得出, ; 例如. 1/100 意味着在每次请求时有1%的机会启动'垃圾回收'进程. session.gc_divisor = 1000 session.gc_maxlifetime = 1440 ####在这里数字所指的秒数后,保存的数据将被视为'碎片(garbage)'并由gc 进程清理掉。 session.bug_compat_42 = Off ####PHP 4.2 和更早版本有一个未公开的特性/bug , 此特性允许你在全局初始化一个session 变量,即便register_globals 已经被关闭.;如果此特性被使用,PHP 4.3 和更早版本会警告你.;你可以 关闭此特性并且隔离此警告. 这时候,如果打开bug_compat_42,那此警告只是被显示出来. session.bug_compat_warn = Off session.referer_check = ####检查HTTP Referer 来防止带有id 的外部URL.;HTTP_REFERER 必须包含从session 来的这 个字段才会被认为是合法的. session.entropy_length = 0 ——→ 从此文件读取多少字节 session.cache_limiter = nocache ####设置为{nocache,private,public,}来决定HTTP 缓冲的类型;留空则防止发送anti-caching 头. session.cache_expire = 180 ——→ 文档在n 分钟之后过期. session.use_trans_sid = 0 ####trans sid 支持默认关闭. ;使用trans sid 可能让你的用户承担安全风险.;使用此项必须小心.; - 用户也许通过email/irc/其他 途径发送包含有效的session ID 的URL 给其他人.; - 包含有效session ID 的URL 可能被存放在容 易被公共存取的电脑上.; - 用户可能通过在浏览器历史记录或者收藏夹里面的包含相同的session ID 的URL 来访问你的站点. 20、httpd-mpm.conf文件详解 #prefork 多路处理模块 <IfModule mpm_prefork_module> StartServers 5 #设置服务器启动时建立的子进程数量,一般不调 MinSpareServers 5 #设置空闲子进程的最小数量,不要调太大 MaxSpareServers 10 #设置空闲子进程的最大数量 MaxClients 150 #用于服务器客户端最大请求数量 MaxRequestsPerChild 0 #每个子进程在生存期内允许服务器的最大请求数,建议10000-30000 #worker 多路处理模块 <IfModule mpm_worker_module> StartServers 2 #设置服务器启动时建立的子进程数量,一般不调 MaxClients 150 #用于服务器客户端最大请求数量 MinSpareThreads 25 #设置空闲子进程的最小数量,不要调太大 MaxSpareThreads 75 #设置空闲子进程的最大数量 ThreadsPerChild 25 #每个子进程建立的线程数 MaxRequestsPerChild 0 #设置每个子进程在其生存期内允许伺服的最大请求数量 21、http-default.conf详解 Timeout 300 #设置服务器在断定请求失败前等待的秒数。默认值300 KeepAlive Off #设置是否启用HTTP 持久链接,On 代表打开,Off 代表关闭。 如果用于同一页面包含大量静态文件的应用,设置为On,以提高性能; 如果用于主要为动态页面的应用,设置为Off,以节约内存资源; 如果服务器前跑有squid 或者其它七层设备,设置为On MaxKeepAliveRequests 100 #限制当启用KeepAlive 时,每个连接允许的请求数量。 如果将此值设为"0",将不限制请求的数目。 笔者建议将此值设为100-500 之间的一个值, 以确保最优的服务器性能 KeepAliveTimeout 5 #设置持久链接中服务器在两次请求之间等待的秒数。对于高负荷服务器来说, KeepAliveTimeout 值较大会导致一些性能方面的问题: 超时值越大,与空闲客户端保持连接的进程就越多 UseCanonicalName Off #配置服务器如何确定它自己的域名, 可选值为On | Off | DNS。DNS 用于为大量基于IP 的虚拟主机支持那些古董级的不提供"Host:"头的浏览器使 用。 笔者建议设置为Off AccessFileName .htaccess #设置分布式配置文件的名字,默认为.htaccess。 如果为某个目录启用了分布式配置文件功能,那么在向客户端返回其中的文档时, 服务器将在这个文档所在的各级目录中查找此配置文件,因此会带来性能问题, 笔者建议关闭分布式配置文件功能。 ServerTokens Prod #控制服务器回应给客户端的"Server:"应答头是否包含关于服务器操作系统类型和编译 进的模块描述信息, 同时还控制着ServerSignature 指令的显示内容。可选值为Full | OS | Minor | Minimal | Major | Prod。 笔者建议设置为显示最少信息的Prod。 ServerSignature Off #配置服务器生成页面的页脚,可选值为On | Off | EMail。 采用On 会简单的增加一行关于服务器版本和正在伺服的虚拟主机的ServerName, 而EMail 设置会额外创建一个指向ServerAdmin 的"mailto:"部分。建议使用默认值Off。 HostnameLookups Off #设置是否启用对客户端IP 的DNS 查找,可选值为On | Off | Double。 DNS 查询会造成明显的时间消耗,建议设置为Off。 22、bin目录 23、虚拟主机配置: vim httpd-vhosts.conf NameVirtualHost *:80 <VirtualHost *:80> ServerAdmin 291406980@qq.com DocumentRoot "/var/www/html/www" ServerName www.etiantian.org ServerAlias etiantian.org ErrorLog "logs/www-error_log" CustomLog "logs/www-access_log" common vim httpd.conf Include conf/extra/httpd-vhosts.conf #基于端口 NameVirtualHost *:80 NameVirtualHost *:8000 NameVirtualHost *:9000 #基于IP <VirtualHost 192.168.1.1:90> xxxxxxxxx 24、apache日志: CustomLog "logs/blog-access_log" combined #日志轮询 #统计IP awk '{print $1}' access_bbs_xx.log|sort|uniq -c|sort -rn 25、隐藏版本信息: 方法一: ※首先修改源文件,再进行make && make install 编译安装 编辑源文件/usr/local/apache2/include/ap_release.h 文件 [root@Nagios-Server include]# vimap_release.h #define AP_SERVER_BASEPRODUCT "IIS" #define AP_SERVER_MAJORVERSION_NUMBER 7 #define AP_SERVER_MINORVERSION_NUMBER 0 #define AP_SERVER_PATCHLEVEL_NUMBER 0 #define AP_SERVER_DEVBUILD_BOOLEAN 0 编辑源文件/usr/local/apache2/include/os.h 文件 [root@Nagios-Server include]# vimos.h #define PLATFORM "Win32" 方法二: [root@Nagios-Server include]# vim /usr/local/apache2/conf/httpd.conf # Various default settings Include conf/extra/httpd-default.conf [root@Nagios-Server include]# vim /usr/local/apache2/conf/extra/httpd-default.conf #ServerTokens Prod #ServerSignature off [root@Nagios-Server include]# curl -I 192.168.1.125 89 HTTP/1.1 200 OK Date: Sun, 07 Dec 2014 11:55:51 GMT Server: Apache/2.2.23 (Unix) PHP/5.4.1 #此处无法去掉,若要隐藏,只有用方法一 Last-Modified: Sat, 06 Dec 2014 07:22:37 GMT ETag: "42760-19-509870ed29d1c" Accept-Ranges: bytes Content-Length: 25 Content-Type: text/html 26、apache的rewrite:vi /etc/httpd.conf LoadModule rewrite_module modules/mod_rewrite.so RewriteEngine on Include conf.d/xx.conf RewriteCond %{HTTP_HOST} hunk.test.com [NC] RewriteRule ^(.*)/index.html$ http://hunk.test.com/test.html [L,R=302] 27、apache安全 Allow from [All /全域名/部分域名/IP 地址/网络地址/CIDR 地址] All:表示全部客户端 全域名:表示域名对应的客户端,如www.domain.com 部分域名:表示域名内所有客户端,如domain.com IP 地址:如172.20.17.1 网络地址:如172.20.17.0/255.255.255.0 CIDR 地址:如172.20.17.0/24 htpasswd -c /usr/local/apache2/conf/users sam 28、图片防盗链 28、忽略某些访问日志 29、APACHE日志分析 1.获得访问前10 位的ip 地址 [root@apache ~]# cat access_log |awk '{print $1}'|sort|uniq -c|sort -nr|head -10 2.访问次数最多的文件或页面,取前20 cat access.log|awk ‘{print $11}’|sort|uniq -c|sort -nr|head -20 3.列出传输最大的几个exe 文件 cat access.log |awk ‘($7~/\.exe/){print $10 ” ” $1 ” ” $4 ” ” $7}’|sort -nr|head -20 4. 列出输出大于200000byte(约200kb)的exe 文件以及对应文件发生次 数 cat access.log |awk ‘($10 > 200000 && $7~/\.exe/){print $7}’|sort -n|uniq -c|sort -nr|head -100 5. 如果日志最后一列记录的是页面文件传输时间,则有列出到客户端 最耗时的页面 cat access.log |awk ‘($7~/\.php/){print $NF ” ” $1 ” ” $4 ” ” $7}’|sort -nr|head -100 6. 列出最最耗时的页面(超过60 秒的)的以及对应页面发生次数 cat access.log |awk ‘($NF > 60 && $7~/\.php/){print $7}’|sort -n|uniq -c|sort -nr|head -100 7. 列出传输时间超过30 秒的文件 cat access.log |awk ‘($NF > 30){print $7}’|sort -n|uniq -c|sort -nr|head -20 8. 统计网站流量(G) 94 cat access.log |awk ‘{sum+=$10} END {print sum/1024/1024/1024}’ 9. 统计404 的连接 awk ‘($9 ~/404/)’ access.log | awk ‘{print $9,$7}’ | sort 10. 统计http status. cat access.log |awk ‘{counts[$(9)]+=1}; END {for(code in counts) print code, counts[code]}' cat access.log |awk '{print $9}'|sort|uniq -c|sort -rn 11. 蜘蛛分析 查看是哪些蜘蛛在抓取内容。 /usr/sbin/tcpdump -i eth0 -l -s 0 -w - dst port 80 | strings | grep -i user-agent | grep -i -E 'bot|crawler|slurp|spider' Webalizer 日志分析程序 [root@Apache-Server tools]# yum install -y webalizer [root@Apache-Server tools]# less /etc/webalizer.conf 30、apache tomcat整合 http://blog.51cto.com/maofan/1560639

资源下载

更多资源
Mario

Mario

马里奥是站在游戏界顶峰的超人气多面角色。马里奥靠吃蘑菇成长,特征是大鼻子、头戴帽子、身穿背带裤,还留着胡子。与他的双胞胎兄弟路易基一起,长年担任任天堂的招牌角色。

Nacos

Nacos

Nacos /nɑ:kəʊs/ 是 Dynamic Naming and Configuration Service 的首字母简称,一个易于构建 AI Agent 应用的动态服务发现、配置管理和AI智能体管理平台。Nacos 致力于帮助您发现、配置和管理微服务及AI智能体应用。Nacos 提供了一组简单易用的特性集,帮助您快速实现动态服务发现、服务配置、服务元数据、流量管理。Nacos 帮助您更敏捷和容易地构建、交付和管理微服务平台。

Rocky Linux

Rocky Linux

Rocky Linux(中文名:洛基)是由Gregory Kurtzer于2020年12月发起的企业级Linux发行版,作为CentOS稳定版停止维护后与RHEL(Red Hat Enterprise Linux)完全兼容的开源替代方案,由社区拥有并管理,支持x86_64、aarch64等架构。其通过重新编译RHEL源代码提供长期稳定性,采用模块化包装和SELinux安全架构,默认包含GNOME桌面环境及XFS文件系统,支持十年生命周期更新。

WebStorm

WebStorm

WebStorm 是jetbrains公司旗下一款JavaScript 开发工具。目前已经被广大中国JS开发者誉为“Web前端开发神器”、“最强大的HTML5编辑器”、“最智能的JavaScript IDE”等。与IntelliJ IDEA同源,继承了IntelliJ IDEA强大的JS部分的功能。

用户登录
用户注册