首页 文章 精选 留言 我的

精选列表

搜索[v],共10000篇文章
优秀的个人博客,低调大师

x-easypdf v2.8.3 版本发布

x-easypdf基于pdfbox二次封装,极大降低使用门槛,以组件化的形式进行pdf的构建。简单易用,仅需一行代码,便可完成pdf的相关操作 新特性: 表单填充器XEasyPdfDocumentFormFiller新增开启外观的方法 表单填充器XEasyPdfDocumentFormFiller新增开启压缩的方法 图片组件XEasyPdfImage新增是否自定义尺寸的方法 文档书签XEasyPdfDocumentBookmark新增获取书签节点列表的方法 页脚组件XEasyPdfFooter新增添加自定义组件的方法(issue#I58BHH) 页眉组件XEasyPdfHeader新增添加自定义组件的方法(issue#I58BHH) 新增类工具XEasyPdfClassUtil 原有变更: 优化表格组件XEasyPdfTable单元格生成逻辑 优化文档XEasyPdfDocument读取页面尺寸的配置 优化字体加载逻辑 问题修复: 修复表格组件XEasyPdfTable自动拆分文本错误问题(issue#I568P9) 修复表格组件XEasyPdfTable跨页显示错误问题(issue#I588ID)

优秀的个人博客,低调大师

W3A SOC v1.0.5 更新

##主要更新 1、整体联调测试,确定没有问题,能够正常进行分析,上报逻辑。 2、增加社区版本通用的规则策略,完善存在DB文件中。 3、增加docker-compose的配置,快速搭建日志审计环境,让平台能够running起来。 4、完善修复Java后端的BUG,解决写入数据异常的问题。 5、完善前端数据展示异常问题。 ##下一步(待办) 1、开发License管理,打通服务部分。 2、优化前端的显示问题。 3、对服务进行压测。 4、增加漏洞管理生命周期功能。

优秀的个人博客,低调大师

xmake v2.6.5 发布,远程编译支持

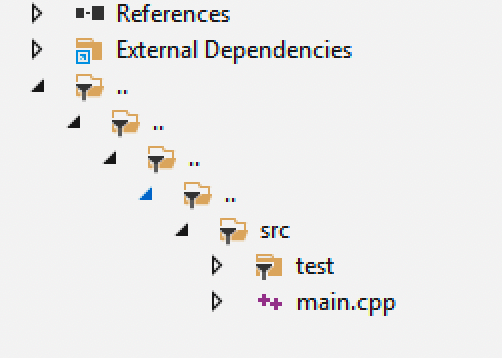
Xmake是一个基于 Lua 的轻量级跨平台构建工具。 它非常的轻量,没有任何依赖,因为它内置了 Lua 运行时。 它使用 xmake.lua 维护项目构建,相比 makefile/CMakeLists.txt,配置语法更加简洁直观,对新手非常友好,短时间内就能快速入门,能够让用户把更多的精力集中在实际的项目开发上。 我们能够使用它像 Make/Ninja 那样可以直接编译项目,也可以像 CMake/Meson 那样生成工程文件,另外它还有内置的包管理系统来帮助用户解决 C/C++ 依赖库的集成使用问题。 目前,Xmake 主要用于 C/C++ 项目的构建,但是同时也支持其他 native 语言的构建,可以实现跟 C/C++ 进行混合编译,同时编译速度也是非常的快,可以跟 Ninja 持平。 Xmake = Build backend + Project Generator + Package Manager 项目源码 官方文档 入门课程 新特性介绍 远程编译支持 新版本提供了远程编译支持,我们可以通过它可以远程服务器上编译代码,远程运行和调试。 服务器可以部署在 Linux/MacOS/Windows 上,实现跨平台编译,例如:在 Linux 上编译运行 Windows 程序,在 Windows 上编译运行 macOS/Linux 程序。 相比 ssh 远程登入编译,它更加的稳定,使用更加流畅,不会因为网络不稳定导致 ssh 终端输入卡顿,也可以实现本地快速编辑代码文件。 甚至我们可以在 vs/sublime/vscode/idea 等编辑器和IDE 中无缝实现远程编译,而不需要依赖 IDE 本身对远程编译的支持力度。 开启服务 $ xmake service <remote_build_server>: listening 0.0.0.0:90091 .. 我们也可以开启服务的同时,回显详细日志信息。 $ xmake service -vD <remote_build_server>: listening 0.0.0.0:90091 .. 以 Daemon 模式开启服务 $ xmake service --start $ xmake service --restart $ xmake service --stop 配置服务端 我们首先,运行xmake service命令,它会自动生成一个默认的service.conf配置文件,存储到~/.xmake/service.conf。 然后,我们编辑它,修复服务器的监听端口(可选)。 { logfile = "/Users/ruki/.xmake/service/logs.txt", remote_build = { server = { listen = "0.0.0.0:90091" } } } 配置客户端 我们还是编辑这个文件~/.xmake/service.conf,配置客户端需要连接的服务器地址。 { logfile = "/Users/ruki/.xmake/service/logs.txt", remote_build = { client = { connect = "192.168.56.101:90091", } } } 导入给定的配置文件 我们也可以通过下面的命令,导入指定的配置文件。 $ xmake service --config=/tmp/service.conf 连接远程的服务器 接下来,我们只需要进入需要远程编译的工程根目录,执行xmake service --connect命令,进行连接。 $ xmake create test $ cd test $ xmake service --connect <remote_build_client>: connect 192.168.56.110:90091 .. <remote_build_client>: connected! <remote_build_client>: sync files in 192.168.56.110:90091 .. Scanning files .. Comparing 3 files .. [+]: src/main.cpp [+]: .gitignore [+]: xmake.lua 3 files has been changed! Archiving files .. Uploading files with 1372 bytes .. <remote_build_client>: sync files ok! 远程构建工程 连接成功后,我们就可以像正常本地编译一样,进行远程编译。 $ xmake <remote_build_client>: run xmake in 192.168.56.110:90091 .. checking for platform ... macosx checking for architecture ... x86_64 checking for Xcode directory ... /Applications/Xcode.app checking for Codesign Identity of Xcode ... Apple Development: waruqi@gmail.com (T3NA4MRVPU) checking for SDK version of Xcode for macosx (x86_64) ... 11.3 checking for Minimal target version of Xcode for macosx (x86_64) ... 11.4 [ 25%]: ccache compiling.release src/main.cpp [ 50%]: linking.release test [100%]: build ok! <remote_build_client>: run command ok! 远程运行目标程序 我们也可以像本地运行调试那样,远程运行调试编译的目标程序。 $ xmake run <remote_build_client>: run xmake run in 192.168.56.110:90091 .. hello world! <remote_build_client>: run command ok! 远程重建工程 $ xmake -rv <remote_build_client>: run xmake -rv in 192.168.56.110:90091 .. [ 25%]: ccache compiling.release src/main.cpp /usr/local/bin/ccache /usr/bin/xcrun -sdk macosx clang -c -Qunused-arguments -arch x86_64 -mmacosx-version-min=11.4 -isysroot /Applications/Xcode.app/Contents/Developer/Platforms/MacOSX.platform/Developer/SDKs/MacOSX11.3.sdk -fvisibility=hidden -fvisibility-inlines-hidden -O3 -DNDEBUG -o build/.objs/test/macosx/x86_64/release/src/main.cpp.o src/main.cpp [ 50%]: linking.release test "/usr/bin/xcrun -sdk macosx clang++" -o build/macosx/x86_64/release/test build/.objs/test/macosx/x86_64/release/src/main.cpp.o -arch x86_64 -mmacosx-version-min=11.4 -isysroot /Applications/Xcode.app/Contents/Developer/Platforms/MacOSX.platform/Developer/SDKs/MacOSX11.3.sdk -stdlib=libc++ -Wl,-x -lz [100%]: build ok! <remote_build_client>: run command ok! 远程配置编译参数 $ xmake f --xxx --yy 手动同步工程文件 连接的时候,会自动同步一次代码,后期代码改动,可以执行此命令来手动同步改动的文件。 $ xmake service --sync <remote_build_client>: sync files in 192.168.56.110:90091 .. Scanning files .. Comparing 3 files .. [+]: src/main.cpp [+]: .gitignore [+]: xmake.lua 3 files has been changed! Archiving files .. Uploading files with 1372 bytes .. <remote_build_client>: sync files ok! 断开远程连接 针对当前工程,断开连接,这仅仅影响当前工程,其他项目还是可以同时连接和编译。 $ xmake service --disconnect <remote_build_client>: disconnect 192.168.56.110:90091 .. <remote_build_client>: disconnected! 查看服务器日志 $ xmake service --logs 清理远程服务缓存和构建文件 我们也可以手动清理远程的任何缓存和构建生成的文件。 $ cd projectdir $ xmake service --clean 改进 Cargo 包依赖 在之前的版本中,我们已经可以通过add_requires("cargo::base64")去单独集成每个 cargo 包,用于编译 rust 项目,以及与 C/C++ 的混合编译,例如: add_rules("mode.release", "mode.debug") add_requires("cargo::base64 0.13.0") add_requires("cargo::flate2 1.0.17", {configs = {features = "zlib"}}) target("test") set_kind("binary") add_files("src/main.rs") add_packages("cargo::base64", "cargo::flate2") 但是上面的方式会有一个问题: 如果依赖很多,并且有几个依赖都共同依赖了相同的子依赖,那么会出现重定义问题,因此如果我们使用完整的 Cargo.toml 去管理依赖就不会存在这个问题。 例如: add_rules("mode.release", "mode.debug") add_requires("cargo::test", {configs = {cargo_toml = path.join(os.projectdir(), "Cargo.toml")}}) target("test") set_kind("binary") add_files("src/main.rs") add_packages("cargo::test") 然后,我们就可以在 Cargo.toml 中集成所有需要的依赖,让 Rust 自己去分析依赖关系,避免重复的子依赖冲突。 完整例子见:cargo_deps_with_toml 当然,如果用户的依赖比较单一,那么之前的集成方式还是完全可用。 为什么使用 Xmake 编译 Rust? 这个时候,肯定会有人问,既然都用了 Cargo.toml 和 Cargo 了,为什么还要在 xmake.lua 中去配置呢,直接 Cargo 编译不就好了么。 如果我们是在用 Xmake 开发 C/C++ 项目,但是需要引入一些 Rust 子模块给 C/C++ 项目使用,那么就可以借助这种方式,快速方便地在 C/C++ 中调用 Rust 库和代码。 更多关于 C/C++ 中调用 Rust 代码库的说明,见:使用 cxxbridge 在 C/C++ 中调用 Rust 支持源文件分组 新版本,我们提供了一个新接口add_filegroups,用于对 vs/vsxmake/cmakelists generator 生成的工程文件进行源文件分组展示。 如果不设置分组展示,Xmake 也会默认按照树状模式展示,但是有些极端情况下,目录层级显示不是很好,例如: target("test") set_kind("binary") add_files("../../../../src/**.cpp") 目前主要支持两种展示模式: plain: 平坦模式 tree: 树形展示,这也是默认模式 另外,它也支持对add_headerfiles添加的文件进行分组。 设置分组并指定根目录 target("test") set_kind("binary") add_files("../../../../src/**.cpp") add_filegroups("group1/group2", {rootdir = "../../../../"}) 设置分组并指定文件匹配模式 target("test") set_kind("binary") add_files("../../../../src/**.cpp") add_filegroups("group1/group2", {rootdir = "../../../../", files = {"src/**.cpp"}}) 作为平坦模式展示 这种模式下,所有源文件忽略嵌套的目录层级,在分组下同一层级展示。 target("test") set_kind("binary") add_files("../../../../src/**.cpp") add_filegroups("group1/group2", {rootdir = "../../../../", mode = "plain"}) 包版本选择支持 Git Commit Xmake 的包依赖管理接口add_requires支持版本语义选择,分支选择,例如: add_requires("tbox 1.6.1") add_requires("tbox >=1.6.1") add_requires("tbox master") 但是,之前的版本,我们还不支持从 Git Commit 中选择版本,而现在我们也支持上了。 add_requires("tbox e807230557aac69e4d583c75626e3a7ebdb922f8") 只要,这个包的配置中带有 Git url,就能从 Commit 中选择版本。 更好地支持 iOS 模拟器编译 如果要编译 iOS 平台目标程序,之前可以使用如下配置,仅仅通过切换 arch,就能分别编译真机,模拟器版本程序。 $ xmake f -p iphoneos [-a armv7|armv7s|arm64|i386|x86_64] $ xmake 但是由于 M1 设备上模拟器也支持 arm64 架构,因此之前单纯从 arch 去区分是否为模拟器,已无法满足需求。 因此,在新版本中,我们新增了一个参数配置去区分是否为模拟器目标。 $ xmake f -p iphoneos --appledev=simulator $ xmake f -p watchos --appledev=simulator $ xmake f -p appletvos --appledev=simulator 而如果没有指定--appledev=参数,默认就是编译真机程序,当然,之前的模式也是完全兼容的。 更新内容 新特性 #2138: 支持模板包 #2185: 添加--appledev=simulator去改进 Apple 模拟器目标编译支持 #2227: 改进 cargo 包,支持指定 Cargo.toml 文件 改进add_requires支持 git command 作为版本 #622: 支持远程编译 #2282: 添加add_filegroups接口为 vs/vsxmake/cmake generator 增加文件组支持 改进 #2137: 改进 path 模块 macOS 下,减少 50% 的 Xmake 二进制文件大小 改进 tools/autoconf,cmake 去更好地支持工具链切换 #2221: 改进注册表 api 去支持 unicode #2225: 增加对 protobuf 的依赖分析和构建支持 #2265: 排序 CMakeLists.txt 改进 os.files 的文件遍历速度 Bugs 修复 #2233: 修复 c++ modules 依赖

优秀的个人博客,低调大师

亲,GreaterWMS V 2.1.0 大版本更新了

愿景:如果你从事着非IT行业的工作,而你又热爱你的行业,那就用科技去改变他。 官网:GreaterWMS 视频教程:B站 New: 新增下载中心 新增移动端页面 新增扫描设备支持,现在支持Zebra和Urovo的扫描设备 Fixed Bug: 收货管理下下载列表,下载下来的文件有一行显示total_cost,应该显示总价格 管理处查看商品标签,当商品名称过长时名称和二维码显示会错 修复初始状态下登入窗口中活动窗口无标记的bug 修改发货管理签收回执中数量只能为正整数,且破损数量小于等于实际到货数量 修复推出登入时控制台报错的bug 修复商品管理下字数超出限制但仍提示创建成功的bug 修复商品管理下输入两个相同的产地时仍提示修改成功的bug 修复仓库设置下编辑库位名称为空后提交仍提示修改成功的bug 修复扫描枪盘点无数据的bug 报表中心新增收发货报表 修复上传中心样式紊乱的bug 修复报表中心]收货报表里出现一条12位小数点的数据 修复了有时候发货单没有数据 修复了收发货记录接口时间日期显示不正确问题 修复了无货情况下,无法生成发货单的bug 修复了下载中心,路径错误的问题

优秀的个人博客,低调大师

MyBatis JPA Extra v2.7 GA 发布

MyBatis JPA Extra对MyBatis进行了JPA扩展,旨在基于JPA 2.1的注释简化对单表CUID操作,根据JPA注释动态生成SQL语句;使用Interceptor实现数据库SELECT分页查询,适配多种数据库;另外提供mybatis-jpa-extra-spring-boot-starter简化SpringBoot集成。 MyBatis JPA Extra对MyBatis扩展JPA功能 1.基于JPA 2.1的注释简化CUID操作; 2.用Interceptor实现数据库SELECT分页查询; 3.提供mybatis-jpa-extra-spring-boot-starter,简化SpringBoot集成; 1、JavaBean注释简单 仅有6个注释 @Entity @Table @Column @Id @GeneratedValue @Transient @GeneratedValue有4中策略 AUTO snowflakeid uuid uuid.hex serial SEQUENCE generator值为数据库序列名 IDENTITY generator无,根据数据库自动生成方式 package org.apache.mybatis.jpa.test.entity; import java.io.Serializable; import javax.persistence.Column; import javax.persistence.Entity; import javax.persistence.GeneratedValue; import javax.persistence.GenerationType; import javax.persistence.Id; import javax.persistence.Table; import org.apache.mybatis.jpa.persistence.JpaBaseEntity; @Entity @Table(name = "STUDENTS") public class Students extends JpaBaseEntity implements Serializable{ private static final long serialVersionUID = -6928570405840778151L; @Id @Column @GeneratedValue(strategy=GenerationType.AUTO,generator="snowflakeid") //@GeneratedValue(strategy=GenerationType.SEQUENCE,generator="SEQ_MYBATIS_STUD") //@GeneratedValue(strategy=GenerationType.IDENTITY,generator="SEQ_MYBATIS_STUD") private String id; @Column private String stdNo; @Column private String stdName; @Column private String stdGender; @Column private int stdAge; @Column private String stdMajor; @Column private String stdClass; @Column private byte[] images; public Students() { super(); } public get(){}; public void set(){}; //... } 2、单表新增、修改、删除、查询、分页查询 package org.apache.mybatis.jpa.test; import java.sql.Types; import java.text.SimpleDateFormat; import java.util.ArrayList; import java.util.Date; import java.util.List; import org.apache.mybatis.jpa.test.dao.service.StudentsService; import org.apache.mybatis.jpa.test.entity.Students; import org.apache.mybatis.jpa.util.WebContext; import org.junit.Before; import org.junit.Test; import org.slf4j.Logger; import org.slf4j.LoggerFactory; import org.springframework.context.ApplicationContext; import org.springframework.context.support.ClassPathXmlApplicationContext; public class MyBatisTestRunner { private static final Logger _logger = LoggerFactory.getLogger(MyBatisTestRunner.class); public static ApplicationContext context; public static StudentsService service; @Test public void insert() throws Exception{ _logger.info("insert..."); Students student=new Students(); //student.setId("10024"); student.setStdNo("10024"); student.setStdGender("M"); student.setStdName("司马昭"); student.setStdAge(20); student.setStdMajor("政治"); student.setStdClass("4"); service.insert(student); Thread.sleep(1000); _logger.info("insert id " + student.getId()); //service.remove(student.getId()); } @Test public void merge() throws Exception{ _logger.info("merge..."); Students student=new Students(); //student.setId("10024"); student.setStdNo("10024"); student.setStdGender("M"); student.setStdName("司马昭"); student.setStdAge(20); student.setStdMajor("政治"); student.setStdClass("4"); service.merge(student); Thread.sleep(1000); _logger.info("insert id " + student.getId()); } @Test public void find() throws Exception{ _logger.info("find..."); _logger.info("find by filter " + service.find(" StdNo = '10024' or StdNo = '10004'") ); _logger.info("find by filter with args " + service.find( " StdNo = ? or StdNo = ? ", new Object[]{"10024","10004"}, new int[]{Types.VARCHAR,Types.INTEGER} ) ); } @Test public void get() throws Exception{ _logger.info("get..."); Students student=service.get("317d5eda-927c-4871-a916-472a8062df23"); System.out.println("Students "+student); _logger.info("Students "+student); } @Test public void update() throws Exception{ _logger.info("get..."); Students student=service.get("317d5eda-927c-4871-a916-472a8062df23"); System.out.println("Students "+student); _logger.info("Students "+student); _logger.info("update..."); student.setImages(null); service.update(student); _logger.info("updateed."); student.setImages("ssss".getBytes()); service.update(student); _logger.info("updateed2."); } @Test public void remove() throws Exception{ _logger.info("remove..."); Students student=new Students(); student.setId("921d3377-937a-4578-b1e2-92fb23b5e512"); service.remove(student.getId()); } @Test public void batchDelete() throws Exception{ _logger.info("batchDelete..."); List<String> idList=new ArrayList<String>(); idList.add("8584804d-b5ac-45d2-9f91-4dd8e7a090a7"); idList.add("ab7422e9-a91a-4840-9e59-9d911257c918"); idList.add("12b6ceb8-573b-4f01-ad85-cfb24cfa007c"); idList.add("dafd5ba4-d2e3-4656-bd42-178841e610fe"); service.deleteBatch(idList); } @Test public void logicDelete() throws Exception{ _logger.info("logicDelete..."); List<String> idList=new ArrayList<String>(); idList.add("8584804d-b5ac-45d2-9f91-4dd8e7a090a7"); idList.add("ab7422e9-a91a-4840-9e59-9d911257c918"); idList.add("12b6ceb8-573b-4f01-ad85-cfb24cfa007c"); idList.add("dafd5ba4-d2e3-4656-bd42-178841e610fe"); service.logicDelete(idList); } @Test public void batchDeleteByIds() throws Exception{ _logger.info("batchDeleteByIds..."); service.deleteBatch("2"); service.deleteBatch("2,639178432667713536"); } @Test public void queryPageResults() throws Exception{ _logger.info("queryPageResults..."); Students student=new Students(); //student.setId("af04d610-6092-481e-9558-30bd63ef783c"); //student.setStdGender("M"); //student.setStdMajor(政治"); student.setPageSize(10); //student.setPageNumber(2); student.calculate(21); List<Students> allListStudents = service.queryPageResults(student).getRows(); for (Students s : allListStudents) { _logger.info("Students "+s); } } @Test public void queryPageResultsByMapperId() throws Exception{ _logger.info("queryPageResults by mapperId..."); Students student=new Students(); student.setStdGender("M"); //student.setStdMajor(政治"); student.setPageSize(10); student.setPageNumber(2); List<Students> allListStudents = service.queryPageResults("queryPageResults1",student).getRows(); for (Students s : allListStudents) { _logger.info("Students "+s); } } @Test public void query() throws Exception{ _logger.info("findAll..."); List<Students> allListStudents =service.query(null); for (Students s : allListStudents) { _logger.info("Students "+s); } } @Test public void findAll() throws Exception{ _logger.info("findAll..."); List<Students> allListStudents =service.findAll(); for (Students s : allListStudents) { _logger.info("Students "+s); } } @Before public void initSpringContext(){ if(context!=null) return; _logger.info("init Spring Context..."); SimpleDateFormat sdf_ymdhms =new SimpleDateFormat("yyyy-MM-dd HH🇲🇲ss"); String startTime=sdf_ymdhms.format(new Date()); try{ MyBatisTestRunner runner=new MyBatisTestRunner(); runner.init(); }catch(Exception e){ e.printStackTrace(); } _logger.info("-- --Init Start at " + startTime+" , End at "+sdf_ymdhms.format(new Date())); } //Initialization ApplicationContext for Project public void init(){ _logger.info("Application dir "+System.getProperty("user.dir")); context = new ClassPathXmlApplicationContext(new String[] {"spring/applicationContext.xml"}); WebContext.applicationContext=context; service =(StudentsService)WebContext.getBean("studentsService"); } } 版本更新 代码优化 新增find方法,根据过滤器查询数据 新增insertBatch方法 新增deleteBatch方法 删除batchInsert方法 删除batchDelete方法 日志功能优化 缓存调整为caffeine 升级log4j2 2.17.0

资源下载

更多资源
优质分享App

优质分享App

近一个月的开发和优化,本站点的第一个app全新上线。该app采用极致压缩,本体才4.36MB。系统里面做了大量数据访问、缓存优化。方便用户在手机上查看文章。后续会推出HarmonyOS的适配版本。

Mario

Mario

马里奥是站在游戏界顶峰的超人气多面角色。马里奥靠吃蘑菇成长,特征是大鼻子、头戴帽子、身穿背带裤,还留着胡子。与他的双胞胎兄弟路易基一起,长年担任任天堂的招牌角色。

腾讯云软件源

腾讯云软件源

为解决软件依赖安装时官方源访问速度慢的问题,腾讯云为一些软件搭建了缓存服务。您可以通过使用腾讯云软件源站来提升依赖包的安装速度。为了方便用户自由搭建服务架构,目前腾讯云软件源站支持公网访问和内网访问。

Sublime Text

Sublime Text

Sublime Text具有漂亮的用户界面和强大的功能,例如代码缩略图,Python的插件,代码段等。还可自定义键绑定,菜单和工具栏。Sublime Text 的主要功能包括:拼写检查,书签,完整的 Python API , Goto 功能,即时项目切换,多选择,多窗口等等。Sublime Text 是一个跨平台的编辑器,同时支持Windows、Linux、Mac OS X等操作系统。

用户登录
用户注册
修改密码
忘记密码