首页 文章 精选 留言 我的

精选列表

搜索[轻量版],共10000篇文章
优秀的个人博客,低调大师

LAMP架构升级版--LNMMP

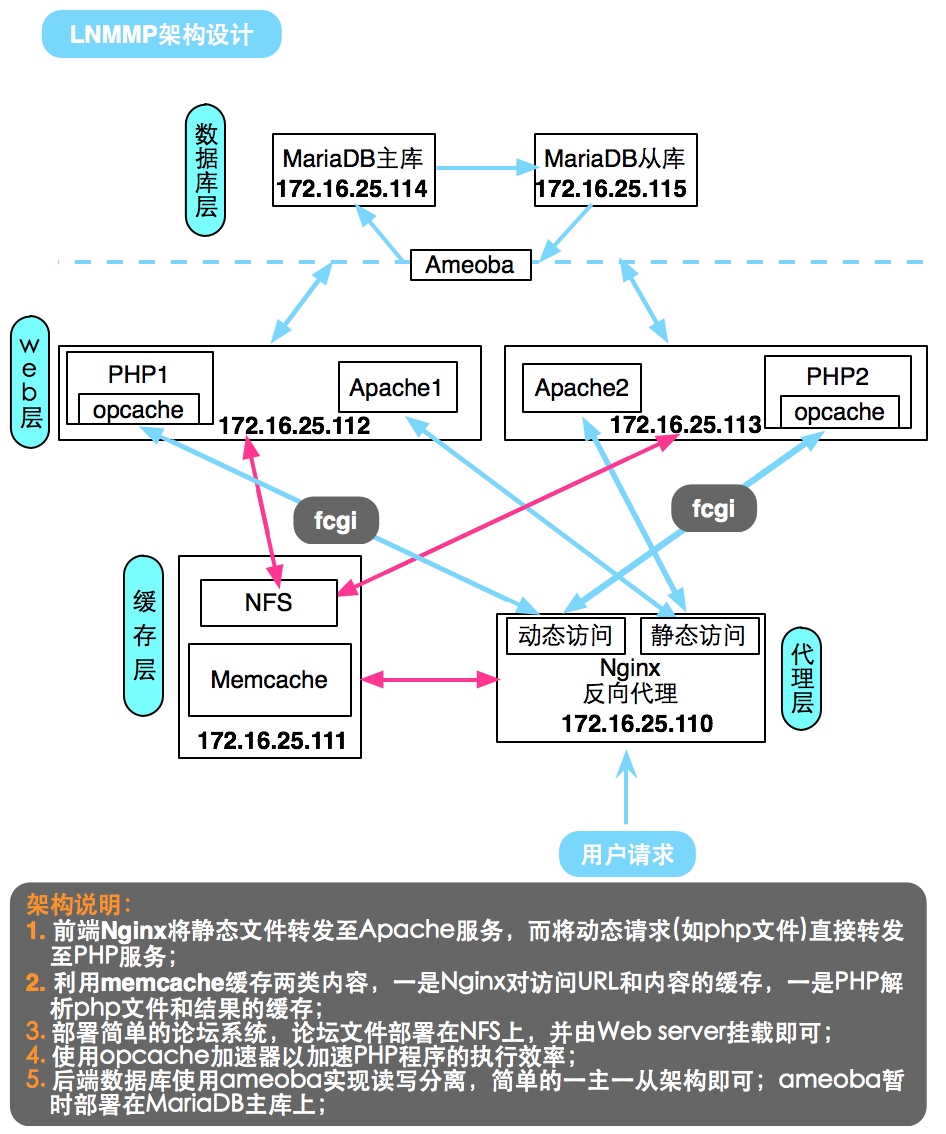
简介 LNMMP=Linux+Nginx+MySQL+Memcache+PHP; 利用Nginx的高性能特点做前端反向代理服务器,分发用户请求,并在能够利用缓存的地方使用Memcache缓存服务,以加速缓存效率,具体架构图如下; 具体部署 代理层:Nginx 编译安装Nginx 1 2 3 4 5 6 7 8 9 10 11 12 13 14 15 16 17 18 19 20 21 22 23 24 25 26 27 28 29 30 31 32 33 34 35 36 37 38 39 40 41 42 43 44 45 46 47 48 49 50 51 52 53 54 55 56 57 58 59 60 61 62 63 64 65 66 67 68 69 70 71 72 73 74 75 76 77 78 79 80 81 82 83 84 85 86 87 88 89 90 91 92 93 94 95 96 97 98 99 100 101 102 103 104 105 106 107 108 109 110 111 112 113 114 115 116 117 118 119 120 121 122 123 124 125 126 127 128 129 130 131 132 133 134 yum install gcc openssl-devel pcre-devel zlib-devel groupadd -r nginx useradd -r -g nginx -M nginx . /configure \ --prefix= /usr/local/nginx \ --sbin-path= /usr/sbin/nginx \ --conf-path= /etc/nginx/nginx .conf \ --error-log-path= /var/log/nginx/error .log \ --http-log-path= /var/log/nginx/access .log \ --pid-path= /var/run/nginx/nginx .pid \ --lock-path= /var/lock/nginx .lock \ --user=nginx \ --group=nginx \ --with-http_ssl_module \ --with-http_flv_module \ --with-http_stub_status_module \ --with-http_gzip_static_module \ --http-client-body-temp-path= /var/tmp/nginx/client/ \ --http-proxy-temp-path= /var/tmp/nginx/proxy/ \ --http-fastcgi-temp-path= /var/tmp/nginx/fcgi/ \ --http-uwsgi-temp-path= /var/tmp/nginx/uwsgi \ --http-scgi-temp-path= /var/tmp/nginx/scgi \ --with-pcre make && make install vi /etc/init .d /nginx # 编辑服务脚本 #!/bin/sh # # nginx - this script starts and stops the nginx daemon # # chkconfig: - 85 15 # description: Nginx is an HTTP(S) server, HTTP(S) reverse \ # proxy and IMAP/POP3 proxy server # processname: nginx # config: /etc/nginx/nginx.conf # config: /etc/sysconfig/nginx # pidfile: /var/run/nginx.pid # Source function library. . /etc/rc .d /init .d /functions # Source networking configuration. . /etc/sysconfig/network # Check that networking is up. [ "$NETWORKING" = "no" ] && exit 0 nginx= "/usr/sbin/nginx" prog=$( basename $nginx) NGINX_CONF_FILE= "/etc/nginx/nginx.conf" [ -f /etc/sysconfig/nginx ] && . /etc/sysconfig/nginx lockfile= /var/lock/subsys/nginx make_dirs() { # make required directories user=`nginx -V 2>&1 | grep "configure arguments:" | sed 's/[^*]*--user=\([^ ]*\).*/\1/g' -` options=`$nginx -V 2>&1 | grep 'configure arguments:' ` for opt in $options; do if [ ` echo $opt | grep '.*-temp-path' ` ]; then value=` echo $opt | cut -d "=" -f 2` if [ ! -d "$value" ]; then # echo "creating" $value mkdir -p $value && chown -R $user $value fi fi done } start() { [ -x $nginx ] || exit 5 [ -f $NGINX_CONF_FILE ] || exit 6 make_dirs echo -n $ "Starting $prog: " daemon $nginx -c $NGINX_CONF_FILE retval=$? echo [ $retval - eq 0 ] && touch $lockfile return $retval } stop() { echo -n $ "Stopping $prog: " killproc $prog -QUIT retval=$? echo [ $retval - eq 0 ] && rm -f $lockfile return $retval } restart() { configtest || return $? stop sleep 1 start } reload() { configtest || return $? echo -n $ "Reloading $prog: " killproc $nginx -HUP RETVAL=$? echo } force_reload() { restart } configtest() { $nginx -t -c $NGINX_CONF_FILE } rh_status() { status $prog } rh_status_q() { rh_status > /dev/null 2>&1 } case "$1" in start) rh_status_q && exit 0 $1 ;; stop) rh_status_q || exit 0 $1 ;; restart|configtest) $1 ;; reload) rh_status_q || exit 7 $1 ;; force-reload) force_reload ;; status) rh_status ;; condrestart|try-restart) rh_status_q || exit 0 ;; *) echo $ "Usage: $0 {start|stop|status|restart|condrestart|try-restart|reload|force-reload|configtest}" exit 2 esac 配置Nginx 1 2 3 4 5 6 7 8 9 10 11 12 13 14 15 16 17 18 19 20 21 22 23 24 25 26 27 28 29 30 31 32 33 34 35 36 upstream memcached { server 172.16.25.111:11211; keepalive 1024; } upstream webserver { server 172.16.25.112:80; server 172.16.25.113:80; } upstream phpserver { server 172.16.25.112:9000; server 172.16.25.113:9000; } server { listen 80; server_name xxrenzhe.lnmmp.com; access_log /var/log/nginx/lnmmp .access.log; error_log /var/log/nginx/lnmmp .errors.log notice; root /www/lnmmp .com; index index.php index.html; location / { set $memcached_key $request_uri; add_header X-mem-key $memcached_key; memcached_pass memcached; default_type test /html ; error_page 404 500 502 504 = @webnocache; } location @webnocache { rewrite ^(\/)?$ /index .php last; # 配置直接访问域名或IP地址时,重定向至index.php文件 rewrite ^/.*$ /set_mem .php?$request_uri last; # 将静态访问重定向至后端set_mem.php,以实现set memcache的功能 proxy_pass http: //webserver ; } location ~* \.php(\?.*)?$ { fastcgi_pass phpserver; fastcgi_param SCRIPT_FILENAME $document_root$fastcgi_script_name; include fastcgi_params; } 启动服务 1 2 3 4 chmod +x /etc/init .d /nginx chkconfig --add nginx chkconfig nginx on service nginx start 缓存层:Memcache+NFS 安装配置memcache 1 2 3 4 5 6 7 8 9 10 11 12 13 14 15 16 17 18 19 20 21 22 23 24 25 26 27 28 29 30 31 32 33 34 35 36 37 38 39 40 41 42 43 44 45 46 47 48 49 50 51 52 53 54 55 56 57 58 59 60 61 62 63 64 65 66 67 68 69 70 71 72 73 74 75 76 77 78 79 80 81 82 83 84 85 86 87 88 89 90 91 # 安装libevent tar xf libevent-2.0.21-stable. tar .gz cd libevent-2.0.21 . /configure --prefix= /usr/local/libevent make && make install echo "/usr/local/libevent/lib" > /etc/ld .so.conf.d /libevent .conf ldconfig # 安装memcache tar xf memcached-1.4.15. tar .gz cd memcached-1.4.15 . /configure --prefix= /usr/local/memcached --with-libevent= /usr/local/libevent make && make install # 编辑服务脚本 # 一次启动了2个memcache实例,一个用于Nginx,一个用于后端PHP服务 vi /etc/init .d /memcached #!/bin/bash # # Init file for memcached # # chkconfig: - 86 14 # description: Distributed memory caching daemon # # processname: memcached # config: /etc/sysconfig/memcached . /etc/rc .d /init .d /functions ## Default variables PORT1= "11211" PORT2= "11311" USER= "nobody" MAXCONN= "1024" CACHESIZE= "64" OPTIONS= "" RETVAL=0 prog= "/usr/local/memcached/bin/memcached" desc= "Distributed memory caching" lockfile1= "/var/lock/subsys/memcached_$PORT1" lockfile2= "/var/lock/subsys/memcached_$PORT2" start() { echo -n $ "Starting $desc (memcached): " daemon $prog -d -p $PORT1 -u $USER -c $MAXCONN -m $CACHESIZE -o "$OPTIONS" daemon $prog -d -p $PORT2 -u $USER -c $MAXCONN -m $CACHESIZE -o "$OPTIONS" RETVAL=$? [ $RETVAL - eq 0 ] && success && touch $lockfile1 && touch $lockfile2 || failure echo return $RETVAL } stop() { echo -n $ "Shutting down $desc (memcached): " killproc $prog RETVAL=$? [ $RETVAL - eq 0 ] && success && rm -f $lockfile1 && rm -f $lockfile2 | failure echo return $RETVAL } restart() { stop start } reload() { echo -n $ "Reloading $desc ($prog): " killproc $prog -HUP RETVAL=$? [ $RETVAL - eq 0 ] && success || failure echo return $RETVAL } case "$1" in start) start ;; stop) stop ;; restart) restart ;; condrestart) [ -e $lockfile1 ] && [ -e $lockfile1 ] && restart RETVAL=$? ;; reload) reload ;; status) status $prog RETVAL=$? ;; *) echo $ "Usage: $0 {start|stop|restart|condrestart|status}" RETVAL=1 esac exit $RETVAL 启动memcache服务 1 2 3 4 chmod +x /etc/init .d /memcached chkconfig --add memcached chkconfig memcached on service memcached start 安装配置NFS 1 2 3 4 5 6 7 8 yum -y install nfs-utils vi /etc/exports /www/lnmmp .com 172.16.0.0 /16 (rw,no_root_squash) exportfs -ar # 导出NFS共享目录 cd /www/lnmmp .com unzip phpwind_v9.0_utf8.zip mv phpwind_v9.0_utf8 /upload/ * . chmod -R 777 attachment conf data html res src themes windid Web层:Apache Apache的安装见博客“httpd-2.4编译安装及新特性详解”; PHP-fpm的安装见博客“LAMP-PHP-fpm服务器配置”; PHP加速器opcache的安装配置见博客“LAMP-各PHP加速器性能剖析”; 配置PHP支持memcache 1 2 3 4 5 6 7 8 9 10 11 12 13 14 15 16 17 18 19 20 21 22 23 24 25 26 27 28 29 30 tar xf memcache-2.2.5.tgz cd memcache-2.2.5 /usr/local/php/bin/phpize . /configure --with-php-config= /usr/local/php/bin/php-config -- enable -memcache make && make install # 上述安装完后会有类似这样的提示: Installing shared extensions: /usr/local/php/lib/php/extensions/no-debug-non-zts-20090626/ vi /usr/local/php/lib/php .ini # 配置memcache模块位置及php会话保存至memcache中 extension= /usr/local/php/lib/php/extensions/no-debug-non-zts-20090626/memcache .so session.save_handler = memcache session.save_path = "tcp://172.16.25.111:11311" # 自定义set memcache的程序 vi /www/lnmmp .com /set_mem .php <?php $fn = dirname (__FILE__).$_SERVER[ 'QUERY_STRING' ]; if (file_exists($fn)) { $data = file_get_contents($fn); $mem = new Memcache(); $mem->connect( "172.16.25.111" ,11311) or die( "Could not connect" ); $mem-> set ($_SERVER[ 'QUERY_STRING' ],$data,0,600) or die( "Failed to save data at the memcached server" ); header( 'Content-Length: ' .filesize($fn). "\r\n" ); header( 'Content-Type: text/html' . "\r\n" ); header( 'X-cache: MISS' . "\r\n" ); print "$data" ; } else { header( 'Location: http://xxrenzhe.lnmmp.com' . "\r\n" ); header( 'Content-Length: ' .filesize($fn). "\r\n" ); header( 'X-cache: ' .$fn. "\r\n" ); } ?> Apache配置 1 2 3 4 5 6 7 8 9 10 11 12 13 14 15 vi /etc/httpd/httpd .conf # DocumentRoot "/usr/local/apache/htdocs" # 注释掉此行 Include /etc/httpd/extra/httpd-vhosts .conf # 取消此行注释 vi /etc/httpd/extra/httpd-vhosts .conf <VirtualHost *:80> DocumentRoot "/www/lnmmp.com" ServerName xxrenzhe.lnmmp.com ErrorLog "logs/lnmmp.com-error_log" CustomLog "logs/lnmmp.com-access_log" common <Directory "/www/lnmmp.com" > Options Indexes FollowSymLinks AllowOverride None Require all granted < /Directory > < /VirtualHost > NFS目录挂载 1 mount -t nfs 172.16.25.111: /www/lnmmp .com /www/lnmmp .com 服务启动 1 2 service httpd start service php-fpm start 数据库层:Ameoba+MariaDB MariaDB的安装详见博客“MySQL初识-架构-安装-初始化-连接-管理工具-数据文件”; MariaDB的主从复制架构配置见博客“Maria10实现主从复制架构及SSL复制”; Ameoba安装见“http://docs.hexnova.com/amoeba/index.html”; Ameoba实现读写分离见“http://docs.hexnova.com/amoeba/rw-splitting.html” 测试验证 Nginx利用memcache缓存小静态文件测试效果 Nginx利用memcache缓存大静态文件测试效果 PHP利用memcache保存session数据测试效果 本文转自 xxrenzhe11 51CTO博客,原文链接:http://blog.51cto.com/xxrenzhe/1403784,如需转载请自行联系原作者
优秀的个人博客,低调大师

Openstack完整搭建系统整理版

Operating System How to login to Ubuntu(12.04) Server system Login as a normal user user: openstack password: password Obtain Root privilege sudo su - password: password Update Host configuration hostname controller echo "controller" > /etc/hostname cat > /etc/hosts << EOF 127.0.0.1 localhost 127.0.1.1 controller {put_eth0_ip_here} controller # The following lines are desirable for IPv6 capable hosts ::1 ip6-localhost ip6-loopback fe00::0 ip6-localnet ff00::0 ip6-mcastprefix ff02::1 ip6-allnodes ff02::2 ip6-allrouters EOF Configure the network Setup the network in Native OpenStack VM # NOTE: The current IP is statically assigned by our system. Please do not change it. vi /etc/network/interfaces # This file describes the network interfaces available on your system # and how to activate them. For more information, see interfaces(5). # The loopback network interface auto lo iface lo inet loopback auto eth0 iface eth0 inet static address 192.168.8.210 netmask 255.255.255.0 gateway 192.168.8.1 dns-nameservers 192.168.8.15 8.8.8.8 # 需在此配置DNS,不可直接修改/etc/resolv.conf文件 auto eth1 iface eth1 inet static address 192.168.8.211 netmask 255.255.255.0 auto eth2 iface eth2 inet static address 192.168.8.212 netmask 255.255.255.0 Restart the network service /etc/init.d/networking restart Enable IP forwarding # To permit IP packets pass through different networks,# the network card should be configured with routing capability. echo"net.ipv4.ip_forward = 1">>/etc/sysctl.conf sysctl -p Upgrade your system to the latest version Add software repository echo -en 'deb http://ubuntu-cloud.archive.canonical.com/ubuntu precise-updates/havana main\n deb-src http://ubuntu-cloud.archive.canonical.com/ubuntu precise-updates/havana main' \ >> /etc/apt/sources.list.d/havana.list Upgrade the system apt-get update && apt-get dist-upgrade Install NTP Install the package apt-get install -y ntp Update /etc/ntp.conf file # Here we set ntp.ubuntu.com as the direct source of time.# You will also find that a local time source # is also provided in case of internet time service interruption. sed -i 's/server ntp.ubuntu.com/ \ server ntp.ubuntu.com \ server 127.127.1.0 \ fudge 127.127.1.0 stratum 10/g' /etc/ntp.conf Restart NTP service service ntp restart Set the OpenStack installation environment # Create the environment variables cat > /root/novarc << EOF export OS_TENANT_NAME=admin export OS_USERNAME=admin export OS_PASSWORD=password export MYSQL_PASS=password export SERVICE_PASSWORD=password export RABBIT_PASSWORD=password export FIXED_RANGE=10.0.0.0/24 export FLOATING_RANGE=$(/sbin/ifconfig eth0 | awk '/inet addr/ {print $2}' \ | cut -f2 -d ":" | awk -F "." '{print $1"."$2"."$3}').224/27 export OS_AUTH_URL="http://localhost:5000/v2.0/" export SERVICE_ENDPOINT="http://localhost:35357/v2.0" export SERVICE_TOKEN=stackinsider export MASTER="$(/sbin/ifconfig eth0 \ | awk '/inet addr/ {print $2}' | cut -f2 -d ":")" export LOCAL_IP="$(/sbin/ifconfig eth1 \ | awk '/inet addr/ {print $2}' | cut -f2 -d ":")" EOF # Update the global environment variables.cat/root/novarc >>/etc/profile source /etc/profile MySQL Server Setup the MySQL password for administrator cat << MYSQL_PRESEED | debconf-set-selections mysql-server-5.5 mysql-server/root_password password $MYSQL_PASS mysql-server-5.5 mysql-server/root_password_again password $MYSQL_PASS mysql-server-5.5 mysql-server/start_on_boot boolean true MYSQL_PRESEED Install the packages apt-get -y install mysql-server python-mysqldb curl Allow external connections # Bind MySQL service to all network interfaces. sed-i 's/127.0.0.1/0.0.0.0/g' /etc/mysql/my.cnf Restart MySQL service service mysql restart Create Databases, Users, Privileges for OpenStack mysql -uroot -p$MYSQL_PASS << EOF CREATE DATABASE nova; GRANT ALL PRIVILEGES ON nova.* TO 'nova'@'%' IDENTIFIED BY '$MYSQL_PASS'; GRANT ALL PRIVILEGES ON nova.* TO 'nova'@'localhost' IDENTIFIED BY '$MYSQL_PASS'; GRANT ALL PRIVILEGES ON nova.* TO 'nova'@'controller' IDENTIFIED BY '$MYSQL_PASS'; CREATE DATABASE glance; GRANT ALL PRIVILEGES ON glance.* TO 'glance'@'%' IDENTIFIED BY '$MYSQL_PASS'; GRANT ALL PRIVILEGES ON glance.* TO 'glance'@'localhost' IDENTIFIED BY '$MYSQL_PASS'; GRANT ALL PRIVILEGES ON glance.* TO 'glance'@'controller' IDENTIFIED BY '$MYSQL_PASS'; CREATE DATABASE keystone; GRANT ALL PRIVILEGES ON keystone.* TO 'keystone'@'%' IDENTIFIED BY '$MYSQL_PASS'; GRANT ALL PRIVILEGES ON keystone.* TO 'keystone'@'localhost' IDENTIFIED BY '$MYSQL_PASS'; GRANT ALL PRIVILEGES ON keystone.* TO 'keystone'@'controller' IDENTIFIED BY '$MYSQL_PASS'; CREATE DATABASE cinder; GRANT ALL PRIVILEGES ON cinder.* TO 'cinder'@'%' IDENTIFIED BY '$MYSQL_PASS'; GRANT ALL PRIVILEGES ON cinder.* TO 'cinder'@'localhost' IDENTIFIED BY '$MYSQL_PASS'; GRANT ALL PRIVILEGES ON cinder.* TO 'cinder'@'controller' IDENTIFIED BY '$MYSQL_PASS'; CREATE DATABASE neutron; GRANT ALL PRIVILEGES ON neutron.* TO 'neutron'@'%' IDENTIFIED BY '$MYSQL_PASS'; GRANT ALL PRIVILEGES ON neutron.* TO 'neutron'@'localhost' IDENTIFIED BY '$MYSQL_PASS'; GRANT ALL PRIVILEGES ON neutron.* TO 'neutron'@'controller' IDENTIFIED BY '$MYSQL_PASS'; FLUSH PRIVILEGES; EOF Message Queue Server: RabbitMQ Install the packages # Install the messaging queue server. Typically it is RabbitMQ. apt-get-yinstallrabbitmq-server Change the default password rabbitmqctl change_password guest $RABBIT_PASSWORD OpenStack Identity Server: Keystone Install the packages apt-get -y install keystone Update /etc/keystone/keystone.conf sed -i -e " s/# admin_token = ADMIN/admin_token = $SERVICE_TOKEN/g; \ s/# bind_host = 0.0.0.0/bind_host = 0.0.0.0/g; \ s/# public_port = 5000/public_port = 5000/g; \ s/# admin_port = 35357/admin_port = 35357/g; \ s/# compute_port = 8774/compute_port = 8774/g; \ s/# verbose = True/verbose = True/g; \ s/# idle_timeout/idle_timeout/g" /etc/keystone/keystone.conf Update MySQL connection for Keyatone sed -i '/connection = .*/{s|sqlite:///.*|mysql://'"keystone"':'"$MYSQL_PASS"'@'"$MASTER"'/keystone|g}'\ /etc/keystone/keystone.conf Restart Keystone and Sync database service keystone restart keystone-manage db_sync Create users, tenants, services for OpenStack wget http://wiki.stackinsider.com/images/9/99/Ksdata.sh_.txt -O Ksdata.sh sed -i 's/quantum/neutron/g' Ksdata.sh sed -i 's/QUANTUM/NEUTRON/g' Ksdata.sh sh Ksdata.sh Create endpoints for OpenStack wget http://wiki.stackinsider.com/images/1/18/Ksendpoints.sh_.txt -O Ksendpoints.sh sed -i 's/quantum/neutron/g' Ksendpoints.sh sh Ksendpoints.sh OpenStack Image Server: Glance Install the packages apt-get -y install glance Update the credentials for Glance sed -i -e " s/%SERVICE_TENANT_NAME%/service/g; \ s/%SERVICE_USER%/glance/g; s/%SERVICE_PASSWORD%/$SERVICE_PASSWORD/g; \ " /etc/glance/glance-api.conf /etc/glance/glance-registry.conf Update MySQL connection for Glance sed -i '/sql_connection = .*/{s|sqlite:///.*|mysql://'"glance"':'"$MYSQL_PASS"'@'"$MASTER"'/glance|g}'\ /etc/glance/glance-registry.conf /etc/glance/glance-api.conf Setup notifier for Glance sed -i " s/notifier_strategy = noop/notifier_strategy = rabbit/g;\ s/rabbit_password = guest/rabbit_password = $RABBIT_PASSWORD/g;" \ /etc/glance/glance-api.conf Setup flavor for Glance cat << EOF >>/etc/glance/glance-api.conf flavor = keystone+cachemanagement EOF cat << EOF >>/etc/glance/glance-registry.conf flavor = keystone EOF Restart Glance services service glance-api restart service glance-registry restart Sync Glance database glance-manage db_sync Download Cirros image wget https://launchpad.net/cirros/trunk/0.3.0/+download/cirros-0.3.0-x86_64-disk.img Upload Cirros image to Glance glance add name=cirros-0.3.0-x86_64 is_public=truecontainer_format=bare \ disk_format=qcow2 </root/cirros-0.3.0-x86_64-disk.img Check the image # Check the image ID to confirm if Glance operates normally. glance index OpenStack Block Storage: Cinder Install the packages apt-get install -y cinder-api cinder-scheduler cinder-volume iscsitarget \ open-iscsi iscsitarget-dkms python-cinderclient Prepare the logical volumnes for Cinder You can manage Cinder via a pre-prepared logical volumes "cinder-volumes", the size of which is 1.2GB. fdisk -l pvcreate /dev/vdb vgcreate cinder-volumes /dev/vdb Volume group "cinder-volumes" successfully created iSCSI configuration Enable the iSCSI target service sed -i 's/false/true/g'/etc/default/iscsitarget Re-configure the kernel modules dpkg-reconfigure iscsitarget-dkms Restart iSCSI services service iscsitarget restart && service open-iscsi restart Update the configuration file of Cinder cat >/etc/cinder/cinder.conf <<EOF [DEFAULT] sql_connection = mysql://cinder:$MYSQL_PASS@$MASTER/cinder rootwrap_config = /etc/cinder/rootwrap.conf api_paste_confg = /etc/cinder/api-paste.ini iscsi_helper = tgtadm volume_name_template = volume-%s volume_group = cinder-volumes verbose = True auth_strategy = keystone state_path = /var/lib/cinder lock_path = /var/lock/cinder volumes_dir = /var/lib/cinder/volumes rabbit_password = $RABBIT_PASSWORD EOF Update the credentials of Cinder sed -i -e " s/%SERVICE_TENANT_NAME%/service/g; \ s/%SERVICE_USER%/cinder/g; s/%SERVICE_PASSWORD%/$SERVICE_PASSWORD/g; " \ /etc/cinder/api-paste.ini Synchronize the database of Cinder cinder-manage db sync Restart the services of Cinder service cinder-api restart service cinder-scheduler restart service cinder-volume restart OpenStack Network Server: Neutron Install the Open vSwitch apt-get install -y openvswitch-switch apt-get install module-assistant module-assistant auto-install openvswitch-datapath 若遇kernel-header错误,则执行以下命令,再执行上一步命令即可: ln -s /usr/src/linux-headers-`uname -r`/include/generated/uapi/linux/version.h /lib/modules/`uname -r`/build/include/linux/ Configure the network bridge Configure the bridge for internal communication ovs-vsctl add-br br-int Configure the bridge for external communication ovs-vsctl add-br br-eth2 # Enable external network access under nested Open vSwitchifconfig br-eth2 promisc up Bind eth2 to the external bridge ovs-vsctl add-port br-eth2 eth2 Update the external bridge configuration vim /etc/network/interfaces # Modify the corresponding configuration auto eth2 iface eth2 inet manual up ifconfig$IFACE 0.0.0.0 up up ip linkset$IFACE promisc on down ip linkset$IFACE promisc off down ifconfig$IFACE down auto br-eth2 iface br-eth2 inet static address {put_eth2_ip_here}netmask 255.255.255.0 up ip linkset$IFACE promisc on down ip linkset$IFACE promisc off Restart the network service /etc/init.d/networking restart Install Neutron apt-get -y install neutron-server python-cliff \ neutron-plugin-openvswitch-agent \ neutron-dhcp-agent python-pyparsing Configure the RabbitMQ sed -i -e " s/# auth_strategy/auth_strategy/g; \ s/# fake_rabbit/fake_rabbit/g; \ s/# rabbit_host = localhost/rabbit_host = $MASTER/g; \ s/# rabbit_password = guest/rabbit_password = $RABBIT_PASSWORD/g"/etc/neutron/neutron.conf Configure the Neutron Update the general configuration for Neutron cat << EOF >>/etc/neutron/plugins/openvswitch/ovs_neutron_plugin.ini [securitygroup] firewall_driver = neutron.agent.linux.iptables_firewall.OVSHybridIptablesFirewallDriver [database]connection=mysql://neutron:$MYSQL_PASS@$MASTER/neutron [ovs] network_vlan_ranges = physnet1 bridge_mappings = physnet1:br-eth2 EOF Update the MySQL connection for Neutron sed -i '/connection = .*/{s|sqlite:///.*|mysql://'"neutron"':'"password"'@'"$MASTER"'/neutron|g}' \/etc/neutron/neutron.conf Update the metadata agent for Neutron sed -i -e " s/%SERVICE_TENANT_NAME%/service/g; s/%SERVICE_USER%/neutron/g; \ s/%SERVICE_PASSWORD%/$SERVICE_PASSWORD/g; "/etc/neutron/metadata_agent.ini Update the credentials for Neutron sed -i -e " s/%SERVICE_TENANT_NAME%/service/g; s/%SERVICE_USER%/neutron/g; \ s/%SERVICE_PASSWORD%/$SERVICE_PASSWORD/g; "/etc/neutron/neutron.conf Change the passphase of Neutron metadata agent sed -i -e " s/# metadata_proxy_shared_secret =/metadata_proxy_shared_secret \ = helloStackinsider/g; "/etc/neutron/metadata_agent.ini Change the passphase of Neutron dhcp agent sed -i -e " s/# interface_driver = neutron.agent.linux.interface.OVSInterfaceDriver/interface_driver = \ neutron.agent.linux.interface.OVSInterfaceDriver/g; "/etc/neutron/dhcp_agent.ini Restart the Neutron services cd /etc/init.d/; for i in $(ls neutron-*); do sudo service $i restart; done OpenStack Controller Server: Nova Controller Install the packages apt-get -y install nova-api nova-cert nova-common pm-utils nova-conductor \ nova-scheduler python-nova python-novaclient nova-consoleauth novnc nova-novncproxy Configure Nova Update the credential for Nova sed -i -e " s/127.0.0.1/$MASTER/g; s/%SERVICE_TENANT_NAME%/service/g; \ s/%SERVICE_USER%/nova/g; s/%SERVICE_PASSWORD%/$SERVICE_PASSWORD/g; " \ /etc/nova/api-paste.ini Update the general configuration: /etc/nova/nova.conf cat >/etc/nova/nova.conf <<EOF [DEFAULT] # MySQL Connection # sql_connection=mysql://nova:$MYSQL_PASS@$MASTER/nova # nova-scheduler # rabbit_host=$MASTER rabbit_password=$RABBIT_PASSWORD #scheduler_driver=nova.scheduler.simple.SimpleScheduler #compute_scheduler_driver=nova.scheduler.filter_scheduler.FilterScheduler compute_scheduler_driver=nova.scheduler.simple.SimpleScheduler # nova-api # cc_host=$MASTER auth_strategy=keystone s3_host=$MASTER ec2_host=$MASTER nova_url=http://$MASTER:8774/v1.1/ ec2_url=http://$MASTER:8773/services/Cloud keystone_ec2_url=http://$MASTER:5000/v2.0/ec2tokens api_paste_config=/etc/nova/api-paste.ini allow_admin_api=true use_deprecated_auth=false ec2_private_dns_show_ip=True dmz_cidr=169.254.169.254/32 ec2_dmz_host=169.254.169.254 metadata_host=$MASTER metadata_listen=0.0.0.0 enabled_apis=ec2,osapi_compute,metadata # Networking # network_api_class=nova.network.neutronv2.api.API neutron_url=http://$MASTER:9696 neutron_auth_strategy=keystone neutron_admin_tenant_name=service neutron_admin_username=neutron neutron_admin_password=$SERVICE_PASSWORD neutron_admin_auth_url=http://$MASTER:35357/v2.0 libvirt_vif_driver=nova.virt.libvirt.vif.LibvirtHybridOVSBridgeDriver linuxnet_interface_driver=nova.network.linux_net.LinuxOVSInterfaceDriver firewall_driver=nova.virt.libvirt.firewall.IptablesFirewallDriver #Metadata service_neutron_metadata_proxy = True neutron_metadata_proxy_shared_secret = helloStackinsider # Compute # compute_driver=libvirt.LibvirtDriver # Cinder # volume_api_class=nova.volume.cinder.API # Glance # glance_api_servers=$MASTER:9292 image_service=nova.image.glance.GlanceImageService # novnc # novnc_enable=true novncproxy_base_url=http://$MASTER:6080/vnc_auto.html vncserver_proxyclient_address=$MASTER vncserver_listen=$MASTER # Misc # logdir=/var/log/nova state_path=/var/lib/nova lock_path=/var/lock/nova #root_helper=sudo nova-rootwrap /etc/nova/rootwrap.conf rootwrap_config=/etc/nova/rootwrap.conf verbose=true #verbose=false EOF Synchronize Nova database nova-manage db sync Restart Nova services cd /etc/init.d/; for i in $( ls nova-* ); do sudo service $i restart; done OpenStack Compute Server: Nova Compute Install the Hypervisor apt-get install -y kvm libvirt-bin pm-utils Setup Cgroup support for libvirt cat << EOF >>/etc/libvirt/qemu.conf cgroup_device_acl = ["/dev/null", "/dev/full", "/dev/zero","/dev/random", "/dev/urandom","/dev/ptmx", "/dev/kvm", "/dev/kqemu","/dev/rtc", "/dev/hpet","/dev/net/tun", ] EOF Allow Live Migration sed -i '/#listen_tls/s/#listen_tls/listen_tls/;/#listen_tcp/s/#listen_tcp/listen_tcp/;/#auth_tcp/s/#auth_tcp/auth_tcp/; /auth_tcp/s/sasl/none/' \/etc/libvirt/libvirtd.conf Listen on TCP sed -i '/env libvirtd_opts/s/-d/-d -l/'/etc/init/libvirt-bin.conf sed -i '/libvirtd_opts/s/-d/-d -l/'/etc/default/libvirt-bin Restart libvirt-bin service service libvirt-bin restart Install the Nova Compute apt-get -yinstallnova-compute-kvm Modify the libvirt_type vi /etc/nova/nova-compute.conf libvirt_type=kvm 修改为 libvirt_type=qemu Restart Nova services cd /etc/init.d/; for i in $( ls nova-* ); do sudo service $i restart; done OpenStack Dashboard: Horizon Install Horizon apt-get -y install apache2 libapache2-mod-wsgi openstack-dashboard memcached python-memcache Prepare Tenant Network Create a bash script for preparation vi /root/prepare_network.sh #!/bin/bash # Create Tenant and User # tenant=TenantA user=UserA usermail=usera@stackinsider.com role=Member if keystone tenant-list | grep -q $tenant;then echo "Tenant $tenant existed!" else tenant_id=`keystone tenant-create --name $tenant | awk '/id/{print $4}'` fi if keystone user-list | grep -q $user;then echo "User $user existed!" else keystone user-create --name=$user --pass=password --tenant-id $tenant_id --email=$usermail fi keystone user-role-add --tenant $tenant --user $user --role $role # Create virtual router and sub-network # neutron net-create --tenant-id ${tenant_id} sharednet1 --shared --provider:network_type flat \ --provider:physical_network physnet1 neutron subnet-create --tenant-id ${tenant_id} sharednet1 192.168.100.0/24 --no-gateway \ --allocation-pool start=192.168.100.150,end=192.168.100.200 # 新建子网,配置共享网段 Execute the bash script to create network interconnection bash prepare_network.sh Set up the default security group rules # Obtain TenantA's default security group ID neutron --os-tenant-name TenantA --os-username UserA --os-password password --os-auth-url=http://localhost:5000/v2.0 security-group-list # Enable ICMP and TCP ports neutron security-group-rule-create --protocol icmp --direction ingress {TenantA security group ID} neutron security-group-rule-create --protocol icmp --direction egress {TenantA security group ID} neutron security-group-rule-create --protocol tcp --direction egress --port-range-min 1 --port-range-max 65535 {TenantA security group ID} neutron security-group-rule-create --protocol tcp --direction ingress --port-range-min 1 --port-range-max65535{TenantA security group ID} Start a VM Check the Ubuntu image # Check the image ID to confirm if Glance operates normally. glance index Generate ssh key and Upload it to Nova # Generate ssh key ssh-keygen # Upload ssh pub key to nova nova keypair-add key01 --pub-key~ /.ssh /id_rsa.pub Launch a VM nova --os-tenant-name TenantA --os-username UserA --os-password password --os-auth-url=http://localhost:5000/v2.0 boot --flavor 1 --image{the cirros ID from Glance} --security_group default --key-name key01 vm001 Check the VM status # Check your VM status nova --os-tenant-name TenantA --os-username UserA --os-password password \ --os-auth-url=http://localhost:5000/v2.0 list Access the VM instance using its flat IP # Obtain the VM's fixed IP nova --os-tenant-name TenantA --os-username UserA --os-password password \ --os-auth-url=http://localhost:5000/v2.0 list # You can find its fixed IP in the "Networks" section: sharednet1={flat IP}.# SSH to your VM when your VM is ACTIVEssh cirros@{put_flat_ip_here} Access the Dashboard http://controller/horizon(controller为主机名) Questions 执行“neutron--os-tenant-nameTenantA--os-usernameUserA--os-passwordpassword--os-auth-url=http://localhost:5000/v2.0 security-group-list”出现错误: “404 Not Found.The resource could not be found.” 解决: vi /etc/neutron/plugins/openvswitch/ovs_neutron_plugin.ini [securitygroup] # Firewall driver for realizing neutron security group function. # firewall_driver = neutron.agent.firewall.NoopFirewallDriver firewall_driver = neutron.agent.linux.iptables_firewall.OVSHybridIptablesFirewallDriver 然后重启neutron服务: cd /etc/init.d/; for i in $( ls neutron-* ); do sudo service $i restart; done 本文转自 xxrenzhe11 51CTO博客,原文链接:http://blog.51cto.com/xxrenzhe/1351626,如需转载请自行联系原作者

优秀的个人博客,低调大师

通过Docker搭建开源版IVRE

1 引言 1.1 编写目的 本文主要介绍开源IVRE项目的安装、部署和配置。目的是提供给IVRE项目学习、研究人员,利于他们更快的搭建和部署IVRE。 1.2 背景 IVRE(又名DRUNK)是一款网络侦查框架,包括两个基于p0f和Bro的被动侦查模块和一个基于Nmap&Zmap的主动侦查模块,其功能类似于国内知道创宇公司推出的一款网络空间搜索引擎ZoomEye(钟馗之眼)。 1.3 定义 Docker:一个开源的应用容器引擎,让开发者可以打包他们的应用以及依赖包到一个可移植的容器中,然后发布到任何流行的 Linux 机器上,也可以实现虚拟化。容器是完全使用沙箱机制,相互之间不会有任何接口(类似 iPhone 的 app)。几乎没有性能开销,可以很容易地在机器和数据中心中运行。最重要的是,他们不依赖于任何语言、框架包括系统。 1.4 参考资料 安装Docker: http://www.cnblogs.com/MicroTeam/p/see-docker-run-in-debian-with-aliyun-ecs.html IVRE官方网站: https://ivre.rocks/ GitHub https://github.com/cea-sec/ivre 2 系统配置 2.1 运行环境 Ubuntu Server 14.4 64位 Docker IVRE 2.2 系统依赖 Python 2, version 2.6 minimum the Crypto module the pymongo module, version 2.7.2 minimum. Nmap & ZMap Bro & p0f MongoDB, version 2.6 minimum web服务器(在Apache、Nginx下测试通过) web浏览器(在FireFox和Chromum下测试通过) Maxmind GeoIP免费数据库 Tesseract(可选,可对Nmap扫描结果增加快照) Docker & Vagrant (version 1.6 minimum,可选) 2.3 前端组件 AngularJS Twitter Bootstrap jQuery D3.js flag-icon-css Passive recon 2.4 系统安装部署图 2.5 系统硬件配置 测试机配置: CPU:Intel至强E5400系列CPU*2 内存:4G 1333MHz 硬盘:100GB 2.6 系统应用服务器软件安装与配置 Linux服务器安装步骤(略) 注意:内核版本如果低于 3.8,就要升级内核,参考方法如下 http://docs.docker.com/installation/debian/ 查看linux内核命令: uname –a 3 程序部署 3.1 安装Docker 快速安装Docker方法有2种: 第一种方法:(推荐使用) sudowget-qO-https://get.docker.com/|sh 第二种方法: sudocurl-sSLhttps://get.docker.com/|sh 3.1.1 验证Docker安装是否成功(可忽略) 运行 hello world: sudodockerrunhello-world 如果前面步骤都没有问题的话,能看到 hello-world 启动了。 HellofromDocker. Thismessageshowsthatyourinstallationappearstobeworkingcorrectly. 3.1.2 把非管理员用户添加到docker组 sudo useradd -G docker 登陆系统用户名 3.2 安装Vagrant 安装IVRE方法有2种: 第一种方法:(推荐使用) wgethttps://releases.hashicorp.com/vagrant/1.7.4/vagrant_1.7.4_x86_64.deb sudodpkg-ivagrant_1.7.4_x86_64.deb 第二种方法: sudoapt-getinstall-yvagrant 3.3 安装IVRE $mkdir-m1777var_lib_mongodbvar_log_mongodbivre-share $wget-qhttps://ivre.rocks/Vagrantfile $sudovagrantup--no-parallel $dockerattachivreclient root@e809cb41cb9a:/# 此时IVRE已经安装成功。通过Docker装好的IVRE是没有数据的。 界面如下: 4 IVRE运行和停止 查看docker有那些容器,命令: dockerps–a 开启IVRE分三步, 第一步要开启database server,命令: sudodockerstartivredb 第二步开启web,命令: sudodockerstartivreweb 第三步开启客户端,命令: sudodockerstartivreclient 然后通过attach命令进入ivreclient sudodockerattachivreclient 5 IVRE扫描并导入数据 通过attach命令进入ivreclient sudodockerattachivreclient 5.1运行如下初始化命令:(前4步可忽略) root@881486651a32:/$ipinfo--init Thiswillremoveanypassiveinformationinyourdatabase.Process?[y/N]y root@881486651a32:/$ipdata--init Thiswillremoveanycountry/ASinformationinyourdatabase.Process?[y/N]y root@881486651a32:/$scancli--init Thiswillremoveanyscanresultinyourdatabase.Process?[y/N]y root@881486651a32:/$runscans-agentdb--init Thiswillremoveanyagentand/orscaninyourdatabaseandfiles.Process?[y/N]y root@881486651a32:/$ipdata--download--import-all--dont-feed-ipdata-cols [...] Thelatestcommandwilltakealongtime.Thenwecanintegratethe Nmapresultstothedatabase: root@881486651a32:/$nmap2db-r-sMySource-cMyCategory/ivre-share Youcanthenexittheshell(`C-d`),thiswillstopthe container. 或者忽略5.1步骤执行如下命令: root@881486651a32:/$ipdata--download 5.1 扫描任务 执行命令: root@881486651a32:/$runscans--routable--limit1000--output=XMLFork 上面这条命令将对互联网上1000个随机主机进行标准扫描,开启13个nmap进程。 5.2 扫描结果入库 root@881486651a32:/$nmap2db-cROUTABLE-CAMPAIGN-001-sMySource-rscans/ROUTABLE/up 5.3 界面展示 6 安装出错解决 安装IVRE成功后,通过attach命令进入ivreclient后。可能出现缺少ipdata、runscans和nmap2db等命令现象。 解决方法如下: 通过attach命令进入ivreclient sudodockerattachivreclient 安装curl root@881486651a32:/$apt-getinstallcrul 安装unzip root@881486651a32:/$apt-getinstallunzip 利用curl命令将IVRE项目里的bin目录下所有文件下载到Docker容器里: root@881486651a32:/$tmp root@881486651a32:/$curl–Ohttp://hackliu.com/bin.zip root@881486651a32:/$cd/ 将bin.zip解压到/usr/bin目录 root@881486651a32:/$unzip/tmp/bin.zip–d/usr/ 为下载的文件添加执行权限: root@881486651a32:/$chmod+xanalyzercli root@881486651a32:/$chmod+xgetmoduli root@881486651a32:/$chmod+xhttpd-ivre root@881486651a32:/$chmod+xipdata root@881486651a32:/$chmod+xipinfo root@881486651a32:/$chmod+xipinfohost root@881486651a32:/$chmod+xnmap2db root@881486651a32:/$chmod+xp0f2db root@881486651a32:/$chmod+xpassiverecon2db root@881486651a32:/$chmod+xpassivereconworker root@881486651a32:/$chmod+xplotdb root@881486651a32:/$chmod+xrunscans root@881486651a32:/$chmod+xrunscans-agent root@881486651a32:/$chmod+xrunscans-agentdb root@881486651a32:/$chmod+xscancli root@881486651a32:/$chmod+xscanstatus 7 其他 7.1 安装所需软件包 链接: http://pan.baidu.com/s/1kUsuOGv 密码: wvct 本文作者:HackLiu 来源:51CTO

优秀的个人博客,低调大师

《Hadoop实战第2版》——导读

目 录 前 言第1章 Hadoop简介1.1 什么是Hadoop1.2 Hadoop项目及其结构1.3 Hadoop体系结构1.4 Hadoop与分布式开发1.5 Hadoop计算模型—MapReduce1.6 Hadoop数据管理1.7 Hadoop集群安全策略1.8 本章小结第2章 Hadoop的安装与配置2.1 在Linux上安装与配置Hadoop2.2 在Mac OSX上安装与配置Hadoop2.3 在Windows上安装与配置Hadoop2.4 安装和配置Hadoop集群2.5 日志分析及几个小技巧2.6 本章小结第3章 MapReduce计算模型3.1 为什么要用MapReduce3.2 MapReduce计算模型3.3 MapReduce任务的优化3.4 Hadoop流3.5 Hadoop Pipes3.6 本章小结

优秀的个人博客,低调大师

Android版-微信APP支付

欢迎留言、转发 文章首发地址:http://www.jianshu.com/p/febf7c2eea82 微信极速开发系列文章(微信支付、授权获取用户信息等):点击这里 目录 1、注册账号、开发者认证 2、添加应用 3、申请微信支付 4、技术开发功能实现步骤介绍 5、代码实例 服务端源码地址:http://git.oschina.net/javen205/weixin_guide 客户端源码地址:https://github.com/Javen205/JPay 微信APP支付接入商户服务中心 官方介绍文档 1、注册账号、开发者认证 在开放平台直接注册,注册邮箱不能与微信其他的产品同号。 比较坑的是微信公众号中的支付(微信买单、刷卡、公众号支付、wap支付)以及微信app支付都需要进行微信认证而不是公用一个微信商户平台(需要交两次认证的费用)。 微信认证这个时间比较短(毕竟交了300大洋)一般一个工作日就会有人联系你核查公司的资料。 微信认证(开发者资质认证)通过之后就可以在开放平台添加应用了(这个需要审核),应用通过之后就可以申请微信支付了(也需要审核) 2、添加应用 这个比较简单,按照提示操作就行 上图 应用包名只定义,应用签名可以使用资源下载中心的签名生成工具。务必记住包名以及签名keystore文件的密码,如果包名或者签名文件不对打包是唤不起微信支付的。 3、申请微信支付 如果添加的应用审核通过了(一个工作日),就可以直接申请微信支付了(7个工作日之内)。 审核通过之后将会收到审核通过的邮件,里面有登录商户平台的登录账户、密码、商户号以及一些操作指引的说明。服务端生成预付订单的签名需要密钥 设置方法可以参考这里 4、技术开发功能实现 微信APP支付介绍【文档】 APP端开发步骤说明 【文档】 这里主要聊聊Android微信支付,主要包括以下几个步骤 1、商户服务端生成订单并在微信平台生成预付订单 2、客户端调起微信支付进行支付 3、客户端回调支付结果 4、服务端接收支付通知 1、商户服务端生成订单并在微信平台生成预付订单 调起微信支付前需要服务器生成支付订单再调用【统一下单API】生成预付订单prepayId,再生成签名sign【调起支付API】 以上两个步骤建议都在服务端完成,客户端(Android)通过接口获取对应的参数即可 2、客户端调起微信支付进行支付 通过微信提供的jar 唤起微信支付 3、客户端回调支付结果 参照微信SDK Sample,在net.sourceforge.simcpux.wxapi包路径中实现WXPayEntryActivity类【包名或类名不一致会造成无法回调】 栗子说明:认真反复读了几遍,感觉这句话有歧义是一个坑,测试的时候一直不回调。这里他想说的意识如下: 比如你申请应用包名为:javen.com 那么回调的WXPayEntryActivity类必须放到javen.com.wxapi 的包下面 4、服务端接收支付通知 支付结果通知【官方文档】 代码实现参考开源项目 【点击这里】 5、代码实例 服务端代码:根据商户订单生成微信预付订单并返回唤起微信支付需要的参数。Demo中参数写成固定了仅供参考 此项目已开源 【点击这里】 如果对你有帮助请点击Start告诉我 hahaha 。以下代码对应的目录在 com.javen.weixin.controller.WeixinPayController.java中 /** * 微信APP支付 */ public void appPay(){ //不用设置授权目录域名 //统一下单地址 https://pay.weixin.qq.com/wiki/doc/api/app/app.php?chapter=9_1# Map<String, String> params = new HashMap<String, String>(); params.put("appid", appid); params.put("mch_id", partner); params.put("nonce_str", System.currentTimeMillis() / 1000 + ""); params.put("body", "Javen微信公众号极速开发"); String out_trade_no=System.currentTimeMillis()+""; params.put("attach", "custom json"); params.put("out_trade_no", out_trade_no); int price=10000; params.put("total_fee", price+""); String ip = IpKit.getRealIp(getRequest()); if (StrKit.isBlank(ip)) { ip = "127.0.0.1"; } params.put("spbill_create_ip", ip); params.put("notify_url", notify_url); params.put("trade_type", "APP"); String sign = PaymentKit.createSign(params, paternerKey); params.put("sign", sign); String xmlResult = PaymentApi.pushOrder(params); System.out.println(xmlResult); Map<String, String> result = PaymentKit.xmlToMap(xmlResult); String return_code = result.get("return_code"); String return_msg = result.get("return_msg"); if (StrKit.isBlank(return_code) || !"SUCCESS".equals(return_code)) { ajax.addError(return_msg); renderJson(ajax); return; } String result_code = result.get("result_code"); if (StrKit.isBlank(result_code) || !"SUCCESS".equals(result_code)) { ajax.addError(return_msg); renderJson(ajax); return; } // 以下字段在return_code 和result_code都为SUCCESS的时候有返回 String prepay_id = result.get("prepay_id"); //封装调起微信支付的参数 https://pay.weixin.qq.com/wiki/doc/api/app/app.php?chapter=9_12 Map<String, String> packageParams = new HashMap<String, String>(); packageParams.put("appid", appid); packageParams.put("partnerid", partner); packageParams.put("prepayid", prepay_id); packageParams.put("package", "Sign=WXPay"); packageParams.put("noncestr", System.currentTimeMillis() + ""); packageParams.put("timestamp", System.currentTimeMillis() / 1000 + ""); String packageSign = PaymentKit.createSign(packageParams, paternerKey); packageParams.put("sign", packageSign); String jsonStr = JsonUtils.toJson(packageParams); System.out.println("最新返回apk的参数:"+jsonStr); renderJson(jsonStr); } 客户端代码实现 使用单例模式统一入口,首先判断微信客户端是否安装,如果有安装再从商户服务器获取调起支付的参数 public class IPay { private static IPay mIPay; private Context mContext; private IPay(Context context) { mContext = context; } public static IPay getIntance(Context context){ if (mIPay == null) { synchronized(IPay.class){ if (mIPay == null) { mIPay = new IPay(context); } } } return mIPay; } //支付结果回调 public interface IPayListener{ void onPay(int code); } public void toTestPay(Order order,IPayListener listener){ if (order != null) { if (IPayLogic.getIntance(mContext.getApplicationContext()).isWeixinAvilible()) { Constants.payListener = listener; new TestPayPrepay(mContext).execute(); }else { Toast.makeText(mContext, "未安装微信", Toast.LENGTH_LONG).show(); } }else { Toast.makeText(mContext, "参数异常 order is null", Toast.LENGTH_LONG).show(); } } } 调起微信支付、获取调取微信支付参数、判断微信是否安装逻辑实现 public class IPayLogic { private static IPayLogic mIPayLogic; private Context mContext; private IPayLogic(Context context) { mContext = context; } public static IPayLogic getIntance(Context context){ if (mIPayLogic == null) { synchronized(IPayLogic.class){ if (mIPayLogic == null) { mIPayLogic = new IPayLogic(context); } } } return mIPayLogic; } //测试 public String testPay(){ return HttpKit.get(Constants.TESTPAY_URL); } /** * 调起支付 * @param appId * @param partnerId * @param prepayId * @param nonceStr * @param timeStamp * @param sign */ public void startWXPay(String appId,String partnerId,String prepayId, String nonceStr,String timeStamp,String sign){ IWXAPI api= WXAPIFactory.createWXAPI(mContext, null); api.registerApp(appId); boolean isPaySupported = api.getWXAppSupportAPI() >= Build.PAY_SUPPORTED_SDK_INT; if (!isPaySupported) { Toast.makeText(mContext, "请更新微信客户端", Toast.LENGTH_SHORT).show(); return; } PayReq request = new PayReq(); request.appId = appId; request.partnerId = partnerId; request.prepayId= prepayId; request.packageValue = "Sign=WXPay"; request.nonceStr=nonceStr; request.timeStamp= timeStamp; request.sign= sign; api.sendReq(request); } /** * 判断微信是否安装 * @param context * @return */ public boolean isWeixinAvilible() { final PackageManager packageManager = mContext.getPackageManager();// 获取packagemanager List<PackageInfo> pinfo = packageManager.getInstalledPackages(0);// 获取所有已安装程序的包信息 if (pinfo != null) { for (int i = 0; i < pinfo.size(); i++) { String pn = pinfo.get(i).packageName; if (pn.equals("com.tencent.mm")) { return true; } } } return false; } } HttpKit MD5 工具类 /** * HttpKit */ public class HttpKit { private HttpKit() {} /** * https 域名校验 */ private class TrustAnyHostnameVerifier implements HostnameVerifier { public boolean verify(String hostname, SSLSession session) { return true; } } /** * https 证书管理 */ private class TrustAnyTrustManager implements X509TrustManager { public X509Certificate[] getAcceptedIssuers() { return null; } public void checkClientTrusted(X509Certificate[] chain, String authType) throws CertificateException { } public void checkServerTrusted(X509Certificate[] chain, String authType) throws CertificateException { } } private static final String GET = "GET"; private static final String POST = "POST"; private static String CHARSET = "UTF-8"; private static final SSLSocketFactory sslSocketFactory = initSSLSocketFactory(); private static final TrustAnyHostnameVerifier trustAnyHostnameVerifier = new HttpKit().new TrustAnyHostnameVerifier(); private static SSLSocketFactory initSSLSocketFactory() { try { TrustManager[] tm = {new HttpKit().new TrustAnyTrustManager() }; SSLContext sslContext = SSLContext.getInstance("TLS"); // ("TLS", "SunJSSE"); sslContext.init(null, tm, new java.security.SecureRandom()); return sslContext.getSocketFactory(); } catch (Exception e) { throw new RuntimeException(e); } } public static void setCharSet(String charSet) { if (charSet.isEmpty()) { throw new IllegalArgumentException("charSet can not be blank."); } HttpKit.CHARSET = charSet; } private static HttpURLConnection getHttpConnection(String url, String method, Map<String, String> headers) throws IOException, NoSuchAlgorithmException, NoSuchProviderException, KeyManagementException { URL _url = new URL(url); HttpURLConnection conn = (HttpURLConnection)_url.openConnection(); if (conn instanceof HttpsURLConnection) { ((HttpsURLConnection)conn).setSSLSocketFactory(sslSocketFactory); ((HttpsURLConnection)conn).setHostnameVerifier(trustAnyHostnameVerifier); } conn.setRequestMethod(method); conn.setDoOutput(true); conn.setDoInput(true); conn.setConnectTimeout(19000); conn.setReadTimeout(19000); conn.setRequestProperty("Content-Type","application/x-www-form-urlencoded"); conn.setRequestProperty("User-Agent", "Mozilla/5.0 (Windows NT 6.3; WOW64) AppleWebKit/537.36 (KHTML, like Gecko) Chrome/33.0.1750.146 Safari/537.36"); if (headers != null && !headers.isEmpty()) for (Entry<String, String> entry : headers.entrySet()) conn.setRequestProperty(entry.getKey(), entry.getValue()); return conn; } /** * Send GET request */ public static String get(String url, Map<String, String> queryParas, Map<String, String> headers) { HttpURLConnection conn = null; try { conn = getHttpConnection(buildUrlWithQueryString(url, queryParas), GET, headers); conn.connect(); return readResponseString(conn); } catch (Exception e) { throw new RuntimeException(e); } finally { if (conn != null) { conn.disconnect(); } } } public static String get(String url, Map<String, String> queryParas) { return get(url, queryParas, null); } public static String get(String url) { return get(url, null, null); } /** * Send POST request */ public static String post(String url, Map<String, String> queryParas, String data, Map<String, String> headers) { HttpURLConnection conn = null; try { conn = getHttpConnection(buildUrlWithQueryString(url, queryParas), POST, headers); conn.connect(); OutputStream out = conn.getOutputStream(); out.write(data.getBytes(CHARSET)); out.flush(); out.close(); return readResponseString(conn); } catch (Exception e) { throw new RuntimeException(e); } finally { if (conn != null) { conn.disconnect(); } } } public static String post(String url, Map<String, String> queryParas, String data) { return post(url, queryParas, data, null); } public static String post(String url, String data, Map<String, String> headers) { return post(url, null, data, headers); } public static String post(String url, String data) { return post(url, null, data, null); } private static String readResponseString(HttpURLConnection conn) { StringBuilder sb = new StringBuilder(); InputStream inputStream = null; try { inputStream = conn.getInputStream(); BufferedReader reader = new BufferedReader(new InputStreamReader(inputStream, CHARSET)); String line = null; while ((line = reader.readLine()) != null){ sb.append(line).append("\n"); } return sb.toString(); } catch (Exception e) { throw new RuntimeException(e); } finally { if (inputStream != null) { try { inputStream.close(); } catch (IOException e) { } } } } /** * Build queryString of the url */ private static String buildUrlWithQueryString(String url, Map<String, String> queryParas) { if (queryParas == null || queryParas.isEmpty()) return url; StringBuilder sb = new StringBuilder(url); boolean isFirst; if (url.indexOf("?") == -1) { isFirst = true; sb.append("?"); } else { isFirst = false; } for (Entry<String, String> entry : queryParas.entrySet()) { if (isFirst) isFirst = false; else sb.append("&"); String key = entry.getKey(); String value = entry.getValue(); if (!value.isEmpty()) try {value = URLEncoder.encode(value, CHARSET);} catch (UnsupportedEncodingException e) {throw new RuntimeException(e);} sb.append(key).append("=").append(value); } return sb.toString(); } } public class MD5 { public static String MD5sign(String s) { char hexDigits[] = { '0', '1', '2', '3', '4', '5', '6', '7', '8', '9', 'A', 'B', 'C', 'D', 'E', 'F' }; try { byte[] btInput = s.getBytes("UTF-8"); // 获得MD5摘要算法的 MessageDigest 对象 MessageDigest mdInst = MessageDigest.getInstance("MD5"); // 使用指定的字节更新摘要 mdInst.update(btInput); // 获得密文 byte[] md = mdInst.digest(); // 把密文转换成十六进制的字符串形式 int j = md.length; char str[] = new char[j * 2]; int k = 0; for (int i = 0; i < j; i++) { byte byte0 = md[i]; str[k++] = hexDigits[byte0 >>> 4 & 0xf]; str[k++] = hexDigits[byte0 & 0xf]; } return new String(str).toLowerCase(); } catch (Exception e) { e.printStackTrace(); return null; } } public static void main(String[] args) { System.out.println(MD5sign("Hello world")); } } 使用AsyncTask异步获取调起微信支付的相关参数。当然你也可以使用其他的异步网络请求开源框架 public class TestPayPrepay extends AsyncTask<Object, Integer, String> { private Context mContext; public TestPayPrepay(Context context) { this.mContext = context; } @Override protected String doInBackground(Object... params) { System.out.println("TestPayPrepay doInBackground"); return IPayLogic.getIntance(mContext).testPay(); } @Override protected void onPostExecute(String result) { try { if (result!=null) { System.out.println("TestPayPrepay result>"+result); JSONObject data = new JSONObject(result); if(!data.has("code")){ String sign = data.getString("sign"); String timestamp = data.getString("timestamp"); String noncestr = data.getString("noncestr"); String partnerid = data.getString("partnerid"); String prepayid = data.getString("prepayid"); String appid = data.getString("appid"); Toast.makeText(mContext, "正在调起支付", Toast.LENGTH_SHORT).show(); Constants.APP_ID = appid; IPayLogic.getIntance(mContext).startWXPay(appid, partnerid, prepayid, noncestr, timestamp, sign); }else{ String message = data.getString("message"); Log.d("PAY_GET", "返回错误"+message); Toast.makeText(mContext, "返回错误:"+message, Toast.LENGTH_SHORT).show(); } }else { System.out.println("get prepayid exception, is null"); } } catch (Exception e) { Log.e("PAY_GET", "异常:"+e.getMessage()); Toast.makeText(mContext, "异常:"+e.getMessage(), Toast.LENGTH_SHORT).show(); } super.onPostExecute(result); } } 支付结果回调 <activity android:name="[应用的包名].wxapi.WXPayEntryActivity" android:exported="true" android:theme="@android:style/Theme.Translucent" android:launchMode="singleTop" > </activity> 封装的是SDK 所以这里设置了一个透明的主题 public class WXPayEntryActivity extends Activity implements IWXAPIEventHandler{ private IWXAPI api; private IPayListener payListener; @Override public void onCreate(Bundle savedInstanceState) { super.onCreate(savedInstanceState); requestWindowFeature(Window.FEATURE_NO_TITLE);//隐藏标题 LinearLayout ll = new LinearLayout(this); setContentView(ll); api = WXAPIFactory.createWXAPI(this, Constants.APP_ID); api.handleIntent(getIntent(), this); finish(); } @Override protected void onNewIntent(Intent intent) { super.onNewIntent(intent); setIntent(intent); api.handleIntent(intent, this); } @Override public void onReq(BaseReq req) { } @Override public void onResp(BaseResp resp) { payListener = Constants.payListener; int code = resp.errCode; System.out.println("onResp errCode>"+code); if (payListener!=null) { payListener.onPay(code); System.out.println("payListener callback"); }else { System.out.println("payListener not callback"); } } } 注意:如果回调的code一直返回-1 1、请检查应用包名以及apk 的签名是否与你提交到微信开放平台的一致 2、请检查返回调取微信支付的参数是否正确 大部分原因是第一种 遗留问题:由于支付应用的包名不固定WXPayEntryActivity无法封装到jar中,需要单独在支付应用添加.wxapi 这个包名并复制 WXPayEntryActivity到此包中。如果有好的解决方案欢迎留言 微信开发系列文章 http://www.jianshu.com/p/a172a1b69fdd 推荐阅读 极速开发微信公众号之微信买单 极速开发微信公众号之公众号支付 极速开发微信公众号之扫码支付 极速开发微信公众号之刷卡支付 极速开发微信公众号之现金红包 极速开发微信公众号之模板消息 如果此文章对你有帮助请点击喜欢告诉我 服务端源码地址:http://git.oschina.net/javen205/weixin_guide 客户端源码地址:https://github.com/Javen205/JPay

优秀的个人博客,低调大师

Macaca-Java版入门指南

导语 接触Macaca已经有一段时间,从开始的对于UI自动化的调研开始,将Macaca与Appium,Robotium等自动化方案进行了多方对比,最终Macaca脱颖而出成为团队的敲定方案,随后经历了Macaca从JS版本到Java版本的迭代,踩了很多坑,积累了很多经验教训,在这里总结沉淀一下,以方便后来人少走弯路,加快脚步。 一、认识Macaca Macaca是一套基于WebDriver标准协议开发的开源自动化解决方案,旨在解决跨平台,跨终端的UI自动化测试的短板问题,减少繁杂、重复的人工工作,降低自动化测试的上手门坎。终端上,Macaca同时支持Native(iOS&&Android)、Hybrid、Mobile Web、以及PC端的自动化测试,用例编写上,Macaca采取CS架构,可以支持任意编程语言的封装,目前已

优秀的个人博客,低调大师

opencv 人脸识别 java版------2

代码下载地址http://download.csdn.net/detail/u013378306/9656546 1.环境搭建:见上一篇博客 整个项目的结构图: 2.编写DetectFaceDemo.java,代码如下: packagecom.njupt.zhb.test; importorg.opencv.core.Core; importorg.opencv.core.Mat; importorg.opencv.core.MatOfRect; importorg.opencv.core.Point; importorg.opencv.core.Rect; importorg.opencv.core.Scalar; importorg.opencv.highgui.Highgui; importorg.opencv.objdetect.CascadeClassifier; // //Detectsfacesinanimage,drawsboxesaroundthem,andwritestheresults //to"faceDetection.png". // publicclassDetectFaceDemo{ publicvoidrun(){ System.out.println("\nRunningDetectFaceDemo"); System.out.println(getClass().getResource("lbpcascade_frontalface.xml").getPath()); //Createafacedetectorfromthecascadefileintheresources //directory. //CascadeClassifierfaceDetector=newCascadeClassifier(getClass().getResource("lbpcascade_frontalface.xml").getPath()); //Matimage=Highgui.imread(getClass().getResource("lena.png").getPath()); //注意:源程序的路径会多打印一个‘/’,因此总是出现如下错误 /* *Detected0facesWritingfaceDetection.pnglibpngwarning:Image *widthiszeroinIHDRlibpngwarning:ImageheightiszeroinIHDR *libpngerror:InvalidIHDRdata */ //因此,我们将第一个字符去掉 StringxmlfilePath=getClass().getResource("lbpcascade_frontalface.xml").getPath().substring(1); CascadeClassifierfaceDetector=newCascadeClassifier(xmlfilePath); Matimage=Highgui.imread(getClass().getResource("we.jpg").getPath().substring(1)); //Detectfacesintheimage. //MatOfRectisaspecialcontainerclassforRect. MatOfRectfaceDetections=newMatOfRect(); faceDetector.detectMultiScale(image,faceDetections); System.out.println(String.format("Detected%sfaces",faceDetections.toArray().length)); //Drawaboundingboxaroundeachface. for(Rectrect:faceDetections.toArray()){ Core.rectangle(image,newPoint(rect.x,rect.y),newPoint(rect.x+rect.width,rect.y+rect.height),newScalar(0,255,0)); } //Savethevisualizeddetection. Stringfilename="faceDetection.png"; System.out.println(String.format("Writing%s",filename)); Highgui.imwrite(filename,image); } } 3.编写测试类: packagecom.njupt.zhb.test; publicclassTestMain{ publicstaticvoidmain(String[]args){ System.out.println("Hello,OpenCV"); //Loadthenativelibrary. System.loadLibrary("opencv_java246"); newDetectFaceDemo().run(); } } //运行结果: //Hello,OpenCV // //RunningDetectFaceDemo ///E:/eclipse_Jee/workspace/JavaOpenCV246/bin/com/njupt/zhb/test/lbpcascade_frontalface.xml //Detected8faces //WritingfaceDetection.png 运行结果:

优秀的个人博客,低调大师

openstack-M版安装部署

[openstack信息简介] Openstack项目是一个开源的云计算平台,它为广大云平台提供了可大规模扩展的平台,全世界的云计算技术人员创造了这个项目,通过一组相互关联的服务来提供了Iaas基础解决方案,每一个服务都通过提供自身的API来提供服务,个人或者企业完全可以根据自身的需求来安装一部分或者全部的服务。 通过下面一张表格来描述一下当前openstack的各个组件及功能。 Service Project name Description Dashboard Horizon 通过提供了web服务实现openstack服务的交互,比如创建实例,配置IP以及配置访问控制。 Compute Nova 在系统环境中管理整个生态圈的计算。承担着经过请求后的孵化,调度和回收虚拟机等一系列的责任,是核心组件,可以说是真正实现的角色。 Networking Neutron 提供了网络服务,连接起了其他服务。为用户提供API去定义网络并将它们联系起来。支持多种网络供应商和新兴的网络技术,比如vxlan等。 Object Storage Swift 通过了RESTful API来存储和检索任务非结构化的数据对象,对数据同步和横向扩展有很高的容错性,不是挂载文件目录形势的使用方式,它是将对象和文件写入多个驱动程序以确保数据在服务器集群中的完整性。 Block Cinder 提供了块存储和持久化,可插拔式的体系架构简化了创建和管理存储设备。 Identity Keystone 提供openstack服务的验证和授权功能。为全部服务提供了访问接口。 Image service Glance 提供虚拟磁盘设备的镜像和检索服务,在计算实例时以供使用。 Telemetry Ceilometer 可扩展的服务,提供了监控、测量、计费、统计等功能。 Orchestration Heat 通过组合模板来进行的服务。 Database service Trove 为关系数据库和非关系数据库提供可扩展和可依赖的云数据库服务。 Data processing service Sahara 属于openstack的大数据项目。是openstack与hadoop的融合。 [openstack体系架构] 下面这张图完整的体现了openstack服务之间的联系(Conceptualarchitecture概念架构): 从这张图稍作了解的话还是能够理解的,其他服务通过相互的写作和工作为中间是VMs提供了各种服务。Keystone提供了验证服务,Ceilometer作为了整个系统的监控,Horizon提供了UI访问界面,这3个服务主要起到了把控全局的作用。在左下角有一个Ironic,它的作用是解决物理机的添加、删除、安装部署等功能,类似为集群自动化增添节点。 可以看说,整个生态系统外围掌控整个系统,内部各个服务相互协作提供各种功能,并且系统伸缩性大,扩展性高。 [openstack环境准备] 软件:vmareworkstation 11 操作系统:CentOS7 3.10.0-327.e17.x86_64 2台:一台作为控制节点controller,一台作为计算节点compute。 基本设置: 1. 每一个都选择2张网卡,一张对外提供服务,需要连接互联网,可以是桥接或者nat模式。一张提供内部网络,作为openstack内部联系的网络,在VMware选择host only模式。 2. 修改对应的主机名,并在hosts做主机与IP的解析, 3. 做时间同步,可以是本地,也可以是时间服务器,在centos7中改为chrony,调整完毕后设置开机启动。 4. 注!:方便起见,把防火墙和selinux全部关闭,确保网络畅通。 到这一步,基本上的环境配置就搞定了,我相信有余力去学习openstack,那对linux有了基本的理解,上述步骤应该能搞定。最后重启系统准备安装。 [openstack基本安装] 在centos上默认包含openstack版本,可以直接用yum安装最新的版本不用费力去寻找相关的源码包。 [root@ceshiapp_2~]# yum install centos-release-openstack-mitaka.noarch -y 安装openstack客户端 [root@ceshiapp_2~]# yum install -y python-openstackclient openstack自带有openstack-selinux来管理openstack服务之间的安装性能,这里,为了实验顺利,这里选择忽略,实际情况可以根据需求选择是否安装。 注!:如没有特殊说明以下安装说明都是在controller中执行。 [数据库及nosql安装] [root@controller~]yum install mariadb mariadb-server python2-PyMySQL #yum安装数据库,用于到时候创建服务的数据库 port:3306 [root@controller~]mysql_secure_installation #安全配置向导,包括root密码等。 [root@controllermy.cnf.d]# vim openstack.cnf [mysqld] ...... bind-address= 0.0.0.0 #这个地址表示能够让所有的地址能远程访问。 default-storage-engine= innodb innodb_file_per_table max_connections= 4096 collation-server= utf8_general_ci character-set-server= utf8 #修改配置文件,定义字符集和引擎,其他可按需修改。 这是yum安装的数据库,是mariadb是兼容mysql的,也可以选择源码编译安装,安装过程这里不详细讲了。 MariaDB[(none)]> grant all on *.* to root@'%' identified by "root" ; 这里先添加远程登录的root用户。 [root@controllermy.cnf.d]# yum install -y mongodb-server mongodb 安装mongodb数据库,提高web访问的性能。Port:27017 [root@controllermy.cnf.d]# vim /etc/mongod.conf bind_ip = 192.168.10.200 #将IP绑定在控制节点上。 ...... [root@controllermy.cnf.d]# systemctl enable mongod.service Createdsymlink from /etc/systemd/system/multi-user.target.wants/mongod.service to/usr/lib/systemd/system/mongod.service. [root@controllermy.cnf.d]# systemctl start mongod.service 设置开机自启动。 [root@controllermy.cnf.d]#yum install memcached python-memcached [root@controllermy.cnf.d]# systemctl enable memcached.service Createdsymlink from /etc/systemd/system/multi-user.target.wants/memcached.service to /usr/lib/systemd/system/memcached.service. [root@controllermy.cnf.d]# systemctl start memcached.service 安装memcached并设置开机启动。Port:11211 memcache用于缓存tokens [rabbitmq消息队列安装与配置] 为了保持openstack项目松耦合,扁平化架构的特性,因此消息队列在整个架构中扮演了交通枢纽的作用,所以消息队列对openstack来说是必不可少的。不一定适用RabbitMQ,也可以是其他产品。 [root@controllermy.cnf.d]# yum install -y rabbitmq-server [root@controllermy.cnf.d]# systemctl enable rabbitmq-server.service Createdsymlink from/etc/systemd/system/multi-user.target.wants/rabbitmq-server.service to/usr/lib/systemd/system/rabbitmq-server.service. [root@controllermy.cnf.d]# systemctl start rabbitmq-server.service [root@controllermy.cnf.d]# rabbitmqctl add_user openstack openstack Creatinguser "openstack" ... [root@controllermy.cnf.d]# rabbitmqctl set_permissions openstack ".*" ".*"".*" Settingpermissions for user "openstack" in vhost "/" ... #安装rabbidmq,创建用户并设置允许读写操作。 [Identity service—keystone] 接下来是openstack第一个验证服务——keystone服务安装,它为项目管理提供了一系列重要的验证服务和服务目录。openstack的其他服务安装之后都需要再keystone进行验证过,之后能够跟踪所有在局域网内安装好的openstack服务。 安装keystone之前先配置好数据库环境。 [root@controller~]# mysql -uroot -p MariaDB[(none)]> CREATE DATABASE keystone; QueryOK, 1 row affected (0.00 sec) MariaDB[(none)]> grant all on keystone.* to keystone@localhost identified by'keystone'; QueryOK, 0 rows affected (0.09 sec) MariaDB[(none)]> grant all on keystone.* to keystone@'%' identified by'keystone'; QueryOK, 0 rows affected (0.00 sec) MariaDB[(none)]> flush privileges; QueryOK, 0 rows affected (0.05 sec) #生成admin tokens [root@controller~]# openssl rand -hex 10 bc6aec97cc5e93a009b1 安装keystone httpd wsgi WSGI是Web Server Gateway Interface的缩写,是python定义的web服务器或者框架的一种接口,位于web应用程序和web服务器之间。 [root@controller~]# yum install -y openstack-keystone httpd mod_wsgi 修改keystone配置文件 [root@controller~]# vim /etc/keystone/keystone.conf [default] [DEFAULT] ... admin_token= bc6aec97cc5e93a009b1 #这里填之前生成的admintokens [database] ...... connection= mysql+pymysql://keystone:keystone@controller/keystone [token] ...... provider= fernet #控制tokens验证、建设和撤销的操作方式 [root@controller~]# sh -c "keystone-manage db_sync" keystone #设置数据库同步 [root@controller~]# keystone-manage fernet_setup --keystone-user keystone --keystone-groupkeystone #生成fernetkeys [root@controller~]# vim /etc/httpd/conf/httpd.conf #修改配置文件 ... ServerAdmincontroller ... 接下来配置虚拟主机 [root@controller~]# vim /etc/httpd/conf.d/wsgi-keystone.conf WSGIScriptAlias //usr/bin/keystone-wsgi-public WSGIApplicationGroup %{GLOBAL} WSGIPassAuthorization On ErrorLogFormat "%{cu}t %M" ErrorLog /var/log/httpd/keystone-error.log CustomLog/var/log/httpd/keystone-access.log combined <Directory /usr/bin> Require all granted </Directory> </VirtualHost> <VirtualHost*:35357> WSGIDaemonProcess keystone-adminprocesses=5 threads=1 user=keystone group=keystone display-na me=%{GROUP} WSGIProcessGroup keystone-admin WSGIScriptAlias //usr/bin/keystone-wsgi-admin WSGIApplicationGroup %{GLOBAL} WSGIPassAuthorization On ErrorLogFormat "%{cu}t %M" ErrorLog /var/log/httpd/keystone-error.log CustomLog/var/log/httpd/keystone-access.log combined <Directory /usr/bin> Require all granted </Directory> </VirtualHost> 设置开机自启动。 [root@controller~]# systemctl enable httpd.service [root@controller~]# systemctl start httpd.service 配置上述生成的admin token [root@controller~]# export OS_TOKEN=bc6aec97cc5e93a009b1 配置endpoint URL [root@controller~]# export OS_URL=http://controller:35357/v3 Identity 版本 [root@controller~]# export OS_IDENTITY_API_VERSION=3 创建identity service 。 [root@controller~]# openstack service create --namekeystone --description "OpenStack Identity" identity 验证服务管理着openstack项目中所有服务的API endpoint,服务之间的相互联系取决于验证服务中的API endpoint。根据用户不同,它提供了三种形式的API endpoint,分别是admin、internal、public。admin默认允许管理用户和租户,internal和public不允许管理用户和租户。因为在openstack中一般都会设置为2张网卡,一张对外提供服务,一张是内部交互提供的网络,因此对外一般使用public API 能够使得用户对他们自己的云进行管理。Admin API 一般对管理员提供服务,而internal API 是针对用户对自己所使用opservice服务进行管理。因此一般一个openstack服务都会创建多个API,针对不用的用户提供不同等级的服务。 [root@controller~]# openstack endpoint create --region RegionOne identity publichttp://controller:5000/v3 [root@controller~]# openstack endpoint create --region RegionOne identity internalhttp://controller:5000/v3 [root@controller~]# openstack endpoint create --region RegionOne identity adminhttp://controller:35357/v3 接下来是创建默认的域、工程(租户)、角色、用户以及绑定。 [root@controller~]# openstack domain create --description "Default Domain" default [root@controller~]# openstack project create --domain default \ > --description "Admin Project"admin [root@controller~]# openstack user create --domain default--password-prompt admin UserPassword: RepeatUser Password:#密码admin [root@controller~]# openstack role add --project admin --user admin admin 对demo工程、用户、角色进行绑定。 [root@controller~]# openstack project create --domain default--description "Service Project" service [root@controller~]# openstack project create --domain default \ > --description "Demo Project" demo [root@controller~]# openstack user create --domain default--password-prompt demo UserPassword: RepeatUser Password: #demo [root@controller~]# openstack role add --project demo --user demo user 测试验证服务是否安装有效。 1.在keystone-paste.ini中的这3个字段中删除admin_token_auth [root@controller~]# vim /etc/keystone/keystone-paste.ini [pipeline:public_api] ......admin_token_auth [pipeline:admin_api] ...... [pipeline:api_v3] ...... 2.删除刚才设置的OS_token和OS_URL Unset OS_TOKEN OS_URL 然后开始验证,没报错说明成功了。 [root@controller~]# openstack --os-auth-url http://controller:35357/v3 \ > --os-project-domain-name default--os-user-domain-name default \ > --os-project-name admin --os-username admintoken issue Password:#admin 验证demo用户: [root@controller~]# openstack --os-auth-url http://controller:5000/v3 \ > --os-project-domain-name default--os-user-domain-name default \ > --os-project-name demo --os-username demotoken issue Password:#demo 最后创建user脚本 export OS_PROJECT_DOMAIN_NAME=default export OS_USER_DOMAIN_NAME=default export OS_PROJECT_NAME=admin export OS_USERNAME=admin export OS_PASSWORD=admin export OS_AUTH_URL=http://controller:35357/v3 export OS_IDENTITY_API_VERSION=3 export OS_IMAGE_API_VERSION=2 这里如果是多个台服务器配置的话。这样的脚本就会方便你配置管理员的API。主要还是起到了方便的作用。 [Image service—glance] 依旧先创建数据库以及相关用户。 [root@controller~]# mysql -u root -p MariaDB[(none)]> CREATE DATABASE glance; QueryOK, 1 row affected (0.04 sec) MariaDB[(none)]> GRANT ALL PRIVILEGES ON glance.* TO 'glance'@'localhost' \ ->IDENTIFIED BY 'glance'; QueryOK, 0 rows affected (0.28 sec) MariaDB[(none)]> GRANT ALL PRIVILEGES ON glance.* TO 'glance'@'%' \ ->IDENTIFIED BY 'glance'; QueryOK, 0 rows affected (0.01 sec) MariaDB[(none)]> flush privileges; QueryOK, 0 rows affected (0.08 sec) [root@controller~]# . admin-openrc注!如果在其他服务器上就需要执行这个脚本,来配置admin api 接来下创建glance用户以及绑定。 [root@controller~]# openstack user create --domain default --password-prompt glance UserPassword: RepeatUser Password: #glance 将admin 角色增加到 service工程和 glance用户。 [root@controller~]# openstack role add --project service --user glance admin [root@controller~]# openstack service create --name glance \ > --description "OpenStack Image"p_w_picpath 创建p_w_picpath服务的三种接口 [root@controller~]# openstack endpoint create --region RegionOne \ > p_w_picpath public http://controller:9292 [root@controller~]# openstack endpoint create --region RegionOne \ > p_w_picpath internal http://controller:9292 [root@controller~]# openstack endpoint create --region RegionOne p_w_picpath admin http://controller:9292 安装openstack-glance并修改配置文件 [root@controller~]# yum install -y openstack-glance [root@controller~]# vim /etc/glance/glance-api.conf ...... [database] ...... connection= mysql+pymysql://glance:glance@controller/glance [keystone_authtoken] ... auth_uri= http://controller:5000 auth_url= http://controller:35357 memcached_servers= controller:11211 auth_type= password project_domain_name= default user_domain_name= default project_name= service username= glance password= glance ...... [paste_deploy] ... flavor= keystone [glance_store] ... stores= file,http default_store= file filesystem_store_datadir= /var/lib/glance/p_w_picpaths/ [root@controller~]# vim /etc/glance/glance-registry.conf [database] ...... connection= mysql+pymysql://glance:glance@controller/glance [keystone_authtoken] ... auth_uri= http://controller:5000 auth_url= http://controller:35357 memcached_servers= controller:11211 auth_type= password project_domain_name= default user_domain_name= default project_name= service username= glance password= glance ...... [paste_deploy] ... flavor= keystone 做数据库同步。输出信息忽略。 [root@controller ~]# su -s /bin/sh -c "glance-managedb_sync" glance Option"verbose" from group "DEFAULT" is deprecated forremoval. Its value may be silentlyignored in the future. /usr/lib/python2.7/site-packages/oslo_db/sqlalchemy/enginefacade.py:1056:OsloDBDeprecationWarning: EngineFacade is deprecated; please useoslo_db.sqlalchemy.enginefacade expire_on_commit=expire_on_commit,_conf=conf) /usr/lib/python2.7/site-packages/pymysql/cursors.py:146:Warning: Duplicate index 'ix_p_w_picpath_properties_p_w_picpath_id_name' defined on thetable 'glance.p_w_picpath_properties'. This is deprecated and will be disallowed in afuture release. result = self._query(query) 开机启动。 [root@controller~]# systemctl enable openstack-glance-api.service \ > openstack-glance-registry.service Createdsymlink from/etc/systemd/system/multi-user.target.wants/openstack-glance-api.service to/usr/lib/systemd/system/openstack-glance-api.service. Createdsymlink from /etc/systemd/system/multi-user.target.wants/openstack-glance-registry.serviceto /usr/lib/systemd/system/openstack-glance-registry.service. [root@controller~]# systemctl start openstack-glance-api.service \ > openstack-glance-registry.service 下载一个镜像并创建,然后可以list查看是否成功。 [root@controller~]wget http://download.cirros-cloud.net/0.3.4/cirros-0.3.4-x86_64-disk.img [root@controller~]# openstack p_w_picpath create "cirros" \ > --file cirros-0.3.4-x86_64-disk.img \ > --disk-format qcow2 --container-format bare\ > --public 镜像active成功。 [root@controller~]# openstack p_w_picpath list +--------------------------------------+--------+--------+ |ID | Name| Status | +--------------------------------------+--------+--------+ |7f715e8d-6f29-4e78-ab6e-d3b973d20cf7 | cirros | active | +--------------------------------------+--------+--------+ [Compute-service nova] 依旧为计算服务创建数据库。这里要为nova创建2个数据库。 MariaDB[(none)]> CREATE DATABASE nova_api;CREATE DATABASE nova; QueryOK, 1 row affected (0.09 sec) QueryOK, 1 row affected (0.00 sec) MariaDB[(none)]> GRANT ALL PRIVILEGES ON nova_api.* TO 'nova'@'localhost' \ ->IDENTIFIED BY 'nova'; QueryOK, 0 rows affected (0.15 sec) MariaDB[(none)]> GRANT ALL PRIVILEGES ON nova_api.* TO 'nova'@'%' IDENTIFIED BY 'nova'; QueryOK, 0 rows affected (0.00 sec) MariaDB[(none)]> GRANT ALL PRIVILEGES ON nova.* TO 'nova'@'localhost' IDENTIFIED BY 'nova'; QueryOK, 0 rows affected (0.00 sec) MariaDB[(none)]> GRANT ALL PRIVILEGES ON nova.* TO 'nova'@'%' IDENTIFIED BY 'nova'; QueryOK, 0 rows affected (0.00 sec) 创建用户并绑定admin角色 [root@controller~]# . admin-openrc [root@controller~]# openstack user create --domain default--password-prompt nova UserPassword: RepeatUser Password: #nova [root@controller~]# openstack role add --project service --user nova admin 创建nova计算服务。 [root@controller~]# openstack service create --name nova \ > --description "OpenStack Compute"compute 创建nova的api。 [root@controller~]# openstack endpoint create --region RegionOne \ > compute public http://controller:8774/v2.1/%\(tenant_id\)s [root@controller~]# openstack endpoint create --region RegionOne compute internalhttp://controller:8774/v2.1/%\(tenant_id\)s [root@controller~]# openstack endpoint create --region RegionOne compute adminhttp://controller:8774/v2.1/%\(tenant_id\)s 安装nova组件。 [root@controller~]# yum install -y openstack-nova-api openstack-nova-conductor \ openstack-nova-consoleopenstack-nova-novncproxy \ openstack-nova-scheduler 修改配置文件,修改内容比较多,需要仔细比对一下。 [root@controller~]# vim /etc/nova/nova.conf [default] ...... enabled_apis= osapi_compute,metadata rpc_backend=rabbit auth_strategy=keystone my_ip=192.168.10.200# 设置内网IP use_neutron=true#支持网络服务 firewall_driver=nova.virt.libvirt.firewall.NoopFirewallDriver [api_database] ...... connection=mysql+pymysql://nova:nova@controller/nova_api [database] ...... connection=mysql+pymysql://nova:nova@controller/nova [oslo_messaging_rabbit] ...... rabbit_host= controller rabbit_userid= openstack rabbit_password= openstack #之间创建的密码。 [keystone_authtoken] ...... auth_uri= http://controller:5000 auth_url= http://controller:35357 memcached_servers= controller:11211 auth_type= password project_domain_name= default user_domain_name= default project_name= service username= nova password= nova #之前创建的用户密码 [vnc] ...... vncserver_listen= $my_ip vncserver_proxyclient_address= $my_ip [glance] ....... api_servers= http://controller:9292 [oslo_concurrency] ...... lock_path= /var/lib/nova/tmp 同步数据库,忽略输出。 [root@controller~]# su -s /bin/sh -c "nova-manage api_db sync" nova [root@controller~]# su -s /bin/sh -c "nova-manage db sync" nova 设置开机启动。 systemctlenable openstack-nova-api.service \ openstack-nova-consoleauth.serviceopenstack-nova-scheduler.service \ openstack-nova-conductor.serviceopenstack-nova-novncproxy.service #systemctl start openstack-nova-api.service \ openstack-nova-consoleauth.serviceopenstack-nova-scheduler.service \ openstack-nova-conductor.serviceopenstack-nova-novncproxy.service 配置compute节点 [root@compute ~]# yum install -ycentos-release-openstack-mitaka #否则直接安装openstack-nova-compute失败 [root@compute ~]# yum install -y openstack-nova-compute 修改配置文件 [root@compute~]# vim /etc/nova/nova.conf [DEFAULT] ...... rpc_backend= rabbit auth_strategy= keystone my_ip=192.168.10.201 firewall_driver=nova.virt.libvirt.firewall.NoopFirewallDriver use_neutron=true [glance] ...... api_servers=http://controller:9292 [keystone_authtoken] ...... auth_uri= http://controller:5000 auth_url= http://controller:35357 memcached_servers= controller:11211 auth_type= password project_domain_name= default user_domain_name= default project_name= service username= nova password= nova [libvirt] ...... virt_type=qemu#egrep -c '(vmx|svm)' /proc/cpuinfo 如果显示为0 则需要修改成qemu [oslo_concurrency] ...... lock_path=/var/lib/nova/tmp [oslo_messaging_rabbit] ...... rabbit_host= controller rabbit_userid= openstack rabbit_password= openstack [vnc] ...... enabled=true vncserver_listen=0.0.0.0 vncserver_proxyclient_address=$my_ip novncproxy_base_url=http://controller:6080/vnc_auto.html 然后设置开机自启动。 systemctlenable libvirtd.service openstack-nova-compute.service systemctlstart libvirtd.service openstack-nova-compute.service 验证结果,在compute上操作。4个up为ok [root@compute~]# . admin-openrc [root@compute~]# openstack compute service list +----+------------------+------------+----------+---------+-------+----------------------------+ | Id |Binary | Host | Zone | Status| State | Updated At| +----+------------------+------------+----------+---------+-------+----------------------------+ | 1 | nova-conductor | controller | internal | enabled | up | 2016-08-16T14:30:42.000000 | | 2 | nova-scheduler | controller | internal | enabled | up | 2016-08-16T14:30:33.000000 | | 3 | nova-consoleauth | controller | internal| enabled | up |2016-08-16T14:30:39.000000 | | 6 | nova-compute | compute | nova| enabled | up |2016-08-16T14:30:33.000000 | +----+------------------+------------+----------+---------+-------+----------------------------+ [Network service—neutron ] Neutron最主要是功能是负责虚拟环境下的网络,但它之前并不叫neutron,是叫quantum,因为被注册然后才改名的。网络在openstack中最复杂的功能,配置也是最繁琐的,从官方文档中单独把网络向导列出来写一大篇文章就可以看出来。从L1到L7都有所涉及,openstack所有的服务都是通过网络练习起来。像glance一样,neutron本身并提供网络服务,它的大部分功能都是通过Plugin提供的,除了DHCP和L3-agent,这些信息在配置服务的过程中能体现出来。 Neutron本身有2种模式,一种是provider networks,指的是运营商提供网络,可以说是外网,还有一种是Self-service networks,这是私人网络,可以说内网,但是第二种网络模式包含第一种,所以基本上都会选择第二种部署方式,对外提供服务用外网,对内使用内网,因此部署openstack一般都会使用2张网卡。 在controller上配置数据库,赋权等操作。 [root@controller~]# mysql -u root -p MariaDB[(none)]> CREATE DATABASE neutron; QueryOK, 1 row affected (0.09 sec) MariaDB[(none)]> GRANT ALL PRIVILEGES ON neutron.* TO 'neutron'@'localhost' IDENTIFIED BY 'neutron'; QueryOK, 0 rows affected (0.36 sec) MariaDB[(none)]> GRANT ALL PRIVILEGES ON neutron.* TO 'neutron'@'%' IDENTIFIED BY 'neutron'; QueryOK, 0 rows affected (0.00 sec) MariaDB[(none)]> flush privileges; QueryOK, 0 rows affected (0.09 sec) 创建neutron用户,将admin角色绑定到用户上。 [root@controller~]# openstack user create --domain default --password-prompt neutron UserPassword: RepeatUser Password: #neutron [root@controller~]# openstack role add --project service --user neutron admin 创建neutron网络服务以及三种API接口。 [root@controller~]# openstack service create --name neutron \ > --description "OpenStackNetworking" network [root@controller~]# openstack endpoint create --region RegionOne \ > network public http://controller:9696 [root@controller~]# openstack endpoint create --region RegionOne network internal http://controller:9696 [root@controller~]# openstack endpoint create --region RegionOne network admin http://controller:9696 网络配置,安装组件。 [root@controller~]# yum install openstack-neutron openstack-neutron-ml2 openstack-neutron-linuxbridge ebtables -y 修改neutron配置文件。 [root@controller~]# vim /etc/neutron/neutron.conf [default] ...... core_plugin= ml2 service_plugins= router allow_overlapping_ips= True auth_strategy=keystone rpc_backend=rabbit notify_nova_on_port_status_changes= True notify_nova_on_port_data_changes= True [database] ...... connection= mysql+pymysql://neutron:neutron@controller/neutron [keystone_authtoken] ...... auth_uri= http://controller:5000 auth_url= http://controller:35357 memcached_servers= controller:11211 auth_type= password project_domain_name= default user_domain_name= default project_name= service username= neutron password= neutron [nova] ...... auth_url= http://controller:35357 auth_type= password project_domain_name= default user_domain_name= default region_name= RegionOne project_name= service username= nova password= nova [oslo_concurrency] ...... lock_path= /var/lib/neutron/tmp 修改ML2配置文件 [root@controller~]# vim /etc/neutron/plugins/ml2/ml2_conf.ini [ml2] ...... type_drivers= flat,vlan,vxlan tenant_network_types= vxlan mechanism_drivers= linuxbridge,l2population extension_drivers= port_security [ml2_type_flat] ...... flat_networks= provider [ml2_type_vxlan] ... vni_ranges= 1:1000 [securitygroup] ... enable_ipset= True 设置桥接代理配置文件。 [root@controller~]# vim /etc/neutron/plugins/ml2/linuxbridge_agent.ini [linux_bridge] ...... physical_interface_mappings=provider:eno33554984#内网网卡 [vxlan] ...... enable_vxlan= true local_ip= 192.168.10.200 #controller ip l2_population= true [securitygroup] ...... enable_security_group= true firewall_driver=neutron.agent.linux.iptables_firewall.IptablesFirewallDriver 修改Layer-3 代理配置文件。 [root@controller~]# vim /etc/neutron/l3_agent.ini [DEFAULT] ...... interface_driver= neutron.agent.linux.interface.BridgeInterfaceDriver external_network_bridge= 修改DHCP代理配置文件。 [root@controller~]# vim /etc/neutron/dhcp_agent.ini [DEFAULT] ...... interface_driver= neutron.agent.linux.interface.BridgeInterfaceDriver dhcp_driver= neutron.agent.linux.dhcp.Dnsmasq enable_isolated_metadata = true 修改元数据代理配置文件。 vim/etc/neutron/metadata_agent.ini [DEFAULT] ...... nova_metadata_ip= controller metadata_proxy_shared_secret= meta #元数据共享的一个密码,之后会用到。 在nova配置文件中修改neutron的参数。 [root@controller~]# vim /etc/nova/nova.conf [neutron] ...... url =http://controller:9696 auth_url= http://controller:35357 auth_type= password project_domain_name= default user_domain_name= default region_name= RegionOne project_name= service username= neutron password= neutron service_metadata_proxy= True metadata_proxy_shared_secret= meta 设置软连接 [root@controller~]# ln -s /etc/neutron/plugins/ml2/ml2_conf.ini /etc/neutron/plugin.ini 同步数据库。 [root@controllerneutron]# su -s /bin/sh -c "neutron-db-manage --config-file/etc/neutron/neutron.conf \ > --config-file /etc/neutron/plugins/ml2/ml2_conf.iniupgrade head" neutron 出现OK成功。 重启nova-api服务 [root@controllerneutron]# systemctl restart openstack-nova-api.service 设置开机启动并启动neutron服务。 #systemctl enable neutron-server.service \ neutron-linuxbridge-agent.serviceneutron-dhcp-agent.service \ neutron-metadata-agent.service #systemctl enable neutron-l3-agent.service #systemctl start neutron-server.service \ neutron-linuxbridge-agent.serviceneutron-dhcp-agent.service \ neutron-metadata-agent.service #systemctlstart neutron-l3-agent.service 配置完控制节点,配置compute节点的网络服务。 [root@compute~]# yum install -y openstack-neutron-linuxbridge ebtables ipset 修改neutron配置文件 [root@compute~]# vim /etc/neutron/neutron.conf [DEFAULT] ...... rpc_backend= rabbit auth_strategy= keystone [keystone_authtoken] ...... auth_uri= http://controller:5000 auth_url= http://controller:35357 memcached_servers= controller:11211 auth_type= password project_domain_name= default user_domain_name= default project_name= service username= neutron password= neutron [oslo_concurrency] ..... lock_path= /var/lib/neutron/tmp [oslo_messaging_rabbit] ...... rabbit_host= controller rabbit_userid= openstack rabbit_password= openstack 修改linux桥接代理的配置文件 [root@compute~]# vim /etc/neutron/plugins/ml2/linuxbridge.ini [linux_bridge] ...... physical_interface_mappings= provider:eno33554984 [securitygroup] ..... firewall_driver= neutron.agent.linux.iptables_firewall.IptablesFirewallDriver enable_security_group= true [vxlan] ...... enable_vxlan= true local_ip= 192.168.10.201 #内网IP l2_population= true 修改nova中neutron模块的配置信息。 [root@compute~]# vim /etc/nova/nova.conf [neutron] ...... url =http://controller:9696 auth_url= http://controller:35357 auth_type= password project_domain_name= default user_domain_name= default region_name= RegionOne project_name= service username= neutron password= neutron 重启compute服务。 #systemctlrestart openstack-nova-compute.service 设置neutron开机启动。 #systemctlenable neutron-linuxbridge-agent.service #systemctl start neutron-linuxbridge-agent.service 验证neutron服务,出现5个笑脸说明OK。 [root@controller~]# neutron agent-list +--------------+--------------+------------+-------------------+-------+----------------+---------------+ |id | agent_type | host| availability_zone | alive | admin_state_up | binary | +--------------+--------------+------------+-------------------+-------+----------------+---------------+ |7476f2bf- | DHCP agent | controller | nova | :-)| True | neutron-dhcp- | |dced-44d6-8a | | | | | | agent | |a0-2aab951b1 | | | | | | | |961 | | | | | | | |82319909-a4b | Linux bridge | compute| | :-) | True | neutron- | |2-47d9-ae42- | agent | | | | | linuxbridge- | |288282ad3972 | | | | | | agent | |b465f93f- | Metadata | controller | | :-) | True| neutron- | |90c3-4cde- | agent | | | | | metadata- | |949c- | | | | | | agent | |47c205a74f65 | | | | | | | |e662d628-327 | L3 agent | controller| nova | :-) | True | neutron-l3-ag | |b-4695-92e1- | | | | | | ent | |76da38806b05 | | | | | | | |fa84105f-d49 | Linux bridge | controller | | :-) | True | neutron- | |7-4b64-9a53- | agent | | | | | linuxbridge- | |3b1f074e459e | | | | | | agent | +--------------+--------------+------------+-------------------+-------+----------------+---------------+ [root@compute~]# neutron ext-list +---------------------------+-----------------------------------------------+ |alias | name | +---------------------------+-----------------------------------------------+ |default-subnetpools | DefaultSubnetpools | |network-ip-availability | Network IPAvailability | |network_availability_zone | Network Availability Zone | |auto-allocated-topology | AutoAllocated Topology Services| |ext-gw-mode | Neutron L3Configurable external gateway mode | |binding | PortBinding | |agent | agent | |subnet_allocation | SubnetAllocation | |l3_agent_scheduler | L3 AgentScheduler | |tag | Tagsupport| |external-net | Neutronexternal network | |net-mtu | NetworkMTU | |availability_zone | AvailabilityZone | |quotas | Quotamanagement support | |l3-ha | HA Routerextension | |provider | ProviderNetwork | |multi-provider | MultiProvider Network | |address-scope | Addressscope | |extraroute | Neutron ExtraRoute | |timestamp_core | Time StampFields addition for core resources | |router | Neutron L3Router | |extra_dhcp_opt | Neutron ExtraDHCP opts | | dns-integration | DNS Integration | |security-group |security-group| |dhcp_agent_scheduler | DHCP AgentScheduler | |router_availability_zone | RouterAvailability Zone | |rbac-policies | RBACPolicies| |standard-attr-description | standard-attr-description | |port-security | PortSecurity | |allowed-address-pairs | AllowedAddress Pairs | |dvr | DistributedVirtual Router | +---------------------------+-----------------------------------------------+ [Dashboard-horizon] 其实将neutron安装完毕以后openstack项目最基本的已经能够运行起来了,但是为了操作更加方便直观,我们再安装WebUI,就是horizon。 [root@controller~]# yum install -y openstack-dashboard [root@controller~]# vim /etc/openstack-dashboard/local_settings ...... OPENSTACK_HOST= "controller" ALLOWED_HOSTS= ['*',] OPENSTACK_KEYSTONE_URL= "http://%s:5000/v3.0" % OPENSTACK_HOST OPENSTACK_API_VERSIONS= { "identity": 3, "volume": 2, "compute": 2, } OPENSTACK_KEYSTONE_MULTIDOMAIN_SUPPORT= True OPENSTACK_KEYSTONE_DEFAULT_DOMAIN= "default" OPENSTACK_KEYSTONE_DEFAULT_ROLE= "user" TIME_ZONE= "UTC"#时区 SESSION_ENGINE= 'django.contrib.sessions.backends.cache' CACHES= { 'default': { 'BACKEND':'django.core.cache.backends.memcached.MemcachedCache', 'LOCATION': 'controller:11211', } } 重启httpd 和memcached服务。 [root@controller~]# systemctl restart httpd.service [root@controller~]# systemctl restart memcached.service 最后打开http://controller/dashboard登录 登录之后能够对openstack进行基本的操作了,当然还有cinder,swift,heat等等组件并没有全部部署上去,这些可以根据需求自行部署。

资源下载

更多资源
Mario

Mario

马里奥是站在游戏界顶峰的超人气多面角色。马里奥靠吃蘑菇成长,特征是大鼻子、头戴帽子、身穿背带裤,还留着胡子。与他的双胞胎兄弟路易基一起,长年担任任天堂的招牌角色。

Spring

Spring

Spring框架(Spring Framework)是由Rod Johnson于2002年提出的开源Java企业级应用框架,旨在通过使用JavaBean替代传统EJB实现方式降低企业级编程开发的复杂性。该框架基于简单性、可测试性和松耦合性设计理念,提供核心容器、应用上下文、数据访问集成等模块,支持整合Hibernate、Struts等第三方框架,其适用范围不仅限于服务器端开发,绝大多数Java应用均可从中受益。

Rocky Linux

Rocky Linux

Rocky Linux(中文名:洛基)是由Gregory Kurtzer于2020年12月发起的企业级Linux发行版,作为CentOS稳定版停止维护后与RHEL(Red Hat Enterprise Linux)完全兼容的开源替代方案,由社区拥有并管理,支持x86_64、aarch64等架构。其通过重新编译RHEL源代码提供长期稳定性,采用模块化包装和SELinux安全架构,默认包含GNOME桌面环境及XFS文件系统,支持十年生命周期更新。

WebStorm

WebStorm

WebStorm 是jetbrains公司旗下一款JavaScript 开发工具。目前已经被广大中国JS开发者誉为“Web前端开发神器”、“最强大的HTML5编辑器”、“最智能的JavaScript IDE”等。与IntelliJ IDEA同源,继承了IntelliJ IDEA强大的JS部分的功能。

用户登录
用户注册